Underworld
- Unfinished Business TWO
The Ghost Train at Castle Orr
By Richard Lawther
This walkthrough is meant as a general guide only. It
may not include every pickup or secret. There may also be alternative ways of
approaching situations within the game.
- Pickups and Items
- Enemies
- Secrets
Introduction
Team Anubis has assembled
at Castle Orr and is working in support of Demon Smalls as he attempts to
summon the Ghost Train that will take you to Lower Hell. Your mission is to
assist Demon Smalls by activating the Castle Orr power grid. Locate the 2
Power Rooms and generate the only sort of power Small's beacons can
utilise.
[Warning:
Using the all-weapons cheat is both unnecessary and risks having important
inventory items go missing from the inventory -ie scrolls]
WALKTHROUGH by Lizard Queen
Maps
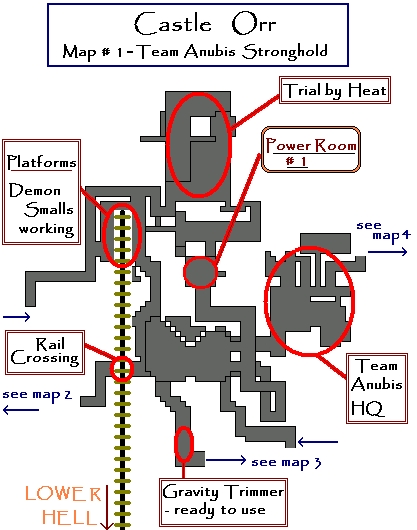

Team Anubis Headquarters (Map#1)
The level begins with Lara
facing a wall with four maps (copies included with download.) Reverse roll and
go through the opening and down a small corridor. Turn left, then right into a
room with three members of Team Anubis playing poker. To the right, pickup Uzis and four summoning scrolls (for later use). Exit
the room and enter the corridor opposite you, which is interrupted by a small
lava pit. Jump over the lava pit and the level loads.
Team Anubis Garage
Make your way to the garage
area and pickup 2x uzi ammo and flares. There
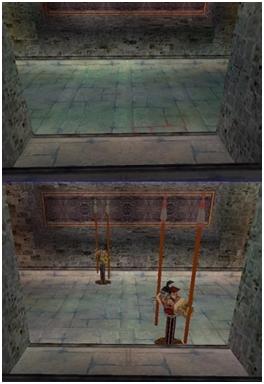
is a vehicle under construction and another completed vehicle nearby. Stand in
front of the sign to see an enlarged view of what it says: The key information
is that this vehicle runs on angry bees. Before you can ride it you'll have to
capture some bees. Leave the way you came and return to the Team Anubis HQ.
Team Anubis Headquarters (revisited) (Map#1)
As you exit the corridors
to an area with a roped lava pit, turn right, then left into a room with Dr.
Psychobabble and a Xian Warrior. Turn right and pick up the final summoning scroll. A cut scene shows a gate opening.
Exit the room. Ahead and to the right, around the roped lava pit, is the newly
opened archway. Go thru the archway and enter an atrium with several
passageways. Follow the columns as they curve to the right and enter the room
on the end.
Platforms (Demon Smalls working) (Map#1)
Jump across the railway
track and pickup uzi ammo. Nearby, Demon Smalls
is studying his laptop, waiting. Work on summoning the train seems to have
stalled. Exit the room and make your way back to the main atrium.
You now have a choice of
two main routes....
ROUTE 1
Head straight and take a
right passageway leading to a section of railroad track. Take a running jump
and grab to the other side. Follow the hallway and the level loads.
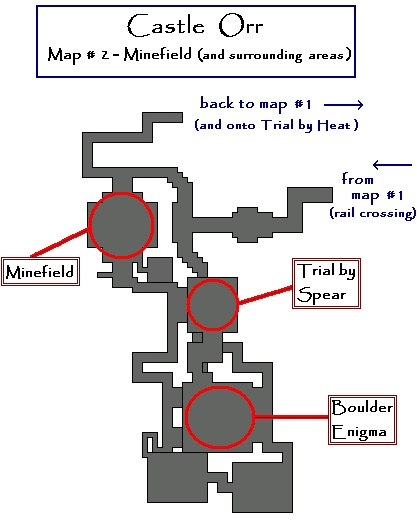
Trial by Spear (Map#2)
Follow the corridor around
to a blocked gateway with two switches. Push both switches to open the gate.
Take a left to enter a room with a lava pool, platforms and spikes. Turn left
at the pool and face the lowest platform so that both platforms are aligned in
front of you. Take a running jump and grab to the first platform. Immediately
take another running jump to the next one, the platforms begin to rise into
spikes above as soon as you land. Reverse roll and another running jump and
grab to the next platform. Turn right to face the platform behind and do a
standing jump to it. Turn slightly left, jump back to the wall and take a
running jump and grab to the block ahead. Up above are more spikes now
descending along the path so make your way as quickly as possible to the ledge
past the spikes at the far end. Facing you is another lava pool with a
partially submerged section of walkway. Do a running jump to the walkway, turn
and run to the right to make another running jump to the sloped block. As you
slide, jump to grab the monkey swing above and drop near the end.
Boulder Enigma (Map#2)
The next area is a puzzle
consisting of five levers, four boulders and several ramps. The objective is to
create a correct pathway for each boulder by choosing to either lower trap
doors (using the four levers closest to you), leaving the doors as is or any
combination thereof. When released (via the fifth lever on a block at the back
of the area), each boulder should land onto a blue square below. If any boulder
lands in a lava square, the floor will burn. The correct combination is to pull
only two levers, the ones at the very left and right (when facing the
boulders). After pulling these two, make a running jump to the fifth lever (at
the back and to the right of the boulders) to release the boulders. Cut scene
shows another partially submerged walkway and a newly created chain. Jump back
and grab the edge of the block and climb down the ladder.
Secret #1: Reverse roll and turn
right towards a block of pillars. From the leftmost edge up the tiny slope,
jump, grab and pull up. Turn right and face the middle of the room. There are
two invisible platforms ahead. From the middle of the pillar block, take a
running jump and grab to the first platform. Turn slightly right and do a
running jump to the next platform and a running jump to the pillars at the end.
Turn left and take another running jump and grab to the last pillar block and
jump into the alcove in the wall to get Secret #1 (Manna from Heaven + Uzi ammo).
Proceed to the lava
entrance, make your way up the chain and do a backflip into the room above.
Follow the stairs and encounter two Spikeballs.
Take them out and proceed down the corridor which opens onto an area filled
with sloped blocks over lava. Starting at the far most block, take a standing
jump to it. Continue jumping and you will eventually make it to the other side.
In the next room, there is yet another set of sloped blocks over lava. However,
traversing the blocks will only take you back to the beginning. Instead, go to
the left wall and notice a climbable wall on the inside of the overhang. Turn
to face the overhang and do a standing jump on the slope and grab the inside of
the overhang. Shimmy to the other side. Down the corridor, you will meet two more Spikeballs. Dispatch them and proceed down
the stairs into a large open arena.
Minefield (Map#2)
A cut scene informs that
this area is not safe. Turn right and enter a room with a switch and a small
dome. Push the switch and bars blocking an alcove outside raise to reveal a
summoning pedestal. Exit this room and proceed left to the newly opened alcove.
Stand before the pedestal and press ctrl (the correct scroll is automatically
selected) and watch another cut scene. The floor is now safe to traverse. At
the end of the room, turn left and the level loads.
Trial by Heat (Map#1)
Proceed through the
corridor and down the stairs to find another large lava area. Climb the block
on the right and proceed to a series of slopes across the lava. Face the
slopes, angled so that the first standing jump lands on the rightmost side of
the first slope. Jump and angle to the right to the next slope (a slight slide
after each jump will help reach the next slope). Another jump and angle to the
left and so on until you reach the flat area with a switch. Pickup the Manna from Hexham and push the switch. A cutscene
shows a rope suspended from the ceiling and activates pistons and flames on the
ledge.
Turn around making your way
back over the slopes. Turn right, climb the block and face the rope swing. Take
a running jump and grab the rope and swing to the slope ahead. Slide and jump
your way along, angling right when necessary. After the slope at the curve at
the far end, you could choose to grab the slope and shimmy as far to the right
as possible. This made the next set of jumps a lot easier. Make your way again
through the next few slopes to the two platforms ahead. Immediately jump back
and grab the edge and let the two boulders fall safely out of the way.
Secret #2: Turn right and face the
alcove. Do a running jump into the alcove and up the ramp. There is a
crawlspace up and to the left. To get this secret you have to position Lara as
high as possible at the end of the chute and just press ctrl and the up arrow
to initiate the jump up. (ignore Alt) Pull up and pick up a Manna from Heaven which is Secret #2.
Exit the alcove and turn
left. While facing the ledge with the pistons, take a step back from the edge
and do a standing jump and grab the edge of the next slope. Shimmy to the
right, lift up, jump and grab the rightmost edge of the ledge. Shimmy to the
right, around the corner until you reach a spot in between the second and third
last piston. Pull up, reverse roll and do a running jump to the next slope.
Immediately jump and angle slightly right to reach the next slope. Jump and
angle slightly left to reach the next slope. Slide and grab the bottom of this
last slope. Pull up, reverse roll and jump to the block below. Immediately do a
standing jump to the next block to avoid the large hammer. Immediately do a
running jump and grab the next block. Shimmy to the far left and pull up to do
another running jump and grab (this will change trajectory so you can land) to
the fire ledge ahead. Immediately jump back and grab to avoid damage from the
piston and the flames on the right. Hang until the first flame subsides. Pull
up and run to a safe spot after the second hammer but before the next flame.
Wait until the next flame subsides and run to the next safe spot (there is one
after each piston) until you finally make your way to the end to do a running
jump and grab into the alcove in the wall.
Follow the corridor, which
opens onto another large sloping area. Do not proceed because there are
boulders above. Position Lara in the 'second lane' from the end and when the
boulder on her left passes, run into its lane to avoid the others. After all
the boulders have fallen, you can finally enter Power Room #1. Lara asks
herself about the "lifts" which don't seem to work. Exit the alcove
and make your way down to the bottom of the slope. A boulder has got jammed in
the entrance and there is no way through. On the left is a climbable wall. Do a
running jump and grab and climb to the top. Pull up to see another summoning
pedestal. Stand before the pedestal and press ctrl. Watch another cut scene as
Laser Beam Dave removes the boulder. Jump back, grab and climb down about 3/4
of the way. Jump, reverse roll, grab the ledge and pull up. Turn left and head
down thru the cleared doorway and jump across the small gap. Push the switch,
activating 3 transport lifts in Power Room #1. Head back out, up the
slope and reenter the alcove on the right.
Power Room #1 (Map#1)
The objective of this
puzzle is to move two pushable Spikeball statues to the top. Move the first
statue onto the octagon platform. Pull the lever and the statue will rise to
the next level. Jump into the smallest transport lift behind you to the first
glass floor above. Move the newly transported statue off the first platform
onto the next one and pull the lever on this floor. There is an alcove on the
opposite wall with a small pool at the bottom. Safety drop down into the pool
and pull up back into the first floor. Jump into the lift on the left to the
second glass floor. Move the newly transported statue off the second platform
onto the third one and pull the lever on this floor. Safety drop down into the
pool and pull up into the first floor. Jump into the lift ahead to the third
glass floor. Move the statue so that the white arrows on the statue match the
blue arrows on the wall. Safety drop back down and make your way to the second
floor lift to the back and right. Repeat the steps to get the second statue to
the top and push into place on the second wall receptacle. [Warning: if the two statues end up on the same square
(following a transport) they both will become fixed and you will be stuck.] A
cutscene shows activation of 1/2 of the power needed to fuel the Ghost Train.
DEMON SMALLS: Damn! I
obviously don't have enough power....
ROUTE 2
Gravity Trimmer (Map#1)
Head straight to the end
and take a left passageway leading to the gravity trimmer. Align Lara up with
the green trimmer line extending over the lava pit and take a running jump (no
grab) to the other side. Follow the corridor and up a flight of stairs. Turn
right and notice a barred alcove on the left and vases on the right. Just past
the barred alcove and above is a hidden area. Jump, grab and pull up into a
crawlspace. Push the switch raising the bars on the alcove to reveal a
summoning scroll pedestal. Exit the crawlspace and enter the alcove. Stand
before the pedestal and press ctrl. Watch as Jim Rummage finds a key.
JIM RUMMAGE: There must
be something down here...................got it!!
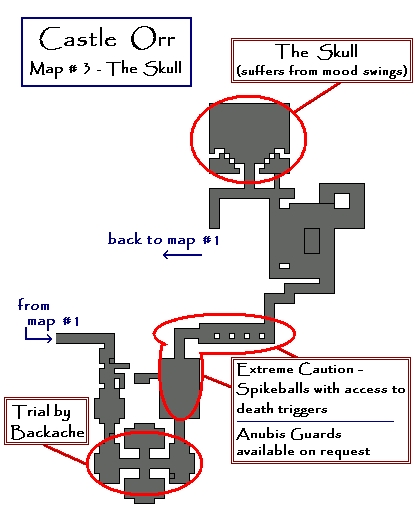
Trial by Backache (Map#3)
 Pick up the key,
use it to open the gate ahead and enter the next area. Push the Xian Statue so
that the gem fits into the wall receptacle on the left to open another gate.
Before leaving, pick up the Uzi ammo in the
back right corner of the room.
Pick up the key,
use it to open the gate ahead and enter the next area. Push the Xian Statue so
that the gem fits into the wall receptacle on the left to open another gate.
Before leaving, pick up the Uzi ammo in the
back right corner of the room.
In the next area there are
two rooms - one representing a copy of the other. On one side, are two pushable
statues, on the other, corresponding coloured squares indicating where the
statues are to be positioned in the opposite room (the one with the statues).
Start with the statue with red arrows. Pull the statue three times from the
wall. Then facing the stairs, push twice. Pull the next statue with green
arrows three times from the wall. Then facing the window ledge, push twice. The
positions of the two statues should be as is shown in the image on the right.
The next gate opens. Before
exiting the room, pick up Uzi ammo on the ledge
on the right. Exit and turn left into the next room. On the right and above is
a boulder. Move the statue under the boulder (with your back to the gate, pull
twice, facing the stairs, push twice.) Immediately do a back flip as the
boulder falls, crushing the Xian statue and releasing the gem. Place the gem into the receptacle to open the
gate. Pick up Uzi ammo on the window ledge and
exit the room.
The next room reveals a
lever to exit, but if pulled it will release a Spikeball
down below and he will run to the nearby "fire trigger square" and
you will be set alight. You need help in preventing this pest from reaching the
deadly square. There is a switch on the wall to the right, between the 3rd and
4th pillar. Push this switch and two helpful Anubis guards will be summoned.
Now you can pull that lever switch and watch as the guards deal with that
troublesome Spikeball. Before exiting, pickup Uzi ammo
between the pillars near the floor lever. Go through the gate and up the
stairs. Your attention is directed to a fire trigger square on the left. Pick
up Uzi ammo on the right. As you enter the
double corridor room, three Spikeballs come
towards you, two down the left corridor and one down the right. Shoot all three
before any reach the fire square or suffer "consequential death by
flame". [you will need the Uzi and about 120 rounds of ammo to do this
safely. If you are short on ammo there is enough in the preceding rooms (see
above)] Make your way thru the corridor and down a set of stairs on the left.
Secret #3: Before proceeding
further, up above and to the left is a hidden alcove. Jump up and pull into
Secret #3 and pick up a Manna from Hexham. Exit the alcove.
Proceed down the remaining
stairs into the next area. Turn left and ahead is a lava pool with a sloped
block below. Facing the pool, jump back from the edge, turn around and backflip
onto the slope below. Slide, jump and grab (to change trajectory), then release
before Lara grabs the ladder above to land into the doorway in the wall. Push
the switch and a semi-submerged walkway appears over the lava pool. Reverse
roll back to the sloped block. Take a running jump and grab, reverse roll and
grab the ladder on the wall. Climb up, head down the stairs to the left and
across the lava via the new walkway.
At the top of the stairs,
to the right, push the switch to release a rope swing. Run, jump and grab the
rope. Turn left and angle to face the ladder, swing, jump and grab the ladder
on the opposite side. [tip: Aim Lara slightly to the right of the ladder to
get the best flight to the ladder] Climb to the top, pull up into the
alcove and pull the lever to open the gate. Move forward and safety drop down
(lost some life) to arrive at the beginning of this room and head through the
newly opened gate.
The Skull (Map#3)
At the end of the corridor
ahead is a summoning scroll pedestal that is currently barred. To the left is a
closed gate with a warning sign... "The Skull is being... Awkward."
Not a good sign. And on the other side are two vases. Pull both vases to pick
up a Manna from Hexham and a skull pass. The gate ahead opens. Proceed with
caution as the Skull, who periodically releases
a hostile swarm of health depleting bees, blasts
deadly fireballs. The objective is to push the 4 wall switches within the room
to raise the bars that block the scroll pedestal in the corridor. After all
four switches are pushed, exit the room, turn left and enter the alcove. Stand
before the pedestal and press ctrl. Watch the cutscene and reenter the room.
Pick up the jar of angry bees on the floor
under the Skull who freakishly follows your every move. You now possess what
you need to operate the Hornet vehicle first seen at the beginning of the
level. Outside the room and to the right, the second gate opens and you are
free to exit. Level loads to Map#1.
Secret #4: At the bottom of the
stairs, push the switch on the right wall to release a rope swing. Run, jump
and grab the rope and shimmy to the bottom. Turn around to face the side from
where you just jumped. Do a Super Swing, jump and grab an upper alcove. Pull up
and pick up a Manna
from Heaven
which is Secret #4.
Drop down and do another
running jump and grab to the rope and swing jump to the other side. Exit the
corridor, ahead to the end of the main room and turn right to exit. Proceed
around the right side of the roped lava pit. Turn right and take the second
corridor at the end and to the left. Take a running jump across the lava pit
and into the next area.
Team Anubis Garage (Map#4)
At the end of the corridor,
turn left and proceed around to the vehicle garage. Approach the Hornet and
select the jar of angry bees. Lara will climb into the vehicle, which is now
ready for use. (vehicle controls for reverse [/] ... and ending reverse
[shift] ) Turn right up the small ramp and left at the end of the corridor,
up the large ramp. Make your way thru several turns through the corridor. At
the end is a maze-like structure with electric cones. The objective is to drive
the vehicle into the cones situated on the maze, crashing into them and
extinguishing flames over the levers on the glass floor above. Once all three
cones have been crushed, climb one of the poles to the upper glass floor and
pull the three levers to open the next gate.
Secret #5: Descend the pole but
before proceeding, there is an alcove in the water, in the wall on the left.
Swim through the alcove and pickup a Manna from Hexham which is Secret #5. Reverse roll
and exit the alcove.
Take the vehicle through
the gate and through the corridor to the next area. Turn left, drive the
vehicle forward and back it onto a red trigger block on the right and dismount.
Run forward to the end of the room where there is a turquoise gem on a dark
blue carpet. Do not walk onto the carpet, it is a false floor. Instead face the
gate on the left, turn left and push the wall switch between the two square
columns opening a previously blocked doorway.
Secret #6: Turn around, walk to the
left edge of the blue carpet area, turn around, jump back and grab the edge.
Shimmy to the left until you are a little more than half way and drop to a
hidden block below. Reverse roll, angle towards the opening in the opposite
wall, do a running jump and grab and pull up. Climb up the stairs and reverse
roll at the end. Jump up and grab the ladder and climb to the top and pull up.
Climb another flight of stairs and claim the Manna of Heaven which is Secret #6.
Take a standing jump and grab the ladder in the opening ahead. Climb down and
safety drop to the ground below (lost some life).
Return to the vehicle and
prepare for a timed run. The objective is to traverse the
rectangular ledge behind you in time to complete a sloped jump to the other
side. From your current position (should still be on the red trigger block),
make a hairpin turn left onto the ledge. Traverse around the ledge and without
stopping, drive the vehicle over the slope before the block ahead lowers. Once
over, enter the opening on the right and turn right again. Turn the vehicle
completely around, back up the vehicle as far as possible while lining up to
the three slopes ahead. Drive the vehicle forward over the three slopes and
crash through the window. Drive up the two slopes to the top and drive over the
turquoise diamond window in the floor. The vehicle will crash through and the
real gem will drop to the floor. Take the gem and place it in the wall
receptacle (at the back, near the false blue carpet). Return to the vehicle and
proceed through the newly opened door.
Secret #7: Down the corridor, turn
right, then right again and dismount. On the right and up is a hidden
crawlspace. Pull up into the crawlspace and pick up a Manna from Hexham which is Secret #7.
Mount the vehicle and
follow the corridor until you reach a lava pool. Dismount (vehicle not needed
anymore) and do a running jump across the lava. Enter the room and jump, grab
and pull up into a crawlspace hidden in the left wall. At the end is another
scroll pedestal. Stand before the pedestal and press ctrl and watch another
cutscene. Exit and follow the stairs up into the next area.
4 Trials by Dark Soul (Map#4)
This area contains 4 trap
doors leading to 4 separate trials. Begin by pushing the wall switch on the
left located beside the painting of the Devil. A cutscene shows a door opening
with a floating green triangle. Open the trap door under the gargoyle painting
and drop inside. Once you pass through the triangle, a boulder will be
released. To stop the boulder from rolling into the lava pit at the bottom,
shoot the other green triangle to the left. The boulder stops and you are now
free to climb the ramp at your leisure. Press the switch at the top and a
cutscene reveals another door opening with a floating red square in the
entrance. Exit the area, open the trap door under the Devil painting and drop
down.
Once again, when you pass
through the red square, a boulder begins it's decent down another ramp. This
time, proceed up the ramp and shoot the red square which is ahead and slightly
above. Proceed to the top and press the wall switch. Another cutscene shows a
third door opening, with a floating turquoise diamond. Exit this area, open the
trap door under the Lizard King painting and drop into the next area.
Pass through the diamond,
run to the right and push the switch on the wall, opening a door on the
opposite wall. Immediately side flip to the right, reverse roll and shoot the
diamond in the newly opened alcove. Climb the ramp and push the wall switch on
the top. Another cutscene shows the fourth door opening with a yellow floating
star. Exit the area, open the final trap door under the painting of Madam Orr
and drop into the next trial area.
Pass through the yellow
star, but this time the boulder remains motionless. Climb up to the second ramp
and face the wall with the barred window. Side flip onto the third ramp and the
boulder begins to roll. Also notice that the three coloured shapes have
appeared below. Immediately make your way down and shoot all three. The door in
the alcove opens to reveal the yellow star. Shoot it and the boulder stops.
Make your way back up the ramp and press the final switch. A cutscene shows the
activation of the circular light column in the main room. Exit this area, take
a running jump into the light pillar to the next area above.
Power Room #2 (Map#4)
The objective of this
puzzle is to connect the three blocks (two stationary, one pushable) by placing
the correct shapes from the two metal posts to their respective spot on the
blocks. Begin by moving the metal post in the south/east corner to the red
block in the north/west corner fitting the red square (on the post) to the
square space (on the block). Move the other post (south/west corner) to the
other red block (north/east corner) so that the blue diamond on the post fits
to the diamond space on the block. Finally, move the glass block so that the
star and triangle are connected to their respective shapes on the two posts. A
cutscene shows electrical beams emanating from the newly connected blocks.
Demon Smalls now has the power and you are taken to the exit point.
Secret #8: Before jumping down,
turn around and reenter the alcove. Ahead and behind the far column is a Manna from Heaven which is Secret #8.
Return back through the opened alcove and be transported back to the main hub.
Drop down and return to the
train tracks by following the columned wall on the right to the corridor at the
end. A magnificent Ghost Train is now ready to go. Make your way to the back of
the train and see Demon Smalls sitting patiently, awaiting your arrival. Enter
the train and watch the final cutscene. As you are being transported to Lower
Hell, Demon Smalls speaks his mind...
Demon Smalls: What
further horrors shall I find within this terrible place. Wherein a time before
these catastrophic events I would have willingly accepted pallid imitations of
such horrors. I now have come so far my sensibilities lie benumbed by all I
see. I do not embrace this horror but rather stand immobile beneath its
self-indulgent gaze. Confusion reigns and I fear the god within the machine is
no longer there.
Lara: Whatever.
The End.