Tomb
Raider - The Wolf
Level by Jesse (SSJ6Wolf) (March, 2006)
[Note]
These levels have some new moves built into them. Read the author's readme file
about them and how they work. [End note]
1. The
Challenge
You start by dropping onto a small ramp and sliding to the
bottom into a room. Approach the west open doorway slowly and a spike ball
drops in front of you. Look down the ramp and see a few holes. Run and jump to
the left side, and jump with a left curve so you are near the wall. Jump and
roll so you are sliding down the slope backwards. Grab the bottom ledge and
shimmy to the left. Pull up, back flip, roll and grab the ladder. Climb to the
top of the platform and enter the west tunnel. Follow the tunnel and use the
floor lever. You get a cut scene of a gate opening in the south wall. Return
and hear a water rushing sound. The pit below is filled with water.
Go to the east end of the platform and look down on the
slope and see a spike pit. Run, jump and grab towards the spike pit. You will
land in a water pit in front of the spikes. Swim to the bottom for secret #1 and pick up red
shotgun shells, blue shotgun shells and Uzi
ammo. Swim into a tunnel and follow it to swim up into a tall shaft.
Pull up at the top to another tunnel. Climb a ladder and pull up into a crawl
space. Drop down the other side and slide into the room where you started. Now
go out the west doorway and jump to the left and just slide down into the
water. Swim into the open gate and pick up red shotgun
shells. Swim north-west to pull up into a tunnel. Pick up flares and enter the open gate in the west wall and
the gate closes.
Watch out for the spike pit and jump to grab the south
ladder. Climb a little and then back flip, roll and grab the north ladder as a
spike ball drops to the south behind you. Continue climbing the north ladder to
the top and pull up into a tunnel. Turn and jump south-east to grab a crevice.
Shimmy to the left and pull up into a crawl space. Crawl down the other side
for secret #2 and pick up a large medipack, red shotgun shells, and Desert Eagle ammo. Pull back up to the crawl space
and shimmy to the right to the south ladder. Back flip and roll to grab the
north ladder and climb back into the tunnel. Run down the tunnel and the camera
view changes to show you in a walled walkway. Go to the end and climb the
ladder down to the ground floor.
Use the floor lever and then go to the blocks in the
south-west corner. Pull up to a block on the south wall. Back flip and jump
forward with a right curve. Back flip and land on another slope to jump to the
west and grab a ledge. In front of you should be the gate you opened. Follow
the tunnel to a room filled with sloped columns. Run and jump to the far slope
in the south-west. Jump west and then north to a slope. Jump between slopes and
use a curve to get to a slope that forces you to the slope by the far west
wall. Basically you have to keep jumping slopes and use an appropriate left or
right curve. Remember you can save while you climb up a slope. You will reach a
situation where you hanging onto a north slope in front of a pedestal on a
platform. Pull up, back flip, roll and grab the south slope. Shimmy to the
right and around a corner to a slope. Pull up, back flip and jump a few more
columns to finally grab a crevice in a wall. Shimmy to the right and pull up
onto the platform with the pedestal. Pick up the Hand
of Sirius and the large doors opens.
Enter the door and go left for a small
medipack. Go east down the tunnel and the gate opens for you. As you
exit you get a flyby of a gate opening on the opposite ledge and a gate opening
on the opposite higher ledge. Go north and follow the tunnel there to get to
the opposite ledge. Enter the tunnel to the left and follow it to a deep pit.
You see a green column and a black line to the north. [New move] The lines are horizontal poles to grab, spin, and jump
forward. You have to do three of them. After the last one, use grab when you
hit the back wall. If you use grab you slide down the wall to a ledge. If you
do not, you bounce off the wall into a deep pit. If you get lucky, it is
possible to land on a green column and save the game before trying the next
pole.
Go into the opening in the north wall. Start to slide down
and jump up to grab a monkey swing. Go to the north wall, release and grab the
wall. Shimmy to the far right. Climb down to about one tile above the bottom
slope. Back flip, roll, and grab the edge of a platform. Pull up, slide and
jump to a flat platform at the south wall. Go west to an opening in the south
wall. That leads down to the pit floor. To the west into a triangular crawl
space and a ladder. I guess you can climb down it and release to jump to a
column in the east. I just dropped off the north side of the wall and onto the
column. To the north are slopes and another horizontal pole to reach an opening
in the south wall. From the column, I just ran and jumped into the south wall
opening.
Start to slide and then slide again. What looks like a
flat solid tile is actually a spike pit. Jump over it and roll to slide down
the next slope backwards. Grab the edge and shimmy to the right and pull up
into a tunnel. Follow to enter a room with a wide spike pit. [New move] Go to the edge of the pit and
hop back three times. Run forward and use sprint and at the end of the pit,
press jump, and you should get a very long jump over the pit. Then grab the far
edge and pull up to the other side. You may need full health for this as the
grab leaves your feet dangling in the unhealthy spikes. Use the floor lever and
kill three scorpions. [New animation] Notice that Lara twirls her guns and the scorpions
are super fast. Go back to the pit to jump into the only place where the spikes
are down. You may also notice that Lara dies differently when impaled by
spikes.
Get into the crawl space. On the other side, slide down
and back flip over a spike trap. Pick up Cartouche
Piece 1 from the pedestal. Get into the
crawl space in the east wall. [New move] Face
the room with the ninja and press action, crouch and the backward arrow and
Lara rolls forward out of the crawl space. Note that you use the backward arrow
and not the forward arrow to do this. Kill the ninja
and notice a closed gate at the back of the room. Get back into the crawl space
and go south into another large room. Again forward roll into the room. Go to
the south-east corner and kill three scorpions.
Use the floor lever at the west wall and get a cut scene of a gate opening.
Go to the south wall and get behind the column to drop
into a crawl space. There is a statue in the trench. Pull the statue back one
tile and an earthquake starts. Climb back out of the crawl space. If you push
the statue forward, an earthquake also happens but you are killed. Go north and
see the collapsed structure. Go to the west side and look for an opening. Pick
up Cartouche Piece 2 from the floor. Then go to
the wall next to the opening to pull up onto a block. Climb the south wall and
back flip into an opening. Pick up Uzi ammo and
the Uzi's. Then climb down to the ground floor.
Go back to the room where you kill the ninja and enter the open gate in the
south-east corner. Enter the room and kill two ninjas.
Run and jump but no grab from a tilted block at the east wall to land on the
south-east column. Run and jump into the opening in the south east corner.
Follow the tunnel south and jump over the spikes. At the next pit use the long
jump move again. When you land, run forward to avoid the spikes that pop up.
Use the floor lever and get a cut scene of a gate opening.
Return over the spikes and back into the room to go east into the open gate.
Follow up the stairs and watch out for a gap where the stairs turn north.
Continue up the stairs and kill a ninja. At the
top of the stairs, jump to grab an upper ledge to the west. Go west and a gate
opens for you. You are in the bottom area of the pit you crossed earlier. Do a
long jump to the south to pull up onto a column. Stand jump to a column to the
south-west. Run and jump to an opening in the south-west corner. Enter and
start up the ramp. Immediately go back to the opening to avoid a spike ball. Go
up the ramp to about where the light is red. Then run back to the opening to
avoid a second spike ball. Go to the end of the ramp and enter a west tunnel.
Continue west and the gate opens as you approach.
Go south and climb a ladder to the top ledge. Go north to
find the open gate. Go to the end and drop into a room with blocks. There is a
closed door at north end. There is a receptacle on the east wall and two
receptacles on the west wall. You are still missing an item so go to the
north-west corner and enter a room. You face a wire over a deadly pool. [New move] Go to the wire over the pool
and use action. Lara turns sideways on to the rope. Keep action pressed and use
the forward arrow to move a little ways across the wire. When you stop, press
forward arrow again to go further. [Note]
The author's notes mention a bug with the slide wire manoeuvres. You have to
exit on the opposite side you got on or you cannot use the wire again. It is
not obvious to me what this meant. I could use the wire twice but never a third
time. [End note]
On the other side go west to face another wire over a deep
pit. You can see the item you need on the floor below. Slide on the wire to the
far west ledge and pick up red shotgun shells and
the shotgun. Drop down onto the ledge below.
Another slide on the wire and you safely cross over the fire. There is a hole
above you that is hidden by a ceiling tile and
you cannot jump up into it. Slide backwards down the west slope. Grab,
release and grab a crawl space. Drop down the other side and enter a crawl
space. You get secret #3 and pick up blue shotgun shells, Uzi ammo, Desert Eagle ammo and
a small medipack. Use
the floor lever and get a cut scene of a gate opening on a ledge. Go to the
north block and run south and jump to grab the pole. You flip forward and into
an opening in the south wall. Get into the water and follow it to swim up and
pull up to a ledge. The gate opens for you and you emerge on to the third level
ledge. Go south and enter the gate you opened. The water current carries you to
the end. Swim into another underwater tunnel and pull up to a ledge. The gate
opens and you safety drop down onto the ledge where you were before.
Jump to the slopes to the east and grab a ladder. Climb to
the top and pull up as if it was a crawl space. Run and jump north to land on a
column. Do a wire slide to a corner ledge. Do another wire slide to a ledge
where you grab the ceiling to monkey swing south to a column. The ceiling is
tricky. The east-west lines are safe. The north-south lines will let you drop
to your death. On the column, climb down to the ground floor and find Uzi ammo at the south wall. Go west to pick up the Hand of Sirius. The gate in the east wall is now
open. Enter the tunnel and follow it to a hole with water. Get into the water
and just follow the underwater caves to the end. Pull up and a door opens and
you enter back into the room with the ledges.
Go to the south-west corner and use the structure to get
to a second ledge. Go north into the tunnel to get to the east ledge. Go south
and climb the ladder to the third level ledge. Go north and enter the open
door. Follow the tunnel back to the room with the closed doors. Use a Hand of
Sirius in the south-west receptacle and the large doors open. Use a Hand of Sirius in the north-west
receptacle and the second set of large doors open. Make the Ba Cartouche and use it and the
third set of large doors open.
Enter the three doors and go down a tunnel into a large
room. Go down a tunnel in the west wall and emerge into an outside area. To the
west is a railway boxcar with the wolf in it. You can climb the sand hills to
the south-east and pick up Desert Eagle ammo.
Go to the south-west corner and pull up to the south wall. Back flip to the
sloped column and then jump to the top of the railway boxcar. Do not fall the
other sides of the boxcar since you cannot get back up to the top. Get into the
hole at the top of the boxcar and walk towards the wolf. The wolf and Lara have
a long conversion and the level ends.
2. Crazy
Train
You start on a railway boxcar on a moving train. You are
warned not to shoot Luke the wolf. Save before any firefight where the wolf is
close. If you shoot the wolf, he does not help you and you should reload. Go
west and the door opens for you. Jump onto the green flatcar and kill two ninjas. Jump east to grab the roof of the boxcar
that you left. Go to the east end and pick up red
shotgun shells. Go back to the flatcar and jump to the next boxcar. The
door opens for you. Wait for the wolf to go ahead of you and he uses a panel to
trigger a spike trap at the corner. Go around the corner and climb some boxes
to the east side. Drop on the other side and pick up flares.
Go west and pick up a small medipack and kill a
ninja. The wolf runs ahead of you and waits by
the closed door in the west wall.
There is Uzi ammo on the
boxes to the left of the door but I never got it. Stand on the ledge where you
found the medipack. Run west, jump and grab the horizontal pole. Spin and go
forward to land on top of the boxes at the west wall to the right of the door.
Use CTRL and Lara kicks in the lower panel to the west. Drop into the space on
the other side. Go south and jump to grab a ladder. Shimmy to the right around the
corner and climb to the roof of the boxcar. Kill the ninja
shooting at you from the next boxcar. Use a long jump to get to the roof
of that boxcar. Drop into a hole in the roof to land in a room with shallow
water. Kill a ninja and exit through the opening
to the west. On the other side drop and use a crawl space to get in to the
boxcar. Go east to press a pushbutton and two doors open. The wolf runs past
you and to the west to a closed door. Use the pushbutton again and the door
opens for the wolf. He uses a panel and another door opens.
Jump to the outside green floor and kill two ninjas. Go to the next boxcar and the door opens
for you. You can shoot the empty boxes. Go to the west door and the wolf will
enter the boxcar and wait by the door. Climb the north wall by the door and
pull up. Then back flip, jump, back flip, roll, and jump with a left curve and
you should end up on a high ledge at the south wall. Drop and shimmy left past the shotgun shells on a spike trap. Run and
jump to the east ledge and the door opens as you approach it. Go outside and
climb up onto the roof of the boxcar. Kill a ninja
and go west to see a wire and a pole. Do not use the wire yet. Use a long jump
to spin around the pole and land on the orange boxcar to the west.
Go to the south side of the boxcar and grab the edge. You
may need to shimmy a little but find a ladder and climb down to a platform. You
get secret #4 and pick up a large medipack and Desert
Eagle ammo. Climb back up to the boxcar roof and go west. You slide into
a depression next to a trap door for later. Jump to a flat spot to the
north-west and side flip over the slope. Go west to the end of the last boxcar
and pick up the crowbar. Return to the trap
door and pull it open. It is a long drop, so walk into the hole in a south-east
direction and you should land on a platform. The floor of the boxcar is a spike
trap in many places so be careful when you get onto the floor later.
Jump to the west to grab a crawl space. Stand up on the
other side and get a flyby showing the safe route over the toxic pool. Look
down at the pool floor to see the safe route. On the other side drop and grab a
crawl space. Drop down the other side to press a pushbutton. You get a cut
scene showing an empty pool. Get back out of the hole and safety drop into the
dry pool. Pick up a large medipack and enter
the opening in the south wall. Go down the ramp into a room and kill three ninjas. You can shoot some empty boxes and look
for a pushbutton in the north-west corner. Press the pushbutton and get a cut
scene of a boxcar with spikes on the floor. Press a pushbutton on the south
wall and it opens a door. The wolf runs past you and runs up the ramp and goes
to a closed door in the dry pool. Press the pushbutton on the east wall and get
a cut scene of a metal ledge rising outside a boxcar.
Go east into the next boxcar and jump the slopes again to
the south ledge. Shimmy around the spike trap again and jump to the north-east
ledge. Out the door and pull up to the roof of the boxcar. Go west and use the
slide wire this time. Slide to the end and use a forward jump. Lara turns and
jumps so you can grab the entrance to the crawl space. Get inside the boxcar
and climb down the ladder. Kill a ninja that
shoots you in the back. Be careful because a lot of the floor tiles are spike
traps. Go west and press the pushbutton on the column next to the spiked floor.
The west door to the dry pool is open and you should see the wolf at the far
door.
Use a small medipack if you health is very low. Walk
through the spikes and use the crowbar to open the box in the south wall. Get secret #5, two grenade
super ammo and the grenade gun.
Carefully go back through the spikes and go east to press another pushbutton
and get a cut scene of the wolf at the open door on the other side of the dry
pool. Go through the doors and join the wolf in the last boxcar. There is a
hole in the floor. The floor above is just a way to get to the roof of the
boxcar for the crowbar. You did that earlier by a different route so jump into
the hole. Use the crowbar to open the west wall. Circle around the boxes and go
into the north-east corner and the level ends.
3. Lee's
Instalment
You start this level as the wolf. You may notice that when
you stop moving, the wolf goes into a fighting position. Climb the ladder to
the top floor of the boxcar. You can look out the west window to see a
building. Go east and climb out of the boxcar. Go to the west side of the roof
and safety drop to a platform. Go south into a large open area and kill the three thugs shooting at you. There is a door to the
north and you can see a quad bike behind the east windows. Go west to hop onto
a short block and kick in the bottom panel. Get inside the crawl space and go
south, as most of the branches end at an empty pit.
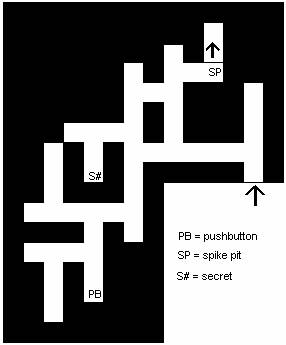
Follow the map to get secret #6
and Desert Eagle ammo. Then go to press the
pushbutton and get a cut scene of spikes retracting. Then go to the spike pit
but now the spikes are gone. Kick open the bottom panel and enter the shaft.
Climb up the ladder and pull up into a crawl space. Shoot out the grate and
enter the room. Kill two thugs and search the
small cabinet at the south wall and get the Desert
Eagle. Use the Desert Eagle sparingly as you
need a few bullets near the end of the level. Go to the north-east corner and
the door opens for you. Enter the corridor and go north and enter another room.
Go up the steps and pass another closed door. Go up more steps and enter a
corridor. Go north and enter the elevator.
Press the pushbutton and the elevator rises.
As you exit the elevator, turn around and see a pushbutton. It causes the
elevator to descend. The next part is real hard. Slide on the wire until you
are near where the sidewalls bend inwards. Then forward jump to grab the
horizontal pole and spin and jump onto the ledge at the north wall. You may
need to make adjustments, so the wire slide goes in both directions by using
the forward and backward arrow keys. I found forward three times and backwards
twice put you at about the right spot. When you land on the ledge, turn around
and see a grate above the south wall. Jump up and shoot the grate with the
pistols. Jump to the crawl apace and pull up into the opening. You get secret #7 and pick up blue shotgun shells and red shotgun shells. Pull up into a higher tunnel to the north and follow it to the
end where you drop back to the ledge.
Slide down the slopes to an opening. Press the
pushbutton on the wall and the spikes on the walkway retract. Follow the
walkway to the end and see another horizontal pole. Back up to the end of the
walkway and use a long jump to grab the pole, spin and jump forward. Keep the
grab so you slide down the north wall and grab the crawl space. Pull up into
the crawl space and shoot a grate at the other end. Enter the room and kill two thugs. Search the short cabinet for Desert Eagle ammo. Notice a blue lock and a closed door
at the south wall. Exit the east door and go north into the next room. Pick up
the orange key from the desk in the north-east corner.
Also notice a closed door there. Exit and go south into a lounge-type room and
kill a thug.
Go to the south-east corner and kick open the bottom wall
panel. Get into the crawl space and drop down the other side. You face a moving
laser beam. Go south and crouch under the laser if necessary. Follow the tunnel
to an opening over the deep room. Shoot out a grate on the west wall. Monkey
swing over there and get into the crawl space. On the other side, climb the
ladder on the south wall. At the top, go into the east crawl space and get a
cut scene of a door opening and water on the other side. Notice a green lock on
the wall. Exit and go into the south crawl space. Exit into a large room with
many black columns and blocks. Kill three harpies
that attack and pick up a green key from one of
them.
Go back into the crawl space and use the green key. You
get a cut scene of a door opening and water on the other side. [The door was
open from the first cut scene so I actually did not need the green key. I guess
that this was an order sequence problem.] Go back to the room with pillars and
climb them to reach an open door in the high south wall. Enter and lift up the
trap door. Get into the water and swim east. Pull up, back flip, jump forward
to a horizontal pole, spin and jump forward to a door that opens for you. There
is a closed door to the south. Go to the north-east and jump out the broken
window to grab a monkey swing. Go north and release to grab a crawl space. On
the other side, stand up and go down a ramp. There is a large medipack on the floor to the
west. Press the button on the east wall and get a cut scene of a door opening.
You can see the railway cars on the other side. Press the pushbutton in the
lift and the elevator goes down. Drop into the room and drop into the hole in
the south-west wall. Jump the columns to the south and then to the west. Give
yourself full health and drop to grab the north edge the last column. Shimmy to
the right against the west wall. Release and grab an invisible crevice. Shimmy
to the left against the south wall. Release and drop to the ground and lose a
lot of health.
Go north and kick open a bottom panel in the west wall.
Enter the tunnel and be careful of the laser trap. Follow the tunnel and climb
a ladder at the south end. At the top of the ladder kill a thug. Press the pushbutton and go up the stairs
through the open door. Then go down the stairs and go into the corridor. Go
south and enter the room to kill a thug. You
have been here before. Enter the crawl space in the west wall and go down the
ladder. Go back through the maze and exit back to the railway cars. Go north to
the open doors and enter the corridor. To the west is a closed door. Remember
this door since it is at the end of a very tight timed run.
Follow the corridor and kill three
thugs. Go into a north branch and up some metal steps. Drop at the end
to pick up the blue key. Pull back up and jump
to the gap to continue up the corridor. Press the pushbutton and the door
opens. You are back in a familiar corridor.
Enter the first west door and use the blue key in the lock to open the door.
Enter the room and climb a ladder. Shimmy left at the top. Run south down the
corridor and jump over the lasers. Enter a west corridor and enter the first
door as it opens for you. Search the short cabinet for a laser sight. Go to the east wall and press the
pushbutton. You get a cut scene of a door opening back in the room with all the
black columns. Exit this room and enter the door in the south-west. You are in
that black columns room. Get down to the floor and go south to the open door.
Enter the room and search the short cabinet for a small
medipack. Go to the south wall and save a few times since the author
stated that the timed runs cannot be reset. This is the pushbutton that opens
that timed door way back by the metal stairs.
First give yourself full health. Press the pushbutton and
use the LOOK key to stop the cut scene. Roll and run down the room. Run around
the desk that is it the way since you cannot jump over it. Pull to the first
black column and turn right to pull up to the ledge. Run and jump down the
ledge to the open door at the north end. Fall into the hole and run down the
corridor. Turn left and jump the lasers that take your health and slow you
down. Just drop into the hole and go out the door. Turn right and enter the
east tunnel. Go to the end and sprint down the tunnel. Sprint down the metal
stairs and you go over the gap. Turn right and then left and get into the open
door before it closes. There are few flat areas where you can use sprint and
that seems to help.
Get into the room and go under the broken metal stairs for
a green key. Use the key in the green lock and
the door at the top opens. A door also
opens in the north-east corner. Enter the tunnel there and save a few times
again. Press the pushbutton and use the
LOOK key to stop the cut scene. Turn and sprint out of the tunnel. Go left and
jump to grab the broken metal stairs. Go up and go left to sprint up the long
metal stairs. Jump the gap and continue back into the corridor. This time run
for the second west door and it opens. Run north into the open door before it
closes. You are faced with a lot of boxes.
Basically try to open every box you see. Start by opening
the east box and then the next three north boxes. Enter an open area. Loop to
the right to pull up onto a box. Get down the other side for secret #8, two Uzi ammo,
and Uzi's. Go to the north-west corner and open
a box. Enter and open another north-west box to pick up red shotgun shells. Roll and go east to press a pushbutton on the
wall. You get a cut scene of a floor tile raising somewhere. Exit and go past
three boxes and open a box on the west side. Enter and open another box. Enter
and go south to open a box. This would seem like a short cut to the door but
you are blocked by an invisible wall. Go west to open a box and press the
pushbutton. You get a cut scene of the entrance door. Press it a second time
and get a cut scene of the entrance door opening. Go north and see shotgun
shells behind an invisible wall. Just keeping going north until you find a box
you can open. Open it and enter to see the floor tile that was raised. Go south
and open a box for red shotgun shells. Go west
and open a box to get access to the west wall. To the east and to the left of
the floor tile is a movable box. Maneuver the box to place it on that floor
tile. Go back to the pushbutton and press it to lower the floor.
Return to that floor tile and drop into the hole. Move the
box to the south-east corner onto the floor tile with cracks on it. The floor
collapses and you fall into the hole. Go east to open a box and pick up the quad bike keys. Get out of the hole and back up into
the box room. Then exit back to the office room. Go into the corridor and enter
the east wall tunnel. Follow the tunnel and go down the broken metal stairs.
This time go to the south east and find the orange lock. Use the orange key and
the door opens. You can now enter the room with the quad bike. Drive through
the windows and back up the corridor to run over a thug
as you drive back to the orange lock.
Shoot or drive through the barricades into a deep red-lit
room. Go up the ramp and jump the gap. Drive down the ramp and through the
barricades to run over a thug. Drive to the east
and drive over a cracked floor tile and fall into a pit. You get a flyby of the
cave and a section where water disappears and re-appears. Drive around the
water pits to the north side. Note the CTRL is forward. Use the sprint key to
change directions and then CTRL goes backwards. Use SHIFT to go forwards again.
Jump the ramp over the water and curve to the left to get to the west corner
before the water re-appears. Just drive up the ramp to the north and drive
through the ceiling to the floor above. You see a floor with spike traps and
get off the bike before you go over them.
Go south and use a long jump to get over the gap. Enter an
alcove in the west to shoot a box and pick up the code
disk. Use the code disk in the receptacle beside you and get a cut scene
where you drop in a corridor. Go west for secret #9 and
a small medipack. Continue west and drop into a room. Go north
to see a wall. Behind that wall is the tunnel you would have reached had you
continued with the quad bike through the spikes. But you would have missed a
secret. Go west to press a pushbutton to remove the spikes from the platform.
Go west to the platform and look down into the north-east corner to see a metal
platform near a crawl space. Climb down the ladder on the east side. There is
nothing on the floor actually, so just climb down three blocks, shimmy to the
far right and back flip into that platform. Enter the crawl space and get a
flyby showing you electrical wires in the water and some traveling lasers.
I found this very difficult to do. Drop on the other side
of the crawl space, roll, jump forward and grab the ceiling before the laser
gets you. Monkey swing to the end but stop just before the next laser tunnel.
You need to get a small angle so that you miss the near corner edge but still
can go to the end of the monkey swing without hitting the east wall and needing
to make an adjustment. As you go south, you get a flyby of a deep room and some
black tiles. At the end you are on the floor next to metal stairs. Use CTRL and
you kick the stairs away. There is the deep pit and steam vents. The floor is
deadly but you can see a crevice to your left. Use the laser sight and Desert
Eagle to shoot the grate at the far west wall. You can use pistols if you jump
up and down at the correct angle. Grab the crevice and shimmy to the right to
pull up into the crawl space. You can stay in the crawl space and use pistols
to shoot the thug in the knees until he dies.
Get into the room and press the pushbutton on the east
wall. Turn and look out the window to see a bridge has formed connecting the
two platforms in the deep red-lit room. Go back to the crawl space and shimmy
back to the tunnel. Give yourself full health again. Grab the ceiling and again
do a very hard monkey swing back to the other crawl space. You need an angle
that misses the west wall. If you hit the wall, you have no chance. When you
make it back to the ledge, jump and grab the ladder to climb to the top of the
platform. Drop to the south and cross the bridge. In the final room go into the
tunnel in the south-east corner and the level ends.
4. Final
level
You get a cut scene where the wolf is playing with a
crystal. There is a sign on the back wall stating "you earned a
crystal". There is a list of credits and you are back to the load menu.
07-may-2006