NECRO'S DOMAIN 6: LOST IN THE CATACOMBS
Levels by Lee Dunning
Walkthrough by Phil
Lambeth
An opening flyby takes
you through an open-air structure somewhere in the Egyptian desert, swoops
through a hole in the floor into a dark basement where a young Lara awaits the
signal to begin, and finally comes back to the outdoor structure where you see
Von Croy running across to the opposite corner. He stops near a face tile and
keeps looking back furtively as if to see if anyone is watching (could it be
he's peeing on the face tile?). The flyby then comes back to rest on Lara, and
we're ready to get started.
Head west up the slope
and you'll soon be joined by a refreshed Von Croy. Allow him to go through the
north opening ahead of you, then follow along and try to keep up. He'll turn
right and vault up into the east passage and continue through a small crypt
into a larger room with a central pool. He'll stop and wait in the NE corner,
impatiently gesturing as if to tell you to hurry up and do what you need to do
here so you (and he) can move on.
Well, you passed a wall
ladder at the end of the previous passage which, along with the pool, may lead
to something of some importance. So let Von Croy cool his heels while you go back
and investigate. Nothing in the pool but a small medipack at the bottom.
However, if you climb that long ladder in the west wall and pull up into the
opening at the top, you'll find a wall switch in the far wall that causes a
minor earthquake when you pull it down. Climb back down to find that a whole
section of wall where Von Croy was waiting has magically disappeared.
Go inside and find Von
Croy standing near a closed door with that same offensive gesture that
expresses extreme impatience. It appears he wants you to open that nearby door.
You look frantically about in this room, but there appears to be nothing but a
blocked opening in the NE corner. So you go back to the previous room, and aha!
There's a crawl space in the north wall down near the floor, and inside is a
floor lever. When you push it a cut scene shows the door opening, and Van Croy
looking as if to say "about time!" as he ducks inside to do something
in the small alcove, and whatever he does apparently causes the stone blocking
the NE opening to roll away.
When you go to check up
on Von Croy, he just stands there in the alcove with that impatient gesture of
his, so go to the NE opening, climb up onto the block and vault up into the
opening. Hop over the trench with spikes at either end, and run down the
pink-tinted passage into the opening to the next room. You find ledges crossing
the room with huge burner bowls carved into the floor below. When you run out
to where the ledges intersect, a wraith is alerted, so quickly run around the room
and pull all four wall switches at the cardinal points to flood the room. Jump
into the water to douse the wraith, ignore for the moment the ceiling switch
where the ledges intersect (which opens a door for later and apparently
confuses Von Croy to your detriment if opened prematurely), then swim through
the south opening and follow the passage into a large room.
Surface and pull out
onto the north ledge. Save your game here in anticipation of a timed sequence.
Pull down the wall switch and watch the cut scene that shows you that Von Croy
has made it to the flooded room and is waiting beside a closed grate. The grate
lifts as you watch, Von Croy walks inside and then the grate slams shut.
There's an earthquake as camera control is restored, indicating that additional
reconfiguration has taken place somewhere. Quickly reverse roll the instant
camera control is restored, run into the water, swim across (angled slightly to
your right), and pull up onto the south ledge. Dash into the still-open doorway
as Von Croy charges out from the other direction. Light a flare and run down
the ramped passage. Step into the alcove to your right on the way down and pick
up the KNIGHTMARE KEY for SECRET #1. As you do so, the gate at the bottom of
the ramp closes.
Go back up the ramp and
onto the ledge where Von Croy is waiting impatiently. Jump into the water, swim
back through the east opening, and follow the passage back to the flooded room.
Pull down the ceiling switch where the ledges intersect, then return to the other
pool where Von Croy waits. The SW doorway is now open, so take the initiative
and go inside, then Von Croy will follow. In the next room (a crypt) is a
plinth with the NECROSCOPIC INSCRIPTION. Pick it up and read it:
To access the Leap of
Faith
you must first bid
farewell
to your ghostly inner
demons.
----------------------
2, 15, 23, 32, 35
It's for later, but it's
important. Now go through the south opening and follow the passage into the
next series of rooms. Von Croy will push past you rudely, but take your time.
In the first room you'll see a quartet of statutes arranged back to back. Look
up on the wall in the SE corner and you'll see a very modern looking map. It's
obviously a clue for later, so make an accurate copy on a piece of scratch paper
before proceeding. In the next room east you'll see a flowing fountain ahead
and to your left, together with a couple of coffins and a regal statue. (Mr.
and Mrs. Pharaoh must be interred here.) Still no sign of Van Croy, so continue
left around the corner into the next room and you'll trigger a short flyby.
Von Croy is waiting
impatiently at the top of the ramp to your left, but the two cartouche
receptacles bear mute testimony to the fact that there are several things you
need to do in this area before you (and he) can go where he wants to take you.
Go back through the south passage to the previous room. Light a flare and
locate the ladder near the dark south wall next to the statue. Climb up the
ladder, and when the texture changes take a back flip into an upper passage.
Turn around and stand with your back to the north wall, standing at the NE
corner of the raised ledge. Take a running jump past the spikes with a hard
mid-air curve to the left to land on a safe area of the ledge. Take a standing jump
south with grab to cross the gap and land safely on the next ledge.
Run forward and activate
the jump switch to turn off the flames protecting the jump switch in the NE
corner. Only problem is, the flames have appeared right behind you, so hang
from the edge (the monkey bars above are for later) and shimmy past the flames
to the corner, pull up and take a standing jump across the gap. Step back to
the south edge and take a running jump NE to the north ledge. Go to the NE
corner and activate the jump switch there to open a door at the other end of
the monkey bars on the other side of the room. Turn around and go to the NW
corner of the north ledge. Take a running jump south with a hard mid-air curve
to the right to clear the spikes. Hop across the gap with grab to reach the
flame-free south ledge. Turn to your left, jump up to grab the monkey bars, and
monkey swing across the room to release onto the pillar. Enter the open passage
and pick up the first BA CARTOUCHE. A cut scene shows a door opening in the
next room.
Reverse roll and walk
out onto the pillar. The flames have re-appeared across the way, so monkey
swing back across and when you reach the point where the monkey bars flatten
out, release and immediately hit the action key to grab the edge. Pull up into
the corner so you won't be set aflame, turn to your right and take a standing
jump north across the gap. Stand at the SE corner and take a running jump NW to
a lower pillar. Pull up north, turn to your left and jump back to the ladder.
Climb down to the room below. Go through the east opening past Von Croy and
into the next room north. The open door you saw in the cut scene is high up in
the wall in the SE corner.
Climb up the ladder in
the NW corner, pull up onto the pillar and face the first of three ropes SE.
Take a running jump and grab to the first one, climb up to the top to stop
Lara's swinging motion, and rotate to your left to face the second rope. Slide
down to the bottom, swing forward and jump off at the apex of your swing to
grab the second rope. Rotate to your right to line up with the third rope, but
slide down only a short distance before swinging forward. The rope is close
enough that only a short jump is required to reach it. From the third rope,
swing forward and jump off to land on the SE pillar. Go through the open
doorway and down two big steps to face a spike-riddled barbecue pit.
The far wall is a mirror
that reveals an object on a block in the opposite corner of the room. The trick
is getting there past the spikes and the flame tiles while being plagued by the
fixed camera angle that takes over when you leave the steps. The following map
has graciously provided by
Harry Laudie:
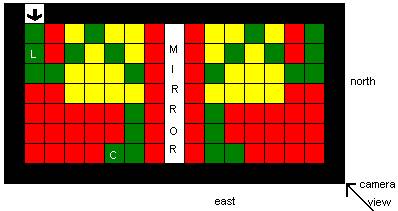
Here's how I managed to cross the room safely:
Stand at the NW corner of the lowest step and face NW (as close to the midpoint
between N and W as possible). Take a running jump to a safe tile against the
west wall. Turn carefully to face NE and take a standing jump to the next safe
tile. Turn to face N and take one step back. Turn to face NE and take a
standing jump to another safe tile. Turn to face N and take a standing jump
(through the mirror, apparently) to a safe tile where camera control is briefly
restored.
Turn to your right. The
tiles are safe all the way to the east wall, but don't go that far. Stop at the
first step and turn right. Take a standing jump to the low step, and the fixed
camera angle returns. Turn to your left and vault up onto the steps east. When
you reach the step against the east wall, camera control is again restored.
Vault up onto the highest step to your right and pick up the invisible BA
CARTOUCHE. I know it's tempting to try a long running jump from this high
position to the steps across the room, but don't be so foolish. Do the wise
thing and retrace your steps in reverse order (the tiles along the diagonal
from the west wall to the step where you took the initial running jump are
safe).
When you safely return
to the SW opening and the room beyond, safety drop from the pillar, go to the
next room south and run up the ramp to where Van Croy hasn't budged an inch in
your absence. Insert the two cartouches in their receptacles and watch the big
door between them open. Van Croy will vault up into the entrance, but for some
reason you have to take a standing jump. Follow him across a bridge that spans
the pool area you explored earlier. Hop down the blocks after him while he
huffs and puffs his way down. When you get to the next room, Van Croy starts
getting frustrated because he can't proceed, so he goes back and climbs the
blocks again (or maybe he just needs the exercise).
However, you're not
bound by Von Croy's limitations. Step out onto the huge left hand of the statue
and take a running jump and grab west to the other hand. Pull up and proceed
across the bridge into the west passage. This is the area where you would
now refer to that wall diagram you copied earlier, but since you're using this
walkthrough you shouldn't need it. Follow until you reach an opening in the
ceiling. Turn to your left and climb the wall into an alcove where you'll find
a floor lever. Push it for a static cut scene showing a blade trap in a room
still to come. Climb back down and continue north through the passage. You'll
step down into a slightly lower passage. When you reach the first crossing,
bypass it for the moment and continue around the corner to your left. Shoot the
scorpion and duck into the alcove on your right for a small medipack.
The passage ahead winds
up at a dead end (but remember it for later), so go back and enter that east
passage you bypassed a minute ago. Follow until you reach the gap with spikes
down below. Take a running jump north over the spikes and grab the far ledge.
Pull up and continue along the passage until you hear the sound of springing
spikes. Vault up onto the low block and jump up to grab the ceiling. Monkey
swing over the fire tiles and release when you reach the end. Take standing
jumps east over the four spike tile traps while the spikes are retracted, then
continue along the passage until you meet another scorpion. Kill it, then
continue until you reach another crossing.
The room to your left is
empty (and the side passage leads to a dead end), so continue forward and pick
up the large medipack just around the corner. Keep going and you'll run over a
decorative floor tile in the green-tinted portion of the passage. The passage
then narrows, so continue and locate two floor levers in the alcoves to your
left. When you push the second one, a cut scene shows the blade trap ahead
being triggered.
Even though the way
ahead is now safe, let's backtrack for another secret before proceeding. Head
back down the passage, go past that side room on your right and continue until
you reach the spike traps. Take standing jumps past them and use the monkey
bars to cross the fire tiles. Continue and take a running jump and grab across
the spike pit. Pull up on the other side and follow the passage until you reach
a crossing. Turn left and continue until you reach an area where the wall has
been lowered to your left. Follow the new passage and push the floor lever
you'll find at the end. Now reverse roll and go all the way back, over the spike
pit, flame tiles and spike traps, and continue running along the passage until
you reach that opening into the side room.
Go inside to find that
the wall has been lowered in the NE corner. Enter the passage carefully and
wait for the spike trap to spring just around the corner. Time a run past it
and pick up the second KNIGHTMARE KEY for SECRET #2. Exit the side room, turn
left and follow the passage to the entrance to the room that was formerly
guarded by the blade trap.
Climb the block stairs
in the next room and pick up the flares at the top. In the next dark room you
see five pushable statues resting on rows of colored squares, and a closed door
on the other side. This is where your scroll comes in handy. The numbers refer
not to letters of the alphabet, but rather they correspond to the letters in
the scroll message. The first number is 2, and the second letter in the message
is "o." Using the same pattern for all five numbers, you come up with
this letter sequence: o, p, y, r and b. When you look at the tiles, you see
that they are colored blue, red, orange, yellow, green and purple. Not too hard
to figure out, once you know the trick. Push the statue on the first row onto
the orange tile, the next one onto the purple tile, and so on. When the last statue
is placed on the blue tile the door to your left squeaks open.
The next room is
extremely dark, and you need to navigate invisible tiles to get to the exit on
the other side. The builder says there's a map on the floor that will be
illuminated if you throw down lighted flares. He has also provided the
following solution: Walk out east as far as you can go, side step to the right
corner and take a standing jump SE. Turn to face due east and take a running
jump to the next invisible tile. Turn left and walk north as far as you can.
Side step to the right corner and take a running jump with a hard mid-air curve
to the right. Turn to face east and walk as far as you can. Take a standing
jump to the ledge in front of the east opening.
Step forward into the
passage and you'll trigger a flyby showing Von Croy coming to join you.
However, when camera control is restored you find that you and he are separated
by a closed grate. Pick up the LASER SIGHT, the revolver ammo and the REVOLVER
lying at your feet (my, what a generous package) and go back to stand in the
east opening. Take a jump over the moat of deadly water and land on the central
platform. Go to the west wall near the SW corner and locate the lion's head
(the first of five you'll need to find) in the underwater alcove. Combine the
revolver and laser sight and shoot the gem in the lion's mouth.
Now stand in front of
the center of the ladder in the north wall and take a standing jump and grab to
it. Climb up eight rungs and take a rolling back flip to grab the rope. Climb
to the top to stop Lara from swinging, then turn to your left. Don't aim for
the tall pillar in the NE corner. Rather, aim slightly SE for the ledge to the
right of the block. Swing forward and jump off at the apex of your swing to
grab the ledge. Pull up, turn to your right and walk out to the dark SE corner
and push the floor lever to lower a portion of wall elsewhere.
Go back and climb up
onto that block against the east wall, and two trap doors are lifted for a
short time. Stand at the NW corner, facing north, draw your revolver combined
with the laser sight, and take a side flip left onto the raised trap door.
Quickly zoom in on the lion's head inside the north alcove, using the crouch
key, and shoot the gem in the lion's mouth. Holster your revolver and take a
standing jump toward the alcove. Slide down the slope, grab the edge and shimmy
to your right or left and pull up onto the ledge. Now go to the block against
the west wall and do the same thing, shooting the gem in the lion's mouth in
the south alcove.
Go to the NE pillar and
safety drop from there down to the platform below. Climb up onto the SE block
and take a standing jump into the lowered wall south. Push the floor lever for
a static cut scene from a vantage point on the upper ledge, then jump back to
the central platform. Use the ladder and rope to get back to the upper ledge
the same way you did earlier. Go to the NW corner and find that a pillar has
lowered, providing access to a ladder. Climb the long ladder, and several rungs
from the top take a back flip into an upper room. Climb the little step pyramid
and pull the chain at the top. A grate lifts in the north wall. Use your
combined revolver and laser sight to shoot the gem in the lion's mouth. Four
down, one to go.
Climb back down the
ladder and safety drop to the platform from the tall NE pillar. The water
around the platform is now safe, courtesy of the chain you pulled just now, so
jump in and locate the central hole in the floor. Swim down and along the short
passage, and pull up into a dark room. Light a flare and locate an opening high
in the east wall. Standing with your back to the west wall on either side of
the water hole, use your combined revolver and laser sight to shoot the gem in
the lion's mouth. You soon hear the sound of a door opening and Von Croy's
huffing and puffing as he hastens to join you. Swim back through the passage
and pull up onto the platform.
Von Croy is busy
climbing back and forth from the SE block. The passage where he was trapped for
so long leads nowhere. However, the south door has lifted, so leave Von Croy
and hop into the opening. You'll alert a wraith before going very far, so put
wings to your feet and proceed to navigate a face-tile maze. Take a left at the
first crossing (the right passage leads to a dead end) and follow until you
come to an opening south. Forget for the moment the passages to your left and
right and run forward into the water. Swim left and through the east opening
into the adjacent pool. There's an opening to your right as you enter, but
ignore it and pull up onto the north ledge.
Vault up into the next
room and jump into a pool of oil where you get a fixed camera angle. Wade
across to the other side and pull up onto the ledge. There's a jump switch on
the left side of the north wall, but don't activate it yet. Go to the other
side of the north wall and face the gray vertical strip. Hop back into the NE
corner of the oil pool (you should be directly underneath a tell-tale tile in
the ceiling) and hit the action key. You should pick up the third and final
KNIGHTMARE KEY for SECRET #3. Vault up onto the ledge and go over to stand
underneath the jump switch. Jump up to activate it, then immediately reverse
roll and take a running jump into the oil as flames start rolling down the
ramps. You should make it across in plenty of time, however, before the flames
reach the oil and ignite it. Pull up to restore camera control, run forward,
jump into the water and swim into the south opening. Swim up the shaft and pull
up into a very dark crypt where nothing awaits you (for right now) but flares
and a small medipack in the far corners. What's more, the flare bug chose this
moment to kick in for me (which may well be the cause of the woes I experienced
later).
Swim back to the first
pool via the west opening, pick up the small medipack in the NW corner, and
pull up onto the north ledge. Enter the maze and turn left. A wall has lowered,
allowing entry into a passage with a water hole. Jump in and swim down to find
a bird statue to get rid of that wraith that's been nibbling at you for so
long. When it finally blows up (you may have to go back up for air if it
decides to take its time committing suicide), swim back up and make your way
back through the maze to where Von Croy is still climbing up and down that
block.
The door in the NW
corner has now lifted. Hop into the opening and enter a room with the builder's
trademark picture and billboard thanking you for playing his level. Pull the
block from the east wall and push it to the right side. Enter the next room,
turn left and run over to open the door in the north wall (if you stray too far
east into the room, you'll hit the exit trigger prematurely). There's a
red-tinted room with receptacles for three keys, so insert the three Knightmare
Keys you're holding. You hear what sounds like a boulder being released while
the ground shakes slightly, and you get a cryptic cut scene advising you that a
door has opened somewhere. (I'm sure you'd like to know exactly where. Well,
that's what walkthroughs are for, aren't they?)
Reverse roll and exit
this room, veer to the right and leave through the SW doorway, and exit the
builder's thank you room by running across the invisible bridge to the central
platform where Von Croy is still playing on that SE block. Pull up into the
dark opening south (no invisible bridge here) and navigate the maze again until
you reach the south exit. Jump into the water and swim through the east
opening. Turn right in the next pool and swim through the south opening. Swim
up the shaft and pull up into that dark crypt. There's a new opening high up in
the west wall. Jump up to grab the edge and pull up into the passage. Run
forward a short distance and you'll be taken to the bonus level.
At this point I was
unable to continue because for some reason the next level begins in total
darkness, and the ability to carry and use flares and the binoculars has been
taken away by the builder. I stumbled my way to a chute and slid down to
trigger the opening credits, for which there was ample lighting, but when
camera control was restored the darkness returned, rendering the second level
utterly unplayable for me. This bug has not been experienced by all players,
but at present its cause and the means to prevent it from kicking in are not
known.
Necro's Domain 6 -
Lara's Knightmare (Bonus Level)
Level and
Walkthrough By Lee Dunning
============================
Start Of
Level
==============
You start
in the same passage as in 'Lost in the Catacombs'. Follow it, turning right and eventually you'll slide down a
slope. This triggers the opening
credits where people familiar with the Kids TV Programme 'Knightmare' will
recognise the theme music. Once the
credits have finished you find yourself in a room with a closed door. Approach this door and it will open,
allowing you access to the Castle of Confusion. Follow the passage to a room where 'Von Croy' explains to you
what lies ahead and that 'There is no turning back'. You can only enter a dungeon once as the doors behind you
seal. You face each
challenge
as it comes and you need to make the right choices. Walk towards the door, leaving Von Croy behind to face your
challenge.
Chamber of
Choice
=================
This
chamber is straightforward. There are
four doorways, all locked. Behind a
pillar on the floor is a texture with the quest item on. Run onto this texture and the exit door will
open.
Chasm with
Bridge
=================
As you
enter this room, you will see that there is a chasm in front of you and a lever
to the right. Run to the wall and pull
the lever. This extends the bridge
which you can now cross and go through the door into the next dungeon.
Level 1
Clue Room
=================
After
entering the room, run towards the centre where two cartouches lie. You will hear Von Croy (Dungeon Master)
explaining that there is a Wall Monster here and he feeds on people without
knowledge. The wall monster introduces
himself before telling the first riddle, 'Of Earth I was born, Deep fires
tempered me, mountains slipped on me, My father was younger than I, and a
sculpter gave me my face. What am I
made of?' If you look on the walls,
there are three designated areas, each labelled with riddles. Run to the section where Riddle 1 is
labelled. Here you will find 3 answers
to choose from. Pull the switch with
the answer STONE. You will here the
wall monster say, 'Truth Accepted'.
Spikes appear in the other two answers preventing you from cheating and
pulling all the
levers if
you gave the wrong answer. The wall
monster then tells you his second riddle, 'Made like me the mountains stand,
the tallest object in our land. Give
name to him'. Now run to the section
labelled Riddle 2 and pull the lever with the answer EVEREST. Again, spikes appear in the other answers
and the wall monster says, 'Truth accepted', before giving you your third and
final riddle, 'Once by magic I was cleft, deep in my chest a sword was left,
ten years of pain I then endured, then came a prince who pulled it forth. Name him now and gain reward.' Run to the section labelled Riddle 3 and
pull the switch with the answer KING ARTHUR.
Again the wall monster will say, 'Truth accepted.' You would have also noticed three doorways,
each having an opening for a cartouche.
Since there
are only two cartouches, you must choose 2 of the 3 objects.
Answering
the riddles correctly gives you a hint as to which objects to take.
The wall
monster then says, 'Magic have I none, yet this I know, All that
glitters is
not gold, and she that lies in wait values her appearance more than base
metal.' Walk toward the doors and you
will see a movie showing you the objects more clearly. There is a Bar of Gold, Hair Brush and a
Key. It's safe to say that if she
values her appearance we need to take the hair brush and the key as all that
glitters is not gold. Take the 2 ba
cartouches from the pedestals and place them in the holes to open the doors
that hold the Hair brush and the Key.
Now leave the room to the right.
Scorpion
Room
=============
Here, you
will find yourself in a short corridor, follow it through the next
opening and
you will be in a small room with a large scorpion. Just make your way past it and try not to get stung. Enter the next dungeon through the opening.
The Fire
Trap Dungeon
=====================
This
dungeon is straightforward, just make your way along the passage avoiding the
jets of flame. Just time your way
through.
Lilith's
Domain
===============
Follow the
passage until you see a short cutscene.
Here Lilith introduces
herself and
says that she does not like trespassers, especially when she hasn't had time to
do her hair. She asks if there is
anything you have that would interest her.
Place the Hair Brush on the pillar.
You may need to walk forward a little so the camera angle will let you
see what you are doing. After placing
the Hair Brush on the pillar, another cutscene starts showing Lilith recite a
rhyme, and a walkway appears over the pit allowing you to enter the next
dungeon.
Swinging
Blades
===============
Just run
forward into the next room, avoiding the swinging blades.
Playing
Cards
=============
In this
room you can see a row of cards. Above
the King of Diamonds is the exit. Stand
on the Diamond texture on the floor, and the King of Diamonds card will vanish,
allowing you to see the exit. The door
will be closed, so run forward and use the key in the slot, opening the door.
Bomb Room
=========
In this
room, you must run forward and exit through the opening before the bombs go
off.
Flame Room
==========
Follow some
passages until you get to a room which looks innocent enough. take a few steps forward and some flames
will be ignited. make your way across
the room, avoiding the flames as they appear.
The Kitchen
===========
Follow the
passage until you emerge in a kitchen.
Here, a nice lady tells you that the way to level 2 is 'kinda odd'. Make your way through the door on the left.
Level 2
Wellway
===============
In this
chamber are 2 skeletons and a well.
Climb into the well and slide down the chute, avoiding the skeletons.
Odd
Passageway
==============
You will
slide into the first dungeon of Level 2.
Since you were told that the way into Level 2 was Odd, make your way
around the room standing on the textures with ODD numbers only and exit through
the door.
Level 2
Clue Room
=================
Run down
the stairs you you will see the familiar sight of choosing the right objects
again. Grab the 2 Ba Cartouches and
this time (as it happens in the TV programme), you have no hints and it is
merely hope and chance that you take the right objects. However, using this walkthrough takes away
the chance by telling you which objects to take. Use the Ba Cartouches to open the doors that hold the Bar of Gold
and Merlin's Talisman. Leave the room using the exit on the right.
Ariacne's
Lair
==============
Follow the
well lit passageway into Ariacne's Lair.
Here, you have to be quick as Ariacne is flying above the room, closing
doors at intervals. Just run forward
and leave through the exit before the door closes.
Dart Room
=========
Another
straightforward room, just run forward trying to avoid the darts that shoot out
of the walls.
Chasm
=====
Just make your
way to the other side by jumping on the platforms, trying not to fall over the
edge.
Merlin's
Chamber
===============
Here, you
are faced with a large room with a chasm in the centre. Place Merlin's Talisman into the receptacle
on the wall to Lara's left as she entered the room. There will be a flash of light and the chasm is not
accessible. Make your way across and
into the next dungeon.
Corridor of
Traps
=================
Make your
way through the traps to the other side.
There are blades that come from the floor, some that circle, there are
teeth spikes that come from the floor, ceiling and walls, then there is a star
gate and a bird blade.
The Lava Pit
============
This room
can be a bit tricky but there is a simple solution. The basic idea is to jump from platform to platform before they
crash into the lava. Jump back as far
as you can, so your back is touching the door you just came from and side step
to Lara's left. Do a standing jump
forward to the 1st platform, and again to the next. Jump to Lara's right to land on the third platform, roll, then
perform a running jump to the fourth.
Then do standing jumps to the remaining platforms and then to the exit.
Moving
Teeth Spikes
===================
Again, you
don't have much time here as spikes are sticking out of the ground and are
moving towards you. Run forward and
then turn to the door with the Quest item texture about it and enter the next
dungeon.
Grumpy Guy
==========
Follow the
passage until you enter a room with a grumpy guy. He says that the wellway to Level 3 is locked but he will open it
if you give him something shiny. Use
the Bar of Gold in the slot and then leave.
Level 2
Riddle Room
===================
This is set
up like the first only this time you must answer all correctly or
else the
Wall Monster kills you. The first riddle is, 'Before the elephant,
there
walked a creature similar to it; yet hairier by far than any who'd been
Hannibal's great pet. Name it.' Go to the section labelled Riddle 1 and pull
the swith with the answer MAMMOTH. The wall monster will say, 'Truth accepted'
before giving you his second riddle, 'Who owned the box which held all the
evils of the world. That box which
never should have been opened.' Run to
the area marked Riddle 2 and pull the lever with the answer PANDORA. Again, the wall monster will say, 'Truth
accepted', before giving you your third and final riddle, 'Nine Goddesses there
were in Greece, of Music, Art and Rhyming Piece. Now, tell me quick and answer true; What name called they, this
magic crew?' Run to the area marked
Riddle 3 and pull the switch with the answer MUSES. Now you have answered them all correctly, the exit door will now
open and you can leave to the next dungeon.
Level 3
Wellway
===============
Climb into
the well to enter level 3.
Skeleton
Pad
============
As you
slide into this dungeon, two skeletons are awakened. You must pull the lever in the corner to open the exit door, and
leave without harm.
Level 3
Clue Room
=================
You will
slide down a path and come to two more pedestals holding Ba Cartouches. Take them and approach the three doors. You will see a cutscene showing you what is
in each. Unlock the doors holding the
Shield and the Horn. Leave the room
using the exit near the bottom of the slide where you entered.
Wall of
Jericho
===============
Follow the
passages until you come to what seems like a dead end. There is a brick wall with the words
'Jericho 6'. This should give you a
clue what to do. Place the Horn of
Jericho in the slot and the wall will disappear. You will see Dungeon Master (Von Croy) who offers you some
advice: '1+2+3+5-7'. Run up the slope
and climb the ladders to the top.
Medusa's
Lair
=============
Follow the
passage until you see a cutscene. You
can see Medusa on the wall and Dungeon Master gives you a warning, 'To Get
Behind the Shield!!!' When the cutscene
stops run along the wall to the left and use the shield in the receptacle. The way ahead will be free to pass now. Cross the room to the exit.
Numbered
Passages
=================
Here, you
will see 5 large steps leading to 5 exits.
If you take Von Croy's
advice,
1+2+3+5-7 = 4. Exit the dungeon through
the exit with the number 4 above it.
Level 3
Riddle Room
===================
This is the
final riddle room. You could skip it
but you will miss some
important
hints. Answer them all correctly for
the hint. Here is the first
riddle: 'A
male goose is called a cob; True or False?'
Go to riddle 1 and pull the switch with the answer FALSE. The wall monster will then give you the
second riddle: 'The Manx Cat comes from manchester; True or False?' Go to riddle 2 and pull the switch with the
answer FALSE. The wall monster will
give you its third and final riddle: 'The flying fox is an insect; True or
False?' Go to riddle 3 and pull the
switch with the answer FALSE. Answering
them all correctly will reward you with a series of numbers: 42, 31, 53,
15. These will help you get across the
causeway. Leave the dungeon.
The Prison
==========
As you walk
along the path, you will hear a plea from someone trapped behind a door. Pull the switch to let him out. He will introduce himself as Motley and will
thank you. You will also notice that
there is a Merlin's Talisman in the cell with him. Pick it up and leave the dungeon.
The Church
==========
Follow the
passageway and you will come to a large room with a stained glass window. It is fairly dark in the room and you're
sure that the light from the window will point the way. Use Merlin's Talisman in the receptacle next
to the window and the room will be brightly lit showing you the right path to
take (the Quest Item texture will be visible).
Take this path.
The
Causeway
============
Follow the
passage until you come to a causeway.
You must stand on the right numbers to get across. Stand on the numbers 4, 2, 3, 1, 5, 3, 1, 5
and exit the chasm.
The Final
Dungeon
=================
You will
notice a closed door on the left. For
now, run to the end of the room and through the bird blade. Collect your prize from the pedestal and
hear a hearty congratulations from the Dungeon Master. Go back through the bird blade (which has
stopped now), and go through the now open door.
Finishing the
level
===================
Run through
a series of passageways and climb up the ladders. You will emerge in the corridor where you started. Turn right and run to the exit back to the
previous level where you can continue to complete that level.