Cathedral of the Black Goat
Level by Colin Benson
(December, 2006)
Walkthrough by Harry
Laudie
[Note] I had to use the original catacomb.* files to build the
level. When I used the revised catacomb.* files, the level would not run and
the game would crash [End note]
You start in a long hallway with a
closed door at the east end. Go forward to pick up the shotgun. Turn around and go west to another closed door to
get red shotgun shells. Go to a hole at the
north (or south) wall and climb down the ladder into a dark cave. Do not go
east yet. Go west to pick up blue shotgun shells.
Go to the west wall and use the floor lever. You get a cut scene of the east
door opening in the hallway above. Go to the south wall and now go east to pick
up flares. Do not go near the black circle in
the middle of the room. If you do, a mass of beetles
pours out. Climb any ladder back up to the hallway.
Go east into the open door and get a flyby of a
large room. Be careful of the many holes in the floor. There are also two skeletons running around the floor. Shoot them
into any hole to get rid of them. Hop on the central platform. You have to move
the two towers onto the marked tiles to open doors. There are two towers and
four doors. Move the towers as per the following sketch to open the associated
door.
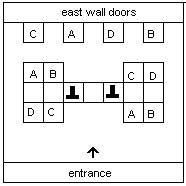
The room names and order of visiting are arbitrary.
This is the order I used.
Room A
Move the towers for room A. Enter the room and use
the floor lever. Exit back to the platform. The doors on the upper north ledge
are open. Climb the ladder in the north-west corner to get to the ledge. Go
east and enter the room. Pick up the laser sight,
revolver ammo, red shotgun shells, and flares
from the pedestals. The flares are called glow sticks in the inventory. Leave
the room and safety drop to the floor. Shoot another skeleton
into a hole.
Room D
Move the towers for room D. Enter the room and use
the floor lever. Exit back to the platform. The doors on the upper south ledge
are open. Climb the ladder in the south-west corner to get to the ledge. Go
east and enter the room. Run up the left steps and pick up the flares. Go to the top of the steps and go west.
Follow the tunnel to another room. There is a closed door in the west wall.
There is nothing hidden in the pots on the floor. Go south and monkey swing
over the deadly pool. Be careful of the steam vents during the trip. Drop at
the end and slide down a slope into a small room. Go west and see a slope. You
can also see a rope and deadly water. The rope is farther away than it appears.
Slide down and at the bottom, jump forward to the slope in the water. Slide
down and near the bottom, jump to grab the rope. Swing to the block in the
north-west corner and pick up the grenade gun.
Jump south-east to grab the slope. Pull up, slide down and jump to the rope
again.
Swing three times and jump to the platform in the
south-east corner. Turn west and run and jump to grab a slope edge. Pull up,
slide down, and jump to grab a block. Pull up and jump west to a lower block.
Be careful of the steam vents and jump the blocks to the north. You can detour
to the west wall for a large medipack. Go east
along a long platform. At the end, shoot a skeleton
into the water. Turn around and shoot another skeleton
that has appeared behind you. Follow the next blocks towards the west wall and
see an alcove in the upper south-west wall with a movable tower. You cannot
move it yet so continue jumping blocks. Follow the blocks near the west wall.
The pots contain nothing. Jump onto the platform at the north wall. Shoot two
skeletons into the water. Go to the east end and use the floor lever. You get a
cut scene of a tile rising behind a movable tower.
Shoot the five sets of bones on the platform. But
you do not have the revolver or crossbow yet. This can be done with the
pistols. Start about one and a half tiles from the bones and shoot towards
them. Now use the END key to roll and continue rolling. This usually shoots the
bones after a few rolls. If it does not work, try the procedure in another
direction at right angles. That is, if you are facing west and it fails, try it
again from the north or south.
Now go into the doorway to the north and go up the
ramp. In my play, I had a skeleton stuck inside the wall. You could hear it and
occasionally see pieces through the wall. At the top of the ramp, enter a room
and shoot the empty vases in the alcoves. There is a crawl space in the east
alcove. Get inside and get ready for a long crawl. It may be a small maze but
with flares you can easily see that the dead-ends are only one section deep. If
in doubt, crawl to the left. At the end, stand up into a room and pick up the revolver from the pedestal. Go west and enter an open
door. Follow a tunnel to the south to enter another room. You hear the secret
sound but no secret is registered. Pick up three
revolver ammo from the pedestals. Now crawl back and go down the ramp to
the platform.
Follow the ledges back to the ledge where you saw
the opening with the tower. Jump up there and push the tower into the room.
Press the face button on the east wall and get a cut scene of a door opening.
Exit the room and the open door is on the east wall ledge and you use the ropes
to get there. Swing over to the ledge and enter the open door in the south-east
corner. Follow the tunnel to a room. Climb the long ladder on the north wall.
Climb to the top and back flip to a ledge. Go south and pass a closed door.
Continue south and climb another long ladder. Go south up the steps with the
red blocks. At the top, enter a small room and press a face button on the south
wall. You get a cut scene of the door opening. Before you leave, search the
east and west corridors and find two Escher Rings.
Now go down the steps and down the ladder and enter the door that you opened.
You are back at the start of the trip. Go east to find the tunnel and return
back to the room with the two towers. Safety drop to the floor and return to
the platform.
Room C
Move the towers for room C. Enter the room and use
the floor lever. Exit back to the platform. The doors on the lower north wall
are open. Go down the steps and face a maze of rooms. First go left, left, and
straight south into a room. You see a closed door in the corner and an item
behind the window. That is the door you have to open so remember where it is.
To the west is a deep pit.
Return north and go to the narrow corridor to the
north-west. Go east and see an alcove in the right wall with a vase. Shoot the
vase for a small medipack. Do not shoot the
vase in the second east alcove, as it releases a wraith.
Turn around and go west to enter a room of empty vases. Go south up the steps
into a room. Loop around the wall to the right and enter a long room. Go north
and then turn to the left to see a face button on a south wall.
Press the face button and get a cut scene of a door
opening at the top of some steps. Go to the south-west into a room. There is a
door at the top of some steps but it is not the door that opened. Continue
south-west and enter the west doorway. To the south is a room with a bird statue
just in case you need it. Enter another doorway in the west wall. There should
be two vases in a south alcove. Then go north down the long room. You see a
closed door in the north-west corner. You also see three vases on a high upper
ledge. Shoot the vases and the door in the north-west corner opens. Enter the
door and go to the back of the room for flares,
grenade normal ammo, red shotgun shells, and crossbow
explosive ammo. Exit the room and go south and look to the left. In a
large east alcove are steps and the door that you opened. Enter the room
carefully as there is a hole in the floor. Climb down the ladder to a lower
room. Go west to jump a trench and see beetles
fall into the trench behind you. Press the face button in the south-west corner
and get a cut scene of a door opening. Jump over the trench and climb the
ladder to the upper room.
Exit the room and go south and return to the closed
door at the top of the steps. It is still closed so you need to find another
door. First go south and enter a room with pots. Shoot the pots and pick up flares. You have also started a wraith. Run north, through the left doorway, and then
straight south to the bird statue. To the east is a pit. Return north to the
closed door and then exit to the north-east to the first face button you used.
Go straight east through this long room, though a
second room, and enter a third room. Turn left and go north. Jump over a hidden
dark pit. Enter the room to your right to awaken a skeleton. Lure it onto the
corner and use a grenade to destroy the skeleton
and break the pots. Pick up flares from the
debris. Exit the room and go west to the far room. Turn left to find the steps
and the open door. Destroy another skeleton and
enter the door. Press the face button and get a cut scene of a door opening.
Exit the room and go back to jump the pit. Then go west to the end and enter
the south-west room to find the steps and the open door. Enter the room
carefully as there is another hole in the floor. Climb down the ladder into a
lower room. There are beetles on the floor. Go
east to jump a trench and press a face button in the south-east corner. You get
a cut scene of the door opening next to the window. Jump the trench and climb
the ladder to the upper room.
Leave the room and go to the north-east. Turn to
the right after the first face button and just follow the rooms back to find
the open door. Enter the room and pick up a Lunar
Pillar. Exit the room and go north. Light a flare and look to the east
corner in the next room. You should find blue shotgun
shells. Continue north, east, and south up the steps to return to the
room with the two towers.
Room B
Move the towers for room B. Enter the room and use
the floor lever. Exit back to the platform. The doors on the lower south wall
are open. Go down the ramp to the empty pots. Then return up the ramp to shoot
a skeleton into a hole before it gets close
enough to push you into a pit. Go west and face a wall ladder and a deep pit.
Also on the wall are fire emitters. Jump to the wall ladder and climb your way
down between the fire emitters. At the bottom, drop into a large room.
Go to the north-east corner and pick up the crossbow. Go to the west wall and use the floor lever
to open the door in the east wall. Shoot the bones on the floor in front of the
east door, just in case they trigger something. Enter the next room and face a
chessboard pattern on the floor. This was a real trial and error solution.
Number the wall torches from left to right as 1 to 4. The diagram below shows
which tiles light the torch and also open a door. In the diagram, green opens a
door, red closes a door, and white is neutral.
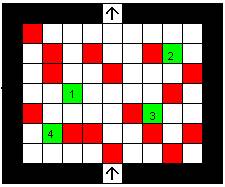
Enter the four open doors and go east. After the
second open door look up to the south wall for a crawl space. Crawl through and
drop into a room for two grenade super ammo.
Crawl back out and continue east into a room with ramps leading to a higher
ledge. The vase in the north-west corner contains crossbow
normal ammo. The other vases are empty. Follow the ramps up to the top
ledge. You see a bridge and movable towers over a large fire pit. The parts of
the bridge that have holes in it are fire traps. You also cannot jump corners
over the fire pit or you will catch fire.
Follow the bridge to the north-east and see a face
tile on the bridge. Go west to pick up a small
medipack. Then move the tower on the platform to the north for two tiles
so that it is out of your way. Now move the tower near the south wall onto the
face tile. While you cannot go onto the tiles with the holes, you can push the
tower onto it. You will have to move the tower on the platform back to its
starting position during the procedure. When the tower is moved onto the face
tile, the fire emitters at the east corner ladders will stop.
The room to the east ahead of you contains a closed
door. Go to the south-east corner and climb the ladder. Pull up to a ledge over
a deep pit. Lara will look to the ceiling to show you the locations of
invisible platforms that float over the deep pit. Jump the platforms and use
the three floor levers at the side wall ledges. The fourth ledge just has flares. The door in the south-east corner will open.
The south-west door is still closed. Enter the room and stop. Notice some tiles
on the floor are different. They are safe tiles. The rest of the floor is a
fire trap. Work you way around the perimeter of the room. Most of the jumps are
simple stand jumps. You can make a small detour for revolver
ammo. Go behind the west wall and press a face button. You get a cut
scene of that south-west door opening. Jump all the way back and then jump the
invisible tiles to enter the open door. You enter a room with four columns. Go
behind the south-west column and press the face button. You get a cut scene of
a door opening somewhere. Exit the room and jump the invisible platforms back
to the entrance. Climb down the ladder to the fire pit room.
Go to the south-west corner and climb the ladder.
You pull up into a large room and see two ropes ahead of you. To the east are a
room and a corridor to two closed doors and a bird statue. Remember where the
statue is located. Go west into a room and see a closed door. Follow a corridor
at the west wall. Go up some steps and emerge onto a second floor above the
rooms. Go east and climb the blocks and you can see the bird statue below you.
A wraith appears so safety drop into the room
and stand by the bird statue until it explodes. Go south and west to return to
the second floor.
Go east again and shoot the vase in the south-east
corner that is hidden by the blocks. Pick up crossbow
normal ammo. The other three vases are empty. Destroy a skeleton that appears. Go near the bird statue pit
again and find blue shotgun shells on a lower
ledge. Pull up and go the south-west. Hop onto a structure and see two floor
levers. Move both floor levers to the opposite direction. You get a cut scene
of a door opening in a corridor. Go east and safety drop into the bird statue
area. I also heard another wraith explode at this point. Go north and find the
open door. Enter the room and use the floor lever. You get a cut scene of a
door opening on the second floor.
Return to the second floor and go to the north-west
floor to enter the open door. Step on the yellow pad and the door opens in the
west wall. The door is timed. Run to the door but you have to follow the
ledges. If you jump the corners over the pit, you catch on fire. When you make
it inside the door, the door will stay open. Light a flare before you move, as
there are two holes in the floor.
Climb down the ladder in the north hole. You drop
into a lower room with many vases. Go west and loop around to the right and go
east. You see a brown vase at the east wall. Shoot it for revolver ammo. Do not shoot
any other vases, as some will release a wraith and there is no close bird
statue. Climb the ladder back to the upper room.
Now climb down the ladder in the south
hole. You face a pool of deadly water. Jump to grab a wall ladder. Shimmy to
the end, back flip, roll, and grab another wall ladder. Repeat this a few times
to get across the water. On the last wall ladder, back flip, roll and grab a
crevice. Then shimmy to the left and drop onto the safe ledge. Go south to find
and use a floor lever. You get a cut scene of a door opening. Use the same
procedure to get back. Except on the last wall, shimmy to the left, back flip
only to a slope and jump forward with a left curve onto the safe ledge. Climb
the ladder back to the upper room.
Exit the room and remember that there is a fire pit
in front of it. Go to the north wall and follow the stairs down to the open
door. Enter the room and use the floor lever. You get a cut scene of a door
opening. Exit the room and go east to the bird statue area. Enter the open door
in the south wall. Watch out for the hole in the middle of the room.
Climb down the ladder in the hole to a lower area.
Go north and you find a closed door. Go west and look for a narrow passage to
the north. Enter the room there and shoot the pots to pick up flares. Exit and continue west. Just follow the
corridors and you arrive at another yellow pad. This opens the timed door that
was at the end of the north corridor. When you step on it you get a cut scene
of the door opening. When you make it inside the timed door, the door will stay
open. Go up the ramp and use the floor lever. You get a cut scene of a door
opening. Return to the climb the ladder to get out of this area. Loop around to
the right to get back to the entrance area with the two ropes.
If you step on the darker floor tiles, the door at
the end will close. Use the two ropes to swing across the floor. Go through the
open door and face a wall. Go around the wall in any direction and enter a
large room. Jump onto the blocks in the middle of the room and drop into a
trench. Press a face button at the north end of the trench. You get cut scene
of a door opening. Exit and room and forget about the ropes. You can just run
over the floor. Climb down the ladder to the fire pit room.
Enter the room in the east wall and see that the
door is now open. Run up the steps and enter a room with a large hole in the
middle. Go to the north wall and pick up a second Lunar
Pillar from a pedestal. Destroy the two
skeletons that sneak up behind you. Safety drop into the room below and
go out the west door. Follow the bridge across the fire pit and go down the
ramps. Enter the west passageway and go over the chessboard again. Continue
west into the next room. Grab the ladder and climb up around the fire emitters
again. At the top, back flip, roll, and grab the ledge. Pull up and follow the
ramp back to the room with the two towers.
The end
Go to the south-west corner and climb the ladder to
the ledge. Go east and jump north onto the ledge on the east wall. Go to the
middle of the ledge and a door opens in the east wall. Enter the room and place
the two Escher Rings and two Lunar Pillars in their receptacles. You hear a
door open. Go east and enter the open door. You get a flyby of the room. Run up
the steps and pick up the 243 Karat Sapphire
off the pedestal. The door in the east wall opens. Enter the door and run up
the stairs and the level ends.
22-dec-2006