
Revenge of Osiris.
A TRO Online Project.
Authorized Walkthrough D&G Productions.
| 1 Parisian Streets | 9 Kingdom of the Dead |
| 2 The Church | 10 Farplane |
| 3 The Airport | 11 The lost Spirits |
| 4 Back to the Temple | 12 Osiris' Pyramid |
| 5 Lava of the Depths | 13 Secret of the Pyramid |
| 6 Underground Lake | 14 Osiris's Spaceship |
| 7 Castle of Corpus Fatalis | 15 Somewhere in Farplane |
| 8 City of The Priests |
Level 1 - Parisian Streets.
By Thierry Stoorne.
Go ahead to the crossing and turn right, follow E to the steps leading to the lower part of town, Baddies attack from both the left and the right. Try to get some distance between you and them so you can take them out before they start shooting. Head S and around the left corner, in that corner a Baddy starts shooting you from a balcony, jump up and down and take him out. Go to the E and on your right side will be an open gate.
The House 1.
On the square is a pool and a Baddy will open fire from the balcony E, take care of him and shoot one of the smaller windows to get into the house. Go right and into the living room and shoot the painting NE, get Secret #1, a Large Medipack and go to the N, right around the corner and up the stairs. One more Baddy and this one will leave Flares. Shoot the window NW and run out onto the wall. Follow to the W end and jump to that balcony NW where the Baddy was to get the Small Medipack he dropped. Return to the E and when facing the house you can run off the wall into the little alley NE, climb up to the stack of crates and get into the window W. Inside more Baddies, go out to the balcony N after shooting a window and get a Small Medipack. Jump to the balcony NE and then to the wall at the yard N. Take out all resistance and jump to the walkway NE, get over to the ledge N and pull the crate once to get a flyby of the open door below and the place beyond, drop and grab the edge of the ledge, shimmy past the crate so you can push it to the W once to open to a store room below. Drop to the yard below and first enter the store room W which opened up. Get Secret #2, Uzi Ammo, a Large Medipack and Flares.
The Factory Hall 1.
Enter the open door N and come in to a large hall with walkways. Turn around just on the sloped floor and look up S, grab that ledge over the entrance and pull up. Walk to the S and turn around to climb the ladder, head through the passages on the right and climb up to the left or right, there’s a hole in the floor and you can see the hall below. Drop in backwards and grab the edge, shimmy left and drop/grab to the walkway below, pull up there. Turn around and take a running jump with a grab to the lower walkway N, climb the chain NE and turn around so you can back flip over the high fence and land on the small ledge in the NE corner of the hall. Throw the lever there and see a crawlspace open up in the NW corner of the hall. Run-jump with a grab onto the walkway S and from there go to either the ledge down S or with a curve and a grab SW onto the bridge.
Get back upstairs using the ladder on the ledge over the entrance, go N and drop down to the walkway again, run jump with grab onto the lower walkway N and this time climb the chain NW and turn so you can back flip over the high fence and land on the small ledge in the NW corner of the hall.
Run jump with a grab to the walkway on the W wall to throw the lever there, when you walk away from the lever a screen will show a gate opening up somewhere. Jump back to the corner ledge and get into that crawlspace, follow the ducts into the room where that gate opened up. Pick up some Flares and head into the open gate E, shoot the Baddy and in the room with the crates. Push the right crate once, now you can use the lever hidden behind it. A flyby shows the pool in the Factory hall fills up with fresh water.
Get back to the hall and drop into the water below, swim under that central platform you saw in the cut scene; into the hole and follow the tunnel into the sewers. (At this point a door was already open when I checked back in the house, before going into the sewers, so here’s a shortcut to the next level without the Crowbar and you need that in coming levels).
Sewers 1, the Crowbar.
Swim to the W past the floating crate and walk into the tunnel, to the end and follow left around corners to get behind a gate, just left of the gate on the wall is a lever, save there before you pull it to open a Timed Skull door. Turn left from the lever while in the cut scene and sprint to the S end, turn right and sprint to the open door, hit “Alt” to roll through before it closes up. If you happen to fall down into the water below, don’t worry, that’s where you had to go first anyway.
The Block puzzle.
In the upper part of this room are 2 blocks, one N and one W, they have to go one floor down onto the W and E ledge so they can be pushed to trigger tiles. Dive down and find 2 UW levers, one behind the pillar N and one behind the pillar S. 2 Platforms will go up upstairs, get out on the green ledge W. Stand right and face SE a bit. Jump and grab the wall next to the ledge above (the Ivy is climbable) and climb back up to the top of the room. Throw the 2 levers on the central pillar, N+S to raise more platforms. Move both blocks onto the new platforms and throw the N and S levers again to drop the blocks one floor down. Safety drop onto the ledge below and move the blocks into the niches E and W. Now an UW gate opened in the pool, N side.
Swim into that open gate and follow up to a ceiling hatch, open it and climb up into the room above, shoot the box and get the Crowbar. Make your way back to the Block puzzle room and get to the top again. When you climb up to the ledge there will be a lever right in front of you. Pull it to open the Skull door again. Follow the sewers back to where you came in and swim back to the Factory hall. Get out on that central ledge and jump to the ledge SW. Climb back up to the entrance and go out to the yard, go over the wall S and drop into the street.
Go straight W from there and into that alley NW. Open the gate there with the Crowbar and shoot the Dogs. Climb the crate in the corner and jump/grab up to that platform, face N and shoot the box in the crawlspace, for later. First look NE and spot the flat roof, run jump and grab that roof go to the SE corner and do a banana jump around the E wall to the next flat roof, shoot the box and get the Trapdoor’s Key. Drop down to the street and go back to the same alley NW, on the E wall is a keyhole and the trapdoor behind you will open up.
Sewers 2.
Drop in and open the small gate W with the Crowbar. Follow the tunnel, climb up right and go to the end, grab the vegetation and climb up, drop down into the next hole and swim through the narrow gap near the bottom S. Climb out into a small store room, hop onto the crate NE and push the crate in, turn left and push that crate all the way. Pull the first crate back out with you and enter the new opening to the left, find the lever and pull it to open a gate near the house. Swim back through the narrow gap, turn right and open the UW gate (Ctrl).
The House 2, the Door’s Key.
Get out of the pool and into the house, left and up the stairs and go out the window NW, go over the wall to the W. Hop left onto the roof and jump onto the steep part of the roof, grab the edge to shimmy left to that open gate. Go in and left to find a lever on the S wall. The lever will open the door on the first floor of the house (this door was already open when I checked back from the Factory the first time).
Go out and drop to the yard below, get into the house and up stairs, go left where you picked up the Flares before. The bedroom to the N is now open, get in and shoot the painting on the E wall to reveal a passage, climb in and crawl through to drop into a room. Behind the crates in the SW corner is a lever opening up the door to the room on ground floor. Get back. Down the stairs to the street and head NE to the yard, look for that open door in the S wall and drop backwards into the hole in the floor. In the room below are a Large Medipack and the Door’s Key.
Go out of the house and to the street. NE and left into the alley again, up to the platform and remember where you shot that box before (N). Run jump/grab over and get in. In the end you can stand, face W, sidestep right and take one step back to the left. Then stand jump with a right curve so you’ll slide down onto a ledge on the roof and run jump over to that balcony W, get Secret #3, a Large Medipack and drop down to the street. Head N and left into the street there, just past a yellow container is a passage. Follow up and open the door with the Key you have.
Up to the Rooftops.
Shoot the Baddies around the corner and come to the elevator room. Climb onto the higher ledge and follow around to the lever, get back and walk onto the grated floor so the elevator will take you up one floor. Again climb the ledge and throw the lever past the small gate and wait for it to open up, crawl out to the walkway along the street where the level started. Go W and to the right is a closed door, go left and from the end of the walkway a run jump over the fence and grab the edge of the roof S, shimmy left to the corner and pull up, hop to the top of that corner (flat) and get down to the lower part.
Jump up to the flat SE corner and jump to the SE, onto the flatter part of the roof from which you can run jump onto the balcony S. Get Secret #4, the Large Medipack and jump back to the inner side of the roof, from the ledge NW a jump back to the walkway N. Head E and look for the place where you can jump from the corner of the walkway to the building SE, grab the edge of the flat corner and hop up to the top (it is a hard jump to that corner, you have to try if you want the Secret). On the lower inner roof is Secret #5, a Small Medipack.
Another Door’s Key.
To get back to the walkway N without going all the way over the streets, hop onto the ledge SW, get onto the corner of the higher roof and side jump S, grab the roof, shimmy to the corner and from the flat part there you can jump to the balcony W. You have to land on the lower one so just before Lara hits her head do a grab and she will just slide under the higher balcony onto the lower. Jump to the roof W and make your way over the roof to the N walkway again. Make your way around the corner E and from the crate you can jump to the walkway N. Get into the room there and follow in to a long hallway with Baddies, in the end to the left is a small store room with a Large Medipack and another Door’s Key under the boxes.
The Trapdoor’s Key 2.
Go back out to the walkway and save before you do a right curved run jump from the walkway onto the crate. You now have to go get another Key and that is where you went up with the elevator before, so get back down to the street (I just dropped from the crate) and go down that ramp NE to the lower part of town, left and left again, into the building at the yellow container and when you get to the elevator you can see a hole in the floor SE. Drop in and follow to a ladder, go up to a crawlspace and follow to a storeroom. A box is hiding the Trapdoor’s Key 2. Look up in the ceiling and get on the low crate to grab up into the duct, follow and drop down onto the elevator, get up onto the ledge and go around to the small window to drop out onto the walkway.
Head W and go right, open the door and follow down to where you can use the Trapdoor’s Key. Drop down into the water and swim to an UW gate, open it and follow the tunnel to where you climb out at the Church.
Level 2 – The Church.
By Rapetou.
Find a Torch.
Watch the flyby and follow to the Churchyard, go left for some Flares and shoot the Dog, some “Priests” will open fire so deal with them too. Go around the Church and near the back wall are those flowerbeds you saw in the flyby, the S side one has the Torch hidden between the plants. You can get it now, if you want to get back out with the Torch, just side jump back over the fence.
Into the Crypts.
Now look in the other flowerbed and if you light a flare you can see a darker part at the bottom of the S wall, hop over the fence with the Torch and leave the Torch in a safe spot. Shoot that dark wall and throw the Torch down the hole from standing back a bit. Crawl in backwards, leave the Torch in a safe spot and open the door. In the small crypt is an altar SE you can pull out of the way, go around it and find another crawlspace, follow straight to a pool and climb in backwards. Swim down in the opening below and get a Small Medipack. Swim out and across the room. Climb onto the submerged ledge and hear a danger sound, just pull up in the passage and immediately hop back, move forward and stand motionless while the Boulder passes over Lara’s head.
Climb up into the passage again and turn around on the edge, stand jump and grab the monkey swing to get to that Jump lever across the pool. Using the lever will set one of the crosses on fire, get back to that room with the crosses and use the Torch (light it on the burning one) to burn the smoking cross. One of the big doors on the Churchyard will open up.
The Bike.
Leave the Torch as there’s no way to take it with you and get back up to the Churchyard and the open gate. Go down the ramp into the Garage. Hell breaks loose as a bunch of “Priests” attack, a Dog will also join in. After the fight you’ll find Shotgun Ammo, a Large Medipack and Flares lying around. Go to the N side of the room and find a ramp going into the next room, turn around, stand at the edge of the ramp and back flip. Then jump and grab the Jump lever over the opening, a gate opens up S and the Bike will be available now. Go to the Bike and if you want you better save before going in (so you can watch the route again) and a flyby will show the hard route through a passage with Sentry-guns.
A Hellish Bike ride.
Ride the Bike to that passage with the ramp N, line up and back up the bike a little bit. Then check your health, save and go up the ramp to take the first jump, you may have to hit the brake after the jump to get around the right corner and up the next ramp. Here (on top of the Priest) I took a medipack and saved. The next part is even harder, you have to maintain speed going sharp around the corner because there’s a nasty slope ahead with an even worse jump. Better hit the brakes as soon as you are on the downward slope so you can go around the next corner without falling off the ledge. Stop at the door and leave the Bike for now.
The 1st Pyramidal Key.
Get the Shotgun Ammo and a Small Medipack from the shrine next to the door and go through the door, shoot the Priest and his Dog. Open another door and follow the steps up to the next door. And while going down shoot the window and follow to the grated floor with all the Dogs, a Boulder will come from behind so get out of the way while shooting the Dogs. Climb the waterfall (you may have to jump up there from an angle) and get the Pyramidal Key from the shrine. Now shoot that shrine left of the pickup and find a Jump lever behind it, throw the lever and see a door open up in the pit where you drove the Bike. Another Priest shows up, so deal with him and get his Uzi Ammo. (If you got the bright idea to try and take the Bike up here to get rid of the Enemies, you’ll find it impossible, because the Skull tile just inside the passage where you left the Bike will split you in two)
Get back down all the steps to where you left the Bike. Don’t use it yet but go on foot to the first corner (NW just past the waterfall), you may have seen that trapdoor there… It’s lowered now so climb down the ladder on the pillar and run through the water. Hug the right hand wall to stay out of range of the first gun, go right around the corner and come to a little ramp. Stay close to the wall and hop onto the ramp, look up and spot the opened door above, climb into the passage and follow to a pit where Secret #1 sounds. Look across the pit and shoot that fuel can, it will destroy the Guns and you will have a (much) easier task later. Climb down into the pit and get Flares, Revolver Ammo and a Large Medipack as your reward. Go back to the big pit and follow to the S end. Look up N there and spot another ladder go up to the top and two steps down, now back flip/roll and grab the Jump lever there to open a door to a ramp. Now make your way back to the Bike.
Bike Jump Back.
Well if you thought getting here was hard, try the next jump… The only way back is with the Bike, have a look near that first ramp and spot the open door in the left hand wall, that’s where you have to jump in with the Bike. The passage is deadly if you try to go in without the Bike.
What I did was (and it’s not that bad once you know how) line the Bike up facing the ramp and standing on the left side of the ramp *screenshot*. Back up as far as possible, even with the hind wheel over the edge and save. (You could also decide to run it around the corner for more speed, but I didn’t need to do that)
Drive up the ramp (left side) with the sidecar almost falling off and as soon as you reach the top turn left aiming for the left side of the opening. If you happen to get inside, don’t save but keep going because Spikes will pop up behind the Bike, so go through the lower part, turn right at the end and up the slope keeping up the speed, you’ll jump out of the tunnel where the gate opened up before.
You’ll end up back on that nasty ramps with the Sentry Gun. Go over the top of the next ramp and watch the health, just on/around the next corner you can now safely stop (Gun is gone) and step off the Bike as you’ll have to do the next jump without the Bike *screenshot*. Run to the end of the ramp and jump to grab the top of the ramp going back into the room where the Priests were.
Dark Caves.
When you slide down into the room where those Priests were before, go into the SW corner and you can open the other big gate on the Churchyard by using the Jump lever in that corner, just to the right of the room where the Bike was. Go back to the Churchyard over the ramp E and find the open gate S. Down the slopes into a dark cave, head SW and crawl into the part where the ceiling hangs low, go for the W wall there and look with a flare or the Binocs to spot another breakable part of wall. Shoot it and crawl into the next cave.
The 2nd Pyramidal Key.
Head to the N side and somewhere in the middle is a breakable wall, shoot it and get up the ladder you’ll find inside. Into the crawlspace and shoot the 2 Midgets while following the crawlspace to where you can drop down to a place with a shrine, get the 2nd Pyramidal Key and just go down the slide. You’ll land in that pool where you triggered the Boulder before, just swim across and go through the crawlspace to the small room, go back up to the Churchyard and use the 2 Keys in the front of the Church (E) to open the door.
The Church.
Go left after the flyby and get a Small Medipack from the shrine left, then step into the water and shoot the Priest, follow the N wall of the Church with a flare in hand so you will spot the darker floor tile, it is a trapdoor and you can open it facing N. Dive in and in the NE corner is an UW ceiling lever, pull it facing S and get some air before swimming down the opened tunnel. Follow through to a flooded Church hall. Go left around the corner and up for air in a vent NW. Now swim to the opposite side NE and throw the UW ceiling lever and get a screen of the other Church hall, get to the next UW ceiling lever in the SE corner and this way flood the other Church hall. Get some air and swim back there.
Because the water level rose you can now get to the platform E where the Dog is (or was if you already got a chance to shoot it), Get up and shoot that Dog, jump to the N - or SW and throw a Jump lever, do a “banana” jump around the pillar to the W and throw Jump lever #2. get to the other side of the hall and do the same to use the 2 Jump levers there (you can also make use of the windowsill W to get to the other side, saves you a banana jump). A gate opens in the submerged hall, so swim back through the tunnels and go into the open gate W. Throw an UW ceiling lever and a trapdoor now opens on top of the ladder on the platform E in the other hall. Swim back again, up on the platform E and climb to the top of the ladder. There’s another Jump lever on the N wall, this one will light a wall torch W and now there’s one more Jump lever to go. Its located on the S side ledge facing E. Blue rays will activate on the ledge W. get over there and the level will change.
Roof of the Church, the 3rd Pyramidal Key.
Go over to the other side where the burning cross is and shoot it. Now you’ll see those big gates open up in the submerged hall. Look for the 3rd Pyramidal Key where the cross was and turn around facing W, hop backwards and grab the edge of the roof. Climb down to the arch over the Church entrance and slide grab the edge of it, shimmy left till you are over the Pyramidal Key below and pull up, back flip/roll and grab the wall. Pull up to get the Large Medipack and a box of Revolver Ammo as Secret #2, on the wall N are some Grenades, you’ll see the trapdoor on the Churchyard has opened up. So drop from the wall and get to that trapdoor N of the Church.
Back on “save” ground.
Follow through and end up on the Graveyard, there’s a gate with a Revolver behind it but it seems to be a red herring as there’s no way to open the gate. Just go for the fenced off hole in the ground and hop into the water. Now you’re back in the submerged hall, swim E through those open gates and walk up the passage. Get into the crawlspace right and follow in to a Store room.
Dogs attack and also 2 Priests will open fire. Only one will drop something, a Small Medipack. Go into the NW corner and get a Pyramidal Key from the shelf, go to the stack of crates SW and find the second Pyramidal Key on top. A Priest comes running in, but if you ignore him he won’t bother you. There’s one more pickup in the room and that is another Small Medipack on the middle shelf NE.
Now you can open the door E with the 2 Keys and enter to open the next door with the 3rd Key. Go into the Subway Station and into the car N, get the Uzi Ammo and visit the S side car to get the Shotgun Ammo. A door opens up and Priests come in, the level changes.
Level 3 - The Airport.
By Leeloo.
A complex level where you can take several routes; follow me and find it all.
Get out of the train and a Dog will come running into the station, shoot him and his Master. Go into the N side car and find the Small Medipack in the NE corner. Go out and hop over the closed fences to the passage S. Follow the corridors up escalators to the ground floor Main entrance of the Airport. SE on the ground floor you’ll find a coffee shop with a passenger asleep. Head N from there and to the right are automatic doors where you can go out later.
Lufthansa, the Rent-a-Car Key.
First go N and to the Lufthansa Counter. In the counter itself is nothing to be found, so open the glass office door N and go in to find the Rent-a-Car Key in the cabinet on the left (stand a bit away from the cabinet before you hit Ctrl). When you go out of the office a Baddy will attack. There are so many of them I stop mentioning them unless they drop something.
Go to the W wall near the Lufthansa Counter and open a small door, go in and left to open the next door, here you’ll need a Key later.
Arrivals, the Lockers Key.
Now go W from the little door and to the left are double doors, open them and go into a large Arrivals hall where you will find the KLM luggage belt in the N. There are 2 shelves NW, the right hand one has a Small Medipack, head into the far SE corner and crawl into the luggage conveyor, go left and then right to find the Lockers Key. Go back out to the hall and over to the KLM belt N, shoot the box standing in the opening of the belt in the wall and crawl in, follow into the next hall. SE are double doors providing a shortcut back to the Main entrance of the Airport. The shelves are empty so head over to the N and into the passage up to a walkway, left and get the Uzi Ammo, return downstairs and go through those double doors SE. left and right into that small door, open the door there with the Lockers Key.
The Lockers, the Subway Access Key.
Inside are shelves, you’ll find Flares, Revolver Ammo, a Small Medipack and the Subway Access Key.
Go back out and to the Main entrance E, go S a bit to the big automatic doors and go outside. When you cross the street straight you will bump into the Metro building, go left and find the Car Rental.
Rent-a-Car, an Access Card.
Open the door and go in, hop behind the left (NW) counter and open the double doors, in the file cabinet is an Access Card. Couldn’t find anything else here so go out and right, back into the Main entrance of the Airport. Straight to that escalator going up left to the first floor.
Main entrance, first floor.
SE is Air France, couldn’t find anything there, so head to the W and left into the Tobacco Shop.
Tobacco shop, 1 Euro.
Look in the drawer under the cash register and find 1 Euro.
Air France, the Orly Hotel Reservation Key.
Go out again and head N, on the right hand will be another Air France Counter, open the glass door behind it and in front of the window of that office is a dark spot in the floor (light a flare). Face N and open that trapdoor, go in and get Secret #1, the Orly Hotel Reservation Key.
Go out and right to get behind the Alitalia Counter.
Alitalia, the Vending Machines.
Get the 2x Uzi Ammo from the file cabinet and then use that Euro you have on the vending machine, you’ll see another vending machine go down somewhere.
CD Piece#1.
Go out and right, into the NE corner and find the door you can open with the Lockers Key, inside is some Revolver Ammo and you can also find the CD Piece#1 on the middle shelves.
Security Checkpoint, the Uzis.
Head W and to the right, through the Security Checkpoint and into the departure lounge. To the left (SW) is a door you can open with that Access Card, get in and follow to another door into the Security Checkpoint, open the next door and open the file cabinet to get the Uzis, look for a kick in wall NW and get into that crawlspace. Get Secret #2, Grenade Ammo there. When you crawl back out make a note of that Terminal on the E wall of the room. Make your way back out and head S through the Checkpoint, straight into the Cafeteria.
The Ducts, the CD Circuit Breaker.
Head into the Cafeteria and look up on the ceiling and see a grating you can shoot. Jump up and get into the ventilation duct, go left and into a glass display with plants to get the Shotgun Ammo there, get back in the duct and follow all the way past the steam vents to where you climb down into a small bar, that’s where that vending machine went down. Climb up right and get the CD Circuit Breaker. Climb back down and open the double doors S to get back out, you’re back at the Tobacco Shop. Go left and down the escalators, get out of the Main hall and cross the street to the SE.
Hotel Orly (bonus).
Open the door and get in to check out the drawers in the counter for 2x Uzi Ammo and 2 Large Medipacks, go upstairs and find more Uzi Ammo in the cabinet. Go down again and out to the street, head SW where you can go down into the Metro.
Metro Station, CD Piece#2.
Go to the toilets in the NW corner, hit Ctrl to push the doors open and enter. Open the second toilet and find a Small Medipack in front of the toilet bowl. Turn right (E) and hit Ctrl so Lara will kick in the bottom part of the wall. Crawl in and follow to a small room, you can shoot the boxes, but there’s nothing in them. Use the CD Circuit Breaker in the machine NW and then open the door E. Go onto the tracks and right, left to the train waiting there and go through the train, go right and over those closed gates. Find the stairs NE and go up to find CD Piece #2 near the closed fence. Head back all the way to the Airport building and enter the Main entrance. (Nice shortcut: while on the tracks, crawl under the train S and stand, then jump up and you are in the first train, go up the escalator)
Airport Departures.
Go up the escalator to the first floor and head all the way N to the Departures, go through the Security Checkpoint and left around the corner, through the doors and into the room where you found the Secret before. Combine the CD pieces and use them in the terminal on the E wall. A door opens N of the departure hall, go out of here and into that door, straight in front and on the floor is an Access Card, turn around and go right around corners into the short passage to use the Card. The next door will open up, go out to the hall, turn right and go through the tunnel to the waiting Chopper.
Level 4 – Back to the Temple.
By Thierry Stoorne.
Lara slides down into an excavation site. A Thug will open fire, after dealing with him you can use a crate NE to run jump onto the hill he was on, so you can get the Uzi Ammo he dropped. More Uzi Ammo is found on a crate NW. Then head S and into a room with a push block SE. pull/push it onto that sandy spot in the middle of the room and another block lowers. Use the lever there and blocks raise S, climb up into a tunnel above.
The 2 Pyramidal Keys.
After the flyby you can drop down into the top of a huge excavation site, shoot some thugs and get a Small Medipack, notice that building with the gate where 2 Pyramidal Keys are needed. Go to the S wall there, climb up and shoot a Thug standing on a ledge below. Then safety drop down to a ledge below and jump over to where the Thug was, get the Uzi Ammo dropped by the guy and climb down the ladder W. Go E through the opening in the wall and down onto the floor there. Look for the Jump lever in the SW corner and pull it to open an UW gate in the pool way below. Jump in the hole in the wall E, down on the other side and find the ladder to the left. Use it or just let go and fall into the water.
The 1st Pyramidal Key.
Gather all Uzi Ammo lying around and go for that open gate SW. Swim through the tunnel to the other end of the room and climb out onto a ledge in the big room. Face N and drop backwards and grab the ledge, shimmy all the way left to the other corner and pull up. Find the Jump lever E and jump to use it. A trapdoor opens up somewhere. Swim to that roof like thing on the middle of the E wall and go over the crate into a tunnel, up one floor and face S, there’s a room with a Boulder. Go in and find the 1st Pyramidal Key on a ledge under the Boulder. Face E or W and save right on top of the Key, grab it and immediately swim forward and away from the incoming Boulder.
The 2nd Pyramidal Key.
Swim back out and down to swim back to the pool for some air. Get back into the tunnel and swim up through the trapdoor, up 2 floors this time and into the tunnel N, follow to a room and climb the blocks to get into the opening in the ceiling facing N. Climb the wall in front of you (N) and go jump to the ledge N, keep on climbing to the ledge where you can see a dark brown rock ledge down NW. Jump to it and look for a red ramp down N, hop onto that ramp and drop from the NW corner down to a pillar with the 2nd Pyramidal Key. Drop from the pillar, go up the ladder S and over the roof to the floor S, left over the crate and grab up to the climb-wall again, go on climbing up N till you are on the highest ledge, run jump straight W to grab onto the brown ledge under the ladder and run jump S from there. Follow the ledges to the far SE corner and get Secret #1, Shotgun Ammo.
Return the way you came and run jump over the last steep part to the ledge under the ladder. Climb the ladder and go straight W, to open the gate in the building to the left with the 2 Keys you have.
Down into the Temple.
Go in and just run off the floor, slide and fall into a pool, climb out and shoot the vase SW for some Uzi Ammo. Dive back into the pool after noticing the 4 big doors in this room, find the narrow gap (crack) in the N side of the pool and get a lung full of air before attempting to get in. Best is to come swimming from far away and aim straight for the gap, ignore the Medipack for now and swim to the end.
The Receptacle Room.
Climb up into a room with 4 coloured shrines (receptacles) and a lever. Throw the lever to open the first set of doors back at the pool room. Dive back into the water, get that Large Medipack now and swim back to the pool room
W Side Doors, the Stone of Atum and the Bronze Key.
Enter the open doors and jump over the ledges to the vases W. Shoot both vases and stand facing the gates that are holding the Keys. Back off the ledge and hang on the ladder, back flip/roll and slide jump to the ledge E, shoot the 2 vases there and a gate opens up N. Inside that passage is another vase and this one will be a bit harder to shoot. Walk to the SW tip of this floor so you stand between the pillar and that slanted block, face SW and stand jump *guns drawn* onto the middle of the slanted block on S wall, jump again *guns blazing* and you’ll end up on the next block facing the gate and the vase and if you are on the right spot the vase will break, opening up those gates up W. Keep jumping the blocks and steer left to get back to the safe floor.
Go stand on the NW tip of the floor and run jump to the far end of the slanted block under the N gate, do a roll in mid air and jump from the block to the next, jump again and grab the ladder to climb back up. Grab the Stone of Atum and save before grabbing the Bronze Key. Run N and jump to the ledge NE. A running jump with a right curve brings you back on the ledge to the big doors, run straight into the pool and swim into the gap N, go to the Receptacle Room.
Put the Stone of Atum in the pinkish shrine left and the next set of doors open up. Swim back to the poolroom.
E Side Doors, the Golden Key.
Follow the passage and at the bottom of the steps you can see 2 vases in alcoves up in the wall, climb the N wall, shoot the vase and run jump over to get Secret #2, Uzi Ammo. Drop down and go E to come to a kind of Library, go right where possible and end up at a ladder, go up and into the passage E. Open a set of blue doors left and the gate drops shut behind you. Open the next doors and go left into the passage at the Blade, throw the lever and go to the N, right at the next Blade and throw lever #2. A bookcase opens up back in the first room S, so go back past the Blades and left to find lever#3. Go back N again through the Blades and enter the next corridor. Mysterious music…
Boulder Traps.
Go up and walk straight up along the right hand side of the hole in the floor, as soon as the Boulders fall, be ready to run right when that Boulder passed. Go up into the next narrow passage and just sprint up to get past the next Boulder before it drops. Follow the passage up to a flooded corridor, don’t go into the water just yet but go around the wall W and use the Jump lever on the wall (E) to open a gate to the Torch.
The Torch.
Go back into that passage N and look up where that last Boulder came from. Jump into that upper passage and get the Torch. Return to the place where you just pulled the Jump lever and head E, wade through the water and get into the treasury rooms, left on the pile of gold you can light your Torch, light the others 3 wall torches and a gate opens up E. Get up there and drop the Torch left or right on a safe place.
Optional: The Secret #3 Challenge.
Save before going in, because you will have limited time to gather all things before the pool turns deadly. You can decide what you find important enough to pick up… If you are too greedy you won’t make it in time.
My route was a run jump straight in to get the Small Medipack, turn SE to the Uzi Ammo over there, E for the Revolver Ammo. Turn left to the Large Medipack and turn W before you take that. A cut scene shows a flame in the passage E heading for the pool, so as soon as you can wade back to the W and up into the safe passage.
Get the Torch and go E to find another wall torch you can light left of the crate. A cut scene shows a gate back in the Library so take the Torch with you when you head back through the Boulder traps and through the Blades to the first room, light the wall torch and the gate to the Golden Key opens up. Leave the torch and grab the Key and go back W over the top of the Library and down to go through that long corridor back to the poolroom.
S Side Doors, the Stone of Maat.
Use the Bronze Key right and the Golden Key left to open the big doors. Step out onto the bridge you saw earlier, shoot the vases (just for fun) and get the Uzi ammo under the last vase left, then approach the next set of doors.
The Fountain Room.
When they open up a bunch of Thugs will come for you. Shoot them and one will drop a Pyramidal Key. Use that on the doors E and go inside to get the Stone of Maat. You’ll see a hatch open up in the room where you got the first Pyramidal Key.
More Bronze- and Golden Keys.
Go out and to the bridge, jump over the railing and swim into the opening in the E wall, through the gap and up one floor, into the tunnel S and up over that Boulder, climb out into the room. Get up on one of the ledges N and turn to jump/grab the ladder. Go up and through the passage, take a left and to a lever opening up a trapdoor, turn around and go left everywhere to get to the trapdoor, drop down and get both the Bronze and Golden Keys. Drop from the platform and sprint through the N doors, over the bridge and straight into the pool.
The Fountain Room, the Stones of Re and Khepri.
Go back S and over the bridge to the Fountain room, open the doors W with the Bronze Key and get the Stone of Re inside. Go out and open the doors S with the Golden Key, get the Stone of Khepri. Now you have them all. Head back to the N over the bridge and into the pool, swim into the gap N and go place the remaining 3 Stones in the shrines. Swim back to the pool and climb out, head into the newly opened doors N and go straight over the next yard to the hole in the ground, slide down into the next level.
Next are 3 Combined Levels.
Level 5 – Lava of the Depths.
By Thibault (TC14).
Lara slides into a hall with a large lava pool; the bridge is a no go. Just do a run jump in the direction of the bridge so when it breaks you will end up on a ledge below. Jump NW and throw the lever, jump back and run jump SE, then around the corner of the wall into the opening. Go down into the next room and to the gate W that will open up, follow the passage to the next challenge.
Grab the monkey swing and go over to that little balcony. Face the pool and run jump/grab to that red block. Pull up over the top and jump the slanted blocks till you can grab the ladder. Go left around the corner and from about one block from the lava a back flip/roll/grab to a crack in the red rock. Shimmy left around the corner and from that ledge a stand jump around the SW corner to land on a slanted block, jump twice and grab the ladder wall. Go climb right around 2 corners and back flip to a ledge.
Go into the opening and follow to a pit with a burner (lots of wall torches here by the way). Run jump/grab across and jump past the next burner too. At the end of the tunnel you’ll get a flyby of a monkey swing leading to a lava chamber. Run jump over the lava flow and enter the tunnel there.
Boulders.
Stand in the opening to the next room and shoot the Harpy first. Then look for the ledge left of that pillar. Take about 2 steps back and hop back, run jump to the ledge, landing left a bit, take a running jump with a right curve to the next ledge and immediately jump/grab to the higher block with the plants E while Boulders go down all around you. Run jump/grab with a curve to that block NE and pull up, get into the opening E. Come into a room where a Demigod will attack, run to him, duck close by and shoot him with pistols.
Look S to spot the burning lever and go into the passage NE where the Demigod came out off. Follow to a room with a statue, pull/push that onto the trigger tile in the NE corner and return to the lever in the room where the Demigod was and throw the lever to open the trapdoor in the room with the statue. So go back again and save at the trapdoor as there’s a Boulder hanging up in the ceiling.
Break Ledge Frenzy.
Face N and hop back in the hole, slide while the Boulder takes off. When you hit the breakable platform. Side jump right to the next, turn right a bit and stand jump to the third a running jump straight to #4 and a stand jump left a bit to #5, stand jump to the next, landing on the left side and run jump turning right to the last, landing on the right hand side so you can side jump left onto “safe” ground. Immediately get away from the lava pool while drawing a gun as a Beast attacks. Then follow the passage around to where you have to jump out right to the floor where another Beast awaits. Go NW and hop to the brick floor. Jump W again to a red ledge and then SW to the floor with the chairs. Stand on the SW corner and run jump over the fence to the low brown ledge in the lava. Shoot the vase W and jump there to get the Small Medipack. Jump back and to the floor S.
Go SE, throw the lever to lower a block in the S part of the cave and go in that direction. Run jump to that grey ledge under the monkey swing and run jump to the ledge with the lever SE, throw the lever and see a lever with a flame. Turn W and jump/grab the monkey swing, go with a circle back to where you’ll drop onto the grey ledge and run jump back to the red rocks NE. Notice the door left on the black rock and make your way back to those brick floors, the one with the chairs and then E to the next. Jump to the red floor and head S there to find that lever (where the flame extinguished) in the SW corner. That door on the black rock will open up. Head all the way back and jump/grab to that black rock, shimmy left against the door and pull up over, slide far and jump left to (grab) the rock with Secret #1, Revolver Ammo. Face N and slide to jump to the ledge ahead, run jump N and get up the ladder.
When you see the grey floor you can back flip, head NE and find a Small Medipack under a vase, then throw the lever there to raise a block SE (and open a gate). Head around to the SE corner of the cave, hop over the right hand fence onto a lower brick ledge, get Secret #2, Shotgun Ammo and drop from the ledge to the ground below. Make your way back up to the bridge above over that slanted black rock, up that ladder and back flip. Go SE again and climb the blocks there. Run jump to the one in the lava flow. Jump/grab to the ladder wall and go right to the ledge with the lever. Throw it and watch all those Boulders do their thing. Go back using the ladder wall and go as low as possible at the end, back flip/roll with a right curve to land back on the grey ledge. Make your way back to the blocks SE and over the bridge to the NE corner where the gate opened (with a little health loss you can also stand jump NW from the grey ledge in the direction of the open gate).
Climb in and your back near the start of the level in that little hall with the 2 gates, the one E is now open. Go in and follow to another lava flow, a burner is making things hard, you have to stand left and run jump (no Ctrl) onto the red ledge at the door NE. Grab the monkey swing and follow to a ledge, drop and hop to the W, then from the last you have to run with a right curve and jump with a grab into the opening N. Throw the lever to open that door back there. Go back over the ledges and the monkey swing and enter.
Bouldertrap.
Watch out there’s a Boulder, turn around before going around the corner, face SW and hop backwards so you will just touch the floor around the corner, immediately run back through the corner before the Boulder flattens you. The rest is easy, just slide down and end up in a corridor with torches. Go straight N and climb the block in the room with the Statues, finally some heavier equipment, the Shotgun with 3x Ammo. Notice the door between the statues and head back, go left (E) where you came down before and come to an enormous room. Go right around the huge pillar and straight E, over some blocks and a lava flow.
The Block Puzzle.
There is a puzzle floor with 4 Symbol tiles and around the room are 4 doors including the one near the statues you saw before. The push block has to be pushed on those tiles to open the doors. Looks like this is a good route but you can also do it your own way…
1 Pushblock SE (feathers), Statue Puzzle & Priest Artefact.
Head back into the corridor W and enter the door between the statues. In the next room a big white Mutant runs around, I just ignored it and hopped over the fence to the Statue Puzzle. The statues have to go around that tile in the middle of the floor, all facing each other so they can have a nice chat and the door W will open up (if it doesn’t open right away, it could be you moved a statue on it’s right spot and then off again, just pull it off it’s spot and back on again to reactivate the trigger). Go into the open door and into an opening W, up the stairs, another Mutant appears, I just ran past it into the next room, jump down to the balcony. Across the room is where you have to go and there are invisible ledges over those whitish objects on the floor below, so just walk straight first, then jump SE, a run jump/grab S and a run jump/grab SW, hop over the fence and get the Priest Artefact.
Make your way back to that big room with the block puzzle to open the next door.
2 Pushblock SW (beetle), the Statuette.
The opened door is in the NW of the room. Follow in to a lava flow and use the monkey swing to get across. Go W and jump to the block, jump the wooden platforms up to a block and shoot that Harpy when it gets too close. Jump SW into the opening in the wall and follow to the next flow, run jump out with a right curve and stand left on the ledge, run jump past the Blades when you get the chance and go on to that ladder wall, climb left to the Zip line.
Ride it to the end and turn right, jump W and right around the corner, grab the crack in the wall and shimmy left till you can pull up in a crawlspace. Climb the ladder almost to the top and back flip off, go up to the pedestal with the Statuette.
Shoot another Harpy and go down the steps to the S side if you want the faster way down (this is the place opposite the start of the level). Go to the SE corner and run jump over the railing to that grated tile down in the lava. Run jump with a left curve and grab to the ledge at the Zip line and then jump to the ledge NE, into the opening NE and over the ledges, past the Blades into the opening NE. Out to the block and down the wooden platforms, onto the ledge NE and use the monkey swing to get back across to the Main room with the Block puzzle. Go to the Puzzle floor and lets take the Eye symbol next.
Pushblock NE (eye), Lava Chambers & the Water Disk.
The door is located in the SE of the room. Enter and shoot the vase E so you can use the lever behind it to open the door left of it (for later). Get up the ladder S and enter the passage S. Jump over the burner pits and throw a lever in the end to open a gate back at the ladder. Return N and jump over the ladder hole to the crawlspace N. Now you are one floor up in the Puzzle room, head N to the end of the ledges and spot the Zip line NW. Look over the right hand side of the ledge and spot Secret #3, Revolver Ammo on the ledge on the pillar, jump down to get it. Drop to the ground and get back up to the ledges through that door SE and up the ladder S. Through the crawlspace N and over the ledges to where you left off. Run jump/grab the ladder wall N and go left around the corner, go up till you’re able to back flip to that ledge under the Zip line.
Zipline, going down…
Save and grab it, go down into a Lava tunnel and wait till you’re just past the lava falls, steer hard right when Lara falls and land safely on a floor next to the lava pool. Jump with a grab to the ledge SE and then to the higher one under the monkey swing, first run jump/grab into the opening NE and get the Small Medipack. Go on and you can shoot those guys, but you can also outrun them and just get to that lever between the statues N. Throw it to open a gate and sprint back to the SE, jump to the block under the monkey swing (from about a step back from the end or you’ll go too far)
Grab that monkey swing and go N, then to the one W and finally into the opening to come to the gate you opened, shoot this Mutant and follow the passage to a lava flow. Jump across and climb the blocks, run pass two emitters and you’ll end up in that pit under the Zip line you fell in before. Run jump/grab across and climb the wall, climb the yellow wall to the right and go up till you come to where that sound came from.
Moving Pillars.
Run left into the room, then stand jump NE and run to the corner. Turn and jump to that block with the pedestal on top. Climb it and get the Water Disk, get down on the other side of the block and run jump past the next Moving pillar. Get onto the block and pull up onto the slide back into the room where the Block puzzle is. Head back to the Eye door in the S wall and go into that gate E (you may have to use the lever again), Inside is a Golden Altar, step in front of it and combine the Statuette with the Water Disk and place the Water Goddess in the Altar. Go back out to the hall W and find the trapdoor under the ladder S open. Go down the ladder and follow the tunnels to where the level changes…
Level 6 - The Underground Lake.
by TimJ.
Go on and turn right at the crossing, climb up and follow the tunnels to a room with a pool, go to that wide passage W, just around the pool, shoot the vases to make some room.
The 3 Block Puzzle.
You’ll come to the main room of the 3 Block Puzzle. Go to the right side of the fence and crawl pass that bench to get the Revolver ammo. Drop down one floor though the opening in the middle of the room and notice the lower part of the room is flooded. Go to find the first push block E and push that onto that wooden trapdoor near the E wall. Walk into the NE corner and light a flare to spot a crack in the wall (facing W), inside is a vase, shoot that and hear a gate open up. Go to the middle ledge of the room and find the opened gate N, go in and get Secret #1, Grenades.
Go out and straight to that lever S, use it to raise a block on the W ledge of the room. Go to the ledge W and move the push block (SW) to that wooden trapdoor. Dive into the water below and swim into the NW corner, face S behind the plants and find an UW lever to open the first of the trapdoors. Then swim to a push block in the middle and find an UW ceiling lever on the S wall to open the other trapdoor (It is on the brick beam over the push block). Both blocks are on the lower floor now. Climb out of the water onto the W ledge, on the W ledge is that raised block., throw it (you might need to throw it twice as long as you see water in the cut scene) and go back to the main room.
Get up on the block and climb back up to the upper floor. Go E and left into the N passage, find the passage to the right and go in to use the Floodswitch to drain the lower part of the Main room. Get out and run to the other side, into the S passage of the upper floor, go down the ladder in the passage on the left. Turn around and push the block out of the passage, go back up the ladder and a Knight appears, this one you can shoot if you like.
Make your way back down to the middle level of the main room and on the central ledge S is the push block you just pushed out of the passage, move that to the N and onto the trapdoor in the middle of the room. The trapdoor opens and the block will fall down. Drop down to the lower floor and go into the opening N of that push block, throw the lever and a block lowers in the S wall.
Move the E push block under a blue tile on the ceiling (NE) and the W side block to the blue tile on the ceiling SW, now the block in the middle of the room lowered. Move the push block into the alcove S and you’ll get a screenshot of a lever. (whatever you do, don’t use the lever N again as this passage where you just put the block in has to stay open to provide a shortcut.)
Turn around, walk out and turn right to go back up (use the ladder S wall close to where you are) and go up to the upper floor by climbing the block W. Go back E to the room with the pool where you came in before, into the passage E of the pool and follow back through the red tunnel to the crossing, go straight S and crawl through the low part. You will come to a lake. Dive in and swim down in the SE corner with a flare in hand, find an UW lever in a niche on the S wall. Throw it and go back up for air. Swim down to the tunnel SW and follow in going right till you meet a Croc, just dodge it (or lure it back to the surface of the lake and shoot it). Swim into the opening left and into an up sloped tunnel, find the UW lever on the S wall, just right of those trapdoors. Throw it and swim back to the surface of the Lake. Climb out W and go into the building. To the left a gate opened up, go in and come to the Castle.
The Castle.
The camera changes, turn right and go past the front of the structure to the W, there’s a stepped wall you can climb up to the first floor N. When you go N you’ll come to the room of which you got a screenshot before, on top of the block you see to the right of the lever is the Ol’ push block you pushed last, throw the lever and the block will lower, pull the block out and move it onto the tile E. Go back S and to the lower level of the castle, go in N and to the NW corner. Light a flare and find the lever on the E wall, when you use it your push block will go up. So make your way back up to that push block and move it onto the blue tile NE to see a gate open up.
Now that shortcut will come in handy, go through the opening N where you pulled the block out just now and make your way back up to the top of the push block room, go E to the room with the pool and turn right there, go into the room in the SW corner and spot the gate NW. That’s where you have to go in a Timed Run in a bit, so remember the route you take now… and don’t forget to shoot the vases standing near the pool!
The Timed Run for the Red Gate.
Go back to the poolroom, go N and left into the gate you opened before. Follow the passage, over some fallen pillars, get some Uzi Ammo and come to a lever near that blue grating you probably saw before. Save in front of the lever. Pull and back flip/roll sprint back through the passages to the poolroom, into the SW corner and into the hopefully still open gate. Stop right inside and save, there is a breakable floor inside! Go to the lever along the left side and throw the lever, another gate opens up.
For the Priest Artefact.
Go back over the remaining tiles and return to the Timed Run passage you just came from (N of the pool). The open gate is in the NW corner of the first passage; go in and up the steps.
Just before you reach the Priest Artefact, a gate drops and you can’t reach it. There’s a gate N and a lever S, use that one and return down the steps and go to the pool room, a cut scene will show a Knight took the Artefact and that N gate opened, but you can’t go back as the gate behind you closed up. But another gate opened at the Castle, so head to the W through the wide passage, go down to the lower level of the Block Puzzle room and through the shortcut S. Go straight and down to the lower level of the castle, head E and climb the walls to the first floor there, go N and up the E walls (NE) to the top level. Go over to that open gate in the middle of the N wall.
Fight a Knight.
Go down to a cave and a flyby shows that Knight that took the Artefact, jump to the middle of the cave and try to stay on the N side of the ground so you’ll have some room to move, best is to hop back turning right, you will be on the sword’s side, but he will be hurt the most on that side and will drop from the horse sooner. Then shoot him till he drops and get the Priest Artefact. Go to the W side and look up for a crack in the wall, run jump and grab the pillar under the plants and shimmy right around the corner a bit, then pull up in and crawl to Secret #2, the Grenade Gun.
Crawl back out, drop in the pool and climb back up to the ground, go up S to the castle. Make your way down to the big lake S. From the wall at the lake you can do a run jump/grab to the lower step of the structure in the lake, go up to the SW corner and stand next to the pillar there, facing the W wall, stand jump/grab the vegetation on the wall and climb up. Climb right a bit so you can back flip onto the pillar behind you. Stand on the E side of it and run jump to the pillar N, grabbing it at the last moment, pull up to get Secret #3, the Revolver (finally).
Timed Swim for the Gate.
Dive into the water and swim to the SW corner of the structure and face W, down and in front of you is a hole in the rocks. To the right and down in the structure is a Timed gate. Swim into the hole and find an opening to the right, go in and at the end is an UW lever on the N wall, be sure you have spared enough air before you save in front of the lever. Pull the lever, roll and swim back. Left in the small cave and out to the lake, steer left and down to the gate into the structure. Swim straight and down inside and go right in the end, then left into that small tunnel and follow to where the level changes.
Level 7 - The Castle of Corpus Fatalis.
By TimJ.
The Big Hall and the Giant.
Climb out of the water and head into the corridor to where a flyby starts and whatever you do, don’t take out a weapon or you’ll burn (that’s the case here). Just sprint straight into a little pool *safe spot* and turn around. Face N and see some furniture left of that opening where you came in, behind it on the black wall is a lever you have to use. So save and climb out, run to the left side of the furniture and then to the black wall. Throw the lever and run to the open gate in the E and just keep running, all the way to a room W where you can’t go on. In the SW corner is a ledges with gratings on it, light a flare to find and throw the lever on the W wall, the room will flood and now it will be safe to shoot that Giant, try to get close to him and shoot with the Shotgun.
Plaque of Corpus Fatalis #1, to the Big Hall.
Now you have to go for quite a detour to get back in the Big Hall as the gate is closed. Look where the Giant dropped as he left behind a Plaque of Corpus Fatalis. It’s a kind of key and you can use in on the receptacle on N wall (NW corner of the room). A big door opens but also the gate up right of you. Climb in and follow through into a gold filled small room. Close to the gate E is a crawlspace in the N wall, hidden behind plants, get in and drop out the other end, turn around and get into the next crawlspace.
First Floor.
Up the ladder and climb up left till you come to the first floor of the big hall. There is a big pillar a bit NW of the opening, run jump and grab the crack in the pillar, shimmy right and pull up on the flat part. Face NE and run jump to the plant on the ledge, follow the ledges, around the corner. Then you will come to the NW corner, there is a crack in the wall, jump/grab to the crack and go left to a burner (as far as possible when the Burner is off and save again *screenshot*) Then go past the burner and follow the ledges past more burners and a closed gate W, to a lever. Throw the lever to open that gate W and go back there.Back down.
Get into that side room and climb the red walls up to a lava flow with a burner, the interval is very short. I stood back in the passage I came from, facing NE a bit and started the run at count 8, jump with a right curve around the lava pillar (highest ceiling) and land on the safe floor (btw the monkey swing is a red herring). Follow to a ladder, go up and side jump the little fences in the next passage, in the end is a dark opening, safety drop out and land in that small pool in the Big Hall.
The Treasury, Plaque of Corpus Fatalis #2.
Go E and into that big open door E into the Treasury. Straight in front of you are Flares, not easy to pick up though. In the NE uou can find some Uzi ammo and SE Revolver ammo and in the right little pool a Small Medipack . Go to that golden block on the S wall and push it into the wall till you can use the lever. Go out and run into that shallow trench with water, find the spot where the block lowered and swim in and climb out. Then push the block once, avoid the boulders and go in to get the Plaque of Corpus Fatalis. You will see an UW gate open up and that’s the gate in the tunnel near the start of the level.
The UW Maze, Timed Swims and stuff.
Go back out to the Treasury and to the exit W. The entrance changed, you can’t get across anymore. Just slide down into the pit and save at the water surface facing S. Swim into the tunnel and go left at the grated tile, save at the UW lever and throw it. Turn right and swim back to the crossing, go straight W and around the bend through a Timed gate to another UW lever. Save there too and roll, swim back to the crossing and go right, through the next Timed gate into the Maze and up into that pocket of air.
The Maze. *Map*First you can go for some goodies as you won’t have much time later, in the far SE corner room are Flares and in the NE room Revolver Ammo. Get back for air and you will have noticed that swimming over and past the objects is quite hard, when there is no furniture on the floor, swimming along the floor worked best for me.
Locate the Timed gates and the UW levers, go to UW lever#1 and save there with plenty air left, pull and roll, swim left into the opening, curve right through the next room and throw UW lever#2, turn left while swimming down a bit and go back to the previous room. Left again to get back to the room with that golden shrine and UW lever#1 and right there, up a bit to go over the small table and right around the plant into the gate. Up in that room is an air pocket, better save here, as you’re not done yet.
Dive into the opening N and turn right into a small hole in the wall, in the next room is an UW ceiling lever in the back corner. Pull it to open the exit gate of the Maze and swim back, there’s no air anymore in both air pockets, so swim straight to the middle room with that golden shrine and UW lever#1. Swim left and straight to the open gate, go to the right and follow the winding tunnel to where you see air again, the gate drops shut behind you. Walk up the ramp and shoot a Knight in the next lava room. Jump up in the SW corner and grab up W. Turn around and run jump/grab to the ladder. Go around to the opposite side and back flip to a structure, get the Shotgun Ammo. That lever texture is a leftover from the last renovations.
Drop down and go to the Lava flow N, hop onto the nearest ledge and run jump past the burner (time the jump) to the one NE, then a jump/grab to the opening in the N wall. Follow up to a crossing and go right (S), crawl to the end and drop onto a ledge, jump W and get the Small Medipack. Jump NW and into the opening N again, this time go left, a gate opens at the top and you’ll come back to the Castle. Follow back E and to the Big Hall to the small pool (W) and from there, go to the right (N) to that flooded passage where the level started. Save there and swim down, at the lowest part is the open gate left. Use the UW ceiling lever just inside and swim up in the red tunnel to come to a cave. The level changes.
The Underground Lake, part 2 TimJ
Swim W towards that grey structure and up in the lake for air. Turn around and look just left of the E cave entrance in the corner of that grey pillar for a Small Medipack. Get some air again and swim back into the E cave, go straight through the first cave and left in the second. Coming in to the wide cave, aim for the middle between the hanging plants on the ceiling and just past them you’ll find an air pocket. There are Crocs in the cave, but they didn’t bother me much. Save and swim down in a NW direction, there’s a group of pointy red pillars with a hole between them in the hole is an UW lever, be sure to have enough air before you save there.
The 3rd Priest Artefact.
Pull the lever, swim up and sharp left, the straight N and left around a grey block in the end, there’s a Timed gate there and it is just opposite the visible closed right hand gate. In the room is a pick up, but you better leave it for now, throw the UW ceiling lever and swim out quick. Straight into the open gate ahead. The current will take you up to the surface. (I got some problem with the current as Lara wouldn’t get to the surface but with some swimming I finally got out). Walk out S and follow the tunnel to an open gate left, go in and get the 3rd Priest Artefact from under the vase.
Go out, follow the tunnel S (there is some Shotgun Ammo around here and just run past that Knight into a hole in the floor S, this is the air pocket in the big cave. Surface and swim back to the UW lever in the red hole, open the timed gate again and swim in to get the Crossbow Ammo and get out fast, straight into that opening E again and up in the sinkhole. Climb out S and follow the tunnel to the S again, hop into the hole and save at the surface facing NE.
Swim to a red spot on the ceiling where it touches the E wall and behind some plants is an opening, go in and swim down in the next room, don’t look around too much but quickly get Secret #4, a Shotgun and roll to swim back through the opening (there is an air pocket in the room, but the Croc is quite nasty). Swim back to the air pocket in the big cave and get air before you swim S and into the cave in the end, to the right and back to the lake.
The Lake.
Swim into the arched opening in the NW corner and down an opening, follow into a room, there are some Flares NW and up in the SW corner is an UW ceiling lever, pull it to drain the room. Then climb the ladder and throw the lever on the ledge to flood it again, but also some trapdoors opened up. Swim out of this place and left to the NE, probably a Croc will come at you, so dodge it and go down into the trapdoors NE, follow the tunnel back to that deep pool. Go up and climb into the opening NE to follow the passage to the crossing. Go right and back to the Lava level.
Lava of the Depths, part 2.
Follow the tunnel and climb the ladder back to the big room with the block puzzle.
Pushblock NE (bird), the 4th Priest Artefact.
Move the push block to the bird symbol NE and the door in the E wall opens up, go in and use the Plaque of Corpus Fatalis to open the next door. Follow in and climb walls till you come to a Lava room. Drop/hang from the edge of the wall and shimmy right around the corner to a ladder, go down a bit and back flip to a cage. Jump over the cages to the other side, at the burner you have to count the intervals, jump/grab to the next cage and shimmy left against the wall before the burner starts up again, you can pull up at the next interval. Look for the cage NW and stand jump around the corner to it. Hop to the next cage and from that one a run jump SW into the opening in the wall (no grab).
Demigod.
There’s a Small Medipack in the vase to the left in the next room. Across the room is a Demigod waiting, go to the far SW corner and shoot him. The Swinging Blade can be a bother here, but keep trying. Then time the Blade and run jump/grab across the lava flow. Throw the lever there to open that gate W in the room with the cages. Get back there, hop to the cage in front and jump/grab into the gate W
Fire Dragons.
There are 3 cages with Fire Dragons. Shoot the vase to get a Large Medipack and throw the lever SW to release the first beast, shoot it and get into the cage to release the next. Go on till you are in the SW cage and get into the crawlspace S. Walk past the fence and get up the next crawlspace. Climb out the other end and go down the climb wall, back flip/roll and jump from the slanted block, jump again and then a slide and jump to grab the wall next to the Swinging Blade. Climb right and next to the crawlspace you have to back flip to a ledge behind you. Jump/grab to the crawlspace and get in, drop onto a ledge and jump the cages around the room to get to the highest one. Jump up into the room above and go throw the lever.
Get back onto the cage and climb off, hang on the edge and shimmy around to drop onto the first cage (SE), go jump around to the NE corner and find the cave there opened up now. Run jump into that cave and go close to the E wall, run jump over those last dark and deadly squares and grab the wall, go up to the room with the Machine above.
The Machine, the 4th Priest Artefact.
Go up the floor E and grab that brown pillar, go up and right around, down a bit and save before doing a back flip/roll/grab past the Blade to the next pillar. Go climb left around and up into a room with a push block. Push/pull the block into the NW corner to get to the lever SW. Now get back on the brown pillars and do the same to get back to the Machine room. Get into the opening W and push the doors open to start the Machine up by pushing the button.
Cages lowered in the Machine room, climb them to get to the ladder W. Climb into the room above and a door opens E, pull the push block (W) to the tile E and the second door opens so you can enter the passage E, shoot a Harpy and a Demigod and go up N. Jump/grab across the lava flow and hop onto the terrace to get the 4th Priest Artefact. Go down to the now open door SE and follow the passage to a little Timed Run.
Stand back against the wall in the passage with the low grate and sprint over the trigger tile, hit “Alt” to do a roll underneath the grate and sprint through the door. Watch out, as there are nasty Darts in the next passage. Slide down the slope; drop into the hole and head N, follow the passage back to the big room with the Block puzzle. Move the push block back onto the “Eye” NE and go into the Eye door S, down the ladder and to the Lake level. Go left at the crossing and crawl through to that deep pool, swim across and climb up W. Head into the passage NW and come to a room where the 4 Priest Artefacts can be placed on the blocks left and right. That deadly pit W will freeze over and the passage W will lead you to the end of the level.
Level 8 - City of the Priests.
By Thibault (TC 14).
Follow the corridor NE and get into the crawlspace, climb out backwards at a pit and hang on the edge. Shimmy around left to the 3rd corner (SW) and drop onto a ledge. Safety drop from the ledge to the grated floor below and find a ladder over the hole in the floor of the S wall. Climb all the way down and get into the crawlspace E, follow and go left in the Lava cave. You’ll have to cross the lava flow, the only way possible is to go down the cliffs SW go over a trapdoor to the N side and climb back up all the blocks to get to that lever E (hold “duck when you climb up into the low cave).
Make your way back down to get to the now open trapdoor and safety drop down. Go W, shoot a vase for a Small Medipack and go back E to hop into the passage. The push block goes straight into the alcove E to open the gate left of it. Climb up E to a monkey swing and use it to get to the W side. Drop/grab and pull up, go up the ladders to the top. Follow through the gate to a Lava room, jump to the floor W and watch a Creature come running. Quite a character… Go to the W side floor and find a vase in the opening N. Move the vase to the different looking Tile on the E wall on the other side of the opening and the door in the N wall opens up (Lava room). Go out and around to that door, enter and find a big door, also some Revolver Ammo on the floor.
The Eye of Osiris Room.
Go back out and into an opening S, hop over the pit at the malfunctioning Machine and come to the Eye of Osiris room. Lara will look up to the Eye of Osiris, hanging in the top of the room. There are some enemies that will show up from time to time, won’t mention them (but try to drop them out of the way as they will stay and you have to jump over them every time when the die on a bridge). Go into the second small house (S) on the terrace and move a vase to a different tile in the opening SW, get the Shotgun Ammo from the crawlspace before you do (a block lowers in the brown structure E). Go into the N house and move the vase there onto the tile in the connection between the 2 houses (Another block lowers somewhere). Go out and to that brown structure, throw the lever on the blue wall and a gate opens, up S in the room.
The Key of Priests.
Go out and S over the ledge, jump over to that ramp S and turn left to run NE and off the ramp (with grab) to land on a terrace below (E), turn right and find another vase, move that all the way to the N and onto the tile. Run jump back out onto the ramp and look down N under the brown structure, a flame extinguished and a Key can now be obtained. Jump with a grab onto the blue ledge and get the Key of Priests (crawl to it) Get back where you can stand and use the monkey swing to get past the Blade to the N. Jump to the ledge N and go E up the steps, follow around to where you can jump to that open gate S from that ramp you were on before. Inside the room are 2 levers, use the safe one SW and see a block rise. Get out quick before that Demigod gets you and just run out onto the ramp below.
In the lava pool below is a brown block, jump there and get a Small Medipack, from the pickup spot a stand jump with grab NW to get on the blue ledge under the terrace with the houses. Grab the ladder wall W and go climb right to that block you just raised, go on to where Lara climbs around a corner behind a pillar (she has to be with her feet on the ladder first).
Drop and turn around to use the Key of Priests there and a flyby takes over to show the gate opening up. To the left of Lara are some Goodies. Stand back in the corner, facing NW and run jump with a sharp right curve to the only safe spot in the lava and get Secret #1, a Large Medipack and 2x Revolver Ammo. Stand back in the corner of the walls facing SW and run with a left curve to jump and grab back into the opening with the keyhole.
Into the Caves.
Get back using the ladder and jump to the brown block. Go up to the ramp and head back to the entrance N, passing the Machine and into the room with the fences, go to the NW corner and jump to the ledge there. Follow into the open gate and shoot a Fire Dragon. Shoot the vases to get a Small Medipack and Uzi Ammo and then head S. At the block is a crawlspace to the right, get in and the gate opens up. Follow in to where you’ll find a Large Medipack in a vase.
Fire Dragons.
In the next large cave are several Fire Dragons waiting, try softening them up from above already (they will run out of range). But that also gives you some time to get down there and start shooting before they get closer. Jump a lot and you’ll manage. In the SW corner is a lever to open a gate in a crawlspace NE, get onto the block and grab the crack to get to that crawlspace and follow in to a Lava pit. Hang on the ladder and back flip over to a ledge, go into the next cave and here you have to time the Blades, standing in the middle to run jump/grab to the next ledge, stand right for the next jump and time both burner and Blade. Go down the next passage to a tunnel with more Fire Dragons, but this time there is a block you can take refuge on.
Continue through the tunnel and in the end is what seems like a closed off crawlspace to the W. Get in and it will open up, proceed to Secret #2, Revolver Ammo, Grenades and a Small Medipack. Get back out of the crawlspace and go straight into the cave E.
A gate opens up under a glass floor, stand on the break ledge and drop into the room with a lever. Throw it and go through both gates to get back to the corridor with the gates near the start of the level. A new gate opened up SW of where you come in.
The Fire Challenge. *Map*.Stand at the edge of the slanted floor and take a step back, then hop back and save before you run jump over the slanted block to grab the break ledge. Pull up and run jump to the safe floor. Go on to the Fire Challenge, a double row of Dragon Statues spitting fire. Time the 2 first Dragons and run jump curved right to the first break ledge so you will be facing the next stand jump to the safe ledge. Then aim for the next break ledge and curve right to and up for the next stand jump to the ledge in front of the ladder, jump/grab to that ladder and go up a bit. Climb left as far as possible and back flip/roll steering hard right to end up on the last break ledge, run onto the safe one. Face W and run jump to an invisible ledge when the burners are off an immediate stand jump to the ledge with the pillars. Go into the NW corner and throw the lever to raise a block near the N Dragon. Run jump (banana) around the S side pillar to that vase and shoot it for a Large Medipack and Uzi Ammo. Face NE and stand jump to the invisible ledge to do a running jump to the raised block next to the Dragon N.
Up the Lava River.
Jump/grab to the blue ledge and keep climbing up all ledges to the point where you have to jump up into the red tunnel a bit left. Climb up in the end and quickly run jump to the ledge in the flow, then jump to the W and take out the Harpy from there. Go all the way S, past a closed gate and finally jump around the corner to a ledge S in the flow. Jump past the burner to the next ledge and then you have to do a jump with a left curve, so you’ll go through the highest part of the tunnel and land on the tip of the next ledge. One more and come to a wider cave; jump to the S and then a jump/grab to the brown pillar just left of the lava flow E.
Switch and Lever Puzzle.
Shimmy left, passing the E room (with a push block and trapdoor) around a brown pillar to the room N and pull up, shoot a vase on the E ledge and get the Small Medipack. Go down to a lever NE and use it to lower a block under the push block in the E room. Get back up to the entrance S and shimmy back to the room E. Pull/push the block onto the tile NE, shoot the vase N to get the Shotgun ammo. Get back into the N room and go down the ladder W, find an alcove S down there and climb up to a lever to raise a block up in the room above.
Notice the closed gate E and return up the ladder to the room N where the block is. Jump/grab up to the block from the S ledge and jump to the ledge with the lever E and use it to open that gate in the room below. Drop from the ledge and get down the ladder W. Through the gate E and climb up right to a lever. Throw it and turn left, follow the passage back to the Eye of Osiris room. Go straight along the E ledge and in the back (E Side) of the brown structure a gate opened. Throw the lever and see that trapdoor open up in the E room with the push block.
Cooling Off.
Go back into that passage S and follow up the ladder to the N room, go out S and shimmy to the E room. Dive into the water and swim into a hidden tunnel E, follow to an UW lever and throw it. Swim back and left in the red cave to get into a canal, get out onto the low white block and climb the higher one to jump to the brown pillar, then jump W to a lever. Throw it to open a gate in the room W of the fence and walk slowly onto the left corner of the blue burner tile. The block goes down and the route S is free. Jump to the ledge there and shoot the Fire Dragon, throw the lever and get a flyby going back all the way along the lava flows. In the vase left of the lever is a Small Medipack.
Heating Up Again.
Go back and into the canal. Swim into the red cave and climb out through the trapdoor, go to the opening W. Stand right and turned slightly right. Now do a run jump dive (“Alt+Shift”) to land on the lowest corner of the ledge W in the lava flow.
Turn S and jump to the ledge there, then a run jump over the lava ridge S to land in the pool behind it, swim into the opening S and climb out to the room with the 2 Fire Dragons. Shoot them and enter the gate SW, follow to another large Lava room and take out the resistance there.
The First Eye Piece.
Stand in the middle of the opening and face the break ledge on the pole, stand jump to it and a running jump to the banner held up by the Statue. Jump over all Banners to the NE corner and stand jump/grab up to the top of the transparent block to get the First Eye Piece there. Jump into the opening N and follow the crawlspace back to where you drop into a ledge in the Lava River. Jump N and then left onto the safe floor, head N and jump E onto the ledge in the lava at the end. Jump to the opening NE and climb down to get to the top of the long climb up the Lava flow.
The 2nd Key of Priests.
Look NW and run jump with curve out to get into that opening with the push block you saw in a flyby before. Push the block all the way and now the passage back to the start opened up. But you’re not done here. So look back in the passage where the push block was and find the Key of Priests.
The Second Eye Piece.
Now go back S and jump back to the opening you came from, continue S and climb up, jump to the ledge in the lava river to the opposite side. Find that gate halfway down, open it with the Key and get in. Go to the back of the room to get the Second Eye Piece. Return to that passage where you just got the Key and follow to the N, look to the right for the opening back to the room where it all started. Go onto the central floor into the door N and save before you do anything.
Combine both Eye Pieces and place them in the door, the next 2 doors slowly open up while you get shot at, better get out of there to a place where you have room to move and take out those nasty Demigods. Return into the same passage and throw the lever in the end to start up the machine and the Lava will rise in the pit, overflowing that Eye of Osiris room.
The Eye of Osiris.
So head into the passage with the machine S and jump to the ledge under the ladder wall. Climb it all the way to the right and drop on the E ledge, go SE and jump to the ledge in front of the brown structure, then from pink ledge to pink ledge to get to the one with the Eye of Osiris. A gate opens up in the passage in the SE corner. Head into the passage and go left through the open gate, down the slopes and into a room with a pool.
A Nice Swim.
Dive under the NE pillar and throw the UW lever, the room fills up with water and you can now swim up in the shaft in the ceiling, swim up for air first or do it in one go. Swim into the tunnel W and throw the second UW lever, to get even more water in the shaft. Swim out and up into the tunnel N and get out of the water. There are some low fences in front of you. Sprint to them and hit “Alt” so Lara will launch herself over the fence, keep sprinting and hit Alt again to get over the second fence, turn around in the back and climb up for Secret #3, a Large Medipack.
Get back over those fences and jump over the hole, dive down the other one S and swim up and into the tunnel N. Climb out and go to the Transporter room. Turn around inside and place the Eye of Osiris in the receptacle under the entrance. Turn around and step into the Transporter Beam. The level changes.Level 9 - Kingdom of the Dead.
By Thibault (TC 14).
Shoot the vase for a Small Medipack and go S to jump the ledges up to that dark-grey platform E, shoot the Hellhound. Go to the Zip line and use it till you can drop onto the green ledge with a grave stone. Jump W and then N twice, turn E again to do another one of those run jump dives (Alt+Shift) to get on top of that black block where the Zip line ends.
Look N and spot those crystals floating in the air, they stand on invisible platforms, so stand jump N to the first and go on with a run jump/grab, turn left and a run jump onto the next, then run jump/grab to the brown block with the Skellie. Hop around the corner and go follow those brown blocks up S to the one under the platform. Grab the monkey swing and go around to the opposite corner. Jump to the E and turn around, either shoot the Demigod from here or proceed as you have to get onto that platform anyway (if you have enough Revolver Ammo).
You have to move quick if he’s still alive, run jump/grab to the roof, shimmy left and pull up on the corner and back flip to that ledge E, stand back and run jump onto the roof. There is a button on the grave W, a flame on the ledges going E will extinguish. Shimmy back to the NE corner and pull up to back flip to the green ledge. Go jump the ledges to the NE corner and then a curved run jump/grab to the one SE. Better save here, as you have to do a series of slide and jumps to finally grab the platform with the pillar. Get up and shoot a Hellhound.
Green Ledge Run.
On the coffin is another button and this one will stop the fire on the first green ledge E, but also some nasty Skellies (Wraiths) will appear so save at the button. Push/roll run to the E and jump to the ledge, keep doing running jumps and normal jump from ledge to ledge, finally jump into the red stuff in that building and swim up a hole. Climb out and push a button SE to open the door N and start a flyby showing a Crystal path far away W.
The Crystal Path.
Just run out of the door to the right and land on the green ledge, run jump over the fence W and then onto the platform. Now do a jump/grab (to shorten the jump) up to a lower ledge left on that green pillar SW. Take a running jump with grab to the ledge NW and a single hop to the N. The last one is a running jump to the Start Platform.
Stand W and jump the Crystal Path to get to that Building (always walk *Shift* as far as possible to the next jump and look down to judge the distance for the next jump).
The Shrine Temple.
Hop over the fence to the walkway around the Temple and a Demigod will open fire from the W, get close, duck and take him out. There will be more enemies every now and then, won’t mention them anymore unless they drop something. Go into the Temple from the W or E side and look down the hole SW, hop over the fence and face SW so you can run off the floor (with grab) into that hanging cage below.
Look down NE and do a run jump down onto that ledge there, jump N then E and grab the crack in the pillar, go right around the corners and drop onto the brown ledge. Face S and run jump to grab that red ladder pillar. Go left around 2 corners and back flip/roll to grab the next ladder pillar, climb all the way left around the pillars till you can drop onto a ledge. Jump to the ledge with the button SW. When you push the button a flyby starts showing a new ladder on the wall of the Temple.
The Torch.
Go back the way you came, climbing the pillars and from the N one a back flip (8 steps from the bottom) onto the now extinguished green ledge near the Zip line. Climb to the Zip line and use it to get back to the Temple through the Transporter. Drop from the Transporter and go to the other side of the Temple, climb the ladder into the first floor and pass the swinging axes and emitter to get to the button W. A Torch is show on a ledge sticking out of the Island SE. Get back past the Blades (run when the burner is off, then jump diagonally to the exit past the third Blade) and down the ladder. Go to the E and in the right corner (SE) hop over the fence, look SE and jump around the corner to grab to the ledge with the Torch.
Jump back to the Temple and go straight onto that Transporter block close by. You’ll be taken to a little hall with big doors and a burning candle next to the Transporter block, light your Torch and hop back on the Transporter to get back to the Temple.
Go inside the Temple and jump onto the SW shrine, light the candle there and see those big doors open up where you just came from. Leave the Torch, go back to the Transporter E and hop on. Just to the right through the big doors is a vase with a Small Medipack, then follow N and come to a pit with Blades, stand left and run jump/grab, stand right and run jump past the next. Go on to a room with a wide pit.
Out on the Fields of Death, the Key of Death.
Jump over the fence and drop onto a ledge in the pit E side and push the button to open up the wall in the W climb back out by the ladder N. Jump over the fence to the other side and go through to a place where a big Dragon died (by the looks of it a while ago). Shoot the 2 Demigods and the last one will drop the Death Key, to be used on the lock N (this key will be used on several locks in this level and will stay in the inventory).
Open the doors and go to the Skellie lever on the central grave. Head through the door E and run jump/grab to the white block. Then go to the S wall and jump over to the ledge with the fence. Use the monkey swing to get across to the ledge N and run jump onto the one with the pillar, run jump/grab straight S and then get onto that ladder wall to back flip/roll/grab the ladder on the pillar. Go around right and back flip to the entrance E. Follow to a closed door and pull the medium sized lava block onto the green tile to open that door. Follow through to a place with a pit and a Demigod.
Go down the ladder into the pit a bit and then climb up again, wait for the Bird to appear and shoot it. On the little ledges below this could be hazardous.
Now go down the ladder till you hang and drop to the ledge below. Jump the ledges to the far N and when on the higher bluish block you have to turn W and go over the green ones to the last. Stand right and run jump N and a little to the right to grab the edge of the Island there, go along the left side and face NW doing a curved run to jump and grab to that ledge W (or do the short run trick, hold shift and forward, release Shift and hit Alt while keeping the forwards key down)
Throw the Skellie lever and a cage rises E, jump back to the Island and go to the SE corner and jump to the dark block, go jump to the one with the lowered cage and the to the one where you can use the second Skellie lever. Jump back to the ledge and climb the cage, jump over to the other one and then onto the Transporter.
The 1st Ghost Artefact.
Back at the Temple go to the opening in the fence N, jump/grab to the first bright green ledge and stand on the right hand side run jump N and curve left around the fence to get to the next ledge, jump to the building W and use the Key on the block. Go around the building to get the Shotgun and 3x Shotgun Ammo. Then step inside and go down the ladder to the ledge below. Jump the green ledges to get to the ladder pillar under the Temple and go up to a higher ledge with a monkey swing above. Grab that and use it to the end where you’ll drop on a ledge with a button. The button will raise a cage at the building N.
Go back using the monkey swing and the green ledges to get back up to that building and climb the cage near the keyhole E. get in top of the roof anf from there to the platform NE and get the 1st Ghost Artefact from the vase. Get back to the roof, drop down and jump to the green ledge E, then to the brown ledge NE and go up to the key hole to open the Gates on the Island E. Jump back to the green ledge and jump SE to the one with the double fence.
The 2nd Ghost Artefact.
Do a diagonal run SE and curve left to jump and grab the ledge E. Go jump to the open Gates and enter, go around the building to the E and find a hole, climb down to drop to the ledge. Jump S then W and use the monkey swing to get to the W side, hang most right at the Blade and go as close as possible before passing, run jump to the ledge with the button and push it to open the doors in the building above. Get back the same way you came here and run to the N, get into the building to find a push block. Maybe you have to run all the way to the other side of the Island to lure those Skellies away and sprint back to pull the block away from the 2nd Ghost Artefact.
The 3rd Ghost Artefact.
Get out fast and SW to get back to the Temple. Go to the W side and find a pillar (it is the one with the wooden texture facing W) on the side of which you can use the Key to lower a cage on a ledge SW. Go to that SW corner and hop over the W side fence. Look over the edge near the pillar N and see a ladder leading to a ledge with a Small Medipack. Go back up and run jump to the red ledge sticking out of the SW corner pillar. Jump W over the ledges and the camera will pan away so jumping will become more difficult, line up using the Binocs, especially for the jump to the thin ledge high up. Stand on the NW tip facing W and look with the Binocs, aim almost for the left hand side of that thin ledge up there *screenshot* and hop back for a straight run jump/grab (no curve). Do a run jump grab in blind faith to the red ledge W and go over the top to the N end. Turn E and jump to the ledge then N to the Island with the 3rd Ghost Artefact, grab the Zip line and get back to the Temple.Go inside and jump to the 3 Shrines to place the Ghost Artefacts. 3 doors will open successively and they are located on the first floor. Go out E and to the S side of the temple. Climb the ladder and go W past the Blades. Climb the block with the button and don’t just run off but jump into the open door. Then run jump to a Small Medipack E and turn to jump into the opening N of the lava.
Look on the ceiling of the next Death Chamber to spot the Safe spots on the floor and jump around to the one E. There you have to sidestep as far as possible onto the NW corner of the floor square and do a left curved run jump through the opening E a bit after the burner went down.
Out on the Roof, the Death Obole.
Go to a pedestal right in front of the opening in the wall you just came from. Get the Torch there, light it on the burner in the opening (just stand close) and then light the pedestal the Torch was on (this time don’t stand too close). A rope appeared under a green ledge SE. Head S and shoot the vase for a Small Medipack, from the opening in the fence E a run jump[ to that ledge on the pillars and jump/grab to the rope. Swing to the roof of the Transporter Island S and on top of it is the Death Obole (Coin).
Crossing the River Styx.
Now you have to get back to the Temple, don’t know if it’s the right route, but I used the rope to get back to the ledge on the pillar N and then did a jump onto that ledge with the pedestal down W (where the first Torch was). Jump to the Temple and go W. Hop over the fence near the Key hole and jump to the wooden ledge on the murky river, jump to the boat and give Charon the Death Obole so he will get you across the River Styx to the next level….Next are 2 Combined and really complex Levels.
Level 10 - Farplane 1.
By Leroy.
The next levels are very complicated and getting all secrets is even more complicated. I’ll try and guide you through this…
Seems there’s no way back….
Go to the SW of the SW tree and find a Small Medipack.
Up the Tree. *screenshot*Go to the N side of that SW tree and look up S. You can grab up to the branch and pull up. Hop to the W branch and stand left facing W, now you can grab up to the even higher branch. Run jump over from the N branch to the tree N and get the Energy Orb. Jump down SW to the arch over the Buildings entrance and get the Shotgun Ammo. Drop to the ground and go to the ledge (tile) in front of the doors to place the Orb there. You will be taken inside.
Level 11 - The Lost Spirits 1.
Leroy
The Osiris Piece.
Go up the ramp in the structure in this hall and jump from that pedestal SE to the 1st floor walkway around it, go to the SE corner and pick up the Shotgun Ammo, go around to the NW corner for the Uzi ammo. Face SE from there and run jump into the gap between the pillar and the ramp. Then go to the SE corner and climb up to the pillar SE with the smoking pedestal. Touch it (the other 3 are deadly) and get back down into the middle of the structure to pick up the Osiris Piece from the pedestal. The big gates open up, go in and drop into the hole, slide down into the Crypts.
Finding the Entrance.
To the N is a closed gate so head S and follow into a small room with a gate S, go into the NW corner of this room to use the lever opening up that gate in the Transporter room. Head back and enter the passage to a Tomb. Better run back S first to get rid of the big Skellie(Wraith). In the room S is a cross in the left corner lure the Skellie to it and wait till it is gone before going back to where you left off (getting rid of that Skellie can give you some problems, better save when you come near the cross and try what works best for you, I shot him a couple of times after visiting the cross and that worked fine for me) . Head back to the Tomb where the Skellie appeared. In the NE corner of the Tomb is a Small Medipack, then go to the SE corner and open the wall panel with the Crowbar. Go in and use the lever, run back to the Transporter room where you came sliding down before and face the W wall. Light a flare to spot the push block and push it in to go right into the passage. There are 2 open gates with a textured floor tile, move the block on that tile and go out of the room. Head back S to where the gate now opened.
Go in and Lara will be looking at a Skellie to the right, ignore her and proceed S to a room with a Statue E and a steaming spot in front of a cross W. Go to the S into a room where 2 Vraeusses have to be used later. For now look for a Jump lever in a higher spot of the ceiling in the NE corner (face W) and use it. Return N and in the room with the hanging Skellie a block went down E. Enter there and throw a lever SW, go back out and to the right (N) to the room where the push block was, step into the Transporter.
Farplane 1, For Holy Water and a Torch.
In This forest area you will be able to go by several routes of which the one described is the one that worked for me and is possibly not the shortest… (you will be back here several times)
Run off the S side of the Transporter Island and turn around, run from the branch to land on a ledge with a cross. From where you land a run jump along the left side of the cross and grab up to the low edge of the higher ledge N. Turn E and jump to grab the ledge there, turn S and jump to the one with the cross. Shoot it and get the Holy Water. Run jump from the NW corner down to the ledge with the other cross and jump up to the ledge N again, walk to the NE corner and jump to the ledge NE. From there do a jump/grab to a branch N and walk to the W, look up left for a short branch you can jump/grab to. Walk E onto the end of this long branch and turn left.
Run jump up onto the higher branch N, landing on the NE end of it. Run jump NE to the rock and run off the NW corner of it to the rock below and grab the Torch. Stand on the highest tip of the rock (NE) and stand jump SE with a bit of a right curve, up to the lower corner of the SE rock. Jump back the way you came and step back into the Transporter.The Lost Spirits 2, 2 Golden Vraeusses and the 4 Gems.
Take the Torch S through the rooms to the one with the pit. Leave the Torch in a safe spot (not in the pit) and go stand facing E on that smoking spot W of the pit to use the Holy Water. The pit will be filled with water, get the Torch and head into the room S. Light it on the wall torch N and run back to that hanging Skellie Lara kept looking at in the second room to the N. Save before setting that Skellie on fire and roll to run into the passage E, light the Skellie in that room too and drop the Torch.
Sprint out of the room and go left, straight into that pool to get rid of the Wraiths. A 1st Golden Vraeus appeared on a little pedestal (NW) of the pool. Go N through the rooms and down the ledge at the gate, turn right and to a little pedestal next to that cross (SE). Get the 2nd Golden Vraeus and get back into the passage S. All the way to the room with the big gates S, open them and get the 4 Gems inside. Now get back to the Transporter and step in.
Farplane 3, use Gems, get Gems.
Drop onto the lower branch S, walk to the W end and drop to the branch below, then drop form the S end to the grey rocks below. Walk around to the SE corner and jump to the ledge up S, then jump to the grey rocks below the tree S. Climb the ladder on the W side to the end of the texture and back flip to a tiny ledge. Face SW and run diagonally over the ledge with a right curve to jump W to that ledge with the Skull post. Place the Fire Gem from facing N and the pole will burn. When you look far N you can already see another Gem appeared on a ledge. Sidestep right once and from there a run jump with a left curve around the burning pole to the ledge NE, jump down to the tree NE. Go to the SE corner again and jump/grab up to the S ledge once more to get a new Fire Gem.
The 2nd Lightning Gem.
Run jump down to the tree N and on to the ledge with the cross N. From the left hand side of the cross a run jump/grab up to the next ledge N and walk to the W end of it. Run jump/grab to the ledge W and walk onto the lower part W, face S and just a run jump (no grab) over the slanted block to land on a ledge with a 2nd Lightning Gem.
Grab up to the block S and slide/jump to the thin ledge; turn left and jump/grab up to the branch. Walk up to the trunk and turn right to the SW tip of that branch. Run jump to the Island with the Transporter SW and get in….
The Lost Spirits Fire Section, a 1st Golden Skull.
End up in a room with a deadly pool below the ledge. Walk to the N side of the ledge and turn around facing S, hop backwards off the ledge (no grab) and jump from the slanted block below to grab the monkey swing under the ledge. Climb forward onto the Tile in the middle and turn right, drop in the end and carefully get the Small Medipack there (face the lava). Then climb up to the opening W, go to the open gate and through to the room with the bridge over a deadly pool.
Pushblock Puzzle.
In the walls are 3 push blocks. Start with the push block (face) in the N wall, push it as far as possible and go left. Follow the passage to the end and find Crossbow Ammo and a lever. The lever will open one of the doors you passed and also the one behind the N block. Turn around and walk against a push block, push that block once so it is in the poolroom. Go back W and to the right is another push block, pull it into the room W and onto the brown tile. Find the lever SW and throw it to open the next door to the room NW, go out to that push block S in the poolroom. Move it in front of the opening W and go around to push it into that passage so you can move it straight and all the way into the room NW, don’t use the lever yet. Go out of the room and left to the first (N) block and push it all the way into the room. Pull it to the left (W) once, use the lever and put the block back in the NE corner in front of the lever again. Go through the room NW to that lever in the S passage and throw it to open all doors N. Now you can move both blocks in the N rooms onto the brown tiles.
With the 3 blocks in place a gate opens up in the room W. Go to the lever S a last time to re-open the door W and go into that room where you’ll find the open gate N.
The Maze and the Almost Impossible Timed Swim.
Meaning you will loose health here due to a lack of air, so get the health bar full and keep an eye on it.
Go in and save before you dive in, just around the corner is a Circular Knife-trap. There’s no time to waste here so I just swam around the corner in the middle of the tunnel and with a bit of luck the Knife-trap was open on passing it. Go left around the next 2 corners (there are some goodies around here, better ignore them for now). Pull the UW lever (isn’t Timed so at this point you could go back for air first, but then you have to pass that nasty trap twice) . Roll, swim right then the second left past that face block go left and left. Then you will get to a long circular tunnel *map*, ignore the UW lever for now and just keep swimming, don’t waste time.
Stay low so you can immediately pass underneath the doors as they start to open up. Go on like this through all doors and go left where possible, you’re back in the tunnel with the Timed UW lever. Quickly use it this time and turn left to swim back into that last door to the right (#1, is timed too) you just came from, keep going to a door on the right (#2) which is now open swim in high and immediately up for air. Even after practice I couldn’t do it without loosing some health.
Timed Cross Puzzle, the 1st Golden Skull.
Climb onto the ledge and get the Large Medipack SW and the Lasersight NE. Head N into the passage and find a Transporter tile, step on and end up in a surreal place. Sidestep left till you are opposite a blue crystal on a block on the lower building. You have to shoot that block. Use Revolver and Lasersight but if you’re out of Ammo I have a nice trick for you. Aim the Revolver with the Lasersight and while doing that hit the #1 key, you’ll hear Lara swapping guns, then shoot and she will use pistol ammo.
A Zip line appears, use it to get to that building on the island. Climb one of the buildings and shoot (pistols) all 4-brass balls to open the gates in the buildings. Go to the E one and pull out that cross as far as possible. Notice the trapdoors and head for the back of the W building where you’ll find a Timed lever. This will raise the E and W trapdoors. The cross has to go out onto the ledge and around into the W side building.
Save in front of the lever and pull, side jump right (or left) and sprint along the side of the pit, jump to the trapdoor and pull out the cross. Turn right or left a bit and run back onto the safe ledge before the trapdoor falls. Move the cross around till it is in front of the gate W. Use the Timed lever again and push the cross into the opening. A Huge Creature appears and you have to shoot it to get the Golden Skull it will leave behind. Best way to deal with him is the Shotgun, get up close and shoot it in the soft belly (one round should be enough).*
Optional for a Secret:
After taking the Skull, look up N and S on the roofs, there are 2 more brass balls to shoot. After shooting them both remaining trapdoors will be up, use that Timed lever W again to get the trapdoor in front of the cross up and pull it out. Move it onto the N and S tiles and see a gate open up. Go to the E of the island and use the Ice Gem on the skull post next to the Zip line, jump the ice ledges and climb back up to the Transporter E to get back to the room with the pool.
Back at the pool, go into the SE corner and pull the coffin out and aside, go into a room with Secret #1 , Crossbow and Uzi Ammo. Turn towards the exit E and shoot that blue ball you see, go out of the room and you’ll be taken to an almost empty area except for the 4 ledges with levers (you’ll be back here 3 more times). Pull the 1st lever to prepare for the 5th Secret and turn around, step back in the Transporter and you will be back where you left off.
*Continue if you don’t want the Secret:
Go to the E side of the island and use the Ice Gem on the skull post next to the Zip line, jump the ice ledges and climb back up to the Transporter E to get back to the room with the pool. Jump into the water and
swim back out, left through 2 doors and turn right, right again (S) and look left for the Uzi Ammo, go W and right at the next turn to get the Small Medipack. Roll and swim into the left side tunnel S, pass through the Circular Knife-trap and go up to the block puzzle rooms. Go E and to that room with the pit and the transporter, hop in and get back to…
Farplane, Intermediate 1.
Go to the N side of the Transporter and run jump down onto that little triangular rock N, turn right and stand jump up onto the higher branch of the tree E, get onto the N side branch and grab up to the Transporter Island. Go N and run jump to the branch N, onto the branch E and up to the upper branch N and just run off NW onto the ledge with the Skull post (or jump over the ledges NE and then W). Place a Lightning Gem and a Transporter becomes active down W. Run jump W from the highest point and land on a branch, go to the trunk and safety drop down the N side, from standing against the tree a stand jump N onto a ledge below and stand jump S onto the ledge with the Transporter (watch your head). Step in…
Farplane Lightning Section, a 2nd Golden Skull.
Watch out for the lightning and turn NE just from where you stand, get the Crossbow Ammo in the far corner and turn around to go straight back SW. Go on to the edge of the pool and find another Grenade Gun there and better save now.
Take out the 3 Harpies and go look for a Small Medipack near the N tower (SE of it). Head NW from there and find some Shotgun Ammo along the N side, just W of that metal Mast. Find the entrance to a cave W and go onto a breakable tile, follow the lower passage to a Puzzle room.
Cross Puzzle.
There’s a cross N, move it straight onto a Pentagram tile S. A screenshot of an Orb appearing somewhere (that lever S is to raise a trapdoor but only there to confuse you as you don’t need it). Pull the cross back and push it into the right hand side of the W passage, while also facing W so it is standing in front of that trapdoor in the pit. Jump over the pit W and use the lever, jump back and go up the ladder in the main room to the floor above. The Energy Orb # 1 is in an alcove W. Pull the Cross (left) onto the Pentagram tile on the floor, another Energy Orb # 2 revealed. Then move the Cross in front of the white Pentagram on the N wall and a block goes down. Go into the passage and straight to a lever, use it and go back to the cross. Push it back once and then move it to the Pentagram that is painted on the E wall. When the wall opened up, you can move the cross once to the middle of the floor so it will be out of the way for later.
Go into the passage N and use the lever. Go out and right, into the passage NW again to the room with 2 crosses. Use one to put on the Pentagram tile, revealing the Energy Orb # 3. Move the cross aside (N or S) and go to the Timed lever W again, save there. That trapdoor at the pit below will rise, so pull, roll and sprint E, out of the passage left and along the left hand wall to the edge of the floor, roll just before you reach the edge and grab, then drop and get to that cross fast, push it onto the trapdoor. Could be the trapdoor will fall while you push, no problem… The cross will just as well go in place and the 4th Orb will be available upstairs. Climb the ladder and go get the 4 Energy Orbs. Go back down to the lower floor.*
Optional for a Hard Secret:
Go stand at the pentagram S, on the wall to the right another white pentagram appeared. Fire a Grenade onto the walkway at the unused lever so it will end up on that walkway in front of the pentagram. The wall with the white pentagram will lower, get in there and slide backwards down to safety drop down into the flooded basement.
Timed Run for a Secret.
Save before you place the Water Gem on the Skull post as the next sequence is Timed. Quickly go through to open gate behind you. There are several pickups in these basements, but you have to get out before the whole basement fills up with water or you’ll be stuck.
You will have to use a Jump lever and get a Lightning Gem and then you can decide what Pickups you can take in the time you have left (I managed to get the Revolver Ammo, the Medipack and the Grenades).
As soon as you come in, better ignore the Flares on the block left, then there’s Revolver Ammo on the high block to the right, left around the corner on a block right in the opening to the E next part a Small Medipack. Shotgun Ammo on the first block, Crossbow Ammo up on the high block left in the end, over the block S and behind that pillar SE is that Jump lever with a Large Medipack (run into the corner left and side jump right onto the block). Go W and on the block left is the Lightning Gem. You can get it by jumping to the next pillar from the low ledge on the right and then jump/grab to the Gem pillar. Go on and better ignore the Normal Crossbow Ammo in the next corner, go around the left corner again, over the wall and there are Grenades on the next wall you have to get over. Then get into that small opening right (S) of the Spike wall and the gate will close. If you managed to get that Jump lever, the wall S of the Transporter is open and you can go up close to that blue ball (or the trigger isn’t activated). Secret #2 is yours, shoot the ball with pistols and walk back in the direction of the Transporter, you’ll end up at the 4 levers. Throw the 2nd lever and get back into the Transporter, step into the next Transporter and you are back on the Lightning field.
*Continue
Go out E and back up to the lightning field. Save as there’s more trouble ahead as the flyby will show you. Kill those Big Guys and place the 4 Orbs on the Skull posts near the 4 masts. You can reach the one in the deadly lake by jumping the blocks E in the lake and grab the edge of the island, shimmy left around the corners and pull up in the end. Place the Orb and shimmy back to the block E, back flip/roll/grab to get back onto the block. Jump back to the field and deal with the new enemies, some Huge Wild Boars. Find the tunnel E and go down, run jump/dive over the ridge to get into the room below. NE is Uzi Ammo, SE the 2nd Golden Skull. Shoot the Beast and the wall will open up again so you can jump up and in from the lowest corner. Get back to the Transporter on the field, jump back into that tunnel from this corner *screenshot* (try run jump, side jump or back flip, it can be hard).
Farplane, Intermediate 2.
Jump to the ledge N and turn to jump up S, grab up to the E side branch and jump down to the tree SE, jump to the ledge SE and from there to S onto the ledge with the cross. Move the cross W and the Main Transporter is now ready for the next step. Run jump and grab the little branch on the tree S and walk W, turn around to grab up facing E and walk N onto the branch to grab up to the Transporter Island, step into the Transporter.
Farplane, Intermediate, collect some new Gems.
Facing E you’ll see 2 more Transporters, one left one right. First we have to collect some new Gems. Walk to the SW corner and drop backwards facing E onto a ledge below, grab the new Ice Gem and jump SE, then walk to the E tip and run jump with a grab at the last moment to the ledge E (this might take some tries though). Jump to the tree N and walk to the NW corner, turn facing S and grab up to the branch above (climbable surface). From the branch up to another branch S and walk SE to jump to the ledge S, run off the SE corner to the ledge below. Then jump NE to the Island with the “Golden Skull” pedestals, go over to the NE corner. Look behind that tree N and spot the tiny branch, run jump with a left curve and onto that branch. Face NW to get the Water Gem. Run off the SW corner to the branch below and go over to the S side. Jump to the ledge with the cross, shoot the cross and get another Ice Gem.
Onwards.
Jump back to the tree N and then from the W branch to a ledge W. Another ledge W and then to the tree S, climb up that climbable branch again. Climb up one more branch (S) and then jump back to the Transporter Island W. Go to the NW corner and jump/grab up to a branch N, (if you happen to land on the lower one, walk N a bit and turn around to face S and grab up to the branch above). Now you can hop onto the ledge with the Skull post. Place the Water Gem and see a small rain shower E. Run jump and grab in the direction of that rain and get onto the invisible ledge, jump/grab E again and walk up to the highest point. Then hop up to the branch to the right (SE). Jump from the E end to the Transporter and step in…
The Lost Spirits Water Section, the 3rd Golden Skull.
Wade to the SW corner and stand close to the cross there, facing NE. Shoot the cross and a Wraith appears, a hole in the bottom opened up NE of where you stand. Get in quick and swim through the tunnel, up and climb out N. Jump to a brown trigger tile on a higher ledge E. Stand back facing E and save, then run jump E and run into the hole, swim down into a tunnel before the Timed block goes up again. Wait at the cross (near the bottom *screenshot*) till the Wraith is gone and swim back out (here too you can have the problem of the Wraith not dying on the cross, if so try different positions).
You have to go W, maybe it was meant you jump all the blocks in the water, but you can also just swim W and left around the corner. Find a triangular sandy ledge along the left side and face straight E on the tip of it, then just climb onto the ledge *screenshot*. Jump over to the NW and then to the ledge N. Face E and spot the opening in the wall, run jump in with a roll and grab the edge when you slide down. Hang in the middle and pull up to back flip/roll/grab the Jump lever (first for the Skull Cage). Swim into the opening E behind the plants where you land in the water and just left around the corner is an UW lever, throw it and swim E again, out of the tunnel and you are back at the start.
Again go W and to the very end W, where you’ll see a cage on the ledge. There’s an UW lever on the pillar NW, use it to lift the cage and swim back to that little pointy ledge of yours (E). Climb out again and jump across the water, walk straight S and face that block on the right hand side of the pillar. Run jump over the block with a roll and slide backwards of the slanted side to grab the edge, shimmy right around the corner and pull up on the next block. Stand jump E with a left curve around the pillar and from that ledge you can grab up to the monkey swing above. Go past the 2 burners to the W and almost at the end turn right facing N. If you manage to drop on the right hand corner of the block below you won’t slide down. Then walk W and stand jump/grab down to the ledge W and go on to the Golden Skull.
Take the 3rd Golden Skull and swim back to the start E.*
Optional for the Secret:
Face E from the Golden Skull pickup and there are 2 wooden crosses, place a Lightning Gem in the right hand one (SE, because the other one will take an Ice Gem and will freeze the pool over and a Giant will appear and NO Secret). Lightning starts everywhere and the pool is deadly now. Go over the SE ledge to jump E over the ledges to the top of that slanted block under the monkey swing. Grab it to go back past both burners and straight N after that second burner, turn right to the wall and drop onto the ledge. Step onto that tiny sandy ledge in the water, run jump W and across to the other sandy ledge.
Go N over the ledges (careful, lightning) and find an opening in the N wall (NW corner) jump in and go up to a room with water. Just right around the corner is a Skull stand, use a Fire gem there to get the torch burning and go down into the water N. Swim through the tunnel NE and step up into the next room. Place an Ice Gem at the statue on the W wall and go to the SE corner, shoot the cross and get the Torch. Get back onto the water ramp. Run in from the W side and the Torch will stay in Lara’s hands, swim at the surface and back through the tunnel to that wall torch you lit in the other room. You can side jump out of the water. Light the Torch and go back into the water, be sure the Torch stays in Lara’s hands. In the other room you can get out of the water by standing against the floor and jump up holding the forward key. Go onto the textures tiles on the ledges next to the candles and light both candles to open the gate to the Secret. Now jump onto the ice ledge in the middle of the room and jump up so the roots of that tree will burn. A new Fire Gem will appear under Lara’s feet, drop the Torch and get that Gem. Swim back to the other room and into the UW gate W. Get out in a dark room and go to the Skull stand to melt the Ice with the Fire Gem, go into the room for Secret #3 , a Large Medipack. Open the Crowbardoor in the W wall and get in, take the Revolver Ammo and turn around to shoot the Blue ball. Get out of the room and you will end up at the 4 levers again. Throw the lever to prepare for the 5th Secret, step back into the Transporter and you will be back where you left off. Swim back and go S out of the room to the cave where it started, dive in as the water is safe again and swim E.
*Continue:
Down into the tunnel and up in the room where the Transporter is now active. Get in and go back to…
Farplane, Intermediate, a new Water Gem.
Walk to the SE corner, stand jump down to the little ledge S then to the tree S. Get the Water Gem and turn around to jump to the ledge with the Cross N, shoot the cross to get the Grenades. Jump to the Skull Island and go to the SW corner to run jump to the ledge SW, run jump/grab to the ledge W. From the highest point a run jump/grab up to the ledge E and then over to the branch with the Skull stand NE. Place an Ice Gem and jump to the Icy ledge, then to the Transporter.
Farplane Ice Section, the 4th Golden Skull.
In this level there are a lot of things you have to do to get to the 4 levers and the Secret. So I’ll divide the walkthrough into 2 parts, first the one without the Secret adventure and secondly the one where you go for the Secret.
Without Secrets:
First grab the Large Medipack behind you and get into the next room.
Timed Door with Traps.
First we will tackle some nasty traps before attempting the Timed run. Jump to the bridge W, drop/hang from the S side and shimmy along the edge around the corner, pull up and immediately hop back, grabbing the edge again, shimmy all the way to the pillar at timed door and do the same there. Now you can run back over the bridge jump to the ledge and get to that Cog wheel S. Save, pull about 5 times and turn right a bit, jump over the wheel and run to the N, turning left and jump with a curve to the bridge, cut the corner with another running jump and jump (grab) into the open door. Go on to a sort of staircase, The Cog wheel in the corner is for later, to open up the timed door again later (the water is for the Secret section. Best keep a separate save at this point if you want to try both parts).
Crossbridge.
Go up the ramps and go W, down to a room with a bridge formed like a cross. Do not throw the lever on the pillar; just pass the gates (W). Crawl to a room with gates and candles you never have to use in this version, go W and just before that little pedestal is an opening up in the N wall, jump up and crawl in and use the Water Gem, an invisible rain bridge appears, walk over to the other side and ignore the earthquake.
Labyrinth, the Energy Orb.
In the Labyrinth go left and find Grenades, turn back going left everywhere and you’ll end up at a push block. Push it all the way E and turn back, go L everywhere to end up at the push block and pull it once. Turn around and go right to the higher ledge on the crossing, take a right there, then straight to the other high ledge and right. Head straight E now and end up on a marked tile on the floor, that’s where the block has to go. First go left there and get the Shotgun Ammo, return to the tile and go S, then the first right to the block. Pull it onto the crossing of passages (twice) and turn around, go E through the passage and follow back to the Cross bridge. Go W and through the crawlspace to the room with the candles, up N at the pedestal to the rain bridge and cross over to the Labyrinth again.
Go right, left, left then right at the high ledge and right again to get to the block, pull it as far as and go back W to the high ledge, left and left again to end up at the block left. Push it as far as it will go and turn around, go right everywhere and come to the block, push it E once and onto the tile. Turn around and head W to that high ledge, grab the Energy Orb and go S to the other ledge for Crossbow Ammo. Go S and right for a Small Medipack. Then go back N and first left after the high ledge, then right and left to get to the rain bridge. Cross the bridge and go down into the room with the Candles, straight to that tile S. Stand on it and use the Energy Orb.
Spiked Pickup Plains, the 4th Golden Skull and another Vraeus.
I advise you to save when the camera is showing Lara no matter what, because when you reload after a death you don’t have to wait the whole agonizing minute for the camera to get back to Lara again. And saving on a pickup spot will reload as a steady view.
There will be a continues circular flyby while you have to go pick up all items or the Golden Skull won’t appear. First there are Flares S, then Shotgun Ammo E, Shotgun Ammo on the other side (NW), Uzi Ammo in a smoking spot S, Grenades NE, a Small Medipack in the middle, a Large Medipack N, Revolver Ammo SW, Crossbow Ammo in the middle. Then the 4th Golden Skull appears NE. Now there will be one more item and that’s the Vraeus you don’t need, so walk E from where you picked up the Skull and you will be back in the room with the candles. Go to that crawlspace in the E wall and get back to the Cross bridge. Go straight E and to the staircase, down and use the Cogwheel to open that door back up, jump out to the bridge and go to the room N to get back into the Transporter.
Scroll down to continue here: Farplane, intermediate : place the Skulls
Optional With Secrets:
First grab the Large Medipack behind you and get into the next room.
Timed Door with Traps.
First we will tackle some nasty traps before attempting the Timed run. Jump to the bridge W, drop/hang from the S side and shimmy along the edge to the corner, pull up and immediately hop back, grabbing the edge again, shimmy all the way to the pillar at timed door and do the same there. Now you can run back over the bridge jump to the ledge and get to that Cog wheel S. Save, pull about 5 times and turn right a bit, jump over the wheel and run to the N, turning left and jump with a curve to the bridge, cut the corner with another running jump and jump (grab) into the open door.
The Ice Gem.
The next room is a sort of staircase, the Cog wheel is to open up the timed door again later, so first hop backwards into the water and find the UW lever in front of you. Save while Lara pulls the level and roll, swim into the tunnel N and go left, up high over the Blades around the corner and through the middle of the Circular Knife-trap. High up in the next corner and left over those Blades, quickly get into that open gate to the right and swim into the room ahead where you can climb up on a ledge left or right. Shoot those Sea Hags and swim under the NE arch, find and use the UW ceiling lever (to lower a block somewhere), climb out on the E side, you can grab up to the ledge above the NE arch, get the new Ice Gem and drop from the ledge.
The first of the 3 Levers.
Get onto the SE arch climb one level higher and jump into the opening in the S wall, follow to a deadly pool. Use the Ice Gem on the Skull post and an Ice ledge appears in the deadly goo. Walk past the Skull post and turn right to run jump to the ledge, then to the next ledge (watch the low ceiling). Throw the lever (to lower another block somewhere) and get back over the pool. Go back to the room with the water and see a rope hanging from the ceiling. Get into the NE arch and jump/grab to the rope. If you want more Revolver Ammo, swing into the SW arch and get it. Get back to the rope to swing into the opening N. Follow the passage W and then right where one of those blocks lowered, at the end is the 1st of the 3 Levers (you’ll get a screen of gates). Go out and right, over another lowered block to the end of the black&white tiled passage. Go right a bit to the top of the staircase/ramp till you hear a gate opening up.
Cross Bridge.
Roll and go W, down to a room with a cross bridge. Throw the lever on the right hand side pillar, some gates closes and other gates opens up.
Labyrinth and the 2nd Lever.
Go into the N side first, follow the passage there and just keep going right where possible. This way you’ll find Shotgun Ammo. Go about straight to the W from here, there is a push block S of that higher Textured tile, pull it once and go E to continue going right everywhere. Find Grenades and then come to a Skull post in front of a pit. Place a Water Gem and walk onto the invisible bridge till an earthquake occurs. Hit the look key, turn around and go into the Labyrinth again, head right again and after you go right at that push block, you have to take another right to come to the 2nd Lever (screen of gates). Turn back and go right again where possible, this way you’ll find a Small Medipack and finally come back to the Cross Bridge.
Blades, the 3rd Lever and a Torch.
Head into the S gate and right again, there’s a Blades-trap. I stood against the N wall, close to the Blades and did a side jump at the moment the Blades were closed so I passed when they were opening up. Throw the 3rd Lever and see those gates open up. Jump back and go to the corridor SE, pull the push block twice and go around the red wall to get behind it and head left at the next crossing. Throw the lever there to stop some more Blades further on and go follow the passage, in case the Blades block the passage you have to use the lever again till they stop in an open position and you can pass the Blades to find Torches. Take one and head back N to the Cross Bridge.
The Torch and 2 Golden Vraeuses.
Go back N into the Labyrinth, head W (almost straight) and pass the push block. Go first right and then left to come to the rain bridge, go across to the other side and go down into the rooms there. Go right (W) and light the Torch near that pedestal, go find 5 Candles and light them to open a gate inside the central structure, leave the Torch. Then get the Uzi Ammo close to the Candle standing at the E wall. Go into the structure and move that cross along the E side into the opened gate S. Head back to that pedestal NW and find the 1st Golden Vraeus. Go to the E and find the crawlspace up in the wall, go through and come to the Cross Bridge.
Labyrinth Pushblock.
Go N into the Labyrinth, first right and have a look right at the next crossing, there’s a Textured tile where the push block has to go. Go left (W) and go left to find that push block again. Push it once and turn around go back and right everywhere to get around to the block again, pull it as far as to the E. Move the block all the way onto that tile (you have to circle around over the Cross bridge/crawlspace W and the room with the candles once to get the block in position). Go W from the block once it sits on the tile, on those higher ledges on the crossings are electric rays. One ledge has the Energy Orb and the other (S) one Crossbow Ammo. From the Ammo go N and first left, then right and left to get to the rain bridge. Cross the bridge and go down into the room with the Candles, straight to that tile S. Stand on it and use the Energy Orb.
Spiked Pickup Plains, the 4th Golden Skull and another Vraeus.
I advise you to save when the camera is showing Lara no matter what, because when you reload after a death you don’t have to wait the whole agonizing minute for the camera to get back to Lara again.
There will be a continues circular flyby while you have to go pick up all items or the Golden Skull won’t appear. First there are Flares S, then Shotgun Ammo E, Shotgun Ammo on the other side (NW), Uzi Ammo in a smoking spot S, Grenades NE, a Small Medipack in the middle, a Large Medipack N, Revolver Ammo SW, Crossbow Ammo in the middle. Then the 4th Golden Skull appears NE. Go get that and walk NE, a Transporter will take you back, turn around and step onto the tile once more to get back to the Pickup Plains. The 2nd Golden Vraeus appeared SW, but it is right on top of a Spike and it is hard to get.
Pick up the Golden Vraeus.
This is how it worked for me:
Go stand facing W and about 3 steps from the Vraeus *screenshot*. Save when the camera is there and most of the times the camera will stay focused on Lara. Run onto the Vraeus as the Spike is almost up and get it. Hold back flip while Lara is picking it up and if you succeed the level will change and you are back in the room with the Candles.
The Vraeus Gate.
Go to the big gates W and place the 2 Vraeus. Follow through to a yard with a tree, drop to the ground to take care of the 2 Harpies first. There are some Flares N if you want and some Uzi ammo SW. Then jump on the block S and climb on the ledge with the Skull post. Place the Lightning Gem and a new branch appears on the tree. Run jump to that branch, stand facing N on the highest tip, turn right a bit and hop back to run jump with a left curve (banana jump) around the trunk. Get into that crawlspace in the N wall and follow to where you get the Secret #4 sound.*
Optional for the next Secret:
Shoot the Blue ball and turn back, the level will change once again. You’ll end up at the 4 levers again; throw the 4th lever to get a ledge out in the middle of the place. Run jump/grab over and get Secret #5 , the Oricalkos Rock. Jump back S and step back into the Transporter, you’re back in the same passage.
* Continue
Get out and quickly get up on the other side of the yard as 2 Wraiths will chase you. Make your way back to the room with the candles, sprint E and go through the crawlspace E to the cross Bridge and sprint straight out to the staircase. Drop from the top floor into the water below to get rid of the Wraiths. Pull that Cogwheel about 5 times and roll, run out the door to jump to the bridge, get to the Transporter in the N room.
Farplane, intermediate : place the Skulls.
Drop N from the island onto the platform with the 4 Skull pedestals and place the 4 Golden Skulls there. Step into the new Transporter.
The Lost Spirits, The Oricalkos Rock (in case you didn’t go for the 4 levers).
Slide down into the next room and shoot that Fire Dragon, get the Oricalkos Rock (in case you have it already it will not show up in the inventory) and go through the open gate. Drop down into a blue circle and get the Osiris Piece (I had that one already). Go into the passage S.
Jump over that first Blade and crawl underneath the next one, climb the grey wall ahead and come to a Lake area. Walk W and through a deep part, when you walk straight to the hill W you can see a flat part up a bit. Jump to that flat part and turn left, run jump S and a bit right curved to get to the next flat (green) spot *screenshot*. From here you can run jump with a curve and grab the branch on the tree. Walk up to the thick part of the branch and grab up to the one above, get to the NE corner and run jump down to the arch on the building, get into the other tree and go get the Energy Orb. Drop from the tree.
2nd Osiris Piece a Knight and a Spider.
On a pedestal is a Red Gem, it’s the second part of the Osiris Piece, take it and a flyby shows a Knight getting on his horse.
Save after the flyby and I tried to stay in the centre of the circle as much as possible, as the lightning is deadly and he won’t get too close to you. When you go stand in the middle of the Pentagram, in that light and facing N, you can use that Oricalkos Rock to destroy the Pentagram and the lightning will stop a little after. Now you are free to move about and shoot that Knight off the horse and then finish him off.
Optional: If you choose not to use the Rock, you can stay in the middle of the Pentagram as much as possible and shoot the Knight from there. Then when you step out of the circle a cut scene will show the Knight being killed by a Wraith and a Giant Spider appears. Shoot that Spider too.
After the battle go SE, jump along the E side of the lake (don’t fall in). Then jump to the corner of the island and go over to the W side to jump/grab across to the one with the energy tile, place the Energy Orb on it facing E. Then get to the Transporter on the other island and get back to where it all began.
The Lost Spirits, Finale.
Optional for Secrets:
Head N and back into the room with the Skellie grave, open the new crowbar door N in the NE corner and walk carefully around the corner at the Blades, get Secret #6 , a Large Medipack and 2x Crossbow Ammo. A Wraith shows up, run back out and go S from the room with the Transporter, the next room has a cross SE, lure the Wraith to it. It’s good you came back this way as there’s another Secret nearby, go up S through the gate and left at the burning Skellie, find a new opening N in the room with the second Skellie. Go in and look for a Torch hidden in the NE corner between the chairs, duck from facing SW and get it. Go back to the burning Skellie in the previous room and light the Torch. Head W and left to the room with the pool where you used the Holy Water, just left around the corner is a new Skellie. Burn it and jump into the pool to get rid of the Wraith and leave the Torch. Return to the room where the Torch was found and find the open wall S, go in and get Secret #7, Grenades, Revolver Ammo and 2x Crossbow Ammo.
Go out and W to the crossing to return N to the Transporter room.
*Continue:
Go to the E wall and push in the block, follow the passage to a Hall. Place the Stone of Osiris (2 pieces combined) and get onto the Altar E. Step into the Transporter and go to the next level.
Level 12 - Osiris’ Pyramid.
By Thierry Stoorne.
The Spike Jumps.
You’ll have to start off right away with some fancy jumping. Stay where you are and look in front to see a pillar in the pit, stand about one step from the green square.
Boulder #1.
Run jump with a roll to that pillar and wait for the Boulder. When it gets close, do a stand jump over the Boulder and grab the edge of the floor before the Spikes on the pillar get you.
Boulder #2.
Now do the same and side jump to the left after the jump/roll to the pillar. Side jump back and a stand jump back to grab back to the floor again.
Boulder #3.
Now do the same one more time and side jump to the right after the jump/roll to the pillar. Side jump back and a stand-jump back to grab the floor again.
Now the 3 pillars are safe. Jump into the 2 tunnels the Boulders came from and go up, turn around and use the 2 Jump levers, one on each side. The gate at the pillars opened up, jump back out onto the pillars.
Open the gate in the Blade Pit.
Stand on the SE corner of the S side pillar and face E, you have to do a curved run jump around that golden fence to land on the floor behind it. Jump to the green ledge SE, then NE and finally to the now disabled Spike ledge in front of a lever (the first to open a gate). Jump back W to the 3 pillars and go to the N side. Do the same to get to the floor behind the golden fence, but here you have to jump up to a block with a fence NE, just around the corner. Face S when on the block and push the green block in so you can step on the green tile to disable the Spike ledge at the lever. Jump back down and then to the ledge NE, to the lever and the gate opens. Jump back and go to the open gate to the Blade Pit W.
The Blades Pit. *Map*
Stand right, face S and side jump right past the Blade onto the slanted side of the pit keep facing this way and jump from side to side till you are close to the next Blade. When that one is back, slide to the edge of the pit and jump with a hard right curve to get past it, keep jumping till you are on a safe ledge. Do the same thing to get past the next 2 Blades and when jumping near the block on the ceiling you have to slide to the edge of the pit again and jump hard right, now just slide down and land in front of the open gate. Save.
Planetary Room, the Blue Gem.
Run down the ramp and jump sharp right or left over that Spike-trap into the next room. Shoot the Harpies and go stand at the hole (with the grating) in the floor facing W, grab up to the transparent block and climb up. Back flip and jump to land on top. Immediately jump through (W) to get behind the Demigod and duck against the gate, turn shoot him and get his Blue Gem. Hop back to that block and drop grab backwards to activate the Jump lever. You’ll land at the hole, which now opened up, climb down the ladder S side.
Head into the passage S and come to a room where 2 Gems are needed. Head up the stairs W and follow to a room where another Demigod attacks, this one leaves a Red Gem. Place the Red Gem in the receptacle at the N wall and a gate opens up in the SE section of the room. Drop down into a room with a pool below the floor.
Pushblocks, Blue and Red Gems.
In the E section of the room are 3 push blocks in the E wall. They have to go into the alcoves in the W section. The one in the middle goes first and straight W into the alcove, now you can go in there and push out the next 2 blocks. N goes N and S into the S alcove so the pictures on the wall are complete again. An UW gate will open up down in the W section. Swim in and climb out to shoot the Demigod for his Blue Gem, use the Jump lever on the wall to open that UW gate in the E section. Swim back and straight into that gate, go straight (to the right is closed) and up to get the Red Gem. The gate will open up, so go out to the E section of the push block room and grab the ladder over the S water hole, back flip/roll and grab the floor at the open gate. Go out S and down the stairs, to the N wall in the room below where the Blue Gems can be used to open the gate.
Follow in to a room where the Red Gem can be placed N to open the gate S, go through the passage to a crossing. The gate S will open up, providing a way back up to the Planetary room.
The Pyramid.
Go E instead and up to the Pyramid. Shoot the Baddies and get 2x Uzi Ammo, a Small Medipack and climb the block N to jump over to the Uzis on the pillar, more Baddies will show up, won’t mention them again but always check if they dropped anything (in those areas around the Pyramid are lots of baddies, if you want you can run around there and shoot them all for the goodies).
The Trapdoor’s Key.
Jump onto the base of the Pyramid and go N between the fence and the Pyramid. All the way around to the S side, where you’ll bump into a high wall. Stand against the wall, face S and back up against the slanted stone, take 3 steps S and back flip, then jump with a hard left curve to get onto the wall. Jump to the wall E and then SE over to a crate behind the fence. Then jump SW onto the wall, head E and at the end of that wall a jump to the NE, go on E and drop left from the wall into a yard with crates, go to a pit NE and turn around to shoot the Baddies, one will drop the Trapdoor’s Key. Go to that pit NE and slide backwards off the corroded ramp. Climb down and swim under the ladder to get Secret #1, a Shotgun.
The Nitro Canister.
Back up the ladder and back flip into a passage, turn around and back flip onto the corroded ramp. Jump and grab the upper floor and jump S back over the pit, go W and in the NW corner is a lever to open the gate. Go straight W almost to the end and right around the corner to find the keyhole for the Trapdoor’s Key. Drop into the open trapdoor and shoot the box in the tunnel to get the 2x Shotgun Ammo. Go on to the end and open the hatch above to climb up to another yard, shoot the box for the Nitro Canister.
Climb back up the wall and go N, drop down and go to that small fenced area. First run jump through the gap between the barbed wire and the back section of the fence to shoot some boxes for Uzi Ammo and a Large Medipack.
Blow up the Crate.
Jump back and go into the tunnel, take out the resistance of which one will drop Uzi Ammo. Find a ceiling hatch over that crate in the middle of the room and open it. Climb in W and follow down into the next room, throw the lever to open a gate and jump back to the crawlspace from standing on the lever block. Drop out into the first room and climb in E, follow to an intersection and go right, drop out of the duct into a room with a laser floor. Go one ledge down line up for a run jump/grab NE into the opening and in the next room is a lever N. Go into the open gate and find a lever left, just inside and this one will open the gate S. Throw the lever on the explosives crate S and watch how a crate explodes at the Mausoleum near the Pyramid.
The Door’s Key.
Turn around and go into the room N, up over the crate E and follow past a closed gate, down the stairs to a room with a pool. Jump/grab up into the passage over the SW corner of the pool and follow to the next pool dive in and use the UW lever. Go back through the same passage and just run into the pool, as you have to swim down the open trapdoor anyway. Follow to an UW lever, throw it to open a gate and turn left (S) to swim under the low ceiling. Get Secret #2, a Large Medipack and return to the pool. Head into the passage S and follow through the gate you opened to the pit you were before, run jump onto that ramp and back flip onto the higher ground, run jump S and climb the E wall. Go N and look down behind those crates left. Climb down between crates and fence and get the Door’s Key from under a box. Climb back up to the walls*.
Optional for a Secret, can also be done another time: Go over the outer wall to the W side of the Pyramid. Climb a block to get on to the higher wall W and go all the way NE to where you can jump/grab to the top of the Mausoleum, climb up to Secret #3, a Large Medipack.
*Continue:
Go NE over the wall and down to the ground near that gate, look for a box a bit S of the gate and get the Large Medipack. Open the gate N with the lever next to it and go straight to the Mausoleum N. Down in the hole you blew and in the last room is a lever up on a sandy ledge (screen of the small gate in the room with the 3 push blocks). Notice the 2 Gem receptacles left and right of the lever. Go back and out off the Mausoleum and head W, jump over the barbed wire and find a metal sort of mound close by, you can climb down into the laser room area. Go E and into the room N, then over the crate E and follow to the room with the keyhole left. Open the gate to the Bike.
The Bike.
Fit the Nitro on the Bike and take it out of the room, go left down the stairs and follow the passage carefully around the pool and through the next couple of bends to the Pit. Back the Bike up near the open gate and speed up holding “sprint” so you’ll jump onto the ramp. Go with aright hand U turn around the crate and into the lower tunnel. Follow to a room with water. Just ride the Bike down onto the steps and off the right hand end onto a ledge, slowly go around to a ramp going E. Back the Bike up as far as possible and sprint to jump into the bypass E, go around the corners and line up straight for the next jumps. Onto the ramp below and keep up speed to jump into the opening W. the gate will open up, just ride down into the next room.
Leave the Bike and go into the passage N, follow into a room with stairs. Climb the ladder of the right hand wall and go up to a ledge with a lever. The lever will open the gate E, but first you have to double back to disable a Spike-trap. Drop from the ledge and go back to the Bike, in the middle of that room is a grated trapdoor, which opened too. Dive in and throw the UW lever just under the trapdoor, roll ands swim through the tunnel into the room with the ramps, get air and swim into the tunnel S of which the gate opened up with the last lever. Throw another UW lever in the end and swim back to the Bike room. Climb out and go N again, up the ladder to the ledge and jump onto the transparent block E. Then over top the open gate and look up right at the disabled Spike-trap, use the Jump lever and go into the Planetary room.
A gate opened up E. Hop to the central ledge and run jump over the slanted block to grab the edge at the open gate. Follow in and a Demigod with some Harpies will descend from the ceiling. Shoot all and get the Blue Gem, use it in the end of the room and drop down into the open trapdoor. Jump to the 1st Blue (Mausoleum) Gem on the pedestal and Spikes will start to pop up on the ledges, run jump to the first, landing on the moment they just went up and do a running jump with a curve to land left or right of the next Spike ledge. Hop to the ledge in front of the Spikes and face the wall with the opening over the Spikes, hop on the ledge and run to the wall to grab up to the opening above before they pop up again.
Start over, back into the Pyramid for the 2nd Blue (Mausoleum) Gem.
You will now walk down to the Spike-traps at the Transporter where the level started. You have to go through the Blades Pit again. Walk onto the left side brown ledge and jump over the W fence, do the banana jump to the pillar again and get into the gate W. Pass the Blades to get into the Planetary room and go down the ladder in the floor. Head N, go straight at the tunnel to the Pyramid and left in the next room. Go right and up the stairs in the green room and up to the room with the fences.
Go to that open gate in the SE section of the room where you used a Red Gem and down to the room with the push blocks. Save before you dive into the E side small UW gate and go right at the intersection. Careful at the end where the opened gate is, there are Boulders, swim left into the room and into a small tunnel E, just over that central Boulder. Throw the UW lever and roll to swim back. Left into the Boulder room, and up SE into the open hatch. Throw a lever W and go back into the water, swim up into the NE corner and throw the lever there. Back into the water and now up W over the central Boulder, get the 2nd Blue (Mausoleum) Gem.
To the Mausoleum, the 3 Red Gems.
Dive back in and swim back into the small gate SW, left at the intersection and up in the push block room, up the ladder S and go S down the stairs, left and through the rooms to the tunnel to the Pyramid. Go left (N) and down into the Mausoleum, place the Gems left and right of the lever on top of the closed gate below. The gate will open up, go in and shoot the Demigod, then collect the 3 Red Gems (see a cage on the Pyramid go down).
Up the Pyramid.
Go out of the Mausoleum and get behind the fence around the base of the Pyramid again. Around N to the S side and get back onto that wall with the back flip jump, this time go up the green steps N and get on the very top of the Pyramid. Go to the middle of the E side and slide down backwards till you get to the ledge with the receptacle. Place the Red Gem to lower the next cage. Jump N and then climb up the ledges 3 times, go to the N corner and jump around the corner to another flat ledge. Hang from the side and shimmy right till you can drop/slide to the receptacle. This Gem lowers the cage on the W side. Use the ledges and the higher ledge on the Pyramid to jump and shimmy around to that side. Place the last Gem and watch the flyby. No more convenient ledges here, so just slide down to the base and go to the S side.
Jump up the wall and the green steps to get to that nice Transporter. Step into the middle and the level changes.
Level 13 - The Secret of the Pyramid.
Thierry Stoorne.
Entering.
Swim into the tunnel W, throw the UW lever and roll. Swim close to the Spikes and save. Time the Spikes to swim through one by one, turning against the wall after each pass so you won’t swim too far. Back in the hall, you have to pull up on a slanted ledge N, start jumping and take out the pistols. Shoot while jumping and hear a gate open up (behind you), just keep jumping and do a roll, shoot the ball S and slide back into the water. Go to the E side and pull up N or S, start jumping and slide backwards as far as possible, then jump and steer to the side to get into the opening. Throw the lever and go out to swim to the gate E.
Just slide down and step back a bit, back flip to the ramp and jump/grab to the Jump lever. Enter the open gate and go shoot the Demigod. He will leave behind a Little Wheel, get that and put it on the little wooden axle of the contraption NE. Go to the lever S and a cage goes up N, climb it and up the ladder to an alcove, turn around and jump/grab to the Jump lever. Use the second lever S and get into the gate SE, follow to a ramp.
Jump Pit.
Stand right and slide down forwards. Jump right from the end of the slide and keep jumping left till you can grab the higher slanted block. Shimmy left to the other end and pull up, back flip onto the ledge behind. Jump down onto the slope below and jump till you reach the ledge with the lever, throw that to open a hatch in the ceiling. Run jump to the high ledge, walk E and jump/grab up into the opening. Use the lever over the hole and run down into the hole with a grab from facing N, do the same to get back up the high ledge and into the other open hatch. Get the Shotgun and Shotgun Ammo and climb up NW.
Skellies.
Go over N to get the White Stone and then shoot those Skellies into the hole. Use the Stone S and get into the open gate for the Lasersight and Revolver. Use the lever to open the gate N and get in there.
Shifting Ledges.
Go to the room with the shifting ledges. To the right you can see a crawlspace in the wall, that’s a Secret. Hop back and run jump in with a bit of a right curve just before the ledge at the entrance appears. Then run to the wall and grab up. Get in to get Secret #1, a Large Medipack and Shotgun Ammo. Now for getting back out, drop when the ledge will appear below, back flip and then run forward with a left curve onto the tile just appearing and jump to the tile just right of the opening W. Run over the corners of the tiles onto the one in front of the gate. Grab so when you fall you will catch the edge of the floor.
Pull up and turn around, look up in that grated ceiling and shoot the Brass ball with the Revolver. Turn around and save again. Run in and quickly duck behind the ridge in the ramp to dodge the Boulder. Go up and straight through the Water room.
The Water Room, the Little Wheel.
Left of the caged lever W is a short passage, go in and turn around to find a Jump lever in the hole in the ceiling. A trapdoor opens up in the centrals structure in the Water room.
Dive in and climb up that middle structure and back in the water, then throw the UW lever E. Climb back out and go down E into the pool, swim into the UW lever Maze after saving.
Go left and then right, around the cage with the little wheel and throw UW lever #1, roll and swim back, go left and to the end of that stretch. Right around the corner and somewhere in the middle of this stretch throw UW lever #2 there. Now first go back for air as the entrance reopened.
Back in and right, follow to just around the corner W and throw UW lever #3, a bit further UW lever #4. Swim on and left at the open gate to the little wheel, but first use UW lever #1 again and swim to the entrance E for air. Now you can go in at ease and get the Little Wheel from the cage, don’t use any of the levers again and swim W, the gate in the back of the Maze opened up. Follow up to a room where you can place the Little Wheel E to lower the cage W. use the lever and swim back through the Maze to the water room. Go to the now lowered cage W and use the lever to open the trapdoor down in the central structure.
Dive down and swim through the tunnel to a wider tunnel, go on and in the second wide tunnel are some Shotgun Ammo and another Shotgun. Climb out, go to the next room and get back to the water hole to shoot the Skellies into it. In the room where the first Skellie was is a push block (N wall), pull/push that into the alcove in the room S and the trapdoor opens.
The Cage Room.
Face N and drop/hang into the opening, let go and look for the cage to the right in the deadly pool, jump onto that cage and immediately start shooting the Harpy, there’s another Harpy across the room. Jump the cages to the left hand lever E, then go over the cages to the SE corner; the last jump is a run jump/grab to the corner of the higher cage. Use the lever E and hop to the N to go into the open gate E.
Shoot the Baddies and go N, then up the ridge W, notice the small gate in the N wall (middle structure) there. Continue W and around to the right to a lower room, climb up at the double fence N. Face W and run jump around the corner to the tiled path (Remember this! ). Look for the Jump lever S and get on a ledge from which you can jump to it, a gate opens up. Go back W and left to that small gate you saw before (just before the drop off) and get in the Baddy will leave a Large Medipack.
A White Stone.
Get down into the pit and shoot the baddy, then use the lever and climb back up, back flip to the entrance ledge and find the ladder to go all the way up to the opened gate, follow through, kill more Baddies and throw a lever to open a gate. Follow all the way back down and get onto that tiled path where you used the Jump lever before. Go W and find the new open gate into a large room. There’s a central structure with 3 directions. Run jump and grab over that slanted block N and into the tunnel there, follow down to a room with a White Stone.
Throw the lever in the other corner and see a gate open up. Get back into the entrance and watch out for the incoming Boulder, just side jump right onto a small ledge. Follow the tunnel back and jump to the central structure, go straight through the open gate. A Demigod comes down, you know, get close, duck and shoot. Stand facing E between those high pillars and back flip onto the one behind, jump and jump again to grab the thin ledge above, go to a Jump lever W and jump to grab it.
Go through the open gate S and on the walkway in the next room, you can see grey ledges below. Stand over the ledge, face E and hop backwards off the bridge, jump and land on the ledge. Walk up N and stand jump (hold “forward” down) into the tunnel N. Throw the lever and the gate back to the Cage room opens up… Wait don’t run out yet, use the lever on the back of the block too and see a gate open up to a receptacle.
To the Upper Level. (Remember this!).
Go jump N to the cage and then to the passage E, follow in, go left and follow all the way to get back onto that tiled floor where you used the Jump lever before, go W and into the open gate again to get to that room with the 3 directions (Remember this!). Hang from the N side of the W walkway and drop to a ledge close to the central structure. Jump to the opening W and follow in to the receptacle for the White Stone. A gate opens up after placing it.
Go back through the shallow water and climb up the ladder just before the now closed gate, walk up to the E wall and grab up to the walkway above, go in E and get Shotgun and Ammo. 3 Skellies will come for you just shoot them back where they came from and off the walkway. Go onto the walkway S and look down SW, jump down to those ledges in the corner and get Secret #2, Revolver Ammo left by the deceased. Now jump with a curve into that opening S under the walkway and throw the 2 levers on the block. Go to the open gate S and jump left around the corner to the ledge, then over the cage to the passage E and make your way back up to the upper level along the well-known route. Head S and all the way to the end, right there and into a new area.
Waterworks.
Go onto the N side beam from the crossing and stand on the lower part, face W and hop backwards from the beam, into the water below. Straight in front of where you’ll land is an UW lever on the pillar under the beam. Throw it and swim into the open gate W, throw an UW lever and swim out, get air and swim into the gate S for another UW lever. Out and into the gate E, follow to the UW lever and swim back to the big room after using it. Go to the W side ledge and climb out, hop over to a lever NW and save there.
Timed Trapdoor.
Look up E from where you stand at the lever and see another lever just over the textured tile, you have to raise a trapdoor to get to it.
Throw the lever, hop back turning left and run jump to the ledge, head left a bit to run jump to the S side ledge and run turning right to jump up to the ledge along the S wall (SW). Jump to the ledge in the SW corner (W wall) and curve right with a running jump to grab the walkway, go over to that beam N and run jump to the trapdoor in the left ledge and quickly use the lever. Hop back to get onto the ledge before the trapdoor opens up.
For the White Stones.
Jump back to the walkway and go into the newly opened gate W, throw the lever on the block and watch the flyby, pools turned safe. Go back out and dive down from the walkway, swim back into the UW gate E and follow past the UW lever. Climb out and turn around at the lower pool, hop back and grab the Jump lever to see a gate open up. Go to the passage E and crawl through to another chamber with a Jump lever, opening up a second gate. Follow back to the big room and get back onto the walkway. Head E and back to the first room with the grey ledges below, drop from the walkway and get into the 2 open gates to take the 2 White Stones.
Go through the passage N to the room with the cages and be careful, as the pool here is still deadly. Jump over the cage to the passage E and head straight E into the new room. Go down left and right of the ramp to place the 2 Stones and go into the open trapdoor with the water below. Swim through and go up the ladder, crawl the crawlspace, go to the room where 2 Demigods are waiting. Take the 2 Little Wheels from the pedestals and use the on the S wall, throw the left hand lever, then the right hand one and see a gate open up. Go all the way back to where you used the White Stones, go W to the crossing and then left into the tunnel S.
To the left at the end is the open gate, go through and follow to a slide down. Then walk up to a pit and do a run jump to the slanted side of the path below. Follow down to another pit and run jump around the right hand corner with a grab o get under the low ceiling. Shoot the Android and get his White Stone. Hop on the ledge with the Skellie and a Large Medipack and then get the Uzis and some Ammo near the other Skellie. Go back to the poison water and jump SW and up the ramp near the S wall. Halfway stop and look N and take a run jump to the other side to a receptacle and use the Stone to open a gate. Drop from the ledge, go to the pit and jump back into the tunnel N of the pit.
Go left around the corner to find the opened gate up in the wall. Get some Revolver Ammo before you turn the pits into safe pools by using the lever on the wall. Go to the pool and swim through to the other one, get on the block and use the Jump lever S. Swim back and climb out to head into the tunnel N and into the open gate.
The Shuttle.
Shoot the Android up on the ledge in the big hall and turn back to walk into the cave S and climb that rock left at the point where the camera changes, turn left and climb up towards the camera. Jump right (left for the viewers) around the corner and get onto the higher grey block. You can see the Shuttle up N, jump first to a pillar and then grab that grated thing N and go climb up left, then up a bit and right around the corner, the Android shouldn’t bother you much at the moment. Climb up (going in an angle up) and all the way left (S) to a crate on top of the grated contraption.
Shoot that crate and get the White Stone, by now that Android will have noticed you, draw a gun and slide down N to land onto the walkway next to him. Take him out and go to the E side of the walkway. Face N and grab up to the contraption to climb up and left to the top of the thing so you can enter the opening W. Follow through to a room where you can place the White Stone and see a gate open up. Go back to the Shuttle hall and climb down the S side of the contraption so you can drop onto the walkway below. Go N and run off left onto the Shuttle. Look for the opening NE, jump in and follow to a pit. Jump that (the water is harmless) and go left and right at the crossing, into a big hall, don’t step on the glass floor and get the 2 parts of the Computer Disk, one in each hall.
Take Off.
Go back and jump left out of the passage onto the roof of the Shuttle. Crawl under the W end of the walk way and climb off the W side of the roof, drop/grab and get inside. Use the CD in the terminal and the Shuttle takes off.
Level 14 - Osiris's Spaceship.
Thierry Stoorne
Authorized Walkthrough D&G Productions.
There are some doors in this level that will never open up.
The Shuttle docked to the Spaceship.
Enter the red docking tunnel and go left as the door ahead closes up. 2 Baddies try to stop you, go E and follow past a wide passage left to where another Baddy attacks. Go on to the last room E and stand facing S at the square in the middle of the room, it’s a trapdoor, open it up and get in. Follow into a room with walkways, nothing else to do then getting down in the water below and shoot the UW grating E (also possible with pistols from the shallow part of the pool, duck and shoot). Swim through the opening and follow the tunnel to a dark corridor, go left and save at the Laser-trap.
Laser Traps.
Over the 2 Lasers you can see a grating, shoot that (pistols) and save. Stand at the line on the floor and jump over the lower Laser as it gets close, run and duck about one block away from the ledge with the lever, the high Lasers goes overhead, now stand up and jump onto the ledge before the lower Laser gets you. Throw the lever and jump over the high Laser when it gets close, run and jump over the lower one as it moves towards you. Go S and find another passage like it. Do the same to get to that lever and back. A door will have opened in the corridor E and left. Jump the Lasers there the way you did the others and get to the door.
For the Fuse.
Go straight to an opening in the floor (there are more so just ignore the others) drop into the pool below and swim to climb out S in the middle of the room, turn around and jump up to grab the monkey swing ceiling. Heads towards the pillar with the ladder and go along the right side of it, then right around that duct and to the E wall, drop into the opening in the fence and head to the right, circle the whole room and go up the passage to a Red Room.
Go into the back of the room and onto a block, grab up N into an opening above and climb up once more to get to a lever N. 2 Doors open up in the red room, go back down and find them W. Pull out the 2 Puzzle Pieces and put them on the red floor tiles in the central structure. Climb back up to the room above and head W. Stay on the ledges at the side of the room with the Sphere and jump into the opening in the W wall, throw the lever there and jump back out to the side, head back down to the red room. The Fuse is now available from the W side of the room, get it and go to the door W, it will open up again.
Follow back all the way around that room again and drop into the water below, go to the N side and from the shallows along the wall you can run and curve to jump/grab the ladder. Or go to the S side get on the monkey swing and drop/grab the ladder. Go around and climb back up in the opening. Go to the Lasers and jump the high Laser, run and jump over the low one. Go right and right and then left into the passage W, swim back to the room with the shallow pool. Go across to the ladder and climb up to the walkway (ladder W), go in S, climb back up to the trapdoor. Go straight W and to the right is the receptacle for the Fuse to lower the Lasers down the corridor.
Go into the passage NE and follow to a lever. A Laser will cut open a part of the wall, head back and enter that new area. Follow through past closed doors and end up at a pool. Stand against the right hand wall and take one sidestep left, turn left a bit and run jump onto that transparent block, jump and grab the grated ceiling. Go over to the next block and turn left before you drop, slide and grab the edge, pull up and back flip/roll/grab the tip of the next block. Climb up and pull up over, almost immediately jump and jump from the next to grab a crack. Go around left and pull up, walk E and turn around to back flip and jump/grab to the ledge above.
Another Fuse.
Use the lever and a Gun turret starts firing away, just hop back and drop into the water. Find the opened gate in front of the tunnel N, under the ledge you just dropped from and swim in. Pull the lever in the next room and see a door open up. Go back and swim straight through the room with the gun, left a bit to that slanted piece of floor, stand against the wall and quickly grab up. Run to safety. Go through the passage and turn left at the crossing, get another Fuse at the end (a door opens). Return to the N and follow the passage back to the broken wall, go up S and right, right again and into the open door.
One More Fuse.
Drop from the walkway onto the one below W and look for the gratings on the wall, shoot them and jump/grab the right hand one. Get in and climb up S in the hole in the ceiling, run through the Red Stripe maze and find a transparent red Jump lever up on the E wall in the end. Use it and return to the hole in the floor, jump over to the Fuse and get back down in the hole, crawl backwards out of the hole and drop on a slanted block, keep jumping towards the walkway and take a run jump (angle to the NW) to the red corridor near the crossing N.
Drop into the hole over the crossing and face E or W, there are 2 passages with Lasers and you have to get into both to place the 2 Fuses. Sidestep (better view) as close as possible to the Laser and turn your back on it. Laser goes away, hop back and duck crawl in backwards (hold Ctrl). Jump up onto the other side and place the Fuse, run back in the pit and climb out when it is safe. Do the same in the other end and the trapdoor in the S end will open up. Go stand close top the Lasers and run after the lower one, duck for the higher one and stand up again, quickly run into the hole.
Follow the passage, climb up N and then up the ladder N, throw the lever and go up the next ladder to the open door. Go down the ramp in the next room and through the automatic door. Look for the red ladder on the pillar left and go up to a passage, follow to a high drop off and jump/grab the ladder to get safely down. Follow the passage and come to a room with a deadly floor. Grab the monkey swing on the walkway above and go over to the last flat part on the other side, drop and slide/jump to a ledge. Go right (E) and to a staircase, go up and go right around corners to come to Secret #1, a Large Medipack. Turn back and go into the room S, shoot the resistance (you can’t fall off the walkway) and look up for a crawlspace in the 4th arched beam above (face S). Grab up and climb in to crawl to the Fuse, crawl back and drop out, head S and left around the corner you can place the Fuse.
Go N to the staircase and look for the second Fuse in the central wall, get that to the receptacle S and place it to see a door open up.
Back through the Deadly Room.
That one is all the way back, head N, down the stairs. In the room with the deadly floor a run jump onto the slanted block SW, slide/jump left and roll while jumping the slanted blocks keep jumping right till you jump on the blocks under the walkway, roll again while jumping (so you face the exit) and slide backwards far as you can, then a back flip and jump/grab from the block behind to get back on the monkey swing. Drop at the exit and follow the rest of the passages. Up the ladder, down the ladder and N through the now open door into the Central Hall.
The Command Centre.
The Blue Artefact.
Go to the automatic door W and head through the left hand one, turn left into a Store room, shoot the Baddies and find Secret #2, a Large Medipack behind the SE crate. Head to the N side storeroom and hop onto the SE crate. Look up in the SW corner to spot the grating, shoot that and get inside. Crawl up and get up in the next room. Shoot the appearing Android when you head to the other side. Pry the 1st Blue Artefact Piece from the block and then climb the block to get the matching 2nd Blue Artefact Piece, combine them right away into the Blue Artefact. Turn around and look up for a hole in the ceiling, face SW a bit and stand jump/grab to the thin ledge to get into the room above. Climb down 2 holes to end up at the crossing with the Red and Blue walls.
The Crystal Key.
Head W and shoot the Baddies coming through the door, go through the automatic doors W and then down one of the staircases E to the lower section of the place. Head E through the next hall and look left and right when you come into a wide tunnel, there are 2 receptacles. Go on to the crossing E and shoot the descending Android to get the Crystal Key he will leave behind.
The 2 Scarab Talismans.
Go back W and stay right or left in the hall to go into one of the bypass passages. You’ll come to the entrance to a big hall, don’t go in W yet but look behind a pillar E and find the receptacle for the Crystal Key. A door opens up to a room with 2 Artefacts. Go back W and to that crossing where you shot the Android, go left and find the open door NE. Get the 2 Scarab Talismans and go back to the crossing, right and to the 2 receptacles I showed you in this tunnel (left and right just before you enter the hall) Placing the Artefacts will lower the Laser at the crossing E, so head back and turn into the tunnel S.
The 2nd Crystal Key and the Crossbow.
Go in straight and another Android appears, shoot it and go right (W) into the W side of the room, go to the N wall and grab the gratings, climb up and to the right onto the ledge. Stand close to the red floor laser and back up against the wall, jump/grab the transparent block and pull up. Immediately jump and slide a bit before you do a jump with roll, keep jumping and you will see a lever in an alcove N. Slide back to the end of the block and back flip, then jump and grab the monkey swing ceiling to go over to that lever, the door across the room will open up. Backup against the wall next to the lever and run jump straight out onto the slanted block, get back onto the monkey swing and go over to the door.
Follow in to a hole in the floor. Climb down the ladder as far as possible and drop. Save here, go to the Large Medipack on the floor and the Boss will show up behind you. What I did was shoot him 3 times with the Shotgun and then I ran away as far as possible, even jump on one of the corner pillar if necessary. Normally he will drop then. Get the Crystal Key he will leave behind and place it S, the doors will open up. Go in and behind the Statue, up the stairs, climb into an alcove N and get the Crossbow, another door opens up in the central hall. Go back through the doors N and up through the next doors, left at the crossing and straight up the steps W in the next hall. Go E on the upper floor and to the central hall, into the open door N.
The Red Artefact.
Careful, walk along the higher side of the room to the back and get the 1st Red Artefact Piece, if you touch the lower part of the floor the Gun turret will be activated. Go out and into the door E of the central hall. Go straight to the very last room and down right of the ramp under that blue glass. Place the Blue Artefact and watch the flyby. The Blue Room will open up, so go back W and left at the crossing with the glass floor, pick up the 2nd Red Artefact Piece and return to the far E room to place the red Artefact down the left side ramp. The Red Room opens up, head back W and fight another Boss. Go into the Red Room and look for a Jump lever up on the E wall. Jump up against the pillar and grab then climb up one more step, back flip and activate the Jump lever. A Flyby shows what happens and a green pole appears in that big hall in the lower section W.
The Flight Deck.
Go out and W to the central hall, through the automatic door W and left down the stairs. Once downstairs turn left or right (U-turn) and follow the bypass to that big hall W, grab the pole and climb up to back flip to the walkway above. Head W and go into the Cockpit. In the SE corner is a grating, shoot it and go in to collect all the Revolver Ammo and Arrows that is hidden under the boxes. Go out and to the NE corner of the Cockpit and do the same to get all the Revolver Ammo there. Then throw the lever on the wall and see a green beam in a flyby. Head out and E onto the walkway. Down the green pole and to the E through the bypass, in the next hall is that green beam. Step in and be transported to the Final level.
Level 15 - Somewhere in Farplane.
By Leroy.
In this fine level you’ll have to fight Osiris, the “Boss” and it seems it wasn’t meant to save in between so you’ll have to do it in one go. Osiris will be in the beam in the middle making preparations to destroy the Earth. Lara has to stop him and his 4 mates and the only way seems to be firing at him with the Crossbow (Explosive Ammo), once or twice till a kind of flyby starts. As soon as one of his mates appears in a corner, go shoot him and take the Gem he drops, the other Demigods will appear now one by one. Go around the Island killing the Demigods and collecting their Gems, then you have to place the Gems in the receptacles and all has to be done rather quickly as Osiris has no time to waste. After placing the Gems I went shooting him again and the end flyby started.
I noticed it was best to stay close to the first Demigod when the level started, but you also have to mind the various traps like Fire, Lightning, Spikes and some additional Locust swarms.
So be quick and keep an eye on the health bar.
The reign of Osiris will end…
Watch the credits and the game ends.
13-03-2007
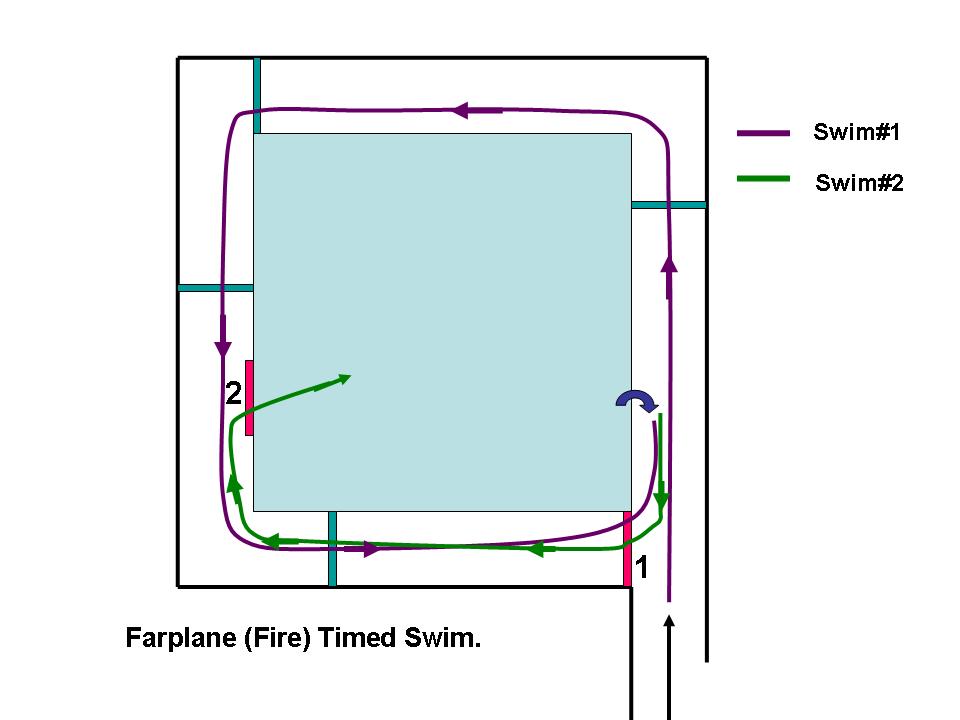