The Imprisoned Spirits
Walkthrough by D&G Productions
Level 1- A Time to be
Born
Into the Earth.
A trapdoor opens after all torches are lit and you can drop down into a dark
passage with steps, on top of the steps is a closed door, go down and through
the opening to a lava room, go L for the Flares on the ledge and then go
over to the ledge E and into the passage.
1st Glimpse of the Ruby Crystal.
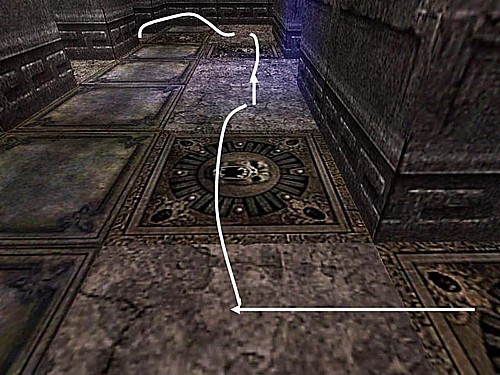
Go up to a deep dark pit where you can spot the Ruby Crystal on the
opposite side. Look L when standing on the edge of the pit and see a switch on
the triangular ledge, stand facing into the passage and sidejump onto that
ledge. Pull the switch to open that door in the lava room and go back. Go
through the open door and strange noises start while running up the stairs, get
out the pistols and start shooting the Mutants while hopping back around
the room, if one of them starts pounding his chest, he cannot be harmed. put
your guns away and then draw them again and he will come at you again. After
the battle, you will find a switch in the SW corner (face N) that opens the
next door.
The Crypts.
Go through the door and follow through a lava room to the Crypts. Straight
ahead is a passage leading to a big Tar Pit (later) and to the L the Crypts
continue, go L (S) and follow to where you will find a closed gate to the R and
up in the wall, then go E and get the Flares. Head up E again till you
come to a room with a closed door R and three Dragon Heads which require Dragon
Keys. Straight opposite that door and in the N wall is a switch, a cutscene
shows a gate opening up and that’s the one you saw near the Flares.
So head back down W and opposite the gate are some blocks against the N wall,
climb the blocks and walk up to the SE corner. Do a long runjump/grab (hold
forward key) to the edge under the gate, go in and run over the bridge to the
switch, a cutscene of a small pool (flooded now).
The Ruby Crystal.
Go back out of the room and follow the Crypts down to the NW and go L (W) now
to the Tar Pit. Head L and to the flooded pool, swim over to the passage across
and go up, follow the small passage till you go through a door and arrive back
in the first room, go to the lava room and into that passage E, follow to the
pit that’s now flooded too. Dive in and find the opening in the wall under the
Key (a bit to the R) Go up in a small room and look NW for a ledge with a ½
MP. Then dive in again and climb out into the other side of the room go
into the NE corner NE of the water, go up to where you can slide down to the
balcony with the Crystal. Grab the Ruby Crystal and dive into the water
to climb out N. Go to the lava room and through the door N and up to the room
where you shot the Mutants, open that gate again (SW switch) and go straight to
the Crypts, straight W and down to the Tar Pit.
The Tar Pit.
Go over the hanging bridges to the N and runjump to that floor NW of the
entrance, look for the switch in the SW corner and throw it to open the gate to
the first Secret. Go jump back to the bridge and head to the crossing, go R a
bit and see the blocks in the Tar Pit, runjump to the first and runjump to the
second a bit SW, then runjump up to the ledge in front of the opening in the SW
corner, follow in and get past the Fire Dragon before you shoot it or it
will block the passage, in which case you will have to jump over it. Better
lure it into the next room and shoot it on the S side so the dead body won’t
bother you. Go get a ½ MP in the SW corner, then go into the open gate W
and take Secret#1, Shotgun Ammo and a ½ MP.
Go out and L at the pool, into the NW corner passage and come out to a ledge
overlooking the tar Pit. Jump around the L corner and hop over to the N side,
again a standjump L around the corner and get Secret#2, the Revolver.
Jump back around the corner and drop down into the entrance passage W to the
door you can open with the Ruby Crystal. (or slide down, jump to the bridge and
enter W from there.)
Level 2- A Time to Die
“There’s
a time for all things”
Place the Crystal and go straight to the next door that will open for you. Go
on through the Cave and to the NW where you’ll find an opening to another big
cave with a long and narrow pool. There’s a dead man hanging L, that’s S of the
entrance (just to be sure you’re in the right cave)
The Ruby Crystal.
Turn around and jump onto a ledge just L of the entrance and from there a
runjump/grab to the block under the opening NE, go to the next opening and use
the grated monkeyswing ceiling to get into the next room. Grab the Ruby
Crystal and return to the big cave, go out E. Head S and into a small cave
with a wall torch and a pool. Climb up into a passage NE, push the Skull crate
3x and shimmy past it along the edge of the floor. Go on to a receptacle for
your Crystal and open the gate with it.
Deep Pit.
Go down W and turn around at the pit, hang from the edge and drop. Just slide
and drop onto the next slanted wall, slide off again and this time grab the
edge of the next wall, climb down and to the right into the passage. Follow in
to where a flyby shows you shows the route up the high pillars to the Sapphire
Crystal.
The Sapphire Crystal, jumps up to 1st level.
In the middle of the room, SW of where you are, are some Flares on a
pedestal, go get those and then head straight E from there. On the wall behind
the pillar is a switch, the first time you use it you’ll see a block go up but
you cannot move. So wait it out and then save, throw the switch and turn left,
sprint back to the Flares pedestal and a bit right passing it. On the far W
wall is the raised block jump on the block and quickly grab the N pillar.
Jump N with a grab and go E, runjump/grab onto the pillar you see SE and stand
on the SW tip of that pillar, turn facing exactly NE and then turn a little bit
R and now you should be able to do a simple sidejump R into that opening in E
wall (or jump in with a grab). Go up to the next jump, a long runjump (no grab)
curved L to end up on the ledge in the N wall.
Standjump/grab to the block SE and walk up to the SE corner, turn L and
standjump left around the corner to the next ledge. Go jump N go over to the N
ledge to runjump/grab to a pillar SE, then jump/grab into the E alcove.
Skull Crate.
There’s a Skull crate (pushblock) in this alcove and some marked Tiles on the
floor, since you can’t push the block to the E wall, push it to the 2 Marked
tiles N and the S on the edge of the floor, now a block and a pillar raised in
the room, the pillar can be used to get the pushblock to the E wall and onto
each of the 3 Tiles there and a pillar will rise in the far NW corner of the
room, where you started your climbing.
To 2nd Level, Timed Flame Run.
If all’s well you don’t have to use the timed switch (SE) again because the
timed block should still be up now, so head W to the raised block. Get up on
the N ledge and climb the new block on the N ledge. Standjump/grab E, then up S
(notice the closed gate E here). Runjump to the blue pillar SW, walk onto the
bridge and wait a bit there, you will see a flame start back up in the S under
the switch. Hop back on the blue pillar and the flame is off (Timed). Sprint
over the bridge turning L a bit in the end and jump to the closest corner of
that ledge where the flame was, then immediately run again and jump around the
R hand corner to the next pillar.
Runjump to the E pillar and from there to the opening in the E wall. Follow
through to where you can runjump/grab to the high pillars in the other part of
the room, go over the bridge and runjump with a grab into that ledge to the R,
then over to the N wall ledge and to the green ledge with the switch with one
of those curved jumps.
Timed Platform Run.
The switch will raise a Timed platform L of where you are, better go have a
look first. It’s R up in the corner, over the ledges to the platform and from
the platform onwards to the pillar.
This is how I did it: pull the switch, turn R and run into the N wall in the
corner, roll and standjump up with a bit of a R curve (a backflip/roll is
another possibility), immediately a running jump/grab into the ledge ahead and
quickly walk up to the edge, standjump/grab to the platform, to the middle and
pull up. Then runjump with a R curve and jump up the corner of the pillar or
grab the N side of it.
Don’t forget to save and turn NW, see the sloped ledge in the N wall leading to
that gate W, you saw before. There’s a trigger Tile on the sloped ledge, the
one with the blue electric fire. Stand back on the pillar and do a runjump with
a R curve and grab as you hit the wall above the ledge, slide and grab the
edge. Go L and pull up on the trigger Tile, grab the edge again and shimmy L to
a ledge, look S and notice the burners on the pillars to the switch are off!!
Runjump to the first pillar, standjump/grab to the next and runjump/grab into
the switch ledge S, throw the switch to open that gate N. Head back over the
pillars and to the ledge N, walk out to the edge and look around the R hand
corner to spot the red block, standjump/grab around the R to get up on that
block and go standjump up N and then S. If you like to go for a hard jump and a
pickup look SE and spot an opening in the wall, stand on the SW corner and face
NE. Turn slightly R and sidejump into the opening, go climb up R to a MP.
Go back and from the lower opening a standjump/grab around the R hand corner
and go on to the red alcove up N. Look W and see an opening in the N wall,
stand on the SE corner of the ledge facing W and turn slightly R, runjump (no
grab) with a R curve in the end and land inside, one more standjump/grab around
the R hand corner and you’re almost there, jump/grab into the opening SW.
The Sapphire Crystal.
Follow the passage to a ½ MP L and an opening to the top bridge in the
high room, jump to it and follow to the last jump over to the pedestal with the
Sapphire Crystal. The door next to the pedestal opens and you can take
the (easy) way out. Just before you enter the next gate, you’d better Save.
The Beast.
Inside the next room is a nasty Winged Beast. Get up to the blocks in
the corner, grab some Shotgun Ammo there and in the passage above you’ll
find the Shotgun to the R, go down the blocks to the ground floor and go
up close to the Beast, drop him with a single shot. Find a pushblock in the
middle of W wall and pull/push it into the opening between the blocks on E
wall, go into the alcove the block came from and throw the switch to raise the
block one level, push it onto the Tile in the SE corner (the door opens where
the Shotgun was). Go up the blocks NE again and through the door to the cave
with the pit. Go NE and back to the Caves, go NE and down the steps to where
you pushed that block before and drop from the ledge, go W to that red cave and
then NW to the cave with the pool.
The Emerald Crystal.
Go to the first pillar R from the entrance, look N behind that pillar and find
an opening in the wall, jump in and go place the Sapphire Crystal. The door in
the black structure W opens. Go out and shoot that Beast from real close. Head
into the open door W and into that door to get the Emerald Crystal. Head
back E through the Cave and just when you slide down into the next cave, on the
block over the hatch E is a ½ MP. Go back down to the cave and head S
into the small cave with the pool again. Dive into the small pool and follow
the W tunnel up to a dark room, find the Flares E and a receptacle for
the Emerald Crystal on the block in the W, this will open the gate N.
The Corpses Hand.
Follow the passage to a hanging bridge over the Cave, look L from the beginning
of the bridge and spot the switch W, do a long runjump to the black beam L of
the entrance to the room where you got the Emerald Crystal and jump around the
corner to use the switch. It will open that trapdoor in the pool below, so hop
down and go into that trapdoor, swim straight N and through the opening near
the bottom N, straight through the next cave and into a tunnel, up in the first
opening near the end and R (E) follow and in the end go up and turn W before
you climb up to a ledge where the Corpses Hand is on a pedestal. Save
before you get it and roll, run off the ledge and swim back fast, keep an eye
on your health and turn L and R a bit every time to shake off the Spirits,
swim back S to the second big cave and up through the open trapdoor above,
surface and the Spirits should go to the Totem N, if not, lead them there.
The Revolver.
Then go to the Corpse standing in the SE corner and place the Hand in it’s
chest cavity and the door on the hanging bridge opens up. So head back to the E
and out of the Cave, sharp R to the cave with the small pool and through the
water to that room where you used the Emerald Crystal. Up the N passage to the
bridge and go over into that opened door N. Follow the cave down to the NW and
when you see a small opening N, turn around. Climb the ladder on the pillar
into the opening above, go L and follow the passage to the end to drop down
onto the Pillar for Secret#3, the Revolver. Drop from the pillar as there’s no easy way
back onto the bridge, you have to go E again, then S to the small pool and
through the water up to the bridge, enter the cave again and down to the NW
where you climbed the pillar.
Go into the passage N and follow to the passage with the Corpses, follow past a
closed door to the R, to the end and after the battle of the beasts, you can go
into the room to the R in the end, runjump over the pit and climb up to get the
Emerald Crystal. Jump back over the pit, go L and then L again, place
the Crystal and follow the passage to a slide down into the next level.
Level 3- A Time to Plant
The Large Underground Temple.
In an alcove to the left when you go N are some Flares. Go on to the
ledge overlooking the underground Temple. On this ledge are also 2 Gem
receptacles (remember). Get down into water and swim to the opposite (SW)
corner and just left of the arch there is a small ledge where you can climb out
of the water, left around the corner is a lever, it will open a gate in the W
wall, dive back in and get into the opened gate.
The Sapphire Crystal.
In the room with the deadly water is a climbable wall to the right of the
entrance, walk up against the wall, jump and grab that wall, go left around
corners and up to get into the opening where you’ll find another lever. The
skull tile under the entrance of this short passage will rise, it has Spikes,
but they aren’t harmful. From the block you can jump back to the entrance ledge
and go on to a block SW, grab the overhead monkey climb and drop onto a block
at the end, jump to ledge for the Sapphire Crystal.
The 2nd Sapphire Crystal.
Take the same route back, the closed entrance will open back up and jump into
the water to swim all the way E and climb out. Head up the steps and go right
to go W over the rocks along the S wall and just past that gate you can runjump
around the corner to a brick block. Jump up to the SW and make your way to the
brick wall W.
Go onto the structure W. From the back of that building facing E you can climb
up to get the 2nd Sapphire Crystal. Remember the 2 receptacles? Head NE
to the wall, jump down to the rocks E and jump up E over the rocks, from the
brick ledge up left and place the 2 Crystals in the receptacles there. Turn
around and see the gates on the opposite side opened up, so hop back in the
water and climb out E again or just runjump left around the corner, head up the
stairs and rocks to the open gates.
Boulder Lock.
Left and right are slanted tiles in alcoves, over the tiles are boulders, there
are as many boulders as there are holes in the floor. All boulders have to go
into the holes to open the gates S. Just stand back against the slanted tiles,
back flip onto the tile and just slide down (no jump), stand still right where
you end up and the boulders will bounce over Lara into their holes.
The Emerald Crystal.
Go through gate and climb on that green block S, grab up to ledge W and get
onto the brick ledge. From there a runjump W with a left curve to end up on a
ledge next to the rock on S wall. Jump over to the ledge W and get the Torch.
Jump down to that rock NE and go down to that burning floor tile W. Carefully
ignite the Torch and use it to ignite the other the floor tile there. Go back
and use the newly revealed lever on the ground floor in the SE and use it to
raise a block on a ledge up W. Go N and just left of the entrance to the N
wall.
Climb up E to the ledges in the N side of the room and jump to the newly raised
block on the W ledge, grab up N, then face NW and jump to the ledge.
Jump to the central ledge S and pick up the Emerald Crystal from the
pedestal, a flyby will take over, Souls are set free. When you get control
back, you can jump the ledges to the SW corner for a small medipack.
The Ruby Crystal.
Make your way down (there’s a nice rock SE you can jump to) and pick up the Ruby
Crystal from the pedestal W. Go back E and use it to open the gate. You
don’t need the torch anymore, but you could use it to get some extra light. Go
down the slanted passage and the gate opens. Find a lever on the ramp in the
middle of the room facing W. A bunch of boulders, coming from the room above
will drop onto the ramps and end up in the tunnels against the closed gates,
but a gate will open NE, follow the passage back to the large underground area.
Boulder Run.
Use the Crystal NE and the gate opens up. Enter and run down around the corner,
save there just before the opening in the ceiling. Sprint down, running along
the middle, jump the Spikes-trap in the floor and immediately run to the left
side into the far corner. Pass the boulder and follow the dark passage to enter
a huge room.
Boulder Puzzle.
Walk straight into the room and on the 3rd left hand pillar is a lever, it will
release one of those boulders and a cage will rise to the right of you (E). Go
to the N end of the room and use the lever in the far NW corner, next to the
ramp. Another boulder drops and a block rises SE, close to that cage. Now go SE
and you can climb that block and then get up the cage N and jump E onto the
ledge. Walk N a bit and jump into the open gate W. Once upstairs, back in that
room with the boulder ramps, take the ramp on the right to go down W and jump
over to the ledge there. Go S and use the lever in the dark on the W wall. Turn
around and wait till the boulder stops to jump to the cage that will appear E
and use the lever there. Make your way down to the ground floor and go N to a
gate opened in the wall there.
A Ruby Crystal.
Wait for the last boulder to fall and go back to the SE to climb up the cage
and jump to the E ledge. To the SE is an open gate, follow in and jump the
ledges to the other side to get the Ruby Crystal. Jump back one ledge
and jump N into the now open gate. Follow through, jump down onto the Boulder
Run ramp and go N up the ramp, back to the large underground area. Jump in the
water and swim past the right hand rocks, climb the ledge on the right side to
get back onto that ledge where the level started and go down to the gate N to
use the Crystal on the left there.
Some Guidance.
At the intersection go W and a flyby kicks in, go down the passage, jump to the
island W, follow the path to the W side and jump to the closed gate SW, now the
guide will come to open that gate for you by lighting the wall torch there.
Another Ruby Crystal.
Follow him and when he is finished you can pick up the Torch between the guide
and the tree. Ignite the torch on the burning tree and take it E. Find a grate
on the floor between two central pillars, throw the torch on the grate. Go to
the NE corner and find a lever to raise the cage, then turn and go SW and use
the ladder. Grab the Torch from the raised cage and light the wall torch N.
Drop the torch and pick up the Ruby Crystal where the block went down E.
Notice the 2 Gem receptacles to the N and S.
Get down to the ground floor and leave E, the gate opens, head back around the
pool and go up the ramp to use the Crystal there at the E end of the
intersection.
The 1st Sapphire Crystal.
Go down the ramp and dive into the water, swim S and up to a ledge to climb
out.
The marked tile N un-triggers a block S, revealing the Water Crystal but in
front of that alcove are trigger tiles raising the block back up. So jump with
a grab over those tiles into the alcove and get the Sapphire Crystal. Go
to the E side of the pool and find a Timed switch.
Timed Swim for the 2nd Sapphire Crystal.
Save in front of the switch, and check out the route first: it’s back in the
opening in the bottom S just down left when facing the water from the switch,
swim back N and into the red light, straight and up in the far left corner,
climb up left and here’s the gate that will open up.
So reload, light a flare and pull the lever, roll and standjump with a left
curve into the water, down into the opening in the bottom and swim down turning
right, swim sort of straight N and up into the opening, hoist up and get in to
grab the 2nd Sapphire Crystal before the gate closes.
The Dragon Key.
Back in the water and take the first opening up. Go back W to the pool and into
the room where the guide is waiting at the Tree of Souls. Climb the ladder
again, don’t forget to backflip off and place the two gems there N and S. Pick
up the Dragon Key E and get down to go through opening W, slide down and
level ends.
A
Time to be Born…
Drop from the passage and go jump to the bridge over the Tar Pit. Go to the R
(S) at the crossing and go through the open the door and the next door will
open for you.
Level 4 - A Time to Weep
Follow the passage straight to a transparent bridge through a Huge Room.
The Huge Room.
Enormous pillars stand throughout the room, cross the room over the bridge to a
room with a couple of gates and a door in the NW corner.
The Intersection, the Crowbar.
Shoot the spiked ball in the middle of the room, which opens the door in the
corner. Get the Crowbar from the room and go back, now you can open all
the gates, but go into the N one first.
The Intersection, N gate: Ruby Crystals/Little Wheels.
Follow the steep passage down to a blue walkway across the Huge room. Go to the
opening S and the R into the dark green room, go L and run into the Blue
Fountain room. The 4 Spirits will kill themselves at one of the 2
Totems.
1st Ruby Crystal.
Go into the passage next to the gate S and shoot the Mutant. Go in and
around the pillar to find an opening up in the ceiling over the low ledge, grab
up and get the 1st Ruby Crystal from above, drop down and go to the far
SE corner, climb up through the hidden opening and get Secret#4, a small
medipack and Shotgun Ammo. Drop down again and leave the room for
now, you’ll be back according to the Gem receptacle S. Go E from the Blue
Fountain.
2nd Ruby Crystal.
Go to the opening E and in the red room with the pool you’ll find a walkthrough
wall N, go in to get the 2nd Ruby Crystal. Back to the Blue Fountain and
open the gates S with the 2 Crystals, follow the passage down to the lowest
level of the Huge Room.
Flooding the Huge Room, the 1st Wheel of Crying.
Go N and past the Corpses hand you see to the L, take the 2nd walkway R and go
to the 2nd Pillar L, there’s a flatter ledge on this side, runjump up onto that
ledge and climb up the ledge L, get the 1st Wheel of Crying and
standjump back to the walkway from the lower ledge, go L and then R at the
crossing.
2nd Wheel of Crying.
Go to the SE corner and see the opening in the E wall, look L of it and notice
another pointy ledge under the pillar, line up straight for that ledge and do a
long runjump up there, holding the forward key. Go to the R and stand a bit
back from the corner closest to the SE opening, aim for the far side of the
opening, hop back and runjump (no grab) with a L curve in the end to get in. Go
get the 2nd Wheel of Crying and return to the opening. Stand in the R
hand corner and aim NW for the corner of the pointy ledge on the pillar, turn R
a bit in midair and hold the forward key to land back on that ledge, runjump
back onto the walkway in the lava.
Go L and to a small ledge along the S wall, jump to the ladder there and go up
into a room to place the Little Wheels. Go into the open gate and use the
switch to flood the lower part of the Huge Room. Go back and down the ladder as
the water isn’t deep enough for a nice dive.
The Corpses Hand.
Go to the W side and get the Corpses Hand. Go place it in the Corpse in the E
side of the room. Head back to the entrance SW and use the cage that raised in
the lava to jump back into the passage. Be quick with those Spirits
chasing you, follow up to the Blue Fountain and stand near one of the Totems.
Now shoot that Mutant also following you and get the Sapphire Crystal.
Head into that small passage S and to the back of that room where you can use
the Crystal and a gate will open up. Go back to the fountain and straight N through
the dark green rooms to the blue walkway and all the way back to the room with
the gates.
The Intersection, W gate: A little gift.
Open the gate W if and go in to come to another ledge in the Huge room, get the
small medipack and go back.
The Intersection, E gate:
Follow the passage over another transparent walkway and go through that gate
you’ve opened, slide down and come out at the next level.
Level 5 – A Time to
Laugh
Follow the path to where you get a flyby of the Mutant running through the dark
rooms, then go look at that poor bloke on the jetty. Heart ripped out and left
to burn…
Nasty Spirits.
In the SW is the gate opened by the Mutant, straight to the N is a Totem and
that is to get rid of White Spirits, they will be released whenever you
get close to the W and E hot areas, so maybe better if you run left to the SW
and onto the grey floor. Sprint along the sandy area to the N and then go R,
past the statue and to the NE, go R on the grey floor and sprint S, then cross
over to the statue again and let the Spirits kill themselves.
The Emerald Crystal.
Now go SE and jump onto the low wall next to the burning sand, runjump to the
ledge in front of the opening S and go on to the E, go left and jump to the E
side grey ledge and go L (N) runjump to the island in the lava and you can
recover the Emerald Crystal. Jump back to the E ledge, follow all the
way to the NE corner.
The Beauty and the Beast.
Get into the opening and use the Crystal to open the gates . Shoot the Beast
(one Shotgun round in the belly). Open the Crowbar-gate N and get the Wheel
of Laughing from the pedestal and a Shotgun with Ammo E, on
the opposite side is a MP for you.
Head back to the Large room and go right around the corner, head W along the N
wall and on the other side go right around the corner again to come to a large
gate opening up for you on approach (shortcut for later). Jump over the ledges
to the far W side and go S, hop into the opening SW and follow in to a room where
2 more Beasts will appear, shoot them or just sprint over to the passage
S, avoiding contact with the Beasts. Runjump/grab the rope over the pit and
swing across to the switch, throw the switch to open the gate N in the room
with the Beasts. Safety drop down into the pit (there is an opening E for
later) and go up the blocks on the other side to get back up the other side.
Head N, into the open gate, use the Cog Wheel to the R (middle) and go into the
next gate to get a Ruby Crystal. There are more gates that need
Cogwheels, so remember this spot.
Head out and go L/L to the exit and down to the ledge below, a runjump up to
the block E, runjump to the ledge E and go inside the opening there. Place the
Crystal in the end, the floor goes up and you’ll be take to the upper level. Go
N and come to an opening overlooking the burning sand.
Break ledges.
Save and runjump/grab to the first break ledge. Pull up and just do standjumps
over the next ledges. From the fore last one a left curved runjump to the last
and a right curved run over the last to jump to the ledge.
Beasts and the 2nd Cog Wheel.
Go on over the walkway to a gate that will open for you. Save and go in, 2
Beasts suddenly appear when you approach the pedestal with the 2nd Cog
Wheel. I shot these 2 (I even managed to drop two with one single round once, as they
happened to stand behind each other and very close together). In one of the
alcoves W is some Shotgun Ammo before you leave through the opened gate
E.
Go through the passage to a junction and head R, a cutscene will show the
shortcut gate opening up at those 2 Beasts that are still alive (where you have
to place the Cog Wheels). Do a safety drop down from the end of the passage and
head down E, through the gates you opening up for you (the gates down W will
close on approach, so much for a shortcut). Go to the SW and into the big
opening, jump up to the open gate W and go to the Beasts. Go R/R and into that
gate to place the 2nd Cog Wheel, get the next Ruby Crystal and it looks
like you need one more Cog Wheel.
3rd Cog Wheel.
Get out to the large room again and head to the far SE corner, fro that low
wall to the ledge and into the opening, place the Crystal and go up once more.
Go N again, follow the walkways to a gate that opens up and come to a room
where sinister music starts, go to the ladder NW and climb up, L a bit and back
flip to have a better look at the task ahead.
Burner Jumps.
Jump/grab back onto the ladder, climb L on the burnerblock and pull up on the
far corner, turn R and a bit more than 90 degrees, hop back and grab the edge,
shimmy L around the corners to the wall and pull up there, now look across the
room and from here you can do a standjump/grab with a L curve to grab the
corner of the opposite burner in the next row.
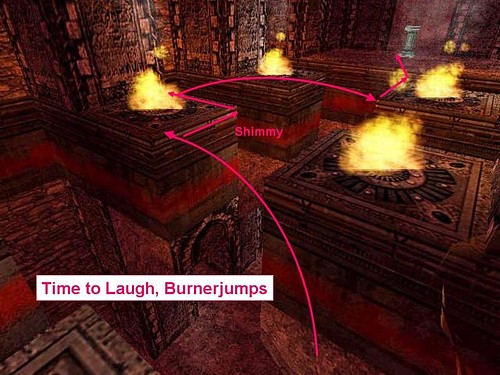
Shimmy
R around to the wall again and repeat the same jump but now to the other side,
from the last burner you can shimmy to a corner close to the ledge and jump to
the pedestal with the 3rd Cog Wheel (Note from George: There
is a much easier way, of course. If you jump to either of the second burners
and pull up, the first two burners go out. Jump back to one of these
extinguished burners and you can then do a straight running jump to the last
burners).
The Corpses Hand.
Safety drop to the floor below and head out the now opened gate W, go through
the passage to that familiar crossing, go L and drop down into the lower
passage, head down E again and into the large room, to the SW and up in the
wide passage. Jump up the slope to the shortcut and go R/R and into the Cog
Wheel rooms. In the last room is a place for the 3rd Wheel, a flyby shows a
gate opening up. Go out and straight S, climb down the blocks to the bottom of
the pit and go E. Go into the SE corner of the big room with the rock in the
middle, in the E wall is a crawlspace, pull up and crawl to the other end, drop
into the small room with Secret#5, another Revolver.
Climb back out and E are the gates you saw in the flyby before, go in to get
the Corpses Hand. Spirits will appear, so make your way back out
and to the pit W, up the blocks and N through the room with the Beasts, right
and down to the wide passage, out and E to the water, run NE to the Totem.
The 2nd Dragon Key.
Go S to the poor bloke on the jetty and see the flames are off, place the
Corpses Hand in his chest cavity and watch the flyby…
Go NW and around the corner to those automatic gates. Up the ramp and to the R
on top, through the place where you saw the Mutant running before, cross the now
safe water and go into the passage in the end, to the R of the hole in the
middle is a pedestal with the 2nd Dragon Key. Look L and down into the
pit in the middle of the room, see the opening below, just run in with a grab
to land inside and follow through to a Secret room, get Secret#6, a MP, 3x
Uzi Ammo, the Uzis themselves and Shotgun Ammo. From the
higher ledge in the middle of the room and facing the passage, you can grab up
to a passage above, go out through a secret door and go L, through the opened
gate and slide back down to the Tar Pit.
A
time to be Born.
Drop from the opening, go to the bridge and head straight to the opposite S
side.
Level 6 – A Time of
Peace
Run into the next door and come to a surrealistic environment, a huge Tar Pit
and an island with Totems ahead, go there first to get rid of a bunch of Sprits
which will greet you. Go back on the bridge a bit and look E from the bridge to
spot the ½ MP on the rock (hard to see), runjump/grab to it and jump
back to the wooden bridge. Continue to the S wall. Turn right and jump W and
get the Emerald Crystal. Make your way back to the wooden bridge and go
to the Island in the middle. Make your way over the rocks jutting out of the
lake to the land W and use the Crystal on the left side of the big gate.
W Entrance:
Go in and come to a deep pit with a pool below, go to the W side and hop
backwards from the edge, grab the lower edge after sliding down, then drop/grab
a crack in the wall. Go to the middle of the wall and pull up into the CS,
crawl to the end and drop into another room, go to the room W and save.
Breakledges.
Run over the breakledges and go over to the door that will open for you and
follow the crypt to a switch at an opening overlooking the lava pool, the
switch will open a door back at the Tar Pit, blocks appear in the lava pool, so
a short jump to the first block and then to the bridge, go jump to the block
near the exit E. Runjump/grab into the E opening and head back through the CS.
Drop down into that pool down in the pit, climb out and shoot some Midgets. Go
in N, along the right hand side past a ladder on a pillar and look for a
see-through part of the N wall, follow through going right and jump down around
the corner at the end to get Secret#7, another Uzi and 3x
Uzi Ammo. Go back to the room and go to the ladder on the pillar and an
opening in the W wall, that one is for later as you need a Gem. Climb the
ladder, and almost at the top a back flip. The gate opens and you’re back at a
familiar place (the pit). Go back out and jump to the Totem Island.
S Entrance:
Go behind the corpse and over the bridge to the S door you opened. Follow the
Crypt down to the W end and go into the cave leading to a lava pool where you
can see a Corpses Hand on the other side (later) runjump to a ledge with a
lever and throw that to get blocks up in the Tar Pit. So return to the Tar Pit
and to the Totem Island.
E side: Ruby Crystal.
From the Totem Island a standjump to the first block E, runjump/grab to the
next and runjump with grab (short jump) to the last, standjump up S and find
the Beast that was running around here before, is nowhere in sight. Go to the
SW corner of the place and climb into the opening between those big pillars,
climb up the ladder top the L in the end and just follow the red light to a
room with breakledges over what seems to be a lavapool, if you fall through,
you’re a goner…
Run along the R hand side to the grating with the switch, throw the switch to
open that gate E and run over the breakledges to grab up to the ledge at the
gate, go in and get the Ruby Crystal.
Back to the W Entrance, the Sapphire Crystal.
Jump to the exit and follow back down to the ladder, go back to the blocks in
the tar Pit and jump back W to Totem Island. Go on over the W blocks to the W
entrance and this time just jump down into the pool below. Climb out and head
to the dark room N and go L in front of the pillar with the ladder to a room in
the W wall, place the Crystal to the R (an UW door in the pool behind you opens
up). Get into the water and swim into the NW corner and through the door you
opened, swim through the tunnel to a room where you can go up in the hole in
the ceiling.
On a pillar in the room is the unreachable Sapphire Crystal, go to the SW
corner first to get some more Flares and head to the NE corner and find
the Skull cage (pushblock) E, push it all the way and get into a room to the L,
shoot 4 out of 5 vases, leaving the one E opposite the entrance intact (Fire
Dragon) and pick up Shotgun Ammo and ½ MP.
Timed Runs.
Jump the slopes to the switch and when you reach the last one a Timed trapdoor
will come up under the switch, slide down and throw the switch (time to spare).
Sidejump to the sloped side of the lavapool, keep jumping and aim back to the
floor. Go back out to the big cave with the Sapphire Crystal and over to the W
side where a part of the wall lowered. Go in and come to the next booby trapped
switch.
Run over trigger tile and jump avoiding spikes, another jump and pull the
switch, turn around and just wait. The lava turns into water so wade back. go
straight over to the e wall and now to the R of that black pillar, follow the
passage up the ladders and drop onto the pillar where you can pick up the Sapphire
Crystal (a trapdoor opens W of the pillar). Drop down and go to the
trapdoor, safety drop in and land in a very dark Crypt.
The Dark Crypt, the Torch for the Emerald Crystal.
Light a flare and go SW, into the next room where you’ll find Shotgun Ammo,
then pick up a Torch from the pedestal. Light your Torch on the
wall-torch and drop it somewhere, then go get another Shotgun from the
pedestal and grab the burning Torch. Go out to the dark Crypts NE, cross over
to the N side and look L for the wall-torch. Light it and go on to the N and L
in the next room to light the next wall-torch on N wall, go R and to the E and
in the second room is the next wall-torch to the R. Go L from the torch and to
the S where the last wall-torch is, to the R of the S gate. Leave the Torch.
Turn R from this one and head straight W, in the second alcove to the L a gate
has opened, go in and to the end of the room where the Emerald Crystal
is standing on a pedestal (gate opens). Go back a bit and shoot the vases to
get Uzis and Ammo. Then leave this room and go R (E) out of the
gate and just past the Corpse the gate (SE) has opened. Go in and use the
Crystal on the S wall, go through to the next room and throw the SW switch, the
room floods, roll and swim R and up through a hole in the ceiling, up and N, to
the next room, go L (W) there and up in the hole (blue light) to reach a ledge
in a Tar Pit.
Look NW and see 2 vases on the opposite wall, shoot them with pistols while
jumping up and a block will rise S of the ledge. Save there and jump to the
block, the next block goes up, jump over the blocks to a last runjump to the
last block at the corner of the wall. Jump/grab to the ledge E and climb up,
the gate opens. There is a switch inside, use it to get one more block up in
the Tar pit. Take running jump S from the lower side of the ledge to the new
block and from there to the ground SW. Go to where you can jump the blocks back
to the Totem Island go over the blocks E to the E side.
E side: again.
Go over to the NE end and standjump to a block from one step back of the edge,
runjump to the next and runjump into the passage between the pillars E, follow
to a lava room where you can place the Crystal to get a platform up in the
lava, this one will allow you to jump to those break ledges ahead, the path is
quite clear, you have to end up in the far L corner.
Lava Jumps.
Jump to the platform and Save, standing back on the platform do a runjump and aim for the L side of the 1st break ledge. Standjump and curve L to get in position for the next standjump (maybe you have to turn a bit more L, you have a moments time to do that) go standjump the other ledges (turning L or R in the air) to the one against the pillar L, here you might have to run forward a bit before you standjump to the next ledge near the wall, standjump to the one against the wall, turn R quick and standjump to the double ledge between the walls, do a running jump with a sharp L curve and keep turning while you land, standjump to the ledge against the pillar and run forward a bit once more so you can standjump around the R hand corner to the next ledge.
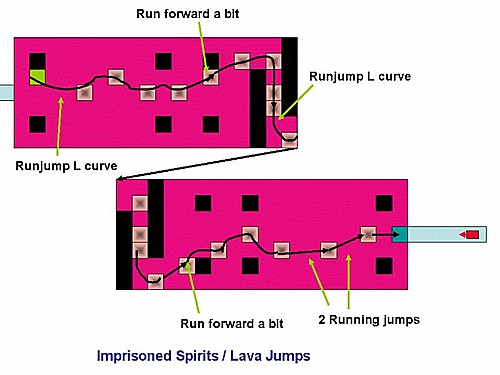
Then to the one in the middle between the 2 pillars and turn R, to standjump to
the next, a running jump from that one, L curved and then it’s running jumps
into the opening in the back wall. Go for the lever in the back and after
throwing it you’ll see a gate opening up at the Corpses Hand.
The Corpses Hand.
Go out the open gate to the R and follow back to the Tar Pit. Go over the
blocks to Totem Island and go on to the W Entrance. Not up the steps this time,
but to the SW corner and runjump/ grab to a block in the Tar Pit, runjump into
the opening between the pillars W and go follow to that gate that opened to the
Corpses Hand.
(Optional:
A bit further away to the S is a pedestal with a Torch on it, that’s for a Secret,
so if you like go grab it first.) Of course you will have to get back to Totem
Island fast for obvious reasons, run back N a bit and turn R around the second
pillar, runjump down to that ledge in the Lava where you use the lever before.
Jump up SE and follow through up the slopes to where you can run over the
bridge to the Totem Island.*
Optional
for the Secret:
Jump with the Torch over the blocks to the W side, go N and to the NE corner.
Runjump around to that green block and then up to the ledge NE, turn and
runjump with a R curve onto that slanted ledge, go to the flame and light the
Torch. Go back the way you did before and enter the Gates W.
Go in to the room with the pit and go around to the back, through an opening in
the W wall. Light the wall torch there and go in to get Secret#8 , the Crossbow.
Then collect the 4x Explosive Crossbow Ammo in the previous room. Get
back to the Totem Island.
*Continue:
Place the hand in the chest cavity of the Corpse and the trapdoor behind Lara
opens up, jump in and swim S.
Level 7 – A Time to Heal
Climb out and enter the opening S, the next door opens for you.
Step out onto the bridge and walk up to the Fire spitting Statues. Stand close
and aim for the block beyond and a bit L, then time the run through the Flames
and jump/grab to that block. Runjump/grab W, then standjump S and a runjump SW,
a runjump/grab S and then runjump over the green block E (just came up from the
Tar Pit) to that bridge going S to the Receptacle Tower (called like
this from now on). There are 4 receptacles on the pillars, take notice of the E
Tower (called like this from now on) from standing on the NE corner and
then walk just S through the structure. Turn R (W) just before the next bridge,
runjump/grab to the W Tower (called like this from now on), walk
straight through to the opening W and 2 blocks will rise from the Tar Pit,
these are not timed so take your time to jump across to a ledge with a switch.
Timed Run for the 1st Emerald Crystal.
First climb the wall behind the switch and get the ½ MP from the top, go
down and save in front of the switch. Pull and wait out the flyby. Then save,
pull the switch and turn R, from the switch a runjump to the first block so you
are able to do a running jump to the second one and a running jump with a R
curve to jump back up in the W Tower, run L around the corner of the pillar and
then R (E) so you can runjump/grab (you can save when Lara is pulling up) over
to the Receptacle Tower and run straight to the E to runjump/grab over to the Timed
opening in the E tower.
Go R around the corner and get the 1st Emerald Crystal, if you want the
Secret, go to the S end and drop/grab from the ledge, shimmy just L around the
corner onto the slanted block and pull up onto the top, immediately jump sharp
R from the top of the ledge around the corner onto the ledge with Secret#9, another Revolver.
A block lowers allowing you to jump over the sloped ledge and return to the NW
corner of the Tower. Runjump/grab back to the Receptacle Tower.
Jump Puzzle for the 2nd Emerald Crystal.
Go over the Bridge to the S and be careful as there’s a nasty gap in between
the stone ledges, from the last ledge a runjump up into the opening with the
door and go through to the opening just before the room with the grated floor,
the gate in the room beyond opens up because you are standing on the trigger
tile. But you have to do some fancy jumping to get to the opened gate, if you
jump wrong the gate will shut. Look down in the pit under the grated floor and
spot the tiles giving a hint as to which parts of the grated floor are safe.
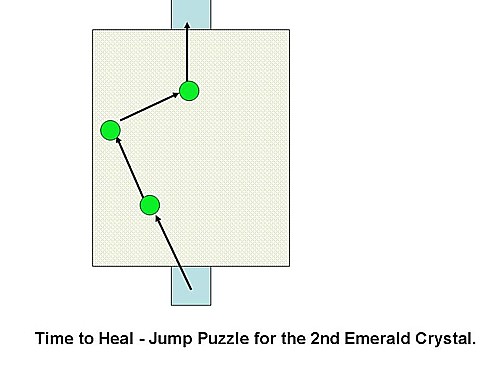
First is a standjump SE, one more standjump SE, then SW and the last
standjump/grab straight S into the opening (you can use the textures up on the
walls to line up for jumps, but if you stand too close to an unsafe tile before
jumping the gate will close, save after each successful jump) Go into the room
with floating Corpses and get the 2nd Emerald Crystal.
Swimming for the 3rd Emerald Crystal.
Go back out to the N and hop down to the bridge, go N to the stone ledge and
look down to spot an opening in the bottom of the Tar Pit, jump over the gap
and drop/ grab backwards to drop into the safe spot, swim down S and look in
the SE and SW corners for Flares and a MP.
Go back up for some air at the surface and Save facing N, dive down and swim
all the way N through bursts of Flames (those can really hurt) and first go up
for air just before the last room, climb out N and get Shotgun Ammo in
the NW corner, jump over the water to the S and get a MP SE. There’s an
opening up S but it’s too high up for now, save at the waterhole facing S and
dive in, swim S and L into the second room, swim straight to the end and just R
around the corner is the 3rd Emerald Crystal on the tile in the green
light.
The 4th Emerald Crystal.
Swim back to the W and R to get back to the air pocket and climb out S, now a
block raised at that opening up S, climb up and you’re back in the entrance
room of the level. Go S and back to the wooden bridge, runjump/grab to the
block S past the extinguished Statues and jump W, then S to the low block and
runjump/grab up E to that platform with the Totem figures, get the 4th
Emerald Crystal from the pedestal SE and go to the SW corner, there’s a
pointy rock down in the Tar Pit W, runjump over the fence, land on the block
and slide/jump to get to that green block S, runjump/grab to the bridge E and
go to the Receptacle Tower to place the 4 Crystals, raising platforms and a
block with them.
Going Up.
Runjump/grab over to the E Tower from the NE corner and go R around the corners
to find a block near where you got the Secret before, climb up and into the
opening N, run L around the corner and runjump/grab to the platform on the
Receptacle Tower. Standjump to the next and a runjump/grab to the one on the W Tower.
Climb up W and look up R. Standjump/grab to the ledge there and turn around to
climb the E wall to the top of the Tower, walk to the E and runjump/grab to the
top of the Receptacle Tower. Walk E and runjump to the E Tower, slide off
grabbing the edge of the roof and shimmy R till you can hoist yourself up onto
the top of the roof. Walk around the red column to the trigger tile on the
protruding ledge and a platform rises under the slanted ledge N, slide down and
runjump NW to land on the L hand corner of the second platform from the top of
the N Tower.
The Gold Crystal.
Walk to the E side and drop down one level through the opening in the floor to
the floor below, you’ll find a pedestal and a receptacle here. Go to the switch
on the S side of the pillar and throw it to open a hatch all the way in the W.
Climb back up NE (face the N side) where you just dropped down and runjump from
platform to platform to the very W end, looking up you’ll see the open hatch.
Climb up from facing S and go L to runjump to the ledge in front of that Tower
E with the Gold Crystal on top.
The 3rd Dragon Key.
Just run onto the slanted E side and slide a bit, then jump curving R or L and
a grab at the last moment to land on the lower platform of the E tower, go
around to the E side and drop down the hole again. Place the Gold Crystal on
the back of that pillar and get the 3rd Dragon Key. A block rises at the
entrance of the place N. Runjump down to that platform W where you got the
Crystal before and jump over the blocks to the Fire Statues N, from the bridge
you can standjump (straight) to the new block NW and runjump up W, then face
the slanted ledge SW and do a standjump/roll to it to jump/grab the climbwall
N, go up and R. Hoist yourself up and slide down the tunnel back to the other
level.
A
Time to be Born
Go and jump to the bridge to go E to where you can enter the crypts again, go
up E and then R to the S, L to the E again and follow up past where you got the
Flares before and in the E room at the end you can now place all 3 Dragon Keys
between the pillars, the Golden Door opens.
Deep Dive.
Go in and follow to a large Pit, just run in and land in the water, swim down S
and through the opening to a large UW room with many alcoves, swim SW and up to
get out of the water and find a MP on the W ledge. Jump to the S and in
the SW corner into a small corridor and the gate opens. Go through the opening
to a wide cave and prepare for battle.
The Boss.
A Big Guardian Guy is wandering about in the room below, Save, pull out
the Shotgun and run up close, shoot him a couple of times (twice will do most
of the time) and run away. He should drop right behind you.
The Scroll of Ephesians.
In this large room are 4 switches you have to pull, one S wall R of the gate,
one N wall R, one SE corner facing W one in the NW corner facing E and a
trapdoor will open up somewhere. Go NE and find a passage S under the entrance
ledges, follow to the end where you can drop down through the open trapdoor,
get the Scroll of Ephesians and climb the golden block to get back out
of here. In the big room a golden block raised along the N side. Climb up to
the ledge under the rooms entrance E and go to the NW corner of the ledges,
runjump to a walkway along the N wall go to the other end and runjump to the
ledge NW with a R curve, climb the block and grab up to the overhead MS. Follow
the MS all the way around corners to the NW corner and drop against the W wall,
turn R and runjump/grab to the CS in the N wall, follow in to a dark cave.
The Torch.
Look SE for the Torch, light it in the opposite alcove W and go to the
N, there’s a Fire Dragon here. Next to that golden block N is an alcove
with a standing lamp. Light that and the block lowers, revealing the Scroll’s
receptacle, place the scroll and watch the end flyby. With the Guardians gone
the gate will open up. Return to the large cave and follow the guide through
the open gate.
Level 8 – A Time to Kill (part 1)
Follow through and come to a shallow pool in a cave, go SW and climb to the
opening, the wall will open up for you, go to a Garden area where a flyby will
show you around. Head W to the entrance between the Garden walls and climb up
both walls L and R between the fences for a ½ MP and Shotgun Ammo.
The Crystal of Light.
Go to the pool W and dive in, get the Revolver Ammo on the bottom E and
swim up to climb out W, look SW and L of those big doors to spot the brick
ledge, climb that and drop/climb down into the hole, come to a room with a
Crowbar door. Use the Jumpswitch on the E wall next to the entrance. Then open
the Crowbar door and get a Torch from the pedestal, light the Torch and ignite
the corpse behind the Crowbar door. Climb down the trapdoor and follow through.
In the next room are 4 fire spitting dragons, go around to the back and step
onto the ledge to get the Crystal of Light. You will probably burn so
get into the water fast and roll. Go back and climb the ladder up through the
trapdoor. Climb up E and go to the trapdoor you opened in the garden NE. Go in
and the climb down the ladder or safety drop into the shallow water below, go N
and pull the corpse away for Secret#10, Grenade Gun and Ammo.
Go S and use the Gem on the door in the end.
Level 9 – A Time to Love
Follow in to where another door opens and you’ll come to a large lava cave.
The Large Lava Cave.
Runjump around those rocks SW, landing on a flat ledge and climb down to one
level above the Lava. Go to the S end and runjump over to the ledge of the big
pillar E. Hop around the R hand corner and once more to the S side, from the
tip of that rock a runjump with a last moments grab to the ledge S. Head to the
W side and runjump/grab the rock W, shimmy along the edge to the R and pull up
on the ledge. Turn R and jump over to the blue light.
To the Top.
Follow the passage up to a climbwall (ladder) and go up to where you can
backflip into a passage. Follow through to where you can drop down into an
opening, safety drop and slide to grab the edge of the rock. Shimmy R to the
end and pull up to backflip to a ledge behind. Go S and just around the R hand
corner is a receptacle for a Ruby. Go L into the passage to a Tile in front of
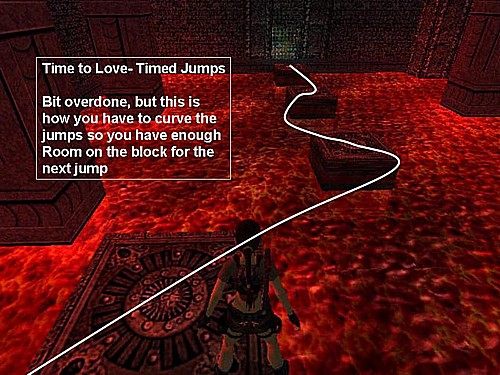
a Lava pool and you’re about to do a Timed Run.
Timed Burner Run.
Standjump (no grab) around the R hand corner onto the corner of the burner
block turn around and see the other (L) burner is off now, so standjump back
into the entrance and jump to the L burner (the lower burners go off), then
stand on the most NW tip of the block and face SE. Save and runjump to the
first of the lower burner blocks. Turning L a bit a running jump to the next
and then a R curved jump to the 3rd. The last one is a standjump and grab to
land inside the opened gate (or at least grab the edge).
The Emerald Crystal.
Go on in and go R to the SW corner and find the Emerald Crystal and some
Shotgun Ammo near by (heavily Guarded btw). Go back and jump the
extinguished Burner blocks back to the Large Lava Cave. Go L and place the
Crystal to open the nearby gate.
There’s
a nice pickup here (no Secret), it’s the Shotgun Ammo W in the cave, hop
onto the receptacle block, jump to the green rock W and then jump W around the
left corner. Go over the grey ledges to the Ammo, return the same way and at
the green rock near the receptacle block you have to hop onto the lowest corner
of it and then jump/grab back to the receptacle block.
Lava Lake with the Hanging Bridges.
Go into the opened gate and straight to the crossing of the bridges where you
can already see the Ruby Crystaldown in the S but you can’t reach it
from here. Go R (W) and look down to the R (N) before entering the passage,
there’s an opening in the wall below, standjump/grab down from the bridge to
land in the passage and follow to a Lava room with break ledges.
Break Ledges and Sloped Blocks.
Stand on the edge and do simple hops over the ledges, from the last you have to
jump and curve slightly R to slide forward from the sloped block, stay on the R
hand side while slide/ jumping and curve R to the R hand block then curve L
again and finally jump to a ledge with a switch that will change the position
of the blocks. Now you can jump all the way back, start by jumping to the L
side of the first block and curve L when you come to the block L, then curve
back R and keep slide/jumping on the L hand side as there will be another one
of those side blocks in the other end, finally come to a ledge S.
Turn NW and runjump/grab to the opening behind the pillar, go jump N and then L
around the corner, look up N and spot the grated ceiling, standjump/grab and
swing into the room L. Drop at the wall and run forward to climb the ledge with
the switch, pull the switch (This switch will open the gate E on the hanging
bridges) Look up SE behind the pillar and jump to where the block went down,
jump to the next and go up S, follow to a hole in the floor.Do a safety drop
(drop from the L side of the opening) into a lower passage. Turn R from landing
and go down the passage to the bridge. Go over to the E side and into that
opened gate, Save at the Change Pit.
The Change Pit/Room.
Here’s a nice one for you…As long as you are on the ledge you’re on, the
central pillar will be flat, but as soon as you jump to it, it will change
shape and gets sloped. So you better go to one of the sides so you can do a
long runjump to the far corner, to land on the down sloped other side and jump
to the ledge E and as soon as you go into the next room you’ll see it changes
too.
The Emerald Crystal.
Go L and stand on a Marked tile in the L corner, turn around and see the room
changed back. Go step one tile E and then turn S jump over two Death face Tiles
(don’t touch them) and turn L to hop E over the Death face Tile, go into that
room and to the back where the Emerald Crystal waits on a pedestal, jump
to the pillar and get it.
Go back
to the change pit and runjump to one of the far sloped corners, so you can jump
back W, go over the bridge (you can see a new passage opened near the Ruby
Crystal) to the W passage and up the steps to place the Crystal and open the
gate, go out into a new lava room with hanging bridge.
The Ruby Crystal.
Go over to the other side (up R you can see a Corpses hand) and slide down a
slope, a flyby kicks in and shows that Mutant running off again. Go on and come
to a passage with Fire Breathing Statues, stand L or R of the middle so you
will just jump past one and runjump over as the one flame is off, go on to
another Fire pit and finally come to the Crystal. First have a look to the L of
it and spot that opening in the wall I mentioned.
Go get the Ruby Crystal after you saved and run L, jump/grab to the
opening and go up fast, (keep an eye on the health) run up the steps and go R
after the door opened for you, through the red passage to the hanging bridge
and to the crossing, L and out to the Large Lava Cave, just to the R there is
that statue to get rid of the 4 Spirits.
Go N to that receptacle for the Ruby Crystal on the ledge up L, place the
Crystal and turn around, look L to where the block lowered and jump into that
new opening to use the switch. The flyby will show the gate across the cave
opening up. Go stand on the ledge close the Big central pillar in the cave and
runjump/grab to it, pull up where possible and look over the top to the NW to
spot a small flat ledge standjump over the top, and then a standjump with grab
(or you’ll go too far) to the NW corner. Get Secret#11, a ½ MP.
Check the health and safety drop from the N side of that ledge to the one
below, runjump to the lowest ledge straight W and climb up to the R, go N and
to the L, stand facing S and backflip to the sloped rock, jump and grab the
higher pillar, climb up further and get over to the open gate. Follow in and
the level changes.
Level 10 – A Time to
Hate
Step into the room and a flyby shows that Mutant again, get the Revolver
from a pedestal on the left and step into the opened gate.
Deadly Sand and Burning Ledges Puzzle.
The sand in the next cave is deadly hot, there are safe normal ledges and
burner ledges (look at the texture) along the way and in addition some deadly
ledges that have to be avoided.
Take a step back from the entrance, stand right and hop back to runjump to the
first ledge, turn L and runjump (grab) to the opening with the lever S. Use it
and it is the first of four to open a trapdoor in the middle of the room (next
to the burner ledge) and each lever will stop a burner ledge). Runjump out to
the ledge NW (maybe shoot that Creature from there), then do runjumps over the
ledges to the N lever, grab to get into the opening at the last jump. Jump back
out and jump to that ledge L (E) first and get the Shotgun Ammo before
you go in a westerly direction along the N side.
Cross over to the SW (a Beast will appear in this area, just let him get close
first and shoot him with the Shotgun). Get the Shotgun Ammo on the way
and also some Revolver Ammo on a ledge W. Now go to a grey ledge next to
a gate W and this one triggers the burner at the NW lever off.
Stand on the corner close to the gate and face E, runjump to the far R side of the ledge straight ahead, not to the one the Ammo was on or the burner will start again, turn L fast and runjump (curved L) to the burner ledge, quickly standjump and grab (curved L) into the opening with the 3rd lever. Go all the way back around the N side and over to the ledge at the trapdoor, now go into the passage for the last lever to open the trapdoor. Turn and jump straight N, stand back on the ledge at the trapdoor, run in and grab the ladder. Go climb down as far as possible and then drop to the block. This is the place you saw the Mutant running to . . .
The
Torch.
Drop down and go into the NE corner to find the Torch. Light it at the
burner ledge W (careful) and go light 4 wall-torches around the room, at the
4th, you better arm yourself and start hopping back while shooting the Mutants,
don’t waste Ammo shooting while they pound on their chest (they cannot not be
harmed then), just wait it out till they come for you again.
Now go check out all the cages,
S cage: MP and 1st Ruby Crystal.
E cage: 2nd Ruby Crystal and Shotgun Ammo.
N cage: 3rd Ruby Crystal and Lge Medipak.
W cage: 4th Ruby Crystal and Shotgun ammo.
The Crystals can be placed at the base of the central pillar and you’ll get
screenshots of the gate in the Room with the deadly sand, go up the pillar and
from the NE corner where the floor is a little higher, you can grab up to the
raised block on top, climb the N wall and don’t pull up onto the sand, but hang
right and backflip to the ledge, make your way over to the gate W and
runjump/grab in.
The Corpses Hand.
Follow the path down to a lava pit, runjump to the L or R hand sloped ledge in
the pit and shoot the vase to be able to runjump to that ledge, go on to where
you overlook one of the rooms with the hanging bridges, the place you have to
go is straight across, use the overhead MS and go all the way to where you see
the electric rays. Drop at the pedestal and get the Corpses Hand. Go
down the ledges in the next room, jump over the black block to the W.
Switch Puzzle.
Jump around to the other side and follow the ledges along the lava in the next
room to a switch SW, it looks timed at first try, but it’s not. There are
trigger Tiles on the same ledge that will drop the gate shut before you reach
it, so pull, turn L and runjump over the lava, go L and runjump back, straight
to the gate. Get in and straight to the switch ahead in the W wall. There are 2
closed doors one L and one R and a gate in the far NE corner of this corridor.
Save in front of the switch as this one IS Timed, not too tight though. Pull/roll
and run out sharp R and around the corner to get into that L door from the
switch, inside to the R hand room and throw the lever (opens gate NE), step on
the trigger Tile N and the exit opens up. Go out and L to that NE gate and to a
switch on the E wall (to the L is a door you will come out later), the switch
will raise blocks in the big lava room with the hanging bridge. Go out and make
your way back E to where you got the Corpses Hand, notice the pillar in the
middle of the big Lava pool isn’t burning anymore. Check your health and use
the MS to go over to that marked Tile on the L hand side. Drop down to the
pillar and safety drop to that green ledge below, jump over the ledges to the
opening NE and runjump in.
Corpse Caves, Lasersight and the Emerald Crystal.*
Optional
for a Secret:
Turn around on the higher ledge in that first room, grab up to the ladder and
go up. Shoot a Mutant in the next room and a vase to get the Shotgun. Go around
the corner and drop down into a passage, get Secret#12, the Crossbow
Ammo and go out SW the door will open up and you’re back at the Lava pool,
get down from the pillar and enter the same opening again.
*Continue:
Follow through to the end and go R, use the ceiling to swing over the corpse to
the room with the Lasersight. The gate N opens, go use the monkeyswing
and come to a large room, to the R is Revolver Ammo. Go N a bit and find
a closed gate, look in the pit and shoot the lone Mutant. The gate will open
up, go in and use the switch, return to the pit and walk out onto the ledge W,
look for a Ball (#1) you can shoot far W where the gate opened. Go back S into
the Corpse Caves, in the room where the Lasersight was a new gate opened up S,
shoot the Ball (#2) and go out to the crossing W. Head straight into the gate W
and throw the lever in the next room, turn R and go in to shoot the next Ball
(#3). Turn around and go in S, throw the lever and see another Ball become
available. Head back N, then E to the crossing and go back to the first room S,
look out over the pit and shoot the Ball (#4).
Now the E gate in the second room opened up. Head back in and R into the gate
to the Emerald Crystal. Go back and straight into the gate E, follow
through to where a door opens up, go R and then L twice, out of the gate and
into the opened gate across the Lava, place the Crystal and go out to the Gates
S.
Level 11 – A Time of War
Watch those Spirits having fun and then go NW to a box of Flares, the
gate opens up, go in and pick up Crossbow Ammo and the Crossbow.
Go N and into that passage, go over a wooden bridge and to an open gate,
runjump across to the block with the switch, throw it, it is the first one for
some gates further on.
Drop down and take care of the Creature (Crossbow+ Explosives), Head
down N and further down the slope there is another switch N. Go down through
the open gates and end up at a huge underground lake with enemies which will be
triggered one by one.
NE is some Crossbow Ammo and SE a MP. Go over the bridge to where
it goes L and jump from the bridge (not over the small fence) to the block W
and keep jumping to the lever there on the wall. Jump back to the bridge and
continue S, the gates are open.
Climb up the rock to the right before you enter and do a curved jump around the
corner for a MP and at the other side is some Crossbow Ammo to
find. Go in and shoot the Creatures and opposite the golden receptacle
look NE and jump there to get into crawlspace (you have to standjump onto the
lowest corner of the rock holding the forward key.
Jump up to grab the monkeyswing at the end of the crawlspace, and into an open
gate. Get the Ruby Crystal, pick up a MP and some Crossbow
Ammo on your way out. At the bridge go R and climb up to the Crystal
receptacle, the gate opens. Climb the ladder and in the next room on the L are Crossbow
Ammo and a small medipack and E next to the gate are two switches. A
block lowers SW with another switch.
Go through the passage and meet the guide in the Lava room, jump to the ledge W
to get some Crossbow Ammo and a small medipack. Better jump back
to the guide, as he has to ignite the lava E. Follow him and let him disable
the Spikes on the steps first, then go get the Sapphire Crystal. Go back
to the lava room and use it there to turn the Lava into water.
Get the Gold Crystal out of the water and go back N, up the passage and
out W, down to the ground and S into the entrance between the rocks, follow to
the end and use the Crystal in the receptacle. Go in and the level changes.
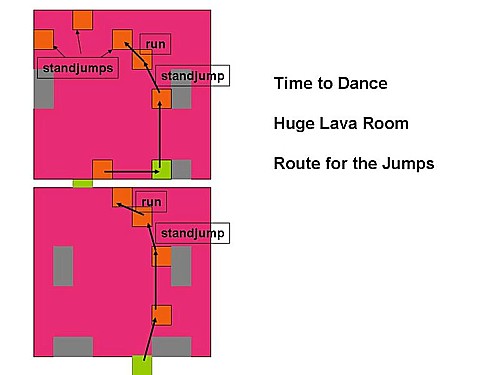
Level 12 – A Time to
Dance
The Huge Lava Room..
Runjump to an iron walkway on the pillar NW, and runjump/grab N to another iron
platform on the R hand side of the pillar. Walk onto the ledge and look N where
you have to go next to see a platform hanging down, you can raise it by
climbing onto the trigger tile on the block on that ledge and the platform goes
up, it is Timed. So face W and stand L on the block, run off and curve R to
runjump to that timed platform, quickly run onto the safe part N of it. Have a
look N again and spot an opening in the N wall, below and R. Runjump/grab to
the break ledge N and hang L, pull up and (you can also shimmy
around the corner, pull up and backflip to the tile in the lava lake, then
sidejump R into the opening) run curving R to jump down to the break ledge in front of the
opening, landing close to the opening, sidejump L and inside (could be you get
bitten by one of the Fire-dragons running around in the Lava, check these guys
out). Follow through to another part of the lava room.
Runjump out straight with a wide R curve to land on that break ledge so you
have room to do a running jump to the next one L, jump to the two connected
ledges L and run over the corner to the second, doing a running jump with a R
curve into the opening in the wall. Look R around the corner and run onto that
ledge just R of the opening, runjump/grab to the brick ledge W, turn S and
runjump to the L side of the break ledge, turn L a bit and standjump to the
next, run over the corner to the one after that and do a standjump to the one
on the S wall, turn L and standjump to the ledge in front of the opening in the
E wall and quickly pull up.
Walk into the next room and look up, there’s a ledge up in the ceiling, grab up
there and get the ½ MP and Shotgun Ammo.
Drop down again and go up the steps L and to the first floor landing to get
another Revolver from the alcove SW there. Walk back to the middle of
the ledge and face the pillar E. Runjump onto that pillar, runjump/grab to
catch the next slanted pillar. Hang one step from the L and pull up over,
slide/jump and immediately jump so you’ll land on the break ledge with room to
do a running jump with a L curve to the platform on the S wall, turn around and
stand on the NE corner facing N. Hop back and runjump/grab to the next slanted
pillar, hang most R and pull up over, slide and jump R, then again a slide jump
curved R to the break ledge, hop onto a Trigger tile on the ledge E and
a Demigod will open fire from down in the lava pit (you have to shoot
him to open the next gate, if he walks to the other side of the room, go down
the N end of the ledge and wait for him at the closed gate). Go into the gate…
The Ruby Crystal.
Follow through into a lower room where another Fire Dragon awaits, shoot
it and look for the ladder on the E wall, over the opening with the red light.
Climb to the Burner tile and backflip/roll/grab to the ledge behind you. Notice
the receptacle on the pillar there and also a tree with blue rays on top, then
head to the pool W and dive in. Find openings in the central structure, there
are 4 Tigger tiles, you have to swim over all 4 (the central part of the
tunnels has a strong current) and then climb up at the structure, go in to step
on a face tile and get a cut scene of the Ruby Crystal in the tunnel below,
carefully drop into the opening next to the Face tile and swim straight down to
the Ruby Crystal (if you go to the side too much the current will move
you out and you have to climb up again)
3 Spirits come for you, so quickly swim up in the E side and climb out E,
run to that tree with the blue rays and the Spirits will die one by one. Then
use the Crystal in the receptacle on the pillar and the Burner tile in the
opening E will extinguish. Runjump/grab (or runjump straight in) over there and
go over the now safe tile to the R (S) around the corner, a block will rise and
you can use that to jump/grab up to the next floor N. There is a small
medipack around the second L corner.
Then go into the central opening and face a Timed Burner pillar, runjump to the
trigger tile on the ledge SW and roll, runjump back and while turning R another
roll, now runjump/grab to the Burner pillar and pull up, runjump to the ledge W
(it is possible to runjump/grab to the pillar, shimmy around and pull up to
quickly backflip to the W ledge). Go to the NW corner and runjump to the roof
N, grab the edge and shimmy L, around the second corner the camera will change
and it is time to pull up and backflip/roll/grab to the ledge with the wall
torches.
Mystic Room, the Emerald Crystal.
In the entrance is a receptacle for a Crystal, follow the passage up to a room
with a cage like passage, you can jump up through the ceiling, through the
walls and fall through the floor, and swim with a Fire dragon, on top of the
cage is the Crystal you’re after (best is to just standjump through the ceiling
of the cage and pick up the Emerald Crystal). The only way to get out is
through the bottom of the cage, so swim under the cage and up at the entrance
to get back to safety and follow the passage back down to use the Key in the
entrance.
The next Emerald Crystal.
A cut scene will show another Burner ledge extinguish. Runjump/grab back to
that roof you shimmied along and go R around corners till you are next to the
wall below, pull up and backflip/roll/grab the central ledge again, go S and
runjump/grab to the ledge next to a block with Crossbow Ammo. Follow the
ledge to the W, runjump to the extinguished Burner ledge N and then W again to
a ledge with a closed gate SW, walk out to the N and standjump/grab to a ledge
with a Flame N, shimmy R around the corners and pull up on the N side,
immediately backflip/roll and grab the ledge N. More Flames.
But you don’t have to get over them, just look SE and spot the opening in the
black structure, a well aimed straight runjump will get you inside, but you can
also sidejump onto the slanted block from facing N and grab the edge, shimmy R
to the last square of the block and backflip/ roll/grab to the opening where
you’ll find another receptacle. Climb the ladder on the S wall inside and find
yourself in a small room with a huge Mutant, I just ran into a corner and
turned around shooting it and didn’t get hurt too much. Get the Emerald
Crystal it will leave behind and go down the ladder to use it, the gate in
the SW corner of the room opens up, so runjump/ grab back to the ledge N and
shimmy L, the ledge with the Flame is safe too. So just get back to the SW
ledge and enter the gate.
Top of the Huge Lava Room.
Walk up to the edge and hop back to runjump around the R hand corner to that
bridge, walk to the W and stand R at that pillar blocking the way. On the N
wall is a pointy ledge with a flat part L, runjump/grab over there and pull up
on the flat part (or runjump straight onto it) and turn around. Jump to the next
part of the bridge SW and climb the ladder (L), shimmy around the corner,
descend and around the corner L and get up at the ledge under the bridge. Throw
the switch and get an Eerie flyby of the Guide waiting for you and blocks
rising throughout the room. Drop/grab from the W side of the ledge and climb R
around the corner, up to the bridge and L around the corner to get onto the
bridge again.
Climb the new green block NW and do a runjump/grab over to the high ledge on
the N wall, walk L and from there a runjump (no grab) to the opening between
the chain fences on the SW part of the bridge (if you look to the far SW you
can spot the anxious Guide on a ledge). Go to the NW corner where you can
runjump to the L side of another ledge N, turn S and standjump/grab straight
back to the bridge and throw the switch located there, it will raise 2
platforms throughout the Huge Lava Room (you’ll hear them go up). Now you have
to get back to the E end of the bridge, so jump back to the N ledge, get to the
R hand side and standjump back to the bridge, walk SE to the opening in the
fence and spot one of those platforms on the pillar SE.
A Secret.
Runjump over to the platform and then NE to the next part of the bridge, shimmy
along the S side past the pillar with the ladder (or jump over the ledges N)
and go E to where you entered the room, look S for the next platform on the
green pillar S and then standjump/grab up SE to a stone ledge on the pillar,
From there a long runjump to the other bridge S, go W to the pillar and look
down S. there are some green ledges (one with a Face (trigger) tile) to the R
of a Burner pillar, save and runjump down to that green ledge with a grab in
the end, turn L and jump/grab the ladder on the Burner pillar, go down and
drop/grab into the opening in the pillar, drop down from the E side and get Secret#13, Crossbow
Ammo.
Climb back up W and standjump/grab up to the green ledge, walk onto the trigger
tile (to stop the Burner on the pillar) and runjump/ grab up to the ladder,
climb up and from the pillar you can runjump/grab back to the bridge, now you
have to get to the Guide waiting on the ledge W. So… walk NW and runjump to a
triangular ledge N. Standjump/grab back to the bridge and get onto the green
block, runjump/grab into the alcove N and runjump to the next part of the
bridge, then look for a brownish ledge on the S wall of the room and
runjump/grab over, standjump/grab up W and runjump NW to the tip of the bridge,
just L of that small fence.
The Torch for a Timed Gate.
Runjump to the W and go past the Guide, the gate is closed so look over the S
side of the bridge ands spot the small water hole below, line up and standjump
straight down into that hole, climb out and head NE from the hole, around the
pillar with the burning wall torch and find Flares and 2 Torches,
hidden in the plant. Pick up one of the Torches and light it on the S side of
the pillar, then light the one on the N side of the same pillar and the room
shakes because a pillar rises SW next to the water hole. Dump the Torch and
climb that pillar on the N face, don’t pull up on the pillar but just backflip
to the bridge where the Guide is waiting, look on the E side of the bridge
where a set of Trigger tiles appeared, they will open the gate, but it is
timed. So stand far back and save, then sprint to the gate hitting
"jump" to dive/roll through the closing gate.
A Corpses Hand.
Follow the passage S to the different rooms and in each room you can pick up
something on the brown ledges to the L, a ½ MP, Flares, Revolver
and Shotgun Ammo. In the last room is the Corpses Hand on a
pedestal. A big trapdoor opens in the room S, go to that big opening in the
floor and hop in.
A Time to Kill (part 2)
Swim through the gate opening up and up in the next pool. You are back at the
Castle. Place the Corpses Hands in the statues at the door.
Go into the downstairs Hall and open the doors in the SW corner. Runjump to one
of the slanted sides of the Lava pit and keep jumping to the other side, land
on a ledge up on the side and run off into the opening S, the door will open
and close behind you as you pass through.
The Torch/Switches Puzzle.
Around the pillar is a pedestal with 2 Torches (one spare), leave them
there for now and go into the passage W, in the room at the end you can climb
up through the hole in the ceiling. Look N there and throw the N switch
(raise and lower pillars in the room S). Hop E over the hole to go and find the
E switch in the end of the passage to lower a pillar behind you, drop
through that hole and land in the room with the Torches, pick one up and turn
around, take 2 steps in the direction of the lowered pillar and throw the Torch
on the pillar, go back up through the hole W and use the same E switch
again.
Go get the Torch from the pillar behind you and go W, then L into the room S
and look for the lowered (like the other raising pillar) pillar L along the S
wall SE, throw the Torch on the lowered pillar, return into the N room to throw
the N switch again and the Torch will go up to the upper level.
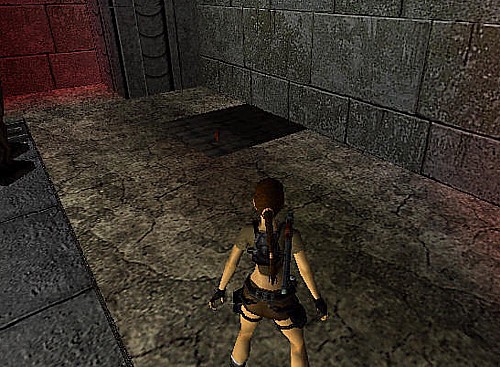
Go
back into the S room and L around corners into the NE corner and step onto a
ledge next to that Totem pillar, face S and stand on the SW corner of the ledge
to grab up to the walkway above and go to the block W on that same walkway,
grab up to the crack and shimmy R around the corner, drop/grab to the
Jumpswitch and activate it to light a Fire next to your Torch.
Climb back up to the walkway and jump S to the raising pillar with your Torch
to carefully light it on the Fire, jump to the walkway and go W to the block
with the Jumpswitch. Look NW and spot a slanted pillar you can runjump to, from
the pillar a backflip to the W side of the walkway (this is actually a
shortcut, the way it was intended was to throw the Torch down to the ground
floor and use the 2nd raising pillar SW and the N switch to bring it up to the
W side and you could shimmy around the block with the Jumpswitch to get there).
Jump with the Torch over to a single ledge in the SW corner, that ledge is another
raising pillar and will raise the Torch up one more level, jump to the ledge
and hit the "1" key to draw pistols and Lara will drop the Torch
where she stands.
Safety drop to the ground floor and go into the N room to throw the N switch
again, climb back up to the walkway and go to the W end past the block with the
Jumpswitch, there’s a higher ledge on the walkway and from facing W you can
grab up to a thin ledge above, jump to the Torch and get it. Hop back to the
thin ledge and stand on the NE corner, face E and standjump onto the R hand
side of the 1st slanted pillar, slide and jump R to land on the next, slide and
jump L and one more tome to the R to land on a slanted ledge and slide to the
ledge in the E side of the room.
The 1st Dragon Key.
Light the wall torch on the E wall and get a cut scene of a room with Dragon
statues of which one will stop spitting Fire, a gate also opened and that’s N
of where you stand, drop your Torch (as you don’t need it here anymore) and
runjump/grab over into the open gate N to get the 1st Dragon Key, a door
opens in front of you. Follow the passage and just run off the end to land on a
slanted ledge in the hallway below. Go to the doors N and open them to get back
to the Castle Hall.
The 2nd Dragon Key.
Go out R onto the landing in the Castle Hall, open the next set of blue doors
and enter, there’s a gap in the grated floor (if you fall in, go out N and back
up the stairs to return here). In the S end the door will open up for you,
follow the passage to a small room with some alcoves in the corners, a Mutant
will show up. Shoot it and look up in the SE corner of the small room to find
an opening up in the ceiling. Step on the ledge, turn around and climb up into
a room with a Jump switch. Throw the switch to see the 2nd Dragon extinguished
and drop down from the room into the small room below, careful you don’t run
into the Fire in the alcove NE (which also appeared when using the Jump switch
above).
Yet Another Torch..
Follow the E passage all the way up to a balcony looking out over the garden,
go L and find the 2 wall torches. A closed door is located between them in the
W wall. You’ll have to light the wall torches to open it. So first go on to the
N and L into the next passage, follow the passage down to a small hall and in
an alcove around the L corner (SE) are some Flares. In the other corner
(NE) is another opening in the ceiling, turn around to climb up to a room with
some Torches, take one down with you (better save before you decide to
throw it down as it can easily disappear in a wall below). Go back up E to the
balcony, past the closed door to the S and down the passage to the room where
the Fire is, carefully light the Torch and return to the balcony to open the
door by lighting the 2 wall torches, jump up into the opening and get the 2nd
Dragon Key (another door opens). You can leave the Torch behind.
Go out and L to follow the passage all the way down to the door you opened and
head straight S to the doors and notice a part of the wall to the L is lowering
down, go through that passage and runjump/grab to the roof over the pool. on
the SE corner is a MP. Get that and runjump/grab back to the balcony, go
back inside and after the wall lowered to the L and open the doors.
Target Shoot.
Head R (W) and open the NW doors, go through to a Deadly pool in the next room,
to the R is a Crossbow then go to the W side of the ledge and pick up
the Arrows (Note by Author: these crossbow arrows will reappear if you run
out which means its impossible to not have enough ammo to shoot the target
balls) . Put the sight on the Crossbow and look for the Target ball
in the opening of the N wall, NW corner, locate it with Binoc’s first, after
shooting the ball, a block goes up in the deadly pool. Runjump onto the block
and look W for a hole in the wall with the second Target ball, shoot
that and the next block goes up, standjump to it and look up in the higher
ceiling N for Target ball #3, turn around and look for the last Target
ball S. Now jump from block to block to the N side and throw the switch in
the NE corner, a cut scene shows the Dragon statues again (the 3rd Dragon
deactivated).
Jump back over the blocks to the 3rd and from there a runjump/grab to that gap
in the W wall where you shot the target, climb in and go up the ladder to the
L, at the crossing to the R and into the room with Secret#14, a Revolver.
Return to the crossing and go R again, drop down on the ledge at the entrance
and get back S to the Castle Hall.
The Stroboscope Room for the 3rd Dragon Key.
Stay on this floor and head over to the open SE doors, go in again and safety
drop into that hole in the floor, head S to the Stroboscope room. In this dark
room a flashing light will reveal 4 Face (trigger) tiles on the slanted sides
of the room (you can just spot them next to the pillars in the flashing light).
Jump on all 4 of them and the 3rd Dragon Key will appear in the middle
of the room, go pick it up and head N back through the watery passage, open the
doors and go straight across the Hall to the NE doors.
Timed Run for the Deactivating Switch.
Open the doors and that Tile you stand on is the trigger tile for the door
across the room and it’s a tight run. Save standing in the Hall, about a hop
back from the doors and a bit R of the middle (so you’ll run next to the corpse
in the water) and sprint over the trigger, the door still has to open up while
you are already on your way. Maybe you can hit "Alt" when getting
close to the door to roll through, but I didn’t need it.
Inside are 4 Demigods, one is already alive and kicking, shoot him to
activate the next and so on till they all are history. Go around the room to
pick up Shotgun and Revolver Ammo. Then approach the door N and
it will open, go into the room to the switch and throw it to get another cut
scene of the Dragon statues (the 4th Dragon deactivated), roll and run back
through the door.
Timed Run for the 4th Dragon Key.
Head back S to the Hall and R (W) to open the next set of doors NW, hop back
into the hall and stand a bit R facing the trigger tile, again sprint to the
end of the passage and jump up into the opening before the door closes. In the
Castle Bathroom is a Demigod in the water, you can shoot him from standing a
bit back from the edge of the pool, he can’t hurt you but you can shoot him.
Dive into the pool and get the 4th Dragon Key from the middle of the
bottom, you have to navigate in the right position to get it (the Dragon Head
only appears once you’ve killed the demigod and jumped into the pool), climb
out of the pool after taking it.
Back to the Garden Pool.
Look in the NW corner of the room for a Jumpswitch which just appeared there,
use it to open that UW door in the pool and dive back in, swim through the
tunnels and swim through the door and up in the pool in the Castle Garden.
Climb out and go down that opening in the brick ledge SW, drop into the open
trapdoor and follow through to that room with the Dragon statues.
Placing the Dragon Keys.
All the Dragon heads stopped spitting Fire, place the 4 Masks and look for the
newly opened gate in the corner of the room SE, go in and walk the Path of
Spirits to where the Guide is waiting for you, just go ahead and wait up for
him at the closed gate, he will activate the gate and blue rays fill the next
room, just run through them and the level ends.
21-03-2007