Quest of Gold "
Level 18 - The Ship Graveyard.
Levels by TC 14.
Authorized walkthrough G&D Productions.
Search for the
Batteries.
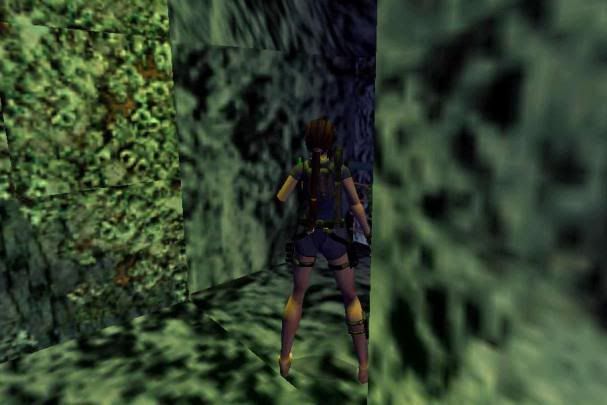
Swim S from the
mini sub and into the tunnel, the gate opens up, swim up into the next cave and
left a bit to climb S onto the wrecked submarine. First shoot the 2 Sharks, walk
to the tower W to get some Flares on the deck of the wrecked sub.
Dive in N to
swim back towards that tunnel you came from, just under the tunnel is Shotgun Ammo on the bottom, look right and spot a hole in the bottom. You’ll be
swimming in there in a Timed swim later. Climb back onto the Wreck and dive
into the S side of the pool, swim into the far SE corner and under a floating
crate is a nice blood coral, look under that coral to find a Battery # 1 (first of five).
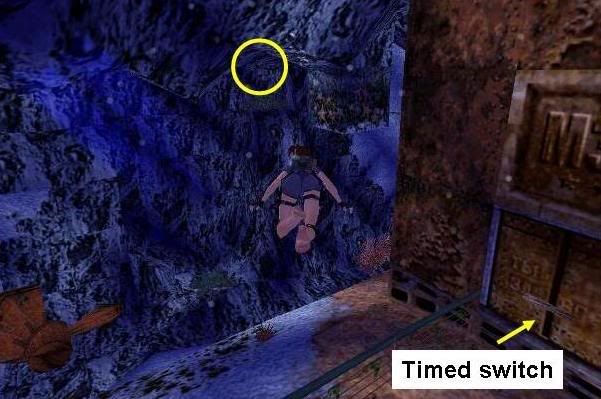
Timed Swim.
Swim W, past a
plant and left around the corner to get the Poisonous
Harpoons from the bottom. Swim W to a closed
UW gate (left) and swim opposite the gate to climb N onto the Wreck. Find the
switch NE and save in front as this is the Timed swim. First jump up once to
break the water surface so you can side jump left later. Pull the switch, side
jump left over the fence and swim E, a bit left to get to that hole in the
bottom past the tunnel you came from before. Swim down and right around the
corner through the Timed gate.
Climb up in a
small cave, head N and shoot 2 Goons of which the last will leave behind a small medipack. Follow through to where you look out into the cave with the Wreck,
run-jump sharp right around the corner (SW) and grab to get into the opening
with the coral. Crawl through and come to a pole going to the Wreck, walk the
pole while a Shark lurks below and from about 2 steps from the Wreck you can
jump forward and grab the crack. Shimmy as far as to the right before you pull
up back flip with a roll to grab the block, get Lara’s feet op the block and
climb around left, go down (with Lara feet still on the block) back flip onto a
crate in the water. Jump to the ledge NW (notice the
underwater ceiling lever) and jump along
the N wall to grab the ledge W, pull up and get to the end of the crevice. Look
up W for a monkey climb, best is to run SW and curve right to grab it. Use it
to get on a block and from there a jump to grab a ledge S, get into the tunnel.
Follow going
right and crawl a bit to the right and you’ll come to a waterfall.
Just dive in
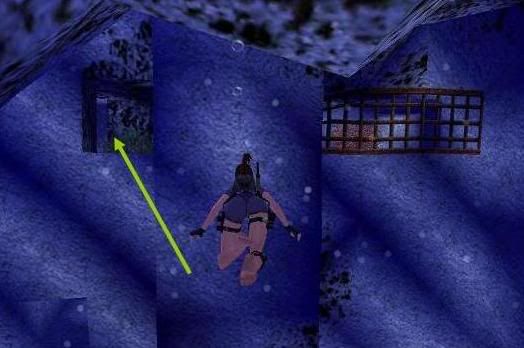
and follow through the twisting tunnels to a cave with a wreck. Swim up NE
behind that pointy rock and turn left into the opening, follow through, swim to
the N end. Climb out quick and kill a Shark. Use the switch there and shoot a new Fish before
you get back into the water.
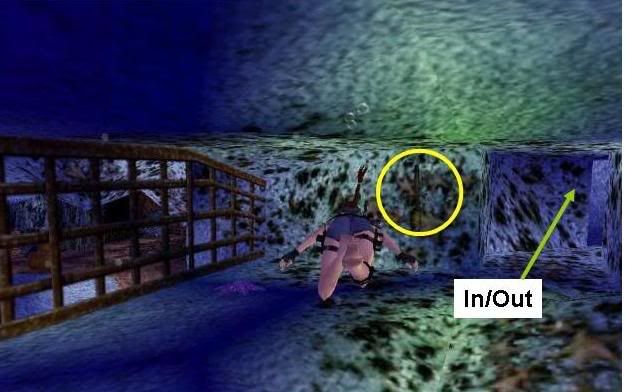
Swim back to
the previous cave and this time down left into the opening E, swim pass a squishy block and notice the next
squishy block has stopped. If it is blocking the passage and the under water ceiling lever (in the middle where the second block is) you’ll have to go back to the
previous switch and use it again till the underwater ceiling lever is available.
When you used the lever a platform will raise in the other cave, so swim back
there. Climb the platform and walk the pole to the switch S. Watch the fly by
of the diver dropping a Battery, first shoot another Fish and
then swim back to the cave again to pick up
Go back through
that tunnel S and follow all the way back to the waterfall, climb out S and
back flip to the ledge. Jump to the waterfall and go S. Follow through to an
opening SE and do a running jump to the crate in the water to pick up
Dive into the
water and swim E along the Wreck till you come to two pillars. Look right
between those pillars and find the UW lever (face E). The lever will bring out a pole near
the crate SE. Swim NE and climb up on the Wreck. Look into the SE corner and
spot the pole. Aim for the middle of the pole and run-jump grab to it. Swing to
that crate in the corner. Jump to the crack W and shimmy right till you come to
a ledge. Do a running jump to grab the slanted pillar NW. Hang left before you
pull up over the top and slide far to jump to the next pillar, jump again to
the corner ledge, slide a bit and jump to grab the pole, swing to end up on a
crate.
Jump into
opening with squishy block and on the opposite side of the block is a small medipack. Turn facing SW, walk back as far as possible so you stand close to the
block (screenshot).
Then take two hops back turning left a bit and hopefully you will grab that
jump lever below the middle of the opening (otherwise just grab the edge and
quickly get over the switch and use it before the block kills Lara). You will
drop straight in front of the now open gate, a Fish comes out so swim to a save place and shoot him. Now
go back into that tunnel, follow through and climb up into a room. Shoot the
crate W and get
Up the Cave for
Go E into cave
and watch out for the boulder, just run in and left against the wall. Proceed
into the next high cave and pick up Uzi Ammo after shooting the Goon. Dive into the stream and swim behind that coral W,
press CTRL to open the UW gate there. There is an underwater
ceiling lever at the end. Wait in the tunnel a
bit before you get out, as another boulder will fall into the stream. Climb out
E and then W onto rock near the waterfall N, face W and run-jump to use the
jump switch W. This opens a trapdoor E on top of the rusty ladder. Jump and
grab up to the ladder and climb up and then climb off left, turn around and
jump grab the crack N, shimmy left and crawl in past
the waterfall. Follow the path and at the end a run-jump to a rock S (notice
the Jump switch up W). Turn E and
walk
over the tight rope
to get to the other side.
Go S and follow
through, look left around the corner to spot the Jump switch again. Run out
with a left curve to jump to the jump switch. Use the tight
rope again to get to the E side and go through
the S corridor and now get on top of the raised platform (Or just jump grab to
that platform from the ledge under the Jump switch).
Jump to another platform N and from there into the opening up N and pull
up, get the small medipack, jump back to the platform and from the middle of it
a curved jump to the opening NE, next to the waterfall. Pull up over the top,
slide down and jump to grab the opposite wall. Climb up till you just see Lara
over the edge, hang left or right. Save there and back flip/roll (timing the
squishy block) and keep the forward key down to get out of the way.
Timed Gate.
Notice the
Timed gate and jump NW to get behind that squishy block. Around the corner is
the switch, so save before you pull it, roll and run around the corner,
run-jump right so you’ll land against the wall just right of the block. Now you
can just side jump right into the opened gate.
Follow through,
slide down on a grating and pick up
Climb out E and
get back up the rusty ladder, all the way up into the passage and go left or
right to find the receptacles for the 5 batteries. In the middle passage is
door that will open up, go in and turn around. Jump up to the jump switch E and
the trapdoor will open up below. Slide down into the next challenging room.
The Deadly Pool
and even deadlier Jumps.
Jump to a ledge
NE and spot the ladder on the N wall, there’s a burner on top of it. Face S and
standing back against the wall and in the middle of the ledge. Save and
run-jump to grab to the pole, aim left a bit when Lara lets go and grab the
second pole. Then curve hard left and land on a slanted side of the pit. Slide
and jump with a roll once, so you’re facing back from where you came and keep
jumping the sloped sides till you are on a save blue ledge, look S for a jump
switch. Run-jump and grab it and after using it you should keep jumping till
you are save again on that blue ledge.
The flames on
top of the ladder N are gone. Walk to the far NE tip of the ledge and run-jump
as far as possible to the N along the wall. Turn slightly left in the end so
you will slide forward down the slanted side, jump with a sharp right curve and
land on the slanted block near the ladder, slide and jump to grab the ladder.
Go up to 4 steps from the top and back flip into a corridor (or back
flip/roll/grab).
There are two Goons you have to take of and one of them drops Revolver Ammo. The next room has a lever E that will open a trapdoor W with a flyby
of the lower area with the Wreck flooded. Go to the trapdoor and drop down into
the corridor below. You are back at the Jump switch you used near where you
placed the batteries.
The UW lever
Challenge.
Go
W and out to the cave, go down the ladder or just jump into the water below and
get a breath of air before you swim out of the cave to the Wreck W. You will now have to
find 4 UW levers.
Lever 1: Remember that underwater ceiling
lever? That is on the N wall near the middle of the ship, near the pole you
walked (screenshot).
Lever
2: Swim in
straight and left at the first slanted pillar (the one you jumped) on the S
wall and facing W is the UW lever (screenshot).
Lever 3: is located in the rooms where you
visited after the timed swim. Swim straight to the Wreck and turn right at that
pointy rock on the right hand, swim into the tunnel (screenshot)
and just keep going right around corners to the lever on
the W wall
(screenshot).
Lever 4: is located W (between the tower
of the sub and wall) Swim left past the tower and look up before you hit the
wall W to find a grating, near that grating is the ceiling lever (screenshot).
You have to go
back and fro to the cave for air, also when you opened the door after the 4th
lever.
Optional
for a Secret:
Swim
into the cave and go NW to that Jump switch you used near the squishy block,
swim into the opening under the switch and follow through to the room where you
got the battery before, this time swim up through the hole in the ceiling and
get Secret
#1, a pile of Gold Coins, Grenades and Revolver Ammo.
Swim back out to the Wreck.
Into the Wreck.
Swim up over
the tower of the sub and down into the tower, through the now open door in the
E. In here and all the way up is a breathing hole (“self contained air
respirator”). On the top ledge N are 2x
Shotgun Ammo and SE is an opening to the next
room. Swim in, get the Revolver Ammo NE on the top ledge. Swim into the opening to the
lower part of the room and near the gate W is another underwater ceiling lever;
the W door in the tower opens up.
Get back and
get some air and dive down, swim out W to get into the other door W. In this
room is on top also a breathing hole. Climb out onto the sloped sides and keep
jumping back and for till you are save on a ledge with a burning switch.
Jump NW and
walk over a grated floor to the NW corner, there’s a Jump switch you have to
use. The stand-jump can be done from an angle and after landing in the room
below you can swim out E. Climb out in the hole and jump up to the burning
switch again, go W into the next room again and use the lever on the wall S as
the trapdoor closed up under the switch.
You see a rock
falling so back to the jump lever you just did NE and dive down, there is a
small tunnel in the N wall. Swim through and use the ceiling lever at the end,
swim back out and climb onto the platform W to shoot the Fish. Also
shoot the darkest box on the bottom and retrieve the
Watch fly by
and get back to the now extinguished switch up E. Use the switch and watch fly
by. Get back into the water and swim E, out into the tower and up, out of the
top of the sub and swim to the W into the opening in the W wall a bit right
from centre. Swim up when inside and climb out E to go N, into the tunnel where
the explosion occurred.
Follow through
and get into a crawlspace, watch the fly by of a large cave.*
The Ship Key.
Optional:
Hang
from the ledge and shimmy as far as left, let go and back flip from the slanted
corner ledge onto the ship. On the deck near the E wall is Secret #2,
Golden Bars. And a Medipack just next to it. Go to the SE corner of the ship and
hop over the railing into the water and open the underwater door N.
*Continue:
Drop from the
ledge and open the underwater door N. Swim in looking up and just before you
hit the big ship propeller there is a ceiling lever up on the ceiling. An underwater
gate will open up when you use it.
Swim back out
to the big cave to the S wall and turn right to the W, pick up 2x Flares from the bottom there and
then swim W and left into the opening with the coral. At the end is a jump
lever up on the wall, if you turn around you’ll find and underwater lever, a
Key will show up on a tile.
Swim out of
this tunnel and straight into this big cave, turn NE under the ship, as there
is the big ship propeller and in front of it is the Ship
Key on the grating.
Swim to the N
wall and find the poles up over the water, facing W is a place to climb out,
back flip with a roll and grab the pole, swing to the next pole and land on a
slanted pillar after that one. Slide and jump to grab the jump switch in the
corner.
Then swim along
the E wall underneath the wooden ship and find an opening left, just past that
propeller. Swim in and use the underwater lever on the N wall in the end, a
door opens up.
Swim out to the
cave and go straight to the W wall, turn right there and save at the surface
before going into a triangular tunnel. Swim
in, and when you get into a somewhat bigger corridor that goes up, you have to
watch out for two boulders. Swim aside and along the wide part of the tunnel
when the tunnel starts shaking, the boulders will go by without harm.
In the next
room you can climb up into the opening E, turn around and jump with a curve up
to the SW. Use the Key W and go into the open door behind you. Follow through
and save at the end, face right and jump to grab the crack in the rock SE.
Shimmy around
left and pull up after the corner, walk S over the pole.
From there, go
SW to the pink coral and stand-jump SE onto the slanted rock, slide down and
run-jump into the opening in the waterfall. Follow through and walk further
down in the waterfall.
Behind the
waterfall is a jump switch you saw before. Slide down and jump to grab the
lever and swim through the open door there and go up to climb out.
Use the switch
S and watch fly by.
Swim out N and
about straight to the small wooden boat (you can only climb out on the middle
section). Shoot the Shark and jump grab E to the ship (Would you have waited to pick up the Secret
now, it wouldn’t count as a Secret) .
Then go to the
N end of the ship, jump NW over the railing onto to the crate in the water and
then onto a ledge N. Face W and stand left and do a run jump with a last
moments grab to the climb-wall and climb up. Now go S and jump past the squishy
block, jump to the ledge on the right and safety drop from the edge, shimmy
left past the waterfall around a corner and crawl into the crawlspace.
Follow in and
use the switch, a gate opens up. Crawl out and safety drop into the water
below, climb up onto the wooden boat and kill the Shark. Now go to the S end of the ship. Run off the end
into the water (on the bottom near the rubber boat you can pick up 2x Flares, turn around and find the
opening in the stern. Shoot the crate, crawl and go right at the intersection,
hang from the edge and shimmy to the right to crawl in N, use the switch there
to detonate the explosives in the crawlspace. Go back the way you came and
crawl to the intersection and go right again, crawl N and stay in the middle at
the end, crawl out backwards and grab that jump switch there.
Up, Up and Away.
Turn around and
swim N into the open gate, in the back behind the plant is an underwater
ceiling lever you have to operate from facing sideward, a rope comes out in the
big cave.
Swim back out
to the wooden boat and jump to the ship, head S and hop onto the crate. Face N
and swing those poles to grab the rope in the end.
Turn right and
spot a triangular opening in the rock wall E, aim for the pillar right of it
and swing to grab a crack in that pillar.
For
a Secret go left:
Shimmy
to the left and pull up into that opening to get 2x Uzi Ammo and
Secret#3, a Golden Skull.
Shimmy back along the crack.
Shimmy right
past the pole and climb onto the next ledge. Follow through and jump onto the
platform at the end, jump W over the next 2 platforms and then up left into the
opening behind the waterfall. From there, a sharp left curved jump to grab the
dark ledge up in the corner, shimmy right to the corner and pull up. Turn N and
spot the hole in the top of the big pillar, run-jump in and swim through the tunnel
to where the level ends…
Level 19 – Voodoo
Magic in
TC14
Swim up and climb up onto the slanted rock, stay in the
water for now and fill the Waterskin
from the inventory. Climb out and go stand on the waterfall N, jump and grab up
to an opening and climb in, turn around and jump to grab to the roof S. Go up
and into that triangular opening, use the switch to open the gate below. Go
back down the roof, shoot the Parrot
and get down to the ground floor to go through the door S. Jump over the ridge
and get down into the next room.
Go close to, duck and shoot the Demigod. Go and find the pushable block in the NW of that central
structure. Push and pull it on that red bloodstain in the SE corner of the
room. Shoot the Lizards, and climb
the vine they came down from S of the central structure. Face E before you go
up and back flip to the top of a pillar and jump over to the NE corner. From
that pillar you can standjump and grab the jump switch on the E wall.
W gate, Teeth Doors, the Caves.
Shoot another Lizard
and go W to the open gate. Go through 3 sets of Teeth doors and use the
switch to lower a block on the central structure. Back to the large room and
use the vine S again to get on top of that structure. Jump/grab to it and pull
up under the railing. Poor the water (from the Waterskin) in the scale and see
a gate opening. Safety drop down to the floor. Go back to the start (N) and
climb the waterfall N again, now go straight into that tunnel as a gate opened
there.
Into the
Caves.
Climb the wall in the end and climb left around the corner
to get in the upper passage. Follow up to the E and you are at a vast flowing
stream. Go S a bit and on the left is a fern (plant), there is an opening
behind that fern. Jump up and follow through you are at the other side of that
gate in the stream. Follow the tunnel upstream. Shoot the Lizard and another one in the opening on the right (camera is fixed
and there’s a block E). Go in there and go down S, slide down and shoot the Parrot. Go E and into opening to the
right at the Torches. Use the switch and go back out and climb up the waterfall
to follow the stream up to the push block. Pull the block W, go around the
block and push it into the stream. The flyby will show a pool in a lower room
filling up*.
Optional:
Head back into the cave W and downstream
towards the switch you just used and you’ll find an opening on the right, go in
to get Secret#1, 2x Uzi Ammo and a stack
of Gold Doubloons. Go back upstream to the push block.
Follow the now dry riverbed N back to the gate, go left
through the tunnel with the fern and left again. You’re now at the dry
waterfall into the start room, safety drop with health loss or standjump with a
grab from the left side of the opening and land in the small pool below.
E Gate:
Blades and Demigods.
Go S again, and now climb into the E gate. Go right (S)
and turn around at closed door in the end. Use the jump switch in the higher
part of the ceiling. Go back and right, the gate there is now open. This is the
pool you flooded, dive into the pool and use the underwater lever E. There’s a
passage E where you’ll come to later.
Climb out, leave W and go back to the room with the
central structure, go into the gate W, through the Teeth doors and the gate
there is now open. Save and slide through the Blades, shoot two Demigods
(mind you, only one will be active at first so don’t go shooting the wrong
guy). One drops a Voodoo Key, so pick it up and use it in the
keyhole W to open a gate N. Look for 3x Uzi ammo in one
of the holes without a pillar NE.
Go into the gate N and in the SE corner of next dark room
is a crawlspace up S, get in, go left at the burner (the next part is about
getting that burner off) and end up in a pool. Swim N and climb onto the part
of a wooden bridge. Jump to the next (E) and dodge the Blade when you time the flame to jump the next one S. Hop back and
hang from the edge till it’s save again to do a running jump straight S to grab
the ladder. Climb up and to about a block away from the Blade, hang right and
back flip onto a platform. Jump up W and grab up to the monkeyswing above, time
the emitter and follow to the bridge, go over to the N side, crawl and shimmy
along the lower ceiling. Jump to the ledge down E and then up E again. Turn
around and runjump grab to the bridge under the Blade, first shimmy left so you
can pull up safely. Walk to the S end of that wooden bridge and turn E to jump
and grab that jump switch (a bit from an angle). This raises a block so you can
exit this place later. Fall back into the water and swim N to open the left
gate of the two. Swim in up for air, face W and an underwater lever is hidden
behind the base of a pillar along the W wall (second from the right).
Underwater
Blades.
Swim through gate N, save here as the next part is very
hard to get past those Blades. Swim under the first, then up to the ceiling and
over the next two to the end, just swim through those flames, get a medipack E and swim up into opening N
and get air.
Burning
Underwater Levers.
There is a lever down N, just pull it, Lara might catch
fire but doesn’t loose health or die. You opened a gate in the first (S) room;
get back for air and save. Swim S into the open gate, same kind of lever, same
fire but be aware of Teeth doors as
well as you have to swim back through those. Save close to the first (screenshot) and go when it is
closing up, just swim immediately down and through the next one.
Swim into the room and better get some air N before
entering opening W. Another switch awaits, the flame in the crawlspace is now
extinguished. Go get some air N and dive down into opening in the bottom of the
central room and swim back where you came from before. Watch out for the Blades
again, swim high first and down after the second Blade. Get up for air in the
room with the pillars and you’ll hear the echoing sound of Teeth doors.
Crawl
Lara crawl.
Swim S and up through the shaft to the big pool and in the
SW corner of the pool is a block so you can jump back into the crawlspace.
Go left (E) and crawl further, over a collapsible floor
and you’ll fall into a small room, could be you land on a ledge halfway down,
just slide further down. Note the dark tile on the
floor and a switch on the wall way up.
Go through the gate N, shoot a Demigod and use a jump switch behind the second pillar E. Notice
the gate NW and then go to the NE corner to get 2x Uzi Ammo near a block, climb that block and jump grab S to grab
up into the open hatch. All the way S is a small medipack. Turn around and go left
(W) into the crawlspace, the rest of the floor
you fell through before collapses and you can now look over the edge and spot a
jump switch, so place Lara directly over the switch, jump backwards and grab that switch, slide down to the lower room again
and a block has risen under the switch.
Timed
Gate.
It is a Timed switch,
pretty tight and the door is all the way N through the room with the pillars
and on the right. Pull, backflip/roll with a bit of a left turn run around that
wooden fence and turn back left a bit to sprint straight N along those pillars.
A sharp left turn at the end and sprint (or jump) into the hopefully open gate.
The Huge
Room.
Once inside shoot the Demigod,
go look in the NW and SW corners to get the Revolver Ammo
and a small medipack along the N
wall and standing S of that central structure is a push block.
Push/pull it to the tile (with the diamond shape) W of
that structure, a trapdoor opens up NE and in the hole is another Timed switch.
Timed
run up the Block, the Vegetal
Keystone.
This switch pushes a block up SW, pull, backflip with a
roll curving right and run SW to the block, jump on block and do a running jump
to the wooden ledge SW as well. Jump and grab the roof N (do not pull up) and
shimmy around to the right and after the second corner you’ll find a jump
switch*.
Optional: shimmy to the right and pull up on
the steaming tile, turn around and runjump into that “window” N, get Secret#2, Gold Bars and 2x Shotgun
Ammo. Jump back to the roof and go shimmy left to the jumpswitch.
*Continue:
This switch opens a door W, around the corner in the
building. Get the Vegetal Keystone
and watch the fly by of where it should be placed.
Go SE and find another switch under an opened trapdoor, a
block will rise in the trench S. Take the push block and push it onto the
raised block near the S wall. Use the same switch again to lower the push block
into the trench. Push the block to the other end (W). Pull the block back once
and look behind it, there is an opening in the S wall now. Go in and up the
passage W, watch out for the pit.
Shoot the Demigod
standing in the distance and a block appears in the room behind you, climb it
and face N. Jump and grab up and climb all the way to the top, then to the
right and drop. Follow through and jump through the narrow gap.
Breakledge
Jumps.
Jump NE to a small walkway, now you have to do a few hard
jumps to get to an opening up E and of course there will be more ways to do
this but I thought this one to be the easiest (Map).
Stand to the right facing N, pull up over the top and
slide to jump to a breakable ledge N, try to grab it so you can have a look
where the next is. Shimmy left around the corner to just before the next
corner, pull up turn left and standjump to grab #2. Shimmy right around two
corners and pull up, run turning right and jump from under the low ceiling to
grab ledge #3 (W). Shimmy left around two corners and pull up to do a right
curved run and a jump onto the tip of ledge #4, a right curved running jump and
grab to the hard to spot opening S. Use the switch there and see that big
trapdoor open up in the room below.
Go stand in the opening and just run out into the water
below. This is a familiar place, turn to swim S and up through the shaft. Out
of the gate and to the block SW. Go through the crawlspace and right to drop
into the room with the deadly red pool. Jump to the platform and place the
Vegetable Stone. A gate opens in a room where you found the Voodoo Key before.
Go S out of this room and go the knife S and now you can climb over that block.
The Big
Climb backwards off the block, hang and shimmy till right
you can crawl in (E) Crawl through and watch the fly by. Look down to the
bottom of this cave and spot some pots, shoot them to raise a block you need
later. Then crawl out backwards and shimmy right and crawl in when you are on
top of that wooden gate below. Go on through
this crawlspace and find the block, look up E and jump grab to another
crawlspace. Follow through and kill a Lizard.
Go to an opening to the big cave and jump out to that platform in front. Walk
up to the SW corner and a fixed camera kicks in. look with the Binoculars to
spot the block on the pillar W, runjump over onto the block and you’re now
standing right over a Secret that will become available when the block lowers later.
Look for a rock ledge W and shoot the Lizard
from here, he leaves a small medipack
behind. Now you can jump down onto that ledge
and get that medipack.
Teeth
Doors.
Go stand NW facing W and see another nice trap in front.
Time the burner and runjump through the Teeth doors, run and curve right to
jump onto the roof there. You’ll have to end up on the green pillar, so pull up
and backflip to it. From there a runjump SW through more Teeth doors, landing
against the wall past the doors, so you won’t go too far. Stand close to the
next doors and standjump SW through both sets.
Pillar
Jumps.
Now you have to jump some pillars, but there is a fixed
camera there. A Parrot will also
bother you.
Go NW and then SW and then S. Most of the times you can
see the next pillar in the corner of the screen. The last one is best done with
a run jump and grab to the S under the lower ceiling. Go SW into the tunnel and
follow through and crawl through the wooden tunnel, stand up at the railing and
go down into the room or just a stand-up there to shoot the Demigod below. Get down, go E to get Revolver ammo and use the switch at the
opening overlooking the cave.
A rope appears outside.
And
Down…
Get back up to the pillars and standjump back to the first
from standing left facing N, the next a standjump and grab from standing right
facing N. Jump E and stand in front op the rope, just a hop and grab to the
rope, slide down the rope and drop onto a block. Shoot the Lizard in the water. He leaves a small medipack, so drop from the block and get it.
In the building W is a push block, pull/push it NE and
over that small wooden bridge near the trench E (don’t push it onto the water
though), leave it next to that pit there. In between you will also have to
shoot another Parrot. You have to
raise a block in the pit to get it any further. Dive into the trench N and swim
to an underwater door E. Open it and follow in to an underwater lever under a
trapdoor. A gate opens up, swim back and climb out of the trench, shoot the Lizard.
Timed
Run for the Block.
Go E through the cave and jump up to a higher floor
(through the cascade) to shoot that Demigod
there, notice the lowered block on the SW corner of this floor. That’s where
you have to get to in a Timed run now. So make a note of the route while you
follow back to the Timed switch. Go down from this floor and head NW to the
cascade looking for the open gate in the N wall. Save and pull, roll run out
jumping left and do run-jumps along the shallower parts of the stream. Jump SE
onto the floor and run with a right curve to jump onto the block, immediately a
right curved running jump onto a wooden platform SE of the block.
The 1st
Voodoo Key.
From the platform a runjump to grab the opening W and go
up the ladder to where you look out high into the cave. Jump and grab the
platform to the right and use the monkeyclimb to get to the pillar E. Grab the Voodoo Key from the pedestal. Use the
monkeyclimb to get back and run down into opening, go down from the grey block
and hang from the ledge at the ladder, hang left and just drop onto the slanted
block below. Safety drop out of this tunnel to the stream below, go straight N
and use the Voodoo Key on the pillar left of the grey door, shoot the Lizard coming out and go in to use the
switch. A vine appears and a gate opens, this will be the way out for later….
A 2nd
Voodoo Key.
Now go to the building N where that timed switch was,
outside on the right around the corner is a jump switch, runjump and grab it
from the higher part of the ground, Go NW and to that push block remember? A Parrot and a Lizard will attack, while you have
to move the block to that Diamond tile S past the stream. Something shows up on
the tile of the floor in the E. Go E and up to where you shot the Demigod and
pick up another Voodoo Key.
The 3rd
Voodoo Key.
Climb the vine from facing NE all the way to the top and
back flip onto the roof of the structure. Side flip to the W and slide, shimmy
and hoist up at the next corner. Jump up the roof and climb up to the crack S.
Shimmy right and crawl in, follow through to a switch. Use the switch and
return to the top of the roof. Slide down and shimmy to the corner where the
vine is. Jump to the vine, climb down and back flip to that wooden platform NE.
Jump back SW to the structure to get the 3rd Voodoo Key. Jump back to
the wooden platform.
Optional:
Walk to the SW corner of the structure and look
for that pillar where you jumped to at the start of the level, a Medipack
appeared and that’s the Secret. Runjump down to that ledge and pick up Secret#3
that Medipack
and a Golden Skull.
When you picked up the Secret a screen will
show the open trapdoor below this ledge, just run down W into that opened
trapdoor in the pool below. Climb out and shoot another Lizard. Go up to the floor E and up the vine from facing SW.
Backflip to that wooden platform in the NE corner.
*Continue:
Go into the open door and follow through to the right to
come to that pool with the underwater lever, go to the E side passage and
follow to where you can use the 2 Voodoo Keys. Go in and through the next door
to the next level…
Level 20 - The Flying
Dutchman.
The door opens, go right (because left you’ll need a key) and pick up 2x Flares.
Jump down and the floor gives way. Just slide down and follow through, climb up
the ridge and slowly walk into that tunnel to watch fly by.
Jump N and keep jumping till you are safe at the other
side of the “Bloodriver”. Jump up and go S, carefully around the obstacles.
Follow through and at the end look down, there are breakable tiles in the bloody
water.
Break
ledge Jumps. (Map)
First is a standjump from standing a bit left in the
opening, a running jump to the second one S and to the right, landing close to
the left side. Turn left a bit and standjump to the corner of the third where
it touches the island, turn left again and standjump onto the slanted side of
the island, try to slide backwards so you can slide and backflip landing back
to the S wall. Turn right a bit and runjump to the island, keep jumping and do
a roll so you will be facing the island, go jump right and slide to the break
ledge, do a U-turn right while running and jump into the opening. You will probably
land against a crate, just shoot it, pick up the Medipack and continue N.
Blade
Ladders.
To the right is a switch over a lowered block and in the
end facing E there are ladders to the left and right. Take the right hand one
(S) and use the switch on top, climb down and from just under the Blade take a
back flip and climb left off the ladder. Go back S a bit to where the block has
risen and use the switch there.
Jump back on the S ladder and climb up right and close to
the Blade (screenshot) and
time the Blade to back flip/roll to the ladder N and hopefully have enough
health left to go up to the next Blade (you can’t use a flare here and the
Blade is hidden in the dark). Hang right again and another backflip/roll grab,
go to 4 steps from the top and one more backflip/roll to get back to the N
ladder, go up and hoist up.
The
Voodoo Key.
Get the small
medipack and walk up to the next room. There is an invisible walkway to the
pedestal where you can get the Voodoo
Key.
Optional: Walk N over the walkway and step
through that dark textured wall to get Secret#1, a Golden Skull and 3x Uzi Ammo. Walk back to the pedestal where the Key was.
Jump to the block E and enter the passage, you’re now back
at the crossing where the level started. Go S and right to use the Key.
The
“Flying Dutchman”.
Slide down the sloped passage and come to a room
overlooking the cave with the “Flying Dutchman” where you’ll find a Medipack SE and Flares NE, in the SW wall is a crack in the wall over the railing.
Jump over the railing, grab that crack and shimmy till you can stand up on a
ledge with a plant. Check the health and runjump S to the wooden platform ledge in the deadly water. (A curved running jump) jump the platforms
ignoring the opening with the Burner and the Teeth door and walk all the way
around the ship. Jump into a cave opening S. Grab up and use the monkeyclimb to
go around the building and drop onto a ledge with a Blade, if you drop on the
right hand closest corner it is OK, so watch out. Face N and sidejump left onto
a slanted block, jump and grab the wall to climb left and up to the ledge with
the switch. The burner at the Teeth door will stop.
Through
the Teeth Door Wall.
Get back to the monkeyclimb, the burner and the blade pose
no threat anymore (but even though it isn’t working the Blade is still deadly,
but if you stand on the wooden platform facing SE that tiny corner is safe). So from there to the monkey climb and jump the
platforms along the ship to the Teeth door wall SE.
Runjump left through the door to the walkway and
immediately hop back and hang from the side to let the boulder pass.
Jump to the ship and shoot 2 Harpies. NE and SW are some Shotgun
Ammo and Flares pickups. You can
trigger another Harpy if you climb
all the way on the back (E). From there jump to the opening in the middle of
that wall. Jump up to the higher floor and a block raises to close off a room;
so go straight, at the end stand left and do a running jump with grab (watch
your health) shimmy a bit left, drop/grab and pull up into the opening.
Look SE and jump on the wooden platform, turn NW and jump
to the stone ledge to use the switch around the corner there (that block lowers
again). Jump back to the wooden platform and then to opening N (or jump into
this opening directly from the switch ledge). Now jump up into the opening SW
and then SW again to grab the ladder out there, climb halfway up and do a back
flip (no roll) slide and grab. Shimmy almost to the right and backflip/roll
with a left curve to the opening left. Climb up a block and jump W, from there
a jump left to the slanted roof NE. Slide and grab the edge to and shimmy
right. Pull up in the passage and follow back to where the block lowered, now
enter a water room.
In the
Wet.
Optional: First walk through the waterfall S
and get 2x Revolver Ammo and a stack
of Gold Doubloons posing as Secret#2 . Go back out and save at the pool.
Dive in, into hole and N, go right at the plants, open the
next (metal) underwater gate to the right. Swim in and to the end, swim up (a
bit hard as Lara might get stuck in the rocks, but then just dive again) Turn
around and climb up, run forward a bit and kill 2 Lizards. Find a crawlspace left (S) and use the switch to stop a
Blade, when it stops fully open (blocking the tunnel) it is in the right
position. Get out of this crawlspace, go W and
into the water in the corner, go left and use the lever behind the Blade, the
water level rises. Swim back a bit and up into that room, climb on a wooden
walkway. Fill the Waterskin here
(jump up once so Lara can run again) and jump S to grab into the opening.
Go to the back wall S and face W, back flip onto the
slanted block and jump/grab the ledge above, shimmy right to pull up. Take a
curved jump right over the railing and empty the water skin in the scale.
Watch fly by and jump in the water, you have to take the
way back by going right and pull out (bit tricky) into the passage where the
Lizards were, at the end in the water again, swim through the open underwater
gate and left, go up and out at the end.
Go out of the room and N, take a running jump back to the
ship. Go W, pick up some Shotgun ammo
and jump on top of the structure with the Teeth doors at the end and then into
opening S. Follow through to a small cave with a shallow pool, kill the Harpy.
Shoot 4 sets of pots (one at the entrance, one in the
pool, one in a crack NE and one SW) and the gate opens up S. You’ll find 2x Harpoons
along the E wall near the plant. Better you fill the Waterskin while
here (although you can get back to fill it). Go into the open gate S, push
the block twice and kill the Lizard
and quickly go into the opened gate. Don’t dillydally but get into the other
room, as a burner will start on that tile on the floor.
Put the water in the scale and watch another tile around
that Skull become active. Go SE and push/pull the push block around till it is
on its tile in the S passage, but be sure to pull it to the tile as you have to get back to the room with the
scale, a block lowers in the NW corner of it. Go in there follow through to a
switch to open a gate near the ship. Go SE back to the push block and push it
once to get out.
A Leap
of Faith.
Go back to the ship, 2 stand jumps, one to the roof and
one onto the ship. Look over to the N and see a small blue flame in the
“Bloodriver”. Go stand on the near by crate and do a running dive (Alt+Shift)
and under the surface is an opening you can swim in without dying.
Blocks
and a Torch for the Voodoo Key.
Swim up and face W, pull up and start jumping left up the
slopes till you can jump hard left onto the floor. N is a vine you can climb.
Back flip into the room above and in the middle of the
room are some Harpoons. There are 4
pushable blocks in here that have to be pulled on 4 tiles.
NW and NE are 2, S are 2 more, the blocks can be pulled
onto the closest tiles.
Climb the vine that appears near the SE block, back flip
to the upper floor, use switch SW and Zombies
appear, you can shoot them now or later, the grenade gun works fine and one of
them will drop the Voodoo Key. Go
get a Torch SE and go down and down
again at the vine holes to the lowest room and ignite the Torch on the flame.
Go light the snakes head W. Drop the Torch and climb up to the top room. Kill
the Zombies if you didn’t yet and get the Voodoo Key one of them will drop.
Optional: For the next Secret you will need a
Torch, so grab the second Torch and jump the block and slide down into the next
room, drop it near the Keyhole W and open the door, grab the Torch, jump into
the passage and go through the first set of Teeth doors. Stand close to the
second set and light the Torch on the Burner, turn around and get back into the previous room, light the Snake head E
and see a door open up. Drop the Torch and go up into the W passage again.
Jump on the dark block W. Hop up into the opening W, slide
down and use the key W. Jump up and go through the first Teeth door, stand
close to the second set and runjump past those timing the burner. Slide down
and grab the edge over the deadly pit, pull up, backflip/roll grab and hoist up
to slide down onto the safe floor.
Grab the Medipack
NW and now you need water for the Waterskin, so go N and jump up into the
passage left (W), fill the skin and get the Revolver Ammo.
Optional: If you opened that door, jump into
the room E and get Secret#3, Gold Bars and 2x Shotgun Ammo.
Go back and fill the scale to activate the third tile at
the Skull. Go back to the room with the water and fill the Waterskin again.
In the room with the scale behind the blue flowers SE is a
jump switch (E), go up into the opening to the block puzzle room E and right to
where the gate is opened.
Climb out backwards on a ladder and shimmy right and drop
down onto that platform. Jump E to get onto that ladder at the end.
Climb till you see a grey wall on your left and back flip.
Walk over and jump to the ship, grab and pull up and go kill two Harpies. Drop from the S side of the
ship onto the platforms below and go W, jump N once and then into the opening
in the W wall. Stand facing the right hand side of the crate with the Blade and
jump up, grab up to a crack and get the Medipack,
drop back out and runjump to grab the slanted wall E and left of that Blade.
Pull up and backflip/roll to grab the roof, shimmy right and pull up.
Shoot the Lizard, grab the small medipack he drops and look for the plant behind
the roof left (NW). Facing W you’ll see a Jumpswitch behind it, runjump and
grab the switch to open a gate upstairs. Jump back up like you did before and
follow through to where you look out over the cave. Grab the monkeyclimb and go
straight to the first mast, the fixed camera makes it hard to spot the right
path, but you have to circle right around the mast and stay on the path with
the stars. Finally drop at the 4th Scale and pour the water in. The
last segment is activated and the Skull is now active.
To get down; stand on the NE corner of the ledge (higher
ceiling), check the health, face NW and do a running jump (Gerty), or a standjump (according to Dutchy) to land on that crate
below. Go to the Skull and step on to get “aboard the damned ship”.
Level 21 – Aboard the
Damned Ship.
Open the door N, go NW through the cargo hole and open
another door, go right around the corner and into the opened door to shoot the
sacks for a small medipack.
The Key to Sailor Brooymans’ Cabin.
Near the crate, with an opening with flames N, is a big
barrel (N wall), it is pushable. Pull/push it S as far as and then push it onto
that different tile between those two canons E. Go into the door NW as the
flames in the passage are off and jump up onto the higher floor to grab the Key to Sailor Brooymans’ Cabin.
So now you can go upstairs (SE), open the door and the
first on the right is a bedroom, nothing there but open it anyway. Go to the
second door right this passage is still closed off, but leave the door open
anyway. Door straight ahead, is a large mess room where two Ghost Pirates attack.
Mess Room: Left hand door E, staircase down.
Open the first door left, go into the bedroom to open a
chest NE. Inside you’ll find the Ballroom
Key. Back out and left, the door left is locked so open the one to the
right, go down some steps, take the slide there shoot the bottle W to get the Key to Captain’s Cabin, then climb up S
from the higher part of the floor to the balcony. Go around the E side over
those blocks and get a small medipack,
follow to the alcove N and find a Timed
switch.
Timed
Run Back Up.
Turn around and see the chain on the chandelier. The
switch opens the doors to that upper corridor. When you pull the lever, watch
the fly by and then save again for the timed run. Pull,
roll and run out to jump to the chain. Landing against it, jump up and grab, go
up five grabs and backflip/roll holding the forward key immediately running
through the doors. You are back at the corridor.
The
Captain’s Hut.
Go back up the stairs and use the Captain’s Key SW. Shoot
two Ghost Pirates in the captain’s
hut, high up over the table is an artefact and there are 3 receptacles in the
SE wall. Open up the door E, go up the stairs, use the switch on the left at
the opening to the room and see a door open up. Jump down and head NW out of
this hut back to the mess room and again go into the E left corridor, down the
stairs and go straight through the newly opened door.
The
Wheel house.
Jump over the
railing onto the higher floor, shoot the box for a small medipack, hop back to a Timed
switch NW. That switch opens a door in the passage S.
Timed
Run Wheelhouse. (Map)
Pull the switch, turn left while Lara pulls and turn
enough to sprint just past that nasty open door, curve right a bit and hit Alt
just before entering the passage so Lara will dive from that slope. Hold the
sprint key down, aim to the right hand side of the timed door and just before
the next slope another roll so you will just roll through the gap of the
closing door. It’s a tight one so it may take a few tries.
The
First Damned Heart.
Get in water and follow through, meeting a Shark in one of the tunnels, swim into
a cave and go right just past that first barrel and find an underwater lever on
the E wall. Use it quickly and swim to the barrel N. Through a small triangular
opening behind it, hoist up at the end.
Get medipack
straight ahead, go into the passage E and use the switch at the window. Watch
the fly by of a canon firing and blowing a hole in the wall. So it’s time to
get back to the cargo hold.
Swim back get out of the water go to the wheel house and
go left through the nasty door, up the stairs, straight through the mess room into the door W, go straight down stairs, go shoot the Ghosts first and then head SW through
the cargo hold to the first cargo hold, pick up Flares SE and find the opening in front of the SW canon. Drag the
skeleton from facing E and get his Damned
Heart.
The
Ballroom and the Second Damned Heart.
Go back N to the other cargo hold and
SE back up the stairs, through the corridor and down the first stairs to the
left and use the Ballroom key there.
Go to the E wall and find a hidden crawlspace up in the
curtain (left side curtain, one block up). Shoot the sacks and crawl further to
climb down in a foyer. Throw a switch in the window SE, head W and look in a
window left for a second switch (screen of a door) run around the corner W to
shoot a Ghost Pirate, there is third
switch on the left wall around the corner (screen of a door opening up), another Ghost
Pirate will come running.
Look along the W wall for a lower part of the ceiling.
Face E and grab up to the ladder to climb up to the floor above. Head to the SE
corner and runjump right around the corner to the opening where the door was.
Pull up and jump across the entrance passage to the
crawlspace. Go through and jump to a crate in the next room. Face N, sidestep
left and run along that side to jump to the grey tile N, then a standjump/grab
into the corridor.
Timed
run for the Damned Heart.
Go left and jump through curtain to chandelier and jump
all chandeliers to the highest one in the middle and climb the chain. Backflip
off and use switch up there, get back down the chain, standjump down SE to the
chandelier and back into the curtain to the room as the fire in front of Timed switch is now extinguished. Save
in front of the switch so Lara will pull it and watch how and where the door
opens first. Save again and pull the switch, backflip/roll and run to the edge
of the opening, standjump and do running jumps over the chandeliers to grab the
last one NW. Pull up and runjump straight with a grab to land in the open door.
The passage leads you to the other balcony to get the second Damned Heart from a pedestal. Drop from the balcony and leave S up to the
corridor.
Mess Room: Right hand door E, staircase up.
Go left to the Mess room and open the right hand door E,
go up the stairs, shoot another Ghost
Pirate, open the first door right and then go to the keyhole a bit further
to the right use the Key to Sailor
Brooymans’ Cabin on the door, shoot the sacks in the corner, use the
switch. Go out and left, down the stairs to the Mess room, into the W corridor
and take the first on your left.
A
Mysterious Maze, the Cursed Book of Souls.
Shoot a Ghost
Pirate upon entering the first room. This is a mighty confusing maze I’ll
tell you. First pick up a couple of Flares. Go in E and if you keep going to the right you’ll end up in the first room again with a Ghost Pirate on your tail. Shoot it and
enter E again, this time keep going left
and you’ll end up back in the first room again, but with a different layout. Go
up the stairs left and end up overlooking a bedroom. Shoot that Ghost jumping towards you. Walk slowly
into the room and you’ll notice half the floor is made of glass, you have to
walk along the E side to the opening across the room.
Now I lost direction a bit (can you imagine) But I think I
went right (shoot a Ghost) and then
right again, shoot a Ghost, but you have to get into a corridor
where the camera angle changes and when using the binoculars you can see a sort
of shaft up in the ceiling. Face W and keep jumping
up till you see a corridor in front of you. At the end of this corridor (shoot
a Ghost) you can safety drop down
and go S into a dark place, stand under that Book in the ceiling and use Ctrl
to get the Cursed Book of Souls from
the floor.
Go N, keep going straight ahead to leave this place. Once
back in the corridor go right to the Mess room and again into the (E) right hand
opening, up the stairs and open the first door to the left.
The
Library.
From the entrance a standjump and grab to the crate W,
stand on the corner of the crate block with the flames losing a bit of health Turn around and jump/grab E to the book case, your
goal is the jump switch NW way up, so crawl into the bookcase, out the other
side and shimmy left over the bookcases to the end. Back flip with roll/grab to
next bookcase and go down to climb left under the floor. Go on and up when you
are back into the larger room. Go up to a burner and release Ctrl a fraction of
a second to hang from the edge of the floor, shimmy left past the balustrade.
If Lara won’t go onto the next bookcase, release Ctrl a fraction of a second
again and try over. Climb up over and drop/grab to pull the jump switch, land
on a slanted block and slide to back flip behind the crate, the flames are all
extinguished now.
Runjump and grab the bookcase NE climb up where the burner
used to be. Shoot the Ghost Pirate
and shoot the little box for a small
medipack.
Go to the NE corner and place the Cursed Book of Souls
between the other 2 books. A door opens in the Mess room.
Optional:
Go NW and Lara will stare at the ceiling, climb
up and through the ceiling for Secret#1, 2x Harpoons in the
room and in a chest you’ll find Golden
Bars. Go down to the room below again.
Stand at the opening in the balustrade where the burner
was and turn around, drop backwards and go down the bookcase to backflip into
the entrance. Go out to the corridor and right to the Mess room, shoot a Ghost Pirate and head N for the open
door.
The
Flooded Rooms.
Get down the stairs and look to
the left to spot a small crawlspace (for later).
Jump to the lower crate just in front and run off the N
side into the water, swim down into that hole between the crates and swim
through to find and use the underwater lever. This raises and lowers the water
in this room.
High
level:
Swim S and back into the entrance where you saw
the small tunnel to the right, near the floor (see above).
Follow through to get Secret#2, Gold
Doubloons and a Medipack. Swim out of the small gap and left to get back to the water
room.
Swim into the opening N and climb out on the stairs,
follow up and crawl in on the right at the closed door. At the hole you can
lower yourself down into the hole and drop/grab to pull that jump switch and
save when you are in the water. Now swim past the knife (stay high), and follow
back past an opened door to the right (can’t use the switch in there yet) Go on
over 2 short stairs to the N staircase, go left and back to the Main room. Swim
back down the hole between the crates to use the lever that will lower the
water level in the Main room again.
Low
level:
Swim N and up the stairs go immediately to the right (E)
and down some steps and on the door to the left is open now, use the switch in
the corner. See a camera shot for a jump switch, get back to the Main room,
down to the lever and raise the water level again.
High
level:
Swim to the chandelier near the E wall and climb the
chain, turn to backflip to the chandelier SW. Jump to chandelier S and from
there to the jump switch. This opens an underwater door on the W wall way down
at the bottom NW.
Swim in and when you come to the corner, better get air
and swim along the surface through the opening instead of diving through
(collision of the door posts). In the next room is an underwater lever. Throw
the lever till you see the Blade in the open position, so not blocking the
crawlspace. You can go back for air when needed. When you succeeded you can get
out to the Main room.
Swim to the staircase N and all the way up the stairs and
into the crawlspace to the right again. Grab the edge of the hole and shimmy
all the way around. Watch the cut scene and after the low ceiling is a passage
to the right, go on and get one Torch from
the pedestal. Go out and S to an opening overlooking the Main room. Standjump
to the closest chandelier and the Torch will stay in Lara’s hands. Walk slowly
off the chandelier and swim to the opening S. Straight in front of that opening
and about one and a half block away from it you best save first. Then throw the
Torch (spacebar) and see it float gently into the opening underwater, landing
in the room S. Go down between the crates to lower the water level again and go
jump into the opening S from the low crate in front of it. Pick the Torch up.
Go up the stairs to the Mess room, throw the Torch where
you can find it later and shoot two Ghost
Pirates. Pick up the Torch and go W into corridor and into ballroom (first
on the right) to ignite the Torch on one of the candles candle (NW).
Back to the Mess room and take the right hand passage E,
go straight to the end and into the door, to come to the room you saw in the
cut scene; light the two wall torches and the door to the Kitchen opens up.
The
Kitchen, the 3rd Damned Heart.
Into the kitchen, shoot the sacks on the floor and go to
the big barrel in the SE corner. If you look NW you see some drops falling from
the ceiling, place the barrel under it (pull twice and pull once). You can
leave the Torch here although I have it with me in the next screenshot you
don’t need it.
The fire over the hole in the floor is out, so drop in,
shoot the Ghost. Go to the next room and time the burner to jump to the crate
in the middle of this inferno. (screenshot)
Stand back on the corner, save and runjump with a right
curve to the next crate with the Blade so you have room to do a running jump
into the opening across the room. Go up the stairs and come to a room where 3 Fire Wraiths will come alive.
Run right and upstairs, the door will open, go out left
and to the Mess room, sprint N and down into the water.
Climb out and go back to the passage E and now take the
first door right (S) and in the chest W get the 3rd Damned Heart.
One more Wraith
might show up, so get rid of it in the water N of the Mess room.
Go back through the Mess room and now go S into the Captains
Hut, to those receptacles SE and place the 3 Hearts. The room above your head
will be filled with water.
The Corsair’s Curse.
Go E up the stairs and dive into the water. Swim to the
Artefact over the table below and grab the Corsair’s Curse. The door S opens,
follow through and up and hoist up. Open a chest to get
Secret#3,
a Golden Skull. Stand on the block next to the chest and jump up into the water
above, swim through and that is the end of the level.
There will be a Bonus level later when the
whole Quest of Gold Series will be released in a Gold Version