ANCIENT ARTIFACT
Levels by Max (August,
2007)
Walkthrough by Harry
Laudie
Level 1:
Ireland
You start by sliding down a hill into a dark
deserted village. Go east and enter the building. Hop up onto the north ledge
and enter the next room. Get onto the ramp in the north-west corner. Turn
around and stand jump to the grab an upper ledge to the south. Go east to hop
the railings. Carefully go north and stand jump onto a higher west ledge. Go
west and jump to a south ledge. Run and jump over the railings and onto an east
ledge. Run and jump north to grab a higher ledge. Follow the ledge to the west
and into another room. Pick up flares off the
floor. Hop onto the corner block and pull down the wall switch on the east
wall.
Exit the room and work your way back down the
ledges. Exit the building and go south down the hill. Look west to see the open
door. Go east and see luminous insects flying in the trees. You will also
trigger a dog to shoot. Return west and enter
the open door. You enter another deserted area. Run west and stand on the top
of a small mount of earth. Stand up there and shoot three
dogs. You can also see a cave in the upper west rock wall. From that
mound, go south and find a hole in the ground near the south rock wall. Drop
into the hole and follow the tunnel to the north.
You enter a cave area. Go west down the tunnel and
enter a room. Go to the south-west corner. Climb the wall that is left of an
opening. Pull up into an upper room. Pick up two Uzi
ammo and secret #1. Safety drop back
into the room. Go west through a doorway and see a large pool. Shoot a dog that was hiding inside the doorway. The water
current prevents you from swimming to the opposite ledge. Go east and then
south to exit back to the entrance hole. Pull back up into the outside area.
Go north and follow the small valley area. At the
end, go west through a rock opening and emerge at the top of a pit. Slide down
into the pit and shoot a dog. Go to the
south-west corner of the area. Back flip off a slope and jump forward to grab
the south ledge. Pull up and go south. Go west and hop up onto the ledge in the
north-west corner. Run and jump to grab a higher south ledge. Pull up and pick
up blue shotgun shells. Slide down and return
to the entrance ledge. Do a hard "banana-type" jump around the column
to the east. You land on a ledge and pick up a large
medipack.
Run and jump to grab the column to the north. Pull
up and run and jump into the west wall alcove. You get secret
#2 and a small medipack. I could not
jump back to the column. Back flip onto the top the south ledge and do the
"banana-type" jump again. Then jump back to the top of the column.
Run and jump to grab the edge of the large opening in the west wall. You can
jump through the tree that is in your way. Pull up but do not slide down the
other side yet. Go north and grab a crevice in the north wall. Aim to the right
and grab the crevice over the lower slope. You cannot grab the crevice straight
on. Shimmy to the right and pull up onto a ledge. Jump into the south-east
alcove and pull down the wall switch. You get a scene of Lara in the alcove
from very far away. A cage has been raised in a trench. Save the game before
jumping back to the ledge. It was a difficult jump. Shimmy back to the left and
drop onto the west ledge.
Look to the west and see the open door of the building.
Use the raised cage in the trench to get over the trench and stand jump onto
the west side. Go to the building and enter the open door. Look north and see a
closed door. Look south and see a receptacle for an item that you do not have.
Go west and pull down the wall switch under the rosette window. You will need
to light a flare to actually see the wall switch. You get a cut scene through
the rosette window above you. Exit the building and go west to get behind the
building. You enter a graveyard and shoot a dog.
Go to the west wall opposite the rosette window. Use binoculars or a flare and
you should see a small cross in the west wall. Stand jump through the green
wall and into a tunnel.
Go to the end and see a spike trap below you. Run
and jump to the west. Land on a slope and jump forward over the spikes and into
a safe tile. Run and jump to the north-east and land on a tile where you do not
slide down into the spikes. A simple stand jump did not seem to work here. The
camera view changes to increase the difficulty. Walk north to the wall and then
walk to the west. You are stopped by a column that is very hard to see because
of the camera view. Jump up and grab a ledge. Pull up and back flip onto a
higher ledge. Go north into the doorway and the camera view changes back to
normal.
You are inside a church in need of repair. Shoot a bat. To the east above your head is a chandelier. You
can see a fire on ledges at the north wall. Go to the north-west corner of the
church. Back flip off a slope and jump forward to grab the side of the ledge
with fire. Do not pull up and run across the ledge or you will catch fire.
Instead, shimmy to the right and pull up on the east corner. Stand jump to the
east and grab the next ledge with fire. Shimmy to the right again. Pull up on
the corner and stand jump to the safe ledge to the east. You will lose health
but you will not catch fire if you stay on the corners. Stand jump to the
higher east ledge and pick up a small medipack.
Pull up into an upper north wall crawl space. Crawl
to the end but do not drop. Shimmy to the left and around the corner and avoid
the spikes. Drop onto a safe ledge. Shoot two bats
and hop up onto the south ledge. You can see another room through the fence.
Pull down the wall switch and exit back through the crawl space. Drop onto the
ledge and then safety drop to the floor. Go to the west wall and see a short
and a taller column. Pull up onto the taller column. Run and jump to the alcove
at the south wall. Pull up for secret #3 and revolver ammo. Stand jump back to the column. Stand
jump to grab the higher ledge to the east. Pull up and go east and to the
middle of the slope. Run and jump with no grab to land in the middle alcove at
the south wall. You land in front of a closed door.
Jump east over a block. Run and jump to the ledge
at the east wall. Hop south into an alcove and enter the crawl space. Drop into
a safe hole and pull up on the other side. There were spikes here earlier. I
think the wall switch removed the spikes. Continue crawling and stand up in a
large room. To the north is the room with the wall switch behind the fence. Hop
onto the short column. Jump to the east and pull up onto the higher column.
Shoot a bat and the camera view changes. Stand
jump to grab the next column. Pull up and pick up a small
medipack. Stand jump to the next column. Stand jump to the south-west
for the next column. Stand jump to the south-west and grab the ledges with the
railings. Pull up onto the ledge. Run and jump over the railings to grab the
ledge at the west wall. Slide down the next slope and grab the edge. Shimmy to
the right and pull up.
Pull down the wall switch and get a cut scene of
the door in the alcove opening. Safety drop to the floor and exit back through
the crawl space. Jump back to the ledge and jump over the block. Go south and
enter the open door. Use the wall switch and get a cut scene of a door opening
in a building with a water trench. Go south and safety drop into the tunnel
below. To the west is the spike pit. Go east and go through the wall to slide
down into the graveyard. Go east and use the raised cage again to cross over
the trench.
Go east to the slope and the camera view changes.
However, stay near the south wall and the camera view is normal. Stand jump up
the south side of the slope and you can get back to the top. Go east and then
turn to the south. You go back through the valley. Run past the first building
on the left side. You reach the second building from the cut scene. Enter the
door and drop into the water. Pick up the golden key
and let the water current carry you to the north. Pull up on the east side and
go back to the open door. Stand at the edge and use binoculars to look towards
the upper south wall. You can see a crawl space. Stand jump to the south to
grab that crawl space. Crawl in for secret #4
and two Uzi ammo. Drop back into the water and
exit back to the east side.
Go north back through the valley. Turn to the left
and slide down the slope again. It has not gotten any easier since the last
trip here. Back flip back onto the south ledge and do the
"banana-type" jump again. Run and jump to the north column and then
run and jump to the west ledge. Go west and use the raised cage again over the
trench. Enter the building and go into the south alcove. Use the golden key and
the door opens in the south alcove. Enter the door and get a flyby of the
picture at the back wall. It shows a symbol on the wall. Run towards the
picture and the level changes.
Level 2:
Submarine
The level starts with a cut scene of two women
talking about a picture of Lara. Then there is an underwater cut scene showing
a submarine. Then the level starts with you standing in a room in the
submarine. Jump over the railings and climb the ladder in the south-west
corner. Back flip into the upper room. Pick up Uzi
ammo on the box at the north wall. Pick up the Uzi
on the box at the south wall. Climb down the ladder to the starting room.
Go south and go pass the ladder on the east wall.
That is for later. You enter a small room. To the south is a ladder but it is
blocked by a trap door. Climb down the ladder at the east wall. You enter a
room with one closed door and two open doors. Go east and enter a room with a
floor lever and a block that needs to be raised. There is a crawl space with a
fire to the south. Exit and go into the west doorway. You see a crawl space
with an item and a fire. Pull down the jump switch on the east wall beside the
pipes. The fire is out in the crawl space. There is nothing else to do in this
yet. Exit the room and climb up the ladder. Go north into the corridor and now
climb the ladder at the east wall.
Pull up into a small room. You see a ladder that
seems to go nowhere. Go into the south-east corner and get into a crawl space.
Go forward and hang in the hole. Do not drop, as the hole is a fire trap.
Shimmy to the left and onto an invisible crevice. Pull up into the crawl space
and continue. The next hole is also a fire trap but the crevice is more
obvious. Shimmy again and continue in the crawl space. Drop onto a ledge over a
deep pit. Jump and grab the ladder on the column to the east. Shimmy around the
corner to the right and climb down. The floor is a deadly fire trap. Climb down
to the last tile on the ladder. Back flip, roll, and grab the edge of the
tunnel. Pull up and go to the end of the tunnel. Use the floor lever and exit
the tunnel. Jump to the ladder and climb up. Shimmy to the left and back flip
onto the entrance ledge. Exit back through the crawl space again.
Climb down the ladder to the starting corridor. Go
south into the small room again and go down the ladder. The door is open in the
north wall. Enter the door and go east. Run over the wire mesh floor and drop
into the tunnel underneath. Just follow the tunnel to the end and use the floor
lever. Exit the tunnel and return to the small room. Go west into the room and
see that the fire has stopped in the crawl space. Get into the crawl space and
crawl until you see an opening above your head. First continue down the crawl
space to the end. You get secret #5 and a small medipack. Crawl back to the opening and stand
up. Be careful of steam emitters and pull up on the east ledge. Use the floor
lever and drop back into the hole. Go east to crawl back to the room. The block
has risen in the room. Hop onto the block and use the floor lever. You get a
cut scene of a trap door opening.
Exit this room and climb the ladder to the room
above. Climb the ladder in the south wall alcove. Pull up through the open trap
door. Go south and drop into the hole. Go south to the railings and see a
structure in the water. Jump the railings onto a ledge with ladders at both
ends. Do not jump into the water, as the water current holds you down to drown.
Run and jump into the hole in the structure. Go west to the controls and the
level changes.
Level 3:
Poseidon Hall
You start the level in an underwater tunnel. Follow
the tunnel to a larger area. Pick up flares at
the bottom near the north wall. Swim up and surface and pull up onto any ledge.
Go to the north-west ledge corner and shoot a bat.
Jump over the north slope and grab the wall of the north column. Climb to the
top and shimmy to the right and pull up onto the ledge. Run and jump to the
east ledge. Run and jump to grab the south column. Pull up and run and jump to
grab the west column with the railings. Pull up and shoot a bat. Hop over the railings and pick up a shotgun. Stand jump onto the higher south ledge. Go
south and shoot a bat. You are on a ledge
overlooking a large room. Notice the skeleton on the floor in front of you.
Slide down into the room and the skeleton awakens. Run to the west and shoot
the skeleton into a pit with spikes.
Look at an opening in the north wall. It is partly
hidden by a green vine. Pull up into the opening and run and jump to grab the
south ledge. Go to the corner and pull down the wall switch. You get a cut
scene pf a gate opening high on a ledge. Safety drop to the ground and enter
that north wall opening again. Drop into a safe hole and pull up on the other
side. There were spikes in the hole before you pulled the wall switch. Enter an
alcove for secret #6 and pick up a small medipack, Uzi ammo, and red shotgun shells. Exit the tunnel and return to the room.
Go east and south and see spikes at he base of a
ledge. Go to the south-west corner and be careful of the spikes. Pull up onto
the ledge. Go through the open gate from the cut scene. Drop into the next room
and go north. Pull down the wall switch and exit the room. Go north and west
back to the pit with the spikes. Some spikes are down so carefully get into the
pit. Go north and pick up a small medipack.
Step into the north-west corner alcove and hear a gate open. Climb out of the
pit and go through the open gates in the west wall. The gates are not timed.
Enter the room and see a wall switch in the
north-west corner. It is a spike trap. Notice the spikes and an item to the
left of the spike trap. Go south and climb into a tunnel that is hidden by
green leaves. The tunnel is between the right column and the left slope. Run
down the tunnel and pull down the wall switch. Return to the room and see that
the spikes are down. Pick up a large medipack.
However, the wall switch is still a spike trap. There is a closed gate in the
south-west corner.
Pull up onto the column in the south-east corner.
The camera view changes but you can stand jump to the north onto a higher
ledge. Go to the west wall and stand next to the railings. Lara does not grab
the crevice if you are too far to the left. Jump up and grab a crevice. Shimmy
to the right and drop onto a ledge. Stand with your back to the wall. Stand
jump to the east to land on the leading edge of a breakable tile. Run and jump
onto the east ledge. Then enter the open doorway. Follow the corridor to a
ledge over a water pit. To the west you can see a wall switch. At the north
wall is a platform with spikes. Look down to the south wall and see a breakable
tile. Stand jump to grab an invisible crevice at the south wall. Shimmy to the
right and when you get over the leading edge of the breakable tile, release and
drop. Roll and run to the left diagonally across the breakable tile. Jump to
land on the middle of the ledge at the west wall. Go west through the green
leaves and enter a tunnel. You get secret #7.
Pick up red shotgun shells, flares, and Uzi ammo. Exit the tunnel and drop into the water.
Look at the west wall and see a closed underwater
gate. Swim north and go up the steps. There is a wall switch and a large
gate. Save the game in front of a tight
timed run wall switch. Pull down the wall switch. Turn to the left and run into
the water on the first step. You can run in the shallow water. If you have to
wade in the water you will not make the open gate. At the corner, jump with a
right curve into the water to the south. Swim south and into the timed open
gate in the west wall. Enter the gate and the gate closes. Swim into a hidden
tunnel in the south wall. Light a flare to see the tunnel. Swim to the end and
pull down an underwater lever. Swim back out the tunnel and out the gate that
has opened again. Swim north and go back to the wall switch. The large gate
beside the wall switch is open. Go west to see a water hole.
Dive into the water, swim down to the bottom and
then swim to the west. Follow the underwater tunnel to a T-junction. To the
east are closed gates. Swim to the west and follow the tunnel through a small
crawl space. Swim up and pull down an underwater lever. Swim back out and swim
down the tunnel that you entered. Swim up the water hole to surface for air.
Swim back and enter the open gate to the east. The water current carries you
into a flooded room. Swim up into an upper north-east alcove and pull down the
underwater lever. Swim out and swim into an upper north-west alcove. Pull down
the underwater lever. Exit and swim down to the floor. Enter the north
underwater alcove and pull down the underwater lever. Exit and swim south into
the left tunnel. The water current carries you back to the entrance tunnel.
Swim left through an open gate and surface in the next room for air.
Swim back to the first north-west underwater lever
and continue swiming up and into a tunnel. Pick up revolver
ammo and swim back into the east open gate for air. Swim west and swim
into the first south opening. Swim up the slope and pick up revolver ammo. Swim back for air. Swim back into the
flooded room. Swim to the upper south-east column for flares.
Swim to the upper north-east column for Uzi ammo.
The exit the room and swim back for air. Continue swiming east and pull up into
a cave.
Go to the south-east and back flip off the east
slope to jump forward onto the west column. Stand jump to grab the west corner
column and pull up. Jump to the north ledge and pull up into the crawl space.
Crawl in and stand up and get into the north tunnel. Follow the tunnel to an
opening above the room you left. At the far south you can see a closed gate.
Stand jump down to the south-east and land on a ledge. Shoot two bats and shoot the ball you see in the east wall
opening. Pistols or shotgun are fine for the task. Run and jump onto the lower
ledge at the north wall. Go west to get back to the crawl space and go back to
the upper opening.
Stand jump to the west onto a small triangular
ledge at the same height as the opening. It helps to light a flare to see where
it is exactly. You have to do hard diagonal run and jump on the ledge and then
use a right curve to grab the side of the south ledge. The gate ahead of you is
open. Shoot a bat. Grab the ledge and shimmy to
the right until you are over the crawl space. Crawl to the end for secret #8, Uzi ammo,
and an Uzi. Crawl out and safety drop to the
ground. Now repeat the column jumps, crawl space, tunnel and triangular ledge
jump to get back onto the upper south ledge.
Run south towards the open gate and shoot two bats. Enter the gate and follow the steps down
onto a ledge. Shoot a skeleton off the ledge.
Pull down the wall switch and stand jump to the ledge at the north wall. The
spikes are down. Pick up red shotgun shells and
run and jump to the east ledge. Go south and follow the steps down to a ledge
over the room with the wall switch spike trap. Safety drop to the floor on the
west side of the ledge. The gate in the south-west corner is open. The wall
switch is still a spike trap. If you did pull down the wall switch you get a
cut scene showing that the south-west gate is closed. Ignore the wall switch
spike trap and enter the open gate.
Follow the tunnel and enter a dark room and shoot a
bat. At the north wall are two closed gates and
two receptacles. Stand jump to the top of the hill to the west. Drop on the
other side into a large area. On the upper west wall are four ledges with
spikes. There is also a closed gate in the west wall. Go north and see a closed
tall gate in the north wall. Look around and you can see wall switches on
blocks that you cannot reach. Go behind the north-west pillars and pick up a small medipack. Go to the middle of the east wall and
hop up onto a short block. Jump up to a north block and monkey swing west to
drop onto the block with a wall switch. This wall switch opens a timed door to
the south over four spike traps. Ignore the wall switch for now.
Run and jump to the north-west block. Two fire wraiths appear and chase you. Run and jump
the ledges and blocks clockwise around the room. You will get to the block in
the south-east corner. Pull down the wall switch and drop to the ground. Run
north into the open gate and dive into the water pool to extinguish the
wraiths. Pick up red shotgun shells and a large medipack from the pool floor. Pull down the
underwater lever on the south wall and pull up out of the pool. Go south and
find that the tall gate in the west wall is open. That tall gate would also
open if you just walked up to it. I guess the underwater lever also did
something else that is not obvious.
Enter the open gate and see an opening in the south
wall. Go west into another room. This is a push bock puzzle on a platform.
There are three wall switches on the south wall that control spikes on the
platform. Also some platform areas are deadly fire traps. First go to the west
wall and pick up a large medipack. Below is a
crude sketch of the room.
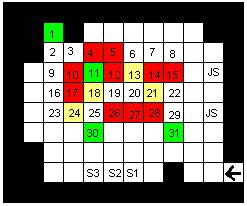
Note the following about the crude sketch:
--- You enter from the lower right corner.
--- North is to the top of the sketch and of the
room.
--- The tiles on the platform are numbered #1 to
#31. Non-numbered tiles are the floor.
--- There are two jump switches, JS, at the east
wall with a dark triangle symbol.
--- Red tiles are deadly file traps.
--- White tiles are safe. They are either platform
or floor tiles.
--- Yellow tiles are spike traps that are
controlled by the wall switches.
--- The wall switches are numbered as S3, S2, and
S1 on the sketch. In the room, these will be wall switches #1 to #3 from left
to right as you look at them.
--- Wall switch #1 controls tiles #13 and #18
--- Wall switch #2 controls tiles #18, #21, and #24
--- Wall switch #3 controls tiles #13, #21, and #24
--- Green tiles are the tiles where you have to
push the cage. They are tiles #1, #11, #30, and #31. Tiles #1 and #31 have a
blue diamond symbol. Tiles #11 and #30 and a dark narrow triangle symbol. I do
not think that the order is important.
The following procedure seems to work.
--- Pull down wall switch #1.
--- Move the cage from #8 to #6. Be careful of the
fire traps. Then move the cage from #6 to #20. Shoot a bat.
Move the cage from #20 to #22 and then finally to #31. You get a cut scene of a
fire stopping at a gem on a pedestal.
--- Move the cage from #31 to #19. Be careful of
the spikes on #18. You can get killed by just walking beside a tile with
spikes.
--- Pull down wall switch #2.
--- Move the cage from #19 onto #18 and stop.
--- Move the cage north to #11. Spikes retract
under the left jump switch.
--- Move the cage south to #30. Spikes retract
under the right jump switch.
--- Move the cage north to #25. Move the cage from
#25 to #23. Finally move the cage north from #23 to #1. You get a cut scene of
a fire stopping at a gem on a pedestal.
Carefully go to the jump switches on the east wall.
Pull down both jumps switches and get a cut scene of a very dark room. Now go
east to exit this room. Go east through the open gate and into the room from
the cut scene. Notice that two spike traps are gone from the ledges at the west
wall. Go west and enter the open gate again. Now enter the opening in the south
wall.
You enter a room with columns and bridges. Go south
and see Uzi ammo on the floor. Sprint there and run over the ammo as the
ceiling falls down behind you. You just want to trigger the falling ceiling now
rather than later. Go north and pull up onto the north-west corner ledge. Run
and jump to the south-east slope. Slide down and grab the edge. Shimmy to the
left, pull up, and back flip to land to a flat triangular tile in the north-east
corner. Jump south to grab the top of the flat column and pull up. Run and jump
to grab the higher south ledge. Pull up and run and jump south to grab a
bridge. Pull up and shoot a bat. Stand jump with
grab to glide into the south wall opening. Go down the blocks into the room. Go
to the south wall and pick up Key #1 from the
pedestal. Climb the blocks back to exit the room.
Jump back to the bridge. Now just run off the south
ledge with no grab and drop into an alcove in the south wall. Pull down the
wall switch on the east wall. Safety drop to the floor. Go north and pull up
onto the north-west corner ledge. Run and jump to the south-east slope. Slide
down and grab the edge. Shimmy to the left, pull up, and back flip to land on a
flat triangular tile in the north-east corner. Jump south to grab the top of
the flat column and pull up. Run and jump to grab the higher south ledge. Pull
up and run and jump to a higher north ledge. Jump to the corner ledge and then
run and jump onto the ledge to the west. The floor grates in the next room are
deadly fire traps. Only the raised platforms are safe. Stand jump to the left
platform. Go to the south-west corner and pick up Key
#2 from the pedestal. Jump onto the platform with the blue diamond
design. Run and jump with no grab to land on the entrance block to the east.
Run off the edge onto the slope below. Grab the
edge and safety drop to the floor. Exit the room by the north-east opening. Go
east to return to the room with the spikes on the ledges. Go east and get over
the hill. Go to the north and place the two keys to open the two gates. Enter
the alcoves and pull down the two wall switches. You get a cut scene of the
room with the spikes on ledges. Go west over the hill and notice that all four
spike traps are done. Go north onto the short block again. Jump to a higher
block and monkey swing over the wall switch that you visited when you entered
this area. This is a very tight timed switch. It opens the gate at the south
wall. Pull down the wall switch and turn to the left a little. Hop back and now
run and jump over the four ledges. Sprint on the last block to get into the
tunnel before the gate closes.
Follow the tunnel to a room with a pedestal. There
is nothing to get. Go to the tunnel in the south wall. Slide down the slope
backwards and grab the edge at the bottom. Pull up, back flip, and roll to grab
the edge of a block with fire on it. Shimmy around the block to the left and
drop onto a safe ledge. Pull down the wall switch and the fire stops. Hop onto
the block and run and jump to the open gate in the upper south wall. Go to the
end of the tunnel for secret #9 and two Uzi ammo. Safety drop out of the tunnel back onto
the ledge. Dive into the water below. Swim south and enter an underwater
tunnel. Continue swiming south and the level changes.
Level #4:
Temple of Poseidon
You start by swimming in a trench. You get a flyby
of the dark cave like area. When you gain control, swim west and pull up onto
the steps. You can see a large closed door that needs only a single item. Go
towards the closed doors and shoot two bats. Go
west and swim to the trench at the start of the level. Pull up onto any ledge.
Jump the ledges over the trench and go east. Jump onto the last north-east
ledge. Face west and pull down the wall switch. Dive into the water and the
current carries you to the west. Pull up on the steps and go to the south-west
corner and see the open gate.
Enter the gate and jump over a spike trap in the
floor depression. Go to the end of the tunnel and pull down the wall switch.
You get a cut scene of a block rising near a pool. Exit the tunnel and go east
to the water. Turn to the south and jump into the water. Swim into the
underwater crawl space in the south-west. Swim into a flooded room and swim up
through the hole in the ceiling. You swim into the pool from the cut scene.
Pull up to the nearest ledge and turn around to shoot a crocodile. Pull up onto the raised block at the west wall. Pull up
into the upper west wall tunnel. You can see an opening in the upper west wall
on the other side of the pool. It seems to be not used.
Follow the tunnel to a room. Go up the steps to the
north and enter a small room. Step in the small water hole and pick up flares. Exit the room and go to the bottom of the
steps. There is a tunnel in the west wall. Follow the tunnel to emerge into a
large outdoor area with four buildings. Go north-west towards the central
platform with a post but do not fall into the hole in the ground. Look down and
see blue lights flying around an item. Do not drop down there yet, as you
cannot get back up if you do. Notice the symbol on the ground beside the hole.
There are four symbols beside four holes around the platform. Go to the west
wall and see a block with a pillar on top of it. On the front of the block is a
bump, which the other blocks do not have. That is a moveable block. Place the
block on the four symbols, one at a time, stopping on each symbol for a few
seconds.
Go the middle of the south wall near the mound.
Stand jump onto a slope where you can stand and not slide down. Stand jump to
grab the edge near the right side of the south block. It is hard to grab. When
you make it, pull up onto the block. Pull up east to another ledge. Run and
jump to the north-east and land on the nearest ledge with columns. There are
four buildings you can reach from here. On each ledge is an open door.
South-east building:
Enter the open door in the south-east building.
This is the ledge you landed on. Pick up Uzi ammo
from the floor. The interior door is blocked by earth. Exit this room and go
back to the ledge.
North-east building:
Go north and jumo the gap to the north-east
building and enter the open door. Go east and see a tunnel with spike traps and
a wall switch above a fire. You can do nothing. Exit this room and go back to
the ledge.
North-west building:
Run and jump to a column at the north wall. Then
run and jump to the next ledge. This is the north-west building. Go west
through the open door. Enter the open gate and see a closed gate in the north
wall. Grab the edge of the slope at the north wall and shimmy to the left. Pull
up, back flip onto another slope and jump forward to land on a ledge to the
west. Jump up onto the higher north block. Pull down the wall switch and get
back down to the floor. The north gate is open. Run north over the breakable
tiles to about the middle. Turn to the left and jump up to grab the crevice in
the west wall. Shimmy to the right and pull up into an alcove. Pull down the
wall switch. Drop and shimmy back to the left over the breakable tiles. Drop
and run to the north to break the remaining tiles. It is easier to get back if
all tiles are gone.
Enter a room with a hole in front of you. I ran
over all the tiles behind the west cage just in case they trigger something.
Climb down the ladder on the north side of the hole. Run and jump to grab the
block with the fire in the middle of the water. Do not pull up but shimmy
around the corner and pull up. You are safe from the fire if you stand on the
corner. Stand jump onto the ledge at the south wall. Grab the edge and shimmy
to the left. Go around the corners and pull up into an alcove over a spike
trap. You will lose some health. Pick up a small
medipack and the spikes retract.
Drop onto the ledge where the spikes were located.
Run and jump onto the east ledge. Go north and hop onto a block to pull down a
wall switch. Exit the room and see that a fire has stopped on a platform. Jump
back to the west ledge. Grab the crevice and shimmy to the right. Pull up and run
and jump down onto the safe platform in the water. Run and jump to the ledge at
the east wall. Go north and jump to the west wall ledge. Go north and jump to
grab the block with the fire. Shimmy to the opposite side and pull up onto a
corner. Stand jump to grab the next block with fire. Shimmy to the opposite
side and pull up into a corner. Look north and see a room with a closed gate.
Stand jump to the next safe block. Run and jump to the ledge at the south wall.
Notice the closed gate above the block beside you.
Run and jump to the east and grab the climbable
column. Shimmy around to the right. Back flip, roll, and grab the next
climbable column. Repeat this flip, roll, and grab procedure until you grab the
column in the south-east corner. The last few columns do not look like ladders
but you can still grab them. On the last column, climb up and shimmy to the
left to drop on a ledge. Pull down the wall switch and get a cut scene of a
gate opening. It may be possible to get back the same way. I could not do it.
Drop into the water and swim back to the entrance steps. Jump to the first
block with fire again. Continue as before until you can jump into the room that
you saw in the north wall.
Go north through the open gate from the cut scene.
Go north and jump into the water. Go to the north-west corner and pick up a small medipack. Return to the ledge at the east wall.
Ahead of you is a moveable block. Push the block to the west twice. Follow the
tunnel and jump over a spike trap. Go to the east wall and pull down the wall
switch. Return and jump into the south alcove. Push a block to the south once.
Follow the tunnel and jump over a spike trap. Pick up a small medipack and
return to the entrance. Push the first moveable block as far as possible to the
east. Return to the west where the block was located and climb the ladder on
the south wall.
You pull up into a room and see fire emitters to
the south. Time a jump over the double fire emitter. Jump into the south-east
corner to avoid the single fire emitter. Pull down the wall switch on the north
wall. Exit through the fire emitters again. Getting out seemed to be easier.
Climb down the ladder and exit west and then south to get back to the water.
Notice that gate on the upper south wall is open. Run and jump to the
south-east and onto the safe block. Run and jump south into the corner block.
Pull up onto the next block and enter the open gate. Run up the steps and go
the east. Pull down the wall switch and see the fire stop in the tunnel below
you to the south. The ceiling looks like a possible monkey swing but I could
not grab it. Exit down the stairs and drop into the water swim back to the
entrance and pull up. Climb the ladder and back flip into the room. Go south
and grab the crawl space in the west wall. Shimmy over the lava and pull up
into the room. Go east to exit these rooms and return to the outside ledge.
North-east building again:
Run and jump to the north wall column and then back
to the north-east building. Go east and enter the next room. Go through the
open gate and drop onto the platform between the spike traps. Run and jump to
the north platform where the fire has stopped. Pull down the wall switch and
get a cut scene of blocks rising in the pit with the flying lights. Run and
jump back to the first platform. Stand jump back into the doorway. Exit back to
the ledge.
South-west building:
Run and jump to the north wall column and then back
to the north-west building. Run and jump the gap to the south-west building. Go
west and enter the open door. Go west through the open gate and enter a large
room. There are holes in the floor. Safety drop into the room below. You get a
flyby of the rooms in the area showing the location of tiles needing a moveable
block. Go to the south-west corner and pull out a moveable block. Move the
block into the north-east corner and onto a tile with a different design.
Return to the tunnel in the south-west corner. Enter the tunnel and go into an
open gate. Enter the room for secret #10. Pick
up two blue shotgun shells from the corner
blocks. Run and jump over the south fence for a large
medipack. Climb the south wall ladder and back flip over the fence. Exit
the room and tunnel and return to the first room.
Notice a dark tile in the middle of the west wall
just below the hole. It has an "I" on it. Place the moveable block
from the corner onto that tile. The moveable block also has an "I" on
it. Turn around and enter the tunnel in the east wall. Follow the tunnel down a
ramp into a room with a lava pool. Go to the south wall and grab the ceiling.
Follow the monkey swing to drop onto the ledge at the east wall. Pull down the
wall switch and get a cut scene of a block rising. Run and jump to grab the
ceiling again and monkey swing back to the west ledge. Go up the ramp and enter
the first room again. Notice that the moveable block has risen. Walk onto the
small pyramid on the floor and stand jump to the east to grab the upper ledge.
Pull up onto the floor of the upper room.
Go west and jump onto the blocks of the three-block
ledge and shoot two crocodiles. Be careful as
you jump down, as there is a deep pit on the north side of that ledge. Now move
the raised block west next to that three-block ledge. Put it on the tile with
an "I" on it. Hop onto the ledge and jump behind the fence at the
west wall. Face east and pull down a wall switch that you see. Hop onto the
ledge and see that the block has risen. Push the moveable block to the east
onto another block with an "I" on it. Now go north and climb down a
ladder into the hidden pit. The ladder is on the west wall. Climb down until
your feet are above the spikes. Back flip with no roll and no grab and you
should land on a block to the east. Turn around and pull down a wall switch.
Run and jump to the ladder and climb out of the pit. Notice that the moveable
block has been raised.
Hop onto the central ledge and run and jump to grab
the south wall ledge. Pull up and jump up onto the east bridge. Look east to
see a closed gate and a tile with symbols on the floor. Move the moveable block
onto that tile to open the gate. You can see a receptacle but you do not have
the item. Run and jump into the large opening in the south wall. Run up the
ramp and see a wall switch behind a closed gate. Follow the tunnel to the west
and south and enter a room with a lava floor. Run and jump onto the sloped
ledges. Bounce between the ledges with a left curve to eventually grab the
higher ledge at the west wall. Shimmy to the left to the end. Pull up and back
flip onto a slope. Slide down and jump forward on a safe platform.
Go east to see another lava floor. Stand jump to
grab the ledge at the north wall. Shimmy to the right, pull up, and back flip
to the south. You back flip over a fence and land on a safe platform. You have
to a very hard "banana-type" run and jump to the north-east. Turn
with a left curve and grab the crevice on the north wall at the left edge.
Shimmy to the right and drop onto a safe platform. Grab the slope to the east.
Shimmy around to the right and back flip over the fence. Follow the fence to
the end and see a fire emitter in front of a slope.
When the fire emitter is down, run and jump onto
the slope. Jump forward and grab the edge of the central block. Shimmy to the
right, pull up, and back flip onto a platform. Go north and pick up flares from the corner. Look to the west and see a
fence. Stand jump to grab the central block again. Shimmy to the right around
the corner. Pull up and back flip over the fence. You land at a tunnel
entrance. Follow the tunnel to the end and pull down a wall switch. Turn around
and enter the tunnel in the north wall. A block drops in front of you. Go to
the end and jump down onto the bridge.
Go north and jump into the opening in the north
wall. Just follow the tunnel around to a room. Pick up the Azure Gem from a pedestal. Return back to the bridge
and go east. Jump around the block and get into the alcove. Place the Azure Gem
in the receptacle. Exit and go west over the bridge to the opposite side of the
room. Enter the open gate, jump over the lava, and use the floor lever. You get
a cut scene of a block rising in the pit with the flying lights. Go east and
drop down into the room. Continue east to exit back onto the ledge. Safety drop
to the ground.
All four buildings done:
Go to the north-east corner of the pit to find the
raised blocks. Jump into the pit and pick up the Poseidon
Pearl from the pedestal. The flying lights are not harmful. Climb out of
the pit. Go to the south-east to exit this area. Go east through the door to
return to the pool. Dive in and swim back through the flooded room and the
crawl space. Pull up into the starting area and go up the steps to the large
door. Place the Poseidon Pearl in the receptacle to the right of the door and
the door opens. Enter the room and go west and use the floor lever. Look behind
the columns at the north wall and see an open gate. The left column with the
bump is moveable but you have no room to move it here. Exit the room back to
the steps. Go into the water in the north-west corner of the room. You may
attract a bat to shoot. You can swim through the
west green leaves wall and into a tunnel. Follow the tunnel to the end and pull
up into a room. Pick up flares and go south to
push the column into the room. Swim back through the tunnel and go up the steps
again. Enter the room through the open door.
Move the column to the right of the column in the
south-east corner of the room. You get a cut scene showing a ceiling falling
and a hanging rope. Look up to the ceiling in this room and see the rope. Go to
the north-west corner to the place the column was located. The west wall with
the black lines is climbable. Climb up and shimmy to the left onto a block.
Stand on the outside corner and just stand jump to grab the rope. You do not
have to go up or down on the rope. Just turn to the south and swing on the rope
a little. Jump off to grab the upper south ledge. Pull up and go east. Walk
through the east green leaves wall and onto the roof of the temple.
Use binoculars and look to the east. You can see a
wall switch behind a cage. Go to the north side of the roof. Look down to the
north-west and use the binoculars to see something that appears to be a closed
gate. Run and jump down to the north-west corner. It was not a gate, but a
green leaves wall that you can walk through. Hop into the tunnel and go to the
end. You get secret #11, two revolver ammo, and a large
medipack. Exit the tunnel and go east to safety drop into the water.
Return inside the temple, climb the wall, and use
the rope again to get to the top ledge. Walk through the east green leaves wall
and onto the roof of the temple. Go north again to the edge. Run and jump to
grab the ledge at the north wall. Shimmy to the right and pull up. Do a
triangular run and jump to the building to the east. Climb down the ladder at
the east wall corner. Pick up a large medipack
and climb back up the ladder. Run and jump to the south ledge. Grab the edge
and shimmy to the right under the crevice to pull up onto another ledge. Run
and jump to grab the ledge to the south. Pull up and use the wall switch. Go to
the north side of the ledge and face south. Take one step forward. Hop back and
delay the grab a little so that you do not grab the ledge. You should glide
down onto the ledge below. You get secret #12
and two red shotgun shells. Run off the ledge
and into the water.
Return inside the temple, climb the wall, and use
the rope again to get to the top ledge. Walk through the east green leaves wall
and onto the roof of the temple. Go south and stand jump over the slope nearest
the temple roof. You land on a ledge that you cannot see from the temple roof.
Use the binoculars and look down to the south-east. You can see an open gate
and a slope. Run and jump to land on the slope and slide down and jump to the
east ledge. Go east though the open gate. Follow the tunnel to a large room.
Run east to the ammo on the floor. You get a cut scene
of Lara's new enemy Brijett on a high
bridge. She holds an item in her hand and walks away. When you get control,
pick up the Uzi ammo.
Go onto the mound in the south-west corner. Climb
the west wall ladder and shimmy to the left into an alcove. Make a very hard
run and jump to the north-west to land on a ledge with an unlit lamp. Stand at
the south corner and run in front of the lamp to jump and grab the ledge with
an unlit lamp to the north. Shimmy to the outside corner and face north before
you pull up. Use binoculars to look at the north wall and see part of a
crevice. Run and jump to the north wall and grab the crevice. Shimmy to the
right and go around the corner to drop into the bridge.
Go south and see a closed gate with a switch behind
it. That must have been Brijett's escape route. Go to the east wall and climb a
wall ladder. Shimmy to the left around the corner. Climb up and back flip onto
the ledge behind you. Turn around and climb to the top. You see a tunnel in the
east wall. Run up the slope of the tunnel and the level changes.
Level 5:
Paris Street
You start in front of a fence. Go south down the
street and ignore a side street. Continue south and look into a left alcove for
flares. Continue south and see a closed gate.
Hop onto the box in the south-east corner. Climb the wire mesh south wall and
pull up onto a ledge. Hop over a short fence onto a roof. Go west and hop up
into a corridor. I found nothing in the area to the west. Stand jump with a
left curve to the north-east and land on a balcony. Run and jump north to the
next balcony. Stand jump to grab the edge of a triangular opening in the north
wall. Go to the other side and run and jump to the east. You land on a lower
balcony. Notice a crawl space on the bridge to the north-east for later.
Go south and pass a room with bulletproof glass
windows. Go south and run and jump over the street to grab a crevice in the
south wall. Shimmy to the left and around a corner. Drop onto a bridge. Jump
onto the window ledge and get a flyby of Brijett
in the room below. Pick up the revolver off the
ledge. Jump back to the bridge and run and jump onto the second window ledge.
Run and jump to grab a crevice on the north wall. Shimmy to the left, around
the corner, and pull up into a window alcove. Turn around and stand jump a
little north of west to grab the crevice in the west wall. Shimmy to the right
and pull up into a window alcove. Run and jump to the north-east to land on a
lower bridge. Run and jump to the next east bridge. Run and jump with grab to
glide into the tunnel in the east wall.
Go north and follow the tunnel to a large room.
Drop and go north to see a structure in a pit. The pit floor is a deadly fire
trap. Run and jump to the structure. Slide down and grab the edge. Shimmy to
the right around two corners. Pull up and back flip onto a block at the north
wall. Run and jump onto the south-east column. Jump and grab the climbable blue
wall to the north. Climb up and shimmy around to the left. Then drop onto a
ledge. Run and jump onto the higher west ledge. Run and jump down to the wall
switch at the west wall. Pull down the wall switch. Turn around and run off the
edge onto the structure below. Slide down and grab the edge. Shimmy to the
right and around the corner to the middle section. Pull up, back flip, and roll
to grab the south ledge and pull up.
Go south to exit the room and safety drop to the
ground. Go west and south to climb the box and wire mesh wall again. Jump the
balconies again and run and jump onto the bridge with the crawl space. Crawl
through and go west to enter the open gate. Pull down the wall switch. Exit
through the crawl space back onto the bridge. Safety drop to the ground. Go
south and enter the open gate in the south wall. Enter a small room and the
gate closes behind you. Hop behind the south-east box for blue shotgun shells. Hop out of the hole and follow
the south tunnel.
You enter an outside street area and it is raining.
Jump into the small bush to your right and pick up the Gate
Key. The key lock is at the east wall beside you. But you need another
item first. Go west and follow the corridor to a small room with boxes. Climb
the blue wall at the south-east corner and back flip onto the west box. Pick up
red shotgun shells. Climb the blue wall at the
north-west corner and back flip to grab an invisible crevice in the east wall
column. Shimmy to the right and pull up for Uzi ammo.
Safety drop to the ground.
Go west and enter a large warehouse area with many
boxes. There is an open hole in the floor that leads to a long drop into a
lower room of boxes. The hole is to the left of the structure with the opening.
Be careful where you run. Go to the dark north-east corner and jump up onto a
box. Run and jump to the west to grab a crevice in the structure. Shimmy around
the corners to the left and pull up onto a stack of boxes. Pull up onto the
east box. Pull up onto the south box. Run and jump to grab the edge of the west
structure. Pull up onto the ledge. Go west and stand jump down onto a box.
Stand jump to the lower west box and jump into the opening in the west wall.
Loop around to the left and pull down a wall switch. You get a cut scene of
boxes in a corner. Exit the room and safety drop to the floor.
Look to the south-west corner of the room to see
the boxes from the cut scene. Drop into the hole to get to the lower room.
Climb the boxes in the middle section of the west wall. Jump south to get a small medipack on the top box in the south-west
corner. Jump back and go through the upper crawl space to the north. Drop and
go north for blue shotgun shells. That is all
that I found to do in the lower room. Climb the boxes to get out.
Go to the north-east corner again. Use the crevice
and boxes to get onto the top west ledge again. This time run and jump onto the
ledge in the lower south-east. Get into the east crawl space. Drop on the other
side and pick up a small medipack. Crawl back
and then run and run to the lower boxes at the south wall. Go to the west end
and turn around to run and jump into a south-east alcove. Grab the ceiling and
follow the blue monkey swing to the west. Drop onto the boxes from the cut
scene. Go up the south tunnel and see a closed gate. Go west and be careful of
the drop at the tunnel exit.
Drop onto a ledge. Go south and climb down to a
lower ledge. Run and jump to grab the west wall ledge. Pull up and go south
into a triangular opening. Go through the opening and run and jump to an east
ledge. Pull up and then pull up to the higher ledge to the north. Stand jump to
the south wall and grab an invisible crevice. Shimmy to the right and pull up
into an alcove. Jump to the box and then jump into the west wall opening. Hop
down into a room of boxes. Jump the boxes to get onto the high alcove in the
upper south-west corner of the room. Pull down the wall switch and get a cut
scene of a wire mesh door opening. Get down and exit the room. Jump back to the
box and the alcoves. Shimmy to the left and drop onto a ledge. Jump to the west
triangular opening again. Then jump back to the east ledge and climb the wall
up onto the entrance ledge.
Do not exit this area yet. Go north and jump up to
grab an invisible crevice. Shimmy to the left around the corner and pull up
into an alcove. Pull down the wall switch and shimmy back to the entrance
ledge. Pull up into the east wall tunnel. Go east and the gate is open. Follow
the tunnel to the end for secret #13, red shotgun shells, large medipack, and revolver ammo. Return through the tunnel and the exit
to the warehouse is blocked. Go outside again and shimmy back into that alcove.
Push up the wall switch and shimmy back to the ledge. Enter the east wall
tunnel and the gate is open. Go north and drop back into the warehouse room
with the boxes.
Go to the north-east corner again. Use the crevice
and boxes to get onto the top west ledge again. Go west and jump down onto the
boxes and into the west wall opening again. Loop to the left and see the open
wire mesh door from the cut scene. Jump south-east on a box. Jump south and
pull up onto the box hanging by a rope. Run and jump into the large opening in
the south wall. Go east and pick up the crowbar
from the floor. Go north and drop onto the box. Safety drop to the floor. Watch
out for the pit as you run north and east to exit this warehouse area. Go east
to the key lock and use the key to open the gate. Lara may look to the left at
the place where you found the key.
Enter the gate and go up the ramp in the south
wall. At the end, kick open the door. Enter the room that you saw from the
revolver window ledge. Go to the safe at the east wall and use the crowbar to
pry the safe open. Enter the safe and hop onto a ledge to pick up a floppy disc. Exit the room and go into the west wall
alcove. Climb the ladder in the south-west corner. Back flip into a room and go
south to the computer on the desk. Insert the floppy disk into the external
floppy disc drive on the desk. The picture on the south wall behind the desk
rises and reveals a tunnel.
Hop into the tunnel and follow it. You gate a flyby
of the library. Enter the library and go south-east. Climb the wall ladder to
the upper balcony. Follow the balcony to the opposite side and pull down a wall
switch. You get a cut scene of a gate opening. Jump over the railings and go
north to exit the library. Jump over the railings again to land in the room
below. Go to the south-west to exit through the door and go down the ramp. Exit
out the open gate and go south into a corridor. The gate is open at the end. Go
through the gate and the level changes.
Level 6:
Temple of Osiris
You start by sliding down a slope in a sandy room.
Go to the north-east corner and grab the top of the column. Shimmy to the left,
around the corners, and onto the crevice in the north wall. Continue shimmy to
the left and pull up onto the top of a column. Stand jump south to land on a
platform. Push the box to the south. Pull up into the crawl space in the west
wall. Crawl to the end and drop down in a large room. In the middle is a broken
obelisk with many crevices. There are corridors in the side walls. There is an
upper balcony to the west.
North corridor:
Go north and follow the corridor to another room.
You can see a structure with a receptacle for something. Continue north and
jump over the east ledge to enter the east room. There is nothing in the room
to find. Pull up into the upper tunnel in the north wall. Drop into a large
room in front of a temple. Notice a very high jump switch on the obelisk in the
south-west corner. On the east wall is a closed door and a high opening. There
is a north-east corridor that ends in a closed door for later.
Go north into the wide doorway and shoot two dogs. Turn around and shoot the two dogs sneaking up behind you. Follow the corridor
and shoot another two dogs. You reach the ledge
of a deep pit. There are alcoves in the walls and swinging chains over the pit.
Do not drop into the pit, as you cannot get out again. Forget the pit for now
and turn to the left and pull up into a crawl space in the west wall. Go
through and drop into a sandy room. Stand on the small sand mound near the
south wall. Stand jump onto the sloped block in the south-west corner. You can
stand on it. Pull up onto the higher ledge to the north. Go to the end and pull
down the wall switch. The column drops below you and you fall. Enter the
opening in the north wall beside you.
The floor is a deadly fire trap but the first
platform is safe. Jump onto the first platform and notice a closed door in the
east wall. Some platforms have immediate spikes and some have delayed spikes.
Stand jump to the north platform. Stand jump to the north-east platform. Adjust
a little and stand jump to the north-west platform. Adjust a little and stand
jump to the north-east platform. Then jump onto the safe ledge at the north
wall. Look back and you can see the delayed spikes on the platforms. The other
two platforms have immediate spikes.
Hop onto the corner block at the west wall. You get
a cut scene of a column rising in the room you left earlier. Go east and follow
the tunnel to a closed door. Go to the left and follow the tunnel to the end.
Pull down a jump switch to open the door. Return to the open door and jump back
onto the safe platform. Jump south in the room. Hop onto the south-west block
again. Pull up to the upper ledge and run and jump to grab the raised column.
Pull up onto the column. Pull down the wall switch on the south wall. You may
need a flare to see the wall switch, as it is almost the same color as the
wall. Get onto the east alcove. Drop and grab the crawl space below it and exit
the room. Drop into the corridor and go to the pit.
Run and jump to the north wall alcove. Grab the
edge and shimmy to the right and pull up. Be careful of the chain. Run and jump
to the south wall alcove. Grab the edge and shimmy to the left and pull up. Be
careful of the chain. Run and jump into the north wall alcove. If you had come
here before the raised column wall switch, there would have been a closed door
here. Enter the open door and see a room with a pit. Stand jump down to the
tiles with the "Eye" picture. The other tiles are fire traps. Stand
jump to grab the north ledge. Pull up onto the north ledge.
Pull down the wall switch and get a cut scene of a
hole near some steps. Grab the ceiling above you. Monkey swing to the south
over the deadly pit. Go to the pit with the chains and alcoves. Repeat the
jumps and shimmies again to return to the entrance corridor. Follow the
corridor down to the outside of the temple. Now enter the north-east corridor.
Hop onto the ledge and go east down the steps. You reach a closed door. Behind
you is the hole from the cut scene. Grab the edge and drop down to pull down a
jump switch. You hear the door open above you. Go east through the tunnel and
stop at the edge of a pit. Do not fall into the pit. It has a spike trap at the
bottom. Run and jump over the pit to grab the climbable east wall. Climb up and
back flip into a room. Go west out the open door. Go up the steps and return to
the outside of the temple.
The door in the east wall is open. Hop up and enter
the room. Shoot the two empty vases. Climb the column but not to the edge of
the slope. Just jump up and grab for the correct position. Back flip into a
higher opening in the west wall. Run and jump to the north-west ledge. You are
in front of closed doors. Go west and shimmy to the left around the columns.
You see a dark sandy crawl space to the north. Crawl into the dark area to get secret #14, Uzi ammo, small
medipack, and red shotgun shells. Crawl
back to the ledge. Run and jump to the south to grab an invisible crevice on
the column in the corner. Shimmy around the corner and pull down the jump
switch. Go east into the room and back flip again to get back onto the higher
ledge. One of the doors is open.
Go north and up the steps. Pull up into a room and
go south to see a corridor of spikes. You can sprint through the spikes with
little damage. But light a flare and look to the south-east corner over the
steps. Jump up there to grab the crawl space. Follow the crawl space and drop
on the other side of the spikes. Go south and pick up Key
#1 from the pedestal. The key looks like a golden scarab. Crawl back
through the crawl space and go down the steps to the ledge. Safety drop to the
ground in front of the temple. Exit this area by the tunnel in the south wall.
Go west back to the structure. You can place the item now or later. I placed it
later. Go south back to the starting room.
South corridor:
Go south and follow the corridor to another room.
You can see a structure with a receptacle for something. Shoot a dog. Continue south and jump over the east ledge to
enter the east room. You see an opening in the north wall for later. Drop into
the room and slide down the slope into the hole. Watch out for the moving blade
as you drop onto the tunnel below. Go south and enter an area with pillars. Go
south to pick up a large medipack. Drop south
onto a high ledge over a deep room. On the ledge are moveable blocks for later.
In the east wall is a closed door.
Go to the east ledge and drop onto the blocks below
you. From there you can safely shoot two dogs.
Enter the hole in the east wall. Follow the tunnel to a slope and a pit. Go to
the east wall but do not slide down the slope. Just run and jump to the south
to grab the crevice in a column. Shimmy to the right around the column and back
flip onto a column. Pull down a jump switch in the east wall. It is partly
hidden behind green leaves. You get a cut scene of a column rising in the pit.
Stand jump to the west column. Jump down and go through the west doorway. You
emerge onto a ledge near the bottom of the pit. Go to the north-west to the
column supporting the upper ledge. Climb the east side of the column to get
back onto the ledge.
Look to the south wall and see three columns. On
the ledge are two moveable blocks and many tiles with designs. There is an easy
and hard way to do the next task.
Easy way:
Push the north-west block #1 over the raised column
and onto the west corner tile. You get a cut scene of the left column dropping.
Pull back block #1 to the east once. If you do not pull block #1 back then
block #2 seems to be stuck and cannot be moved.
Pull back the north-east block #2 and push it back
into the corner to the original position. You may get or may not get a cut
scene of the right column dropping.
Pull back the north-east block #2 and push it onto
the tile at the south ledge with the big yellow bird design. You get a cut
scene of the middle column dropping.
Hard way:
Pull back north-west block #1 once.
Move north-east block #2 over the raised column and
onto the west corner tile. You get a cut scene of the left column dropping.
Drop onto the blocks in the pit again. Jump into
the east wall tunnel again. Use the crevice and shimmy again to get onto the
corner block. Go west onto the ledge near the bottom of the pit. Run and jump
onto the south ledge where a column was lowered. Enter the room and go to the
back for a small medipack. Return near the
entrance and save the game in front of a timed wall switch. Pull down the wall
switch. Roll and run to the south-west corner. Back flip off the north slope
and onto the south corner column. Run and jump to the east to grab the column.
Try to grab it on the left side. Pull up, turn left, and stand jump to the
higher north block. Turn left and stand jump onto the bridge. Stand jump onto
the west wall block and run through the timed open door. Pull down the jump
switch on the west wall. Exit the room and jump back to the bridge. Jump into
the opening in the south wall. Drop into a room and pick up red shotgun shells. Exit the room and safety drop to
the floor. Exit back to the pit and climb the column again to pull up onto the
ledge. Go into the open door in the east wall. Pull out block #3 that you find
in the room. Move block #3 onto the tile at the south ledge with the big yellow
bird design. You get a cut scene of the middle column dropping.
Move block #1 onto the north-east tile where you
obtained block #2. You get a cut scene of the right column dropping.
All three columns are down:
Drop onto the blocks in the pit again. Jump into
the east wall tunnel again. Use the crevice and shimmy again to get onto the
corner block. Go west onto the ledge near the bottom of the pit. Run and jump
onto the south ledge where a column was lowered. Run and jump the blocks to the
west and jump into the west wall tunnel. Follow the tunnel up to the end and
shoot an empty vase. Jump east onto the ledge. Pick up Key
#2 from the pedestal. Go back down the tunnel into the pit. Climb the
column again to pull up onto the ledge.
Go north and enter the tunnel. Carefully climb up
the pole with the moving blade. Climb near the second yellow ring from the top
and back flip to the north. Follow the north tunnel and safety drop to the
ground. Go into the north corridor and place the key in the structure. You get
a cut scene of the starting room. You may notice a light beam behind then
structure. Exit and go south into the starting room. Go into the south corridor
and place the key in the structure. You get a cut scene of the starting room.
You may notice a light beam behind then structure.
Hop onto the east ledge and stand jump into the
north wall opening. Go north to the ledge overlooking the starting room again.
Stand jump onto a ledge to the west. Run and jump to grab the crevice in the
central obelisk. Shimmy around the two corners, get into the normal climbing
position, and back flip onto a ledge at the north wall. Jump to the corner
ledge and then into the opening in the west wall. This is the area of the cut
scene. To the west are two opens doors and a room beyond them.
Enter the room and the doors closes. Shoot a demigod and pick up a Key
from the dead body. Go to the south-west and pick up a small
medipack. Go to the north-west and pick up a large
medipack. Then enter the alcove in the west wall. Use the key and the
door opens next to you. Shoot a demigod and pick
up a Key from the dead body. Go west up the steps
and enter the alcove in the west wall. Use the key and the door opens next to
you. Shoot a demigod and pick up a Key from the dead body. Go west up the steps and
enter the alcove in the west wall. Use the key and the door opens next to you.
Enter a small room with an obelisk. Go out the
south opening and into a large room. You can see an object on top of a high
south column. There is a hole on the floor on either side of you. Go west and
drop into the hole. Land on a slope and jump over the spike trap. Ignore an
upper crawl space. It leads to a parallel tunnel that ends in spike traps. Go
south and climb the wall. Back flip into a room. The tiles on the floor with
symbols are spike traps. Carefully jump the spike traps to get into the
north-east corner. Pull down the jump switch on the north wall. Exit out the
tunnel you saw in the north wall.
Turn around and grab the south wall above the
tunnel entrance. Climb up and pull up onto the ledge. You get a cut scene of Brigett with wings near the pedestal. She back flips
into a vibrating blue cloud in the south tunnel and disappears. You can jump
onto the ledge but you cannot seem to pick up the item on the pedestal. Jump
south into the vibrating blue cloud in the south tunnel and the level changes.
Level 7:
The Beyond
You start by sliding down the slope and landing in
a cave. You get a flyby of a church with flying buttresses. You may have
noticed a high jump switch while Lara was sliding down the slopes. Turn around
and go into the dark south-east corner. You need flares to see anything. Stand
jump the slopes to the west and pull up onto a block. Run and jump to the slope
at the east wall. Stand jump onto the north-east mound. Go north and slide down
the slope. Jump up and pull down the jump switch. Safety drop to the ground.
Shoot a light spirit
that dies like a bat. I do not really know what to call it. But it looked like
a light spirit that I saw in a TV program called "Beyond". Go west
and enter a room and the camera view changes to annoying. Go into the
south-west corner and pick up a small medipack
from a pedestal. You can look above you with binoculars to see platforms and a
birdcage. Exit the room and look back to see many closed gates in the west wall
corridor. Go north and you can see the death figure on a boat. Beware of the
deep pit in front of you. Go north along side of the church and find an open
gate in the east wall. You also have to shoot four
light spirits.
Enter the church and see a water hole in the floor.
At the north wall is a large steaming bowl. At the south wall are torches on a
pedestal. Dive into the water and swim to the west. Take the left branch and
swim up into a large room with many floors above your head. There are also
three side tunnels in the walls. Climb the ladder behind the tree and pull up
to the second floor. Shoot two light spirits and
go to the east ledge for a small medipack.
Safety drop to the floor.
East tunnel:
Jump up into the east tunnel and follow it to a
ledge over a lava pool. You can see a crawl space in the north wall for later.
Run and jump to the east wall and grab a crevice. Shimmy around the corners to
the right and go to the end. Drop onto a slope. Jump and roll to grab a ladder.
Shimmy to the right and pull up into a triangular space. Run and jump to the
south to grab a crevice on a column. Shimmy around the corners to the other
side. Drop onto a slope. Slide down to about the middle, and then jump with
roll to grab a crevice on another south column. Shimmy to the right and pull up
onto a block. Grab the north wall and climb up into a triangular opening, Turn
around and stand jump to grab the edge of a south tunnel. Pull up and go south.
Jump over a lava pit and pull down the wall switch. Return to the entrance and
notice that a block has risen in the lava pool. Safety drop back to the block
below you.
Run and jump to the west onto the safe dark area.
Pick up a large medipack and climb the ladder.
Wait and shoot two light spirits. Climb the
ladder to the higher ledge. Do not jump onto the west wall opening. It is a
spike trap. Run and jump to grab a crevice on the east structure over the lava
pit. Shimmy to the right and around the two corners. Pull down a jump switch as
you fall onto a safe platform. Run and jump to the safe dark area to the
south-west and climb the ladder. The spikes are still there. Go into the north
corner and grab the crevice in the north wall. Shimmy around to the right and
drop at the entrance.
Now run and jump to the north wall crawl space.
Crawl inside and pull up onto a west ledge. Go west into a room with wall
ladders. Climb the wall ladder to the top. Release and grab the edge and shimmy
to the left as far as possible before Lara gets into the normal climbing
position. Pull up, back flip, roll, and use a right curve to avoid the spike
traps. If you use the normal climbing position, Lara is too far to the right to
jump safely. Go south to the open gate. Shoot two light
spirits. Go to the end and safety drop into a hole. Use the floor lever
and get a cut scene of the water hole. Run and jump over the spikes on the east
ledge. Go north and shimmy back to the entrance. Go west to exit and save the
game before you enter the room with the water hole. The fire has started at the
entrance of the east tunnel and you may fall into the fire.
South tunnel:
Jump up into the south tunnel and follow it to a
ledge over a lava pool. The camera view changes to annoying but you can use
binoculars to look ahead of you. Turn around and hop back to grab the edge.
Shimmy to the left around all corners until you see a jump switch below.
Release and grab a lower crevice. Release and pull down the jump switch. The
spikes retract so that you land safely. Jump down the north ledge. Hop onto the
platform in the lava. Go back to the ledge and shoot four
light spirits. Go north and save the game in front of the timed wall
switch. Pull down the wall switch and jump the platforms over the lava to the
open south wall gate. You probably will not make the first time. Land on the
north ledge and hop back to the platform. Pick up a small
medipack and shoot two hellhounds that
you have attracted.
Return to the north wall switch. Pull down the wall
switch. Roll and go forward about half a tile. Stand jump onto the nearest edge
of the platform in the lava. Run and jump to the second platform. Stand jump
twice and you should make the timed open gate. Once inside, the gate opens and
stays open. Go into a wide corridor and see a closed gate at the top of the
east ramp. Go up the west ramp to a large room. Stop just before the spikes and
hop back onto the ramp. Shoot four hellhounds
from the ramp. They cannot go down the ramp after you. Now run and jump over a
spike trap and enter the room.
Climb the ladder to the south. At the top, shimmy
to the left and pull onto a flat ledge. You can see a jump switch on the east
wall but do not go there yet. Go west and stand jump to the south-west ledge.
Be careful of the fire in the cage. Jump into the opening in the south wall. Go
south and stand jump over the slope. Go west and pull down the wall switch on
the north wall. The go down the east slope and pick up two
Uzi ammo. Safety drop to the floor. Jump over the spike trap again and
enter the wide corridor again. Go east and go up the ramp and through the open
gate. Go north and climb down the long ladder onto a ledge. Climb down a second
long ladder and go north to enter a room. Shoot two
hellhounds and three light spirits.
Notice a jump switch on the high south wall above
the middle alcove. There is another jump switch high above the north-west
ledge. Go to the column at the middle of the east wall. Climb the wall and back
flip onto a ledge. Ignore the jump switch on the south wall for now. Go west
and jump to the ledge at the west wall. Run and jump to the north wall ledge
and pull up. The circular thing on the wall is not a receptacle but will be a
fire emitter later. Jump up and grab the invisible crevice on the column to the
east. Shimmy to the right to the other side of the column. Drop to the ledge
and climb the east column. Run and jump into the east wall tunnel. Go to the
end for secret #15, two
Uzi ammo, and a small medipack. Exit the
tunnel and jump back to the west column.
Jump down to the lower south-east platform. Run and
jump to grab the block to the south. Do not pull up, as the block is a spike
trap. Shimmy around the block and drop onto a platform. Run and jump onto the
platform to the west. Run and jump to grab an invisible crevice on the west
wall. Shimmy to the right and drop onto a ledge with railings. Run and jump
over the railings and pull down the jump switch on the north wall. It is not
obvious but a block has dropped on a column at the upper south wall. Safety
drop to the floor. Climb the east column again and back flip onto the ledge.
Now run and jump to south to grab the edge above the jump switch. Do not pull
up but release and pull down the jump switch. You get a cut scene of a gate
opening and many fire emitters starting above you.
When you land notice the gate behind the bowl in
the alcove in front of you. Climb the east ledge again and shimmy to the left
or right side. This just requires a lucky jump since you cannot see when the
fire emitter has stopped. When the light reflection gets dimmer back flip onto
the ledge. You should land beside the stopped fire emitter. Immediately hop
back to avoid the fire emitter as it starts again. Time the next fire emitter
and jump to the west ledge. Run and jump to grab right side of the north ledge
and pull up. Shimmy around the east column. Climb the east wall and be careful
of a steam emitter near the top.
Jump down to the lower south-east platform. Run and
jump to grab the block to the south. Shimmy around the block on the left side
and drop onto a platform. Run and jump to the south-west and grab the edge of
the dropped block. Pull and jump to the column to the east. Go east and stand
jump to grab a ledge. Pull up onto the ledge with the railings. Go north and
stand jump the railings onto the next ledge. Jump over a spike trap and stand
jump the railings onto the next ledge. Stand jump over to the two columns to
the west. Finally jump onto the ledge at the west wall. Run and jump onto the
south ledge. Hop up into the west wall alcove. Pull down the jump switch and
exit the alcove.
Jump to the corner south ledge and pick up a small medipack. Stand jump over the east railings and
land on the dropped block from earlier. Run and jump to the north-east
platform. Stand jump north-east down on the sloped column. Slide down and
safety drop to the floor. Go to the south wall and hop up into the alcove with
the bowl. The gate is open so jump down into the small room. Hop onto the block
and pull down the wall switch. You get a cut scene of spikes dropping in
another area that you have visited before. Get out of the room and shoot a hellhound. Go to the south-west and climb the long
ladders to the top.
Pull up and go west into the wide corridor.
Continue west up the ramp and jump over the spike traps again. Climb the ladder
again and shimmy to the left. Run and jump to grab an invisible crevice on the
east wall. Shimmy to the right and pull down the jump switch. You get a cut
scene of two platforms rising in the lava room. Go east down the ramp and north
to return to the lava room. The raised platforms are on the south wall above
your head.
Go east and then go north and see a column with the
black marks to denote that the column is climbable. Climb the column up to a
crevice. Back flip and roll to grab a ledge behind you. Pull up and jump
south-west onto a raised platform. Go west onto the next platform and then onto
the column in the corner. Enter the tunnel and follow it to an opening over the
lava room. Run and jump to the floating platform and shoot three light spirits. Use the floor lever and get a get
a cut scene of the water hole. Run and jump to grab the crevice at the north
wall and shimmy back to the entrance. Go north to exit and save the game before
you enter the room with the water hole. The fire has started at the entrance of
the south tunnel and you may fall into the fire.
North tunnel:
Enter the north tunnel and shoot a light spirit. Jump over the spike pit and use the
floor lever. You get a get a cut scene of the water hole. Go south and jump the
spike pit again. Save the game before you enter the room with the water hole.
The fire has started at the entrance of the north tunnel and you may fall into
the fire.
All tunnels done:
Dive back into the water hole and swim back to the
church. Remember the torches at the south pedestal. You can return here later
for a torch. Exit the church and go south and then west into the room from the
level start. The gates are open at the west wall. Go through the gates and
enter a room over a lava pool. The gate closes behind you. Shoot three harpies and see the body of Brijett on a platform in the middle of the room. You
can jump onto the platform and jump on the dead body if you want.
Go to the south-east corner for a large medipack. There is Uzi
ammo on the ledge to the west. Climb the south wall ladder and go west
over the slope. Shoot a harpy and a light spirit and pull down the wall switch on the west
wall. Safety drop to the floor. Pick up red shotgun
shells from the floor. Jump the ledge and go north to pick up Uzi ammo. Notice an unlit wall torch. Go north-east
for a small medipack. Jump over the gap for now
and pick up red shotgun shells. Jump to the
south-east and pick up a small medipack. Climb
the north wall ladder and go west over the slope. Shoot a light spirit and pull down the wall switch on the west
wall. Safety drop to the floor.
Go east and climb down the north wall ladder to the
lava pool area below. Jump onto the platform in the center of the lava. Run and
jump to the block at the south wall. Pull down the wall switch. You get a cut
scene of a fire in a bowl. Hop back to the ladder and climb up again. Go east
to exit the building and go outside. You see the fire from the cut scene.
Return to the church and pick up a torch from
the south wall pedestal.
Exit the church and light the torch on the fire.
Return west to the room with the body. Go to the north-west corner and light
the wall torch. The gate in the west wall opens behind you. Go there and enter
the gate. Go forward and slide down a long slope. At the bottom, you see the
Sacred Grail on a pedestal. Run towards the Sacred Grail and get a flyby of the
area. Then there are some closing end credits. There is a final scene of the
lava pool room again. Brijett’s body is gone and there are bloody footprints
going towards the door. The rumors of her death were premature. Then the level
ends.
14-nov-2007