TRSearch project.
Builders team: Bojrkraider - Danilo - LeelooBasket - Michiel - MrNiceGuy - Sarge - Trinity - White Tiger (TR Search Crew)
Walkthrough by G&D Productions.
Story:
<READ ERROR>... Booting back-up program... <ERROR: PROGRAM TERMINATED>... Activating emergency frequency... <INITIALIZE text.doc 21:55:36>.
Imagine a Tomb Raider world with no objects. No textures, geometry or enemies. No Urban Fashion for your level. That world is now.
Join Lara as she ventures into the heart of the Tomb Raider Level Editor to destroy the unknown force behind the malfunction of her world.
Leap into the very core of trsearch.org and absorb the environments that are in danger of being deleted! Expand your mind beyond the limits of the program...
TRLE Search Engine HQ is under attack!
Moves: Leave a crawlspace = Alt + forward cursor.
TIP: hit escape while in game, there you can see several hints.
LEVEL 1 - CROFT MANOR - 5 secrets
Emergency objectives:
Learn new moves from the gymbook
Enter the testlabs in the manor basement
The lottery: save before shooting the targets so if it doesn’t work, reload again.
Push the button, left of the Computer and leave the room.
Gathering Keys and Supplies.
There are different ways to go, but this is what we did.
Go right and open the next door and watch the fly by. Pick up Flares, go W into the next room, find the book to flip in the bookcase N. Get more Flares near the fireplace and get into the fireplace to climb up the left hand wall, climb off to the right, picking up another batch of Flares. Get down and around the corner in the next room get a small medipack NE. Jump to the S and go right (SW) to flip that switch there on the wall.
Now turn and push that block on your right, you are in the attic now. Pick up Flares on the floor and even more Flares on top of the boxes and a third batch of Flares around the corner NW. Go E and down the stairs, open the door with the button (N). Go out and walk to the S side of the landing to open the first door into the bedroom.
You’ve opened the closet door NW earlier, so gather SECRET # 1, a small medipack, the Cathedral Key, FMJ-Rounds and Shotgun Ammo. Go out and to the right to open the Bathroom and find yet another bunch of Flares.
Leave the bedroom and go down the stairs and find more Flares on the NE windowsill. On the S wall is another button, that leads you into the downstairs cloakrooms and in one of them you'll find a Medipack. Go back to the hall and to the left around the corner into the kitchen, grab some more Flares near the kitchen table. On the W wall are two buttons, use them to open doors to the dining room and to the garden.
Poor Winston...
Turn around go to the button E and open the freezer,...
Lara: “Gosh”
Push poor frozen Winston over to the hot burning stove in the kitchen, take a step back and watch the fly by. Grab the Battery from the kitchen counter left of the stove. Then follow Winston upstairs to his bedroom, S side and next to Lara's bedroom. He takes his time and also makes a lot of noise.
The Roof.
Go to the bookcase NE and flip that book to see a trapdoor opening on a roof. Winston will go to bed as soon as you leave the room, so leave and go to the attic (NW) and pass the push block N, immediately go right and climb up the wall there. Once on the roof jump down and into the opening to get the SECTRET # 2, Cathedral Key # 2.
Doll Secret.
Go back into the house, through the attic down the stairs E onto the landing and into the room NE (the start of the game), place the Battery in the doll statue E. Turn left and jump into the open panel to grab SECRET # 3, Cathedral Key # 3 from that hidden room.
Target Practice.
Get out this room and downstairs to the front door and open it. Go right and open the gate there. Go left and get the pistols out to shoot the 4 targets. It seems you have to shoot them in the correct order, otherwise the gate won't open, so face E while shooting them and start with the one closest to Lara and work your way to the gate one by one. The gate E opens get in and grab SECRET # 4, The Cathedral Key # 4 E.
The Gym.
Go back into the house through the front door or through the Kitchen and now go to the Gym (NW from the hall). Run to the W wall to get the Gym Book and read the instructions. Go to the E wall and climb on slope # 5 and shimmy to the right top pull up at the end, turn to jump to the pillar and use the monkey climb to go over to the next S and pick up more Flares. Drop down to the floor and climb up from ramp #1 to the box near the poles. Face W (do stand in the middle) and take a running jump to the pole. Keep the CTRL key always pressed down. The pole will swing around and now (using the up cursor) swing to the next one. Using the back cursor, turn Lara around and now using the ALT key Lara will jump to a higher pole. Use the back cursor and Lara turns, now use the up cursor to swing to the next pole and from there to the platform and use the switch there.
The Pool.
Safety drop down and enter the swimming pool N. Go to the diving board and use the button behind it to see a wall panel open up. Now dive into the pool and grab SECRET # 5, Cathedral Key # 5.
Climb out S and go back to the hall way and into that open panel SE. Save, as this is a time run to the opposite side. Use the switch, back flip/roll, aim Lara a bit left, sprint, roll while sprinting (SHFT and ALT) sprint further and take another roll near the door and you should make it. (You can also hit roll when you run against the half open door)
Santa's Surprise.
The button to re-open the door is located to the left of the door. On the E wall is a bookcase, flip the book that is sticking out. This door, from the cut scene is in the hallway and to the right of the big clock. Once inside the door you see a fly by of Santa coming over, turn around and go out the front door, pick up the Blue Bear Santa left behind. Go back to the door near the clock and run down the stairs.
LEVEL 2 - TESTING LABORATORIES - 3 secrets
Objectives:
Pass Cave and Sand test to get 2 Keys
Enter the secret subway
Lara will first put on her backpack that is hanging from that grate. Follow through and turn right (N) to the door, which will open when approaching.
Go left and take the first opening left and go to the back of the room to crawl into a crawlspace at the W wall. Follow through and use both buttons. One is for a door and one for a door with “Hall of Fame” written above it. Crawl back and get out of the room to the corridor N. Go right and right again and walk straight over to the “Hall of Fame” door.
"HALL OF FAME".
Just have a look around at all the relics in this museum and at the Weapons area you can't pick up the USP Shotgun and M870 Pistols as they are just models. In one room, also do not try the Gyro Sphere as Lara will fall into the water and a snake will bite her, instead go down the stairs and if you want you can shoot the snake. Go back out and leave the “Hall of Fame” to continue with the adventure.
TESTING LABORATORIES.
Go straight N and again through the door, go left in the corridor and take the last opening to the right (N).
There are three openings in this hall and you’ll be back here again, so take the first opening on the left (the one with the vegetation).
TESTING LABORATORIES - COASTAL AREA - 3 secrets
Objectives:
Pass Coastal and Egypt test to get 1 Key.
The Lost Masks.
Follow through and grab the Flares you'll find on the beach. Go to the SE and jump on the rock that is jutting out. Jump to the next and the next and then grab the crack in the rocks to shimmy left. Go around the corner into an alcove and grab the Lost Mask.
You can go back the way you came but you can also jump into the sea and the current takes you to the beach. Now run all the way to the N side, and carefully get on the first rock you see in the sea to the right. Aim with a running jump to the next NE, walk towards the end, jump up so Lara can run, hop back and take a running jump to the corner where another rock is jutting out. Face NW and get into the alcove for SECRET # 6, Burst Rounds and FMJ Rounds. Jump in the water and get swept to the beach. Go straight (W) and keep to the right along the building and go left into that building, get into that small pool and pick up the second Lost Mask (NW corner). Go out and get a small medipack at the SE corner behind the building. Head W from there and go to a dark cave W, follow in and in the SW corner is a crawlspace. Follow through and place the two Masks to open the door.
Lava Fields.
Go N and climb the ladder in the NE corner. Go straight ahead and climb on a block a bit further to use a monkey climb to get to the other side. Turn S and go to the edge of the lava fall. There is a ladder to climb down so you can get SECRET # 7, Flares and a Medipack.
Back up the ladder and use the monkey climb again to get over the lava stream. Run N along the stream and climb up some rocky ledges and then to the left and make your way over the ledges in the lava fall, to the top (NW). There's a rope dangling W. From there use the rope to get to the other side (S). Go W and behind that pillar is another rope to traverse the lava pool. From there take a running jump E to the sandy floor.
Head N and up E in the wall is a crawlspace if you don't want the next secret, get through it. Otherwise jump to the next rock in the stream, go over to the W wall. Take a running jump from the highest point and another one to the next rock. Then grab the crevice and shimmy right and drop at a block. Jump up to the left at the end hang down and shimmy right to SECRET # 8, Shotgun ammo and a small medipack. Grab the monkey climb and go to the other side of the lava stream. Follow the path and use the ledge in the lava to get over the stream. Go right (S) and find a lever there. A second rope appears over the lava so use both ropes to get to the N side. Swing once with the first rope and align the next straight at the sandy shore and swing a couple of times. Enter the opening and slide down.
TESTING LABORATORIES - EGYPT AREA - 3 secrets
Go further and meet your first enemy. Kill him then pick up the Shotgun he will leave behind and head S (there's a closed gate with a secret behind it), go right around corners and come to a crawlspace up in the N wall. Get in to pick up SECRET # 9, Shotgun Ammo. Go back out and up the ramp S, jump to a block W and grab the Sun Goddess. Back to the ramp, and go S and meet more opponents. Go to the SW corner and up into a crawlspace. Use the jump lever you find in this small room and return to the cave. Another ninja appears and then get into the open gates S.
Room with the 3 Statues.
There are three giant statues in here and look to the heads as they all look in a different direction. Your goal is to turn their heads. So climb up the steps behind those statues and use the push pole to turn their head towards the front.
N statue push the pole once to the N.
W statue, push the pole twice.
S statue push the pole to the E once.
Now go to the chain in the E and pull and watch the flyby. Climb the pillar nearby and jump to the higher one and again till you can get the Sun Disk.
You can now return to the start area N where the gate is now open to get SECRET #10, a Medipack, return to the statues room.
Go up the steps to the gate SE, combine the Sun Disk and the Sun Goddess to get the Sun Talisman and place it in its receptacle near the gate. Enter and go to the back where you have a fight on your hands with 2 ninja’s. One leaves behind some Revolver Ammo. Step on 3 marked tiles, one NE, one NW and one in the passage S, left in the SE corner. Now that sarcophagus in the previous room moved aside so you can get get SECRET #11, a Medipack.
Go to the passage S and pick up the Coastal Key in the SW corner and a trapdoor opens next to it.
Go in and slide down to follow through, approach the door that will open back to the Laboratories corridor.
TESTING LABORATORIES (2 part) - 3 secrets
Objectives:
Pass Cave and Sand test to get 2 keys
Enter secret subway
Yellow bear
Go back to the NW door and take the middle opening on the left. You enter an icy area, follow through and there are some sleeping wolves in this cave. They do however wake up. Before going further retrace your steps and enter a cave in the SW corner, Climb up at the end and shoot a bat. Here is SECRET # 12, a small medipack and Revolver Ammo. Go up the stairs and watch out for the poisonous darts. Make your way to the back of the cave (E) along the right hand side.
First just run off the edge to that tallest block below and slide backwards to SECRET # 13, Burst Rounds (NW). Climb the smallest block and jump to the one N to get back up the ledge again. The next part is a bit tricky as you have to face SE from the pointy ledge on your left (N) and run with a slight left curved jump to the pole. The pole swings around right; use the forward cursor to swing to the next. Then ALT and use the forward cursor to get to the higher pole. Turn around (backward cursor) and again use Alt and forward cursor. Two swings more to get to a rocky ledge N. Turn left (W) and a running jump to the snowy ledge.
The Cavern Key.
Go forward (W) and watch the poisonous darts. Slide down and go up the ramp avoiding boulders, go up left first, then right and finally left again to pick up the Cavern Key in the next cave. Enter the doors that will open up. Go around the corner and save, as this is a tricky part. Sprint down and around the corner and jump the pit and land in a room with moving spike walls. Sprint forward and climb up and slide down. Watch out for poisonous darts.
The Medipack and Ammo lying in front of the moving spike walls are no secret and I wasn’t able to grab those. It is however possible to get at least the Medipack. Jump over the spikes and rush to the corner on the right, more moving spiked walls, flip the floor lever in the end, turn left and dash into the opened doors. Go down and jump to the floor and through the door you are back at the Test Laboratories again.
Golden Serpents.
Again a trip to the NW door and now take the most right opening on the left. Fall through the trapdoor and land in a small lake. Climb out and you are in a desert area. Pick up the Shotgun ammo SW, then go to those bushes W and shoot the snake coming out. Step into the bushes and do pick up that Golden Serpent from the one in the middle. Go N and around the corner, keep your pistols out as there are more snakes. Follow through and passing a trapdoor and go the bush at the end. Shoot another snake and grab the second Golden Serpent from the last bush. Back to those trapdoors and use the two Golden Serpents. Fall down in a cave, grab the Flares and Lara will stare at the floor at a certain point. Pick up the Torch there and ignite it on a wall torch.
Go on and on the wall on the right is a wall torch; you’ll find quite a lot of them so I won’t mention them anymore and don’t forget to take the torch with you wherever you go (don’t think they did anything else than giving Lara some light but you never will know as I lit all the wall torches, but at least you’ll know where you have been). Use the lever nearby. The door N opens, on the ledge N is a Medipack. Go through the opening W, under the vase are some Flares. Follow through and from the tomb get the Rules of Senet, Shotgun Ammo and another Shotgun.
Go back up the stairs and into the now open door E. Shoot some bats and watch the fly by. Leave the Torch and play the game. The game sticks are found N on top of the entrance. You better win the game but have a look for yourself, as loosing the game will only make the next bit harder.
The rules of Senet:
To win the game, get all your pieces of the board by landing them on the final Horus square. On your turn spin the sticks. Your throw is the number of white sides showing. If no white sides show, your throw is a six. If you throw a six or land on a Horus square, you get an extra turn. If you land on an opponent’s piece, it is returned to the start.
You have to move the colored pieces; Semerkhet moves the gold ones. To take a turn, press Action to spin the tiles on the frame. You may then advance one of your pieces by the number of white tiles showing. Step on the colored square (red, green or blue) corresponding to the piece you want to move. The pieces advance as shown in the diagram to the right. Your pieces follow the path marked in red; your opponent's pieces follow the path marked in gray. If you spin all black tiles, this counts as six. If you spin a six or if one of your pieces lands on a square with an ankh, take an extra turn. You may not land on a square occupied by one of your own pieces. If you land on a square occupied by one of your opponent's pieces, it is sent back to the start. The first player to get all three of his pieces to the final ankh wins.
Courtesy of Stella - http://www.tombraiders.net/stella
Game of Senet after losing:
The different tiles on the floor are open, so jump in the opening closets by and use the lever.
A wraith will awaken and get out and go back where the sticks were. Take a running jump to the first column on the puzzle floor and the next and so on, then into the opening of the S wall. Continue: *
Game of Senet after winning:
Cages appear on the puzzle floor, so take running jumps to the other side of the room into the opening S wall.
* Pick up the Torch in the corner there and ignite it at the wall torch.
The maze, a Yellow Bear.
Proceed down the steps, around the left corner, jump over the spiked floor and come to a wall torch. Light it if you like, proceed and go straight, the next one to the right has a Boulder, so trigger it and hop back, hop through the corner over the boulder and go for the Yellow Bear.
Go out and right, after the corner is another wall torch. Go left there and then to the right to get a small medipack. Return and go left/left. Follow straight and hop over the spiked floor. When you come to a sloped passage, go along the left or right hand wall, as boulders will come down. Go through the opening and come to a small pool. Swim in and into a narrow tunnel SE. Pull out for SECRET # 14, a Medipack and FMJ Rounds. Swim back out and straight W to the Medipack on the bottom. Climb back out of the pool N. You can leave the Torch here.
The Desert Key.
Go to the passage E and take a step inside backwards so you can immediately run out as a boulder comes down. Climb up to the right and then on a ladder to get the Desert Key and climb through the trapdoor. Follow through and jump down and leave this place through the door S and into the corridor. Go straight to the opposite door and place the three keys in the three locks there. Turn, go through and kill the nasty guy and going over that sort of bridge the level chances.
LEVEL 3 - MOUNTAIN RAILWAY - 1 secret
Objectives: Take control of the train.
Lara changes into another costume.
Use the switch on the left of where you start, go through the train and pick up Burst Rounds. Jump to the other car and shoot a guard, get the small medipack he left behind. Go into the next door and shoot another guard and pick up his Key Card. In the toilet area on the right is another switch but be careful as there are more guards sneaking around this train. After using that switch you'll see a cut scene of a hatch opening up.
Go back (E) and instead of jumping back to the next car, jump to the ladder on the left and climb to the top of the train. Turn around and run to the W and jump over to the next roof and spot the trapdoor. In you go, shoot the dogs and use the switch in this cage. Another door opens, climb out and up and go to the front of the train (W) to pick up SECRET # 15, Grenades and Shotgun ammo.
Go back to the back of the train and use the ladder to get down into the train again. It can be that Lara shimmies to the end and it looks like she is stuck, just let go and grab again and she is in climbing position. Travel W, open the door and do save before you jump to the next car.
“Welcome intruder.
You'll be gone in less then three minutes, hahahahaa”
Don’t dillydally, shoot the guy and run to the end and use the Key Card (in this car is a green box N if you pull it aside you can get 2x Uzi Ammo). You see a cut scene of a chopper (you can also save at this point). Now jump to the next car and shoot some dogs and guards. Watch out as one of them has a Key Card you need. So pick it up and open the door W, jump to the next car and again open the door there, keep shooting at more enemies and use the Card W. Another guard keeps watch so get rid of him as well (he’ll leave the Submachine gun) and flip the lever to slow speed. You made it!!.
Btw it is also nice to reload a save game and see what happens if you are too late, the train speeds out of the curb and hits the bottom of the canyon.
LEVEL 4 - BRITISH MOUNTAIN RANGES - 4 secrets
Objectives:
Choose your computer (PC or MAC)
Find the bike and use it to get to the frozen lake
White Bear
Go left (W) and take a turn right immediately after the fence, to the back of the cabin. Open the trapdoor you see and enter the cabin. Get the 2x Flares and also the Card: Choose MAC or PC from the table. Put it in the slot next to the type computer you are playing (PC or Mac) and see a block rising outside. Leave going to the left around the cabin to the block and climb onto the roof. (If you want all the secrets, you have to go around the train to get SECRET # 16, FMJ Rounds.)
Snowy Valleys.
Once on the roof jump to the snow hill NW, then NE and again NE and the next is to the rock N. Face S and hang and shimmy left till you can pull up and shoot the icicles. Take a running jump into the cave SE and follow through. Watch out for falling icicles. Jump up and shoot more icicles, then jump in the opening SE. Keep going and see an opening in the floor and drop in. Shoot more icicles and leave this crystal cave. Follow through and jump into the opening in the floor. You are in a dark cave and there is nothing in there...
You’ll be met by a pack of wolves, go to the frozen pond and keep going left (S). Go right and right again (N), left around the corner and follow through (a long walk), slide down, keep going and in the end you'll come to a cave with water. Get down into the cave.
Into the Caves.
Go in and right (N) dodging icicles and take a running jump to the swing pole from standing in the middle of the river. Lara swings toward the wall (use the down cursor to turn around) and the up key to swing to the next pole. Then swing to the ladder straight ahead. Climb up and turn the Wheel there.
Watch the fly by. Climb down and walk through the stream to the NE and jump from there to a stone ledge. Walk to the wall and take a jump to the pole W and from there to the ladder. Shimmy around to the other end and back flip and grab the next ladder. Shimmy around one corner, climb down and back flip with grab to a rock ledge. Face NW, jump into the opening there and climb a ladder all the way to the top and hoist up. Go into the next area and shoot another pack of wolves.
Unicorn Castle.
Go right and around the corner go the pillar N (under the arch) and at the back turn the Wheel there. The door in between the Unicorns (W) has opened. Get in and step up but don’t go forward but turn right (N) and hoist up. Follow through to the SE opening, jump over some crates, keep going to the left, the camera will change, be careful here.
Basement of Traps.
There is a trapdoor so run over the black line and start sidestepping so you can open the hatch without dying. Get into the opening, and time your run through the rotating axes and squishy block. Jump over and run behind the second rotating axes to the opening W and get the SECRET # 17, a Medipack there. Go out and run into the opening NE, then jump SE. Face S and get the Silver Rod from the pedestal, immediately jump back as blocks will drop.
Turn around into the NW corner and crawl through the opening, jump back avoiding the squishy block and in the next part follow the rotating axes. Jump past the squishy block and go climb out the trapdoor to go back S. Make a U turn left and walk N along the right hand wall to find a swing pole.
Swingpoles.
Take a running jump and swing around the corner, then swing to the next pole, take another swing end up in a corridor. Go E and time the rotating axes so you can open the trapdoor and jump in. Use the wheel and the next bit is a bit awkward. The only way out of here is facing E, jump up and grab the edge on the left side. Don’t hoist up right away, just time the rotating axes and once up, immediately side jump left and out of the way. Now go W and in the next room in the SW corner is SECRET # 18, Burst Rounds.
Go to the pedestal and grab the second Silver Rod. Drop down on the floor below. Go back around the corner and now go into the building on the left (from the well) and immediately go right and follow through till the end. Place the two Silver Rods at the Dragons mouths and enter the open door.
The Mirror Room, Golden Rods.
Go straight keeping the ice on your right and shoot that snowball that is against the high snowy hill. A block rises E, climb up and first face SW to take a running jump to that ledge over the mirror, pick up the 1st Golden Rod. Go back to the block and get ready for some pole swinging. Take a running jump to the pole W. Swing to the second, turn around (down cursor) and then swing to the next, swing to one pole higher (hold Alt). Then a swing to the next, turn around (down cursor) another swing to the next, from there swing straight to the ledge at the mirror S. Go to the right and jump on the next and now take a curved running jump to the ice N. From the far N end another running jump to the ledge N and pick up the 2nd Golden Rod. Take a running jump back to the ice (no CTRL) and look up. Face W and back flip and grab the ladder to go climb up. Go NW and find a slide on your left. All the way down and then jump NW you are at the front of the Castle with an open drawbridge.
The Drawbridge.
Go NE and take a standing jump and another one then a running jump to the stone bridge. Insert the two Golden Rods and use the Wheel. The Drawbridge is down.
A Slippery Bike Ride.
Drop to the ground floor through the opening in the floor; go over the wooden bridge to the right corner. Take a running jump with at the last moment grab NW to the side of that heap of snow. Shimmy left and hoist up Go to NW and get the bike. Drive the bike to the other side keeping the wall on your right and get up the hill there. Keep straight and a bit to the left so you drive over a steep sloped ridge with the mountain on your left. Watch out for falling snow boulders. Go on till you can drive left into a cave.
The White Teddy Bear.
Once you are back in the cave leave the bike near the waterfall and jump up the waterfall (S), look to the right and pick up the White Teddy Bear. Get back on the bike, head N and take the first opening to the right (where you entered this cave before), drive through the snowy landscape all the way to the other end, passing the small frozen lake you saw before. In the end, take a snow slope up and leave the bike there. Climb over the ridge ahead and jump down to the waterfall, go down N to a frozen lake. On the frozen lake in the SW corner is a small medipack as SECRET # 19. The way out of this frozen lake is straight N from the medipack in a passage behind some trees.
LEVEL 5 - THE VILLAGE - WESTERN SECTION - 3 secrets
Objectives:
Explore the village
Enter the factory
Enter TRSearch headquarters
Go left and you are in a small village. Go over the bridge to the SE corner of this little village.
Mad Granny.
Go to the garden of the house and shoot the dog there. Find a blue angel statue on the NW corner of the house and move it to that tile S, near where the dog was (It will sink into the ground a bit). Go to the blue angel statue E and move it S onto the tile and the sundial in the S side of the garden will lower. First head to the tree SE (near the statue you just moved), go into the cave S and climb the ledges up to SECRET # 20, the AK-47 and 2 x Ammo, get back down to the garden the way you came. Walk out of the cave to the N a bit and turn right into the opening. Climb the ledges and look on the ledge to the right for SECRET #21, the Laser Sight and a Medipack. Get back down to the garden.
Now go to that sundial on a block a fly by cuts in and two dogs attack Lara. You can shoot the dogs while the camera moves and the window of the house will open. An old granny shouts:
“Be quiet stupid dogs, I am trying to sleep” and she throws a cabinet out of the window. Go and push the sundial on the tile W between the cast iron benches, the fountain starts working.
Granny again: “Who switched time at one o’clock, it is driving me crazy”
She throws out the washing machine this time. Go to the place the washing machine landed in the garden and get into the opening there. Be careful of the water that has electric current, pass it and go straight (W).
Stand with the right shoulder against the wall and crawl in and push the cabinet out of the way against the wall of the cellar. Pick up some FMJ Burst Rounds, find another cabinet E and push it also towards the wall. Enter this opening and flip a switch in there. Go back to the small pool of water as now you can pick up the Fuse there. Use the Fuse on the W wall of the cellar where a trapdoor opens so climb up.
Into Granny's House.
NE is a jump lever, this lowers a block so you can get even higher up in this house. There is a Medipack in the SE corner under the easel with a painting, duck to get it. Lara looks at the garden windows W, shoot the lock to open them. Now go out and take a running jump to the snowy ledge SE. Open the right hand door and enter the house again.
The Room Key.
On the staircase wall is a painting of lovely Aunty Agathe. Go all the way downstairs (keep to the right) this opens a shortcut to the room with the trapdoor, kick in the door N and get a small medipack from the bathroom there. Go up one flight of stairs and go right again and to open the kitchen door. Get a small medipack in the corner and shoot the vase on the table. Grab the Room Key.
Meet Aunty Agathe.
You can leave through the door there but a sentry gun will appeared in the front door on your right and Grandma screams: “Stop, who is making that noise?”
So leave through the door you came from and run all the way up the staircase and use the Room key next to the open door to the terrace. Save and be sure to have full health before entering Grandma’s room. Shoot the dog (grandma yells: “So you’re the one who is disturbing me, I will show you now”), and go to the cabinet NW (left) and open the drawer for a Fuse. Run out while keeping an eye on your health (If you want to see Aunty Agathe in action, run out to the terrace and stand on the ledge W).
Go downstairs to the front door and you get shot by that sentry gun, so use the Fuse and enter the door to the left while watching the health. Shoot two dogs and go to the cabinet and open the drawer for the Ignition Key, a small medipack and the Church Key. Don’t leave yet, as there is a jump lever on top of the door.
The Jeep, a Memo and a Factory Key.
Run out and go right and to the right (opposite the kitchen) the door to the garage is open. Take the jeep, go right and then straight when you reach the bridge, go right along the frozen canal go straight drive over those snowy boulders E. Get out of the jeep and crawl into a crawlspace (where the snowy boulders were) and lower yourself down. Jump to another crawlspace in the W wall. Then jump to the other side and then run off this one to the one down below. Now jump to the ledge with the swinging chain, from there, jump onto a block SE, turn around and another jump/grab up to the higher one N. Turn left (W) and jump to use the jump lever. Walk SE and now run-jump with a curve to the one E behind the swinging chain. Make your way to another jump lever SE, over a now raised block. Jump back to the swinging chain and from there a running jump SW and down to the other swinging chain ledge. Avoid the chain and jump to the block W, face to the left (S) and jump to a now open trapdoor, climb up.
Open the door and open the cabinet drawer to and find a Memo and a Factory Key.
On the note it says:
The code card is hidden in the Factory.
Don’t let Miss Croft get it.
Distract her, so we can finish the TRsearchHQ takeover.
PS: One Factory Key in hidden W, the other in E part of the village.
The door W is open, head out into the street, go to the left (S), then right (W) and walk towards the W wall there into that crawlspace. This is SECRET # 22, a Medipack. Go back to the jeep and go right and then left at Aunty Agathe’s house, up over the mountain and those snow boulders. You’ll come back later.
LEVEL 6 - THE VILLAGE - EASTERN SECTION - 3 secrets
Objectives
Explore the village
Enter the factory
Enter TRSearch HO
The Church, the House 1 Key.
Go E and find the church on your right, park the Jeep. Climb up the left (E) of the front doors and take a running jump to the pole. Turn (down cursor) and swing to the next (up cursor) and next until you can jump into an opening in the house (N), the one with the flashing yellow light. Use the switch at the end and get out and before sliding out, pick up some FMJ Rounds on the floor at the entrance.
Back to the church and up the block and back to the swing pole but now swing to the next one. Then use the Ctrl and Alt key together with the up cursor and grab the crack in the wall of the church. Shimmy to the left and let go, use the Church Key and drop to the ground floor. Enter the church.
Go to the back and push/pull that bowl (SE) 3 tiles to the N, next to the altar where it will sink into the floor. Go into the opening in the W wall and climb up. Turn around and hoist up, push the bowl onto the trapdoor S and jump down. Use the switch and push the bowl N onto the trapdoor. Use the switch again and now push the bowl onto a similar tile in this side the church, opposite the other bowl.
Go to the back of the church and jump to the block that appeared from standing on the shrine. Jump SE and use the switch there. Face N and take a running jump (no Ctrl) to the next one. And from there, jump to the ledge in the corner and pick up the House 1 Key.
Jump to the organ loft and again a jump to the ledge in the corner W to get a small medipack. Get back to the organ, open the door W and use the switch. The bells start ringing, so safety drop down and wait for the priest. He goes to the altar and follow him, he is picking something up, just keep following him. He opens a secret door and once inside you get SECRET # 23, a Medipack, shotgun- and AK-47 Ammo and two small medipacks.
Your work is done in the church so now go the priest’s house. Go N over the bridge, pass under the arch and then to the right and it's the last house on the right, enter.
The Priest’s House, a Fuse.
There is nothing in the kitchen, shower and cloakroom but in the living room (glass door), pull the cabinet away from the wall and use the switch there. Go upstairs now and open the door there and in the bedroom open the door NW. Crawl into the opening behind the toilet bowl and find the Fuse on a pedestal.
House 1.
Go down and outside and go left (W) back to the church; take a left (E) and over the bridge, to the end of the street. The camera changes; go right and around the houses to the front doors. Use the House 1 Key in the house left (closest to the church). Go up the stairs and once on top, turn around and jump/grab to the ledge to use the switch. Watch the cut scene. Just leave the house, as all the other rooms are empty.
Take the Jeep and go N from the church all the way to the N, drive over the mailbox of the house (needs a key) left in the last street. Stop and grab the Secret Key, which dropped from the mailbox and open the door. Inside open the door on the left for SECRET # 24, 2 x FMJ Burst Rounds, a small medipack, Shotgun Ammo and a Brown Teddy bear and another small medipack you can get by crouching in front of the chairs.
Go out and left, then right (E) and in the middle of that house you'll find a crawlspace. Get in and get your SECRET # 25, a second Sight, a small medipack and some Shotgun Ammo. Back out into the cold go back to the Church. Go left and jump on the ice and on the corner face W and jump into the water. Turn and swim SE and swim close to the left wall and take the first opening on your left.
A Timed Shimmy.
Go NE and climb out. Use the Fuse N and a block appears. Then go to the W along the S wall (watch out in the corner for the boulder) and find a Timed switch in the N. Save before using the switch, as it is a timed run. Run back and now jump on the raised block and from there a running jump S, shimmy to the right and at the last trapdoor hoist up and back flip. A running jump/grab into the opening W. There is another nasty boulder hanging in this corridor, keep to the left as much as possible and run past it.
Pass the electric wires and go into the opening in the floor in the corner. There is another switch, watch that flyby. The door N opened, so go out, take a right and right again under the arch, as the house is to the right from the church.
The House 2 Key.
Enter and open the door left. You are in a storeroom of sorts, with a timed switch in the SW corner (a stopwatch on top), this will open a trapdoor upstairs. Better leave it for now, as we have to explore where to go first. Go out and up the stairs and watch out, boulder. Just run straight against the wall and let the boulder come to a stop, go left, (S) and find a pushable closet N. Push it once and then slip beside it to push it out of the way just once (facing W). Go to the other side and there is the trapdoor you are looking for. So back to the storeroom, save and then use the timed switch, roll run out, up the stairs to the left, through the room and through the trapdoor (not too tight a timed run).
Once in the room, jump up to crawl up the shelves in the middle and grab the House 2 Key, this also opens the exit door. You can go outside into the cold again. Go E, passing the church, keep that ornament on your left and aim for that block of houses E. The last house needs the Key you just acquired.
House 2.
Get in and into the Kitchen and open a drawer SE. Get the Memo, a small medipack and the second Factory Key.
Memo:
The code card is hidden in de factory.
Don’t let Miss Croft get it.
Distract her, so we can finish the TRsearchHQ takeover.
PS: One factory key in W, the other in E part of the Village.
Not much to find downstairs but in the bedroom upstairs is a Medipack in a drawer. Better tiptoe up those stairs, as the inhabitants are asleep in that room. Go back to the jeep go NW and return to the Western Village.
WESTERN VILLAGE part 2
Go straight passing Aunty Agathe's, take a right in the end and go over the bridge, park the jeep there. Shoot the barriers and jump over the mines that are on the floor and use the two Factory Keys left and right of the gate. No need to take the jeep as it will explode if you drive over the mines.
LEVEL 7 - THE FACTORIES - DISTRIBUTION - 1 secret
Objectives:
Enter the production part of the Factory
Find the code card
Use the code card in the East part of the Village.
Go E into the yard and shoot a dog. Climb up a railway car N and pick up FMJ Burst Rounds, the railway car E has Flares as a pick up. Behind the garbage container N you can get Revolver Ammo. A guard will come looking so shoot him.
Nothing more for now to do here, so go back and go around the building (N). You see a chopper on a helipad with a guard. Shoot him and get his Access Card.
Go behind the chopper and jump N to the snow ledge and from there climb higher on a ridge, go right (E), passing over the fence, jump to a snow triangle and again. When you reach a small bush up left, you can drop down S and find a bush in a small cavern. Here you can pick up a Secret Key, duck to grab it from the bush.
Loading Dock.
Enter the factory S. There is a Flare pick up on a windowsill NW. Open the door S, two workmen will come out, kill them and pick up another Access Card one of them leaves behind. Enter again and open the door on the left to use the Valve wheel S. In the windowsill left are Flares.
Go outside and back to the Loading Dock and immediately left, as in the SW corner of the Loading Dock is an opening in the floor. Jump over to the right hand side and climb down (floor is now safe because you used the Valve) to use the switch there. Enter the opened gate, follow through and drop into the lower passage with the lasers, save.
Laser Trap, the Fuse.
Time the lasers; there is an alcove on the left you can jump in and another one on the right in the back with a small medipack. Jump down when the lower laser is going. You can stand save against the wall facing the lasers. (I faced N, standing against the right hand wall, did a run-jump over the lower laser, a side jump left into the safe alcove and then a run-jump out left to end up against the N wall where you are safe). Grab the Fuse and hop back against the wall again, now get out of here, climb up at the pipe shaft and make your way to the corridor S, through the open door again.
The Crowbar.
Go down a ramp, follow through and shoot away some gratings near a pipe to crawl in. Use the switch, crawl out and pull away the green crate (N) so you can get behind it. Don’t bother to open the door right, as that is the toilet with only a Mechanic in it. Once behind the crate, get the Crowbar.
You can use one of your Access Cards on the slot there, but you can’t do anything in that Control room yet. So back E, up the ramp and now take the left ramp and stairs upstairs. You are on a balcony. Jump over the railing into the windowsill E. Drop and hang and shimmy to the left to the next windowsill, jump W to the iron bride and use the Secret key, a block will lower.
Into the Factory.
Jump SW, back to the balcony and go to the NW corner to use the switch on that machine. Two guards are there and one leaves some Flares behind. Go in and to the left, use your Access Card to enter.
Go immediately to the left (an U-turn) and spot a green crate (this is where that block lowered), pull it out of the way, get behind it for SECRET # 26, Grenades and a Medipack. Go back out and left, behind the red crate (E) are Flares. (If you leave the green crate out, you have a shortcut back to the balcony, one way only) If you want to go over the metal bridge S, where you can shoot a guard and his dog on another metal bridge around the corner but there is not much to do there.
Down again for a Keyring.
So go back to the balcony, go down the ramps to the lower room, where you can use the Access Card for the red door to the Control room. Shoot the guard (was not here till now) and part form getting FMJ Rounds you also get a Keyring. Notice the Terminal on the wall SW (needs a CD).
Factory, the CD Pieces.
Go upstairs again over the balcony into the Access door over the walkway and use the Keyring around the corner on the right, to the left the block will lower. Open the trapdoor and crawl in W. Go left and lower down into a storeroom.
Moving Crates, a CD Piece.
Push/pull the crate NW aside for a small medipack, push it back (you'll need the space) and go for the crate SE, push/pull it aside to the NW and go move the crate behind it. Under that crate is a CD Piece. Crawl onto the wooden crate in front and get down on the right, behind it are Flares. Jump up and crawl over the crates and you are back in the hallway at the trapdoor.
Factory, Ground Floor.
Go N to the walkway and in the first alcove on the right is a switch. This opens an access door NW in the Loading Docks. So go down the ramps and into the open door NW. Go to the back and stand on the higher raised ledge S of the basin and face W, walk against that pillar and grab up, shimmy to the right and pull up on the walkway. Pick up the second CD Piece from the N end.
Control room.
Get down and back to the Loading Docks, down the ramp and up the ramp on the left to the Control room. Combine the two CD Pieces and insert the Security Computer Disk in the Terminal W. Go down and out and up to the balcony, over the walkway in the Factory to the hallway with the trapdoor and the door that has opened in the E wall near that iron bridge.
The Pump.
Insert the Fuse on the W wall; the pump starts and water has filled the basin in the Factory, so back to the basin downstairs. Watch out for a guard and his dog though.
Exploring the Basins, A Key.
Once downstairs get into the water and pull the underwater lever E, get air and save before you swim into the open gate S, go left around a corner and right, right again and straight (passing a gate on the left, S) swim up a bit, go left around the wall and down. There is an underwater lever there, DO NOT touch it.
Swim in the room with the big Fan and get the Key. In the upper corner on the N wall behind the Fan is an underwater lever. Pull it and swim back and up, and go right and right again through the now open gate S and get some needed air. On the W wall is an underwater lever, use it to get more water in this small pool so you can get out SE.
Sewers, a Laser Access CD.
Shoot the rat and now shoot the grate NE. Use the monkey climb and grab the ledge under the opening and crawl in. Shoot the next grate and end up in a sewer sort of place.
Go N to pick up Flares and a small medipack and jump into the water there. Swim into the narrow tunnel NW and follow through, climb out at the end. Time the flame emitter to climb up facing S. Shoot the rat and crawl out at the end and shimmy left hoist up. Crawl to the SE and light a flare to spot and get a Laser Access CD.
Crawl back to the NW corner and safety drop to the floor. Now Face SE and take a banana jump around that pillar to the right, shoot the rat and take another running jump to the alcove SE and use the Key on the lock. Use the Laser Access CD on the Maim frame inside, the fan will slow down, get out of the cut scene and shoot the rat that is nibbling at your toes. Save before jumping in the water. Look down in the water and spot the two underwater levers N on the left and on the right. Use them both and swim N through the open grate. Swim to the end and hoist up on the left there, get the Flares. Jump to the other side and enter.
Laser Alley.
I couldn’t manage it without some health loss….
Jump down and run after the laser, then jump over the emitter. When the next laser comes toward you jump over it and try to jump into the alcove on the left where you are save for a bit. When the lower laser is coming towards you jump down and over the emitter (there is another alcove on the left where you can get a Medipack) then jump down when the bottom laser is coming and run straight into the wall at the end. You are save here as well. Hope over into the alcove. Go up a ramp and climb the blue boxes at the end.
Leave the door on the left closed, as there is only a guard in it and nothing else. The door a bit further on the right has a switch in a corner. Watch the fly by, go out and right up the blue ladder S wall and you are out on the back of the complex where you started.
Go back N to the helipad around the corner, up the snow back behind the chopper and jump over the hedge down to get into the Loading Docks. Go in the door S and up on the right, over the balcony, left over the walkway in the Factory into the hallway and left. Head S over the metal bridge and right into the open access door W.
THE FACTORIES - PRODUCTION - 2 secrets
Objectives:
Find the code Card
Exit the factory
Use the code card in the east part of the village.
“Emergency”
Go W and get the Flares and if you want choose the EASIER mode then do it now.
This is the hard mode: (easier mode is in green)
Get into the opening left and shoot a guard while you run over the ramp to the other side and open the door there. Follow through opening another door. Get the Flares from a box SW. A guard will shoot Lara in her back; he’ll drop some FMJ Rounds.
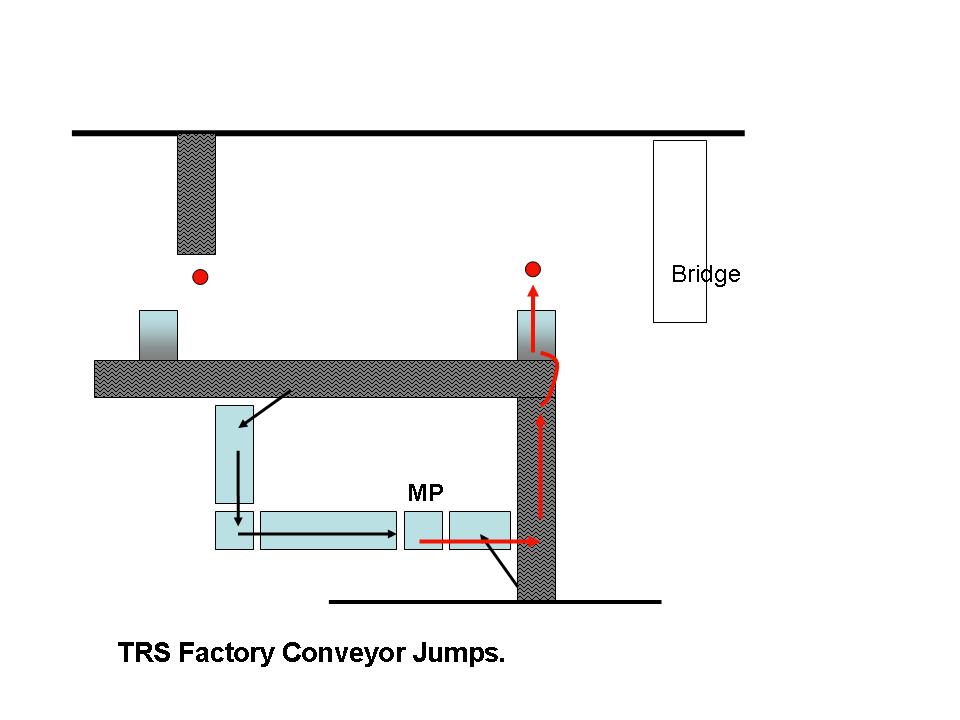
Conveyor Belts, the Security Computer Disk.
Pull and push the green crate to the SE corner (different tile). The floor opens in the NW corner. Jump in and go stand on the platform over the conveyor belt facing W and save. See that Cutter? Wait till it is up and run onto the belt (as much as possible to the right side of the belt) avoiding the Cutter so you can jump off to the right side as well. There is a big Medipack to compensate the health loss. First go to the small chest NE and get the Security Computer Disk. Open the trapdoor SE, jump in and save first before using the Conveyor Belt Control switch, as it is timed.
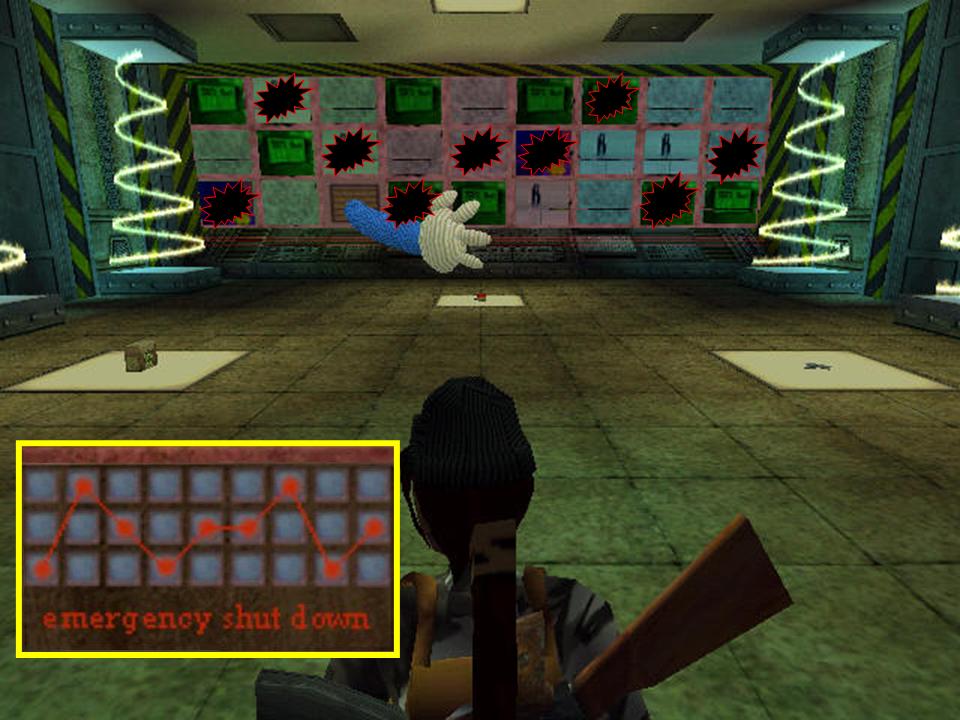
Timed Conveyor Belt, the Emergency Shut Down Plan.
Turn right and run-jump over the pipe, turn left and get out here fast and jump on the belt (that runs in the other direction) and jump up to the platform. Walk down to the terminal at the red door. Now insert the Disk you have and enter. On the E wall is an Emergency Shut Down Plan, write that down, as you’ll need it later (we provide the clue for you there).
Get an Access Card from the desk W and leave. Climb back up through the hole NW and head E. Go back to the Thumpers room, over the ramp to the other side and through the door, to the left and use your Access Card.
More Thumpers and Conveyors.
Before you can do anything jump down in the SE corner and go E, climb the ladder and get the Laser Access Disk and the second AK47 from the chest. Get down and go W into a room with wooden crates. There is a timed switch just around the corner. Flip it and go and stand on the block that disappeared. Just wait and you’ll be transported up. Jump NW and pull up.
Map.
Now go NW to run onto the conveyer belt NW, just through the opening, jump off on the left onto the slanted ledge. Slide and jump to get that Medipack (missed the first jump? Go around the corner standing on the belt and jump left to the next slanted ledge to get to that Medipack). Turn around facing N and run-jump back onto the belt, try to land in the middle. Slide till just before the belt goes left and jump over the next belt onto a slanted ledge near the chain (easier version, there is a save ledge here), slide and jump to grab the chain. Turn left and swing to the second chain. Turn right and swing over to the Jump switch on top of the opening in the wall. Land, back flip roll and jump again to get back onto the chain (Easier version, there is a save ledge behind the belt). Swing back to the first chain N and swing to land on the bridge there (swing once and let go). Jump over to that platform E and throw the switch there. Jump back and go to the open door W.
The CD Pieces, Crate Puzzle, the first Fuse.
Go all the way down the ramps, jump in the water and swim to the other side. Pull up and go straight, run SE onto the nearest conveyer belt when the Thumper is about to go down and jump off again (left). Use the Valve wheel for later (N wall) roll and jump clearing the belts to the other side and get the CD Piece and a third Laser Sight from the chest there. Back on the conveyer belt to the W and immediately jump left into an opening. Go through to the next room.
Push the crate with a fuse inside to the NW corner. Don’t mind the thumper but don’t stand under it, it will stop when you push the crate under it.
Then go to the SE and pull up onto the floor above and use the Valve wheel there. See the blocks are shifting. Now jump on the glass ledge and go back to the NW and pull/push it to around the corner SE. Jump back to the wheel and change the blocs again. Jump to the raised platform at the crate and push it once, jump back to use the wheel and jump back to take a running jump/grab to the NW ledge a bit further away from the block. Pull the block twice under those Hammers. Go to the trapdoor SW and get down for the second CD Piece.
Get out and back to the ledge with the wheel but this time turn to the wall N and use the jump switch. This releases a chain so back to the top platform and a running jump to the chain and swing to the other side NE. Use the switch and climb up the switch block for a small medipack. Jump back to the chain and swing to the platform SW to get to the shattered crate and pick up the Fuse.
Make your way down, go N and jump over the 2 belts, run SE onto the nearest conveyer belt when the Thumper is about to go down and jump off to the left. Go E and left into the opening there and compile the two CD pieces together so you can use the Security Computer Disk in the terminal. Pillars appear in the room behind you.
Jump to the pillar and transfer around the corner, be sure you are about in the middle, back flip/roll/grab the next, transfer again around the corner to the left and back flip/roll/grab the next pillar. Shimmy two corners on this one and back flip/roll/grab the next. Now go the right and climb almost to the bottom, back flip/roll/grab the ledge. Walk to the end and use the monkey climb to get to the other side and pull up. Go left and use the Valve wheel, a guard will appear and he’ll leave a small medipack. Go back, use the monkey climb and jump back to the pillar. Shimmy left around the corner and back flip/roll/grab to the next pillar and from there (you know the drill now), to the next after that and back flip to the ledge N.
The Access Card.
Enter and jump to the right (E) and from there into the save water, swim trough and pull up. There will be 2 guards here; one leaves Uzi Ammo the other a small medipack. In the room next to it is more Uzi Ammo. The middle cupboard has an Access Card. The left has the Submachinegun and the right hand one some Shotgun Ammo.
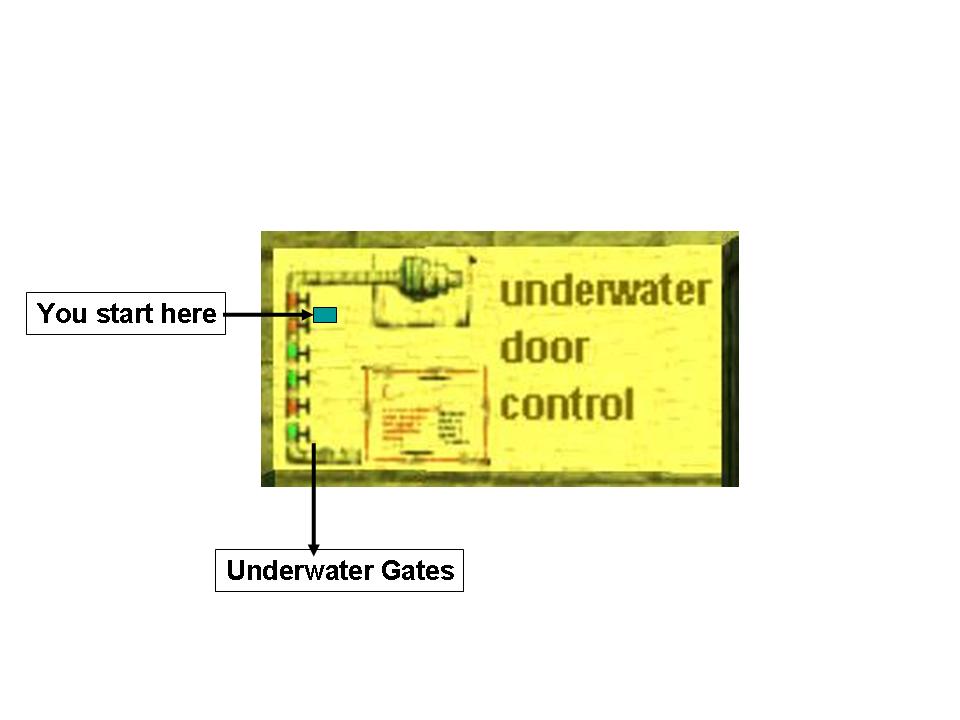
Valves Puzzle, the second Fuse (screen)
Get behind the middle pushable green crate N and write down the underwater door controls. Left to right: 0 x 0 0 x x
Nothing more to do than jump back in the water and hoist up at the wheels. Turn the Valve wheels accordingly to the plan and jump in the water at the end (So from the E side of the room, don't use the first 2 valves, use the one opposite that entrance and run-jump over to the next one you have to use. Jump to the very last one and use the valve.) Swim carefully so you won't end up in the left tunnel and go up N to climb out. Climb on the highest step and take a running jump/grab to the edge above and pull up.
This a timed race, from the room on the right to the room on the left.
Timed Run.
Stand if front of the switch in the alcove and save. Pull the switch, roll and run/sprint out, watch out for the hole in the floor, turn around the corner and sprint/jump through the water, be sure to be in the middle and jump on the ledge right in front of the chest. Get the second Fuse inside, while Lara gets the Fuse, hold back flip roll and keep jumping till you are save.
The third Fuse.
Go to opening floor S and face E, run in and turn around. Now swim left into that opening to the Fan, going in high and as much as left as possible. There is a big fan so try to keep close to the wall and swim in the small opening left to come out in the pool. Climb out of the pool left (N) and go up one ramp and use the Access Card on that receptacle W. Go up the other ramp and you can access the elevator. Pull the switch and watch the fly by. Step into the elevator and use the switch again to get to the other side. Step off and grab the third Fuse form the vending machine standing right.
You can travel back with the elevator if you want but you can also jump into the pool below and climb out SE. Jump to the ladder against the E wall, climb up and climb off it on the right. Insert the 3 Fuses you have and the toxic pool is drained.
The Conveyor Belt Control Key.
Jump back down into the pool, get out S and run left onto the conveyer belt, jump off to the left. Turn the Valve wheel again (to turn some flames off) and go into the opening a bit further to the left and run to the NE corner and jump into the hole in the floor.
Save in front of the rotating knives and run through along the left side (best is when the knives are coming up, start sprinting). Just around the corner is a jump lever, use that then take the next hurdle. Jump up the block and climb up N. Jump into that opening E.
Store Room.
Watch out as the next room has guards. There is a lever that you need to use the Crowbar on in the SE corner and the highest stack of crates you are looking at has a Conveyor Belt Control Key hidden in the middle, you can make your way up from the crate E. From the top go over to that high stack in the NW corner and from the darker crate you can climb up onto the attic, go into the opening NW and get SECRET # 27, another Shotgun and Ammo. Go down to the ground floor again.
Leave through the opening W where you came in, through the knives and climb out at the end. Climb into the opening a bit further (E wall), use the monkey climb and get into the now open crawlspace. Jump up for SECRET # 28, 2 x Grenade Ammo, the Grenade Launcher and a Medipack. Get out back to the dry toxic pool and leave S. Jump to the other side and run onto the belt to jump off into the opening left. Go to the SE corner and use the Key on the lock there.
Use the switch and the conveyer belt N has stopped. Climb on and follow through, use the Laser Access CD and before entering, remember that Emergency Shut Down Plan? Well have it handy, as you’ll need that.
THE FACTORIES - MOTHER COMPUTER.
Objectives:
Find the Code Card
Exit the factory
Use the code card in the east part of the village
You goal here is to shoot the specific tiles on the screen E as you wrote down. So save first and save as often on different places. When that part of the screen shatters you know you did well.
There are goodies to collect as well as enemies to be slain and that arm to dodge. Additional corkscrews will come down from the ceiling, so have fun.
| X | X |
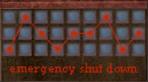 |
|||||||
| X | X | X | X | ||||||
| X | X | X |
When you shot all the tiles, there will be an explosion (takes a while, so take medipacks while you wait) and the wall of the room caved in (if you happen to die, you will get a reminder of that clue given before).
Go to the opening and to the left and behind the tank another left. Get the Code Card and A Key form the chest, go back to the tanks, take a right and go straight S and find a barrier is gone.
THE FACTORIES - DISTRIBUTION - second time
Use the Key on the lock and step outside into the snow and watch the fly by. Shoot some soldiers and leave through the opened gate.
THE VILLAGE - WESTERN SECTION - third time
Jump over the minefield and get into the jeep. Go to the E side, near Aunties house and up the mountain again to the eastern section of the village.
THE VILLAGE - EASTERN SECTION - second time
Travel behind the Church (S) wall, SAVE and drive the jeep up a ramp, through the barriers and steer to the left, then right over to a roof and use the brakes when you are on the breakable floor. Get down into the room. In this room is some Uzi Ammo. First insert the Code Card on the E wall and watch the explosion. Use the switch on the W wall to open the door, get out, go to the wrecked fence and step through. Go left and to the left of the wooden barriers is a crawlspace in the rocks (E), follow through and once out, use the switch to stop the fan. Crawl back and go to the front of the building, climb up that grated ledge. Shoot out the grate in front of the fan on the right and jump in there. Crawl under the fan and go right around the corners to drop down and watch Lara quick change into her “sneak mode” outfit.
LEVEL 8 - TRLE SEARCH ENGINE HQ. - 1 secret
Objectives:
In HQ find F 3 security card (it opens doors automatically)
Find security computer disk
Enter Database and destroy the virus.
Slide down and follow S through the storehouse and a bunch of guards will storm into the hall. Go straight ahead (S) and better save in front of the HQ pedestals in the blue cubical to the right and keep that save apart (as this is a clue so you won’t have to go back and forwards later). Or take note of the colour and the way the HQ is angled and the pedestals are placed.
The left door opens it is the toilets, shoot the guard on the left and open the trapdoor behind the closed toilet door. Leave it for now so get out, go left (S) and follow this wide corridor up to a hallway. Straight-ahead is another bathroom, there is nothing there and you'll attract two guards. There are more guards patrolling this building so keep an eye out for them. Go left to the counter.
Jump over the counter and in the second cubicle to the right you'll find a button. You see some ledges going up. Behind this cubicle (N) look up at the ceiling and spot a crack in the ceiling. Face S and jump up to grab the trapdoor. Crawl in and get SECRET # 29, a Revolver and Revolver Ammo from this glass crawlspace between the floors.
A Note, Keith’s Lucozade.
Leave and go around the wall to the other side. Go into the cubicles W and to the right are Shotgun and FMJ Rounds. Go into the cubical in the middle and open the drawer to get a Note, giving a clue to the upcoming puzzle. Head into the lower hall E, shoot the top of that huge mirrored ball in the middle from the hall to release 2 chains. Go S and hop onto the table to pick up Keith’s Lucozade. (The ball might appear up again but that is a small bug of the LE, run around a bit till you see the ball appear on the ground). Go to the ball you shot down and push/pull it against the E wall under the wall torch (clue on the Note). Cut scene of a wall.
Go to the corridor SW and up another floor. Find the opening in the balustrade E (overlooking the hall with the ball) and take a running jump with grab to the platform. From there take a single jump to the first chain, then one swing to the platform on the right. Take a running jump to the second chain; align with the third and take two swings to the last chain. Take one swing for the jump lever and see a cut scene of the next puzzle.
HQ Puzzle, the Floor 3 Door Security Card - Automatic Scanner.
Now go up one flight again and left and cross that glass floor and on the left is the puzzle.
The puzzle piece will be on the correct spot when you see a cut scene of a door.
The middle one is the green colour that one goes into the SW corner under the green dot.
The right hand one is the blue colour that goes in the middle under the white dot, E side.
The left one is the pink one and that goes to the N wall under the white dot, E side.
A door goes up, go SW to go up another floor, in the corridor in the back is the open door. Open the drawers and get the Floor 3 Door Security Card - Automatic Scanner and some Burst Rounds.
The Electric Wires.
Go out and now you can open more doors on this floor.
Room in the NE corner, has a button in the NE corner. Cut scene of a grate opening up. In this same office you can find a Medipack in the drawers in the SE corner.
Go out into the corridor and into the opposite door W, get the Flares and a small medipack from the drawers SW. Turn around and go N, up into the open grating and climb the wooden crate in there to get to the Electric Wires. Go back out and into the corridor. Into the opposite door and get the Flares from the chair.
The AK47.
Leave, go left and into the next room left (armory room) use the lever in there (behind the N wall), another grate opens and get another AK47 from the drawers S. Get out into the corridor and head SW. Go down one floor towards the glass floor and left around the corner is another grate you opened. Crawl in and at the end drop down into another office. In the drawers is the MP5k Submachine gun (Uzi) and use the switch (S). The office door opens when you approach it, so you can leave and head to the stairs SW.
Powering up the Elevators.
Go down two floors to the ground level, into the toilets up into the trapdoor, jump down at the end and put the Electric Wires in the electric box. Cut scene of the elevators. Go out and to the elevator.
Up the Elevator Shaft.
Jump in and climb the chain and back flip to a ledge. Get on top of the elevator and jump to another ledge with a chain. Climb it and back flip off onto the other elevator. Open the trapdoor there and drop down. Use the button E and you arrive at:
TRLE SEARCH ENGINE HQ - TOP FLOOR - 1 secret
Jump on X when clones won’t show.
Objectives:
Destroy the clones in the top floor and get the disk
? means confusion, use it to your advantage
There is only one way and that is to the E, the door will open.
Cloning Machines, the 4 Electric Wires.
Run in and wait for a goon, shoot him as he has the Electric Wire with him and you need that. Go left into the N side office space and to the printer E, get the Clone Machine Instructions from the printer.
Cloning Machine.
Tested with empty bottles
Warning: In case of the overload break the balloon by jumping onto the emergency spot.
You'll need 4 of those Wires in total but first put this one in any box, I did the first in the NW office.
Save as the next part is tricky. The tile next to it a man appears and there is also electric current, face the green dot on that glass bubble and jump against it to shatter the glass and shoot the guy from a safe distance. He has the next item you need. You better try lure him from that corner though, otherwise you have to step onto that dangerous tile to get the Wires.
It doesn’t matter where you use the next Electric Wire but look around for where the next goon will wake up.
The electric box SW wakes up the guy NE.
Box SE wakes up the guy SW.
Place the last one NE, see a cut scene but first go SE as you need another Electric Wire for that room of the cut scene.
Go to that strange looking machine E and place Keith’s Lucozade (out of your inventory) on it, SECRET # 30, appears, a Medipack. Some flying bottles (bats) will attack you, shoot them and leave through the double doors, go to the open door on the right. Same thing as before, place the Wires, but now you can just grab the Security Computer Disk. On the floor of the office are 3 small and 3 big Medipacks plus a Turkoise Teddy Bear on the desk (only appear after using Keith’s Lucozade first).
Leave through either elevator and you’re back at
TRLE SEARCH ENGINE HQ - second time
Go all the way down to the ground floor again and use the Security Computer Disk you have next to that red window. Go in and down the stairs NE, follow through..
TRLE SEARCH DATA BASE - 1 secret
Objectives:
In HQ find F3 security card
Find security computer disk
Enter Database and destroy the virus
Walk forwards and watch the fly by go in, take a right (N) and slide down into a cave, light a flare and turn around to use the jump lever, go further and jump down into that pit. Find a crawlspace SE and get in for SECRET # 31, a Grenade gun, Shotgun Ammo, a Medipack, 2 x Flares and a small medipack. Crawl back and climb up N to the opening.
Timed Jumps.
Save in front of the switch as it is timed, it opens a door straight ahead (S). Use the switch and you have to take a running jump to the ledge left (SE) and then one again near the door SW. Jump onto the block, turn around and jump even higher, hoist up, locate the jump lever on your left and use it. Jump back up again and jump into the opening SW.
Onwards, turn the Lasers off.
Of course this place is guarded and the first you meet, leaves a small medipack. Go into the passage N and the door on the right is now open. Use the button N wall, watch the fly by and now go out the room to the left and then a right, get in the alcove left in the corridor where the camera is fixed (where the second guard comes out) and use the button there. Go down the stairs and straight S.
Exploring.
In the next room there are two buttons, use them both but go into the S passage first.
South, Lasertraps.
Down some steps into a crawlspace, watch out for the lasers.
Crawl in when the laser is going and stand with your back to the wall, you are save for now. Jump over the laser when it returns and run-jump up to grab the ledge W, pull up and roll to get with your back against the wall. Jump up to grab the monkey climb, as that is safe as well. Go to the other side and watch out for that laser, let go, grab and hoist into the crawlspace, get out at the end and use the switch W (you'll be back here in a moment with that card for the S door).
Get the small medipack from the guard, use the switch NW, go all the way back, through the crawlspace, laser trap (just safety drop down at the right moment) through crawlspace up the steps into the open door E.
East, Flames.
Follow through and near the emitters is the door you just opened. I stayed on the right side and time your run through the emitters to use the button at the door. Run inside before the guards can push you into the flames and shoot them to get a small medipack and the Basement Key. Medipack landed under the flames, so I left it there.
South, a Key Card.
Go back through the emitters, through the S door again and laser trap and place the card. Find a push block at the S wall and pull it out and aside as there is another one that has to come out. On the left is a Key Card and on the right Shotgun Ammo.
The TROJAN VIRUS.
Leave (back through lasers) and door N and up the iron staircase to the left and use the Key Card.
Walk out onto the walkway and shoot everything in sight. Then go down, dodge the VIRUS and grab the two Silver Keys (on the floor), climb up the computer to the ledges W and use the Keys there. Doesn't matter where you go first. Use the switches in both rooms get out and go to the other ledge and also use the switch. Run back and slide down the computer into the opening in the floor.
Crawl through and use the lever defeating the TROJAN, well defeated...
TROJAN - 1 secret
Objectives:
Destroy the clones in the top floor and get the disk
? Means confusing, use it to your advantage
Wait out the Credits and you'll have a final battle with the revived TROJAN when he gets back on his TROJAN HORSE.
Hop backwards turning right so you'll shoot him from the side of the axe and when he finally falls from the horse you have to lure him away there before he gats back on. Shoot him till he drops and leaves a Key behind. Don't pick it up yet but go to the N side of the island. Drop backwards from the edge and grab, then drop and grab the opening below. Go in and get Secret #32, a Medipack. Walk forward a bit and look at the sign "The order of the colour is the key" with a Teddy Bear. Now walk to the sign and you'll be taken back up. Grab the Key and the level will end.
TROJAN - Defeating the Virus.
"The core of the virus revived"
Important Tips: On the pillars SE and SW new Ammo or Medipacks will appear every time (you'll see electric rays when there's a new pickup available). Under the island when the Big Trojan Virus appeared are more Medipacks and Ammo. When those tiny viruses appear... save and reload, they are gone.
Shoot those nasty flying viruses and save. That golden floor you're on, is safe, the lower part around it is deadly for now. Jump onto the 4 corner pillars and get 2 Blue Spheres and 2 Medipacks.
Place the two blue Spheres on the N and S side of the central pillar. A block goes up W, climb it and pull the plug out of the ledge above. A Blade starts turning on the central pillar and 2 more flying viruses appear.
Jump to those pillars NW and NE again and now pick up the 2 Yellow Spheres and place them in the remaining receptacles on the central pillar, another block goes up (E), climb it and pull the plug.
A large wheel appears N and with it a Big Virus (dragon). She will fire bolts of Fire at you and also swarms of tiny viruses. A taller block went up N of the central pillar. Jump to that block from one of the lower ones and jump back onto the 2 thin ledges over the plugs. Jump and grab the ledge E and W and then to the pedestals with the Blue and Yellow spheres. Of course the one you pick up E has to go into the receptacle W and the other way around. So jump over to those ledges to place the Spheres and use the water below as a refuge. You can climb back onto the island on the ledges around it (don't forget those pickups below).
After placing these last Spheres blocks are up on those thin ledges E and W of the central pillar. Jump onto those and pull both the plugs to get a yellow virus turning around over the central pillar. Shoot that from standing on one of the receptacle ledges over the water E or W and the Big Virus will explode. Get back down to the island and remember that line about the colours??
A Final "Secret"... To get it you have to shoot the 5 bears hanging around in this place and some can only be shot from a certain spot and you also have to do it in the right order.
Start with the dark blue one up E, next the brown one up W and then the yellow one in the SW corner near the water. Then shoot the light blue from the receptacle ledge up E and turn S to shoot the last one, white up S. A Thug will appear on the island, go shoot him and he leaves the Rainbow Teddy Bear.
Only one thing remains to be done...Shoot the last yellow virus at that big wheel N and your job is done....
13-01-2008.