The Legendary City of Salsipuedes
By Juan Carlos Pena Delgado
This walkthrough is meant as a general guide only. It
may not include every pickup or secret. There may also be alternative ways of
approaching situations within the game.
- Pickups and Items
- Enemies
- Secrets
WALKTHROUGH by Lizard Queen
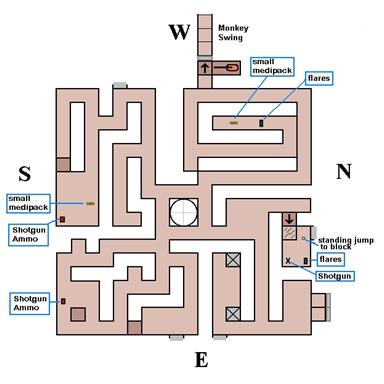
Main Hub: North/West
The level begins with Lara facing the west wall of a simple yet nicely
textured room with four paths, one in each corner. Start by taking the corridor
in the north/west corner. Follow it around until you reach an alcove on the
west wall. Climb the block and watch a cutscene. Turn right and push the floor
lever, opening the gate into the next area.
Facing west at the edge of the newly
opened gate, take a standing jump and grab the monkey swing above. Follow the
corridor around until you have a choice of going either left or straight. Go
left and monkey swing forward to the wall. Turn left, swing one tile forward
and drop onto the block below. Face south, jump back and grab the edge of the
block and drop down. Face west and take a standing jump to the next ledge. Take
a running jump to the second ledge and turn right. Shoot the pot and pickup the
flares. Face west again and drop onto the lower
floor. Light a flare (or shoot pistols to save on flares) and pickup the Grenade ammo in the north/west corner. Pickup the Uzi ammo in the north/east corner and a large medipack near the middle of the west wall.
Reverse roll, climb the east ledge and take a running jump back over to the
ledge. Take a standing jump to the next ledge and turn right.
Walk to the end, turn left and take
two steps back from the edge. Light a flare and take a standing jump and grab
the edge of the sloped block. Pull up, slide and jump to the next sloped block.
Slide as far as possible without falling off and jump to the next sloped block.
Slide as far as possible on this one as well and jump and grab the ledge ahead.
Shimmy to the left as far as possible and pull up. Turn around, angle right and
take a running jump to the sloped block closest to the wall (you will not slide
off this one). Push the floor lever, opening a set of double doors back in the
Main Hub and return to the edge of the sloped block nearest the wall. Angle
right and take a running jump back to the ledge. Jump back and grab the edge.
Shimmy right and pull up. Climb the ladder, pull up and slide down the ramp.
Turn left and follow the corridor back to the Main Hub.
Main Hub: North/East
Take the corridor in the north/east
corner. Turn right, then left and enter the newly opened double doors. Head
through the first room and pickup the flares
behind the column in the north/west corner. Enter the next room and climb the
block. Move forward, reverse roll and arm weapons. Shoot the scorpion on the block and the 3
scorpions on the floor below. Pickup the Shotgun
ammo and Uzi ammo. Reverse roll, drop down and arm weapons. Enter the
next room and reverse roll again. Shoot the 2 ninjas
in the left and right corners of the room. Reverse roll and approach the north
ramp at the end of the room. Shoot another 2 ninjas
in the left and right corners of the room. Head up the right side of the ramp
and when the running music begins, reverse roll and run down the other side
(right side) of the ramp as two boulders fall. After they roll away, head up
the right side of the ramp again but this time no music to warn you so go about
two tiles up, reverse roll and run down the other side (right side) of the ramp
as two more boulders fall. Now that the ramp is safe, head up to the top and
turn right. Run past the zombie mummy and climb
the ladder on the east wall. Backflip to the ledge, turn around and run past
another zombie mummy to the middle of the ledge.
Jump up and grab the monkey swing on the ceiling and swing over the pool to the
other side. Pickup the Eye Piece on the pedestal
and jump into the water. Pickup the large medipack and
Shotgun ammo at the bottom of the pool. Swim through the opening in the
north/east corner of the pool.
Underwater Maze
Follow the underwater corridor
around until you have a choice of either going right or straight. Go right and
follow the blue corridor around and surface at the end. Head to the south/east
corner of the room and reverse roll. Jump up and grab the inner wall (it is
climbable) and climb to the top of the second last block. Take a backflip and
twist into a sloped alcove. Slide a short ways and when the boulder starts to
roll behind, take a standing jump over a spiked pit, landing on a flat surface.
Immediately take a step back to avoid the darts. Run past the darts and slide
down the next half of the slope. There is another spike pit at the end, so take
a standing jump just before it and grab the edge of the pit. Pull up and take a
standing jump over a fire pit and arm weapons. Shoot the 3 scorpions approaching. Climb the stairs and dash
past the zombie mummy in the corridor. Jump up
and grab the ladder and climb to the top. Pull up and light a flare.
Secret #1: Walk to the end of the
corridor and take a standing jump and grab the wall ahead (it is climbable).
Climb down and quickly let go and grab the lower edge of the crawlspace.
Quickly pull up before Lara positions her feet back on the ladder and climb
into Secret #1. Pickup the Hand of Orion and exit the crawlspace.
Drop into the water and immediately
surface in the same spot. (To bypass Secret #2, go to Main Route)
Secret #2 (Mini Side Quest): Turn to face east and dive down to the bottom of the underwater maze.
Follow the floor as it curves right and swim until you reach the east wall. Turn
right and right again (travelling west now) and swim through the small
triangular space. Swim up and enter the underwater crawlspace in the west wall.
Swim down and left into another underwater crawlspace in the south wall. Swim
right and follow the corridor as it curves slightly right. Swim west and just
before reaching the west wall swim up and turn left. Swim through the
crawlspace into an underwater room which is Secret #2. Swim left and surface
for air. Pickup the Uzi, Grenade and Shotgun
ammo on the floor. Return to the air space in
the north/east corner and surface for air. Turn west and exit the room back
through the crawlspace on the right. Swim down and turn right. Follow the floor
to the end and swim back through the crawlspace in the east wall. Swim left,
down and left again. Follow the floor as it curves to the end of the west wall
and turn right. Swim forward through a small crevice and swim up. Swim left and
right (heading north now) through an opening with a slanted block. Swim forward
and surface in the airspace ahead.
Main Route: Turn to face east and dive down to the bottom of the underwater maze.
Follow the floor as it curves right and swim until you reach the east wall.
Turn right, swim up and through a crevice at the top (travelling east still).
Swim towards the double doors and swim to the right. Swim right again and
follow the floor left through an opening in the south wall. Surface for air in
the next room.
Face west and pull up out of the
water. Climb the ladder on the west wall, (the other ladders are only traps).
Pull up into the room above and arm weapons. Shoot the scorpion
approaching from within the fire water. Take a running jump and grab the rope.
Swing and jump off the rope to the other side. Push the floor lever and return
to face the rope. Take another running jump and grab the rope. Angle to face
north/east, swing and jump off the rope to the other side. Make your way back
to the ladder, careful to avoid the shooting darts and climb back down. Drop
back into the water and swim north through the opening. Swim to the right
towards the double doors, then left around the block. Swim north and enter the
newly opened doorway and surface for air in the next room. Swim to the
north/east corner where there is a ledge and pull out of the water. Turn right
and jump up and grab the ladder on the column. Shimmy around the column and
drop down. Reverse roll and take a running jump and grab the edge of the south
block and pull up. Angle right and take a running jump to the ledge. Arm
weapons, angle right and take another running jump to another ledge.
Immediately shoot the scorpion that appears on
the same ledge. Walk north to the edge and angle left. Take a standing jump and
grab (to change trajectory) and shoot another 2
scorpions in the corridor. Follow the corridor around to the right and
then left until you reach another pool to the north. Jump into the water and
swim to the other side. Pull up onto one of the ledges on either side of the
block and turn to climb the block. Turn north and climb into the alcove. Climb
once again and push the floor lever causing an earthquake, flooding the entire
previous area with water. Reverse roll and drop into the water. Swim forward
and through the south opening in the pool. Swim right, then left and left
(facing east now) into a previous area. Swim down and to the right through an
opening to the south. Swim left (east), through the newly opened double doors
and surface for air. Pull up and pickup the second Eye
Piece on the pedestal and watch a cutscene of the location of the
receptacle for the Eye of Horus. Head to the south/west corner and climb
through the newly opened gate in the south wall.
Wall Jump
Arm weapons and shoot the 3 scorpions that appear in the corridor. Head to the
end of the corridor and turn left. Head to the wall, turn left and jump up and
grab the ladder in the north wall. Climb as far up as possible, then jump,
reverse roll and grab the other side. Continue to climb up, jump, twist and
grab until you reach the top of south wall. Shimmy to the right until you reach
the other end, drop into the alcove and turn right (west). Keeping to the left
side of the corridor, run down the stairs and angle right as you approach the
bottom. Turn into an alcove on the right (north) as the boulder falls safely
out of the way. Drop into the water and reverse roll. Pull up, arm weapons and
shoot the ninja lurking in the south corridor.
Enter the corridor and turn right. Climb the west ladder to the crawlspace at
the top. Quickly let go and grab the edge of the crawlspace and climb in before
Lara positions her feet back onto the ladder. Crawl forward and turn around.
Climb out and grab the ladder on the inner wall. Climb to the bottom, reverse
roll and light a flare. Follow the corridor around until you reach a ramp in
the west wall. Slide down and turn right. You now have a choice: to continue to
Secret #3, head straight through the double doors to the north. To bypass the
secret, turn left and follow the left wall back to the Main Hub.
Secret #3 (Mini Side Quest): Head forward through the double doors to the north. Run through all
three rooms, up the ramp and drop into the water. Swim through the opening in
the north/east corner of the pool. Follow the underwater corridor around until
you have a choice of either going right or straight. Go straight and follow the
corridor, keeping close to the floor to avoid shooting darts. At the end, swim
up when you reach the south wall and surface for air. Pull up out of the water
and head to the back of the room (south). Turn right and climb the ladder in
the east wall. When you get near the top, take a backflip and reverse roll into
a hidden alcove behind. Slide down the ramp as it takes you right and take a
jump over a spiked pit. Climb up the block and jump up and grab the edge of the
crawlspace above. Climb in and crawl to the end, which is Secret #3. Turn
around, climb down into the new room and pickup the Crossbow ammo, Grenade ammo, flares and a large medipack on the floor. climb the block on the south wall. Jump
up and grab the ladder and climb to the top. Pull up and climb the stairs until
you reach the room above. Follow the floating belts until you reach a grassy
wall (facing west). The wall is fake, so walk through the wall being careful
not to fall off the block on the other side. (Press the look button to help
change the camera angle) Turn left and face the set of ropes above the pool.
Take a running jump and grab the first rope. Swing once and jump and grab the second
rope. Swing once and jump and grab the third rope. Angle to the face the
south/west corner and swing, jump and grab (to change trajectory) into the
alcove. Slide down the slope, head straight (west) following the right wall
back into the Main Hub.
Main Hub Collectathon
From the middle of the Main Hub,
face the north/east corner and enter the corridor. Follow the left wall until
you see an opening in the right wall. Turn right, climb the block and walk to
the edge. Light a flare, take a standing jump over the spiked pit and pickup
the Shotgun and flares in the two back corners
of the room. Go to the right side of the spiked pit (see map) and angle left facing south/west. Take a standing jump back into the
opening. Drop down into the corridor and turn left. Follow the right wall back
to the Main Hub.
From the middle of the Main Hub,
face the south/west corner and enter the corridor. Follow the right wall around
until you reach the south wall and have a choice of going left or right. Go
left, light a flare and pickup the small medipack and
Shotgun ammo in this small room. Return into the corridor in the
north/west corner and turn right. Follow the right wall, bypass the corridor on
the right (south) wall and head straight back to the Main Hub.
From the middle of the Main Hub,
face the south/east corner and enter the corridor. Turn right and follow the
left wall. Arm weapons and shoot the ninja
lurking in the east room. Pickup the Shotgun ammo and
small medipack and reverse roll. Exit back through the corridor in the
south/west corner and follow the left wall back out to the Main Hub.
From the middle of the Main Hub,
face the north/west corner and enter the corridor. Follow the left wall all the
way around, light a flare when necessary and pickup the flares. Continue forward and pickup the small
medipack. Reverse roll and follow the right wall until you reach the
alcove in the west wall.
Monkey Swing-revisited
Facing west at the edge of the newly
opened gate, take a standing jump and grab the monkey swing above. Follow the
corridor around until you have a choice of going either left or straight. Go
straight and monkey swing until you have a choice of going either right or
straight. Go straight and monkey swing until you have a choice of going either
left or straight. Go left and swing to the wall. Go left again and swing to the
end. Drop down onto the block on the left and down to the floor. To bypass
Secret #4, go to Main Route.
Secret #4 (Mini Side Quest): Facing west, jump back and grab the ladder. Climb down and light a
flare. Reverse roll and head forward. Keeping to the left, dash past the zombie mummy and follow the corridor
around to the end. Pickup the flares and reverse roll. Light another flare and head back
down the corridor, avoiding the mummy along the way. Turn left at the first
corridor, then right and left to face south and a hot coal pit. Light another
flare and take a running jump and grab over the pit. Pull up and turn left.
Head down the corridor to the end and turn left again. Drop into the water and
swim down into Secret #4. Follow the corridor around and pickup the Uzis. Continue
swimming through the corridor and when you have a choice between going left or
straight, go straight. Surface in the room at the end. Pull out of the water
and pickup 2 sets of Crossbow ammo, flares and
a large medipack from around the room. Enter
the opening in the east wall and turn right. Arm pistols, using them instead of
flares at the moment. Make a hairpin turn left and shoot the 3 scorpions descending the
staircase. Climb the stairs to the end and slide down the ramp. Light a flare,
angle right to face south/west and take a standing jump into the opening. Drop
down into the corridor and turn left. Follow the right wall back to the Main
Hub. Head back down the corridor in the north/west corner. Follow the right
wall around until you reach the alcove on the west wall. Climb the block and
take a standing jump and grab the monkey swing above. Follow the corridor
around until you have a choice of going either left or straight. Go straight
and monkey swing until you have a choice of going either right or straight. Go
straight and monkey swing until you have a choice of going either left or
straight. Go left and swing to the wall. Go left again and swing to the end.
Drop down onto the block on the left and down to the floor.
Main Route: Facing west, crouch through the room to avoid the darts being careful
to move around the spike tiles. Stand up, arm weapons and approach the end of
the room. Shoot the 2 ninjas, drop to the lower
floor and turn right. Climb the sloped block and slide into the next room.
Combine the two Eye Pieces and place the Eye of Horus in the receptacle. Arm
weapons and step forward. Shoot the 2 ninjas on
either side. Immediately reverse roll and shoot the ninja.
Reverse roll and jump up and grab the crawlspace. Pull up, crawl through and back
out the other side. Immediately backflip onto the block behind and arm weapons.
Turn around and shoot the 2 ninjas in the room.
Face east and take a standing jump to the floor, keeping to the right to avoid
the darts. Push the floor lever opening a door in the north wall.
Secret #5: If you got Secret #1,
place the Hand of Orion in the wall receptacle. Enter the newly opened door
into a seemingly empty room. Continue through the east wall, it is a false wall
into Secret #5. Pickup the Crossbow, Shotgun ammo
and Uzi ammo from around the room. Reverse roll and
exit the room.
Head through the door in the north
wall. Arm weapons and shoot the ninja. Continue forward and the
level ends.
The End.