~Lara Croft: I AM LEGEND~
A CUSTOM LEVEL ADVENTURE MADE
BY CLARA & MASHA
Authorized walkthrough written
by Selene
(editor’s
note: A second walkthrough, kindly written by Araelfi,
can be found here)
Storyline:
Somehow immune to an unstoppable, incurable virus, Lara is the last
human survivor in
Levels:
Legend Title ~made by Clara~
Manhattan- Sunset ~made by Clara~ (4
Secrets)
Laboratory ~made by Masha~ (No Secrets)
Manhattan- Night ~made by Clara~ (2
Secrets)
Legend Cut ~made by Clara~
As always, please consult the readme prior to
starting the game. It contains information on the process of installation,
required settings, potential bugs/issues and much more. If you have any general
questions about the nature of the game, the readme
can often provide the answer.
~Prologue~
Lara: My name is Lara Croft. I’m a
survivor living in
You are not alone.
MANHATTAN- SUNSET:
Pickups: Small
medipacks, Platform
Code, normal shotgun ammo, DVD, Bunch of Keys, Dilution, Car Key, flares, Garage Key, Fuse, large medipacks, Kiosk Key, crowbar, Cork, shotgun, Station
Key, Pocket Watch + 4 Golden Rose Secrets
Enemies: Mutants, rats
Lara’s
journey begins on the stairs of her
The dog
following you around the streets is Sam. She’s your only friend and those are
rare around here, so don’t shoot at her. She has a way of pushing Lara around,
but isn’t too hard to outrun.
Starting
from your house, go down the stairs and head left along the street. At the
corner of the park (this is the greenish area on your right-hand side,
surrounded by a fence) you might notice a button on the fence. This opens
the black gate next to it, granting you access to the park. You’ll be exploring
the park later in the game, but for now there’s nothing to do there. I’m just
mentioning it so that you’ll remember its location for later.
Keep going
until you reach the very end of the street (with the graffiti on the wall),
then turn left (W). At the far end of the street where the
black van is parked there’s a large blue sign reading Platforms and
Scaffolding LTD. Kick the door open and enter the building.
The gate on
top of the ramp is closed, so we’ll need to find some means of opening it. Left
of the ramp there’s a wooden door, open it and enter the small bathroom. Pick
up the small medipack next to the toilet, leave and
pull up onto the roof of the bathroom.
Turn to
face the entrance and look up on the wall, a little to the right of the door.
It’s a bit dark here so you might want to use a flare or the binoculars, but
you should be able to spot a jump switch high up on the wall. In the dark
corner straight ahead there is a platform. A running jump and grab should work
nicely here. Now turn left and line Lara up across from the jump switch. In
order to grab it you have to position Lara at the approximate centre of the
platform, do a running jump and press Action in mid-air.
The gate on
top of the ramp opens, so run up there and into the office. On the desk in the
left cubicle you’ll find the Platform Code
written on a small piece of paper. The cupboard in the right cubicle contains
some normal shotgun ammo (for Lara to
open the door you have to take one step back from the cupboard and press
Action). There is nothing else of interest in the office, so head back down
the ramp and leave the building the same way you came in.
Back in the
streets keep going E past the park. You can break the bags laying on the
ground to the left, but they don’t contain anything of interest. The crates
further down the street are apparently of the unbreakable kind. At the junction
look left: there’s a motorbike behind a closed gate and we’re obviously one key
short.
Turn the
right corner of the park and keep going until you reach the red van that is
parked on the left side of the street. Turn left here (E)
and go towards the waterfront, you’ll see two blocks that have plants growing
on them. Climb onto the one furthest away from the street, turn to face the
green building and whip out some firepower to get rid of the balcony railing (and
the window beyond in the same go).
Standjump
with a grab to reach the balcony, pull up and enter the small room. The
bookshelf in the far right corner holds a small
medipack and
you can also pick up a DVD from the
small table over in the left corner. That’s about all you need in this
building, so return to the balcony and drop down to the ground.
Return to
the main street and climb onto the brick wall by the harbour (opposite of
the park). Push the button here to open the gate leading out to the docks (note
that there are two buttons here, so you can open and close the gate from both
sides). The speedboat looks tempting, but it’s also quite useless.
Just past
the docks you’ll find an elevator. Note that you can only use it once, so it
could be a good idea to save the game before trying. The code that you have to
dial on the keypad is written on the note you picked up from Platforms and
Scaffolding LTD, so now’s a good time to look at it if you haven’t already.
The number
you’re looking for is 2012 (a combination that will seem familiar to anyone
with a knack for sci-fi, Armageddon and theories revolving around the end of
the world). Stand in front of the keypad, press Action and select the
following keys: 2-0-1-2 and finally >. If all goes well a message saying
“Access granted” will show on the screen, you’ll see a camera shot of a balcony
with some keys on a table and the elevator will take you up to the top of the
scaffolding.
The
previously seen balcony is located across from the keypad once you’ve reached
the top. Shatter the railing, jump up there and grab the Bunch of Keys from the table. Hop back down to
the elevator and climb onto the scaffolding to the left. Stick to the left wall
of the building and at the end you’ll have to reach the platform on the other
side of the gap. A long running jump with a last-minute-grab is what’s required
here.
Now turn
left and look across the street to find a white building. This is the Washington
Square Metro Station (also known as Station 3). Do
a long running jump with yet another last-minute-grab to reach the roof
of the station. Walk across the roof and you have just found yourself the Golden Rose Secret # 1.
The short
way of getting back down is to simply hang from the edge of the roof and drop
down. This will cost Lara a little bit of health though. The long, but safe way
around it is to go back to the scaffolding and elevator the same way you came.
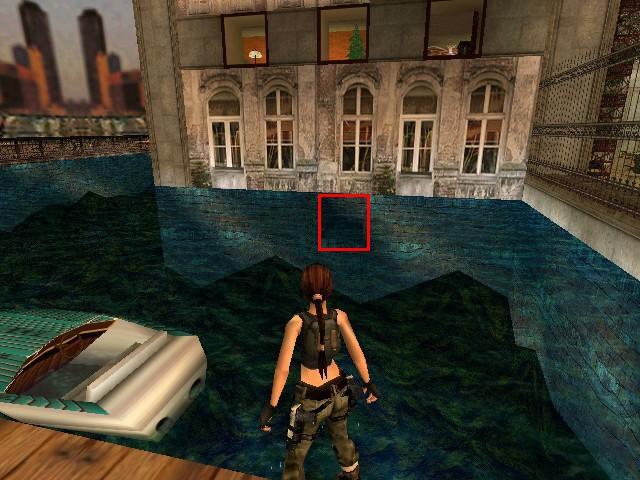
When reaching the elevator, dive into the water and search the wall of the
building with the scaffolding for an underwater door. It’s located
approximately at the middle of the wall and can be a bit difficult to spot, but
it’s a bit darker than the rest and looks slightly different too. See this screenshot
if you’re having trouble locating it.
Take a deep
breath and start swimming along the passage. It’s a bit long, but eventually you
will reach a junction. When you do so, follow the right tunnel first and you’ll
find Golden Rose
Secret # 2. Swim back to the junction, go left this time and lets
the strong currents sweep you straight back to the docks.
Back at the
docks climb out of the water, return to the street and keep going N past
At the far
end turn left and you’ll find a small yard with a bench underneath a tree. Left
of this there is a green door and a belonging keyhole. Use the keys you found
before to unlock the door. There’s nothing to be done downstairs, so head up to
the first floor and use the keys again to open the glass door nearby. Walk
around to the left and open the small door, entering a room that has definitely
seen better days.
There’s
little to do in here, just head around the corner and pick up the Dilution from the small table near the cobweb (on
the left-hand side). That was all you came here for, so now you can go back
downstairs and return to Washington Square.
Cross over
to the street where your house is (where you started the level) and
almost adjacent of the white arch there’s an alley with some parked cars (facing
W this alley is located just left of your house). Go to the far
end of said alley and look for a button to push near the left corner. It opens
a nearby gate, letting you through to a new and slightly more sinister part of
the city.
First of
all look at the building on your left. Through the windows you can see a video
store. Follow the building all the way around to the left until you arrive at
the front of said store. A male mannequin is standing in front of the entrance,
which is locked. You’ll also find a button on the fence ahead, opening a gate
which will take you back to the part of the city where your house is.
Place the
DVD you found before on the pedestal near the store entrance to open the front
door. Enter and say hello to the rest of the family of mannequins, before
grabbing the Car Key from the desk in
the back S/E corner.
NOTE: Some people report having seen a cut of a mutant leaving a bathroom
somewhere else in the city. As far as I know, this cutscene
is only triggered if you enter the building that said mutant comes from BEFORE
entering the video store. The order of doing things isn’t set in stone here, so
don’t fret if you don’t see the cutscene with the
mutant. I’ve played this level a couple of times already and have yet to see it
myself. So don’t worry: you haven’t done anything wrong and you will still be
able to finish the game even if you don’t see the mutant.
POSSIBLE BUG NOTE: Be careful with re-entering the video store once
you’ve left it the first time around. I did that once and found that the front
door had closed, leaving Lara trapped in the store. At least make sure you have
an extra savegame at hand if you insist on trying.
After
leaving the store head S/W towards the alley you came from when entering
this part of the city and pass the broken bridge W. When you reach the
second set of Christmas decorations hung up across the street to the right,
turn to face it and walk towards the building that has Union Square
written on it (this is the second metro station, by the way). At this
point a cutscene starts, showing a stag running
across the street. The poor animal disappears into the darkness of a building
at the far end of the street and Sam, the silly mutt, decides to go chasing
after it. Lara desperately attempts to call him back, but to no avail.
Ok, first
things first. We need to find Sam, although entering that dark and creepy
building is all but tempting. Keep going down the street and at the end of the Union
Square Metro Station turn right and blast away a couple of
crates to find a box of flares. Now go
back a little and turn to face the building where Sam and the stag disappeared (it’s
the building with the long chain hanging in front of it).
NOTE: If you save the game and then reload anywhere near this building before
entering it, you will see a second stag running past you and into the building,
just like the first one did.
It’s extremely
dark in there, so you’ll probably want to light a flare (or a dozen).
When entering start by going to the right down the hallway. You’ll pass an
opening on your left side, it’s a dead end so just
ignore it. At the far end you will find an open gate (note that if you enter
this building before having been to the video store and finding the car key,
this gate will be closed). Go through and left to a small bathroom (this
is the one you would have seen the mutant coming out of if you had entered this
building before going to the video store- of course the door to the bathroom
wouldn’t have been open then, so you’d have to enter this building, then go to
the video store and finally come back here again afterwards. Much
ado about nothing, huh?).
In the
bathroom you’ll find that someone has kindly dropped a Garage Key. Bring it with you and return to
the entrance. You can’t leave now though, we haven’t
even found Sam yet. Go past the entrance and down to the far end of the
hallway. A gruesome sight awaits you down there: the floor is soaked in blood
and someone (or something) has ripped that poor stag’s head straight
off. Yikes!
Of course
we don’t know any better, so we’ll keep exploring the premises. Notice the
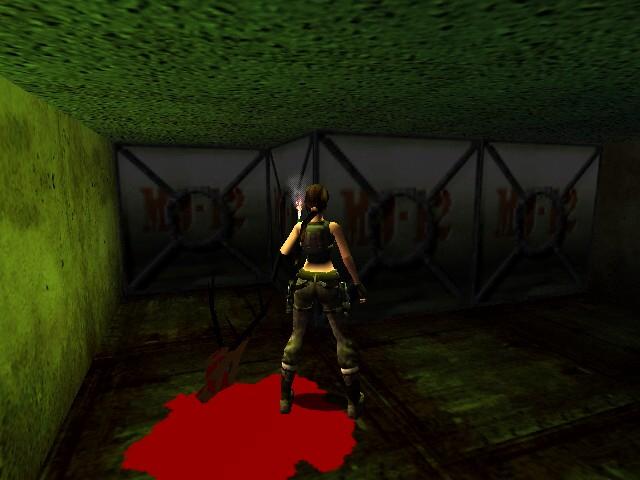
bunch of crates to the right: you need to move these out of the way. Both because you need to reach a hidden passage behind them and
because you most definitely will be in need of a free passage when leaving this
dreaded place. The goal is to move all the crates up against the N
wall, at least so much that you will have a free and unblocked path going from
the open doorway in the S/W corner (said passage will be hidden
behind the blocks when they’re located in their original positions).
It doesn’t
really matter how you move the crates or how many times you move each one, but
one solution could be to finally have them positioned in a somewhat similar
fashion as in this
screenshot. They don’t have to be placed exactly like that; the most
important thing is that they’re not in your way now and that they won’t be
later on either.
Light
another flare if you need to and enter the newly revealed passage. On your way
through the dark passage you will pass by a room on the left-hand side. Oh
dear: that room seems to be home to an army of mutants. They seem to be asleep
or something and so they’ll leave you alone…..for now! Just keep going and at
the end turn left to find a ladder. Climb up until you see a ledge behind Lara,
then backflip. Pick up Golden
Rose Secret # 3 from the floor of the alcove and go back down the
same way.
It’s now
time for you to bravely enter the room with the mutants. There’s a box of much
needed flares immediately to the right
and in the far right corner from where you enter you’ll find a hole in the
floor. Drop down into that hole and grab Golden
Rose Secret # 4.
Light a new
flare if need and climb out of the hole. In the S/E corner you will to
your great surprise find a sleeping Sam. The next part can be a bit of an
adrenaline rush, so make sure to prepare properly. First of all be sure that
you have a flare lit and that it won’t go out straight away. Secondly you’ll
see a yellow item on the floor. Do NOT pick it up yet. Just stand right
by it, facing the room with the mutants. Now, save your game and grab the Fuse. Several things will happen at the same
time. Sam will wake up from her slumber and more notably: so will the mutants- all of them at the exact same time and
they’re obviously not too happy to have someone snivelling human stealing their
belongings.
Time for a hasty retreat. Flare still lit, veer
left and left again at the corner. You’re out of the mutants’ lair, but not their
domain so immediately rush right and make it a left past the crates from
before. Dash down the dark hallway and out through the entrance on the
right-hand side. At this point all the mutants
will have retreated into the shadows again. Phew!
NOTE: When doing this, try not to fret too much about your angry pursuers.
While they are fully capable of killing Lara, all you need to do is to get away
from them. Sprinting, running or jumping doesn’t matter; just make sure you
don’t stop anywhere until you’re out of the building. That’s why we moved the crates
earlier, to prevent them from getting in your way during the escape.
How
wonderful it is to see Sam back out there with you. Don’t go too far away from
the building yet though, we still have some business here. There’s a chain
right outside that you can climb. Backflip onto the balcony and walk right onto a pillar with a plant growing
on it. Directly across the street, right where the hanging decorations
are stuck to the opposite pillar, there’s a well-hidden jump switch. You might
want to use the binoculars or something in order to see it better. Do a running
jump from the pillar with the plant and press Action in mid-air (perhaps
steering Lara a bit left as well so that she comes straight onto the switch).
Pulling it down opens a gate somewhere not too far
away.
Head down the street N and just as you reach the corner turn right to
find the open gate. There’s a keyhole on the wall to the right, use the key you
found in the bathroom to gain access to the Garage.
Inside
the Garage there are two cars suspended upon hydraulic ramps. There’s a
fuse missing from the fuse box on the far wall and you just happen to have
found one of those recently. You’ll also find a switch on the wall next to each
car.
The
one next to the jeep doesn’t seem to have any particular function as far as I
could tell, but the switch on the right wall lowers the hydraulic ramp with the
swanky, pink car. Open the cabinet in the corner next to the entrance, it
contains a large
medipack. Now you can get into the fancy, pink car and
leave the Garage.
BUG NOTE AS MENTIONED IN THE README: Once you have used the switch to
lower the hydraulic ramp in the Garage, you must NOT save the game until
Lara is sitting safely in the car. By reloading the game at this point you run
the risk that the hydraulic ramp will be gone, but the pink car will be
floating in mid-air. Of course it’s of no use to you in that state and the only
solution would be to go back a savegame or two.
By
the time you drive out of the Garage, Sam will be gone again and a whole
flock of stags is running lose in the streets. Drive down along the street
towards the mutants’ lair, turn right and locate the entrance to the Union
Square Metro Station. The gate at the bottom of the stairs is closed, but
naturally this is no problem to a heroine with a car. Drive down the stairs and
Lara will be crashing into the gate at the bottom, forcing it open.
Unfortunately
the crash also causes huge chunks of rocks to fall from the ceiling, blocking
the entrance to the station. If you like you can drive the car back up the
stairs so that it won’t get in your way. Stand facing the centre of the fallen
debris and look up for a crevice. Pull up into the crevice and slide down to
the bottom. Entering was easy enough, getting out is another story. Jump over
the turnstiles and run down the stairs to Station 2.
Search
the platform for a large medipack and some breakable bags containing
a box of flares. While running around
down here you have to be very careful not to drop down onto the train tracks: as you can tell from
the crackling sound and the bluish currents surging through them, the power is
still switched on and the tracks are just as lethal as they appear.
First
of all walk over to the tracks E. Push the button on the wall to the left and a
gate opens across the tracks, leaving you with access to an alcove that has steam leaking out of the
wall.
The
steam can harm Lara, but
thankfully not too much (not if you’re quick about your business, anyways).
Runjump over to the left-hand side of the alcove,
immediately turn around and jump up to grab the monkey swing above. Shimmy ahead and right to get away from the steam. Keep going towards the yellow
gleam on the left wall, right before that there’s an opening on the same side.
Shimmy
in there and drop down onto the safe ground. Follow the passage around to a
wooden door. Push it open and enter the Power Generator Room. Draw guns
and shoot off the panel covering a high-voltage switch on the wall, pulling
this switch you might notice that the crackling sounds stop. Make sure to shoot
away the wooden railing left of the switch too, and gather the remains: flares and a large medipack.
Leave
the room and upon returning to the tracks you will find that they’re now
perfectly safe to walk upon. Climb onto the platform and head over to the W
tracks. To the left there’s a train, to the right an alcove in which you’ll
find the following written on the wall: Track Control Sector E.
There’s
also a wooden railing in front of the alcove, but since the tracks are
currently safe you can hop down and blast away the railing with your trusty
pistols. Pull the lever here and the train moves away, revealing a key that was
hidden underneath it. With that you can safely retrieve the Kiosk Key from the tracks where
the train was formerly located.
After claiming the key keep following the
tracks N. Draw guns as you round the corner to get rid of a rat and continue ahead. Down at the far end you'll
find a lonely train and somewhere along the left wall you should find a
ground-level crawlspace. A grate is preventing you from going through that way.
My recommendation would be for you to save the
game before attempting to break through the grate, as the next part has been
said to cause problems for some players. Position Lara directly in front of the
grate (as close as you can possible get), crouch and draw guns. Shoot
the grate, immediately put the guns away and crawl through at full speed before
she's run over by the aforementioned train.
Pick up the flares and
follow the crawlspace to the end, shoot another grate
and (being careful with the swinging
chains) drop down into the partially flooded room below. A
crate is floating in the water underneath the entrance; you'll have to find a
way of reaching it. Facing into the room turn left and
swim/wade over to the sloping part of the floor. Look up to spot a
sloping walkway near the wall, stand directly underneath the lower part of it
and jump up to grab the edge.
Pull up onto the walkway, turn right and
shatter the crates on the E platform. Runjump
+ grab to reach it, pick up a large medipack and push
the nearby button. This causes a gate high up on the opposite wall to open.
Turn right, walk to the edge, look across the water
and into the right corner to spot the gate you just opened.
Now turn your focus towards the electrical
cable hanging above the water. Don't worry about the electrical currents
surging through the top of the cable, it's harmless and works as well as any
average swinging rope. You need to use it in order to reach the metal walkway
across the water (close to the open gate). The procedure is fairly
simple: runjump-grab-swing and jump off the rope as
Lara reaches the highest peak of the swing.
There's a rat running
loose in the room beyond the open gate, with some luck you can shoot it from
the safety of the walkway. The ceiling is too low for you to jump into the
doorway, so here you'll have to stand at the left corner of the walkway and
simply run forwards through the opening (yes, this is indeed possible).
Push the button to open a hatch behind the fence to your left, leading down
into a flooded room. Walk around the corner, pick up the crowbar lying on the floor and dive through the
open hatch.
Swim down into the flooded room, on the counter
to the right you'll find a
Turn around to find that a gate nearby has
opened. Turn the valve wheel in the alcove and two things happen: the water is
drained from the lower room and the main room is flooded even further. Climb
the ladder down into the room below, pull up onto the counter ahead and pick up
the normal shotgun ammo. Climb back down
and open the cabinet (kind of neat how the water pours out of it when you
open the door), adding the shotgun to
your arsenal of weapons.
It's time to leave this room now, so head back
out to the flooded main room and dive into the water. Before heading for the
exit swim left and climb onto the small platform to obtain some more normal shotgun ammo. Now swim across the room,
climb onto the walkway from before and, standing at the highest point, do a
running jump + grab to the floating crate. Stick to
the right side of the crate and standjump with a grab
towards the crawlspace on the wall just as the chains
swing left.
Pull up and return to the train tracks. Now
that the train is gone you are free to continue E, straight to
There's nothing else of interest in the kiosk,
so leave and run up the stairs E. Jump over the turnstiles and use the
recently found key in the nearby keyhole to open the gate on top of the next
flight of stairs. You're now free to leave the station, but first of all scour
the floor to find a Pocket Watch among some litter.
[NOTE: According to Clara the
pocket watch doesn't actually have a purpose other than being a referral to the
movie adaption from 2007 which this level is based
upon. Neville (the main character in the movie, played by Will Smith)
keeps a watch with him to remind him of the approaching hours of night. In other
words your pocket watch serves as nothing but a visual parallel to the movie].
Head up the stairs and you're back out at
11. WASHINGTON SQUARE- SUNSET:
Pickups: Bowl, small medipacks, Yellow
Key (No
Secrets)
Enemies: None
You start the level just where the
last one ended: in the entryway of your own home and soon enough you’ll notice
that Sam has followed you inside. There’s a staircase leading up to the first
floor, but before going that way let’s have a look around the ground floor.
The first door to the left can be
opened and leads to a small living room. Look to the left as you enter
to see a button next to the window and a detonator on the window sill. Both the
button and the detonator are for later. If you push the button now you’ll find
that it causes the blinds in front of the window to close, but they will roll
back up again straight away. There are buttons like it next to every window in
the house; each button has the purpose of closing the blinds of the window
closest by. We’ll get back to what all this means in due time, so just take a
mental note of it for now.
Directly opposite of the door you
came through there’s a double door with glass panes and a wooden frame. Stand
in front of the door and press Action, Lara will push it open. This is the bathroom.
To the left is a bathtub, a window with a tape player standing on the sill and
another button. To the right you’ll find the shower, complete with a button you
can’t access due to the glass case covering it. For now there’s nothing more to
see in here, I just wanted you to see where the bathroom is as you have some
business to attend to in there at a later stage.
Return to the living room
and go left. Through the open doorway you’ll find the kitchen. Go to the
far end and take notice of another window and a button on the right wall. Pick
up the Bowl from the floor near the
right corner (presumably belonging to Sam) and leave the kitchen
through the open doorway in the S wall.
You’ll come out into a hallway.
There’s a door that can be opened by pushing the button next to it. This door
leads down into the basement, the location of your laboratory. Note that as far
as you have some business to attend to in the apartment you’ll be capable of
going back and forth between the apartment and the lab, but later in the level
the access to the lab will be temporarily closed. You’ll see what I mean by
this when that time comes though. For now it’s good to know that if you enter the
lab and realize you have forgotten something in the apartment, you can come
back up and retrieve it.
Just leave it at that for now
though and turn your focus towards the end of the hallway left. At the far end
there’s a closed gate with a red-framed keyhole behind it. This is for way
later, after the first visit to the lab, so just keep its location in mind. In
the alcove right of the closed gate you can pick up a small medipack from the shelf.
Head E down the hallway and
you’ll come back to the entrance door where you started. That’s basically all
there is to see at the ground floor, so venture up the stairs to the first
floor. The house only consists of those three floors mentioned: the basement (lab),
the ground floor (entrance/living room/bathroom/kitchen/closed gate) and
the first floor (mainly bedrooms and one living room), so there
isn’t as much ground to cover as it might seem at first sight.
Start by going left and at the end
of the hallway straight ahead you’ll see a closed door. It will remain closed,
but there’s another way of accessing the same room that is located behind that
door. Turn left, keep going down the hallway past the wooden railing and turn
right at the end to enter a miniature gym.
Take a quick glance to the left to
see two windows and button, then go on over to the glass case in the right
corner and pull it away, retrieving a small medipack from underneath it. To
the right is the master bedroom. There are two windows here as well, one
on each side of the bed, and one button for each window. The door to the right
is the closed one I mentioned seeing from the other side.
Return to the staircase and this
time go around to the right. At the far end you’ll find an open doorway on the
left-hand side. It leads to the children’s bedroom, currently abandoned.
At the first glance there seems to be nothing here but two windows and a button
over by the bed. Go over to the top left corner and the shelf that has clothes
hanging along the bottom. Crouch and crawl underneath the clothes, but don’t go
too far ahead. In this well-hidden alcove you’ll find a small medipack, but you’ll also end up
inside the fireplace and the flames burning cheerily away at the wooden logs could be a
little too much heat to handle.
Retreat into the previous bedroom
and go back to the hallway and staircase. Time to see what’s
behind that final door to the right of the stairs. This would be the study.
Apparently Lara is certainly keen on studying that glass panel on the wall
ahead. In the right corner is the fireplace connecting this room with the
children’s bedroom through the secret passage.
At the bookshelves W there’s
a button on the left side. For once there are no windows with blinds nearby, so
let’s push it and see what happens. Part of the bookshelf
turns out to be a well-hidden door, revealing a secret passage through the
wall. Climb up there and at the corner turn to face the final wall tile
on the right-hand side (just in the back corner). Stand in front of it
and press Action, you’ll find Lara indicating that
this is indeed a moveable block. Push it in once, which is as far as it goes,
then turn to your immediate left and push a second moveable block all the way
until it comes to a halt (this requires a total of four pushes).
By now Lara should be standing in a
small room with flame emitters embedded into the floor in all four corners. You will also find two
closed gates in the W and S wall and an equally closed door to
the E. There is also a switch high up on the wall in each corner,
directly above the flame emitters. Your task at hand is to find a way of reaching the switches and at the
same time avoid the flame emitters. What to do?
Cross over to the middle of the
floor by timing a run past the first flame emitter. Turn to face the
leftmost moveable block by the N wall and pull it out twice. Now go
around it to the right (being careful with the flames) and face the flame emitter in the N/W
corner. Right behind it there’s another moveable block (located next to the
one you just moved).
Timing a run past the flame emitter, stand as close to the
moveable block as possible and when the flame ceases pull the block out once.
This deactivates the flame emitter, opens the gate next to you (leaving
you access to another moveable block) and makes it possible for you to
climb up onto the block and pull the switch.
Return to the first block you moved
and push it up against the E wall. Carefully wriggle her around the right
corner of the block (try to avoid being toasted) and time a push into
the corner opposite. Vault up onto the block and pull the switch. Drop down and
go back to the second block you moved. Push it back into the corner alcove
where you found it (the flame emitter will remain deactivated).
Now face the block in the W
wall alcove and pull it out once. Go around it to the left and push it once
onto the flame emitter in the corner. The gate in the N wall opens, revealing a final
moveable block. Climb onto the block you just moved and pull the third switch.
It’s time to focus all your
attention on that final block. Pull it out three times, time a run past the flame emitter to the right and go
around to the opposite side of the block. Now finally push it into the last
corner. Climb up, pull the switch and the door in the E
wall opens.
Drop down to the floor and follow
the dark passage through the open door. At the end you’ll find Lara looking out
through the glass panel that she looked up at when first entering the study.
Grab the Yellow Key and return to the fire room. From there follow the passage back to the
study the same way you came before.
There’s nothing more to be done up
here for now, so return downstairs and enter the living room. Go straight
through to the bathroom and go right over to the shower. If you look down on
the floor of the shower you’ll see what looks like a dog’s paw prints. Stand on
top of the paw prints and place the dog’s bowl that you found before on the
floor (either by pressing Ctrl twice or pressing ESC>selecting the
bowl>Enter/Ctrl). The glass case to the right rises, so you’re now free
to push the button. The shower is turned on and water fills the bowl. Pick it
up and return to the entryway.
Go left and press the button on the
right-hand side to open the wooden door (Sam might be running around your
feet, but she’ll disappear once you start the next level). Run down the
stairs to enter the……
11. WASHINGTON SQUARE- LABORATORY:
Pickups: Large medipack, small medipacks, Blood
Test, Powder (former dilution)/Distilled Water/Serum 391/Inactive
Vaccine, Tape, Red Key (No Secrets)
Enemies: None
Keep going down the stairs and
enter the laboratory. Turn to your immediate right at the entrance and climb
the counter for a large medipack. Going to the left there’s also a small medipack on the counter near the
fire extinguisher in the corner.
Head over to the far left corner of
the room and you’ll find a wooden door leading to the test lab. There are eight
cages in here, each housing a rat (some more active than others). On the
floor you have a large square made up by four smaller squares, each with a
number inside. The cages are also numbered (you’ll see the number at the
back wall of each cage) and so are the switches and platforms along the
left and right walls. Finally in the left corner we have a moveable
crate.
What the floor tiles, cages and
platforms/switches all have in common, is that they’re all carrying the same
numbers. Moving the wooden crate onto any of the four numbers on the floor will
raise the platform with the corresponding number. The switch that you will gain
access to by raising the platform underneath it opens the door of the cage with
the corresponding number. Get it?
For example: moving the crate onto
the numbered tile 393 raises the right wall platform with the number 393
written above it. When you pull the switch the door of the cage numbered 393 opens.
This is what you need to do, but with the correct number.
The rats in two of the cages
separate themselves from the lot. The cage with the number I used as an example
(393) holds a rat which seems to be stone cold and dead. This one won’t
be any good for you at all. However, one other rat appears to be a lot calmer
than the rest. This one is in the cage numbered 391.
Move the wooden crate onto the
floor tile that has the number 391 on it. The corresponding platform on the
left wall will rise. Climb up there and pull the switch, opening the door of
cage # 391. Hop back down to the floor and climb up into the open cage (note
that you can’t vault up into the cage, you have to jump up). Crouch down
next to the tranquilized rat and grab the Blood Test.
A panel opens on the wall out in
the lab and since there’s nothing else you need in the test lab, you can return
to the main room.
A blackboard with some formulas
scrawled across the surface has been uncovered as the panel opened, go over and
read what it says.
dilution>centrifuge
= powder
------------------------------
powder + distilled water
= serum 391
-----------------------------
heat up serum 391 + ice
= vaccine???
------------------------------
Ok, now we know what to do next. Or
do we? At least we got some help along the way. First of all we need to find
the centrifuge so that we can make a bit of powder out of that dilution found
earlier. The centrifuge is the machine located just right of the blackboard.
Place the dilution into the machine and it will seem to disappear, but it will
show up in your inventory as Powder.
And now for the
distilled water. Use the key you found in the secret room up in the apartment to unlock
the door in the S wall. Enter the distillery, go right and pick up a small medipack next to the tanks near
the wall. Now go to the far end and place the bowl of water in the empty spot
underneath the large tank of the distillation machine.
Stomp on the bellows (standing
next to them pressing Action) to set the fire blazing. The water in the bowl
starts heating up and distilled water drips into the container at the end. Go
over there and pick up your Distilled Water. Combine it with the powder and you have got yourself
a glass of Serum 391.
Leave the distillery and return to
the lab. Place the serum 391 over the candle flame left of the sink (N).
You get back a dose of Inactive Vaccine and the gate previously keeping
you out of the alcove in the opposite wall opens. Enter and pick up the Tape AND the Red Key. Make sure you grab
both items (you have to press Action twice to get them both).
If you miss out on one of them and
leave the lab, you’ll not be able to come back down for the second item. The
door to the lab will be locked and you will be stuck without any ways of
advancing further, so reloading a previous savegame
is your only option. When picking up these items you hear Sam barking
ferociously upstairs. Run back up the stairs and check what’s going on.
11. WASHINGTON SQUARE- SUNSET:
Pickups: None (No Secrets)
Enemies: None
Press the button to open the door
and go back to the apartment. Night time is approaching fast and we have a few
things we need to do. Return to the entryway and go through the living room to
the bathroom. You’ll find Sam out in the bathroom, growling and barking at the
top of her lungs. It’s finally time to see what all those blinds and buttons
are all about.
Before doing anything else you need
to remember where all those buttons are located, because you’ll not have a lot
of time for finding them again. There are three buttons on the ground floor and
four upstairs. They are found in the following locations:
Ground floor:
Bathroom- 1 button
Living room- 1button
Kitchen- 1 button
Upstairs:
Children’s bedroom- 1 button
Gym- 1 button
Master bedroom- 2 buttons
Now position Lara in front of the
tape player and SAVE THE GAME. The moment she inserts the tape found in the lab
into the player a cutscene starts. Soothing music
fills the room, in stark contrast to what is soon about to happen. Do watch the
cutscene closely, as it will fill you out on the
locations of the buttons near the windows.
11. WASHINGTON
SQUARE- NIGHT:
Pickups: Small medipacks, shotgun (No Secrets)
Enemies: (Mutants)
Lara: Oh no, it’s late. I have to close
the blinds.
Time sure flies. You’ll hear the
angry buzzing of an alarm clock and you’re tossed head-first into one heck of a
race against time. You now have exactly two minutes sharp to run around the
house and press every button mentioned before (and seen in the previous cutscene). That done the blinds will close. If you succeed in closing all the blinds
before the time has run out, the timer stops and you see the gate near the red
keyhole open.
If, however, you fail in pressing
all the buttons before the two minutes have gone by you’ll just about now be
set for taking care of some very unwelcome company. A pretty large flock of mutants will barge through the
backdoor and come looking for you. You’ll have to kill them all. Using the
shotgun is by far the best alternative here, it only
takes about three cartridges to get rid of one of them. If you run out of
cartridges, you can find another shotgun on the shelf next to the now open gate (by the red
keyhole, this is where you found the medipack
earlier).
Once you’re done you can
go around the house picking up some more stash that can come in handy. There’s another small medipack in the alcove next to
the fire place (accessed by crawling under the shelves in the children’s
bedroom) and in the gym you’ll find that the glass case in the corner is
back in place. By moving
it away you can pick up one more small
medipack from underneath it.
Now go back downstairs and approach
the open gate with the red keyhole at the end of the hallway. Pick up the shotgun from the shelves to the
right if you haven’t already. You can now use the key you found in the lab to
open the door at the bottom of the stairs left of the keyhole (see now why I
told you not to forget this key down in the lab?). Head down the stairs
through the open door and the next level loads.
MANHATTAN- NIGHT:
Pickups: Flares, large medipacks, revolver, Old Key, small medipacks, normal shotgun ammo, revolver ammo, Golden Key, Dynamite, torch, Glass Door Key, lasersight + 2 Golden Rose
Secrets
Enemies: Mutants,
mutant dogs
Looks dark and gloomy out there,
doesn’t it? Go forwards past the yellow cab and at the end of this alley look
to the right for some flares and left for a large medipack. Out in the streets turn left and go to the end- back to some familiar grounds.
Head N/E
towards the
Washington Square Metro Station, go past it and continue over to
the house where you found the dilution in the first level. For those who do not
remember it, that’s in the far N/E corner of the streets.
Right by the house there are some
red girders nearby, look up there to find a hanging ladder. Stand in front of
the ladder facing the streets and start jumping straight up and down while
pressing Action. It’s not as easy as it looks, but eventually Lara should grab
hold of the ladder and pull it down. Climb up to the top, turn left and look
for a crevice running along the nearby house to the N.
Do a running jump towards said
crevice and shimmy left until she’s able to pull up. Go left, pick up the large medipack and turn left again. Look across
the courtyard to spot a balcony. Draw guns and clear off the wooden railings
before runjumping over to the white slope at the end.
Shimmy left,
pull up at the end and backflip/roll/grab in order to
reach the aforementioned balcony. Here you’ll find a table holding the revolver and when you pick it up you’re
treated to a camera shot of a van suspended high up in the air by some wire
somewhere in another area.
Getting back down you’ll lose
health no matter what, runjumping
back to the white slope and safety-dropping from there will cost you marginally
less health than dropping down directly from the balcony. Your
call.
Back on the ground make your way to
the park (in case you’ve forgotten it’s the rectangular area with all the
trees surrounded by a fence- just opposite of your house). At the far S/W
corner you’ll find the entrance gate (and the button to open it).
Inside the park there’s a mutant running around with a
whole pack of mutant dogs. Just to have said it: the dogs are immortal and can not be killed. However, they are
fully capable of hurting and killing Lara. They won’t leave the park though.
Your best bet is to just try to avoid them in every way possible and keep the
damage to a minimum.
As for the mutant, you have to kill it.
This can easily be done by simply using the pistols, but remember to keep
moving around a bit to avoid the dogs at the same time. Once the mutant falls it drops the Old Key, grab it quickly and
get out of the park as fast as Lara’s legs can carry her. Just beware that if
the mutant drops dead on top of a slope or something similar, this can make it
difficult at best (and in worst-case scenario: impossible) to get a hold
of the key. Keep that at the back of your head and remember to save the game
before entering the park, just to make sure.
Once you have the key head E
down the street and right before the end turn left towards the alley with the
locked gate, you are now able to open the gate thanks to the key left behind by
the mutant. Start up the stairs ahead, but turn left and just past the first
block with the plant growing on top there’s a small medipack for you to pick up. Go
up to the top of the stairs and jump over the fence on the right-hand side.
Inside this small garden you’ll find some normal shotgun ammo.
Now return to the motorbike and hop
on. There are two ways for you to go from here. I will list both options and
you can have your pick. The first one is the path intended by the level
builders, but the other way works just as well. When you’ve finished either,
simply skip down to the paragraph marked with ** to proceed with the
journey.
PATH A:
Ride the bike out onto the streets,
past the park and the house where you live. Keep going past the metro station
to the far end, you should be seeing some yellow and white barriers at the end.
Ram through them and the ground collapses, sending Lara plummeting down into a
dark tunnel (she will probably lose some health in the process).
Get off the bike and look for a large medipack hidden among the bushes
near the red supporting beam on the left-hand side. Return to the bike and ride
through the cobweb-covered opening, keeping an eye out for a ladder on the
right-hand wall. Park the bike there, light a flare and run W down the
tunnel. Just past the red supporter beams look for a switch on the right-hand
side. Pulling it opens a trapdoor right above the ladder where you parked the
bike.
Go back there and climb the ladder
to the top. Head left, pick up the revolver ammo from the floor, shoot the bags for
some normal
shotgun ammo, grab the Golden Key from the nearby shelf and finally look left to find a large medipack underneath the sink. That’s
all you need from here, so climb down and get back on that bike.
Keep going down the tunnel, gun it
up the ramp at the end and smash through the barriers on top. You’re back at a
very familiar part of the city and this time around the mutants have come out to play.
Luckily you have the bike. Ride around the area, making sure you do not stop
until you’re the only living, breathing organism left.
PATH B:
Drive out on the street, past the
park and your house and into the first alley to the right. Leave the bike for a
swift moment in order to push the button that will open the gate. Get back on
that bike and we’re in for some massive fun.
Mutants are running wild in this part of
the city and we’re just about to put a stop to that. Drive around while killing
them off one by one. There are quite a few of them out there, so make sure you
get rid of all. When the motorcycle massacre is over drive
towards the N side harbour and look for some white and yellow barriers
blocking your way to a dark tunnel in the ground.
Drive your bike down there and stop
at the base of the hill. Light a flare if needed and search for a switch on the
left-hand wall, this opens a hatch somewhere nearby. Keep hugging the left wall
until you find a ladder to climb, pull up through the hatch you just opened.
Scour the room for revolver ammo (lying in plain
sight on the floor), normal shotgun ammo (hidden inside one of the
sacks), a Golden Key (on one of the shelves) and a large medipack (on the floor by the
sink, past the shelf).
Climb back down and this time keep
going down the tunnel until you get just past the cobweb-covered opening. Near
the red supporting beam on the right-hand side there’s a large medipack nestled among the
bushes. Return to the bike and we’re ready to go back up to the city. More mutants have appeared by now,
so make sure you deal with all of them before continuing.
** Once the mutants are history
drive past the metro station and over to the closed gate near the S/E
corner. Get off the bike, use the key you found before to unlock the gate and
drive into the small courtyard. There’s a wooden door to the right, carefully
run into it with your bike in order to smash it (do NOT drive
into the building though). Park the bike outside and enter the Mine
Factory (yes, that’s the building you just gained access
to).
There are mines on the floor: some are
active, others are not. You would be wise to stay far away from the active mines, the ones with a gilded
mechanism (or whatever it is) in the centre. First of all turn left and
hop over the active mine to reach the shelves on the left-hand side. Pick up Golden Rose Secret # 5, then sideflip once to the right. The camera pans out to a bird’s
eye view. Hop backwards onto the deactivated mine nearby, turn left, stand at
the approximate centre and jump diagonally to the left to reach another safe
mine.
Make your way back to the entrance
and climb onto the crate on the right-hand side (facing into the
factory). Hop over to the metal grate held up by the forklift and face
the suspended crate. As you might notice there’s a mine on top of the crate, so that’s a
no go. What you need to do here is to perform a standing jump from the edge of
the grate while pressing Action to grab onto the chain suspending the crate.
Climb up, turn right and backflip
onto a safe ledge.
Do a running jump (or a standing
jump and last-minute-grab) from the ledge to the second suspended crate (sticking
to the left-hand side works best and be careful to avoid the moving crane).
Now you have to jump and grab the black grating where the steam is hissing out.
I found that the best way to avoid
the steam as much as possible is
by standing on the rightmost corner and take one step to the left, then doing a
standing jump and grab to the black grating. Quickly climb up to the top and
keep moving right and around the corner. Climb down and press the button in the
alcove.
Walk to the edge of the alcove and
look diagonally right across the room. You’ll notice that a glass door has
opened over by the ledge where you were earlier. The best way of getting back
there is to do a running jump out into thin air, aiming for the grate on top of
the forklift. You might lose a touch of health in the process, but as long as
you avoid the steam (which I would highly recommend that you do) the loss should be
kept to an absolute minimum.
Use the chain to climb back up to
the ledge with the open door. Out on the balcony you’ll find some Dynamite on top of the wooden
boxes. Bring it with you into the factory, drop down onto the forklift grate
and make your way to the entrance via the safe crate next to the doorway.
To the right there’s a mannequin
guarding a closed door on top of the stairs. Place the dynamite inside the rope
trap next to him and you’ll see the black gate from before open up (it’s up
underneath the ceiling of the factory, between the two leaking steam pipes).
Return up there the same way you
did before, but instead of jumping from the crate to grab the black grating
simply do a running jump straight through the open gate. Pick up a torch (there are some
spares as well in case you should lose the first one before you’re done using
it) and go back down to the floor.
Leave the factory and head out
through the open gate back to the city. Go straight ahead and at the end turn
left. Near the building where the mutants’ lair is located there’s a burning
barrel. Use it to light the torch, but be careful not to get so close that Lara
catches fire. Return to the Mine
Factory, stand in front of the dynamite facing the entrance gate and save
your game.
Press Action and Lara will stoop
down to light the fuse of the dynamite with her torch. Now you have to get out
of there FAST, so jump forwards and run into the Mine Factory
before she’s blown to pieces. This is in fact the only place where she’s safe
from the explosion. When silence once again falls over the city it’s safe to go
back outside. The mannequin is long gone and the entry door to the Museum
has been blown apart, meaning that you’re free to enter.
First of all go past the stairs on
the right-hand side and over to the wardrobe at the far end. Pick up a small medipack from underneath the
clothes hangers on the left side, then bring the torch with you up the stairs
and through to the next room. Go left past the pillars with the hieroglyphs on
them and between two pillars at the far back you’ll find a wooden hatch on the
floor to the right.
Stand next in front of it and press
Action. Lara stoops down and sets the wooden hatch on fire. Drop the torch and
hop down into the hole. Pick up Golden Rose Secret # 6, which is the final one in this
game.
NOTE: I’ve heard some people
saying that by saving the game while down there in the hole they were unable to
climb back out. If you insist on saving I’d recommend you to wait until you’ve
climbed back up onto the floor, just in case.
The torch is no longer of use to
you, so just leave it here. Return to the main hall and dive into the pool,
picking up the Glass Door Key from the S/W corner. Climb out of the pool and
head over to the far right corner (S/E). Never mind
the dogs howling out in the garden, there’s no way for them to get into the
building. Climb up the ladder to the left and runjump
over to the suspended ledge left to pick up some revolver ammo, then
return to the main platform with the five blocks.
The block in the middle is not
moveable, but the four surrounding it are. Look closely at the hieroglyphic
inscriptions on each of these four blocks. Now: go and have a look at the floor
tile in each of the four corners of the platform. You do see a pattern, don’t
you? Four corner tiles, four moveable blocks, matching inscriptions. Piece of pie. Move each block onto the corner tile with a
matching inscription.
For each correct move you’re
treated to a camera shot of the closed glass door in the W wall alcove.
Once the fourth block is positioned where it’s supposed to be said glass door
opens. Do a running jump over to the alcove and use the key you found in the
pool to open another glass door at the far side of the main hall.
Runjump back to the platform
with the blocks, climb the corner block to the right and look up at the
ceiling. It’s a very cleverly concealed monkeyswing,
so do a running jump and grab to the part of the ceiling that is slanting down
to the right. Swing straight across the hall and drop down onto a small
platform on the right-hand side. This is the glass door you saw opening
earlier.
Walk through the door, draw guns
and shoot the window covering the alcove across the hallway. Runjump while pressing Action to land inside the alcove and
pick up the lasersight. Once again you’re shown a camera
shot of the suspended jeep. Runjump back to the glass
door alcove and dive into the pool. Climb out and you’re ready to leave the Museum
the way you came in.
Head straight back
towards the burning barrel near the mutants’ lair. On the right-hand side
you will find a rope trap. Look up above it and there’s the suspended jeep for
you. Combine the revolver and lasersight first. Walk
over to the rope trap and place the Blood Test in the centre, then hop
backwards once or twice.
A cutscene
starts and we see a mutant girl stagger out of the lair. She stoops down inside
the rope trap and grabs the Blood Test. When the cutscene
ends draw the revolver and aim for the chain sticking out from underneath the
suspended jeep. Shoot it and the car will drop. The mutant girl is trapped and
hordes of mutants come charging down the alley to your left.
Pickups: Detonator Key, Empty Ice Maker (No Secrets)
Enemies: None
Apparently Lara has managed to
escape with the mutant girl. We find them back in the laboratory: the girl tied
down and Lara needing to figure out what to do with her. Use the button to the
left to open the nearby gate. Enter and pick up the Detonator Key. A cutscene
shows the only detonator we have available: on the sill of the living room
window, just behind the closed blinds.
Oh dear. Mutants are running rampant in
the streets outside your house, probably looking for their missing member. A
gate opened in the S wall, go in there and pick up the Empty Ice Maker. That
done leave the Laboratory through the now open door and head back up the
stairs to the apartment.
BUG NOTE: Do not draw guns when
heading up the stairs to the apartment. If you enter the next level with
weapons drawn you will find Lara pulling out her guns as the new level starts
and she’ll be aiming for some invisible target. This is followed by the game
crashing to the desktop. Keep an extra savegame just
in case.
11. WASHINGTON SQUARE-
NIGHT:
Pickups: Ice Cubes (No Secrets)
Enemies: Mutant
Leave the basement by pushing the
button on top of the stairs and keep your guns ready (personally I prefer
the shotgun here). You’ll probably encounter a mutant running around the house, so just
dispose of it as it appears. Run into the kitchen straight ahead, left into the
living room and right into the bathroom.
Use the ice maker the same way you
did with Sam’s water bowl earlier. Place it on the floor of the shower, press
the button as the panel opens and pick it up. Return to the kitchen and in the
far left corner you’ll find the freezer. Place the ice maker filled with water
inside and wait for a bit. You now have Ice Cubes at your disposal.
Return to the living room and open
the blinds. Use the detonator key to blow up some mutant butt. Unfortunately
it’s not nearly enough, as there are heaps more of them out there and they do
not look happy about what you’ve just done. Leave the living room quickly-
mutants are now pouring into your house through the back door. The door to the
basement is open again, dash down there and enter the laboratory for the final
showdown.
11. WASHINGTON
SQUARE- LABORATORY:
Pickups: Active Vaccine (Ice
Cubes + Inactive Vaccine), grenade gun (No
Secrets)
Enemies: Mutants
Run right through the door to the
mutant girl. The door closes automatically, but with the army of mutants outside clawing and
pounding at the door and windows that’s a meagre comfort. Especially
considering that all the ammo you had stashed away (minus that of the
pistols of course) has mysteriously vanished. Quickly combine the ice cubes
with the inactive vaccine to make (well, duh) the Active Vaccine.
Inject the vaccine into the mutant
girl through the plastic bag hanging next to her. Turn around immediately and
in the far right corner of the room a gate has opened. Enter the alcove, stoop
down and grab the grenade gun (it has the shape of a hand grenade).
This is the only gun you have
available so draw it and position Lara with her back to the small, half-circle
grate/door opposite of the main door where the mutants are going crazy. Launch
a grenade at the mutants, immediately roll and put the grenade gun away.
Now you should be able to crawl
through the grate/door that was blown open. Note that she can’t crawl through
unless you holster the gun. I couldn’t get it to work at first, but eventually
I got through it. Just keep trying until you finally succeed. Follow the long
duct and crawl towards Sam waiting for you at the far end. With this a long
journey comes to an end and safety awaits for you in
the light of the rising sun, beyond the borders of