Barkhang’s Nostalgy
Levels by Drakan (Joel Dauvilliers)
Walkthrough written by the builder, and translated from French to English by
eRIC
Not all ‘ordinary’ pickups are mentioned in this walkthrough.
Level 1
Pick up the book and open it to read
what may be already written.
By the opened door, slide until the bottom of a big cave.
Wait for the end of the camera fly-by and explore the place, pick up flares,
there is few enemies here except for some spiders !
The men near the fire are friendly monks who have escaped from mercenaries.
You will have to find 2 stones so to open the door with the 2 horizontal bars. The
order to find them is not important.
First Stone :
Let’s go for the first one : dive in the big water pool in the North side. Swim
around, you discover an underwater lever located behind a pillar to the North.
Pulling it shows a block that lowers, know that this lever is timed : you have
to swim towards the block in the West, pull up on it and make a running jump to
grab the ledge in the corner, turn and run jump to the next ledge, then a
standing jump to the bigger platform (a running jump is also possible), running
jump to the highest one in the same direction. Then turn to the left to jump on
the ledge along the North wall (aim the angle), standing jump on the next block
then run to jump to the last one before running and jumping where the opening
is, the timing is generous but do not doodle too much on the way nevertheless.
Once in this opening continue your way, kill some nice little beasties,
continue and you arrive to a dead end (if you look up and to the right you can
see an opening). A bit farther in the far right corner where the ground is
slightly higher, Lara can reach/grab a higher ledge if you press both the Jump
and Ctrl keys.
Pull up, you can see the stone but can’t have it now. Notice a different block,
pull it and push it so to make it fall down below. Go down, and push it towards
the opening ; climb on it to get the 1st Stone of Everest.
Come back to the beginning of the level.
2nd Stone :
You probably have seen a closed door (in the West side of the big cave)
requiring a key ; this key isn’t far.
Firstly, go pick up the Waterskin which is on the pile of wood
near the 3 monks sitting by the fire.
Fill the waterskin where there is shallow water just before the big pool, then
push the cart located in the centre of the cave towards an opening in the East
wall. Climb on the cart. While doing so, at the top of your screen a message
appears indicating that Lara has written something in her diary about a new
move when exiting crawlspaces : no need that Lara go down from a crawlspace
backwards (although she can still do that), but just by pressing the Jump key.
Enter the crawlspace then, and go out from it the new way, in the next little
room kill the spiders and save your game.
Position Lara in the angle of the square with the fire, select the waterskin
from your inventory and pour the water from on it (Lara should do the right
move to turn off the fire, look at the trailer to better understand the
position).
After the fire is off, retrieve the Key (what an idea to place a
key in a fire !).
Go out by the wheel shape door which has opened, and go West at the opposite of
the big cave to open the door, not far from the bigger one with the 2
horizontal bars.
You arrive in a big lava room, obviously you will have to do some gym here ! The
camera sequence shows the place where the 2nd Stone is.
Make a running jump to the triangular ledge at lava level. Climb on the block,
then walk on the tight rope ; before arriving at the end of it, jump forward
towards the horizontal pole , press the Ctrl key to perform a nice move , and
grab the rock ; shift to the left , pull up and slide, jump to grab the block
ahead , and pull up on it (phew !).
Go down to the rock below slightly to the right to read a new indication
written in the book then jump to the climbable pillar with vines (or jump to
the pillar to the right, shift right around the corner, pull up, make a jump
with a roll and grab the climbable pillar with vines).
Climb to the top, and Lara grabs the ceiling, follow the vines of the ceiling
to monkey swing around the pillar. Let drop when Lara has her nose against the
next pillar.
From the block where Lara has landed, face South and jump to the horizontal
pole, grab the block ahead, climb on the block and jump to other horizontal
poles ahead, while keeping Ctrl key pressed : Lara goes from pole to pole and
grabs the pillar at the end. Climb a bit and shift around the corner to the
right near the waterfall, you will find a medipack (1er secret).
From this place you can see the 2nd secret on a block , but not easy to go for it, Lara has to
jump again towards the last horizontal pole then slightly to the right on the
pillar, and from there jump towards the 2nd secret.
Come back on the previous block and from there jump to the horizontal pole so
to grab the wall.
This time, shift left around the corner and climb until the ceiling, Lara grabs
it and monkey swing along the waterfall of lava until a wall where she can let
drop and grab.
Turn around the corner to the left and go down 2 clicks from the ceiling, then
jump backwards with a roll to grab a horizontal pole (Ctrl key pressed) then
grab the wall ahead.
Climb a bit and enter to take the 2nd Stone of Everest.
With her back towards the opening, jump backwards and grab, go down to the max,
then let drop, when Lara hits the slope, press the Jump key so to grab a
climbable block with vines, pull up on it and slide, jump to the block in the
corner, slide and jump to grab the horizontal pole, then the pillar ahead,
shift around then go down (Lara needs to have her feet in the water) and press
the Jump key.
Lara is now on a block at water level, and has to make a running jump to grab
the top of the block in the North direction, then shift to the right to the
maximum, pull up, slide and jump with a curve to the right to the exit.
And voila : the gym session is ended for the moment !
Exit and go place the 2 Stones of Everest in their receptacles, both bars of
the door slide and the door opens, enter and pull the lever at the end : At
last, Lara can reach the heights of this cave, as a block is raised.
After the 2 stones : going up in the big cave
Climb on that block and jump towards the blocks North to grab a crack, shift
right and pull up, jump to the higher block above the crack. Pick up flares. Make
a standing jump North where a lower block is along the wall, then jump ahead to
the higher ledge in the corner.
Turn to the right. Again you are in for some gym session : Standing jump to the
horizontal pole towards the slanted block, aim Lara slightly to the right so
that Lara can grab the next horizontal pole then grab a block, pull up and jump
to the rope.
At this point, 2 ways to proceed :
Depending on the fact you want all secrets or not.
With secrets : swing and jump ahead to land on the slanted block ; when you slide,
jump again to grab an invisible crack (if you miss it, spikes will pierce your
bottom) shift left and pull up.
Jump into the opening above, to get the 3rd secret.
For the 4th secret, from the opening of the 3rd secret, jump to the right and
with a curve to grab a pillar with vines in the corner. Climb it, pull up, make
a roll and jump to the block ahead for the 4th secret.
Come back on the previous block and look North and down to see railings on a
flat ledge. Check that Lara has full health before making a running jump beyond
these railings, Lara lands where she should have landed if she had used the
rope directly without going for the secrets.
[ Note : if for some reason, you get the 3rd secret but do not go for the 4th,
from the opening of the 3rd secret, drop just below this opening on a block
which has a flat triangular surface. Make a running jump with a curve towards
the climbable pillar in the corner and pull up. Then turn to the North and make
a running jump to the ledge with the railings. Shift left along the railings
and around the corner, then pull up on the flat ledge ].
Without secret : Turn around 90° to the left with the rope, swing to jump on the ledge
ahead where railings are.
Continuation of the adventure : along the wall East is a crack, grab it and
shift left, at the end climb into a crawlspace and follow the passage, you are
almost at the top.
Jump on the block to the right, then with a running jump and with a slight
curve to the left, grab the pillar ahead coming down from the ceiling, shift
around it to the left and drop on a block. Then turn around : there is 3
breakable tiles, you have to run on them and at the end jump a bit to the left
to grab a block, pull up and jump towards a ledge ahead a bit on the right.
There, a lever which rises a timed trapdoor (look with the binoculars), above
which is a Jump switch that you will have to pull hopefully in time.
Pull the lever, step back and turn , with a curved running jump reach the block
in the South-West corner (aim the angle) ; from there, a running jump for a
series of 3 horizontal poles (try not to turn several times around the poles)
before pulling the Jump switch on the wall.
You fall down on the trapdoor (if it is still up) : quickly jump to the left to
grab the vines of the wall and climb .
If you haven’t succeeded to activate the switch, you can come back by the
passage on your left (if you have succeeded, this passage is closed).
Grab the bars of the ceiling, monkey swing until you are above the ledge beside
the pillar, let drop and enter into the new opening.
Go straightforward (a new message is written in the diary), enter into a crawlspace,
at the end go down.
Run up the slope, avoid the snowballs and kill some little beasties, then to
the passage on the left, pull the lever in an alcove on the left to open the
door, after that climb to come outside at last.
Outside : getting the Snow-bike
Follow the valley until some doggies, continue straightforward and go down into
some icy room, take the medipack. You can hear Lara’s voice saying « Barkhang,
I’m coming ».
Come out, return where you have killed the doggies, take the passage behind the
fir trees, continue (you meet some other doggies), eventually you arrive to an
opening in the ground where you will find the snow-bike locked behind a door.
When coming back outside, immediately go to the right in a passage, there is a
block you need to pull out of the way to reveal a trapdoor. Opens the trapdoor
with your hands, go down and activate the lever which opens the door, enter,
you’ll have to push several blocks (see picture).
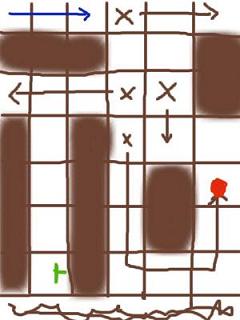
Blue : entrance
Crosses : blocks to push
Red spot : emplacement of the block
Green : lever
You have succeeded, the lever indicated in green in the picture opens the door
for the snow-bike.
Return there, and with the bike drive up the large slope to the 2nd level of
the game.
Level 2
Arrived in the 2nd level with the
snow-bike, drive until a closed door, leave the snow-bike and climb on a
triangular ledge, you have to jump above the low wall (where there is a spot of
blood) without touching it for deadly spikes are concealed on that square. When
you are on the other side, pull the lever to open the door.
Get back to the snow-bike and continue your way driving, you arrive soon in a
large clearing, nothing particular to do here, so continue your way until a
pit, stop just before it, come near the edge of the pit by foot, there is a new
message written in the diary, opens it to see what Lara has written (a turbo is
required to clear this pit with the snow-bike).
First thing to do, go to the other side of the pit by jumping/grabbing the
pillar and go pull the lever near the door , this lowers a block near the first
door that you have just opened earlier.
Come back to the other side of the pit and go down there by the ladder on the
side.
Enter in an opening in a wall and get the Turbo, a wheel shape
door blocks the passage.
So exit and look for a Jump switch high on a pillar, climb on the block near by
and with a standing jump pull it : that opens the wheel/door, go to the opening
and into the newly opened passage to push a movable block outside. Once it has
fallen , push it again at ground level towards the ladders, climb on the block
and jump to the ladder, there is 2 ways to do it , the most direct way by
stepping back and jump to grab the ladder, or by making a back jump on the
slanted block and bounce towards the ladder and grab it.
Before climbing back to the top , shift left on the ladders to the max, then
climb to the top , Lara grabs the ceiling, monkey swing and finally grabs new
ladders around an opening , in which you can enter for the first secret (shotgun) .
Now you can use again the ladder to climb to the top this time (well almost to
the top), and make a back jump.
Place the Turbo on the snow-bike , make a U-turn to drive back to the first
door.
The block which is lowered has revealed a Jump switch. As you pull it, a camera
sequence shows the opening of the door beyond the pit. The lever is timed
though, so you will have to dash while driving, jump above the pit with the
vehicle and go through the door before it closes.
Pull the Jump switch again, climb on the snow-bike and accelerate (Dash Key),
you need to arrive well in line with the head-land so to clear the pit and pass
by the opened door. (Tip : use the Dash key wisely, there is no need to use it
all the time. In the last strait line, the snow-bike needs to be in full speed
to clear the pit, look at the speed bar).
On the other side of the timed door, stop before the first pillars and leave
the snow-bike for a moment. You can jump up and grab the left hand wall, shimmy
and pull up on rather flat ledges. From there, make a jump to the pillar, and
from this one a running jump with a curve to the next pillar with the 2nd secret of the level.
Go down and drive the snow-bike again, continue your way until a place with
other pillars. Lara can jump up and grab the top of a pillar on the left , pull
up then climb the wall with a ladder into an opening, crawl in, at the end of
the passage make a jump to the roof to get the 3rd secret. By the same
way, come back to the snow-bike.
Drive it while avoiding a pit before the entrance of a cave. After the cave
entrance, stop the snow-bike , you may notice a trapdoor on the left. Go
forward carefully towards a pit after the corner. Make a jump towards the South
slope surrounding the pit, slide backwards and grab the edge of the pit. Release
and grab again an opening below. Enter for the 4th secret.
2 ways to climb back :
1) With a lateral jump, grab the side of the pit.
2) Shoot the gate on the other side of the pit, jump towards it, farther a
trapdoor opens on approach, climb back to the snow-bike.
Drive the snow-bike along the right side walls to avoid the pit, then up the
slope to Level 3.
Level 3
Arrived in the 3rd level, continue in
the cave until you reach a large and hot pit.
You can go for the first secret immediately by foot, this secret is located in
the North-East corner of the big pit room, but better stay on the snow-bike and
drive counter clockwise around the pit along the stone way until the North-East
corner and before the last section of the way. There is a ladder on one side of
the pillar North-East, go down to the bottom to a safe ledge ; make a running
jump to another ledge along the wall with the 1st secret of this
level. Return to the previous ledge and climb back to the snow-bike.
To make the jump over the pit with the snow-bike while dashing, it should be
positioned the farthest possible from it , so to have the longest rectilinear
way possible and therefore have the maximum of momentum. Also at the end, when
you make the jump, aim a bit to the right (watch the trailer).
Once inside the tunnel, leave the snow-bike for a moment and retrieve the Crowbar
on a block on the left side, drive again until the end of the tunnel where
another tunnel is on the right and stop there. Leave the snow-bike again,
through an opening go open a door with the crowbar to get the 2nd secret.
Come out, and with the snow-bike drive into the next tunnel, continue until
some machine guns, no use to go too near of them. Climb on a block on the right
where some flares are, and look up for a trapdoor, position Lara under it, jump
up and Lara opens the trapdoor. Position Lara North on the left side of the
block and climb the ladder. Then go down in a cave, kill spiders and a baddy,
there is another baddy behind the waterfall. There also, some monks who are
prisoners are standing still. Behind a gate is a lever.
Go towards the left side of the waterfall and look for an opening, light a
torch to better see it.
Enter the opening then crawl in the passage and a bit farther you will find the
Revolver. A camera shows the opening of the gate in the cave with
the waterfall, return there to pull the lever, this blows out the machine guns.
It also opens the gate where the monks were prisoners.
Go south to a wheel/door, pull the lever near by to open it.
Back to the snow-bike, continue until a ramp and a new pit, stop just before
it, go down and to the left you can go retrieve the 3rd secret.
Climb again on the snow-bike. To clear the pit you need to drive enough
distance before making the jump so to have enough momentum. And you need to aim
the right side of the ramp, otherwise you would fall down in the water.
After this jump, stop again, and look for the Laser-sight in a
dark alcove on the right side.
Climb again on the snow-bike and drive until the exit of this cave.
There are 3 baddies around a lake, and 2 doors ahead protected by some machine
guns. You can kill one of the baddies with the snow-bike on the left. You can
also leave the snow-bike and kill the baddies.
When the baddies have bitten the dust, dive in the lake on the right side and
to the North, you will see 2 gates, one of which Lara can open with her little
hands, opens it and pull the UW lever, this opens the other gate nearby, swim
there, get some ammos after this gate. Swim up and get out of water North. Beware
to crawl or walk slowly (otherwise the machine guns would detect you) until the
end of the way. Combine the revolver and the laser-sight and aim the back of
the machine guns (the red part) to blow them out.
The way is clear now to go towards the 2 levers on each side of the double
doors. Before going through the doors after pulling both levers, dive to find
the 4th secret through an UW gate which has also opened.
Swim back, and now you can go through the double doors towards the 4th level
(the monastery).
Levels 4, 5, 6 (they are linked with each
other)
Level 4
Arrived at the monastery, take down the
baddies and explore the place, under some ice you may see a Jewel, and in the
end, near a cart, is a keylock; we shall come back for those later in the game.
For the moment, you need to find a way to enter the monastery, and everything
is closed there.
At the left side of some grated gate with smoke, a ladder is hidden behind fir
trees. Climb it, shift to the right, then up and enter into an opening. After a
short crawlspace, go forward and you can deduce that you have to go to the
pillar ahead, jump to the snowy wall to the left with a running jump, then
shift to the right until the pillar, and let drop. Go your way along the
windows of the monastery, the windows are not breakable, well the first ones
aren’t. But yes the last one is, shoot it and enter into the monastery.
You can see a lever high up on a wall, that can’t be reached for the moment.
Opens the door to the next room , there is a closed door and some ammo in a
corner , climb on the green table and jump to open the trapdoor, climb to the
upper level and up there follow the corridor until a closed wooden door beyond
a block. Spot an opening high up on the left side of the corridor ; climb on
the block and jump into the opening (NOTE : for realism sake, you will not be
able to save your game in the next section with moving spiked walls)
As soon as you enter, beware ! A spiked wall is triggered, you need to hurry to
go through this room and jump in the opening ahead (avoid sliding on the
slanted opening otherwise you’re dead, you better then have to jump near the
opening so to avoid sliding), in the next room, do the same : run ahead fast,
and eventually a gate closes behind you.
Arrived on the other side, you can see a lever behind the gate and a crowbar.
In this new corridor, go through an opening in the right hand wall for another
series of runs. Do the same as before, running fast and avoiding 2 other moving
spiked walls (When it is done, you can quietly trace back your steps to pick up
a medipack). Then, go quietly at the other end of the room to pull the lever
(this extends a block below the lever seen earlier in the small library) and
take the Crowbar (you may have it already in your inventory if
you have found it in level 3) and return at the other end of the room to open
the wooden door with the crowbar.
Go out, a gate closes behind you (NOTE : you now have again the possibility to
save your game).
Back to the small library to activate the lever, this opens the door in the
next room with the green table.
Go there and enter by the newly opened door, take down a baddy. At the end of
the corridor you can notice a keylock, there is also two closed doors on the
sides of that corridor, one big and one small.
Run up the staircases to arrive in a bigger library, kill the baddy and explore
the place.
In a corner on the left is a keylock, go towards the right side where the baddy
was. Pull the book which is sticking out of the central bookshelves along the
South wall (no camera shot shown, know that this opens the bigger door in the
previous corridor). Go now beyond the sofas ; in a corner pick up a big
medipack and pull the Jump switch (camera showing a door opening). Return to
the corridor towards this door and take the Key on the pedestal,
it’s the one to place in the keylock near by.
At this point , there is several choices to proceed , it’s up to you, either
you go open the 2 big doors with that key and continue this way, either you go
see what’s beyond the other door that you have opened with the book.
This walkthrough describes the latter option : so go through this opened door. You
can see a closed door on the left and a ladder on the right, go to the ladder
but it’s useless to climb it yet as you will later face a closed door. Instead
make a roll, and notice a Jump switch high up opposite the ladder, with a
running jump, pull it to open the door ahead.
Go there and run down the staircases, you arrive in a mirrored room with exact
reflection in the floor. On the opposite end of the entrance is an opening but
you can’t go there yet as it is trapped. Look in the mirrored floor in a corner
on the right, you see a Key which is hanging somehow, come to
this square and take the Key. Then run up the staircases to a hall, pull a
lever to open big doors and you are back outside. Go to the right to place the
key in the keylock near the cart, this lowers a block. Pull the lever which
frees the trapped passageway in the mirrored room.
Return inside and enter this passage, run up some staircases. In a wall mirror
you see a Stone of Everest on the pedestal, take it. Look again
carefully in the mirror, you see a passage , you can deduce you can go through
the wall in that spot indicated in the mirror, this ‘walkthrough wall’ is the
way to pick up the first Golden dragon
(Secret 1).
Now you can exit the mirror rooms, this one and the next, run up the
staircases, and return to that corridor to use the key in the keylock to open
the 2 big doors.
The 2 big doors open revealing an immense hall with a gigantic Buddha statue in
the far end. Step forward and a great flyby starts.
As soon as the camera sequence ends, pull out your pistols or the shotgun to
get rid of 2 baddies. Explore around this big room, kill some dogs (Dalmatian
dogs are naughty, lol) and 2 others baddies.
Pick up a big medipack in a pedestal in the centre of the room , then go
towards the Buddha, jump above the railings, pull up, you are at the level of
the Buddha’s feet, go around it and see a lever, which opens the door near by
and below, go there and kill a baddy. A new message is written in the book (‘I
need 8 prayer wheels’). This is the room with the Prayer wheels receptacles.
Exit the room and down the stairs, enter left in a room where a baddy is
waiting for you, take him down and pick up the important Key he
was carrying.
Go use this key (if you haven’t spotted the green keylock, it was to the left
when you have entered in the big Buddha room, so go back upstairs and to the
opposite corner of the big room). An extended block appears when you use the
key , allowing Lara to go higher ; climb on it , then climb higher and retrieve
the 1st Prayer wheel.
Turn around and jump on the pathway beyond the railings, follow the way until
the corner North-East, climb the ladder until the last bar, then jump with a
roll to grab the horizontal pole, and grab a ledge.
Go until the end of the pathway and jump above the railing to the Jump switch
ahead on the pillar, which opens a gate below located in the North wall. Go to
this new room where you have to face some good challenge.
You’ll have to go across this red room from breakable tile to breakable tile,
this isn’t hard, make a running jump to the first one, then a standing jump to
the 2nd and grab it (as long as you don’t walk on it, it does not collapse) ,
pull up on it and make a running jump to the 3rd tile, run immediately on it to
the right for a running jump to the couple of next tiles , turn quickly to the
right, run and jump to the right to a safe block in an alcove (phew !).
(Note : it is also possible to do the whole sequence in one go without grabbing
any breakable tile ; if you choose to do so : after the first running jump,
quickly go forward a bit on the tile, standing jump to the 2nd tile , then
running jump to the 3rd, and the rest is the same).
What remains to be done is to jump on the ledge ahead, and a last standing jump
into a corridor and now you are up for a few stunts on slanted blocks !
Grab the slope on the left , on the right side of it , pull up and jump
backwards on the slope behind , aim Lara to the right , and she should bounce
on two slanted blocks before grabbing a crack. Shift to the left. Pull up and
jump backwards, jump forward and grab another crack. Shift to the right, pull
up and into a crawlspace. Go down and pull the lever (it opens the gate, and
most importantly makes a column rising a bit farther). Continue and go down. Climb
on the column which has risen.
Jump to the horizontal bars and grab the pillar, shift right around the corner,
pull up and jump backwards without grab to land in a corridor. Pick up the Bundle
of Keys laying on the ground and pull the lever at the end (a prayer
wheel appears).
Go down and out, back to the big room to pick up this 2nd prayer wheel.
Now exit the big Buddha room, and return East to the bigger library where you
have been before ; when you enter the library go left, in a corner use the
Bundle of Keys to get the 3rd prayer
wheel (only 5 left to find).
Now that we have this Bundle of Keys, we can go climb the ladder we also saw
earlier (that’s what it was said earlier it was useless to climb it for now).
Exit therefore the library and in the corridor go to the left, then to the
right and climb this ladder until the last bar, make a back jump with a roll to
grab the ladder behind, climb this one also until the last bar and make a
simple jump backwards to land in a passage. Open the door with the Bundle of
Keys. Go around the top of the big Buddha room until the end.
You enter in a corridor (passage to the 5th level)
Level 5
In this short 5th level, your goal is to
raise a kind of big table at the top.
Firstly open the gate on the right with the Stone of Everest you have and pull
out the table, place it in the centre of the room on the different patterned
tile.
Where the table was, is also a lever, pull it to raise the table upper. Now you
have to climb in this iron tube, return towards the entrance of the room and
climb by the opening, go push the table to the end, this lowers a block
revealing a lever ; a gate opens as well. Pull again the table to the centre
and go down again at ground level, go by the lateral corridor, and run up to
arrive where the gate has opened, pull the table until where it has to be (near
the open gate, on the purple tile under the hole in the tube) , climb again in
the iron tube and activate the lever, this rises the table at the upper level. Go
down at ground level.
In a corner (S-W) of this room is a ladder, climb it, at the top Lara grabs the
ceiling. Monkey swing until above the iron tube and drop, go pull the table to
the centre, then to its definitive place : on the different patterned tile on
the North side : this rises a block in the centre. Climb on it and to the room
above to get the 4th prayer
wheel (only 4 left).
Exit this room (we don’t have to come back there anymore) and come back to
level 4.
Level 4 (2nd time) :
Go along the pathway around the immense
Buddha room then down by the ladder, and return to the Buddha room, run to the
small room under the Buddha where you have been before, there is a keylock. Use
the Bundle of Keys to open the trapdoor just behind you, go down. Below is a
corridor with some statues with swords, pass them carefully then go to the
Spiral , which carry you in a frozen passage, proceed to a frozen room under
the ice where you can collect a Jewel of Kathmandu. Come back the
same way by the Spiral, then out of there through the trapdoor.
Before running up the staircases, you can notice the receptacles for the Jewels
of Kathmandu (2 are needed to open the door above them), run up the staircases
and go along the red corridor until the end, then to the right ; there you
discover the poor monks enclosed with their weapons placed along the wall ;
there is a big keylock on the pillar in the middle (Lara has to find a way to
open their prison).
You can exit this room to the large red corridor, if you meet baddies make some
holes in them with bullets. There, open the double doors to arrive at level 6.
Level 6 :
You arrive at a big pool with shallow
water, and naturally you will have to fill it. Go to the other side of the
flaming vase (you can drop below, climb a ladder, and back flip with a roll to
that ledge), from there you can see a ladder on the central pillar.
Make a running jump to the slope in front of that ladder, jump towards the
pillar, grab the ladder and climb to the top, pull the Jump switch to fill the
pool.
A door has been opened in the West but you can’t go through as the current is
too strong. To the North side is a closed gate; we shall firstly find a way to
open it: look behind a pillar East for an underwater lever and pull it : that
gate is opened. Now swim to the right around pillars and to the corner to open
another gate with your hands, swim in the passage, go out of water and pull the
lever in that small room, to drain the pool.
Come back to the open gate and you can pull the block out of the way, you
discover the 5th Prayer wheel (only 3 left to find).
Take it but before going out look up to see an opening to the right above the
small column, you can’t access it now, you have to fill the pool again. Return
therefore to the lever in the small room to pour water again in the pool; then
swim to this opening and pick up a Gem (it will be useful later
to get a secret).
Come out of water and then to double doors you open with your hands; in the
next corridor you have to make your way carefully through some moving blocks.
At the end, jump to the right corner, slide down the slopes.
Some knifes are a hindrance for you; you deduce that you can pass them by
grabbing the ceiling (that is if you could jump to the ceiling).
Look just at the end of the slope, on it there is a lever, do a jump backwards
on the slope, slide a bit and jump to pull the Jump switch: this rises a block
behind a big table. Go to the left, on this block and push the table to make it
falling down. Push it towards the corridor with the big knives. Climb on the
table and grab the ceiling, pass the knives then let drop.
Turn left, you arrive in a room with on one side some big gate protecting a
golden dragon (secret) and on the other side, some other gate with a shining
cube which is in fact water.
Look for a keylock near a ladder and use the Bundle of keys on it, the trapdoor
above the ladder opens, climb and pull the lever which opens a wooden door. Take
a torch and go down, go towards the door that has opened (take the corridor to
the right just after the one with the big knives), leave your torch for a
moment to place the table just under the lighted torch on the wall, take again
your torch to light it, and come back towards the big room. Go right to light
the torches on each side of the big gate: doors open on this side.
Enter in the new room with the cube of water, you can see a Prayer wheel and a
Jewel as well behind a gate.
Go beyond the cube of water, turn and look at it. On this side are small
drawings on it, it’s by this side that Lara can enter inside the mass of water.
Press the Look key to retrieve Lara if needed, and pull the Under-water lever,
the trapdoors above open, swim up. Next swim to pull another U-W lever to the
right, return and continue swimming. Then out of water, go down and slide in a
corridor, then come back to the room with the cube of water and get the 6th Prayer wheel (only two left now) and a Jewel of Kathmandu on
pedestals. Exit this room and the room with the cube of water as well, go right
as now you can climb back to level 4 via a series of blocks in the North-West
corner. At the top go right.
Level 4 : (3rd time)
Go right in the large red corridor, stop
at the next door to place the Gem in its receptacle to open the door. Slide and
you’re back for a short revisit of Level 6. Pick up the 2nd Golden dragon (Secret 2).
To come back, use a couple of blocks and a ladder, at the top jump backwards
with a roll and grab. Use the crowbar to open the next door. After that, don’t
go left towards the moving walls but to the right, and you will soon be back at
level 4.
Level 4:
Back in the large red corridor, return towards the big Buddha room ; when
entering go down the stairs immediately on your right. Place the Jewels of
Kathmandu in their receptacles : the door above opens. Go there, then make your
way up, you are soon facing the Buddha room from above. Go on its head to enter
the small opening in the wall behind the head, enter therein and push a block
outside, it falls down on the ground (remember this block). Return to the head
of the Buddha ; on its hands are 2 keylocks, use your Bundle of Keys on both,
this will open the gate on the ledge where a prayer wheel is waiting for you.
Go get this 7th Prayer wheel (only one left) on the ledge ; then enter by the
opened gate, slide , and get the Golden Key. The gate opens, go
down and use this Key near by in the keylock : a flyby shows a trapdoor
closing.
Before proceeding, go behind the Buddha, the block which has fallen is there,
climb on it and retrieve the 3rd Golden
dragon (Secret 3).
Now go climb where you have retrieved the first prayer wheel (the starting
point is South-East at the green keylock). After the climbing, jump to the
trapdoor, then to the next trapdoors, until the pillar in the corner, climb
near the wicker vase, then jump to the next trapdoor, and a last running jump
to the one where the 8th Prayer
wheel is. Take it and see a Golden dragon on
a hanging platform in the centre of the room. Impossible to go for it, but if
you look in the far left corner of the room, you can perceive a vase inside a
broken pillar, draw revolver with laser-sight and destroy the vase, a rope
appears and you can reach the platform with the dragon; beware though to not
swing too much otherwise you may reach the square with the Spiral and you would
find yourself back on the platform where you found the 1st prayer wheel.
Pick up the 4th Golden dragon (Secret 4) then step on the square with the Spiral to make your
way down.
Now that you have the 8 Prayer wheels, you can place them in their receptacles,
the 2 horizontal bars slide and the door opens, kill the baddy, you see in the
far end a closed door and another small door on one side.
If you have the 4 dragons, place them to open the small door and claim the Chalice.
Come back in the previous room, in a corner is a Jump switch, pull it to open
the last door, enter and take the Key of the prison. A flyby shows the
keylock of the gate where the monks are prisoners: Lara can set them free !
It’s the end, enjoy the final cutscene.