DEEP DOWN BELOW
An aquatic adventure by Codo
Walkthrough by DJ Full (speedrun version)
GENERAL INFO
This level is a totally underwater adventure. Being something completely different from a classic raid, it's all about non-linear pickup hunt. There are also 3 secrets to find in here, and they can be collected in any order as well. However, the place design, shown on this map:
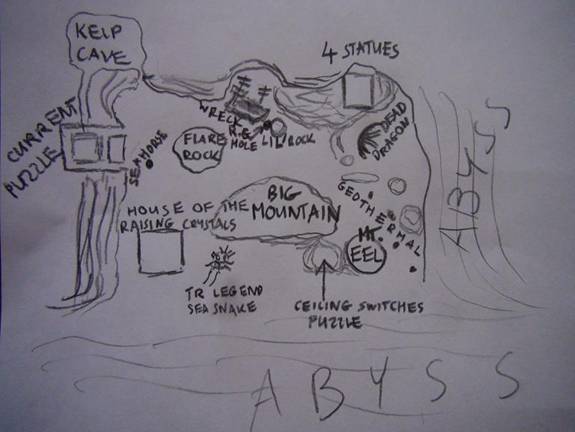
allows you to visit all the places without backtracking. So, if you are in haste, you'd better follow this 8-shaped route:
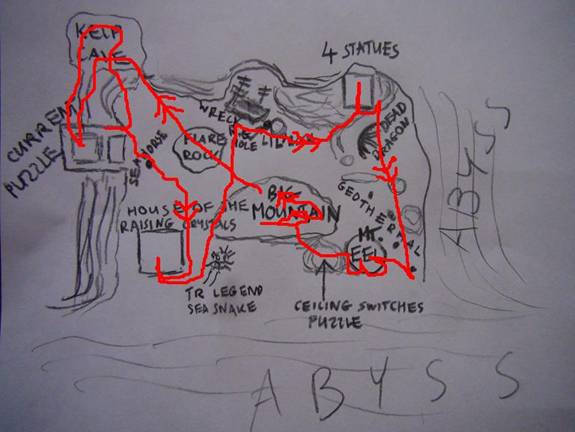
which is a path of my speedrun I've done for the TRForge Advent Calender Contest. If anyone knows a faster way of completing this game - please update the walkthru. Anyway, hop into the water!
INVERTED COMPASS IN THIS GAME. DIRECTIONS ARE THOSE SHOWN.
PICKUP LIST
(WARNING! These below are locations, not chapters! Sometimes it's faster to leave one location and return there later to check its other part.)
Big Mountain 7
Flare Rock 3
Kelp Cave 3
Current Puzzle 1
Seahorse 1
House 4
Wreck 1
Red Gem Hole 1
Cliff/4 Statues Chamber 4
Geothermal 1
Eel Mountain 2
Black Pearl Cave 1
WALKTHRU
THE CENTRAL MOUNTAIN DESCENT
Facing NW, swim down. After several seconds a mountain should emerge. This is probably an underwater volcano, or something similar, and there are 7 pickups in total in here. The 1st one awaits you on the very peak. Grab it and continue down NW, watching out for the coral collision, to find a niche with the 2nd gift. The 3rd present is on the sand, at the mountain base. Leave the volcano for now - you'll be back here in the end.
FLARE ROCK
Go NW inside the Flare Rock. NOTE: flares (Luminescent Crystals) are on the other side of the rock, but they were not included in the speedrun challenge, so the walkthru doesn't tell precisely where they are). Get the 4th gift from the cube near the left wall. Swim out through the hole in the ceiling, and find the 5th package on the NW sand piece. NOTE: There are some more flares not included in the speedrun on your right. Find a murrain and enter the Kelp Cave behind it.
KELP CAVE, CURRENT PUZZLE
Get in. Follow the left wall until you find another passage. The 6th gift is among some kelp. Grab it and swim into the 4 switch room to watch a flyby. You only need to throw the NW and NE lever. This changes the path of the current surrounding you, what pushes the coral off its growing place and shatters the seahorse statue. Get back to the previous cave, follow the left wall again, swim behind the plants in the NW corner and get the 7th gift from there. The 8th one lies in the same cave, in the SW corner. Swim over the kelp (there is a place close to you where You can do it), get outta here and follow the outside wall to find another cave (this one where you've changed the current). Get the 9th gift, go back out and grab the Yellow Gem from the destroyed seahorse statue. From the nearby hole, get 10th pickup from under the fallen coral. No, I'm not mad - this is very tricky, but You WILL succeed after several tries and - if You are doing the speedrun - You'll save more time than by going for this gift before entering the Kelp Cave. TIP: Try to move Cordelia after pressing Action.
HOUSE
Swim out of the hole and find the 11th package near the Flare Rock. Approach the House. Now THIS thing looks like one of Antonio Gaudi's works and when I saw it I REALLY thought Codo is from Spain. Swim around the building and grab the 12th gift from the entrance. Get on the first floor, throw a shellswitch and get some flares. The trapdoor opens and lets you in the "basement". Get in, pick up the 13th gift from the niche on your right and pull the first switch from the instruction below:
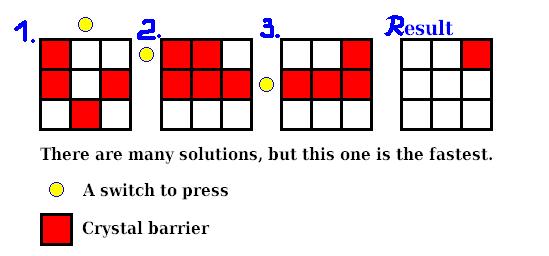
NOTE: There are more solutions of this puzzle, but for a speedrun, this one is a part of the fastest path, allowing You not to backtrack, when You: leave the switches alone for a while, open the door in the closest wall and use the Yellow Gem by swimming over the yellow crystal with holding Action. Reverse roll, throw the remaining switches, enter the passage under the trapdoor behind You, get the 14th pickup and throw two shells (starting from the left one is faster). That finally unlocks SECRET#1 - the White Pearl. Grab it and go back to the 6 switch chamber to open the remaining door and find the 15th gift behind it. Everything is done in the house.
WRECK
Refer to the map to find the wreck. Find the 16th gift by it.
RED GEM HOLE
There is a Red Gem Hole next to you. Swim in for some flares, the 17th box and the Red Gem.
4 STATUES AREA
Get out and follow the cliff, ascending a little bit on your way to the red crystal. Swim over it with holding Action to use the Red Gem. This opens the door and lets you in the chamber. You can see 4 statues here, and the 4 levers to press. Actually, only 1 of them is necessary to be pressed - the one in the corner containing the 18th pickup. So throw this switch and the one below the door to be able to enter the SECRET#2 room. Here, get the Golden Pearl and the 19th gift. Get out and in the upper cave. For some more flares, swim in the niche in the right wall. Find another gift (20) among the poisonous sea thingies looking like plants, but being animals in fact, and I don't know how they are called in English. Descend, find the pillar and the 21st box next to it.
GEOTHERMAL
Get to the dead dragon skeleton and find the Blue Gem. Swim through the rift valley to the very end of the geothermal springs row, behind the last rock, to find the 22st gift by the barrels.
EEL MOUNTAIN
Enter the closest mountain and use the Blue Gem by swimming over the blue crystal and pressing Action. Watch the camera and reverse roll. Swim out and right around the mountain, ascending to find a small cave with the next (23rd) pickup. Reverse roll again, get out and swim right around the mountain again, but this time descending to locate the 24th gift on the rock. Dive deeper.
BLACK PEARL
Refer to this:
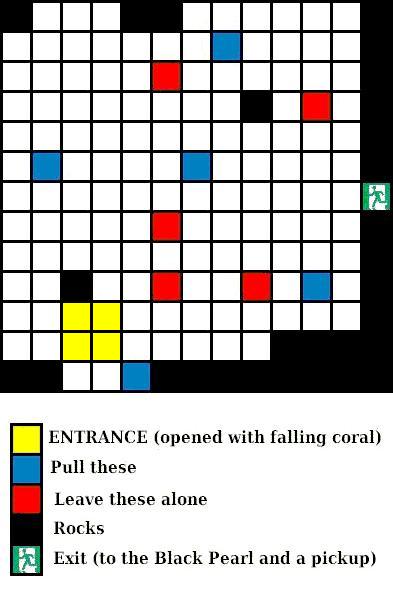
and, behind the open door, find the 25th gift and SECRET#3 - the Black Pearl.
BIG MOUNTAIN ASCENT
Back at the mountain base, get the 26th package from the left of the right cave entrance. Get through the mentioned entrance and follow the right wall to find the 27th box and throw a ceiling switch. That lowers a grate at the other end of the corridor - keep close to the right wall again to find the revealed niche and the 28th gift. Reverse roll, swim forwards a little bit to locate a hole somewhere in the ceiling and get through it to find yourself on the upper "floor". From the niche, get the last (29) pickup.
ENDING
Get back to the Santa and out of the water to finish this unique level.