BACK TO BASICS 2011
Steampunk Level 10: MADNESS IS NOT A SHAME
Level by uranos1
Walkthrough by manarch2
Getting out of the Cell
After a flyby you get control over Lara being in her room, pick up the Flares from the pedestal NW and push the table right
of you once E. Climb on it, turn right and jump up to the chandelier. Get the Crowbar on the other side, drop down and use it
to open the exit door E. The spiderweb disappears when approaching; you enter a
bigger room. Look to the right to see a keyhole that requires a yellow key you
don’t have yet. Turn left and approach the circle door so that it opens. Head
toward the uneven floor and jump between the slopes with curve jumps while
jumping forward, or try a direct jump to the other side. Eventually you reach a
triangular tile you can stand on.
First Timed Run
Progress to a trap gauntlet; you can see a button to the left. It is a timed
one – it opens the door at the far end of this passage. While doing this run,
there are many trapdoors that open and close again – don’t jump in as they take
you back to the start. Also, you have to avoid the fires to the right, you
cannot jump over the tiles while they are active or Lara will die burning.
Activate the switch, jump over the first trapdoor, curve to the right as a
blade endangers you, run and jump over the pipe and the second trapdoor, stay
right because of the fallen debris, then sprint and roll under the next pipe,
timing the roll with the bumper (sprint against the pipe and roll in the moment
the bumper goes down) and jump over the next trapdoor, avoid the swinging
chain. Wait at the next trapdoor, and run on it while it raises, so that Lara
drops a bit but stays on the platform. Time the run-jump under the burner and
the next trapdoor, you will land in front of the next pipe. Jump over the pipe
and the knife (stay as far right as possible) and curve right when you have
passed the burners. Either jump to the door or sprint and roll under it to get
into a new room. ( video
) ( savegame )
Second Timed
Run
Remember the inactive expanding block ahead for later, and find another timed
switch on the left hand wall. Use it, quickly climb the right expanding block
and start climbing the next trapdoors, always trying to jump directly to them,
and when you have to climb a ladder, stay as close left as possible. Try to use
turns as often as possible when you want to jump up to the next block. If you
have time enough you can pick up some Flares
in an alcove. Eventually you can climb up to a platform where you can use a
button, the expanding platform downstairs you saw earlier now gives access to a
button, drop down, at two points you have to drop back and then press Action,
but release it before Lara grabs the ledge to let her fall onto the trapdoor
below. After few health losses you get down to the switch. Don’t use it yet –
use the lever to raise the trapdoors above again, then quickly climb to the
button, use it, turn left, jump back and then up the first trapdoor. Climb up
the same way as if you would want to use the button, but on the button ledge
climb the right ladder, drop left on the ledge, turn right, get backwards to
the wall, run-jump to the opposite ledge, climb up, roll and turn, run-jump to
the ledge above, climb, roll and turn and jump to the next platform, turn
around, climb up and jump up the last trapdoors to eventually reach a safe
ledge. Grab the Little Medikit from the
wall and open the right door with the Crowbar. Remember the ladder that you can
see above the shaft. ( savegame
)
Upside Down
After the flyby run up the wall of the room in the form of a half circle. Run
up and you can open the left door with the Crowbar. Get into the room, you can
see the ladder going up, but actually the floor is the top of the ladder in the
last room (with the trapdoors). Use the switch in the passage to lower a
raising block, the next block cannot be lowered yet as the switch seems to be
too high and wrongly rotated. So return, run back through the half circle, and
climb the long ladder to the top. Jump in the passage and have an odd déjà-vu
effect. Run to the end and use the switch to lower the next block, the next
switch however is again out of reach. So return, climb back down the ladder and
run back up the half circle, get in the passage and use the switch, another
switch out of reach awaits you, so return through the half circle, climb back
up the ladder and use the last switch to open the way. Run through the
corridor, push the container three times, get Crossbow
Ammo from the right wall.
Push the container on an invisible ledge above the deep gap to see a block
appearing in a little cutscene. Jump over the gap, get on the expanded block
and pull the container three times back, climb on it and use the Crowbar to get
Poisoned Crossbow Ammo for SECRET #1.
Get into the teleporter so that you arrive at the top of an airship.
Airship Roof
After the flyby shoot two crows coming
from the left. You can see a fountain with a little pool to your left, when
watching closely a trapdoor can be see in the pool. Get right behind the
teleporter and find Flares, search in
the bushes for an item. Duck to get the Broken Disk
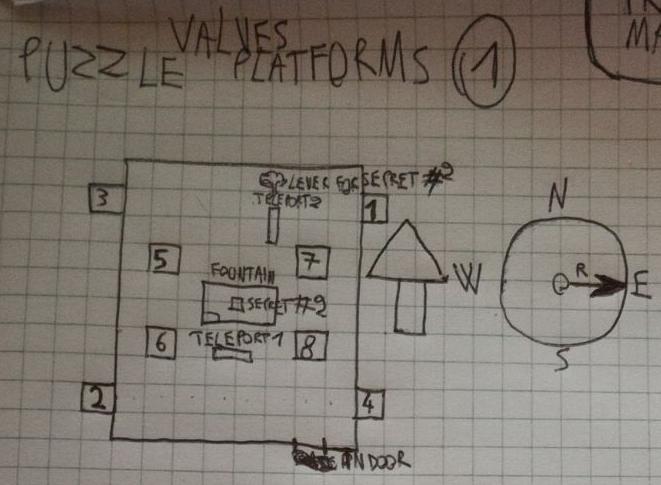
(Smaller Piece) under a bush. Look around the area. Your task is to
get power into all eight vertical pipes. To achieve that, there are eight
valves in this area – four on the lower level behind the pillars in each corner,
four currently unavailable ones on top of the pipe construction. The valves on
the floor turn on the power on the nearby pipes, they also raise the blocks to
reach the upper valves, but they also raise the blocks near the other valve
downstairs. The upper valves lower but raise some other blocks too – both
blocking and helping ones. Your task is: You have to find the correct order for
the lower valves, they all can be used without climbing upstairs. The right
order is: SE – NW – NE – SW. Now you can use the upper valves in this order: NE
– NW – SE – SW. The fountain stops and the pool drains. Get into the drained
pool and open the trapdoor. Get down and find the Broken
Disk (Larger Piece). Combine it with the smaller one to form the Key Disk.
Puzzle Solution by AlexCroft:
Go E and pass
the inactive teleporter (under a bush is a Little
Medikit, duck to get it), go to the tree behind and see a lever.
Behave as if you tried to activate it (press Action in front of it) so that
Lara climbs the tree and breaks a branch off the wall. Get down, pick up the Torch and head to the pool and the central
pedestal with lightning on the top. Light the Torch here and right afterwards
use it to burn the pedestal. After a big explosion you can pick up SECRET #2, the Crossbow,
from the pedestal.
Go to the SW
corner of the airship and place the Key Disk on the receptacle right of the
door to open it.
Main Hall
Go to the right of the stairway, pass a ventilator and find Flares at the far end of the dark passage.
Return, now heading downstairs. See a boulder hanging under the ceiling to the
right, and enter the left pipe stairway. At a certain point the boulder will
start rolling down the pipe, sprint down the ramps, taking two turns (the
boulder is slow at these turns, so you have plenty of time). When you reach a
room with a closed door, stepping in front of it makes life safe again. Open
the door using the Crowbar. Enter the big hall and get welcomed by not less
than six female ninjas. If you stay in
the first area, you will only fight against the first three; when getting into
the middle area two ninjas with swords and another “normal” ninja attack.
Always keep moving, then you won’t have to need much health. After the big
fight get up the S stairs and kill two more “normal” ninjas. Return and find a Little
Medikit directly on the right wall of the N stairs. Get to the SE
stairway and climb in the plant box right of it to find a Key to Sauna. Get up the stairs and use the key
in the right hand keyhole.
Cabins
Enter the new room and go to the left to find a Key to Cabin 13. Turn around
and shoot the snake in the pool. Pushing
the button in this room closes the door; the other button closes the door too,
so that Lara is trapped in the other room. Enter the little chamber and a fire wraith appears; sprint into the pool and the
wraith extinguishes. Get back in the chamber and open the trapdoor, get in the
crawlspace to find the Key to Cabin 6.
Get out, climb the N stairs and search for a yellow keyhole to input the 13
key, get in, there are some breakable tiles, go to the right and find a Little Medikit
on the table. Drop through the tiles, kill a female
ninja and a boar and find
Open the double
door to get back out. Head to the SW corner, open the door to cabin 6 and find Flares on a pedestal in the SW corner. Shoot the
window and the breakable tile in front of the table, then pull the table away
and open the trapdoor. Kill the scarab
and get the Cogwheel it loses after
passing away. Return to the main hall and go and to the middle S door to find
the keyhole for the tool shed, enter the fitting key. Jump over the machine and
climb over the right block. Place the Cogwheel on the receptacle, a wraith appears, climb the box and return to the
exit, run up the S stairs and to the pool room of the sauna. Jump in the pool –
the wraith follows and extinguishes. Get back to the room where you placed the
wheel, dive over the machine and use the left hand valve. The block moves into
the wall but the pool is also drained (you cannot first use the valve and then
extinguish the wraith).
Pull the block
to the NW corner, then to the NE corner behind the exit. Then, pull the table
in this room under the NW crowbar door and open it to get the Connector. Leave this room again to the main
hall. Now go into the far E part, with many tables, and pick up Flares and another Connector
under a table – duck to get it. Go to the NW corner and place a Connector to
raise a SW block. Climb that one, turn right and grab the crevice on the
rightmost point of the block. Shimmy right until you are exactly over the
jumplever, then drop and pull it down. The door under you opens – head through.
Raising Gaps
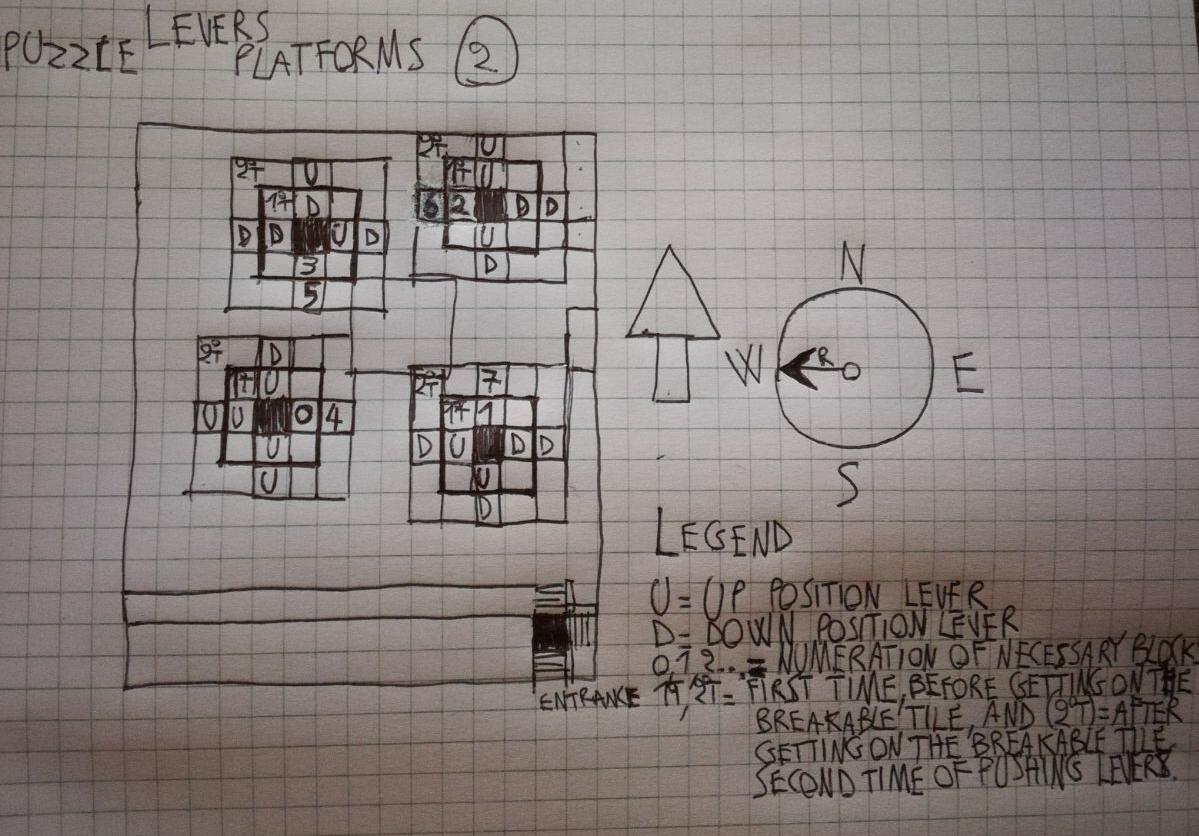
You find yourself in a room with many levers on the corner pillars you cannot
reach yet, as you first need to raise some blocks therefore. All in all, there
are twelve levers on four pillars. First of all, crawl under the right hand
stairway to find some Flares. Get to the
N wall and place the next Connector under the bridge to start the machinery.
The bridge over you changes to an escalator, and the lowest block of the four
raising block towers. Also, the twelve blocks under the levers on the pillars
get out of the wall so that you can pull all of them. The flyby also shows you
your next destination – the top of the hall. What you have to do is to activate
some of the levers on the pillars. All levers that, if you go
counter-clockwise, are the rightmost ones on each of the pillars, raise the gap
in the pillar tower one block higher. The middle ones raise the gap two blocks
higher, and the leftmost ones raise the gap four blocks higher. So – if you
know a bit about binary numbers, you can raise the gaps from one to a total of
seven tiles, as follows (for example, pulling down
the middle switch on any one of the four pillars raises the gap above that
pillar two tiles):
Right - 1
Middle - 2
Right, Middle - 3
Left - 4
Right, Left - 5
Middle, Left – 6
Right, Middle, Left -7
So, now you have to create a path up the tower.
NE column – raise the gap one block – pull the right lever
NW column – raise the gap two blocks – pull the middle lever
SW column – raise the gap three blocks – pull the right and middle levers
SE column – raise the gap four blocks – pull the left lever
Go back to the entrance of this room, up the little stairway, turn right and
climb up to the ledge, turn left and jump to the first NE column. Jump to the
NW gap, to the SW one and then jump on the breakable tile SE. Run to the safe
pillar. You can now jump to the SE corner to see you are stuck. But you can now
return (and climb up again) to the safe pillar in the S, as you can see a
ladder down there. Jump back there and climb down, avoiding steam and rotating
wheels. You now can raise the gaps even higher as you can return to the
pillar’s top.
SW column – raise the gap two blocks to a total of five – reset the middle
lever, pull the left lever
NW column – raise the gap four blocks to a total of six – pull the left lever
NE column – raise the gap six blocks to a total of seven – pull the middle and
left levers
SE column – doesn’t need to be raised as you don’t need it anymore
Climb back up the S ladder, timing the moving cogwheels. There is a shorter and
a longer gap between them, when the longer gap apparently starts. Climb up
losing a very little amount of health and do the same on the next trap,
eventually you reach the top. Turn around, jump to the SW column, then to the
NW, finally to the NE. Look NE and jump to the far left part of the yellow
textured slope – jump again to reach the ladder. Climb up to the leftmost point
of it (don’t let Lara get into the climb motion, as this could cause a bug) and
shimmy left around the corner, then finally climb up to the stairway. Turn
right. You can see a swingpole and the rest of the stairway.
But the
swingpole is a little longer to the right. So jump to the slightly right to the
pole, and swing to the yellow airship cover. Slide down and jump on the
transparent tube with the pipes inside. Walk up and get SECRET #3, a big
Medikit. Turn right and jump again to the far yellow slope and jump
again to the ladder, shimmy left around the corner and get up to the stairway
again. Now jump straight to the swingpole, and swing and jump to the next
stairway.
Puzzle Solution by AlexCroft:
Cockpit
Ignore the button and the door for now, get up right and you arrive in the
cockpit. Use the SE switch to raise a button on top of the airship, climb the
ledge left of the cogwheel, then use it once (no timed run here though), then
head back to the button you recently saw. All the other objects, even the
button and wheel you can use, are useless. Use it to get on top of the airship,
return to the center where a big raising block blocks the way to the pedestal.
Climb it up to the top, use the left hand zip line and look down, you have to
release the zipline so that Lara just falls through the opening circle door.
Lara will fall down through more of these ziplines, and not only the game ends
here.
THE END