Tomb Raider She
A Levelset by Augusto (
Walkthrough by dmdibl (Levels 2,3,4), manarch2 (Levels 1,5,6,7,8) and
Soul (Levels 9,10,11,12,13)
Starting Notes:
-
This is a huge levelset including twelve levels; if
you find all 20 secrets in these levels you will get access to a bonus level.
-
The white needle of the compass shows North.
-
It might happen Lara won’t grab any ledges and the
Ctrl key does not work anymore. In that case simply exit this game completely
and re-start it again, then everything should work again.
-
Thanks much to Scottie for providing a whole lot of
videos for the hardest sequences in this game. We inserted the links at the
respective passages in the walkthrough.
-
As some of the tasks are pretty hard we included
several savegames which should help you out.
-
Used Colours:
- Pickups
- Important Pickups
- Secrets
- Enemies
- Switches
Get directly to…
|
Part I: Ireland |
Part II: Egypt |
Part III:
Senegal |
|
|
|
|
|
1) On the Air |
9) In the Swamp |
|
|
2) The Magician |
6) Henutmire |
|
|
3) Grotto |
11) Kor |
|
|
8) Nile |
12) Eternal Fire |
|
|
|
|
13) Epilogue |
|
|
|
14) Ayesha’s Palace |
Part I: Ireland
Secrets: 0
Top of the Plane
Watch the flyby showing Lara in the Aer Lingus plane; after getting back
control over her open the door in front of you
to get into the toilets. Pick up the Small Medipack
from the floor and also the Plaster
from the cupboard under the first-aid box. Get back
out again and head W through the plane until you see a door S with a valve. Open it and jump SW to the wing, climb
up to the top of the plane at the far right side.
Luggage Room
Run over S to drop on the opposite wing. Now
go to its SW corner, draw your pistols and shoot the far door lock at the
side of the plane to open the door. This will take you some time but
when you aim Lara correctly this is rather easy. Climb back up to the top of
the plane (again from the far right side), head to the square that is directly
over the door and turn backwards to the plane’s edge, then press Backwards and
hold Ctrl until Lara is about to grab the edge. Lara will safely drop into the
room below. [Savegame] Open the blue case in the near right corner to find Horace Holly’s Diary. Open it to read the
first four pages of this diary, then enter the plane’s
main hall again.
To the Parachutes
Go W to enter the cockpit and right of the stairs you can find a Lever on a control panel, which you can
combine with the Plaster. Go to the SE cage and
use this combination standing in front of it facing E to have access to the Parachute Key. Run back through the plane and
place it far E to open the left door. Enter the
newly revealed chamber and see the cutscene of Lara getting down to Earth
again.
The parachute is caught in a tree. Lara goes out a
dark NW passage. Follow left and right to a small room with an overhead
walkway, go straight across and continue angling right until a flyby kicks in
to show a large pool area. Cross the pool to west side, ahead see upper wooden
balconies. Go left (S), climb a pole, back flip onto a
first floor balcony.
Notice an odd carved head on the
wall, turn it (press Ctrl). A screenshot shows a pillar going down in water. To
get down Lara can jump over the railing without health loss. Dive into water at
the west end, swim a little way along a channel and down into a right alcove
where that pillar went down. It is hard to see, but inside left there is a Door
Key on the bottom.
The Way to a Tavern
Continue swimming out and right along the channel. At
the end look under a ledge right for an underwater
ceiling lever, pull it. Get out of the water at a nearby ledge.
Continue forward and left to reach a tavern, John Barleycorn, where a door
opened. Go inside, to the left by a burning lantern, find a block with a pile
of loose arrows. Hop on the block, pick up a Dart.
Upper Walkway
Go back, swim to the big pool area, retrace
Lara's steps by taking the east passageway back to a small room with an
overhead walkway. Don't go back into the red-lit entrance, but run to the right
side and look up. There is a ladder here for the overhead walkway; jump and
pull up. At the middle pick up a Small Medipack, then
go to the end, use your key on a left keyhole. A window opens.
Go through here to come out on a balcony overlooking
the pool. Push a barrel on the left to the south end of the balcony. Hop onto
the barrel, stand in the middle all the way right, angle right and stand jump
to a monkey swing under the eaves. Jump close to the building, so Lara's
shoulder brushes it. Take the monkey swing around the corner, drop onto a far
balcony. Find another curious head, rotate it, and a
door opens below Lara.
The Alchemist
Jump into the pool, pull out
at the south side. Run down a passageway to see where a door to the Alchemist
opened. Go inside, up the stairs left, to a top room. At one end of a table
with colorful glassware there is a pile of what looks like nuggets. Pick up Stardust.
Combine it with the dart to get Magic Wand. Lara
can also push open glass doors to the balcony.
The Magician
Jump down into the pool, swim away from the building,
pull up to the left (W). Enter a dark lit doorway and run up stairs to the
Magician. Look up to see two glowing balls floating in air, one higher than the
other. Jump as if to grab a floating tile with a ball in its center, and pull
up. Look for the second floating ball above, jump and pull up to the tile that
the ball marks. Turn around left to face SW, and make a running jump to a wall
lever.
Use the lever to open the big door, then hang and
drop. Go inside the door that opened, follow the passageway left, come out in a
magical room with dancing objects. In the corners of the room are statues, each
holding a magic wand. Across the room to the east are
ledges. For now Lara can only go to the right back corner (SE) and pull up to a
higher ledge where there are two wall
switches. This is for a timed run.
Timed Run
Scottie has posted an instructive video of this on
YouTube. The idea is that after throwing the switches Lara will be running
diagonally across the room to the NW corner and jumping up on blocks, then
turning around and leaping to the top of the closest pillar, which has a ladder
at its top. To begin, it helps if Lara first lights a flare. Throw either of
the wall switches. Then do a back flip/twist to land in front of the other wall
switch on this ledge, and throw it. Jump down headed toward the diagonally
opposite corner, and when Lara is near the floor throw away the flare (hit
Flare key). She lands ready to run, instead of going into a crouch.
Sprint across to the NW, letting up on the Dash Key in
order to make a leap to the top of the block that rose up. For me it was more
natural to vary from Scottie's video at this point, and jump to next higher
ledge with a twist, so Lara lands on it backwards. Then back flip to the
highest block in the corner. By jumping at a slight angle, Lara lands at the
edges of the blocks. Turn right to face the ladder at the top of the pillar,
make a stand jump/grab to it. Shimmy around to the opposite side, go up to one
block below the ceiling. Shimmy all the way to the left. Back flip/twist with a
hard curve right to land on a floating ring.
Video
[Savegame]
Place Magic Wand
Go right (S), make a right into a room with a statue,
use Ctrl to place the Magic Wand in his hand. Hear a door open at the south end
of the big room. Go out left to the opposite side (N), about where Lara landed
on the ring. Make a running jump (with Ctrl) to the opening in the north wall.
For First Secret
Run down stairs, around a corner, use a wall
switch. The window opens. From there make a standing jump to
the first floating ball, then pull up to the second floating ball as Lara did
before, and jump over to a corner wall lever. Put
it back in the upright position, so that the door below closes.
There is no need to jump back to the ball at this
level. Face right of it and make a standing jump lower down. Jump into the open
window south, go up stairs, drop into the big room.
Note that a block is up in the NW corner, so that Lara won't need to do the
timed run over again. Go out the W doorway, take the passage back to the closed
main door, and find that to the right – hidden when the door was open – is a
hole. Drop down.
Go into a room where Secret #1
chimes. Shoot all barrels for the Shotgun, Uzi
Ammo, Small Medipack, Shotgun Ammo.
A Magic Mirror
Run back to the big room. Use a small NW ledge to climb
up, get onto the highest block, jump to the ladder
atop the pillar. Shimmy around as before, jump to the ring, run over south to
jump into a doorway. Leap into a magic mirror for the level to end. (Note:
Lara will be returning to this level later, which is why there seems to be
unfinished business.)
Level 3 – Grotto –
Begin in a huge room. There is a streaming waterfall
to the NW – look down and see a large medipack behind
the waterfall at a lower level. Make a running jump toward that lower ledge,
pick up a Large Medipack. Use the Ctrl bug
to get down one level (as most already know: jump back as if to grab the edge,
but release Ctrl to miss, immediately press Ctrl again to curve inward and land
on a lower ledge).
How to Get Down
From here there are two choices, to get safely down,
or to go for a secret.
(a) To get safely down. Crawl over a
peak in the floor (E), get into the corner in a crouch. Holding
the crouch key, ease out at the corner as if to hang. Lara will fall,
but there is a glitch (as if she drops into a texture seam), so the effect is
the same as when she drops into a deep waterhole, and is unharmed. You may need
to press Jump for Lara to stand.
Or a Secret
(b) To get a secret. (It may be
that
Floor Lever One
In the west, climb into a crack to get a Small
Medipack. On the other side of this big area, climb
into cracks on the east (SE), find a floor lever to
throw, and a screenshot shows a first stone platform starts an elevator ride up
and down. There are five stone platforms to trigger, so four more to go.
Tightrope Wandering Mine
Also in the SE, Lara can climb up south, and go right
to get on top the small waterfall here. Go through the water to get behind the
waterfall. Then go right to drop through a west hole, make a left along a ledge
to face a tightrope walk. Before crossing continue to the end of this ledge to
pick up a Large Medipack. Come back and
look the situation over. The spiked thing is a floating mine so if it touches Lara it explodes and she
dies. Thus Lara not only has to tightrope walk, but must pause in place, and
time her movements for a safe shift forward.
Second Floor Lever
Get to the other side. Then go left into a corner to
throw a second floor lever, for the next
stone platform in the starting room to start to move. Go to the other end of
the ledge and left.
Piranha Pool
In the passageway, pick up Flares, go
east. Come to a green-lit area with pool containing lovely colored fish, and a
pack of piranha. Near where Lara came out there is
a Large Medipack, but it is initially obscured by a bush,
and easy to walk right past. At a wooden barrier in the south there is a sign
with V, five. Five levers to raise those stone platforms in the
starting big area. But also five plugs to shoot in this room.
Shoot Five Plugs
Go right from the sign, toward a dark corner (SW). The
corner is heavily shadowed, but just out of this shadow to the right spot plug
#1 at eye level. Shoot it with pistols. A beam of light comes out of a
hole.
Go right. If Lara gets to the entrance she has gone
too far. Before the entrance is a mound, and where that begins is a corner, and
around the corner over Lara's head is plug #2. Get
practically on top of the thing, jump up and down, shoot
it.
Go to the opposite side of the pond. Lara stands
facing the entrance across the water, and there is an inside right-angle bend
in the pond to her left. It is hard to see, but there is something about a bush
down in the pond. Make a standing dive into that bush, and Lara will dive into
a hole and down. If she is lucky none, or only one, of the piranha will follow
her. (If too many piranhas follow, try again.) In the cave below swim to the
farthest NE corner, there find a hole to go up, surface, pull out.
A slope is adjacent to the waterhole. First get a Small
Medipack a little beyond. Step back, and put that slope at
Lara's back. Look up at the cave wall ahead. Lara has to back flip as high as
possible, jump forward with pistols blazing, and hit that plug. So get out
pistols and start jumping, hit plug #3.
The next one is much easier. Go out the mouth of the
opening, and turn right, directly north. The plug in the far wall is the right
height to shoot. Walk straight for it to get Lara aligned. Then shoot plug
#4.
Turn around and face directly south. This plug is over
the top of a wooden barrier. Align Lara carefully, then
jump up and down shooting until finally hitting plug #5. Slide
down to the level of the pond. You may want to go to the bars north, to see
another secret for later. Then go south to where the sign is.
Third Lever
Enter the door that opened behind the sign. Get to the
far back corner SE, throw a floor lever, see a third rock platform begin to move. Shoot a green
lizard either here or outside, and get his Small
Medipack.
North Exit – Fourth Lever
Go to the north of the pond, where the wood platform
has gone up higher than it was before. Now it is possible for Lara to pull up
onto it, get on the top block, and make a running jump to the opening north.
Inside go left, continue to a fourth lever, throw it for a screenshot of one more rock platform
beginning to move. Only one lever to go.
Fun With Thumpers
So all Lara has to do is get past the thumpers on the
ledges ahead. The first wooden platform is free. The rest can be frustrating until
you realize a couple of things. Lara doesn't have to pull up in a corner, but
can actually pull up more toward the middle of that platform. That makes the
jump to a next platform easier to set up. And most important, it is only when
Lara has fully stood up on a platform that she is vulnerable to a thumper blow.
So the key is to time it so Lara fully stands right
after a thumper has made a down blow.
With Lara hanging from the second platform, try to
sense when a thumper is about to come down, and that is the point when Lara
starts to pull up. This lead to a couple of thumper strikes while Lara gets up
to stand, then she runs. I didn't try any fancy dash by the second thumper, but
had Lara drop back to hang from that platform. Then getting by all of the
thumpers follows the same technique. Once past the last thumper, Lara jumps
ahead to a slope on the left side.
Fifth Lever and a Choice
Slide down. Throw the last of those five floor
levers. Get a screenshot of all five stone platforms moving
up and down. [Savegame] Lara can
now get a secret (for the secret go to next paragraph), but if she wants to
exit she climbs the pole. Ignore the first set of slopes Lara comes to, keep climbing all the way to the top. Back flip off the
pole high, with Lara facing north. If you go all the way up to the top of the
pole, you will see one direction with a higher ceiling, a clue which direction
to jump. Slide down back to the huge starting room, where Lara comes out east
by the first floor lever. (Skip over secret.)
Detour For a Secret
If Lara wants the secret after getting past the
thumpers she must be at nearly full health (over 90% health). Be sure to throw
the fifth floor lever, as this gives Lara options. Then turn back toward the
thumper pit, and stand jump over the edge of the slope. Turn right and run to
the opposite end of the pit, light a flare, find a crawlspace on the left, go
through it to a dark cave. Advance to a lighter area on the right, where there
is a ladder. Climb to the top for Secret #3 – the Shotgun, 2x
Shotgun Ammo. Now jump over to a ledge under a door to pick up a Large
Medipack, the door opens above it. Pull out to the piranha
pool area. Since Lara has thrown all five floor levers she now has a choice of
how to exit.
(a) She can return to the tightrope,
but since the floating mine is still active she has to get by that. After
crossing the rope go right to the end, then turn left to face the wall, and
jump to pull up there. Go to the back of the waterfall and get out and down
there.
(b) Repeat the thumpers. Or Lara can
climb up on the boxes and make the north jump. Continue to the thumpers and
make those jumps again....you probably wanted to do
that anyway. Make the last jump to a slope, and slide down. Climb the pole.
Ignore the first set of slopes Lara comes to, keep
climbing all the way to the top. Back flip off the pole high, with Lara facing
north. If you go all the way up to the top of the pole, you will see one
direction with a higher ceiling, a clue which direction to jump. Slide down
back to the huge starting room, where Lara comes out east by the first floor
lever.
Rock Platform Elevators
However Lara returns she is now in the starting area.
Go to the elevator stone platform that comes all the way to the ground, and
make an easy jump onto it. Turn south to make a running jump, then top up Lara's health for the jumps to follow. Make
another running jump south. Turn left and prepare for a long jump which
requires a loss of health – must use Ctrl to extend the distance on this one.
Waterfall, Last Elevator
Turn toward the waterfall and make a jump to the final
rock platform. From here turn right, and make an easy jump SE to a corner of a
rock, and get a musical salute for achievement. Jump toward the waterfall, and
then into water. (If you have not gotten a previous difficult secret, and
want to try again, go to next paragraph.*) Go inside a little ways, jump
left for Revolver Ammo. Go further in,
pick up a Large Medipack; Lara will need
it. Jump over a hole to the right. This triggers a rock platform ascending from
deep in the hole, but the platform doesn't come up very far. It is still a
nasty drop down, and Lara has to hang in the hole and drop. The best time to
land is during the millisecond when the rock elevator has peaked and is just
starting down. Ride to the bottom, jump out, cross the
next room. (Skip next paragraph.)
(*Second Chance for Secret
*This may actually be the route that
Traveling Rock Platforms
Go out right. Continue to overlook a floating chateau
and rock platforms that move from side to side. If it is any consolation this
is as hard as it looks. Lara can't simply stand on those moving platforms; she
has to travel with them, running or even sprinting to avoid falling off.
Jump out to the nearest platform when it is heading to the right, run
along with it and make a jump left to a stable platform.
Next Lara wants to jump to a lower platform that moves
quickly from side to side. When Lara lands she will go into a crouch, and
during that delay the platform will move away, and Lara will fall. One can use
the same flare trick as for a previous timed run: throw away a flare as Lara
lands, so she is immediately ready to run.
Wait for the lower rock platform to be moving to the
left, then make a running jump for it, throwing away a
flare as Lara lands. Run with the traveling rock left. When it stops Lara
should be able to make a running jump to the next rock platform ahead. (Two
of the walkthrough writers experienced a problem at this point. The moving rock
platform only traveled about two-thirds of the distance it was supposed to go,
then stopped, leaving Lara stranded out in the middle of nowhere. This is an
impossible situation, but since the level is by
Sharpshooting
Now it looks like Lara has to jump to an elevator rock
platform that is on fire. Not to worry. Face Lara to the SE and step leftward.
Look through binoculars and spot an object to
shoot, underneath the floating island. There is a prominent downward protruding
light-colored rock SE, and the object to shoot is hanging by a chain just to
the left of it. Carefully position Lara, draw pistols, and jump up and down a
couple of times firing. Nothing will appear to happen, there is no screenshot,
so be sure to glance to the left to see if the fire has already gone out on the
next rock platform. [Savegame]
Shoot a Window
With the fire out, make a running jump when the
elevator rock is still coming down, in order to land when it is at its lowest
point. Ride this rock up to its highest point with Lara facing SE again. Get
out the Shotgun and save the game. There is a highlighted window at the top of
the chateau, the window closest to Lara. Once Lara is properly aiming for it,
tilt backwards and fire with the Shotgun. It only took a couple attempts to hit
the window, but if you miss reload the game in order not to waste ammunition.
Some players found it easier to shoot the window while standing in front of the
chateau.
The Floating Chateau
Now make a running jump to the chateau island when the
elevator rock platform is descending from its peak. After landing Lara can go
left of the chateau to pick up a Large Medipack, and
to the back for Shotgun Ammo. Go to the front
of the chateau where a skeleton has a Shotgun and Shotgun
Ammo.
Swing Pole Challenge
Near here go to the lowest hanging fire
brazier, which is supported by a swing pole. Position Lara
facing the chateau, where she can make a standing jump to grab this swing pole.
Swing around it while the load bar fills. These swing poles are a bit different,
and problematic. Lara has to release the bar (let go of Ctrl) just after the
lowest point of her swing. If done correctly Lara will leap forward and grab
the next bar (press Ctrl).
On the second bar press the Left Arrow Key to make
Lara gradually move to the left, one square over to align with the platform
ahead. Leap to the corner platform. Now turn left (N). Make a running jump/grab
to the next swing pole, and from there leap to the platform in the far corner.
Once there, turn left.
Even Better
Remember what a long time it took for Lara to travel
left on that one pole? Well, now Lara has to travel right on the next pole. And
to make things interesting there is a traveling fire brazier on that pole, so
Lara has to get right before it comes back to burn her.
Set Lara up for the running jump when the fire brazier
is over at the right end. As it comes back left make a running curved jump
right, as far right as Lara can go and still grab the swing pole while not
getting burned. You sort of have to do this blind. If you can see the fire
brazier coming back left it is probably too late for the jump. Jump when you
anticipate it coming back, so Lara just misses getting burned when grabbing to
its right. Go right with Right Arrow. Lara has to get completely behind the
platform (i.e. don't try making a curved jump). Let the load bar fill most of
the way. Make the jump forward onto the platform.
Roof Jump
From the outer corner of the platform Lara has to jump
NW over the roof. It is easy to back flip, slide, and grab the edge. Shimmy
left, drop to grab the window sill, pull up into the opening. (Those who
haven't been following this walkthrough may have neglected to shoot the window.
In that case you will have to start from scratch, shooting the window, and repeating
the pole jumps.)
Scare Off Wraith
Walk forward in the window opening. There is a
collapsible tile down to the left. Make a running jump to it, then fall to the floor. Get out pistols, fire at a wraith to scare
it off while still in this narrow part of the room. From here see a ladder
ahead, left. A flyby showed you that a Revolver is up on the platform that
ladder leads to. Also use binoculars to spot a Large
Medipack at the opposite end of the room.
Creature With Evil Eyes
Run to the ladder, climb up to about a block from the
top, back flip onto a platform, pick up the Revolver. Lara
has attracted attention, an odd head that tries to
target her with blue energy bolts. Now she wants to keep moving (if she stands
still it will hit her). Drop down the ladder, roll, run S to a similar ladder
on the other side of the room, and similarly climb up and back flip. Get the Lasersight,
combine it with revolver. Don't run to the edge of the platform, as this makes
Lara an easy target, but only go far enough so the laser sight crosshairs will
center on the creature's eyes. Shoot each of the eyes, and the head explodes.
Go down the ladder, go to where the creature exploded,
pick up Destiny Wheel. In
the middle of the room pick up Revolver Ammo, and
go pick up the Large Medipack that Lara spotted
(NE). Now Lara can go to a magic mirror that the creature was guarding, or she
can go for a secret first.
Secret Now Available
For a secret go out the door that opened, and run
around to the back of the chateau, where Lara picked up Shotgun Ammo. The rock
platforms have now been put into motion. Make a running jump to an elevator
rock at the back. Time it so that Lara can make a standing jump to a traveling
rock, but here Lara once again has to run with it toward the chateau, and make
a jump to a ledge. Pull up onto a higher ledge. Go right to pull a lever on a
pillar.
See a screenshot. Instead of one, there are now two elevator
rocks at the front of the chateau. Go there. Make a running jump to the first
elevator rock, then a standing jump to the second. Make a running jump to land
on a rock platform for Secret #4, Revolver
Ammo, Shotgun Ammo. Get back to the
chateau island.
Go back inside the building, to the rear SE corner,
jump into a magic mirror, to be transported back to
Level 2.2 – The Magician
This looks familiar: Lara returns on the opposite side
from the magic mirror she used before. Hop out onto the floating ring. Go left
to the middle, and drop down onto a ledge where a door opened.
Bring the Village Alive
Go out onto the balcony, turn right, and next to the
doorway place the Destiny Wheel. Get an extended flyby. Gears turn, clock hands
begin to work. The village comes alive, people start to move. A guide comes out
of a doorway. See her go to a wall torch, and light it with a cigarette
lighter. The flyby stops, which can be misleading.
Look fast over the edge of the balcony and see the guide in a room down to the
right, lighting a hanging wall lantern.
(This can cause confusion, as usually Lara is supposed
to follow a guide. But if you are fast enough to look, you see the guide
fulfilling her only function. The guide is done. Now it is up to Lara to get her
own torch.)
Go to where the balcony juts out, and make a leap
diagonally right into the water below. Climb out and go to the SE where the
wall lantern is now lit, and the door is open.
A New Way
Go inside and look around this new area; actually
there isn't a lot to do. Climb the ladder.
At the top shoot two guards. Go to
the middle right, outside to shoot another guard, using
pistols from a distance. Where the first two guards were, inside north, find a Shotgun. Go back
outside, in the NE is a Lasersight. Run to the other
side along this wall, in the SE use a wall lever. See a
trapdoor go up, for much later. To get down, fall into the water and get out.
Go into the south doorway.
Statue Courtyard
Ignore the gate on the right (opens from other side). Stop
on reaching a courtyard and shoot two guards from a
distance with pistols. There are several more doorways here; gates to the N are
for a secret. It can be very important to go and look through the secret gate,
to study what is inside. Continue across to the other side (E) and those doors
open automatically, so shoot two more guards from a distance.
One of these guards leaves a Small Medipack.
Dormitory Wing
Go inside east to see a dormitory. To the left (N) is
a Large Medipack. Not much else to do. Open the small door
east, and this time whip out the Shotgun, run forward, shoot the soldier three
times. Light a flare or you may never see it, but he dropped a Door
Key.
Shoot as many of the translucent side panels as Lara
feels like. Get 2x Flares, two Small
Medipacks, a Large Medipack, 3x Revolver
Ammo, a Revolver. In
the space between the two rows of pedestals there is a ceiling hole and a ladder to climb, but if Lara goes up now the way
is blocked. Go back through the dormitory and outside, take a left (S), use the
key to the left of glass doors.
Machine Gun Countermeasures
Run up stairs, shoot a soldier, get his Small Medipack. Save the game.
As Lara opens the door ahead an automatic machine gun starts
firing on her. Take a step outside, turn completely around, and jump up to pull
a jump switch (opens a trapdoor where Lara came from).
Ignore the Revolver Ammo on the walkway for now. Run away and down the stairs.
Outside make a right into the dormitory, continue
east, find the place between the pedestals to jump and grab a ladder in a
ceiling hole, climb up, hang, pull out. This is where
the trapdoor opened. Crawl toward the opening west, keeping to the right side.
Lara needs to crawl most of the way forward to aim. Use Revolver and Lasersight, aim at the little red triangle at the back of
the gas canister on the automatic machine gun. Shoot it, and it explodes.
The way is clear. Lara can just drop out of the
crawlspace with minor health loss, and go back outside and left. Return to
where Lara was, up the stairs to the walkway and pick up the Revolver
Ammo that was left behind. Where the machine gun was, go left, outside, and
follow the upper walkways to the other side of this courtyard.
Moving Statue
Turn the head on the wall, see a statute in the courtyard move forward. It is a
long way to jump, so Lara takes the stairs back down. Dive into the central
waterhole where the statue was, swim south, which takes Lara very near an exit
waterhole. Pull out, run along a dark passage to enter
spacious church grounds, accompanied by nice music.
Needed Crowbar
You may want to look around a bit. The first thing is
to go up the church steps and to the right (E), hop over a little railing.
Beyond the statue turn to the right, spot a jump switch on the
side of a pillar. Make a running jump over the small railing to reach the
switch, grab and pull it.
It may not be clear unless Lara has already done some
exploring, but a trapdoor fell open in the well. Go there and climb down a
ladder, fall into water, pick up Crowbar.
Getting out is something of a puzzle. Lara can't grab the ladder. She can't
really jump to it because the ceiling is too low.
Wade out to either side of the ladder. Move around to
the south, turn to face the ladder. The trick is that Lara can slide on the
slope in the water. Start to slide, or sometimes Lara will stumble onto the
slope. In either case jump to the ladder, grab it, get out of the well.
The Angel's Deep Secret
Go toward the church and left (W), to the end of a
grassy passageway. At the gates, use the Crowbar on the right side. Go through
to face the angels. The one on the left (E) is pushable, and needs to be placed
symmetrical with the other angel, onto a marked tile. So maybe Lara should push
that angel west and south? Take a good look at the texture on the ground where
the angel will go. Better pause here.
This is a nasty situation because it involves a
one-time secret. If Lara doesn't get this secret now then she can never get it.
Let's go take a look at the route to the secret, to prepare for a timed run.
Lara goes east, jog right, and east. Find two gates
that open from this side, so pull them both open. The east gateway returns to
the beginning courtyards. The south gate goes to a passageway beside the church.
Continue straight out east, go right, and then left to return to the courtyard
with a moving statue.
Here the north gates are still shut. Look inside and
see a spinning head that indicates a secret. There is also a texture on the
wall, a very memorable texture, the same one that is used for the pushable
angel. And that is the point.
Now retrace the timed-run route. Go back to the angel:
west, make a right, then a left into the metal gate for the church, continue to
the pushable angel. When Lara pushes this angel onto the texture there will be
the sound of a door opening, a nearby door to the right. But this masks the
sound of the secret gate opening. This is a timed run!
So Lara is supposed to recognize that the secret gate opened
because of the marked texture. She must dash to that secret gate at once,
because the trigger to open it can never be repeated. Get the secret now or
lose it. Better make a couple save games.
Trying Timed Run
Push the angel onto that texture tile, turn east and
make a leaping run, sprint around the corner, make a leaping run, and so on. When the sprint bar goes down always try to be in a position to
start making leaps since Lara travels faster in air than she does on the
ground. After a dozen tries make the timed run.
The left side of the secret gate closes sooner, so expect to slip in at the
right side of the secret gate. [Savegame]
Inside pick up Secret #5, Shotgun, Shotgun
Ammo. Not much of a reward. Anyway, now go back to the pushable angel (you
certainly know the route). Remember that Lara heard a local door open.
Ringing Bells
At the angel go a few steps west and left to find an
open door. Go inside, climb a ladder, pull a NW chain. A
nice flyby shows bells ringing, the main church doors open, and there is a
flyby clue inside, a shot of the next door that Lara wants to open.
Drop down and go out by the angels. Go that way,
around to the steps of the church, mount them, enter
through the main doors.
Interior of Church
Inside there seems to be a lot to do. There are
climbing surfaces on the two ceiling pillars in the middle. There is a ladder
north, but Lara can't reach it. How to start is a real puzzle. Go to the church
doors, and turn the two lanterns on either side of
the door. Look at the north ladder, which is now quite reachable. Climb it to
the upper ledge.
Turn around (S) and make a running jump/grab to the
ladder on the pillar. Pull up, shimmy around to the opposite side, back flip to a platform with a chain. Face
Lara to the NW, pull the chain once. This way you should be able to see the
ground floor door opening in the NW.
Curious Route to a Key
Drop down and go there, into the NW door. Continue
through to a gate, climb onto a block there. Facing the gate, do a running jump/grab to the upper slope. Pull up, back
flip/twist to grab the edge behind, which Lara can pull up to stand on. From
here jump up to either high side block. Now do a running jump
toward the opposite ledge in the east opening, grab it, and pull up higher.
Go west, and pull open the right-side gate there. Do a
running jump/grab to a building across the way. This is above the angels. Lara
wants to jump to the north opening in the wall, but it is too far. So jump to
the left wall slope (W), curving left so that Lara slides back and grabs the
edge. Shimmy all the way right. Pull up, back flip/twist and curve to the left
to land inside the north wall opening.
Open a ceiling trapdoor. Drop down and shoot an excitable
pig. Find a Gate Key close
to the NW corner, near the wall. Go out the door and make a right, use the key
on the right. The west gates open here, so enter.
Tavern and Torch
Go in and right, Lara finds herself outside the tavern
(a bit close to the church). There is a wall lever to the
right of glass doors, use it, but don't go into the tavern yet. Go to the north
here, where there is a shovel, jump up on a ledge to
pick up a Torch. Take the torch into the tavern,
across to the far side and light it at one of the small fires on a hearth.
Now return the way Lara came, back to the church. Run
east past the pushable angel, make a jog right, continue east straight out the
gate. Make a left into the large water area.
Return to Alchemist
For a secret, go left through a tunnel to the original
doorway to this area, go out (where the guide may be running in circles),
follow the left wall into the Alchemist, go up stairs
to the top. On a table with retorts and colored glassware light an oval metal
container at the eastern end of the table. A trapdoor NW falls open.
Drop the torch, and go down the NW hole. Hear the
chime of Secret #6, and shoot every barrel and crate
in sight. Pick up 2x Small Medipack, Flares and Uzi Ammo. Get out
of the hole and retrieve the Torch.
Cannonball Finish
Now retrace Lara's route: downstairs and
out, follow the right wall back to the area the guide opened up, where the
cannon are. Curve around on the right side, go to the
east end of the waterway, at the metal bars. Lara raised a trapdoor in the
water some time ago. (For those who haven't been following this walkthrough,
the wall lever is overhead.) Now use that trapdoor to jump across with the
torch.
On the other side go left to a
cannon and light its fuse with the torch. See a cannonball destroy part of the
east wall near the water channel. To reach that opening and the level end, Lara
can stand on the south side of a mound to pull up onto it. Up on the mound,
jump through the gap, and the level changes.
Level 4 – Talamh Bhrionglóid
Fall into water, swim straight forward east, and pull
up into a grassy place. It seems as though Lara should explore
here, but the main feature of this area is the small rectangular patch SW. This
is completely surrounded by spike traps (barbwire), one section of which pops
up in warning.
Head Downstream
Follow the stream out NE, to where there is a
waterfall drop. Lara can hang and drop, but it is easy to slide and bounce down
the steeply sloped rock on the left (W). Once down shoot an albino
fish with pistols, then get a Shotgun pickup
from under the waterfall. Run downstream and shoot another albino fish – no,
make that two fish.
Look Sharp for Secret
Take a look at the NE bank, at a section near the last
swimming bird. Under the waterline there are broad bluish V-shaped rock
textures—except in one spot. Go closer, and find a trench there. Lara crouches
and crawls in under the bank. She doesn't have any trouble breathing; in fact,
once inside there doesn't even seem to be water. Stand and run to jump into a
waterhole, swim through left, pull out.
Pull up into an opening and go right for the chime of Secret
#7. In front of a leprechaun are Small
Medipack and 3x Uzi
Ammo, behind him are Flares. In a strip of
water find 2x Uzi Ammo.
Huge Verdant Landscape
Go out straight to an opening over the stream, hang
and drop. Follow the stream down to one lower level and then the next. Under
the lower waterfall there is Shotgun Ammo. From here go a
little downstream and then make a left turn (S) going toward another large
waterfall.
Too Well Hidden Trapdoor
Approach the waterfall where it makes an angle. Find a
SE patch of grass growing closest in front of it. Stand facing W in front of
this outer square of grass. Walk forward one tile, and lift up a trapdoor,
which is about as sneaky as it gets.
Dive down into the revealed waterhole. Once Lara gets the vegetation out of her eyes swim south, and
approach a far wall to spot an underwater lever.
Pull it (get an unbreakable screenshot of a metal gate opening), and swim back
for air.
Too Well Hidden Second Lever
Now for the second lever. Face
the waterfall, dive down in the hole and swim south
toward the far wall. At the end make a left turn. Ahead see two thick bunches
of vegetation hanging down from the ceiling. Swim to the center one, go up into the ceiling hole at its top. An underwater lever is
opposite the direction in which Lara is swimming, so turn around and pull
the lever (W), get an unbreakable screenshot of a metal gate opening. (There
are going to be four metal gates.) Dive straight down from the ceiling hole to find Shotgun Ammo. Swim
back for air.
Third Lever
Face the waterfall, dive down in the hole and swim south toward the far wall. At the end make a left
turn. Go past the thick vegetation, continue east, keep going to find a square
opening in the easternmost wall (probably best to ignore the revolver ammo Lara
just swam over), swim through and up, look on the west wall for the next underwater
lever, pull it. See screenshot – too bad they aren't
breakable. Go straight up for air. Remember the barbwire traps, so face south,
and pull out on land.
Return to Jump Switch
This is where the barbwire traps are, so all Lara
wants to do is pull the jump switch on the south
wall, and not go walking anywhere else. Watch a long and scenic flyby to see
what this accomplished in a leprechaun cave. Now return to the waterhole, swim
down, swim into a low opening, retrace the route back a little ways and
slightly left to pick up Revolver Ammo. Continue to go
back to the waterhole at the other end by the waterfall.
To Next Pool
Pull out, go west, downstream
to a drop-off. See a wood bridge and a low pool ahead. Fall down into the water
below, turn around and swim east. Beneath the vegetation on the east wall there
is a fourth and last underwater lever to
pull—get a screenshot of a fourth metal gate opening.
Swim to the other end of this pool, and find on the
left a slope that Lara can pull out onto. Make a standing jump to a ladder W,
climb up, and incidentally find containers for four shamrocks on this wall. Go
right, jump on a triangular grassy slope, then Lara can pull out of the pit.
From where Lara pulls up go diagonally left, soon find a depression in the
ground with a hole that is sealed by loose timbers. Use Revolver and Lasersight
to shoot this wood.
Reward for Lara's Labors
Climb down into the hole. Lara passes through four
open metal gates (yes) and into an underground chamber. On the right there is a
mound topped with lush grass. Jump to the center of this mound and press Ctrl.
Lara should pick up a Shamrock. This is one of
four.
Climb out of this hole, run east toward the waterfall,
then turn diagonally left (NE) and run toward a leprechaun on a toadstool. When
Lara pulled that jump switch this was the cave that was featured in the flyby.
Go past the leprechaun, and look around. Halfway into the cave room on the left
(W) is a chain that was revealed in the flyby. Pull the chain.
A trapdoor opens under a bubbling cauldron. Go there
and drop into a hole into filthy reeking swamp water. Great.
But stand in the center, press Ctrl, and Lara picks up a second Shamrock of
four. These were the easy ones to get.
Go out from here and to the right (W), to a large rock
with an orange lit interior and a gate. Use Ctrl on the gate, Lara opens it
with the crowbar and promptly falls into viscous swamp water. There is no way
for her to get out, so quickly go forward on the left side by the rocks to
where there is steam. Lara should just make it to air before she loses health.
Now turn right to see an opening in rocks there. Lara can jump straight up into
air and come down, to help free her legs from the swamp. Then do a short-takeoff jump to that north
opening. Lara pulls up into it.
Go forward and look to the right to a tricky
leprechaun – use binoculars to study his map, which is upside down. You can see
that Lara has to make a diagonal jump to the left to a high spot in the swamp. Then
forward to another high spot. Then reach the back wall, turn right, and
proceed. At least that is the theory.
Murky Navigation
The first jump really isn't a diagonal jump left. It
is something less than a full 45 degree turn. It's more like a 30 degree jump
from straight ahead (I told you the leprechaun was tricky). If Lara makes a
running jump she should land with a solid thump. The best way to find the
limits of a mound is to sidestep; turn to the side and edge back to where the
mound starts, which is the place from which to begin a running jump. Now aim
for the back N wall. Jump straight up to free Lara's legs. Then make a
short-takeoff jump north. Lara probably lands with swamp over her head, but go
forward one square and Lara is once again on a raised underwater mound.
The map wasn't clear but instead of heading straight
toward the back wall, Lara actually wants to angle a little bit so her target
is one square right. Repeat the procedure to make a short-takeoff jump. Land
near the wall, underwater, but advance and quickly get on a mound again.
At the wall turn right, east. Lara wants to get to the
far corner. This time try to do a full running jump toward that corner. Lara
plunges into swamp, but move forward and she makes the corner before running
out of air. Get a screenshot of a trapdoor, which is back near the gate to this
swamp: the trapdoor will allow Lara to get out of here eventually. In the corner pick up a third Shamrock.
To Get Out
The only way out is to reverse everything. Make a running
jump along the wall to trudge forward and reach a high mound. At the wall turn
left, but aim for a target one square to the right, make a running jump.
Remember to always jump straight up first. This is the hardest mound to find;
if Lara misses the mound is likely on her right. Once on it make a straight
jump to the south to reach a high underwater mound near the door. Lara has to
make a running jump from here to the doorway; it is the only way.
Once at the doorway, make a diagonal running jump left
to that steam vapor by the rocks on the other side – the same marker Lara used
before. From here make a full running jump to land on the trapdoor. Then jump
to the outside. If Lara lands right in front of the doorway she can quickly
pull up and out.
For Last Shamrock
Go right, to the wood bridge over a pool. Head over to
the other side, then go SW toward a keyhole. Lara doesn't have a key, but look
down into a pit below. There are four little islands at the bottom SW, and Lara
wants to reach the one that is farthest away.
I hope there isn't some easy way to do this that I
missed. Lara can't reach the opposite side of the huge pit. If she jumps down
here there is a shimmy ledge on this north side that she can take all the way
to the west end. However, the jumps at the west end fail, as Lara can't reach
or bounce to any safe standing place.
Abysmal Swamp
So Lara must start by reaching the little island SW
that is closest to her. From the edge of the pit jump down on the slopes below
so that Lara slides backwards, hangs, and shimmies left (W) to get opposite
that first island. (Trial and error is needed to figure out Lara's position.)
Pull up, back flip/twist with a right curve to land as close to the ridge of
the island as possible, but on the side that will bounce her west toward the
next island. Make a hard curve left, then sometimes
Lara hits the tip of the second island and bounces forward to the third. She
can stand on this one, so save the game.
Or, sometimes Lara hits the tip of the second island
and bounces backward. If that happens try to keep the back and forth bounces
going until she can hit the slope that will take her to the third island.
Getting there will take a few attempts.
Once Lara is standing on the third island, it still requires
effort to reach the bigger grassy island. Lara stands just past the peak, on
the side toward the bigger island, and makes a running jump down the ridge,
even to getting her toes into water, in order to reach the top.[Savegame]The grass is lush, but stand in the middle to pick up the fourth
and last Shamrock. Don't leave without it.
Long Shimmy Out
Getting out is easy. Start by making a running jump NW
to that other island. Make a stand jump north to grab a shimmy ledge. Shimmy
right. Keep going and going. Eventually Lara will start to go upward, and at
the peak she can pull up and stand (or pull up and immediately roll if there is
trouble getting her stable). Here she can jump upward, grab to pull out of the
pit.
Place Shamrocks
Go forward north to the pool, to the left wall. Drop
down on a stone ledge and place each of the four shamrocks in their containers.
When the fourth one is placed a screenshot shows a trapdoor falling open. This
is over near the leprechaun's cave. Turn right, and use that little triangular
grassy patch to stand on, pull up and out.
Dance Floor
Turn right (NE) and run toward the leprechaun. The open trapdoor is just
at the edge of heavy grass on the side where he is standing. It doesn't do any
harm if Lara falls into the open trapdoor. Take stairs down, and push open
double doors. Get unexpected dancing.
I can never see the keys in these levels, but this one really seems
invisible. (In my game, while I was looking around, Lara simply picked up this
key. I can only assume that she spotted the clue given by a picture on the E
left pillar.) Go to the middle of the dance floor, under the central light.
Stand there and press Ctrl, pick up the Ballroom
Key. No time for a quick drink, so head back out.
A Needed Relic
Go SW, across the wooden bridge, and SW to a keyhole
to the left of a door. Go inside and examine artifacts. In the SW corner jump
up to pull a chain once. This lifts a cover from a
central artifact, but activates a hopping stele, which will explode and kill
Lara if it touches her.
The stone misses Lara if she is on her hands and
knees, and not right under its path. If she is in a crouch taking the artifact,
then the stone will strike her head. So stay on hands and knees, perpendicular
to the stone's path, ready to edge forward to pick up Saint
Patrick's Pastoral, then back to
hands and knees to pull away. Time the moment when Lara can
stand, then quickly hop backward.
Sailing Into the Blue
Exit the building. Go left across the bridge, and keep
running straight north, reach double doors in a fence. Now the hole has been
covered, so Lara can push open the double doors.
A flyby takes over, showing Lara running forward to a
waiting balloon. She gets into a gondola, the balloon
takes off and sails into the sky. This is a scenic conclusion to the
Part II: Egypt
Level 5.1 – Ghosts of the Past I
Secrets: 1
The Bes’s Mask
An introductory flyby shows you a huge pyramid area after Lara’s landing
with the balloon. Don’t go up the large stairway yet; this is for much later.
At the start head N and go clockwise around the large fence, passing a building
with a small version of the Sphinx, until the camera angle gets fixed. Pick up
the Flares on the floor and now run SE
towards a kind of well and a man trying to
raise a water pot out of it.
Drop down to the floor carefully – first onto the slopes on the edges,
then to the lowest part. Kill two snakes
down here. A tip: Crawl into the narrow passage and shoot the snakes, which
won’t follow you, safely from there. Now follow the crawlspace until you can
stand up and reach a bigger room as dramatic music kicks in. Save before
grabbing the mask from the pedestal as this triggers the ceiling to quickly
come down but also the exit door to close. Now get the Bes’s Mask.
Getting Back Up
Immediately backflip with a mid-air turn and run to the left of the
closed entrance to quickly use a magically appeared floor
lever. This triggers another lever
to the right of the entrance. Sprint there and use this one too to open the exit door again, get out of this room as quick as
possible and crawl back to the floor of the well.
Now it gets a little tricky: Stand with Lara’s back facing the slope
around the middle, but not exactly in the middle. Now backflip onto the low
slope and, when landed, immediately jump with an either left or right curve
(depending on which side of the slope you chose) to the upper slope. Save now
as you now need to jump to and fro between those upper slopes with curved jumps
towards the edge of the well. This might take some time – don’t try to early –
eventually Lara will curve jump up to the pyramid area again. Video
[Savegame]
Pickups around the Big Pyramid
Head W now until you see two workers pulling a crate out of a passage. Run
down the stairs here and head around the left corner to find Shotgun Ammo in the passage. You can see a
spilled doorway you cannot enter in one corner. Get back outside and now head
NW to the fence – there is a Small Medipack
on top of a block. Drop down after picking it up and go S around the pyramid,
follow the path around (there is a kind of temple with four statues in the far
W, but you cannot do anything here yet). Go around the far S pyramid and find
another Small Medipack on top of a high
block, then head NE to spot another stairway leading down. Enter the cave and
place the Bes’s Mask on the wall to open the door
right of you. In the newly revealed passage grab the Small Medipack in a right alcove, then head on
further through the tunnel and drop down some blocks.
Object Puzzle
Run up the next stairs and follow the dark corridor into a larger room
with several intriguing objects Lara walks to when pressing Ctrl, but none of
them is actually movable. Save your game here and put the next save in a
different slot, as you need to remember all the exact locations of the objects.
Now head in the N passage and jump over four dart
traps (the passage after the second is empty and thus can be ignored).
The next room has the same objects as the one you should remember, only placed
in different places.
Before doing anything else, head N into the dark passage and find a room
very similar to the stair room before entering this area. Find Flares left of the stairs and a Small Medipack to the right. Nothing more to do
here (the W passage is empty as well and only shows the other side of the
spilled doorway you saw a while ago) so head back to the previous room. All
those objects are in fact movable and you have to move
them so that this room is the copied, NOT the mirrored version of the very
first room of this area. Use your save in the previous slot to switch between
the two rooms and it should be easy, but here is the solution anyway:
The huge pillar NW goes NE under the lower ceiling.
The huge pillar SW is on its right place and thus
immovable.
The blue and yellow coloured open sarcophagus NE goes
in the middle of the two E wall slopes.
The vase NE goes all the way to the E wall in the
middle between the S wall and the left wall slope.
The jackal statue SE is on its right place and thus
immovable.
The jackal statue W goes one square SW of the left N
wall slope (it’s point-symmetrical to the other jackal statue)
The big pharaoh statue W goes in the middle of the two
W wall slopes.
A trapdoor in the middle of the room opens – drop down
and slide down the short slope to use the rope. A block
lowers
somewhere in the outside area – jump back up and climb into the previous room,
then head S, through the dark cave, up the blocks and exit the underground via
the stairway.
Climbing Session
To your right, you can see the lowered block high up on the S building.
To reach the bridge there, head to the SW part of the outside area where you
find a large structure and approach the S side of it. You can jump up and grab
the crack on the very right part of the wall. In this level onwards it is
possible for Lara to jump up when she is grabbing a crevice, which is very
useful now – press Alt and Lara will jump up to the higher crevice. Grab it,
shimmy left and around the corner, then as far left as possible (when Lara
hangs just between the crevice and the solid wall), then jump up once more,
shimmy left around the corner, then jump up to the last crevice and finally
jump up and grab the edge of the roof. Shimmy around either two left or two
right corners to be able to drop on a safe platform. You apparently stand on
one of the few safe parts of a broken bridge. Stand-jump to the S platform,
then around the fence to the W one, then take a long running jump and grab the
next platform. Jump to the longer piece of the bridge and save on the first
square.
Spike Challenge
You are facing a pair of spike walls which are
moving back and forth on the bridge – you’ll soon notice the walls have two
different frequencies – a slow and a fast one, so only move when they move in
slow frequency. There also is a breakable tile on the path to the bridge, which
will be your first destination. When the front wall just starts moving
back follow it onto the breakable tile, then run one square further, wait until
the tile falls to the floor and then step back causing Lara to fall, then grab
its edge.
This can be done in two steps – break the tile in a first step and then
sprint towards the gap holding Ctrl to grab the edge in a second step. Either
way wait until the spike wall moves over your head, climb up and dash over the
bridge and in the last possible moment before the rear spike wall touches you
take a run-jump over the left railing, facing the left part of the building’s
wall, and hold Ctrl to land on the alcove you lowered a while ago. [Savegame] Push the button to see a
cutscene of the temple in the far W where a rope appears out of a snake statue.
Henutmire’s Ankh
Drop down to the floor which lowers your health a
little bit, then run all the way to the W temple, enter it and climb the rope
facing SW, climb it six times, face E and backflip onto the W ledge. Jump onto
either the right or the left wall of the temple, turn around and run-jump to
the pillar above the rope, grab the crevice – it’s actually possible to grab it
from the W side, but you can also jump between the E pillars with a slightly
curved jump and grab the other side of the pillar with the visible crevice.
Jump up to the top edge of the pillar, but don’t climb
up yet as a block moves down iteratively that kills Lara if she is standing on
the pillar. Shimmy to the middle of the E edge, wait for the block to move up
again, then climb up, run to the wall and quickly pry the Henutmire’s
Ankh off the wall, then immediately step back until you can grab the edge
again. When you see that the block is moving up again, climb up again, then
take a run-jump onto the temple wall. It is possible that after prying the Ankh
off Lara refuses to grab the edge and falls down to death, in that case you
have to run-jump to the wall in one go. Drop down to the floor. Video
You now can place the Ankh onto the door in the
pyramid S of the temple which then opens, jump in and head through the passage to
finish this level.
A Detour for a Secret
Before placing the item head all the way back NE to
the well you once found the Mask in, drop down to the floor there and get
through the crawlspace. If you haven’t noticed already this room is safe again
so you can enter it without any worries. Approach the NE corner – a third floor
lever has appeared here, so use it to raise a block in the
underground room you visited before. Get back through the crawlspace, jump up
the slopes (look into the Getting Back Up chapter for details) and run S
around the pyramid, down the stairs, into the door you once opened with the
Mask.
Get through the dark passages into the room with the
immovable objects. The raised block is located in the E but since you cannot
simply climb on it and place Lara between the block and the E slope standing
one step in front of the slope. Face the block and backflip on the slope, then
jump and grab the edge of the block. Climb up and jump in either of the two E
openings to find Secret #8 – Flares, two
Small Medipacks, 4x Uzi Ammo and the Shotgun. Drop
back down, run S and follow all the way back outside, then head to the SW
pyramid where you can place the Ankh on the N side to open the door. Jump in
the passage and follow it to let the level change.
Secrets: 2
The Harp
Follow the passage into a larger room, bypassing a
small gate for later. In the NE corner you can find Revolver Ammo. Head
up the S stairs and on the upper floor shoot the glass on the SW pedestal to be
able to grab the Plectrum. Now go NE and climb onto the N
ledge left of the central vase. Turn around and face SW. Over the nose of the
right painted image, but high up near the ceiling, is a shatterable coin so
take out the Revolver and shoot it to open the door directly beneath you. Drop
down and follow the long passage to a new room. Inside there are two harp
player statues and another harp just left of the right hand statue.
Stand in front of this right statue facing E and press Ctrl to use the Plectrum
– but actually Lara will do that on the standalone harp. A cage lowers up an E
stairway so run up there, jump up to grab the ledge and climb up to use the
rope. A lever lowers its position in the previous room, so drop back down and
exit this room W, head back over all those stairs into the first room and run
up the stairs.
Deadly Door Passage
You can find the lowered switch in the
SE corner, use it and the pole going through the W statues prolongs itself and
now you can jump to it, swing until the bar is fully loaded and then jump to
the ledge of the high up W passage. Climb up. Do not yet step forward as where
you stand is the only safe spot in the whole corridor; there might be some
other safe spots but only if you stand pixel perfect. When the two blade doors
you see are moving back run forward. As soon as they just return from the wall
take a run-jump or a sprint through them, this might require a bit of luck
though.
Quickly take your Revolver to spot and shoot either
the left or the right hand ball up the ramp. The easiest method now is to
return through the passage before the doors kill you, turn and drop back to
grab the ledge, climb back up and repeating the same sequence to shoot the
remaining ball. It’s also possible to jump back and fro between the slopes and
trying to not get caught by the doors, but this requires much more luck than
simply jumping through the doors. When both balls are shot, return through the
passage a last time. Video [Savegame]
The Door Key
Drop down and see the S door on the upper stage is now
open. Enter the chamber but don’t yet go down the W stairway. Look up to the
ceiling to see a monkeyswing which is your next aim. To get there you have to
go behind the S pedestal and jump onto either left or right slope, thereon
bounce to and fro between the slopes. Avoid jumping on the slope leading you
down to the pedestal again so that you don’t have to do everything again, and
make curve jumps towards the top whenever you jump forwards. Eventually you can
grab the monkeyswing above you when jumping forwards. Follow it N to the right
hand wall. Drop down and shatter the glass of the pedestal to pick up the Door
Key. Now drop back down to the floor and head down the W hallway, put the
Door Key in the keyhole to open the door right of you.
The Queen of Senet
As soon as you enter this hall a cutscene shows you three
poisonous jackals hunting you so kill them. Pick up a Small
Medipack just a few metres W of the entrance. In the rear part
of the room far W there are two buttons which are currently blocked by a glass
barrier, so nothing to do there yet – go up the right hand (N) stairway looking
from the entrance and find three game tables. Go to the middle one and grab the
Queen of Senet from it. Now head back down and run up
the opposite (S) stairway and go left around the corner to place the Queen of
Senet facing E. A block lowers S in the big corridor leading W to the two
blocked buttons, search the left wall to find it and enter the passage.
At the end run-jump with a midair turn onto the ramp,
then jump and grab the ladder. Climb it up and backflip onto the platform from
where just two or three climbs are needed to reach the top of the ladder. Climb
the next ladder to the top, then follow the passage and when the path divides
go into the left room with four bull statues as the right ramp leads you back
to the chamber with the two buttons. The one and only thing you shall do in
this room is to push the boulder directly left of the entrance into the lowered
path in the middle, then into the passage you came from and finally down the
ramp so that it drops into the button room. Slide down behind the boulder and
notice another block has lowered opposite to the previously lowered block.
Enter this passage.
The next passages seem to be the mirrored version of
the rooms you explored to get the first boulder down, so the only thing to
mention is that after doing all the tasks you arrive in a room that is very
similar to the one where you found and pushed down the first boulder. Before
doing the same with the boulder right of the entrance, light a flare go behind
the NE bull statue in the corner. Look on the ceiling to see a ladder. Jump up,
climb it to near the top and backflip in a dark passage. Under the rotating
pharaoh head you can find Secret #9 – a Large
Medipack. Notice a bright wall in a side alcove, then drop
back down and now head to the boulder. Push it down in the lowered path, then
down the ramp, slide down again. Now you can push both boulders into the near
holes in the floor (a few squares W). As a result the left hand glass raises
letting you have access to the button which
you can straightaway use. A cutscene shows you two things: A machine on the
ceiling moves above a strange tile in the middle of the two boulder holes, and
the glass above the right button rises. Go there
and push it to see the machine fishing up that tile, revealing a hole where you
can drop down.
Another Secret
Stop! Don’t drop down yet – do you remember the bright
wall in the passage where you found the last secret? You have to return all the
way there, so go to the middle of the large hallway, enter the N passage, climb
all the ladders up to the room where you found the second boulder and climb the
ladder in the NE corner. Backflip and climb into the right hand alcove to see
the bright block has lowered, revealing a small chamber
with a floor lever at its end. Push
it to see a platform appearing in the large hall near the entrance. Return all
the way back there – drop down the ladder, run back through the room, slide
down and follow the hallway E. Run up the right stairs and jump onto the first
platform, now you can run-jump to the second, the third and finally into the
far N room. The sound for Secret #10 appears and you
can pick up a Large Medipack, Shotgun
Ammo and Flares. Drop back down and head all the
way W to the hole in the floor.
Pool Room
Now drop down. There is no way back so if you missed
something you have to reload an earlier save. Run along the passage and
eventually find yourself in a large pool room. A flyby shows you a high up
opening with an object you have to shoot behind (but it’s closed when you get
back control over Lara) and several slopes. There is nothing to find in the
smaller pool ahead so go right to the N pool and follow along the right side.
Pass a ladder for now as you will be stuck when you try climbing up yet. Jump
over the small creek and while running N you can find a lever on the
second last of the statues that face the pool. Use it to open the trapdoor
above the ladder, return there (jumping over the creek again), climb up to the
top and head W, then around the right corner.
Slope Jumps
There is a bull statue in the middle of the W wall and
closed gate in the far S that requires a key, but you cannot do anything here
now. Face the E slopes and run-jump with a midair turn to the first one, slide
and grab the ledge. Shimmy to the far right corner and in the same moment when
you hear the spikes behind you, climb up, wait a fraction of a second and
backflip onto the spike slope, then take a jump forward with a right curve to
the next slope. Again grab the ledge, shimmy as far right as possible, then
climb up, backflip with a midair turn and a left curve onto the block and save.
Next you have to carefully balance over a rope, so
step onto it and walk until you stand in front of the darts that move up and
down (this is when you first can hear the sound of them). When they just move
up quickly go on and eventually you reach the safe ledge on the other side.
Save again, then stand-jump to the very left part of the following slope, then
directly jump with a hard left curve (to avoid being caught by the flames) and
grab the ledge of the next slope. The door you saw in the flyby has opened
again; shimmy to around the centre of the ledge. Notice a ball moving from the
left to right and vice versa. When it just moves out of sight wait two seconds,
climb up the slope and slide a bit, take out your pistols, jump and shoot the
ball that just comes back in sight. An underwater door just ahead of you when
you drop in the water opens. Video
[Savegame]
The Waterskin
Swim through the just revealed E passage and climb out at the end. Go to
the N side of the room and pick up the Large
Waterskin from the pedestal. Jump back in the pool and swim through
the passage in the large pool room. Climb out and fill the Waterskin in either
N, W or S creek or on the top stair of the stairway W in the pool. Now climb
back up the S ladder to the second stage, run all the way W to the bull statue
and fill the left pot with the water from the Waterskin to open the bucket in front of the bull. Pick up the Door Key that was hidden inside and head NE to
the right of the closed gate. Place the Door Key here to open the gate, enter the passage and at its end you can push a floor lever to open
another underwater door in the big pool.
Tile Puzzle
Return back to the bull statue and dive into the pool, swim SE to the
door. It’s recommended to first take full air. Now swim in and follow a long
underwater corridor, swim left at the only junction as the right path is a dead
end and after a long time swim up into a new room. Look at the upper sloped
walls to see a total of three textures whose
corresponding tiles you have to find and jump onto in the three tile gaps
without jumping on any other textures – the tile on the NE wall is in the SE
gap, the one on the SE wall is in the SW gap and the one on the SW wall is in
the NE gap.
A door opens SW when everything is done
correctly, enter the room and the left one of the three glasses hiding a valve each has risen up. Use it, the right
glass raises so use the valve there,
lastly the middle glass raises so use the last valve
to see a cutscene of an explosion taking place in the upper room which appears
to be the very first room of this level. Go back to
the room with the tiles and notice a N door has
opened. Head up the ramp (no boulder, so you don’t have to worry), slide down a
short path and head up another ramp and go through the open door which leads
you back to the starting room.
Henutmire’s Cartouche
Approach the steam coming out of the floor
window from the room beneath, go two squares further S and now face the
smoke, start running and when Lara just ran over the dark tile which is closest
to the window jump and you will be carried up to just under the ceiling, grab
the ledge and climb up. Don’t go up the stairs yet but head E around the
balcony, grab a Small Medipack and open
the big double doors. Follow the passage to a
small chamber where you can pick the Henutmire’s
Cartouche from the pedestal. Return through the passage and now head
up the huge stairway. Follow the passage until you arrive at a larger room with
changing sound.
Double Timed Run
There are four deep and deadly holes in this room – two N and two S, so
beware of them. Enter the NW corner chamber and first of all pick up a Large Medipack. The wall
switch is timed so save before using it. It raises
a trapdoor on which you have
to use another timed lever on a high
S balcony for a very short time, so after using it sprint S through the room
and to the right of the right hand gap, jump up to grab the crevice (this will
only work if you jump up in the first left third of it), jump up and shimmy
right until you can jump up again, shimmy left, drop on the balcony, turn and
dash to the lever, use it. Now there are two possibilities:
1) Turn immediately and light a flare. Run as fast as possible to the
square left of the far W pillar object, then jump down onto the large stairway
and while still in air throw away your flare. This will give you a precious
second.
2) After using the switch hold Ctrl and Forward until the trapdoor opens
again, this way Lara won’t drop in the deep hole below but (hopefully) land on
the stairs – directly after landing turn and sprint through the room.
Sprint to the left of the left N gap, jump up to grab the first right
third of the crevice, jump up once more, shimmy left until you can jump up
again, then shimmy right, drop and turn, then run onto the second trapdoor to the nearby lever, use it and take a right sideflip just
before the trapdoor opens up again. [Savegame]
A Helpful Block
Carefully jump down onto the stairway again, thereon enter the E hall
through the just opened door, entering a room with two aquariums in the N end
and a huge statue on a W pedestal. Go to the stairs in front of the left one to
find a Large Medipack. Now head SW and
look on the pillar here spot a slightly different
block as a base of the pillar. You actually can pull it out, then push it into the previous room through the door in the
middle of the W wall. Now push and pull the block in one of the four holes in
the floor, make sure you have enough health (80-90 percent) and drop down from
the ledge. Crawl through the short passage and find a dark passage leading E.
Activating the Elevator
Follow it up a ramp and when you come to a wall simply turn around, jump
up to a crevice and jump up a few more times to eventually be able to climb
into a small room. Exit it through the N passage as there is nothing to find
NW, you are overlooking the aquarium room. Take a run-jump to the NW crevice,
shimmy around the right corner and further right until you can stand up. Now
you have to do a banana jump N around the pillar – stand with Lara’s back
towards the S wall and at the far SE corner, then step once left and turn Lara
slightly right, run forward and jump off the ledge when she is near the pillar
and press Left to get Lara on the next ledge.[Savegame] Place the Henutmire’s
Cartouche in the receptacle to see a cutscene of two birds flying out of, then
around the big statue and also the elevator in the far E now working; the scene
somehow reminded me on the “Heart of Venice” BtB
level…
Great Pyramid Key
Drop down to the floor – this costs a little health –
approach the elevator and when it comes down run onto it, get carried up and
run into the opening. Follow the passage into a room with a closed golden door
and a pedestal in the NE corner. Shatter it to grab the Great
Pyramid Key, the door opens. Slide down the slope into another
large hallway. There is a door in the W that
needs to be opened so we are searching for a switch. Actually, you can find a wall
lever behind a SW pillar. Push it to open the door, then
head back to it and enter the passage to finish this level.
Level 5.2 – Ghosts of the Past
Into the Pyramid
Follow the passage and a small earthquake appears.
Approach the door at the end and it will open for you. Jump through the opening
and you are back in the large pyramid area. You cannot return to Henutmire
through the far S passage as a block hides your way there now, so just run E
passing all the workers and return to where you started this part. If you
didn’t get the secret in the first visit you can still get it now. Head up the
stairs at the S end of the huge pyramid and enter its interior. The hole is too
deep to drop in, so just follow the wooden bridge and afterwards head in the
darker passage to let the level change.
Level 7 – Ghosts of the Past II
Secrets: 2
A Warming Welcome
Follow the passage; another earthquake starts and a
message appears on your screen. This will happen more often in this level; the
messages actually are the lyrics of the Nightwish song “The Pharaoh Sails To Orion”:
“Get away from me!
Take head to thyself
and see my face no
more!
for in the day
Thou see my face
Thou shalt die!”
Go through the passage – the message will stay for
some time – and beware of the blocks that fall down; stay in the middle and nothing
bad will occur to you. You’ll soon face an impassable and deadly spike pit.
Luckily you now have the Great Pyramid Key so you simply can put it in the
receptacle in front of the pit, to your right. A platform raises its position
which makes you being able to run-jump over the spike pit.
Back to Basics
Watch the flyby. Now latest you notice you have – at
least very possibly – been here before and only enter the pyramid the other way
round. Step in front of the next spike pit and the message disappears. If you
jump left it’s likely that you get hit by a falling block so stand in the very
right corner of the square, step back and face the nearest passage behind the
slopes. Run-jump there and follow the passage to the third spike pit you have
to overcome by standing on the edge of the slightly higher block, then stepping
back and run-jumping straight to the other side. Follow the passage to the room
with the bluish shaft – the trapdoor is closed so you cannot climb down there.
Climb the ladder but not to the top as you cannot proceed there; climb until
you can see the shaft from an outer perspective and backflip into a passage.
Follow up the ramp and climb up into a room.
Ahmet Cages
This is one of the rooms where Lara once used the
libra. Since you only have the Large Waterskin you cannot do anything here, so
head N and kill an ahmet coming out of the
cage. In front of a W passage you can find a Small Medipack;
afterwards enter the passage and find a Large Medipack in
front of an unreachable high ledge. Return and go N where the ahmet came from.
In the right passage you can find a Small Medipack. Now
go into the opposite passage and follow it to a larger room with many ahmet cages.
Jump up to the crevice between the second and the third S cages, jump up once
more and shimmy right, around a corner and drop onto the pillar. Use the rope to
open the door of the left S cage, drop down and kill an attacking ahmet. Enter
the opened cage and open the trapdoor facing S, then climb down the long
ladder.
Catacombs
While following down the stairway another part of the
song starts and the lyrics pop up again:
“The Unicorn arrives
with the westwind
to dream his funeral
“Thou art born for
Seteh dwells in Thee”
Slumbering with the ebb
and the flow of this
foaming tomb
“Thou art born for
Seteh dwells in Thee””
Get up the stairs and follow around a corner. You get
several glimpses of the room your well-known arch enemy can be seen in. Drop
into a room and climb up at the opposite side – there is nothing else to do
yet. Now carefully run along the passage and look for a small gap in the wall.
Take out your Revolver and look straight through the gap to see a shatterable
ball behind another of those small gaps. When it breaks by your shot a door
behind it opens. Follow the passage around the room, run down some stairs to
finally reach the open door.
The Stairway
Jump up the ramp and drop down into another gap, climb
the blocks at the end and pass a closed gate. You won’t get through it but it
has its function – you will see that when you progress a bit. Turn right and
follow the passage into a bigger room. There are two passages left and right of
the large stairway: The SE one with a turning head behind (you should know what
that means…) is blocked yet but the NE one is accessible, so enter it and use
the floor lever which opens the
gate up the large E stairway in the previous room. Sounds too easy? Well,
return there and see the stairway alternates every few seconds and changes into
a slope that brings you back to the start of the stairs.
Before trying to get up there, you might want to find
the secret. If so, return through the SW opening, pass the still closed door
and get back to the door you opened when shooting the ball. It is closed now,
but you might remember there is a gap to the right of it. Look through and spot
another ball you can shoot. Take your Revolver and do that now to open the SE
door in the stairway room. Return all the way there and enter the now free
passage to find the Uzis and 3x Uzi
Ammo for Secret #11 at the end. Now
you can get to the stairway. To get up to the open door you obviously have to
hurry: Stand directly in front of the slope; you can hold Forward
if you like to not loose any time. When the slope changes into the regular
stairway again Lara will run on, directly press Jump
and hold it as well to perform run-jumps up the stairs – you cannot sprint up
stairs, so this is the fastest method. If you turned Lara straight towards the
open gate you will manage it.
The Flooded Room
Follow the passage into a room with several passages
leading away from it, but only the NE one doesn’t lead to a closed door or a
dead end for now. Run up the stairs and climb into the small crawlspace, drop
out at the end onto a slope and slide down to eventually drop into a pool.
While falling down you might notice an object in the far right end of the large
bridge ahead. As there are two crocodiles in the water
quickly climb out on a broken NE pillar and kill them from there. Now jump to
the N crevice (slightly left to be high enough to reach it), shimmy right and
jump up to grab the ledge of an alcove. Climb up, go to the SW corner and jump
to the W bridge. Go to the S end of the bridge and look down on the right side
to spot the jumplever you might have noticed before,
drop down to use it which opens the N door on the bridge. So climb back up the
NE pillar, shimmy right again, jump up to the alcove and finally to the bridge.
Enter the open door and follow the dark passage into a high room.
Seth Attack, First Neshmet
When you approach either W or S alcoves a cutscene
starts with Seth escaping from his lair – well, he might
be bored and wants to see something different after twelve years of being there
– and coming nearer and nearer. Eventually he will enter the room Lara is in at
the moment, so hurry up when you get back control over her and climb into the S
alcoves, drop down in the end – Seth won’t harm you here – and follow the E
passage until you can climb up to your right.
The passage ahead will lead you to the other side of
the door in the maze-like area you visited a while ago. Thus there is no need
to go there yet, so turn around and jump to the high right opening, drop in the
gap behind you and pick up the first Neshmet. Climb
back up, drop into the long passage and follow it W, then N around the corner
and to the very end. Climb the right blocks to the top, avoid Seth’s rays if
necessary and run-jump to the second floor – you must do this from the highest
possible point or you’ll fall down again.
Second Neshmet
Climb up and head S where you can find a Large
Medipack, Revolver Ammo and a Small
Medipack. Don’t go further W yet but go to the NE corner
behind the pillar and run-jump to the pole, jump to the next two poles (all
three pole jumps have to be done with the bar fully loaded) and finally to the
high up ledge, grab it, climb up and go to the S end of the platform. Face the
SE corner, go to the edge and step back once, then take a run-jump to the low
alcove and in midair press and hold Ctrl so that you can land further. To
prolong the jump even more you can jump up once before starting to run.
When you’ve made it drop into the passage, go to its N
end and take the second Neshmet with you. Pass
the other alcove left of the one where you entered this area but note it for
later. Go to the southmost alcove with a turquoise grating which is actually
climbable; you are thus able to climb up into a high passage. Climb the block
and use the floor lever to move a pillar
in the high hall. Now climb back down again, run N through the passage and get
up the first left alcove. Turn SW and run-jump with a curve to land on the
platform with four pedestals for later on. [Savegame]
Third and Fourth Neshmets
For now run W which triggers a song again – if you
want to read the lyrics return a few metres:
“Open thy Veins
for my venom
Kiss the cobras
with thy twisted tongue
So shalt thou
join the empyrean circus
Where beggars mourn
and seraphs dance
In this twilight cathedral
Shall I wed thee
O Bride of the Netherworld”
Run all the way N again and jump to the high E platform via the three
poles. Now turn around and face the next three poles
– jump to the first one, swing three times until the bar is half loaded,
then jump off to the next one. If the bar is fully loaded you will jump too
far. On the next pole repeat this method, jump to the next pole where you also
swing three times and then you can load the bar fully and jump to the S ledge.
Maybe you’ll notice a bright block in the NE shaft. Head to the far S end of
the platform and pick up the third Neshmet
from here. When you pushed the floor lever after finding the second ship, you now
can jump SE onto the moved pillar, then climb
into the alcove, drop down and find the fourth and last Neshmet in the right passage. Climb back out
and drop onto the block.
Revenge at Last
Now you can drop onto the first stage again. Run E to the receptacles and place all four Neshmets and
rays appear in the middle of the room. As soon as you placed the last ship a
FMV starts showing the last happenings before Lara was buried in the crumbling
temple in The Last Revelation, then you can see Seth turning in circles in
these rays and finally exploding. A locust swarm
attacks you, leaving you three choices: Either quickly run away from them or
crouch or save and reload (recommended) so that they are vanished immediately.
Drop down afterwards; there also is a ladder far W. Thereon go to where Seth
exploded to find the Sphinx’s Ankh; a
cutscene shows a door opening somewhere.
Back up for a Secret
Do you remember the bright block high up
on the top floor? This one is lowered now, so if you want climb all the way up
to the third floor: Climb up the SW ladder, run N all the way to the wall, then
use the three E poles to get to the high NE platform, turn around and use the
next three poles to get to the top stage. Run-jump into the just revealed
passage and follow it to its S end to find Secret
#12: 3x Shotgun Ammo, Wideshot Shotgun Ammo and 4x Uzi Ammo. Return back through the passage, run
up the stairs and at the end turn around, drop and grab the ledge and finally
drop down. Run-jump back onto the E platform, then head S and climb down the
ladder.
Escape
Now head to the middle of the S wall climb back up into the S alcoves,
drop down in the passage and follow it E until you
can climb up to your right – this is the passage I told you not to enter as
there is nothing to find before. Now the door is opened here in the right hand
passage so head through to find yourself back in the
room after getting up the nasty stairway. Don’t go back there unless you want
to get the secret in case you missed it but head S through the opening and go
through either left or right passage that both lead to the same room where
you’ll find the gate that opened after Seth exploded in the SW corner. At the
end of the corridor climb the long ladder to the top to find yourself back in a very familiar place. Head S to let the
level end.
Level 5.3 – Ghosts of the Past
The
Go back over the wooden bridge and head outside again. Run down the
stairs and go to the near N building with the Sphinx
on it. Place the Sphinx’s Ankh on the receptacle on the door to open it,
jump through and slide down the slope to exit this level once and for all.
Level 8 –
Secrets: 2
Neshmet Ride
Slide down and when you come to a halt simply run onto the next slope
and you’ll eventually stand facing a room with two rivers. Drop down and jump W
over the river, get onto the slightly higher NW platform and from the highest
point you can climb up to the pillar with the column
on it. Stand in the SW corner, face E and run-jump to the ladder, shimmy around
two corners and drop on the balcony. Step on the golden tile to hear a door
open in the river, drop down and climb into the neshmet.
Drive forward through the open door, don’t get off the boat as there are
piranhas in the river then left and
follow the river that eventually leads you down some falls to a larger lake.
Now paddle N (there are more piranhas
here) and W to a small bay. Get out of the boat using (the left) Shift and Left/Right.
Notice that if the water on one side
is too shallow, you can't get out there. Swim NW to find a Small Medipack, then enter the boat again and
paddle E. Do not try to drive around the N swirl as it will be deadly as often
as you try (and there is nothing important behind it either), but keep E and drive up the waterfall which magically has a inversed water
direction, then stay at the very left or right side to avoid the blade and the
thorn traps – it doesn’t matter for Lara to drive under a very narrow
ceiling. The flow transports you
through the river, leading you to a crossing.
Against the Flow for a Secret
Try to keep right as when you want to get the
secret you have to reach the end of the E part of the river which will be very
hard because there is a hard current working against you. Still, you probably
get taken N to the bigger area – but you can easily drive back S along the SW
sloped walls as there is no current. When you follow these slope walls and
eventually drive into the current again, try to keep right by pressing Forward
and Right so that you drive S. As soon you entered the passage you came from
(very likely facing S) press Left to both make left turns and drive further on.
Pressing Forward and Left together might not be that
effective, but it’s still possible. Try not to hit the walls or you will be
taken back, then it should be fairly doable; when you steadily press Forward as soon as you finally face exactly E, after some
time the current stops and you can get of the boat, but of course don’t swim
with the current now.
Swim to the very SE corner facing S – it’s recommended to only face the
wall and then perform a left swerve to reach the leftmost point – then climb
out, wait a fraction of a second and thereon backflip with a
midair turn, then grab the crevice. Jump up once, then enter the
crawlspace and at the end you will reach a bigger room with Secret #13 – Flares,
3x Shotgun Ammo, the Uzis and 2x Uzi Ammo.
Crawl back out, then drop into the water and climb back into the boat. Drive W
and the current takes you back to the larger lake.
Into the Cave
Drive NW, climb out of the boat and quickly swim S avoiding the piranha swarm towards a platform where you can
climb up. Pick up the Large Medipack, then jump back in the water and swim N under the block to find
another Large Medipack. Hurry while
swimming back to the boat and now drive onto the NE passage staying at the left
side as some debris falls down. Follow it to the very
end, losing a bit of health when the boat falls from a higher position. At one
point near the start of this passage the boat might be stuck, if that happens simply drive left or right of the ramp and you’ll
soon progress on. Eventually you arrive in another lake area where you need to
climb out – no piranhas this time. There is a closed door S you need to open
with an underwater ceiling lever
located under the NW island. Take enough air and swim
there fighting against the current and eventually you reach the lever; use it
to open the S door. Swim back, enter the boat and drive along the passages
until you face a double blade trap. Either
work your way through loosing a bit health or climb off the boat and swim under
it – you don’t need the neshmet anymore. Either way
you’ll eventually reach a large cave.
A Hard Timed Run
If you still drive the boat, climb off now and swim SW along the floor
to find a Small Medipack here. Swim to
the far SW island and climb up. Pick up a package of Flares. When you step onto the
golden tile a block in the far NE corner of the room raises for a short
time, so save before you start this pretty tight sequence. Simply swimming to
the block will be too slow so you’ll have to take the slightly dryer way: Stand
S of the tile facing NE to the underwater pillar you can jump to. Run onto the
tile, to the edge of the island and run-jump to the edge of the tile; then
slightly curve right and run-jump to the larger island.
Run along to the E, then jump to the next underwater pillar, but not too
far or you won’t be able to do the next run-jump in one go without stopping. So
when you land, directly run on, jump with a slight left curve to the next NE
block, then sideflip right onto the near SE pillar. Next you have to either
perform a one-step running jump (slightly faster but harder) to the NE column
or you run to the NE edge and stand-jump to the next one, leaving you more
space to do the next run-jump to the far NE tile. Finally run-jump to the
island landing on the right half as you need to climb the block from the S
side; don’t climb it standing too near the left edge as a last run-jump to a NW
opening follows. It’s most likely to happen that the block lowers while you
still are running on it, but don’t fear that, Lara has
enough time to jump if that happens. Video
[Savegame]
First Cartouche Piece
Climb up and follow the long stairway up, then climb into a smaller room
with many crates and shovels. Open the N door and
step outside. A cutscene shows you a leaf platform raises
in the water, letting you be able to get back if you fail during the next
actions. You stand on the side of the lake where you started this level.
First head N and enter a small cave where you can find Flares SW. Head back S and look up the hillside
to the right of the entrance. Near the SW lattice you can find a flat ledge,
from here jump up the hill and now head N again to be able to reach the ledge
over the cave you just have visited. Shatter the vase in the green fog and get
the Cartouche Piece 1. Return back S
and slide down the slopes. Head far SE around the building, you’ll step onto
stone floor.
Hard Jumps
There is a ledge E in the river but since you cannot reach it from here
you have to search for another path. Run W through the opening
in the wall, then head up all the stairs to find a closed doorway SW and a
keyhole at the left end of the stairs. From this square you can reach
the low NE block you have seen before, but it will take its amount of
preparation and time: Stand with Lara in the far NW corner of the keyhole
square, face straight E and run-jump far onto the slope. Of course Lara won’t
directly get to the block, so be sure to slide down forwards on the slope –
well, actually you never slide but in fact have to perform three subsequent
curved jumps as far right as possible so that she finally can jump onto the
block.
The next jump E over the waterfall will be equally hard: Stand in the SW
corner of the block directly near the slope, face straight E and start running
E, then jump when Lara just is in front of the ledge and curve-jump left to the
corner of the opposite block without pressing Ctrl. Now jump E over the slope,
stand-jump onto the higher rock. Another banana jump around the pillar ahead
awaits you – best start at the end of the greenery on the first part of the
rock standing one step away from the ledge to the river, then run and curve
jump around the pillar. Finally line up with the crevice in the E wall, stand
with the back to the W wall and one step away from
the ledge, then jump to the crevice. Jump up three
times and climb up – a second leaf platform raises so if you fall down
into the water or will miss something later on you won’t have to do these jumps
again. [Savegame]
Second Cartouche Piece
Around the right pillar is the receptacle for the full
Cartouche, so as you only have the first part of it, you should first go on
search for the second. Found nothing on the plateau to the left of the
waterfall so climb the block left (N) of where you climbed up to this ledge and
drop down on the other side. Follow the path through another green fog and jump
up to the ledge at the end. The cliff is too deep to drop down so you have to
run-jump to the edge of the N building, climb up and use the ladder in the N
part to drop down into a courtyard. As an alternative you could jump into the
water, climb up the just raised leaf platform and then jump to the safe
riverside and enter the courtyard via the W opening.
Shatter the near left vase for the awaited Cartouche
Piece 2 and the SW one for a Small Medipack. Now
climb back up the ladder, head SW and run-jump back to the rock ledge, follow
the path back S, jump up several slopes and climb the block again, then drop
down on the other side and run around the pillar. Combine both Cartouche Pieces
and place the Ra Cartouche in the
receptacle. Afterwards you can hear a window door open somewhere.
The
The door is not far from you – you can actually see
where it is in the load screen – as you simply have to run a few metres W, then
grab the right edge of the platform after dropping off and drop, then
immediately grab to be able to climb into the revealed doorway. Enter the
chamber and shatter the vases to get a Large Medipack and a
When you land on the other side it will explode and a hammer
god appears. You cannot jump back to the previous ledge because now the
spikes are activated. By now you should have a large amount of Hell Breath so I
suggest using the Shotgun for it; one shot will take 18/300 of the enemy’s
health. The Revolver is slightly more efficient with 21/300 health lost per
shot, also works well but there isn’t so much ammo for it. You can also reduce
its health by pistols while jumping back and fro and then use the weapon of
your choice. When the god is finally killed he will explode. Pick up the nearly
impossible to see Gate Key he leaves behind
In the SE corner is a gate with the balloon waiting for you behind, but you
haven’t done all the necessary things yet to exit. Also notice a kind of shrine
up the stairs.
Raising the Shrine
Head to the SW corner and place the Gate Key to the
right of the doors to open them.
Approach the valve that looks like the Eye of Horus
and turn it to raise the shrine up the stairs you probably have just seen. But
before going there head N through the passage until the two torches – one
lighted, one not. Stand in front of the latter and use it as it can be rotated as
well to see a window door opening in the far
NE corner of the area. Head N through the passage and through the gate that has
opened here, then to the aforementioned corner. Climb up onto the windowsill,
stand in the SW corner and turn SE. Jump to the crevice, shimmy far left and
jump up to the next crevice. Shimmy right until you can drop. Turn and follow
the hallway to hear the sound of Secret #14.
Shatter the vases for 2x Shotgun Ammo, 4x
Wideshot Shotgun Ammo, a Small Medipack, the Uzis and 2x Uzi
Ammo. Now run back E and run-jump to the windowsill holding Ctrl to not
loose too much health. Drop down, jump over the pit – the spikes are
deactivated again – and run up the stairs to find the Kallikrates Amulet under
the raised shrine. A cutscene shows you the door in the SE corner opening, so
run back downstairs and head into the S passage to finally get outside. Run
towards the balloon to finish this level and the whole
Part III: Senegal
Level 9 – In The Swamp
Secrets: 1
On The Tribesman's Heels – Exploring The First
Area
Run forward until a flyby kicks in that gives you a nice view over a
vast area, filled with muddy water and ends by showing a tribesman entering the
swamp through a gate.
Bug Warning: Some players encountered a bug, where all
the textures are black. In order not to activate it don't run forward at the
beginning, but go to the left instead and then go forward.
Once you have the control over Lara back, simply slide down into the
water – there's nothing of interest up here.
If you want to, you can explore the area a bit now: Start by going right
and keep following the edge of the water, until you get back to the start.
Doing so you will pass a cave which is not accessible yet, find some Shotgun Ammo in the far W of the area, a part,
where you can get out of the water (also in the W), the gate you saw in the
flyby (it's closed now) and a spot with some thick fog in the S, right next to
the lattice fence. You will also encounter a crocodile
somewhere in the water, so shoot it.
And that's all you need to know.
Let's start with exploring the thick fog in the S:
In the water behind it you can find an upside-down boat, which Lara can
stand on, next to a tree. Get on it and spot the horizontal branch that's connected
to the bent tree. It's a swinging pole and will get you to the green platform
in the water. If you look up to the rocks now, you can see an opening. Use the
same technique, you used in “Henutmire” (jumping from slope to slope to get
higher and higher) to reach it and then get into the new room (a raising block will go down and reveal it).
At the skeleton to your right you can find a Gear, then get on the boat and jump down with it. (Much better
than the kayak, isn't it? :-D)
The next thing we are going to explore is the cave in
the NW:
You couldn't reach it before but now that you have the
boat, it's possible: Simply park it sideways right next to the opening, so that
you face W. Then press and hold Walk followed by Right and Lara will jump out
of the boat to the entrance of the cave. Progress to the far E end (there's
nothing of interest either on the floor or in the pond) and have a look at the
right tree. There's a hole on its side.
Press Ctrl in front of it and Lara will grab into it and find the Gate
Key.
And finally the part, where one can get out of the
water in the W:
If you haven't done so yet, take the Shotgun
Ammo in the water next to it and then get on land. It's hardly visible but if
you just run forward a bit you should notice that tiny darts are constantly
coming out of the wall at the start of this triangular area and if you look
closer, you'll see that they are actually coming out of a hole in the
right wall. Grab into this hole (you'll lose a tiny amount of your health here)
and then quickly step out of the line of fire again, while you get a shot which
shows the open gate.
You're done with the muddy-water-area and can progress
to the swamp now with your boat.
The Tribesmen Are Watching You
You'll soon face another closed gate and if you look
at the left wall, you'll find a keyhole there (hardly visible). The square in
front of it is safe, so park your boat at the gate, jump out to the left to
land on this square and use your key there.
In the next area you can see a Senegalese Mask
engraved in the South wall (and two tribesmen standing on top of this wall ;-) ). Get out of your boat at this mask and Lara will
unexpectedly land in a pool of muddy water that will lead her to a room with a chain. Pull
it and a raising block that goes down outdoors reveals a new area. So swim back
outside, take the pack of Flares from the skeleton
in the E and then drive the boat through the new opening.
The Twisted Bridge
You won't need the boat for a while, so park it
anywhere and jump into the water. Then swim towards the closed gate and get out
at the right riverside, where you can use a ladder to get higher. Two tribesman will try to attack you up here, so
immediately draw a powerful weapon (Revolver or Shotgun) and get rid of them.
Then go to where they came from and find a big cogwheel at the
left wall. Placing the gear (you found it in the area where you also found your
boat) at its right side will make the metal in front of it go down and if you
now press Ctrl where it was, Lara will turn the big cogwheel and you'll get a
camera showing a transformation of the bridge outside.
Using this new path that was created you can now reach
a passage in the rocks (NE). Follow the passage until you find a skeleton under
a burning torch to your left and a second Gear at the
same square. Then progress to the end of the passage.
The room you want to reach now is just across the
water (see the second big cogwheel?) and if you look
closely at the ceiling right in front of it, you'll see that the rock is
covered with moss. While this says NOTHING in real life, it's a clear indicator
for a monkeyswing in TR and thus also in “She”. So simply do a running jump
towards the slope to your right, shimmy to the left, until you have the moss
above you and then press the Jump button so that Lara does her new trick and
lifts herself up to the monkeyswing. Use it to get into the tiny cave. As soon,
as you enter it two tribesmen will approach you
so immediately draw the revolver and kill them, before they can push you off
the edge. Then do the same you already did in the first cave (place gear –
activate cogwheel) and another part of the bridge will change its position.
Get to this new part (jump into water, get out at the
right riverside, climb the ladder, follow the bridge to the end and do a jump
forward ;-) ) and try reaching the crevice under the red lighted opening ahead
of you (in the NW of your current position).
In case you have any problems, here's how I did it:
Take a run-up along the border of the diagonal part and then jump off with a
slight curve to the right, in order to reach the rightmost part of said
crevice.
Use the new move to get higher and then draw up into
the opening (you'll hear a door), where you can crawl into a new room. Pull the
chain there to see a raising
block going down somewhere. It's right next to the
fireplace where you encountered the first two tribesmen so go there.
Acrobatics Above The Swamp
If you look down, when standing in front of the new
opening, you'll see that it's better not to slip here. A series of jumps are now waiting to be dealt
with, but don't become desperate, if you can't make one of them – there's a savegame after this sequence at the end of the paragraph.
If you want to, jump to the block on the right side
first, then to the next ledge and finally to the block in the W of the cave to
get some Revolver Ammo. Then head back
to the entrance.
There's a sloped platform ahead of you (slightly to
the left) you have to reach next with a running jump. (If you can't do it, be
sure that Lara passes the highest point of the ceiling.)
Then shimmy to the left as far as possible, draw up
and save your game.
Once Lara starts sliding, jump off the slope again, do
a mid-air turn and press and hold the right cursor key. Wait a bit and then
press the Ctrl in the very last possible moment and hope that Lara grabs the
edge. (if she bumps into it, you pressed Ctrl too
late, if she misses it, you pressed it as too early)
It's not over yet: Shimmy to the right about 5 times
and then press jump to lift yourself up to the mossy “monkeyswing” above your
head. It goes along the left wall and will guide you to the next ledge.
From there it's rather easy to reach the triangular
platform in the corner by doing two consecutive running jumps.
Now look to your left: There's another sloped platform
ahead of you and down in the swamp, there's a floor tile, Lara can stand on. I
found two ways to reach it and you can decide yourself, which one is easier:
1) Do a running jump (with a curved run-up) towards
the slope, slide down as far as possible, jump off with a curve to the right,
until Lara faces the floor tile and then press Ctrl. If you did it right, Lara
lands just a few steps in front of the floor tile, so quickly move forward and
try to draw up (press forward and Ctrl), before you get sucked into the swamp.
2) (in my opinion a bit easier): Do a running jump with a mid-air turn so that
Lara lands on the slope backwards and can grab its edge. Now shimmy to the left
as far as possible, draw up, jump off again with a mid-air turn, followed by a
curve the right until Lara faces the floor tile and then press Ctrl. If you did
it right, Lara lands just a few steps in front of the floor tile, so quickly
move forward and try to draw up (press forward and Ctrl), before you get sucked
into the swamp.
No matter which way you choose: This video by
Scottie should help. Also here's the promised savegame
[Savegame].
A Secret Opening
The floor tile opened the door in front of you, which
means that you could now access the cave with your boat and clear the swamp,
but don't do that yet. Instead jump into the water, swim back to the entrance
of this area and look south. A raising block at the opposite side got lowered
in the water and revealed a new path. Follow this path and draw out of the water
at its end to get Secret #15: 2x
Shotgun Ammo and 2x Uzi Ammo.
Then swim back outside, get on the boat and ride it
through the newly opened gate.
Passing the Dart-Trap
There's nothing of interest here so just keep riding
forward until you can't go any further with the boat. In the N you can see a
“light at the end of the tunnel” so get out of your vehicle there and jump to the monkeyswing at the left side of
the ceiling.
Follow it until you're almost at the end, where the
ceiling gets lower again and save your game! You can't see it, but there's a
dart trap and it will already hit you, when you're still hanging on the
monkeyswing, so you better be fast ;-).
Since you saved your game, you can experiment with it
a bit yourself but here's how I did it:
I approached the trap diagonally. When it started to
hit me, I immediately dropped down and pressed the roll-button. It's not
possible without health loss, but you can keep it limited.
In case you can't do it, I provided a savegame [Savegame]
A little remark: If you stop while
hanging on the slopy part of the ceiling, Lara will
be stuck and you'll have to turn 90° to one of the sides, to solve the problem.
The Tribesmen's Den
Take the Shotgun
Ammo from the skeleton in the W. Swim to the E and climb out of the
water. Head to the triangular ledge NW near the water, draw the Revolver and
aim for the highest spot of the rope SW, from the ledge you're standing on it
is just in a row with the far ladder, so that the raft gets moved under the den
and you can get into it. (You may get a messed up view, as a result of using
the Lasersight. Save and then load your game to get
rid of this problem)
Alternative way: Climb the raft. This time one can see the dart traps very
well, so it should be clear that only the middle of the raft is safe.
Now draw your Revolver and carefully shoot the highest spot of the rope.
After entering, pull the chain in the
inner of the den and see a door opening somewhere surrounded by rocks. It can
be found in the E of this area and marks the end of the level.
First we're going to get another health reserve and listen to a nice piece of
music though.
Get out of the den through the big double doors and
follow the walkway until its end (where the ladder is) to activate some music.
Then turn around and spot the Large Medipack on the wooden ledge at the left
side of the den. To reach it, you can either use a direct curved jump (it's
VERY hard though) or do the following: First get on the wooden ledge on the
right side of the house (via the rock next to the waterfall). Now jump to the slopy rocks in the N and shimmy to the left until Lara
starts going upward. If you now draw up at the left side of the highest spot
and do a backflip, Lara will land on the desired ledge and you can get the Large
Medipack as reward.
You're done with the level now, so jump into the water
and get out of it in the E. The door you saw earlier is to your left, so get
into the opening and go forward a few steps to end the level.
Level 10 – Amahagger's Village
Secrets: 3
A Hazardous Welcome
Just follow the path, until you reach an “interesting”
trap. It consists of 3 parts (the upper, the middle and the bottom part) and
each one of them is constantly moving back and forth. I'll do my best to
describe how to pass it without losing any health, but you may also want to
check Scottie's video
of this section.
Stand right in front of the trap and wait until the
upper and the bottom part are right next to you. Your first task is to get to
kneel down at the hollow in front of you, which should be rather easy.
Now just wait until the bottom part gets behind you
again, start running forward and jump over the middle part which is on the
other side. If you stand right at the wall, the traps can't hurt you, so you're
safe for now.
If you look through the next opening you'll see that
it's not over yet, but don't try to pass it too fast if you're going for all
secrets (in case you're not interested in secrets you can again use a hollow to
your advantage)
Go to the end of the breakable floor in front of the
trap (if you keep close to the wall, you won't get hurt) and wait there. Lara
will drop down into the pit and land next to a crawlspace. Get into this
crawlspace to find Secret #16: a Pack
of Flares and a Small
Medipack.
Then crawl back outside again and watch the traps
while you're hanging on the edge of the pit.
When the bottom one gets moved away from you again
(after having been behind you), draw up into crawling position and move to the
hollow in front of you.
Wait a whole cycle and as soon as the upper part of
the trap got behind you, run up the left side of the tiny hill in front of you.
Now just wait until the bottom part approaches you again, pass it with a
standing jump and then keep running forward until you're out of range.
Room With 2 Statues
Run down the big stairs, grab the Shotgun
Ammo at its end and then simply progress, until Lara slides into a huge room
with two statues.
If you look down at the right side of the entrance of
this room you can see a crack in the wall (you may want to go forward a few
meters, turn around and then inspect the (now left) wall with the binoculars to
see it) It can be reached, by diagonally running over the edge of the bridge at
this spot and pressing Ctrl.
It's a bit hard though, thanks to the horizontal pole object so here's a savegame. [Savegame]
Let Lara shimmy to the right, until she passes a vine
and jump up to grab the monkeyswing under the bridge. Follow it all the way to
the other side, then get into a crawlspace which leads
you into a new passage, where you can find a pack of Shotgun
Ammo. Take it with you and then draw a weapon of choice to get rid of the two
tribesmen, who are approaching you at the huge staircase.
Then go upstairs and progress through the narrow doorframe
to reach the next area:
Room with Red Columns
Go down the stairs and you'll find yourself in a
multilevel room. Take a look around and you'll see a closed door that seems to
be connected to a broken switch, two openings in the N with a closed gate in
between and some red columns. Let's start with the latter:
The column in the NE isn't as stable as the others, so
step behind it (Lara is facing S then) and press Ctrl, so that Lara pushes it
and triggers a nice chain reaction. Hehe – it takes
more than destroying a switch to stop our heroine.
If nothing happens, change your position slightly –
it's important that Lara is facing the middle of the column and best way to
approach it is by walking (if you are going forward too fast Lara will be
pushed to the side by the columns collision).
Go through the newly opened doors and find a Billali Amulet on a
pedestal at the left side.
Now let's shift attention to the openings in the N.
Both of them lead to the highest level of the room, but only the left one is
target-aimed so get in it there. Jump up to the first crack and use the new
move three times to get higher and higher. Then shimmy to the left, pass two
corners, draw up and you should soon reach an opening high up in the room (be
sure not to fall down, so better use Walk here). The ledge in front of you is
way too far to reach it, but there's still something you can do here: Get out
your pistols and shoot the box in the cage to make it fall down.
Then turn around, enter the passage on the right and
follow it all the way down to the closed gate. Open it with the switch on the
left side and you're back at the ground level of the room, where a tribesman is
attacking you.
Once he's dead, take the stairs in the S, turn around
at the end and follow the horizontal corridor to reach the ledge the box
dropped onto. You'll have to move it under the hole in the ceiling on the left,
so move it towards the wall first and then push it 4 times to the N.
Now climb onto the box and look up: At the right side
there's a slope. Use it to get into the alcove on the opposite side. Then jump
to the next alcove to your right and do a curved running jump to reach the
inner of the cage, where the box was.
Pull the two chains in the
cages to make the bridges go down in the main room and head back there the
exact way you got here (slide down to reach the middle level and then take the
long corridor, pass the narrow doorframe and go right).
More Fun with Red Columns
The opening in the W of the main room is finally
accessible, so run and jump across the bridges then go left and you'll soon
reach a room with six red columns in a swamp, which are surrounded by moving
flames. Looks like a nice challenge, doesn't it?
As one can already tell, Lara has to jump from column
to column and reach the opening in the opposite wall without catching fire. If
you can't make it, then have a look at Scottie's video or download a savegame – both things are linked at the end of this
paragraph.
It's hard to say what needs to be done exactly so I'm
just describing the best starting position, the best time to start the run and
the (IMO) critical part. The route itself should be clear (it has the shape of
the letter “S”).
The best starting position: Go to the very
left wall, turn around (so that you face W) and jump forward. Then sidestep to
the left, until you're at the edge and turn so that Lara faces the first
column.
The best time to start: Watch the flames
closely: They are moving along a circular path and (at least from this position)
it seems that two of them are passing the closest red column. Wait until the
first of these flames is just above it and then hop back and do a running jump
towards said column.
Critical part: If you don't
land on the right side of the third column, it will be very hard if not
impossible to reach the fourth column. All the other jumps are rather “easy” in
comparison.
Video
by Scottie (He found another “best” time to start) Savegame at the end of the
challenge[Savegame]
A Jumping Puzzle
Go through the opening and all the way upstairs, until
you find yourself in a narrow passage next to the previous room. Go down a bit and
look at the floor. Some floor tiles show an eye that is shining like the sun
and the others show a weird two-headed creature.
Common sense dictates that the ones with the eyes have
to be jumped on, while the creature-ones have to be avoided and it's your
decision, if you're doing it from S to N, or from N to S – the latter is a
little easier though.
Once you made it, you'll get teleported to the other
side and also get to hear a nice piece of music. The passage leads Lara into an
interesting looking corridor, where you can find a pack of Flares. Don't
worry about the junction or the closed door at the end, as both things are for
later, and just keep progressing, until you find yourself in a new area, after
running up a big set of stairs.
Hall Of The Ustane Effigy
Don't waste your time on the ground floor here and
climb the ladder in the W. (you better use your new move to be faster)
On the next level you can't do anything either (yet –
but you'll soon have to get into the opening at your back), so just keep going
all the way upstairs, until you reach the highest ledge.
There's an alcove on the S side of the structure you
just passed and it's situated right under the ledge you are standing on at the
moment. There are many ways to reach it – most people used a running jump from
what I read – but here's one I found rather easy:
Align Lara exactly the way it's shown in this picture. Now hop
back 3 or 4 times and then simply sprint forward. You'll pass the edge so press
Ctrl once you're in the air and Lara should land in the alcove. (If Lara misses
it by a few inches, try steering her to the right a bit before pressing Ctrl)
Use the switch in the
alcove to see a door getting opened on the other side of the room and then drop
down into the water below.
Climb the ladder in the W again, but now turn around
and look up to see the opening with the door you've just opened. To reach it first jump into the hole in the left wall and then
perform a curved running jump to grab a crack below the opening. Now
just press Jump and Lara lifts herself up.
Use the tightrope to get to the other side and then
jump on the block to your left from where you can reach the monkeyswing. It
takes you to a corridor in the S wall. Enter it and climb the ladder at the
end, to reach a room, where you have to pull a chain. It
opens a door high up in the hall (you haven't seen it yet, if you followed the
walkthrough) so go back outside and try to do a swan-dive into the pool from up
here. A normal jump works as well, but it's a lot harder and involves two
tricks (press Jump at the last possible moment and also press Ctrl once you're
in the air)
Get out of the water again and then climb all the way
up to the highest ledge. The newly opened gate is at its end so get into the
new room and shoot the four vases to find 4x Uzi Ammo. Then
hang from the outer edge of the opening in the north wall and jump up to the
roof.
Believe it or not, but you now have to get into the
cage at the bottom of the area, so go the middle of the roof – give yourself a
Dutch courage if needed – and do a running jump (or better: a swan dive), so
that you finally land next to the
pedestal with the Ustane
Effigy. Take it with you and you'll get a camera of the open
gate in the previous room. So exit the cage via the hole in the floor, swim
outside, then make your way up again and exit the whole area, by going through
the newly opened gate.
The Valley
You'll soon reach an outside area that's situated high
above a valley. There's also a secret in a cave ahead of you, but that one is
for later – just keep it in mind.
Then turn to the left, follow the path all the way to
its end and jump to the next ledge from there. If you now look to the other
side (W) you'll see that the trunk of the tree looks slightly different. So get
out your pistols and shoot it to make the tree fall down and then use it to
balance across.
There's nothing of interest in the cave to your left,
so just go downstairs (it's an interesting shape for a rock – isn't it?) and
enter the next room which seems to be “guarded” by two statues.
Stand in between those statues and look up towards N
to spot some floating shotgun ammo that's way too high to reach...yet. Then turn
around, enter the corridor in front of you and go downstairs, where you'll find
a switch which opens the gate next to it. If you're not interested in getting
all the secrets, simply skip the following section, and go further down to
reach the eponymous village.
Going Back For Two Secrets
The switch didn't only open the gate, but also moved
the floating shotgun ammo downwards. So head back, get on the ledge in front of
the right statue and do a running jump towards the Shotgun Ammo.
You're now standing on an invisible platform and can get to the crack above the
waterfall from there. (Use walk to find the edge of the platform, then hop back and to a running jump)
Now start shimmying to the left.
Remember the secret, you saw
when you entered this area? It would be accessible now, but save it for a
little later and shimmy even further to reach a secret opening behind the
waterfall in the corner.
Get in to find Secret
#17: A Shotgun and 3x Ammo for
it.
The following passage would take you back to the room
that's guarded by two statues, but since you still have to collect the other
secret, go back outside, hang on the edge of the waterfall again and shimmy to
the right, until you're below the other cave (it's
right where some mist is coming from the waterfall). Your new move gets you up
there and you can collect Secret #18: A Revolver and Ammo for
it.
Then follow the passage downwards and open the ceiling
trapdoor at its end to find yourself back in a well-known room. (the
other yellow “floor tile” is also a ceiling trapdoor btw. and you would have
reached it if you went down the passage that lead away from the 17th
secret)
There's nothing left to do in this area, so go
downstairs and this time progress through the open gate to reach the next vast
area.
Amahagger's Village
Let's explore this place a bit with the same technique
you already used in the beginning of the previous level, if you followed the
walkthrough: Start going right and run along the rocks, the walls of the huts
or the edges of the basins (no need to jump in there), until you get back to
the entrance. Always keep a good weapon handy, as you'll encounter four
tribesmen on your way.
If you don't rush this, but also look around a bit, you'll
not only get to know the whole area better, but also find some goodies: Two
packages of Shotgun Ammo (in the NW) and a
Small Medipack next to a totem pole near your starting
point.
However there's also another reason why I think that
doing a round through this vast area is the best way to start. Did you notice
something about the 8 huts in the village?
While only three of them are open, you can at least
have a look into the other ones: The two huts whose entrances are pointing to
the square in the SW aren't really of interest yet, but the other three all
have some familiar signs on their floors and – oh the coincidence – one of
these signs each is attached to the front-sides of the open huts. This means
that there's always a closed hut that belongs to one of the open huts and this
leads right to the next puzzle.
Puzzle in the huts
First look into the hut, which is S of the entrance to
this area and keep the exact position of the signs on the floor in your mind
(it will help to look at the bed and other objects as well).
Now go to the respective open hut – it's next to the
waterfall in the N of the village and jump onto the parts of the floor, where
the signs were (a running jump is needed to reach the first one!). Don't step
on any other floor tile, or you will have to start again, by going outside.
If you have problems with it, you may want to have a
look at this picture,
which shows the solution to the whole puzzle.
Once you did it right, Lara will be teleported into a
cave and can pull a chain that will
activate one of the cannon-like objects on the square.
WARNING (Possible Dead-End): If you forget to pull one
of the chains, you won't be able to get back up again!!!
Then take the Small Medipack and go
towards the pit.
To get back to the floor you'll have to jump onto the
roof of the building to your left so do that now and you'll lose about 10-30%
of your health (depends on the spot you jumped off and where you landed). Then
drop down and continue with the puzzle:
The second closed hut is the one you just landed on
and the fitting open hut is next to the entrance to the village. Again you'll
have to jump onto the respective floor tiles and a detailed description can be
found in the paragraph above. In case you can't do it have a look at this picture for the
solution.
If you did it right, Lara will be teleported into
another cave and can pull the next chain that will also
activate one of the objects on the square. Again there's a Small
Medipack, but you won't need it to get back to the bottom.
Simply jump onto the roof of the building to the right of the cave and slide
down from there to encounter the fifth tribesman.
The final closed hut is between the square and the
first one, the respective open one is in the far N of the village. It should be
clear already, what to do now (detailed description in the paragraph above –
picture with the solution here) and once you
made it, Lara will be teleported for a final time and can pull the last chain. In
contrast to the other caves, there's a Large Medipack now.
The only way to get down and stay alive is by jumping
towards the far right corner of the building to your left. It's certainly
possible to do it with a little less health-loss, but the (easy) way I'm
describing here needs at least 80% health: Hang from the edge on the left side
(if you are in hanging position, it's the right side) so that you're just a few
inches from the wall and then draw up again. Now slightly (!!!) turn to the
left and save your game, then press Roll. If you did
it, all that's needed now is a normal running jump + grab (press Ctrl once
you're in the air).
Back down on the floor the next tribesman
is running towards you, so kill it and then turn the 3 wheels at the
back of the cannon-like objects.
This opens the door to the hut nearby so
get in there and take the Sherd Of Amenartas from the pedestal.
Exiting the village
Watch the next flyby closely to see how a block gets
lowered in the E of this area and reveals a corridor that further leads back to
the room with the two statues.
Here's a description of the route, in case you've
slept during the flyby: Enter the new corridor, slide down and keep running
forward at the end until you can enter a newly opened gate (to your right is
the huge hall, where you found the Ustane Effigy). In
the next room go right and finally left – voilà.
Now jump towards the bridge in the middle of the room
and run to the receptacles between the statues to place the Ustane
Effigy and the Billali Amulet – a trapdoor in the
room below drops. (In case you didn't find the Billali
Amulet: Scroll up a bit and read the first paragraph under “Room with Red
Columns”)
Now you only have to get into the waterhole (the
easiest way is to just sprint over the edge of the bridge in the W), swim some
meters and the level ends.
Secrets: 1
Swim forward and use the ceiling hole to reach a vast
river area. You'll now have to place the artifacts you found in the previous
levels, in order to open the huge door between the two statues. It's up to you
which one to place first – I'm starting with the one Lara found in
Placing “Saint Patrick’s Pastoral”
First swim towards the ship in the N of
the river to find a passage directly right under it. Follow
it, take the Shotgun Ammo halfway through
and climb out at the end. You can already see the St. Patrick statues in the
next room... but doesn't it look way too easy?
Draw your revolver and carefully move forward, until two
tribesmen appear. This time they are much more
aggressive and will instantly set you on fire, if they get too close to you, so
get rid of them as fast as possible and then take the two keys (Door
Key 1 & Door Key 2) they
left behind.
Now that this place is safe again, go to the left
statue and place the Saint Patrick’s Pastoral to get a view of the door in the
first area.
In case you haven't noticed: A trapdoor is now
blocking the waterhole, so place the two keys next to the blue doors and draw
the chains in the respective rooms to open it
again – then swim back to the river.
A Key for Later
Before placing the next artifact we're going to
collect a key which is hidden somewhere in this area. Get out of the water, by
drawing up to the ledge next to the boat in the N. There's nothing in the
crates but you can shoot them if you want to.
Look at the wooden platforms: there are two wheels at the
left side of each one of them. Using the right one will always raise the
respective platform by, let's say 1 meter, while the left one does the exact
opposite and lowers the platform.
All you have to do now is to create a path to the flags,
which are actually swinging poles, by raising each platform as high as
possible.
It's rather easy to find out the solution with trial
and error: First raise the left one, so that Lara can just reach it with a
standing jump. Then go on with the middle platform, which now has to be raised
be raised, until it can just be reached with a running jump from the first
platform and so on.
In case you're too lazy to find it out yourself: The
left goes up 3 meters, the middle one 5 meters and the right one 7 meters.
Now make your way up to the right (raised!) platform,
be sure that you're health is at least 50% and do a running jump towards the
first swinging pole. Wait until the loading bar is filled and then release Ctrl
just after the lowest point of her swing, to make her jump to the next one. Do
the same again here and Lara will land on another platform in the river. (It's actually possible to reach it without doing the
previous puzzle - Lara can stand on a triangular part of the surrounding rocks
– but it's not the intended way)
In contrast to the other platform, there are some
goodies in the crates now, so shoot them and then pick up the Shotgun
Ammo and the Kallikrates Key.
Bringing back the “Sherd of Amenartas”
Jump into the water again and swim towards the gate S, where you can get
out at the right side. Then go left and approach the huge archway to find a wall
switch between the two pillars. It opens an underwater door
somewhere in the river and to find it, simply follow the ledge towards N, pass
the two golden statues and also the following huge archway and then drop into
the water after running another few meters. The door is behind the thick
stone-pillar.
Swim into the new opening and follow the passage all
the way until you can get out of the water again.
Be sure to shoot all the three vases in the next
corridor to get a Small Medipack, some Flares and
the Uzis. Then keep running forward until you reach a
lava-pit. Looks like a nice challenge, doesn't it?
It's not that hard actually once you realize that the
swinging fire-bowls and the moving platforms aren't synchronized. This means
that is may be a real nightmare to pass them at first try but a walk in the
park, if you wait a few cycles and try it again. It's your decision, but if you
want to make your life easier, keep reading:
Easiest Way: Stand right at
the edge of the pit and wait for the exact moment, where the first platform is
as far away from you as possible AND the first fire-bowl is on the far right.
Now just wait, until the platform gets back to you
again, and start running forward, when it changes direction. Now comes the only
critical part, as you have to jump off, once you've just passed the second bowl
of fire to land on the edge of the next moving platform.
Wait a bit (until this one changes direction) and now
you just have to run forward a few meters and do a running jump to finally
reach the other side of the pit.
If you can't do it, these might help: video/savegame [Savegame]
There's nothing in any vase/chest here, so just make your way to the statue and
place the “Sherd of Amenartas”
to get another view of the door in the first area.
Luckily you don't have to go back the way you came
here, as the door in the E wall is now open. Get into it and
drop through the hole to reach a new passage. Pass the wall at the left side
and then just keep going forward (no need to enter any of the other ways here)
to the very end, where you can see a slope to your left and an opening in the
ceiling.
Backflip onto the slope and instantly jump off again
to grab the edge above. Then shimmy to the left, until Lara passes the corner
and draw up.
Now press and hold both Jump and Right so that Lara
will start doing pendulum-jumps to reach the floor and then get into the
opening in the wall in front of you. You're back in the first corridor now and
since you're done here, you can exit this area via the waterhole and swim back
to the river.
Last But Not Least: “Kallikrates
Amulet”
Swim to the place between the second and the third
ship and try to spot a flat square with loads of grass on it. Get out a flare and
approach it to see that it's not only affected by the lighting in a different
way (which indicates that it's actually a very well-hidden object) but also has
a handle on its S side. Position Lara in front of this handle so that she faces
N and then press Ctrl to make her interact with this object and see that it's
an underwater trapdoor.
Once she opened it, wait a bit until you can control her again (it takes a
while) and then swim into the new passage. Get out of the water at its end and
enter a blue corridor. Shoot the vases, while going downstairs to get some
goodies: 2x Shotgun Ammo and a Small
Medipack and then place the Kallikrates
Key to open the door. (If you don't have the key in your
inventory, read the “A Key For Later”-section of this
WT)
Jump into the opening in the right wall in the next room and then enter Kallikrates' place.
You can't place the amulet yet, as a tiny stone-pillar
is blocking the pedestal, but there's a switch in an alcove next to the pool...
Look at the chandelier above it, and especially at its chain. One of the links
seems to be broken, so shoot it with your revolver and the object will fall
down into the pool and create a new “platform”. Use it to get into the alcove
and then push the switch, so that the
stone-pillar in front of the statue gets lowered. Now you can place the “Kallikrates Amulet” and the huge door will finally unveil
what's behind, so make your back to the river and enter the next vast area.
The
Normally I would suggest to circle the whole area and
get to know it a bit better but it doesn't really make any sense here,
as
Start by jumping into the pool of water just ahead of
you and find an underwater ceiling switch under
the small island in the middle of it. Use it to make the trapdoor on the ground
below drop and then swim into the new passage and follow it to the end.
You're now inside the red-lighted building so get out
of the water (the double doors will open) and then climb the ladder in the
middle that will take you to some kind of bedroom (phew...there must be a
terrible draft!).
What looks like an interesting golden painting on one
of the pillars is actually a big wall button, so
push it to raise the first of three circular platforms outside.
Now exit this room, via the left opening in the west
and then cross the bridge which leads to a tower.
Getting down seems impossible at first, as it's way too high, but it can be done:
Stand on the right side of the pit and look down to
spot a windowsill in the W wall. Align Lara so that she faces it, then hop back
3 times and start sprinting forward, until Lara passes the edge. Then press
Ctrl and Lara will land in the opening (she'll lose a tiny amount of her health
here) and can drop to the ground.
Shoot the two crates here to get a Small
Medipack and some Shotgun Ammo and
then turn the wheel once to activate the wooden elevator and open the door
leading outside.
The elevator apparently takes you back to the bridge
but there's more to it: Using it you can now get onto a part of the wall at the
side of the bridge. So draw up there and then turn around to
face yet another windowsill that can be reached with a running jump.
Hang from its outer edge and then jump upwards to reach the border of the roof,
where you can draw up to a flat square.
Enjoy the nice view up here (ahhh
the sunset!), and then do a running jump to get to the roof of the bridge,
where you can find the second wall button.
Push it to raise another circular platform and then get back to the
ground of this vast area. (The slanted walls of the red-lighted-building come
in handy here.)
Pushable Statues
Let's go on now with the two statues made of bronze.
Each one of them has to be placed under one of the hooks, which are hanging
from the cranes on top of the pillars near the entrance.
This way two raising blocks (one per correctly placed
statue) will go down and reveal two chains behind
the building in the N (the one with the blue door).
Pulling them will activate the cranes and thus raise
the two statues so that you can now move them to the top of the pillars, but
first you'll have to even get there: So go back to the entrance of the
red-lighted building and look to the E to spot a ladder on the wall.
Climb it to reach the top of the wall that separates
the two areas, jump to the block on your left (another place to enjoy the great
view) and then get down to the narrow part of the wall.
Now just follow either of the two walkways to get to
the first statue and pull it back once. If you have problems, then do the
following: Stand in front of the statue and press and hold Ctrl. Lara won't do
anything so also add a directional button (left or right).
Do the same with the second statue as well and the
building in the N will get accessible, which means that you're done up here and
can get back to the ground.
The
Go through the newly opened doors, but also draw your revolver, as two
tribesmen are in the building and will attack you
with their torches. Kill them and then take the Door Key 3 one of
them dropped. Use it to unlock the right glass-door in the S wall and then get
into the new room.
Activate the jumpswitch in the
left corner and then use the elevator (now in motion) to get up to the roof of
the building.
In the middle of it, there's another smaller
“building” and to the right of this pseudo-building, there's a second hole, but
it's too deep for Lara to get down alive. Both things are for later, as you
start with the four partly destroyed load-bearing walls (or whatever they
are... it's hard to describe) which carry another platform above you. Climb
onto them and then do a running jump to reach the top of the pseudo-building up
here.
Now look at the wall in the SE. In contrast to the
other ones, there's a flat block right under the ceiling and you can easily
reach it, by first doing a running jump to the lower block on the right. So do that now and then hang from its W side and use your new
move to get up to the highest part of the building. Jump over the slopes in the
middle and throw the switch to activate the
second elevator as well, then make your way back down
to the roof.
As you can already tell you can now enter the second
hole and thus the other room in the blue-lighted building. Again there's a jumpswitch in
here, but this time it's placed a lot higher, so do a running jump from the
elevator to activate it. It may take some tries but once you did it, the third
and last circular platform outside will be raised.
You aren't done on the roof yet, so take the elevator back and then
enter the pseudo-building via the double doors which you can push open.
In the next room you'll find a Torch, so
take it and then go down with the first elevator and light it from the wall
torch here... but what to do with the burning torch now?
Using The Torch
Finally the circular platforms which you raised
earlier come into play: When standing on them, Lara is high enough to light the
marble bowls and exactly that is needed now to progress.
There are three bowls in total so it's best to start
with nearest one, just next to the blue-lighted building. Since it's impossible
to get onto the circular platform from below though (with your torch at least),
you have to first get back up to the roof.
Then head to its E edge and look down, to see the
statue from above. A running jump from the NE corner will get you down to the
raised platform and you can light your first bowl. Better stay away from it a
few inches, when pressing Ctrl so that you don't catch fire. If done right,
you'll get a shot of a closed door and can move on to the next two bowls now.
The respective statues are both in the W of the area
and reaching the circular platforms is a lot easier now. Simply run up the huge
stairs to their left/right, until you reach the first even step and do a
running jump from there.
Once you lit all the three bowls, the double-doors in
the middle of the big white building will open. You don't need the torch anymore,
so drop it anywhere and then go upstairs and progress through the doorway.
Stairway To Hell
The door here can't be opened, so simply enter the room to your right.
Look behind the funnel-shaped structure to find a wheel that
will lower the wooden platform in its center. As a result of this a new passage
is now accessible, so jump into the “funnel” and then follow the passage
downstairs to some kind of cage, where you can end the level.
Don't do this yet though, but turn around when Lara is
right in front of the cage and go all the way back up. The wooden platform got
raised again and revealed another passage below it, which will finally lead you
to the level's secret: Secret #19: 3x
Shotgun Ammo and a Small Medipack.
Then climb back up, go downstairs again and now really enter the cage to hit
the finish trigger.
Secrets: 1
Into The Fiery Depths
Lean back and enjoy this cinematic start, that
shows Lara getting lowered into a huge lava-cave.
The grand finale has started!
Wait until the flyby is over and then jump
across the lava to reach the bluish floor. (I guess I don't have to mention
that the lava leads to instant death) Now go either left or right and follow
the path, until you get to the cave in the NW. No matter which direction you
choose you'll have to do a running jump over the lava/ a slope once but this
really shouldn't be a problem ;-).
Enter the cave and go upwards until you get to another
deadly pool that has to be passed with two running jumps. Then just keep
progressing and you'll soon see a huge lava lake with some floating rocks in
it. Jumping down from up here isn't advisable so better run forward a few more
meters, until you find a Large Medipack and some Shotgun
Ammo. Now it's safe to drop down to the ledge on your left.
This Is Madness! – Madness?! THIS...IS...TARAAAS!!!
I guess, that this subheading (which is an allusion to the movie “300”
btw.) doesn't make any sense to you yet, but you can trust me that it soon
will...
Your next task is to pass this lake by jumping from
one of the floating rocks to the next one and so on. While this wouldn't be too
hard, there's more to it: The rocks can't carry Lara's weight and will slowly sink
into the lava, when she steps on them, which means that you have to do
everything without stopping.
It's a real nightmare, but I'll try my best to guide
you through it. In case you can't do it, feel free to have a look at Scotties
video or download a savegame. Both are linked at the
end of this section.
General Tips:
- Save in another slot each time you reach a rock.
- Try to always land on the edges of the rocks, not in
the center! This way you will have plenty of space to align Lara correctly for
the next jump.
- Once you reach the slope it will get a lot easier, so don't give up too fast,
if you're having problems with the first 5 jumps.
- A Picture that shows the exact route can be found here.
Start with a curved running jump to the first rock,
but directly jump off , after doing a curve to the
left and try to reach the left side of the second rock (you will need to steer
to the right, while you're in the air).
If you did it right you will now be able to turn
almost 90° clockwise, before jumping off to the third rock. This is needed, so
that Lara can land on the SE corner of this rock.
Now comes the hardest part (IMO): The third and the
fourth rock are pretty close to each other. This means, that you have to jump
off the third one as early as possible (that's why you had to land exactly on
the SE corner) so that you won't land in the center of the next rock but reach
its left side instead.
If you did it right getting to the fifth rock is
rather easy, as you will have plenty of space to curve to the right, before
jumping off. [Found by Scottie: Lara can actually stay on the fifth rock,
without dying. The platform goes down, at first, but it also gets back up again
and if you are standing on the right spot Lara won't catch fire and you can
take your time to align her correctly for the next jump]
From now on it will be easier: Get to the slope, but
directly jump off while having “Forward” pressed to land on the sixth rock in a
running motion. Use the length of the platform to align Lara so that she faces
the next rock and jump off in the last possible moment to reach it. Now just
perform 3 consecutive running jumps and you made it.
Skip this, if you're not interested in getting all secrets:
If you still haven't had enough of it, you can go back
to get a secret now. It's hidden in a room behind the lava-fall in the NW
corner of the lake and you may want to check this picture to see
how to reach it.
I'm not going into detail too much, as it's the final
secret in the game, but as you can already tell it won't be easy at all:
Towards the end the rocks are all pretty far apart and will also trick your
mind due to their unusual shape (in the end, they are squares, as the LE works
that way).
That said try jumping a bit more to the right, if you
have problems reaching a rock.
Another thing that's worth mentioning is the jump from
the final rock: The entrance to the secret room is in the wall to your right,
so a curved running jump is needed to get in there.
Once you made take your reward: Secret
#20: 2 Large Medipacks and 3x Shotgun Ammo.
Then jump back the same you you
came here.
Scotties video
only features the way across the lake (not the secret). [Savegame]
Platforming Above The Lava
Take the goodies (4x Shotgun Ammo and a Large
Medipack) and then enter the next passage ahead of you to find
a Small Medipack as well. Look up now and you'll see
two cracks in the E wall. Use them to get higher, then turn around and jump to
the other side to reach a ledge above the lava-lake. Go up the slanted blocks
there (Don't worry about tiny cracks filled with lava – Lara can step on them)
and draw up to next platform.
Don't follow the walkway here, but approach the NW
edge instead and look down to spot a triangular shaped rock which you'll have
to reach in order to progress. Of course there are many ways to do that, but I
found the sprinting-technique to be the easiest: Align Lara so that she faces
the middle of the rock, then hop back 3 times and start sprinting forwards.
Lara will pass over the edge and should land on the ledge shortly afterwards.
Now go N and enter the next passage to your left.
Follow it until the track splits. The left way leads you to two packs of Shotgun
Ammo, so go there first and then enter the right way to finally reach a place
high up in the first area.
Walk to the edge (don't slide down here, unless you
want to do everything again!) and look to the cave on the other side. Then turn
a bit to the left and back to the right and you should soon spot the reddish
orb object that is floating in the air. Do a running jump towards it and you'll
land on a diamond-shaped platform that popped up below, which triggers another
orb in the S.
Again a running jump (+grab, if you can't make it)
will get you to the yet invisible platform below it, which will trigger yet
another orb in the SW. Landing on it will also call a harpy, so
kill it before it can push you into the lava and then jump towards the fourth
orb in the S.
Turn to the right to find the next (fifth) one high up
in the air and do a running jump with a grab in order to reach it.
From there you will have to get to the flat part of
the rock that sticks out of the wall, which is rather easy, if you keep
pressing forward, while Lara lands on it. Also have in mind, that the circular
platforms are actually squares for the LE and so Lara can still stand on (and
thus: jump from) the thin air around it.
Collect the Large Medipack once you made it and then
look down to the SE to spot the sixth orb there, which can be reached with a
running jump and a grab. This time however the grab (press Ctrl once Lara is in
the air) is needed to make Lara jump a little further.
Again landing on it will call a harpy, so
immediately draw your Revolver and kill it before jumping down to the next
platform in the E, which will trigger the final (eighth) orb in the S. You
can't directly jump onto the yet invisible platform, but have to grab its edge
and then draw up instead. Now all that's needed is a final running jump to the
ledge.
Scaretales ~ The
Grand Finale
Head into the next passage, until a great flyby kicks in, that
introduces you to the final enemy, which I'll be calling “witch” from now on. I
couldn't really find out, if there's more to the pigs or the dead man
story-wise, but it's certainly a nice way to incorporate the pieces of music
into the gameplay. :-P
Wait until you have the control over Lara back and
then slide down the slope on the right.
Some information about the “boss fight”:
Your weapons are useless here and you'll have to find
other ways to harm the witch.
So all you can do is running around and look for
mechanisms, while trying to dodge her attacks.
She mostly just fires energy blasts at you, which will
cost up to 50% of your health, but sometimes she also shoots a bigger energy
ball, that will set you on fire and thus lead to instant death. So watch out
and save in different slots!!!
First enter the cave in the N, kill the two pigs that
attack you and then grab into the hole at the right side
of the back wall. Then head into the cave on the other side of the area, get
rid of the two aggressive pigs and find yet
another hole in the back wall. So grab into it as well
and then get back out again.
A red platform appeared in the SE lava-pool. To reach
it, just do a running jump from the left diagonal border next to the long slope
(the entrance) but be prepared, that it will start sinking, as you step on it,
so directly jump off again and land on the safe spot in the corner.
There's a crack in the S wall, so use it to get to the
higher ledge, where you can find the dead man you saw in the flyby. Approach
him from behind and then pull him back once to reveal a
Door Key 1. If you want to
you can shoot the vase to get a Large Medipack, then
open the door in the E and shoot the gong
inside...Seems you just found out how to harm the witch ;-)
Now make your way back to the floor (drop from the
middle of the ledge) and look into the NW lava-pool to see, that another red
platform appeared here. It can be reached it by doing a running jump from the
diagonal border next to the “throne”-room and again you have to use it to get
to the safe spot in the corner. This time the crack is in the N wall, so use it
to get to the higher ledge. If you're low on health, destroy the vase for a Large
Medipack, then enter the door on the
left side to find another gong. Shoot it to make
some more rocks drop onto the boss enemy and then drop down to the floor again.
The next red platform appeared – this time in the SW
lava pool, so use it to get to the safe corner and then get up to the ledge in
the W. (not going into detail too much now). There's a Large
Medipack in the vase at the far end of this ledge, so take it
if you need it, but then go back and enter the door to find and shoot the third
gong… I can feel it – she'll be dead soon.
All good things come in fours, so get back down again
and find the final red platform in the NE lava pool. Again it will help you to
get to the platform in the corner, from where you can use the crack in the N
wall to get higher. No real need to get the Large Medipack that's
inside the vase, unless you're trying to get all the pickups. Instead get into
the room to your right and shoot the final gong.
Ding-Dong The Witch Is Dead...
… or at least frozen :-P …
If you watched the final flyby closely you saw that
the throne in the W got destroyed and revealed an opening behind it. Enter this
opening and then get into the hanging cage here to end this level.
Secrets: 0
You're back in “Kor” now and
if you followed the walkthrough, the blue door in the room to your right should
be open now so get in to reach the bonus level.
If you didn't find all the 20 secrets, the door is
closed, so you can now either download this savegame [Savegame]
and still play the Bonus Level, or end this whole game by going outside and
watching the final flyby.
Level 14 – Bonus Level – Ayesha’s Palace
Secrets: 0
Enjoying The Peace
Go right and you'll get to what looks like the
forecourt of the eponymous palace. There's not too much you can do here except
for enjoying the calm atmosphere.
The doors in the W, that can be opened with the button next
to them lead into the library, but there's nothing you can do there yet, so
enter the dark passage in the E and follow it all the way to the end, until you
reach yet another inner courtyard.
The First Cat-Statue
Get into the diagonal creek here and fill your waterskin.
(Yep, you heard right. An object we collected in Egypt and only used a single
time so far comes into use again)
Now use the switch in the S and then go through the
newly opened doors to enter Ayesha's bedroom...guess she doesn't care for
furniture too much :-P
The stairs in the left side of this room will take you
to a higher level and here's where your waterskin comes into play: There's a
total of six bowls in this room but two of them are still burning and now Lara
has to extinguish them. So do that now (you'll have to refill the waterskin at
least once) and a secret passage in the W wall gets revealed behind a bookcase.
Enter it and take the the cat statue, which is called Bastet, from the
pedestal.
Then get out again, press the button
on the pillar ahead and then leave this room through the newly opened
gate.
Platforming In The Towers
You're now on a higher ledge in the courtyard. Your
next task is to explore the 4 towers, so go left first and open the tower in
front of you by pressing the button next
to the gate. Inside you can see another one of those wooden platforms from
“Kor”, so activate it with the switch in the right corner and then use it to
get to the highest ledge in the tower, which will further lead you to a fenced
walkway.
Follow this walkway all the way to the other side to
find a button, that opens the gate to your right
and enter it.
You'll now have to get down to the bottom of this
second tower but first jump to the ledge on the left side and look down to spot
a vase in an alcove in the SW corner. It hides an important pickup so try to
reach this alcove; either with a direct jump (costs about half of your health)
or with the help of the windowsills (get into the one below the entrance first
and then do a running jump from the opening next to it). Once you made it, you
can shoot the vase and collect the Small Medipack and
the Gate Key. Then drop down
to the bottom of the tower and press the button, so
that you can get back to the ledge outside.
Now get back up to the fenced walkway by using the
wooden elevator and follow it all the way to the tower in the NE. Place your
key in the keyhole and then go through the newly opened gate. Again you'll have
to get to the ground floor of the tower, so first jump to the ledge on the
right side, then hang from its E edge and drop down to a pillar with a Small
Medipack on top. Now you can get down to the bottom with a
little health loss and press the button there.
It not only opens the gate leading outside, but also the entrance to the tower
in the NW corner. So go there now and then leave this whole area through the
narrow passage with the spiderwebs.
Inside The Palace
Follow the corridor, until you reach a huge room with
two great-looking paintings on the walls and a throne at the far end. Approach
the throne and find another Bastet on the
left pedestal, then leave this area through the passage in the S. Shoot the
vases, that are placed along the way if you want some more goodies (you can
find a total of 3 Small Medipacks, but
you won't need them anymore) and also take the third and final Bastet from a
pedestal, that's placed in a bright spot about halfway through the passage.
Now just keep following the way (not only the passage
inside the palace, but also the path outside – there's only one direction to go
so it's not needed to go into detail here) until you reach a grate-door in the
far SE end.
Press the button to open
this gate and then get into the next room, which is actually the library, you
might have already explored at the beginning of the level.
Drop down to the ground here and then place the three
Bastets into the receptacles in the N wall. This will reveal a new passage in
the wall to your left so get in and find the final artifact of “She” there: A
book titled “Aristophanes – The Banqueters”.
When Lara takes it, you'll get a shot of the door
which leads back to Kor. This means, that you've completed the bonus level and
thus the whole adventure, so just exit the library through the double-doors
(you may have to press the button next to
them) and then get back to the “Epilogue”-level the same way you got here.
Level 13 - Epilogue
Go right here and pass through the doorframe to get
outside and then lean back and enjoy the final flyby.
THE END
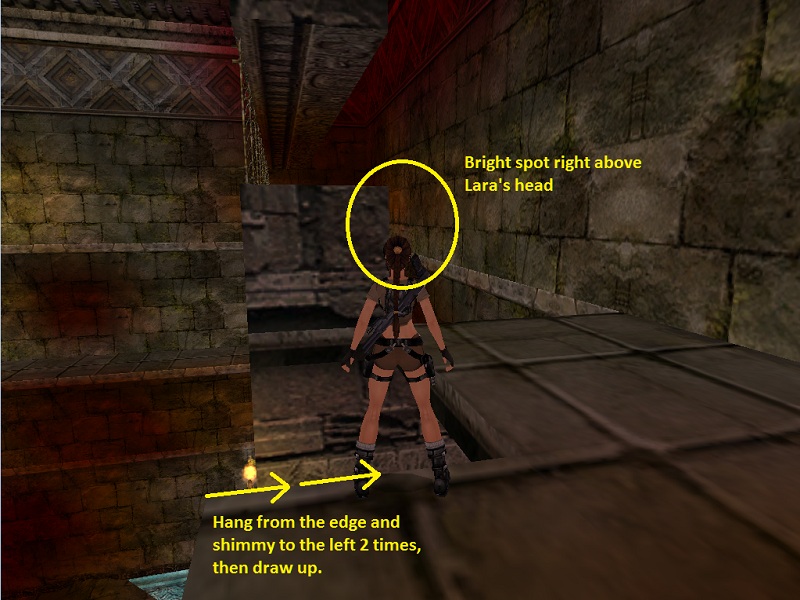
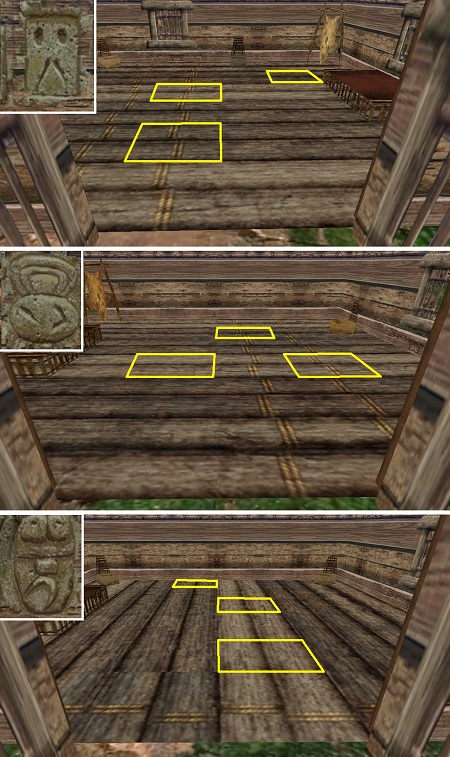
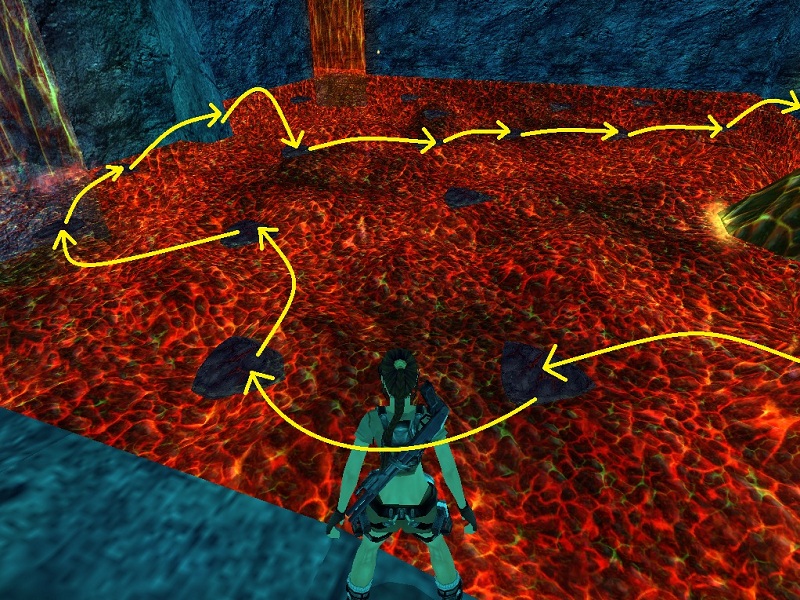
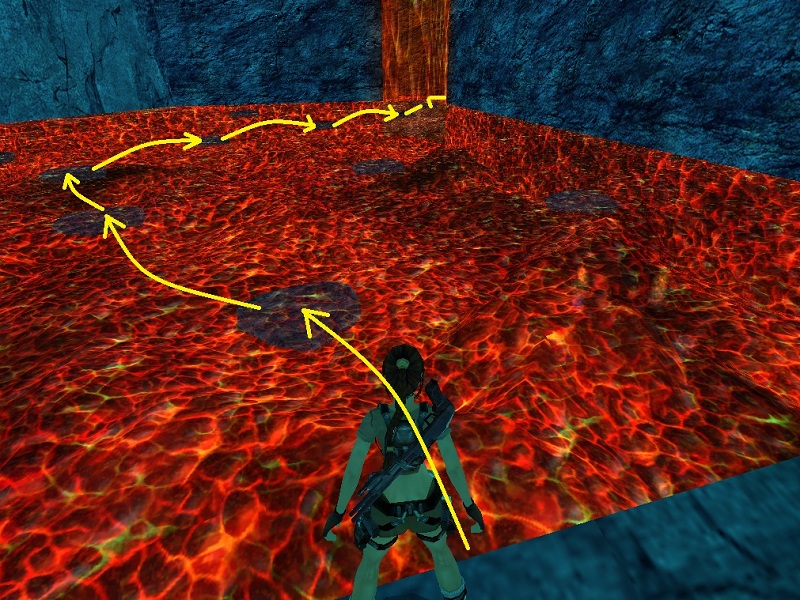