THE GOLDEN CROSS
Levels by LOTRKingluis
Walkthrough by Nina Croft (Level 1 and most of Level
2, completed by Phil Lambeth, with the help of a video walkthrough created and
posted by Blacksheep)
LEVEL ONE: Dark Caves
secrets: 1
Slide down into the first cave. You'll see a couple of windows and
closed doors around. Pick up uzi clips
from the pit ahead, then climb into the alcove in the
NE corner, where you'll find a wall lever. This will open the door in the
opposite corner. Drop down, roll and run to the other side of the cave
(left-hand wall from the entrance). Jump up to grab the crack in the wall,
shimmy a bit to the right and pull up near the golden window. Turn around and
stand jump diagonally to the left to land inside the opened doorway. Crawl in
and follow the crawlspace to the opening above the first cave. Drop to hang
from the edge and shimmy to the right around the corner. As
soon as you shimmy around the corner, pull up into the low opening, where
you'll find a floor lever. Use it to open the golden gate below. Crawl
backwards through the opening and drop into the cave below. The opened doorway
is directly ahead, a bit to the right. Go through.
BIG CAVE WITH LAKE
You'll enter a big cave that leads to three main directions. Kill two bats. Both gates to the left (near the lake) are
closed, but still, go there first and pick up an important item. To the left of
the lake there is a big alcove with flares
you can find in one pit in the corner. Jump back out of the pit and stand at
the edge of the pit facing SW. From there, run jump to land in the area behind
the steep rocky formation. On the pedestal here you'll find the SIMPLE KEY. Also, near the lake, in a bush to the
SW of it, you can find uzi clips. Return
to the entrance (fork) and go left (N). Just notice a passage leading to the
right, and proceed further. Jump into the water and swim down through the UW
passage, keeping left (but don't make the U-turn into a dead-end). Find the UW
lever and pull it to open a gate elsewhere. Return for now back to where you
jumped in and climb back into the cave. Return to the entrance into this cave
and go right, towards the small lake. Jump over a steep block to the left (S),
near the skeleton. Climb the ladder and go through the
gate you've just opened.
CAVE WITH SLOPES
From the entrance run jump to land on the pillar ahead. Stand jump to
land in the alcove to the left and pick up an SM.
Take one step back from the edge of the alcove and take a stand jump back onto
the pillar. Turn left and stand jump W to grab the edge of the sloped pillar.
Pull up, slide, jump onto the next sloped pillar, jump off and land onto the
third pillar. Jump quickly off this pillar to land in the pit where you'll find
SECRET #1: BRONZE
SHIELD and flash grenades.
Save your game before you attempt to jump out of this pit.
Using the Look/Camera button, pivot Lara towards the lower edge of the
slope above. Stand jump to land onto this slope facing downhill. Jump off
quickly and land on the last sloped pillar. Jump off immediately, and if
necessary, steer Lara a bit to the right to make her grab the crack in the
pillar ahead. Shimmy to the left and climb onto the flat pillar, then onto the
higher one next to it. Run jump to grab the edge of the opening ahead, pull up,
then drop onto the lower ground to the right. Follow
the passage to the fork, go right and pick up TRIANGULAR
PIECE from the pedestal. In the flyby you'll see the receptacle for
this item, but first you need to find the key that opens that gate near the
lake. So, return to the fork and go right. Before you climb up onto the higher
block, save your game.
Stand against the higher block and sidestep all the way to the left.
Then hop back and stand jump to land on this sloped block. Slide a bit, then
jump off and steer Lara hard to the left, to land in the alcove and thus avoid
the boulder falling from above. Before you proceed through this alcove, jump
diagonally to the right over the boulder into the alcove where you'll find shotgun ammo. Jump back into the previous alcove
and then diagonally to the right (SW) to land on the slope below. Once again,
save your game here. Jump onto the sloped block below the golden gate and
immediately jump off over the deep pit to land on the flat block ahead. Climb
onto the block to the left and use the lever to open the golden gate you've
just seen. Return to the edge of the deep pit and once again, save your game. This
will probably be the trickiest jump in this level. ;)
So, stand at the edge of the alcove, turn to face the opening, then a
bit to the right. Hop back and do a run jump, steering Lara to the left towards
the middle of the opening. Press Action at the last possible moment to avoid
hitting the gate and falling into the pit.
Note from Moderator: Using the
"walking jump" worked reliably for me. Hop back, then walk
forward before initiating the jump. Keep
the action key depressed and you'll land safely in the opening. This opening leads back to
the first cave (savegame01). Hop
down and exit N.
PIT WITH POLE
In the next room continue N and enter the passage E just before the
water hole. Pass some rays of sunshine,
kill one small scorpion along the way and
follow the long, twisted passage to another cave with a pole and pit below.
Kill one bat here. Sidestep to the right
and run jump to grab the pole. Climb up
a bit, turn Lara to the right until the large spider web comes into view to
your right. Back flip into an alcove and
stand jump diagonally to grab the ladder. Climb just a bit up the ladder and
back flip to land on a pillar behind you. Now, turn to face S and a bit to the
left. If you use the Camera/Look button and take a careful look through the gap
to the left of the pillar, you'll see a lever there. Now, stand jump to grab
this gap. Shimmy to the left and around the corner. As soon as the corner is
cleared, pull into the gap (use Up and Crawl buttons) and use the floor lever.
You won't see what happened; a block nearby has been raised. Crawl back through
the gap and drop into the pit. Go N and climb to the entrance. Once again, run
jump to grab the pole. You can see the
raised block in front of you. Turn
Lara's back towards the passage hidden in the far right corner (SW) of the
cave, and back flip from the pole to land there. Kill two bats that bothered you, if you haven't already
done so.
Climb onto the higher blocks in front of Lara (if the raised block is
behind her). From there run jump onto the raised block. Turn to face E, then a
bit to the left. Make a running jump to grab the crack on the wall E (around
the pillar in front of Lara). Shimmy a bit to the right and climb onto the
pillar near the corner. Take a look around the room and locate the JS on the
wall SW. For now, stand jump to grab the crack on the pillar S and shimmy around
the corner to the left, to the flat alcove where you can pull up. From there,
run jump to grab the JS. You will have no idea as to what happened: a trapdoor
opened in the main cave in those UW tunnels you've already visited. So, return
to the pit with pole N, climb to the entrance and return through the twisted
passage back to the main cave. Go right and jump into the water hole.
Swim ahead, to the broader tunnel with some plants hanging from the
ceiling to the left of Lara. Swim through the opening concealed by these plants
and go left at the fork. Just swim to the end of the tunnel, making a left turn
around the corner, and through the opened trapdoor, where you can climb out of
the water. Use the Simple Key in the keyhole to open the gate, go in, kill a
couple of bats and a big bug, and use the Triangular Piece in the
receptacle opposite the entrance. This will open that gate near the lake.
Return through the UW passage to the main gate and then to the fork, making a
turn to the right towards the lake W. Finally, enter the next cave through the
open gate (which then closes behind you).
CAVE WITH KNIGHTS
Find a button in the SW corner and press it to open two gates. Two knights and two wolves
will emerge, so shoot them down. The best and easiest tactics for the beginners
is to jump around evading the knights while shooting at them. Their weak spot
is their chest. Do not let them corner you. They should soon be down. Pick up
the WHITE KEY from one dead knight. In
the dead-end passage to the N you'll find crossbow
arrows. In the dead-end passage to the S, you'll find a JS that
re-opens the gate through which you entered. Use it and return to the lake
area. Now you need to find the keyhole for the key you've just retrieved.
Return to the skeleton between the entrance and the lake. If the ladder
is to Lara's right, take a look to the left and locate the opening in the
ceiling. Refer to this screenshot for clarification.
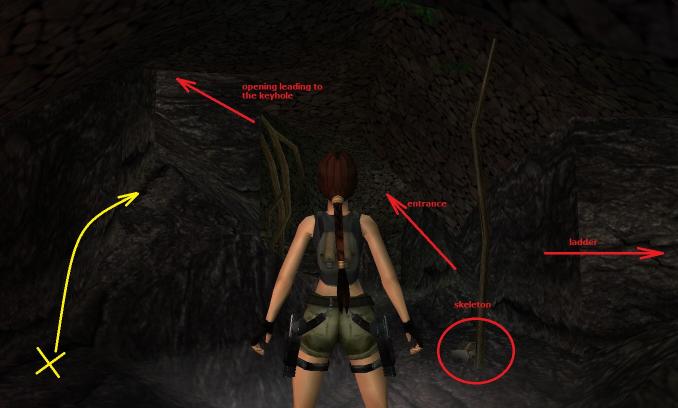
Jump over the steep rock below the opening (from the X along the yellow
arrow in the screenshot). Climb into the opening and pick up shotgun shells from the ground. Crawl forward,
unlock the door and slide down to the next level.
LEVEL TWO: Even Darker Caves
secrets: 2
Slide down into an opening with water. When you dive down into the
flooded cave, remember where this opening is, in case you need to return there
for air. You'll normally land in this opening facing N. Swim to the left (W)
and find a well-concealed ceiling UW switch hidden in the third plant on the
left, starting from the entrance. This will open one UW gate NW at floor level.
Swim through this passage and climb out of the water. You need to kill one knight and one wolf
in order to proceed. Find the pushblock opposite the entrance and pull it back
twice. Then push/pull this block towards the opposite end of the room (E) all
the way it will go. Climb up on it and run jump to grab the edge of the opening
E. Pull up.
Follow the short passage to a room with pedestal on which you'll find
the CROSSBOW. Watch out for the pit with
spikes near the pedestal. Picking the weapon up opens a door nearby and a knight and a wolf
will enter. While shooting at them, be careful not to fall into the spike pit.
Once they're dead, notice one JS above the pedestal, a lever on the nearby
block (you cannot use it as yet), bones in the alcove where you've just opened
the door, one pushblock near the spike pit and a lowered trapdoor directly
above the spike pit. For now, go up the
stairs opposite the pedestal and climb onto the pushblock. Jump up to grab the
monkeyswing above and traverse towards the JS. Drop from the ceiling to grab
it. Or you could have just activated
the JS by jumping up from below it.
The trapdoor above the spikes will rise. Now you can push/pull the block
to stand against that block with the floor lever. Use it to open another door
back in the flooded cave.
Before you leave, make sure to blast the bones with the Crossbow (use
the Look button to look down and shoot).
Or you can stand in front of the bones with pistols drawn and shoot
continuously while hitting the roll key repeatedly. Note from Moderator: According to the builder, shattering the
bones in this game serves no useful purpose. Go back to the pushblock, push/pull it four
times S and get up on it. Take a running
jump slightly SE and grab the crack in the wall. Shimmy right as far as possible and pull up
into the crawlspace. Crawl forward and
pick up the GOLD SHIELD and a SM for SECRET #2. Get back down and exit SW to the previous
cave. Jump into the SW water hole.
Once back in the flooded cave, swim to the left, open the UW door and
swim through the gate you've just opened. Climb out of the water into a cave
with chains. Go up the block to the right and slide down into the pit with six
or seven scorpions. Kill them and pick up
normal crossbow arrows from the ground.
On several flat floor tiles some blades are concealed, so watch out. Notice a
crawl space opening in the SE corner, but don't go there yet. Instead, return
towards the entrance SW, jump over the steep block and pull the wall lever to
open the third door back in the flooded cave. Return there through the UW
passage. When you enter the cave, swim forward (to the W) and through the
opening.
Climb out of the water in a small cave. You'll see the Winding Key in
the corner, but it's protected with spikes, so don't go there just like that.
Instead, go to the opposite side of the room (NW), overlooking the block with
the key. This block is a bit steep, so sidestep until you can stand at the
highest point just near the steep edge. Jump up to grab the monkeyswing and
traverse towards the key. While Lara is hanging above the key, the spikes will
pop up and retract permanently. So, drop down and pick up the WINDING KEY. Return to the UW cave,
find normal grenades in the SE corner of
the cave, and return E to that room with chains. Just make sure first to pick
up the SCARAB located in the seaweed
just to the left near the E door you opened manually earlier. In the room with
chains go through that crawl space you saw earlier (SE corner). Combine the scarab with the winding key and
use it on the raised brown tile in front of the spike-trapped green tiles to
deactivate them. PICK UP THE SCARAB AFTER PASSING THE SPIKES.
TRAPPED CAVE
The door ahead will open automatically. Climb into the cave with many
traps, including two fires on both sides. For a start, save
your game. The tile just at the entrance to the cave is safe; there are
some blades to the left and right, as well as concealed blades directly ahead
(near the pillar). Jump diagonally to the left to land on the safe tile (second
tile from the fire ahead). Crawl towards the fire to avoid the ball with spikes
falling from the ceiling. At the border between this tile and the tile with
fire, stand up, keeping Lara as far to the left as possible. You cannot jump
over the fire, so turn Lara to face diagonally to the left (away from the
fire). Jump over the sloped block next to Lara to land on the tile with ammo.
Do not pick up the ammo as yet, but hurry to run to the adjacent tile, keeping
close to the wall on the left. Only then may you turn to the right towards one
pretty harmless blade. Now three blades have been deactivated, so you can pick
up revolver ammo from the tile where you
jumped. Be careful not to step on any other tiles, as they conceal more blades
and spikes. Once you've picked up the ammo, return to the tile with the
deactivated knife, near the pit with concealed spikes.
You are standing to the left of the swinging chain and breakable tile
covering yet more spikes. So, don't even try to go there. Instead, turn to face
NE, with two sloped blocks above the spike pit. Run jump to land on the
left-hand (W) slope and keep the Jump button pressed. Lara will bounce off the
slope, land on another and bounce back. Every time she bounces off facing the
next slope, press the Left cursor to make her steer to the left in mid-air.
When you clear the spikes below, along with the sloped block to the left of
this spike pit, you can let go of both buttons and land on the flat block near
the entrance to another cave.
BRIDGE
Enter the cave with a bridge in the shape of a cross, where the camera
is fixed. The gates to the left and right are closed, so keep running across
the bridge until you reach the ledge opposite the entrance. You have to kill a knight here and to use a hole
switch in the corner to the right, to open the gate W. Cross the bridge to the
intersection and turn right to go through this gate. Go along the edge of the
pit and jump over a steep block ahead. Face the pit N and run jump to grab the
edge of the rock formation ahead. Pull up, step forward and slide just a bit
lower towards the closed door ahead and turn away from the door, facing SE
toward a gap between two higher, steep rocks. Refer to this screenshot for
the exact position before the jump.
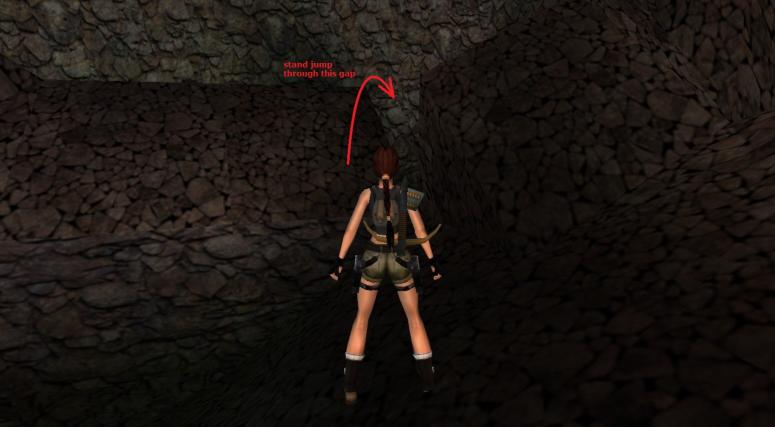
Stand jump through that gap to land on a block behind, instead of
falling into the pit ahead. Turn left and run jump NE to land on the ledge
behind the steep blocks. You'll find a button on the wall that opens the door
in this cave. Stand jump SW back to the block above the pit, then jump NW
through the gap and slide down to the door. Go through.
Kill one big flying bug along the
way and approach the next door that opens automatically. Enter the room with
three buttons protected by spikes. Pick up an SM
in the near right corner and kill two flying bugs
that come to life. If you stand on the central tile you'll see a camera of the
Western door back in the cave with the bridge. Enter the W passage to the left
and approach the door on the opposite side. You'll have to kill a knight who'll drop an SM.
Climb into the opening to the right and drop into the water. The UW tunnel will
lead you to a big room with a floor lever that opens one golden gate in the
passage where you killed the knight and retracts the spikes protecting three
buttons. So, return to the passage where you killed the knight and climb up
some stairs S until you emerge above in the room with three buttons. Jump off
the steep slope as you slide down, otherwise you'll land on the fire and die.
Go left toward the buttons.
CAVE WITH STEEP PILLARS
Press the buttons in this order: right - left - middle, to open the
Western gate back in the cave with the bridge. Return to the previous cave S
with pits, run jump to grab the other side, pull up, jump over the steep rock
and go to the bridge. Cross to the other side and go through to a room with
slopes and cog switch. Shoot a giant flying bug. In the near left corner near the cog wheel
you'll find UZIS. There are some bones
in the near right corner, so shoot to shatter them using the Crossbow (or
Pistols) like you did the first time. Do not pull the cog as yet. Instead, run
jump to grab the back side of the steep pillar located exactly in the middle.
Pull up, slide just a bit and jump to the next pillar. Once you land, slide a
bit, jump off and repeat this process (jump onto, slide a bit, jump off) a
number of times, with an annoying fixed camera angle, until you reach the ledge
on the opposite side of the cave, where you have to kill another flying beetle near the closed gate. Go to the S edge of
the ledge and run jump SW onto the flat pillar near the wall to find uzi clips.
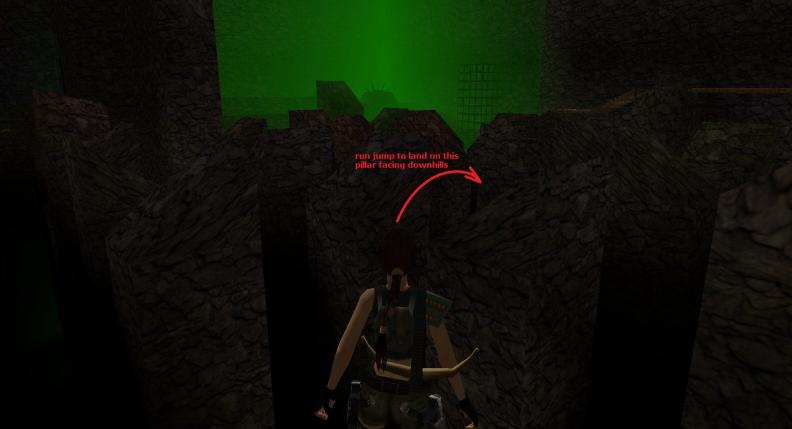
If you want the next secret, now would be a good place to save your
game. Turn to face NW (refer to this screenshot
for the exact position) and run jump onto the pillar there.
It's important to keep a careful count of the pillars as you jump off
each one. Keep jumping off and landing
onto the next steep pillar in sequence until you reach #12. Don't jump off this one, but instead hit the
action key so that you glide down into an opening in the adjacent pillar. Crawl forward and pick up the SILVER SHIELD and a LM
for SECRET #3.
Getting out of here is a bit tricky.
Back into the low corner so you'll stand up, then turn to face SW. Light a flare to position Lara correctly, but
toss it before making the next jump (or you won't be able to grab the
ledge). Take a standing jump to the
lower face of the next pillar, then jump off
immediately upon landing, with no slide. Grab the ledge ahead (a left midair
curve might help) and pull up. Kill
one big beetle and jump diagonally into
the alcove to the right of the closed door. Press the button to open this door
and to lower the cage back in the cave with cog switch. Climb back into the big
cave and go all the way to the cog switch. Before you use the cog (facing N),
save your game.
TIMED RUN
Pull the cog five times at least to open the door at the opposite side
of the cave for a very short time. Go around the cog on the left (or hop
back while turning right in preparation for the running jump, as the Moderator
did), turn right near the corner of the cave and run jump E (you have no
time to hop back first, so just run and jump, and do not jump from the very
edge of the ledge, but a step or two before the edge), to land on the ledge
where you lowered the cage. Keep running and jump from near the edge onto the
longer ledge with bridges extending along the cave wall to the left. Sprint to
the other side and run jump (also without hopping back first) diagonally to the
right to land on the ledge with the still slightly opened gate. Immediately
bounce off the slanted block onto which you landed and you'll find yourself
directly in front of the door. Quickly pivot Lara to the left and roll through
the narrow opening, if the door remains sufficiently open. If not, try again
or use this savegame
to proceed.
Pick up the SM and uzi ammo at your feet and draw your uzis before
sliding down the long slope ahead. At
the bottom you'll be met by two giant scorpions. There are convenient places of refuge in the
NE and SE corners where you can shoot the scorpions from relative safety. When they're dead, the N door opens to
release a third giant scorpion. Enter the N doorway and note another closed
door ahead. At the entrance turn right
and activate the JS in the corner alcove to open the S door at the other side
of the cave. Go there and shoot a flying bug, then use the reach-in switch on your
right. The E door opens in the cave
outside while Lara's theme music plays.
Those closed doors here and in the N room must be dummies, so exit to
the cave and enter the E doorway. Hop
onto the slope and slide down while a boulder pursues you. You'll hit the level jump trigger before
anything bad can happen.
LEVEL THREE: The Church
secrets: 3
Just allow Lara to land safely in the shallow pit while the boulder
sails harmlessly overhead. Pull out
right and go to the skeleton. Pull it by
the head and pick up the SIMPLE KEY it
was covering. Jump into the nearby water
hole and grab some flares. Return and explore this area. Find and pick up the revolver ammo, and note two keyholes. Your Simple Key fits one of them, so use it
to lift the gate near the skeleton. Go
there NW and find a HEART on a pedestal.
When you take it the wooden sticks underneath burst into
flames.
Reverse roll and go back to the water hole. Turn left there and vault up into an
opening. Step forward and jump to grab a
higher opening. Pull up to find a
receptacle for the Heart. When you place
it a flyby shows a door opening down below at the end of the NE passage. Go there and enter a room where a
sword-wielding skeleton lies sprawled on a slab. Crouch down and take the SKELETON'S KEY from its left hand while the S
door opens to reveal shotgun ammo. Unfortunately, when you pick it up two wolves and a knight
come running, so get ready to do battle.
You have a good idea where the new key goes, so when all is quiet again
return the way you came and locate the keyhole in the S passage. Insert the Skeleton's Key to open the door
over your head. Pull up for a nice flyby
of the church and the surrounding structures.
Head down the steps and turn right.
Run all the way to the W wall and look right for the alcove containing
the WOODEN CROSS for SECRET #4, as well as some uzi ammo.
Reverse roll and follow the W wall to an open doorway. It looks interesting inside, what with a
dormant warrior statue, two nonresponsive buttons on either side of the room,
and a switch for which you need a crowbar.
As there's obviously nothing you can do here yet, exit and run E past the
front of the church.
There are some bones to the left of the church entrance you can shatter
if you wish. The nearby water hole is
empty, but continue E to find another water hole. Jump into the water and swim into the S
opening. Turn left to locate an
underwater lever. Pull it to retract
some spikes elsewhere and also to lower an adjacent trap door. Return the way you came and pull out of the
water hole. Run back W past the front of
the church and turn left. With the
church on your left and the wall on your right, run S down the alley until you
reach the second segment of the wall.
Pull up right onto the wall and locate a depression NW with a wall
switch. Hop there and pull down the
switch to raise a timed block directly behind you.
Take a rolling back flip out of the depression and run to the raised
block. Pull up onto the higher pillar
before the block retracts. Turn right
and take a running jump W. Grab the
ledge and pull up. Hop down onto the
ledge ahead and follow it to the N end.
Take a running jump NE to land in front of a ladder. Climb the ladder, back flip to a ledge and
locate the nearby JS. Activate it to
lower a rope to your left. From the SE
corner of the ledge jump to the rope and swing jump to the ledge in front of
the floor lever. Push it to release a
giant bird of prey. Turn around and kill it.
Take a running jump NW to the ledge and find that the door to your left
is now open. Enter and follow the
passage past a campfire to a plinth with a SIMPLE
KEY. Return to the ledge and
take a running jump to grab the rope.
Slide to the bottom and release. Now for some more running exercise. Return to the E side of the church, jump over
the wall and locate a closed door with a keyhole next to it. That's where the Simple Key goes. Open the door for a brief cut scene of the
church interior, followed by a remote view of three wolves
and three knights you've attracted. Not very favorable odds,
but Lara's up to it. Clear the
table and enter the opened doorway.
There's a pushblock in your way, so pull it back three times to clear
the entrance. Enter the alcove to find
another quick dead end, so apparently the pushblock served another
purpose. Pull up onto it so you can
access the E ledge. Jump across to the E
pillar, and from there slightly NE to the higher pillar against the wall. Take a running jump and grab N to the next
pillar and pull up. Pull up left onto
the higher ledge and take a series of running jumps W along the ledges until
you reach a bridge of sorts that allows access to the church roof. Jump there, pull up and follow the roof line
S until you reach a plinth with PICTURE PIECE 1.
Run back toward the N end of the church.
About halfway there, jump onto the brown roof structure and take a
standing jump to the highest flat portion.
Run all the way N to the cross and pull up beside it. Take a running jump to grab the ladder, shift
right around two corners and drop down onto the ledge. Turn around and take a running jump NW to the
ledge. Make your way NW until you can
jump slightly NE and grab a crack in the wall (release and immediately grab
again if need be). Shimmy right around
two corners and drop down onto a ledge.
Run E along the ledge and jump the gap to approach a plinth. Kill the bird
of prey that appears, then
pick up the REVOLVER and the LASER SIGHT. Follow the ledge around for some revolver ammo in the SW corner. From here, look over at the church and see
the bell. Combine the revolver and laser
sight and shoot the bell to open the entrance door. Now follow the ledge to the E end. Take a running jump and grab the E
ledge. Continue in a generally E
direction until you reach the E wall.
Take a standing jump SE to the slope, slide a bit and jump off to land
on the S bridge. Pick up the nearby STATUE'S PUZZLE 1 and run to the W end of the
bridge. Take a running jump W and grab
the ledge, pull up and activate the wall switch to retract some spikes
elsewhere. Save your game, as your next
jump needs to be precise.
Back up from the wall switch and face NW. Take a standing jump over the slope ahead
with a midair curve to the left and land in the water below. Pull up E onto the retracted spike bed and
pick up the PICTURE PIECE 2. Jump back
into the water and follow the passage, keeping left until you come out facing a
familiar underwater lever. Swim toward
it, loop around to the right and surface.
Pull out S and run S to return to the pushblock that you pulled out of
the opened gateway. Now
for an exhaustive detour to the next secret. Use the pushblock to access the ledges in the
E wall. Go around in a counterclockwise
direction as you did before, and jump to the church roof. Pull up onto the N ledge with the cross and
jump to the ladder. Shimmy around two
corners and drop onto the ledge. Work your way around in a clockwise direction until you reach the
ledge where you got the revolver and laser sight. Run almost to the E end, turn right and take
a standing jump S down to the top of the nearest pillar. Turn to face N and take a running jump with
grab to land in the opening. Pick up the
SILVER CROSS
for SECRET #5 and grab the LM before dropping down to the ground.
Run to the W side of the church and follow to the second wall segment
where the rope is hanging down. Use the
wall switch in the nearby depression to raise the timed block again, and use it
to access the top of the adjacent pillar.
Use the ledges to reach the ladder as you did earlier, climb up and back
flip to the higher ledge. Walk out to
the end and turn around. Look up NE to
see the spikes you retracted earlier.
Walk back toward the ladder and jump up to grab the ledge. Pull up and pick up the flares.
Save your game and take a running jump E to grab the ledge in front of
the retracted spikes. Pull up and use
the crack in the wall to shimmy right around several corners until you can pull
up into an opening. Use the nearby wall
switch to open a door to the church at roof level. Turn around and take a long running jump to
the roof of the church, losing a bit of health upon landing. Pull up, jump to the highest flat portion of
the roof and run S to the open doorway.
As you step onto the threshold four wolves
are attracted, so dispose of them quickly.
Enter and avoid the swinging chains as you make your way past the cage
along the right wall for some shotgun ammo.
Continue to the S alcove and squeeze past the cross to pull down a wall
switch.
You hear the sound of a trap door opening, so continue around the
perimeter of the room until you come to the open trap door near the NE
corner. Drop down into a lower room and
run S past the reach-in switch to an alcove where you'll find a TORCH.
Return to the reach-in switch and activate it to lower a cage behind
you. Take the torch and jump up to the
higher floor. Exit to the roof and run
to the N end, toward the cross. Slide
down to the right and locate the opening in the fence. Walk up to the edge and toss the torch to the
ground. Remember that you did this. Return to the room S with the swinging
chains. Locate the treasure chest near
the hole you jumped out of and open it facing E for the GOLD SHIELD
and SECRET #6.
Get back out to the roof and jump E through the opening in the fence
(near the marked tile with the torch) to the rock bridge. Safety drop from either
side to the wall below and make your way to the N entrance to the church
(opened some time ago by shooting the bell).
The W door in the narthex is open, the E door is closed. The gate to the sanctuary itself remains
closed, and a knight on the other side appears eager to get at you. Enter the W side room and pick up the uzi ammo on the step. Note the nearby ladder and push the floor
lever in the SE corner. A flyby takes
you through the E side room, the door to which is now open. However, the door allowing you to exit from
this W room is now closed.
Note that pushing the floor lever also opened the trap door at the top
of the ladder. Climb the ladder and pull
up onto the roof of the church. Take a
running jump to the rock bridge, using the opening in the fence, shimmy right
or left around the corner and drop down onto the wall below. Run N back to the entrance of the church and
enter the narthex. The E door to your
right is still open, so enter the side room and push the floor lever to retract
the spikes to your left and attract two dogs. When they're gone, pull down the wall switch
to open the gate to the sanctuary and release that knight
who was so eager to get at you earlier.
Kill the knight and enter the sanctuary. Another knight attacks from your left, so take care of
him. Go to the altar and take the STATUE'S PUZZLE 2
from the plinth. Note the missing pieces
in the S mural and the closed doors on either side of it. Exit the sanctuary,
go outside and turn left to run W to that green-tinted room you visited briefly
earlier. Insert the Statue's Puzzle 1
and 2 in the receptacles on the N and S sides of the room. This awakens that statue
warrior, who immediately starts spewing blue flames at you from that
sword of his. The gate to this room is
now closed, preventing escape. Wear down
the warrior with a hail of bullets, and when he finally explodes pick up the SWORD he leaves behind.
Remember that crowbar lever you saw earlier near the entrance? Use the sword on it to re-open the exit
gate. Go outside and run E past the
front of the church. Turn right at the
wall and follow it to the opening in the fence high above. Pick up the torch that you tossed down
earlier and take it with you to the N entrance to the church. Drop it as needed to perform the tasks
described hereafter, picking it back up again each time. Approach the mural and insert Picture Pieces
1 and 2 in the gaps. The doors on either
side open. Enter either one and come to
a shaft with a ladder. Toss your torch
down the shaft and climb down the ladder.
Back flip just before you reach the spikes below.
There's a handy fire, but unfortunately the torch is protected by the
spikes. Shatter the bones near the fire
for target practice if you wish, then enter the W opening to find more spikes. Jump up left and take a running jump W to
grab the ledge ahead. Pull up and grab
the ladder ahead. Shift right as far as
you can go and drop down into an alcove.
Jump up N onto the ledge, turn right and take a running jump E to grab
the ledge to the left of the spike field.
Pull up, walk forward and use the reach-in switch to your left. A door opens elsewhere, so turn around, walk
to the edge and take a running jump SE over the spike field, turning left in
midair to grab the ledge. Pull up, turn
right and drop down into a familiar room.
Enter the open N doorway and follow past a couple of crosses to a
crowbar switch. Activate it to open the
gate to your left. Enter and follow past
a wooden floor that begs to be burned.
Pull up into a graveyard and open the chest for uzi ammo.
Pull the chain in the NW corner to retract the spikes beneath the
ladder. Go back there, pick up your
torch, light it on the nearby fire, and return through the N doorway to that
wooden floor. Toss the torch onto it,
wait until it catches fire and shatters, then hop down
into the room below. Locate the crowbar
switch and activate it. Enter the NW
doorway and run forward to jump to the final level.
LEVEL FOUR: Church's Catacombs
secrets: 1
Run forward until a flyby is triggered, showing a huge lake down below
that's swarming with crocodiles. Drop down into the water and quickly swim SW
toward that horseshoe-shaped structure.
Pull up and clear the area of crocs (five of them if I counted
correctly). Note the closed gate at the
head of the horseshoe and jump back into the water. Swim across to the E side and turn right just
before the closed doors. Pull up onto a
ledge and use the crowbar lever to raise a cage near a structure on the other
side of the lake. You may also arouse
another crocodile. Jump into the water,
swim across to the NW structure (you can see the raised cage from afar off) and
pull up. Deal with the croc and jump N
between the two crosses. Enter the
passage ahead.
Pass a niche with a skeleton and bones you can shatter if you so
desire. Continue along the passage and
pass another niche on your left with shatter bones. Emerge in a larger area with a NE plinth
containing crossbow arrows. Go S between the cages and enter an area with
three wall switches. The left one will
drop you onto spikes, the right one will drop you down to a crunching death, so
pull down only the middle one to open that gate at the head of the horseshoe
platform in the lake. Deal with three dogs and two knights,
then note that a formerly closed door in the W wall of the room with the plinth
is now open. However, there's another
closed door at the end of the W passage, so make a mental note to return here
later.
Exit S and return to the lake.
Three more crocodiles have
materialized, so dispose of them before swimming S to the horseshoe structure. Pull up and enter the opened gateway. Stop at the far end and save your game. Here's the way I did the next part safely and
reliably. Take a running jump to trigger a boulder gauntlet, reverse roll
immediately upon landing and run forward immediately in the opposite
direction. Run toward the closed doors
S, turn right and find some shotgun ammo
in the SW corner. Run back E, loop
around to the left and take a running jump NW up the slope to a stable surface,
then jump SW to the ladder. Before
climbing the ladder, run N along the wall, jump over the obstruction and slide
down to a flat surface. Drop down into
the hole and pick up the UZIS. Pull up E and slide down. Go back to the slope at the S end and jump
back up to the ladder.
Climb the ladder, shift right as the camera angle changes and drop down
onto a ledge. Turn around and jump over
the gap between the crosses. Follow the
ledge around to your left as a skeleton
materializes across the way. Wait for
the skeleton to approach you, then use the combined
laser sight and the revolver or crossbow to shoot off its head to disorient
it. With this distraction neutralized,
push the nearby button to open one of the doors back in the boulder trap area. Return there, slide down and enter the opened
SE doorway. Follow the passage until
another flyby kicks in.
Safety drop to the floor below and engage a giant scorpion. When it's dead, pull up onto the
lighter-colored block (near the spot where you dropped down), face the
inaccessible golden star and jump over it into the E passage. Follow to the end and pick up the GRENADE GUN.
Return and hop down to the floor.
Walk SW to that nearby pool and clear the water of crocodiles so you won't have to deal with them
later. Run past a bunch of pillars to
the E wall and turn right. At the end of
the passage is a skeleton sword switch.
Push it to raise a trap door at the other end of the cavern.
Return to that lighter-colored block and go past it to the NW
corner. Climb up on the block there and
climb the next block in front of you.
Turn around and find that raised trap door. You can access it, but there's nothing you
can do up there now, so just note it for later, get back down to the cavern
floor and jump into the crocodile-free water nearby. Swim SW and into the opening. Locate and pull the underwater lever in the
next room to lower that lighter-colored block outside. You know what to do now. Exit the water, go to where you lowered the
block (dealing with a giant scorpion on
the way) and move the adjacent block underneath the GOLDEN
STAR. Climb up and pry it off
with your sword.
You probably saw the receptacle for the Golden Star while you were
dealing with the crocodiles, so go there and insert it to lift the gate to your
right. Enter, shatter some bones at the
end of the passage if you wish, and slide down right into a new area. Yikes, here come two awakened statue warriors. There's no way out, so you'll just have to
kill them while trying to avoid their deadly bolts. Judicious use of the Grenade Gun here would
be wise. When your task has been
accomplished, take the BONE KEY from the
S plinth and pick up two TRIANGULAR PIECES
dropped by the slain statue warriors.
Insert the Triangular Pieces in the wall receptacles on either side of
the plinth. This opens the trap door
near the NW corner of this room.
Drop down into the passage and follow to a block. Pull up facing a short canal filled with
water and pick up the SHOTGUN at your
feet. The water is freezing, and you
can't pull out on the other side, so jump up to grab the ceiling and monkey
swing across the water. Watch out for
the swinging pendulum blade as you pull up into the next cave. Run past the blade and come to another area
with a multiple blade contraption crossing your path. You may think it would be quite easy simply
to run around it, but the area is riddled with hidden floor blade traps. The best strategy is to wait until the
contraption passes you to the right, step left to trigger the blade trap there
and hop back to safety. When the
contraption comes by the next time you can simply run left into the next area.
Oops, more blade contraptions.
This one's easy, however. When
the right-hand contraption rotates by you, follow the blades and scoot to your
right into the passage. Stop upon
entry, however, as there are three floor blade traps arranged in a row
here. Trigger each one by walking
forward and carefully advance into the next small room. There's a deadly spike trap in the
different-textured square, so avoid it by going clockwise around it. Hop over the NW corner and face another blade
contraption. This one fills the entire
corridor, so how to get past it?
Actually, the solution is quite simple.
Stand at the edge of the brown field, hugging the left wall. When the contraption moves away from you, run
to the other edge of the brown field and stop.
The blades will miss you as the contraption comes by again. Sprint forward and scoot left into the
passage where you'll be safe.
Climb three blocks and turn around to find a ladder. Jump up to grab it and climb up several
rungs. Back flip into a familiar area
where you negotiated the boulder gauntlet earlier. Go down and enter the open SE doorway. Follow the passage until you come to an
opening that faces the trap door you raised earlier. Jump to it and pull up left onto the rock
ledge. Turn right and take a running
jump S (no grab) to that lower ledge to the left of the slanted pillar. Continue with a running jump S to that
structure with the Golden Star receptacle, grab the edge and shimmy left until
you can pull up in the corner. Save your
game.
Turn to face SW and stand jump to the higher level, then repeat and run
forward to pull the chain. A block is
lowered on the other side of this cavern.
Facing S, hop back from the chain and back flip onto the sloped roof. Slide down, grab the edge and drop to the
ground. I tried to jump back to the N
ledge to save a little time, but I was unable to make the grab. Go to the NW corner and use the blocks and
raised trap door to get back up. Pull up
left onto the rock ledge, run forward and slide down E. You can see the chain ahead, so take a
running jump E, grab the next pillar and pull up. Save your game again, as the next jump needs
to be precise. Take a standing jump
forward and grab the sloped pillar ahead.
Shimmy to the left corner, pull up and slide down the other side. At the last possible instant jump off and
grab the corner of the E ledge. Pull up
and go to the chain. Pull it once to
open a door in the pool down below.
Jump back to the previous sloped pillar and safety drop to the
ground. Run SW to the pool and jump
in. Swim down SE through the opened
doorway, surface and pull out N. Insert
the Bone Key in the keyhole to retract an underwater block. Jump back into the water, return to the
previous pool and swim NE. Enter the SE
passage and follow around N until you reach a door you can open with the action
key. Enter,
turn right and swim N past the retracted block into a wider passage. Swim up the shaft at the far NW corner for
air.
You will recognize this area from earlier. Swim W and pull up onto the horseshoe
ledge. There may or may not be crocs in the water. There weren't in my game. If there are, get rid of them before jumping
back into the water. Swim
NE to that underwater structure with the open doorway. Swim inside and pull up onto a structure with
a cross at each corner. Enter the N
opening and climb the ladder into an upper passage. Drop down the other side and note the obvious
spike field ahead. You should still have
your Mechanical Scarab with Key, so use it on the ornate tile to trigger the
spikes. Dutifully pick up the device on
the other side and enter a new room with an open fire. There are more bones here to shatter if you
wish.
Nearby is a skeleton sword switch and a wheel
switch in the E wall. Leave them both
for now and go into the NW passage. At
the N wall turn left for a LM, then
reverse roll and proceed E to a mirror room with many spike traps. There's an important pickup in here, so save
your game while standing at the entrance with a fixed camera angle. Turn left and run to the mirror. Turn right and walk forward. Note the spike pit ahead,
that you can see in the mirror, and jump NE onto the slope. Allow Lara to slide down, then
turn to face the mirror. Hop back to grab the edge of another pit, release and pick up the GOLDEN SKULL for SECRET
#7. Climb back out W,
turn right and jump N over the slope to find some flares.
Turn around and jump S back over the slope. Turn to face NE and take a standing jump to
the slope. Slide down safely E and turn
right to face S. Hop back once or twice
until you clear the phantom floor and grab the edge. Shimmy right around the corner and pull up
for some crossbow arrows.
Turn to face N and jump over the slope to a safe tile. Turn left and run to the mirror. Turn right and walk over the spikes to OCULAR PART 2. Retrace your
steps, jump SW onto the big slope, slide down and grab the edge, and shimmy
left and around the corner until you can pull up safely. Stand jump SW to the slope, down down and
take a running jump to the SW corner.
Turn left and exit this room.
Return to the cave with the open fire. Ready your grenade gun or crossbow and push
the skeleton sword switch to raise three skeletons from the dead. One well-placed grenade or explosive arrow
should clear the area (together with the bones if you didn't shatter them
earlier.) The NE door is now open, so go
there and open the chest at the end of the N passage for some flares.
Reverse roll and locate the E opening leading down to
a lava lake. Save your game. Slide down on the far right side and
immediately take a running jump left as three fire wraiths
pursue. Grab the ledge, pull up and take
a running jump angled as far to the right as possible. Slide down if applicable, grab the ledge and
shimmy right until you can pull up. Turn
around and take a running jump S to the ledge jutting out over the lava. Pull up and take a running jump forward to
the next ledge and dart left into the alcove to pull down a wall switch. The lava turns into water, albeit freezing
water, so back flip to destroy your nemeses and quickly swim down to find OCULAR PART 1.
Swim to the NE corner and pull up onto the left corner
of the ledge with the open fire. Turn
left and pull up W onto the ledge. Walk
a few steps forward, hang from the edge and shimmy left and around the
corner. Pull up in front of the entrance
to this room. Return to the cavern with
the open fire. Use the wheel switch in
the E wall if you haven't already done so and enter through the opened gateway
to your left. Locate the NE pedestal,
combine the two Ocular Parts to form the GREEN OCULAR and
place it on the pedestal to lift massive underwater doors elsewhere.
Exit this room, run past the open fire into the open W doorway and pull
up into the passage that leads you back to the huge green lake. Jump into the water and swim SE toward that
arched opening. Swim underneath those
lifted doors and find additional doors ahead that need to be opened.
Pull out S, deal with the awakened skeleton
and pull the inert skeleton away from a SM. There are nearby bones for your shattering
pleasure, together with an extra GRENADE GUN. Pull down the S wall switch to lift the trap
door beside you. As you hang from the
edge to drop down, a bull is released in
the area down below. Now that you are
forewarned, be prepared to take prompt evasive action the moment you release.
There are several trigger tiles that need to be struck head-on by the
bull, using yourself as bait. When you run W away from the bull's lair and
turn left, you arouse the first of many flying bugs
in this area that make your life more difficult. The first shatter tile is dead ahead. When the bull strikes it the nearby E door
opens. Follow this passage into the next
room and kill another flying bug. The next shatter tile is to your left. After the bull strikes it (to disable hidden
spikes in the S opening), run S into the next room and kill another flying bug.
Turn right to find the third shatter tile. When the bull strikes it a platform is raised
in the NW trench. Take a running jump to
it (no grab!) and say adios to the bull.
There are two flying bugs in the
next room. Vault up into the NW alcove
and activate the wheel switch to lower a block and provide a shortcut through
the bull's domain (although for what purpose is not clear). Get back down, run up the SW ramp and pull
down the ceiling trap door. Pull up S,
run down the passage to a closed door needing a key you don't yet have, and
pick up an extra SHOTGUN. Slide down S into the next room and engage
two knights on horses (although you
should be able to target and kill one of them before he has a chance to
mount). When both have been eliminated,
pick up two HEARTS dropped by the fallen
knights.
Before using them, however, locate and activate a JS on the SE column to
raise a block in the NW corner so you can leave this area later. Now place the two Hearts in the receptacles
on either side of the S door to open it.
Three flying bugs await inside. Pick up
the SIMPLE KEY near the NE corner, grab
the grenades in the SW corner and take
the first SNAKE PUZZLE from the S plinth
to awaken three skeletons. One grenade should do the job. Exit this room and use the raised block to
access the NW passage. Use the Simple
Key to open the nearby door and enter.
Pull up into a familiar area.
Jump W to the nearest slanted pillar and safety drop to the ground. Run to the water and jump in. Follow a familiar route into the SE passage
and follow around N until you reach the opened doorway. Enter, turn right
and swim N into a wider passage. Swim up
the shaft at the far NW corner and surface.
You're back at the huge underground lake. Swim E to the lifted double doors, swim
underneath them and pull out N. Climb
the ladder at the end of the passage, shift left and drop down into an upper
passage.
Turn left at the wall. There are
two pushblocks in the W wall. marked by their lighter
green color. Push the far one (SW
corner) two times W to reveal a passage to your right. Look right to see a third pushblock. Push it N once to reveal the second pushblock
to your right. Turn right and push that
block E one time. Run all the way around
to the right and push the same block two times N to reveal the ladder passage
to your right. Reverse roll and find
that you now have a circular passage with a single block at the center.
Go to the SW pushblock and pull it back two times. This gives you access to a SW alcove with a
wheel switch. Activate it to drop a trap
door at the bottom of the ladder shaft.
Return to the NE ladder shaft, stand at the edge and take an angled jump
to grab the ladder. Climb down to find
the open trap door. Drop down, pull
the wall switch to open a door elsewhere, and climb out N. Climb up the ladder, shift left and drop down
into the pushblock passage.
Push the far S block W two times, back into the wheel switch
alcove. Turn right, go to the NW block and pull it back
two times. Run around to the right and
find a new passage with the doorway you opened with the wall switch. Take the second SNAKE
PUZZLE from the plinth at the end of the wooden passage. Reverse roll, return to the ladder shaft,
jump to the ladder and climb down. Turn
around, hop over the open trap door and jump into the water. Pull out W and insert the Snake Puzzles in
their receptacles to retract the two blocks between them. Enter, pull up and slide down into a harbor
protected by a dragon.
Quickly, before the dragon has time to take offensive action, draw your
combined revolver and laser sight, look up slightly to the right and shoot the
gem in the lion's mouth. Turn left, get
close to the sloped block and take a running jump to what appears to be (but
isn't) a spike-trapped ledge. Grab it,
pull up, run to the far end and take a running jump NW (with a midair curve to
the right) to grab a ledge containing a LM. By this time the dragon is certainly spewing
out life-draining energy bolts (as opposed to the usual locusts). Notwithstanding these distractions, look up
NE to see another lion's head in the distance.
Shoot the gem in its jowls (using the crouch key to zoom in).
Jump into the water, swim S along the ship and turn right at the bow to
locate a lowered block where you'll find a ceiling lever. Pull it down and swim back to the middle of
the ship where you'll find a raised cage.
Climb up on it and activate the JS.
Swim back to the area with the lowered block and find a ledge S that you
can pull out onto. Pull the chain for a
cut scene that frankly does not convey a great deal of information. Jump into the water and fight the current to
swim to the nearby bow of the ship.
Locate an opening and swim inside.
Light a flare and follow the passage to a place where you can surface.
Pull out N and run forward toward the suits of armor. Take the GOLDEN
CROSS from the plinth to end this grand adventure.