Hogwarts Ruins
Level by: Lynus
Walkthrough by: Nina Croft
Starting inventory: dual pistols
Secrets to find: 5
IMPORTANT NOTE: There are two levels here (+ Bonus Level for collecting all five
secrets). However, these two levels (Hogwarts Ruins and Hogwarts Ruins 2) are
interconnected and you have to visit both levels for several times. For the
purpose of clarity, I will not point out each time the other level loads, to
avoid confusion.
EVEN MORE IMPORTANT NOTE: Starting from the Grand Staircase, the level is not straightforward and
there are several possible routes through it. However, there is a certain order
that you have to follow in order to make the Key of Fat Lady work, in order to
open the shortcut in the Boathouse etc. This walkthrough is written to comply
with this order and to reduce backtracking to the lowest possible measure.
CREDITS to TOMBTITAN for hints regarding the Key of Fat Lady and
appropriate time of its use
Legend of the colors used:
BLUE - key items
GREEN - ammo,
weapon (bold), health supplies
ORANGE - interactive
objects (pushables, buttons, levers)
RED - enemies (kills)
PURPLE - secrets
PINK - hazards
(traps)
CAVE WITH TORCHES: When the level loads
you'll find out that you don't have any single flare or a medipack in your
inventory... Great, as the cave you're in is quite dark. For a start, pick up
the LM lying near Lara. Then pick up one TORCH and save your game before you attempt to
throw it through a narrow crack. Turn to face W-NW (between West and
North-West) and throw the torch through a bit wider crack. With a bit of luck,
the torch will land safely on the other side of the crack, on the part of the
ground where Lara can stand up. Crawl through the gap and pick up the torch on
the other side. Carefully approach the fire
and lit your torch there. Once again, return to the gap where you picked your
torch and face E-NE and save your game before attempting to throw your torch
through the crack. Crawl to the other side and pick up your torch again.
Enter the lake and go towards the wall on the left, carefully avoiding
deeper waters. Lit the first scone on the
wall and go towards the middle of the lake, where the water is not too deep.
Make a left turn and enter the passage with another wall
scone you have to ignite. Just a bit further there is a raised
crawlspace and a curve to the left. First enter the passage to the left. The
Camera button is disabled here, making things extremely difficult. You have to
throw your torch through the low passage so that it lands in the deeper water
just around the corner to the right. So, stand near the right-hand wall and
face that corner. Save your game once again and throw your torch. Once it lands
in the deeper water around the corner, you can climb into that crawlspace you
saw. Pick up an SM lying to the left and
drop from the crawlspace in another dark cave. Go to the left and around the
corner to pick up your torch. Follow the passage towards another fireplace and
throw your torch somewhere where the water is not deep and where you can find
it. Kill one hound that attacks, pick up the
torch again, carefully approach the fire and
ignite it. Lit two wall scones here to open
an underwater door just below. You can now drop the torch and enter the deeper
water at the end of the passage.
PUSH PUZZLE: Swim through the
water plants into the passage where you've just opened the door, and surface in
the upper right corner. Climb out of the water S, kill two
bats and press the button on the wall
TWICE to deactivate the blades below two jump switches nearby. Go through the
other passage and enter the room full of traps. You'll see one rotating blade in the back part of the room, as
well as three jump switches to the left, and
three wall scones to the right. Drop to the lower level, below the JSs, pick up
some SHELLS near the window, pick up one SM on the right-most tile with deactivated blades
and use the left-most and the right-most JS to open the door above. Do not use
the middle JS, as the blades protecting it are not deactivated. You can
push/pull the red pushable object onto the
red tile in the corner. Now climb to the level above, stand facing the rotating blade and as close to the right-hand wall
as possible. Time your run past the blade and turn right to enter the door
you've just opened.
Go towards the stairs and look briefly to the right to see a closed
door. On top of the stairs you'll see a green pushable object on a raised
block. Pick up an SM on the bottom of the
first staircase and press the button on the
wall to the right. You cannot kill the skeleton,
so avoid it as best as you can. Now the block with the green
pushable object is lowered. You can push it from this side, but that
skeleton won't leave you alone. If you want to be safe from it, you have to
return to the rotating blade, time your run
once again and drop to the lower level. Push/pull the green object onto the
green tile in the corner to open that door near the stairs. Return up there and
go through. The door will close behind Lara and a new level will load.
GRAND STAIRCASE: The shallow water on
the floor is infested with hungry piranhas,
so make sure to spend as little time as possible in it. Make a running jump
from the bottom of the stairs towards the block with a pulley and quickly go
out of the water before the fish kill Lara. Pull the pulley
once to drop the main staircase. Run jump towards it and quickly climb to the
first landing, where you'll find an SM and
meet a skeleton. Avoid it and go to the right
and up the stairs (notice some falling blocks
as you go). Enter the MAIN ENTRANCE to the left and kill two nasty hounds. You'll find an LM to the right of the entrance. Also, an SM is hidden in a small storage room to the right
of the big door with keyholes. Notice a big closed door requiring two golden
keys to open. Opposite the entrance you'll see four
pushable objects colored differently, and the shields on the wall above
indicating the order in which you have to arrange them.
PUSH PUZZLE: As you already
figured out, you need to arrange the pushable objects to match the color of the
shields above. If you are an absolute beginner in TRLE, you should know that
Lara can stand between these particular pushable objects and push them from
there. Or she can also stand on the lower floor facing the object and go
towards it until she stands on the higher step against the object. She can now
push that object from there. Once you arrange them properly, the double door
opposite the big door with keyholes will open. Kill three
bats that'll attack and save your game before you enter the next room.
ENTRANCE COURTYARD: Walk through the
gate and wait for the stones to fall from
above. Jump over these stones and explore the courtyard avoiding the fires lit on the ground here and there. Along the
left wall you'll find SHELLS. The button in the near left corner opens a door that
leads back to the Main Entrance. In the far right corner you'll see a closed
door. Directly opposite the entrance there is an alcove protected by
oscillating vertical burner. Shoot the chest
in this alcove first, then time your run across the burner
when it's off, pick up BINOCULARS and run
over the burner again when it's off. Go to the right-hand side of the
courtyard. There is a staircase in the far right corner you'll have to visit as
soon as possible, to open the shortcut for returning back here later.
So, go down this stairs and as soon as you make a left turn, start
sprinting. A boulder will be rolling behind
Lara, so quickly get into the passage to the right. There's another curve to the
left, with the same situation. In order to avoid the second
boulder, sprint and hide behind the corner on the left. Proceed down the
stairs to a Boat House. Kill one hound
here and use the JS on this side of the
pool. Nothing happens now, as you have to use another JS on the opposite side.
However, you cannot get there as yet. You can also pick up an SM in the opening with water below the stairs.
What you have just done now was lowering the block under these
stairs. That is necessary to be done before you attempt to use a shortcut
leading through the Boat House later.
Now you can return to the Entrance Courtyard. Once back there, take the corridor which is now on
your left (West). Kill two bats and two wild boars, enter the small courtyard to the left,
shoot to break the chest containing the SHOTGUN and SHELLS,
and press the button to open the door. Do
not go through that door, as it leads back to the grand staircase, and you
haven't the necessary keys to return there as yet. Instead, go left towards the
big cog switch and huge aquarium.
HERBOLOGY: Use the cog switch four or five times, flip to the left
and sprint through the opened door before it closes. You have entered the
Herbology, and the first thing you'll notice is the poisonous
gas and Lara's loosing air quickly. To make things even worse, the door
through which you entered is now closed. So, approach the big aquarium to the
right and climb on top of it. Make a quick assessment of the situation here:
there is a water elemental receptacle nearby, an opening with water and rope, a
block preventing access to another cog switch, and a button protected by
burners below. For now, jump into water and retrieve the KEY OF LOYALTY 1 from the bottom. You'll also
notice that Lara's green bar is replenishing while you're in the water,
so whenever Lara loses her air outside the water, you can always jump into the
aquarium and replenish the green bar.
Climb out of the water and jump to grab the dangling rope. Turn to face two big hammers, swing and jump to grab the
crevice in the block behind the hammers (start swinging when two hammers smash
into each other). With a bit of luck, you'll go through the hammers alive :)
Once you grab the crevice, shimmy to the left around the corner and press Back
cursor key to make Lara jump off, turn in mid-air and grab the edge of the
opposite crevice. Shimmy a bit to the left and pull up directly behind the golden pushable object. Push it once away to make
the sunshine from above fall onto the mirror below that will set the nearby
tree on fire. Quickly press Camera button to get Lara's perspective back. Run
jump back on top of the aquarium and get into water to replenish your green
bar. If you have enough air, you can grab the edge of the ledge where you
climbed up, shimmy to the right and climb up (with Crouch button) onto the
greeny ledge with bushes. You'll have to quickly crawl diagonally to the left
and find the SMALL WATERSKIN on the metal
grating before the fire from the tree above is ignited again. If your air bar
was too short after pushing that object away, you'll have to return to the
aquarium first, and use the dangling rope to get up here again in order to pick
up the waterskin.
Drop onto the lower level, near the shallow pool where you can fill your
waterskin. Climb on top of the aquarium once again and use the waterskin with
water on the elemental receptacle (you have to select the waterskin in the
inventory). The poisonous fumes in the Herbology will disappear and the burner beneath the button in the opposite corner
will deactivate. Now, you can leave the Herbology if you want, or you can
collect a secret and a medipack along the way before you leave. In order to do
that, grab the rope again, swing between the hammers
and grab the crevice ahead. Jump back to grab the ledge with pushable object,
keep shimmying to the left as far as Lara will go, and pull up onto the edge,
near the pushable object. In the bushes to the left you'll find an SM. Don't drop down as yet, but go around the
pushable object, grab the edge of the ledge, shimmy to the right and climb up
there where you found the waterskin earlier. This time crawl to the right, all
the way into the opposite corner, where you'll find the HELGA'S SHIELD representing secret
#1. Now you can drop from here onto the ledge near the elemental
puzzle. Make sure to refill the waterskin, just in case. In order to leave the
room, you have to press the button above the
deactivated burner, to lower the block preventing access to the cog switch. Use
the cog switch five times to open the door,
flip to the right twice, and sprint through the door before it closes.
COURTYARD WITH QUICKSAND: Once out of
Herbology, go left into a broader passage next to the aquarium. Sprint here, as
some rocks are falling from above. You can
open the door to the right with the button,
but don't go through (another door leading back to the grand staircase). Open
the door to the left and enter the small courtyard. Kill three wild boars and watch out from the fire as well as blades
concealed near the LM lying near the wall on
the left and inside the pile of leaves near the wall on the right. Once you
kill them, break the chest in the corner to
find some ARROWS, approach the switch opposite the entrance and pull it to
temporarily open the door nearby. Roll, sprint avoiding the fire and concealed blades
which are now to the left of Lara, and run jump into the open doorway to the
left. Go through before the door closes.
Do not step into the quicksand to the
left, and also, avoid the fire and the hidden blades. The pool ahead is poisonous, so make sure not to be in the water for
too long. Enter the pool keeping as close to the right-hand wall as possible.
Jump up to grab the crevice in the wall and shimmy to the left until you are
hanging below the JS. Press Jump to make
Lara jump up and grab the JS. This will drain the toxic pool and you'll be able
to use the button to the left twice
to open the timed door through which you came in. Now you can pick up some SHELLS lying to the right. Approach the edge of
the pool with quicksand and the ladder hanging on the wall opposite the
entrance. Enter the quicksand in front of the ladder and grab them. Shimmy to
the left into the corner which is safe. Jump up to grab the monkey bars and
swing across, timing the burner ahead. Let
Lara drop into the quicksand at the end of the monkey bars and quickly go to
the left, pressing Action to make Lara climb onto the safe block where you'll
pick up KEY OF LOYALTY 2. Do not try to pick
up the LM ahead, as it's impossible. Run
jump to the left towards the safe ground, keep Forward and Action buttons
pressed, and Lara will climb out of the quicksand onto the safe ground. Exit.
GREAT HALL: Once you have two
Keys of Loyalty, you can return to the Main Entrance. The shortest route
thereto is through the door you'd opened just before you entered the courtyard
with timed door. Once back in the Grand Staircase room, run diagonally to the
left across the falling ledge, jump onto the
staircase near the locked door, go up the stairs, jump over the hole in the
corner, go right and enter the Main Entrance, where you can use these keys into
the keyholes. Enter the Great Hall and watch the door closing behind Lara. As
you explore, a nasty giant scorpion will attack,
so dispose of it (with a bit of luck, it will stuck between the tables and you
can kill it easily). Pick up the LM in the
left-hand alcove. Climb the ladder just to the right of the entrance. In order
to pull on top of the pillar, release Action, press it again quickly, along
with Up and Crouch buttons to make Lara climb on top of the pillar. Shimmy to
the other side, and while hanging there, press Down button to make Lara jump
off and grab the edge of the pillar behind. Press Up and Crouch to make her
climb on top of it and pick up some ARROWS
there. Drop to the ground.
Go into the last alcove on the left side of the room and jump up to grab
the crevice in the bridge above. Jump up from there to grab the edge of the
ledge above, crawl and drop to grab the JS
on the other side. This will raise a block on the opposite side of the room.
Climb into this alcove (last alcove on the right-hand side) and onto the block
to the left. Pull the lever there to open a
door outside in the courtyard. Drop to the block below, turn S and climb onto
the pillar above. Pick up one TORCH. Remain
as you are, facing S, and press Space to throw the torch. For some reasons, the
torch will land on the raised block behind Lara. Drop onto it, pick up the
torch, ignite it carefully on one fireplace
and lit two wall scones opposite the
entrance to make an item appear on the empty pedestal. Pick the HUFFLEPUFF'S CUP from the pedestal. The big
entrance door is now open, so you can leave.
TRAPPED COURTYARD: Enter the opened
door and first kill one hound that attacks. Be
careful not to run into a rotating blade
nearby during the fight. Time your run through the rotating blade (keep close
to the right-hand wall), pick up one LM
lying on the floor and carefully walk up to the double
stargate. Press roll to go through this trap when the blades retract and
enter one big courtyard where a wraith will
attack. It'll kill itself on the central statue.
Pick up REVOLVER, LASER SIGHT and 2 x
BULLETS from the far right corner. Combine the Revolver with the Laser
Sight and use it to shoot to break two targets
on the balcony above (opposite the entrance). This will raise a block on which one pushable object is standing. From this moment
on, do not leave this room or save/reload the game until you've pushed this
object to its designated position. You have to push/pull this object onto the
marked tile in the alcove with windows along the left-hand wall (the first from
the entrance or to the left when facing the pushable object). In order to do
that, you have to use the button in the
other alcove (far left corner, in the alcove to the right when facing the
pushable object). The sequence follows:
Once you raised the block with the pushable, push it once towards the
middle raised block (it remains raised all the time). Climb to the button and
press it to raise the block onto which the pushable is currently standing.
Climb onto this block behind the pushable and push it once onto the middle
(fixed) block. The third block just ahead is lowered. Return to the button,
press it to lower the first block and raise the third one, and finally, push
the pushable onto the third block, then into the alcove and all the way onto
the marked tile. This will raise one block near the entrance and activate some
burners around the courtyard.
Climb onto this raised block, save your game. The easiest and safest
route is described here: Jump up to grab the ledge with the burner above, but don't climb up. Instead, shimmy
to the other side of it and climb onto the very corner (right-hand corner).
Turn around and stand jump to grab the edge of the safe ledge ahead. Run jump
to grab the next ledge with the burner,
shimmy to the other side, climb onto the edge, turn around and stand jump to
grab the edge of the safe ledge near the building. Run jump diagonally to the
right around the corner of the building to land on the balcony. Blast the chest to find some BULLETS
inside and use the JS to open the door
below. Jump to the ground and enter the building through the door you've just
opened.
DUNGEONS: For a start, keep sprinting
around the staircase to activate the stones
to fall from the ceiling and to avoid them. Also avoid the tile with spikes in the far right corner. When the
air is cleared from traps from above, open the alcove in the near right corner
using a button and pick up UZI CLIPS hidden inside. In the far left corner
you'll find a button that opens one door on
the middle level. In order to get there, you need to go outside and once again
jump across the ledges with burners, back onto that balcony. Go through the
door and hide quickly in the alcove to the right to avoid the moving rotating blade on this ledge. When the
blades go off to the left, run out of the alcove, sprint to the right and use
the button there to open the door at the top
level. Side flip to the left to land on the floor of the dungeons. A skeleton is released from a side dungeon in the near
left corner (from the entrance, when facing the big staircase). Inside this
dungeon you'll find SHELLS.
Climb up the stairs then up the stairs on the left. A rotating blade will activate. For me, the easiest
way to go through this trap was to make a diagonal run jump to the left when
the blades go off to the right. On the next landing you'll see a hole in the
floor. Don't go up the next stairs immediately. Instead, just step onto them to
activate two boulders and hop back
diagonally to the left to get from their way. Once they land through the hole,
go up the stairs, make the same run jump across the next rotating blade and go through the door you've just
opened. The first level will load. Enter the first hallway and time your run
through swinging blades, picking one LM up along the way. When you're on the other
side, notice a closed door to the right and proceed further around the corner.
LIBRARY: Between the shelves, there are two burners. Crawl under the flame and pick up BULLETS in front of the first burner. Do the same with
the second burner, this time picking up the KEY OF
FAT LADY. On two floor shelves you'll find book
switches; use them both. There is one book switch in an alcove high
above. Go to the entrance to the library, climb onto the lowest shelf and jump
up to grab the monkey swing above. Time your traversing pass three side burners and drop to grab the crevice
near the alcove after the third burner. Climb into the alcove and use the book switch there. The big gate below will open.
Enter the next room and time your run across the blades that pop up. First run into the near right corner, where
you have to use the waterskin on the scale to put off a burner nearby. If your
waterskin is empty, you'll have to go to Prefect's Bathroom to refill it with
water (see the text below). In the far right corner you'll find a chest with an SM
inside. In the far left corner you'll find UZI
CLIPS in the chest, and in the far left corner you'll see the burner you deactivated. Use the book switch here to open a door elsewhere. If
camera gets stuck here, hop back just once and use the Camera button to bring
back Lara's perspective. Leave the library, go left then left down the stairs.
Pick up some ARROWS and UZI CLIPS on the landings, and kill one hound that attacks. The door you've just opened are
straight ahead, but first make sure to open one tunnel through which you
can later come back here when necessary.
PREFECT'S BATHROOM: Enter the wider
hallway on the left, and open the door to the left with the button nearby. Enter the Prefect's Bathroom, pick
up SHELLS from the near left corner, find an
LM on the bottom of the empty pool, notice
two keyholes to the left and use the switch
on the wall to the right. This will open that door you saw in the hallway after
the swinging blades. Return all the way there and open the door ahead.
DADA CLASSROM: Find an SM in the far right corner, blast the chest and kill eight small
scorpions. One will drop KEY OF LOYALTY 1.
Use the switch near the entrance door to
open the door on top of the stairs only temporarily. This timed run is pretty
tight. Once you pull the lever, roll and sprint towards the stairs. Stop
sprinting near the wall, make a U turn and sprint up the stairs and through the
door before it closes. Once inside a small room, kill one hound and pick up the KEY
OF LOYALTY 2. The timed door will reopen, so return all the way to the
Prefect's Bathroom, where you can use both keys and flood the pool, as well as
open the door at the bottom of it. Dive down through the hole and use the UW lever to open a gate just above. Return to take
the air (you'll need it) and dive down again. This time swim through the gate
you've just opened (straight ahead) and follow the tunnel until the next level
loads.
BOAT HOUSE: When this level
loads, make sure to use the UW lever to the
left as soon as you make a turn to the left around the corner. Keep swimming
through the gate you've opened and into the Boat house where you can surface,
pick an SM, and climb out of the water on
both sides of the pool with kayaks. Use the JS
on this side to open the gate. Provided that you visited the Boat House earlier
from the other side, you'll be able to climb out of the water on the opposite
side. You can also jump into the pool behind the open gate and take a look at
the ceiling using your Binoculars with Action. You'll see some symbols there,
so remember them. As the second gate inside the first gate is still closed, you
better return to the Prefect's Bathroom through the UW tunnel. Once back in the
corridors, go through the door you opened earlier (from the Library), which is
now on the left.
TROPHY ROOM: Stand close to the
wall on the right. Run around the rotating blade counter-clockwise,
timing your run just after the knife. Follow the passage to a chest containing one SM.
Keep going further until you emerge in a room with another rotating blade that moves sideways. Also, one wraith will attack. Time your run near the blade
and enter the right-hand passage ahead, where you'll find a sundial that can kill the wraith. Blast away four chests around the room to find UZI CLIPS, ARROWS,
SHELLS and BULLETS.
Do not go into the passage there, but instead, return to the room with blade,
make a U turn and enter another passage there. Open the door with the button and go through.
THROUGH THE TRAPDOOR: Kill three hounds first, then pick up an LM and ARROWS
from the near left corner. Pull the pulley
on the right to open the trapdoor below the vertical pole. Opposite the
entrance you'll find a TORCH. Lit it up on
the wall scone near the entrance and walk to the edge of the trapdoor. Press 1
to throw the torch directly through the opening. Jump to grab the vertical
pole. You can slide all the way down as quickly as you can, avoiding two blades to catch Lara. Also, if you know the
trick and have a medipack to waste, you can bounce off from the pole into two
side rooms where you'll find 2 x SHELLS, UZI CLIPS and SM.
Once you slide down into the lowest room with poisonous
fumes, pick up the torch from the ground, jump over the steep rocks onto
the flat area with a wall scone and ignite
it. Repeat the same with the wall scone on
the opposite side of the room. The trapdoor below the vertical pole will drop
and you can also drop into the room below.
Enter the room with blades. Pick up
the SM just to the right. Go left and jump
up to grab the crevice in the wall. While hanging, press Jump to jump up and
grab the crevice above. From there, press Down to jump off and grab the
crawlspace behind Lara. Crawl in and hang on the other side of the CS. While
hanging, press Down to jump off and land on the ledge behind Lara. Jump up to
grab the monkey bars above and monkey swing towards the central pillar. Drop
there to grab the crevice below, shimmy to the left around the corner, then
press Back to jump off and grab the crevice behind Lara. Now shimmy to the
right, pull onto the corner ledge and jump onto the ledge with shackles. From
there jump onto the central structure, and diagonally to the left to grab the ladder.
Climb up then to the right around the corner and drop onto the high ledge. Jump
up to grab the monkey bars above and monkey swing all the way into the corner,
where you'll find the KEY OF WISDOM 2.
Now you can get the second secret. Make sure Lara's health is 100%.
Monkey swing back to the ledge with the ladder. Face W so that the ladder is
directly behind Lara. Run jump to grab the crawlspace hidden behind the ivy
hanging on the wall. Inside you'll find Secret
#2: ROWENA'S SHIELD. Drop from
the crawlspace directly in front of the door (Lara will lose 90% of her health
with this drop). Unlock the door with the key you've just obtained and go
through. The second door will open automatically.
HORSEMAN: You'll have to kill the horseman here (first his horse, then him), in order to
proceed. You'll have to evade him and also be careful not to fall into side trenches with lava. Once he's dead, pick up his HORSEMAN'S DIAMOND, as well as UZIS, UZI CLIPS,
SM and LM
from the floor. Use the diamond into the receptacle
to open the door opposite the entrance and enter another room. In the corners
you'll find 2 x SHELLS, ARROWS and UZI CLIPS.
Do not even try to enter the passage protected with lava.
SCALES: Jump into water and use the UW lever
here to open a door upstairs. Climb out of the water using the stairs and jump
up to climb into one alcove above. You'll see scales in one alcove. In the
alcove opposite the scales you'll find the LARGE
WATERSKIN behind the gate you've just opened. In two side alcoves you'll
find an SM and BULLETS.
Using both Waterskins down on the flooded staircase, you have to obtain 4
liters of water. I am not sure about the hint, but I guess this amount
of water is hinted by four shields in the alcoves near the scales. In order to
obtain four liters, here's the process: Fill the LW with water and combine it
with SW. Now you have 2l in the WL and 3l in SW. Empty the SW. Combine the LW
with SW to pour those 2l from the LW into the SW. Now fill the LW again with
water. Combine it with SL. Now you have four liters of water in the LW. Climb
up to the scales and use the LW (from Inventory) onto the Scale. If you make a mistake, the spikes below the scales will pop up and kill Lara.
If you've done it correctly, the passage protected by lava will be safe now.
MIRROR ROOM: Don't just ran
across this room, as it has the lava pool concealed
with floor tiles. You can only pick up an LM
on one metal tile to the right. Then observe the mirror and see where the other
safe tiles are located (all of them are made of metal). Jump onto the first one
(a bit to the left), jump diagonally to the second on the left, run jump from
there to land on the tile next to the mirror, turn right and run jump onto the
tile where you'll find PURE HEART PIECE
(visible in the mirror only). A fire wraith will start chasing Lara, so you
have to have a lot of luck to jump across the safe tiles back to the entrance,
and to run to the pool with water in the previous room, before the wraith put
Lara to fire. Now you have to return via the horseman room, room with blades
and up the pole back into the Trophy Room. Once back there, return to the room
with moving blades, then go left into the room with the sundial, then through
the passage on the left, which will bring you back into the Great Hall. Return
to the Main Entrance, then go right up the stairs and back to the Grand
Staircase hall.
FLITWICK'S CLASSROOM: Once on the stairs,
go right and up the stairs, breaking some ledges
in the corner as you go. Open the door at the top of the stairs. In the small
room behind the door a wraith will attack.
Crouch near the sundial statue on the left
and wait until the wraith commits suicide. Opposite the sundial you'll see a
key inside the flame. In order to deactivate
the flame, you'll have to use the marked floor
tiles. Start with the one near the entrance. Stand jump onto the next
marked tile in front of the sundial. The next marked tile is straight ahead,
near the window. From there side flip to the right onto the last tile. If you
did everything correctly, without touching any other tile in the room, the
flame will be off. Now stand jump onto the raised ledge with the key and pick
up the KEY OF WISDOM. Return to the Grand
Staircase hall and go down the stairs (jumping over two holes in the corner).
You'll find a blue keyhole near the door to
the right. Unlock the door and enter another area.
CLOCK TOWER: As you enter, watch
out of the stones falling from the ceiling.
Kill a couple of bats, then go up the stairs to
the left. You'll see a mechanism missing two cogs on the right. The wall lever
to the left of the clock is not working, as the cogs are missing. Pick up ARROWS from the floor in front of the switch, go
down the stairs there and pick up one SM.
Return to the ground floor and go through the door opposite the entrance.
Notice the ladder in the near left corner. Do not go there as yet, but instead,
in the near right corner (SE). From the pile of snow jump up to grab the edge
of the gallery above. Press the button to
open the door directly beneath, but before you drop back to the ground, go to
the other end of the gallery, jump over the fence to land on the roof facing
uphill, grab the edge and shimmy to the left until you can climb onto the
opposite gallery. There you'll find the first WHEEL
(behind the pillar). Drop to the ground, and go diagonally across the
courtyard towards the door you've opened. As soon as you enter, save your game.
Stand jump from the doorway to grab the first horizontal pole. Keep
Action + Up pressed all the time so that Lara can swing around the pole. When
you want to jump off and grab the next pole, quickly release Action and press
it again almost instantly, so that she doesn't fall to the burning floor below. From the second pole jump
onto the ledge below the ladder. Face the next pole, hop back to the wall
behind Lara and stand jump to grab the next pole. Jump off to grab the next
pole, then again, jump off to grab the ladder and climb onto the ledge above.
Pick up SHELLS, face the fifth pole, hop
back to the wall behind, stand jump to grab the pole, jump off to the last one
and finally, jump off of it to grab the ladder ahead. Climb up onto the ledge
above. Then hop back with Action to grab the edge of the ledge and immediately
press Right to make Lara shimmy around the corner before she bends her legs. On
the other side, press Down to make her jump off and grab the crawlspace behind
her. Crawl through, hand on the edge of it, press Down and Action to make her jump
off the edge and grab the monkey bars on the ceiling. Swing to the other side
(notice an opening to the left), drop to grab the opening below, and crawl
through.
Drop to hand on the other side, into the room with lifting floor. You
have to sprint diagonally into the opposite corner and climb into the
crawlspace there before Lara gets killed by the blades
above. Hang on the other side of the CS where you'll find the ladder.
Climb to the left around the corner and hand in the middle of this ladder. Drop
onto the slanted slope below and immediately jump off across the burning floor
to grab the JS ahead. It will extinguish the
floor beneath Lara. Wait there a bit before crawling through the opening, and
kill five small scorpions first. Now crawl
through the opening and enter the room where you'll find the second WHEEL hidden in the chest.
Return to the JS and turn Lara's back towards the slope (facing the JS). Take
only one walking step away from the slope behind and back flip onto it.
Immediately jump off to grab the ladder above. Climb up, then to the left
through the open door, and jump over the fence back into the Clock Tower
courtyard. Go right into the tower, up the stairs, and use two cogs in the
mechanism. Pull the wall lever to the left of the clock to melt a pile of snow
outside. Drop down to the ground level, go out to the courtyard and find the KEY OF WISDOM just in front of the closed gate,
where the pile of snow used to be. Use this key in the keyhole
to open the gate.
STONE CIRCLE: Proceed through the
windowed corridor, picking up some SHELLS
and UZI CLIPS just in front of the blades.
Time your run across the right-hand blades
(left-hand blades are lethal), and sprint between two
moving rotating blades ahead. You'll enter the open area with stone circle
where you first need to kill one nasty raven.
Pick up the BULLETS from the ground at the
centre of the circle and go left towards the hut. When facing the hut and to
the left, there is a lake with freezing water.
Save your game before jumping in. On the left-hand wall you'll find a UW lever. Use it to open the trapdoor in the lake.
One wraith will chase you, just ignore it
and outswim it for now. Quickly swim through the open trapdoor before Lara
freezes. The water will become warmer as soon as you enter the flooded Village
of the Meerpeople.
Swim to the right and find an SM in
an alcove there. Then swim to the left, pass the entrance and to the right
between two supporting pillars. As soon as you go through, swim to the right
and to the other end of the cave. There swim carefully through the window to
the left, wait for the stones to collapse
from above, then swim in, down and to the left. Exit through the window and
enter another building where you'll find the KEY OF
WISDOM. Hurry back into the freezing lake (the exit is on Northern
side), and hurry to climb out of the water. Now you can run around the hut to
the left, where you'll find the sundial that
will finally kill that wraith. You can ignore the old
wild boar, it's not going to attack. Pick up an SM
near the window, and go around the hut. Along the way you'll find the button to the right that opens the door inside the
hut. But you have to open the hut first before this button can work. Return to
the stone circle and jump/climb on top of each stone to open the door to
Hugrid's Hut. Kill one hound inside, blast the chest near the bed to find 2 X ARROWS and CROSSBOW.
Behind the door you've opened with that button outside, you'll find the motorbike
and more SHELLS in the corner. Run out and
further to the other side of the valley, where you'll have to unlock the door
with the key you found in the lake.
OWLERY: First enter the Owlery on foot
to pick up some SHELLS in the corner. Then
ride the bike in and drive up the stairs and up the steep ramp. Once on the
wooden ledge, try not to drive the bike into the wall. Get off the bike and
jump into the windowsill diagonally to the left. Pick up RAVENCLAW'S PEARL from the windowsill (very hard
to spot, so make sure you pick it up). Jump diagonally to land on the higher
wooden ledge where you'll find an LM and ARROWS. Drop onto the slope below and leave the
Owlery. You can return via the Closed bridge to the Clock Tower killing two ravens along the way. Once back in the courtyard,
enter once again that room with burning floor
and horizontal poles, that is now in the far left corner. You have to repeat
those jumps across the poles and ladders until you hang on those monkey bars
inside the Clock Tower. This time swing through the opening to the left.
Press the button
here to lower the staircase
ahead and pick up some SHELLS lying nearby.
Go out to the ledge, then right and jump up to grab the monkey bars. Swing
forwards and to the right, drop to grab the edge of the opening and climb in.
Follow the passage until the level changes. Subsequently, open the door and
enter a huge building.
DIVINATION: Walk across the
floor to trigger the rocks to fall from the
ceiling. Go up the stairs to wake up two hounds
and kill them. Don't take the SM on the
first landing right away, but wait for the blades
to retract first. There are such blades on
the second landing as well. On the third landing these blades
protect ARROWS. Open the door on top of the
stairs and enter the classroom. Find two chests
to the left and right of the fireplace and pick up ARROWS
and SHELLS hidden inside. Turn Lara's back
to the fireplace, select Crossbow with explosive arrows in the inventory, turn
a bit diagonally to the right and shoot the crystal
balls on the tables. When they explode, a trapdoor above the ladder to
the left of the fireplace will drop. Climb up onto the roof, blast away a skeleton and pick up OPPORTUNISTIC
KEY. Select the Revolver with Lasersight from the inventory and shoot to
blast the crystal ball above, at the edge of
the tower. This will make the secret #3
to appear, so pick up the GODRICK'S SHIELD.
Return down the ladder to the Divination, go out, down the stairs and back to
the previous level and Grand Staircase room. Just drop from the CS onto the
stairs below.
DUMBLEDORE'S DESK: Go down the stairs
and climb the ladders here. Crawl into the triangular tunnel on the left and
when you reach the fork, go first to the right. Climb through the CS and enter
the room with five buttons and a door. Open the door by pressing three buttons that have food symbols above (the
same symbols you saw earlier in the Boat House), i.e. both buttons to the right
and the left-most of three buttons to the left (when facing the door). Enter
the corridor with staircases. Pick up ARROWS
on the first landing and SHELLS on the
second. Carefully walk towards the third landing and wait for the rocks to fall from above. Jump over and approach
the door that opens automatically. Kill two hounds
and enter the next room. Blast the chest to
find an LM inside. You can open the glass cabinet to the right, but there's nothing
inside. Use the waterskin full with water on the elemental puzzle receptacle
(if your waterskin is empty, return to the first pool, e.g. in the Grand
Staircase and fill it with water). The gate ahead will open. Enter and kill three bats inside. Go up the stairs on the right to
avoid falling rocks on the left. Pick up the
KEY OF COURAGE from the staircase and return
all the way back to the crawlspace leading back to the Grand Staircase. Instead
of going to the left back to the Staircase, crawl to the right.
MIMBULUS MIMBLETONIA! Then turn left
around the corner onto a high walkway in the Grand Staircase room. Run across
the first falling block and pick up SHELLS along the way. Run across the second and third falling block and pick up 2 x ARROWS. Keep running and make a U turn at the
end of the walkway, and pick up another box of SHELLS
from the small balcony. Use the Key of Fat Lady in the keyhole
to open a large painting door just to the left of the painting. IMPORTANT
NOTE: This painting will remain closed when you use the Key of Fat
Lady if you haven't already dropped the second staircase near the Clock Tower
(the button and the staircase are highlighted in yellow in this walktrhough).
GRYFFINDOR COMMON ROOM: Kill a skeleton to the right and blast the chest near the right-hand wall. Pick up SM, SHELLS, UZI CLIPS and BULLETS
with ARROWS (two separate pick-ups) near the
left-hand wall. Use the Key of Courage in the keyhole
and enter the bedroom. Pick up the SM in the
near left corner, sprint diagonally to the far right corner to avoid the rocks falling from above and pick up the GRYFFINDOR'S SWORD (Crowbar). So properly
equipped, you can proceed with the game. Return to the Grand Staircase hall
(use run jumps with Action to clear the gaps before the CS) and go down the
ladder. This time go down the walkway ahead. Approach the ammo on the walkway
carefully. Pick up BULLETS when the blades retract and keep going down the stairs.
Turn right at the fork, select the Crossbow with explosive ammo in the
Inventory and drop into the shallow water through the hole in the corner. Kill
one skeleton and climb into the opening nearby
before the piranhas eat Lara up. Follow the
passage to the keyhole for the Opportunistic
Key and open the gate. You have to use four Jump
Switches here to open the door ahead. To the left there is a rotating blade you have to evade when pulling two
switches on that side. To the right there are spikes
over which you have to jump at the right time in order to use two switches on
that side. When the door opens, enter into a large hall.
POTIONS: First side flip to the left to
clear the opened gate. From there, run jump to grab the crevice in the wall to
the left. Shimmy to the right until you can pull up and pick up one TORCH. Jump onto the higher block, go down to the
ledge and run jump onto the translucent ledge in the middle of the room. Stand
jump onto the next block and finally on the last block. Run jump towards the
entrance, go through and lit your torch in the previous room (choose which wall
scone is the easiest for you to reach). Then return to the big hall and ignite two wall scones at the entrance. Then run jump (no
Action) to land on the ledge near the right wall, jump onto the ledge above and
ignite the third wall scone. Return to the
ledge near the entrance, jump over three translucent ledges and on the last
one, turn left and run jump onto the ledge. Ignite the fourth
wall scone there to open the door opposite the entrance. Run jump back
onto the translucent ledge and jump with Action to grab the open doorway. Blast
away the chest in the small room to pick up
some ARROWS. Hopefully your small waterskin
is still full of water since your last use. If not, return to the room with
four jump switches and fill the waterskin there. Use the waterskin on the water elemental puzzle to make the SNAKE'S STONE to appear.
Return to the Grand Staircase. Once there, run through the shallow water
to the right and climb onto the raised block before piranhas eat Lara up. If
you think it's worth it, pick up UZI CLIPS
just to the left of the block. Climb onto the stairs above, ignore the doorway
on the left and go up the stairs ahead. Jump over the hole and climb up to the Main
Entrance. Return to the Entrance Courtyard, go right and down the stairs
leading to the Boat House. Once there, swim back through the UW passage to the
Prefect's Bathroom. Directly opposite the Prefect's Bathroom, there is another
bathroom.
MOANING MYRTLE'S BATHROOM: Explore the
area, open six small toilettes to find an SM
and 2 x SHELLS. You'll also trigger a wraith. In order to kill it, you have to sprint
back into the Dada Classroom and crouch near the sundial
until the wraith dies. Return into the bathroom you've just visited and use the
Snake's Stone there to open the trapdoor inside the stone formation here. Climb
onto the toilets and jump over to this central stone structure. Crawl backwards
through the trapdoor you've opened. Drop facing W and making sure you have at
least 70% of energy. You'll land on the slope facing uphills. So, jump and roll
in mid-air to make Lara face downhills. Jump over the first set of spikes at the last moment possible, then jump over
the second set of spikes and let Lara land
on the breaking ledges ahead. Since there
are spikes beneath the middle ledge, and
since the boulders are coming after Lara, be
very quick. Move to the ledge on the left (when facing downhills) and crouch.
The ledge will fall, but there's nothing beneath it. Enter the tunnel to the
left to find secret #4: SALAZAR'S SHIELD. Climb out of the pit and slide
onto the next slope facing downhills. Jump over two
next set of spikes and land into a pool. Climb out of the pool on the
opposite side.
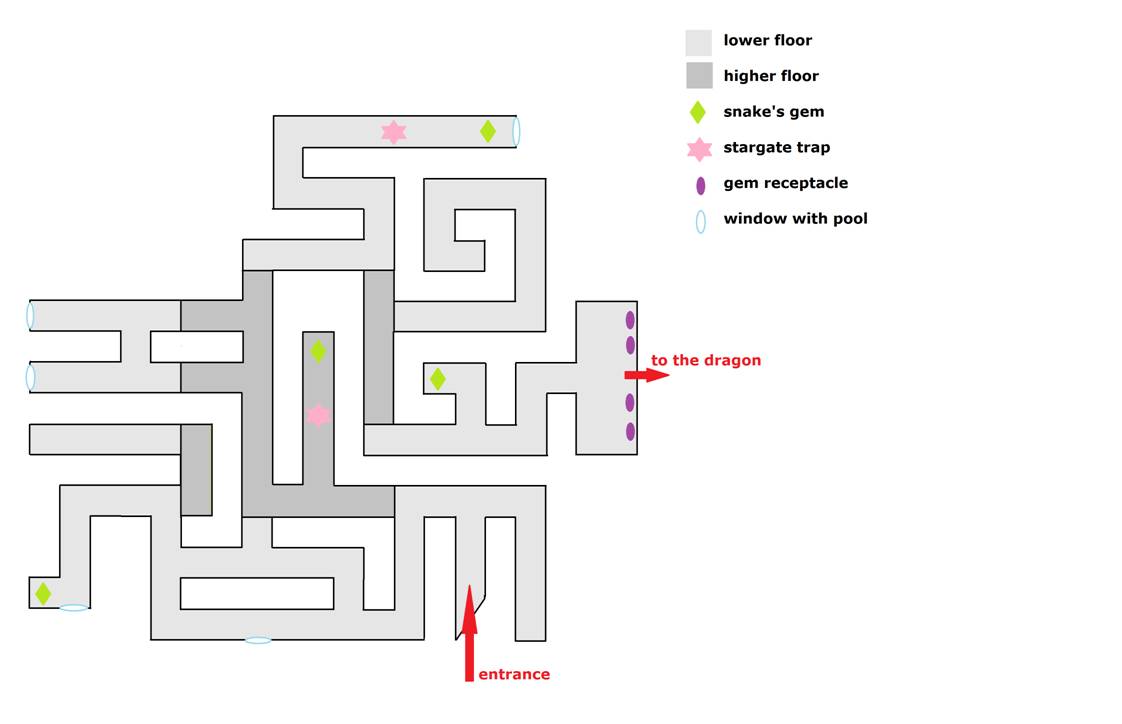
THE LABYRINTH: Carefully go to the right avoiding rotating blades. Time your run across the first spikes when they retract. Repeat the same with the
next two sets of spikes. As soon as you
enter the big cave on the left, save your game, as it is rather difficult to
avoid all falling rocks from above. Finally,
enter the passage ahead, leading into labyrinth. The goal here is to collect four SNAKE'S STONES and place them into four
receptacles. The map for the labyrinth is below. Once you collect all four
gems, you can unlock the door leading to the Chamber of Secrets.
CHAMBER OF SECRETS: Swim through the
tunnel and use the alcove to the right to go through the rotating blade. When
you surface for air at the end of the tunnel, pick up an LM, save your game and climb out of the water. You
cannot kill the dragon so don't waste your
ammo. Just be as quick as you can. At times, locusts
will attack Lara. You can use a good bug typical for TR4: when the
locusts appear, save and reload. They will be gone after reload. It might last
longer, but this is quite useful when you are low on medipacks. You can collect
some pick-ups placed near the dragon if you want: four
LMs. Also, if Lara catches fire, enter the pool with the dragon to extinguish
the fire or just reload an earlier save and try again. The goal is to obtain an
artifact and escape asap. Enter the pool and go into the far right corner of
it. Climb out of the water, jump up to grab the ledge above and run jump to
grab the crevice on the right-hand wall. Shimmy to the right and pull up. If
Lara catches fire along the way, feed her with medipacks (if you have them) and
run into the pool in the corner. Or reload an earlier save. Use the button here to open the gate on the opposite side
of the dragon's lair.
Return to the pool with dragon, go to the opposite side of the lair, climb out
of the water and then jump up to grab the ledge above. Pull up and run
diagonally to the left to grab the edge of the open doorway. You have the pool
to extinguish the fire if Lara catches it. Use your crowbar to pry the second PURE HEART PIECE from the wall. As quickly as you
can, return to that button on the right-hand side of the dragon's lair and jump
into the water next to the button. Swim down and through the opening on the
opposite side of the pool. Climb out into the corridor with red carpet ;) At
the next turn, hop backwards three or four times to trigger the boulder, then run into the passage to the right to
avoid it. Continue up the ramps and climb into the hallway to the left at the
end of the corridor. At the next turn to the left, repeat the same tactics to
trigger and avoid the boulder. Keep going up
the ramps until you emerge back into the Grand Staircase. Once back there, go
to the right, through the piranha infested water and climb onto the raised
block and to the walkway above. You have to go to the Room of Requirements, and
the quickest route (known to me) is through the Entrance Courtyard, Boat House
and Prefect's Bathroom. Once there, approach the pink wall between the
Prefect's Bathroom and Moaning Murtle's Bathroom. The wall will magically
disappear, revealing the door that will open automatically. Pick up an LM from the small toilet and pry the wooden door
open with your crowbar. In the Inventory, combine two pieces of Pure Heart to
obtain SLYTHERIN'S LOCKET.
ROOM OF REQUIREMENT: Approach three pedestals to place three precious
artifacts you've found. Once you do that, the HARRY
POTTER'S GLASSES will appear on the pedestal in the centre, representing
secret #5. Once you have all five
secrets, you can return to the GRYFFINDOR COMMON ROOM at the top of the hall
with Grand Staircase. This time just jump into the lit fireplace
to be teleported to the bonus level.
Bonus level: HOGWARTS EXPRESS
Pick up the GRENADE LAUNCHER
on the left. Enter the first wagon, blast the chest
and pick up an SM hidden inside. Use the
crowbar in the switch to open the door at
the end of the wagon. Run jump into the second wagon. Open the door of it,
enter and blast away four skeletons that appear.
At the opposite side of the wagon, to the left, you can pry one box open with the crowbar. Use the switch there to open the door nearby. Run jump
diagonally to the right to grab the ladder on the third wagon and climb up to
the roof.
Run jump on the wagon behind, kill three birds
and two hounds that attack. Go to the opposite
side of the wagon, run jump onto the first wagon and use the crowbar in the switch to open the door on the third wagon. Run
jump back onto the second wagon, drop through the opening on the roof, and run
jump from the second wagon into the third. Go around the chain, open two side
toilets to find MINES and SM inside, go around the second chain and to the
end of the wagon. Once again, run jump diagonally to the right to grab the
ladder on the fourth wagon.
Climb onto the roof of the fourth wagon, drop to hang on the right-hand
edge of the wagon, drop to grab the CS below and crawl into the wagon. Blast
away three skeletons that appear, go left, find
the MINES behind the switch and use the crowbar to operate it. This will open the
roof trapdoor back in the third wagon. Climb on top of the fourth wagon from
the CS through which you came from and run jump back onto the third wagon. Drop
through the opening in the roof, kill three hounds
inside and head back W/E. A block was there to the left of the chain that
lowered meanwhile. Press the button here to
open a door back in the fourth wagon.
Once again, run jump to grab the ladder on the fourth wagon, climb up
onto the roof, hang on the right-hand edge of the roof, drop to grab the CS
below and crawl into the fourth wagon. Go towards the door you've just opened
and enter into the sleeping cab, where Lara can finally take some rest after
this amazing adventure.
THE END
In Hamburg,
16 November 2013