THREE GHOST STORIES Walkthrough
Level by: Raidermatty
Walkthrough by: Nina
Croft
IMPORTANT NOTE: When the game starts, there are four levels open for you to explore: Beth's House, Crypt of Treasures, Gardens of the Church and Cemetery. The builder did his best to make this gameplay everything but linear. Therefore, there are many possible routes through this levelset. This walkthrough describes only one possible route, that involves as little backtracking as possible (although backtracking is inevitable at some points). It means that the Gardens of the Church level will be visited only after Lara has obtained the Church Key. The Cemetery level will be visited only after Lara returns from the Spectral Realm level, although both these levels can be visited at any time you want. This being said, the sequence of the levels in this walkthrough is made according to the route described in this walkthrough (Beth's House -> Crypt of Treasures -> Gardens of the Church -> Spectral Realm -> Cemetery -> Beth's House) although other sequences are also possible.
NOTE ABOUT KNOWN BUGS: When Lara catches fire when trying to enter a CS or a
corridor, it means that a bug appeared. The best solution for this bug is to
run to the nearest entrance to any other level available and to return back
immediately. The only exception is the roof of the church at Cemetery level.
Lara is not supposed to go there at all, so don't waste your time trying to
jump onto that roof without getting burned to death. If Lara won't grab an edge
she is supposed to grab, try to reload a save, or try to grab that edge from
another angle etc. If you follow this walkthrough, such bugs will appear almost
never.
CREDITS: This level is very obscure and puzzles are quite hard and complicated
at moments. I must express my endless gratitude to all the people participating
in Stuck threads at TRLE.net. Without their precious help and hints, I would
have never been able to finish this walkthrough.
PLOT: December 2013: Lara is invited at home of her friend Beth to celebrate
Christmas Holidays with her boyfriend Johna and his sister Cindy. But during
the night of Christmas Eve, some strange sounds start to come from the
basement...
ABBREVIATIONS USED: CS (crawlspace), JS (jump switch), UW (underwater), LM (large
medipack), SM (small medipack)
COLORS USED: green
(medipacks, ammo, flares), purple (hazards, traps), blue (key items), orange (interactive items, pushables, breakable objects,
switches, keyholes...), violet (optional routes to obtain secrets)
Level one: BETH'S HOUSE
BETH'S
LIVING ROOM: You start the first level in the living room of
Beth's. She is also standing near Lara, next to the big Christmas tree and holding
a glass in her hand. First climb onto the low drawer cabinet next to Beth and
pick up LETTER
from the bunch of Christmas cards, and some FLASHLIGHTS (flares) a bit
farther. Approach Beth from her left and pick up the GLASS from her hand. If you approach
the table with the vase to the right of Beth, you'll read Lara's thoughts on
the screen: "This vase is very
durable. I must find a way to break it." So, make a mental notice of
this hint, as you'll need to return here once you obtain some explosive weapon.
Make sure to notice the other details in this room: the fireplace and the metal
grate in the corner behind the Christmas tree. You don't need to visit the
dining room S (along with the kitchen) as yet, therefore, climb the stairs.
CROWBAR:
Up on the gallery, make a note of the locked door to the left, one locked and
one closed door on the right and closed trapdoor above the ladder in the
corner. For now, climb into the left-hand window and pick up more FLASHLIGHTS.
Go to the other side of the gallery, so that the right-hand window is on Lara's
left now. Run jump diagonally across the fence to land inside this window and
press the button
there to open the entrance door below. Run jump back onto the gallery. Now,
stand near the fence facing N, so that the right-hand window is on Lara's
right. Use the binoculars to locate a CS in the shadows below the fence and run
jump in that direction over the fence to grab the edge of the gallery on the
other side. Drop to grab the CS below and crawl in. Inside a small opening you
will find the CROWBAR.
Drop from the crawlspace near the entrance door you have just opened and go
through. Watch the flyby showing you a part of Beth's courtyard.
DOUGH:
Once outside, go to the right and around the corner, until you come to a gate.
Open this gate by the
crowbar, enter the small garden and press the button in the near right corner to open the door
to the storage. When you enter the storage, use the switch on the left wall to lower the central
platform and raise the block near the opposite wall. Find a pushable barrel in the near
right corner from the entrance and push/pull it onto the lowered platform. Use
the switch again to
raise the platform with the barrel on it. Climb the ladder to reach the higher
ledge, and push/pull the barrel along this ledge all the way to the gap with
the lowered block. You'll pick up Revolver BULLETS along the way. Drop down and use the switch again, climb to the
higher ledge again and push/pull the barrel across the raised block. Once you
cannot push any more, as a crate is standing in the way, jump diagonally to the
perpendicular ledge and pull the crate away from the wall, so that it no more stands in the way
of the barrel. Push the barrel two more times, so that it drops from the ledge
into the other part of the storage (behind the fence). Drop there yourself and
push/pull the barrel around the wooden crate in the middle of the room, so that
it stands below the slightly different ceiling tile. This will lower the block
nearby. Climb the crates in the corner, picking up FLASHLIGHTS along the way. Jump
with Action onto the ledge where the block lowered and pick up DOUGH
hidden there. Climb on the wooden crate, jump up onto the higher ledge, drop to
the other side and return all the way back to the entrance to Beth's house, but
don't enter.
You
can pick up the first GOLDEN CROSS
now or later, you'll be through this door for many times again. It is hidden in
the CS just above the entrance to the house, to the right, if you look from
outside through the entrance door. To get there, you need to climb onto the
entrance to the house, from its left side, where the ground is a bit higher.
Just run jump from the highest tile to grab CS and pick up the prize. Drop down
and return to many other tasks ahead.
BASEMENT
KEY: Instead, climb the diamond-shape ladder to the broken
window of the guest bedroom. Make a note of the cassette player on the window
when you enter the room through the window. On the desk ahead you will find JOHNA's
NOTEBOOK. You will also get a camera of Beth's boyfriend Johna in
the dining room below. Use the button to open the door and
return via the gallery to the lower level. Enter the dining room S and pick up BASEMENT KEY
from Johna (face him one or two steps away and press Action). Since you are
already here in dining room, pick up the BATTERY from the cabinet and CUP
from the small table SE. Return to the living room and immediately go left,
between the stairs and wall to the left. Unlock the door and enter the flooded
basement. Another level will load.
Level two: CRYPT OF TREASURES (first
visit)
SMALL BIN:
This is your first visit, only to pick up some required items, since you'll
need to return here when you find the object that opens the big golden door you
see while this level loads. As soon as you enter, squeeze between the wall and
table to the right and pick up SMALL BIN. Passage ahead is not interesting
for you now, but you can also pick the first ROPE from the high crate in the
SW corner of the flooded room.
BOILER ROOM:
Enter the passage N leading to boiler room. The ramp on the left is blocked, so
use the button to the
right. A big boulder will fall through the
trapdoor you lowered thereby. Make a
save, and walk to the ball. Don't release Walk button and press Action to push
the boulder once towards the ramp. Wait for the boulder to be perfectly still
and push it two more times in the same way, until it rolls down the ramp and
break the wall for you. Run down the ramp into the basement with a boiler. Save
before you use the wheel on the wall to the
left. Don't waste your time when you use this wheel. Press Roll repeatedly
during the camera shot until you see Lara rolls. Immediately run forward
steering sharp to the right and up the ramp. Now sprint up the ramp and save
Lara from the explosion. <download savegame>
You can now enter the boiler room again. You'll notice that the back wall of
this room has been blown away and you can now access a switch. Avoid fires
in order to get there, and use it to open the door back in the basement.
REVOLVER:
Return to the basement and go through the opened gate straight ahead. There are
three switches to the
left, and some burners to the right. I
myself don't know the hint (maybe the ceiling?), but I know the correct
sequence of these switches. Every switch turns different burners on/off. Simply
use the first and the third switch to turn all burners off and crawl through
the passage into the storage where you can pick up REVORLVER, BULLETS and FLASHLIGHTS. Return to the
basement. Ignore the third area you overlooked now, as that is a dead-end for
now. Return to the first level.
Level one: BETH'S HOUSE
PIZZA DOUGH:
Now properly armed, you may want to blast a few things around, as typical for
Lara when visiting her friends, right? First enter the dining room again, and
this time, open the door to the right with the button. When you enter the kitchen, pick up an SM
from the window left, then, go right and use the toaster to open the door of the storage and go
there. Pick up FLASHLIGHTS
from the table to the right, crouch and shoot to break the crate to the left and pick
up PAN
hidden inside. Also make sure to pick up BULLETS just nearby and return to the kitchen.
Approach the cooker
which is now on Lara's left and enter your Inventory. Combine Dough with the
Pan and so obtained DOUGH TO BAKE and place it into the oven. Make
sure to pick up PIZZA
DOUGH from the floor once the baking is finished. Return to the
living room, jump over the sofa and shoot to break the grating behind the Christmas tree. Blast one grating more and drop into
the room with piano. From the window straight ahead you'll pick up BULLETS.
Blast away the pink painting
on the wall opposite the entrance CS. Press the button inside the alcove hidden behind the
painting, to open the garage door. Go through.
GARDEN KEY:
Near the passenger's door of the car you'll find FLASHLIGHTS. On the table in the
far right corner you will find INGREDIENTS for the pizza you intend to bake
soon. Press the switch
in the far left corner to open the rolling door and enter the backyard of
Beth's house. Go left and open the door of the small storage. Shoot to brake
the crate on the
right and pick up BATHROOM KEY hidden inside. Once back in the
backyard, you can go all around the house and open the gate leading back to the
courtyard, near the red keyhole. Just open that gate using the button on the pillar to the
right, but do not go through. Return to the piano room through the garage
instead. You don't have to use the CS through which you entered. Instead, go
past the piano and enter the passage to the right. Press the button to open the door,
and you are back to the living room. Go right and up the stairs, go to the S
side of the gallery and unlock the door with the golden keyhole. Using the mirror in the
bathroom, find the invisible GARDEN KEY on the floor and return back to the
ground floor. Again, exit the house, go left and near the corner of the house,
make sure to pick up the second ROPE hidden in the bush. At the end of the
courtyard you will find the red
keyhole. Unlock the garden door and enter the backyard of Cindy's house.
CINDY'S
HOUSE: As soon as you enter, a flyby will start, so watch it
carefully. It will point out to a swarm of fireflies. That is also an important
hint that will be of great use later when you find the Church key. For now,
just go around the house to the right, and use the letter in the yellow post box near the
entrance door. You opened the door to Cindy's house. Now push the grey wastebin away to
reveal a button.
Press it to open the inner door to Cindy's living room. In Cindy's kitchen you
will find CHEESE
on the cabinet to the left. In the SW corner you will find a shelf where you can place
the Glass. On a small table near the entrance there is a coffee machine. Combine Cup
with Small bin in your inventory to obtain COFFEE CUP and approach the coffee machine
from the front (Lara has literally to stay INSIDE the table). Finally, combine
Pizza Dough with Ingredients in your Inventory to obtain PIZZA and bake it in the cooker in the far right
corner. These three actions will open the outer door of Cindy's living room.
CINDY'S
LIVING ROOM: There are more things to do in this room that you can
see at the first glance. For now, say hello to Cindy, and go to the dog. To the
left of the dog there are some MINES on the floor. If you go near two shelves
near the dog, you will notice Lara looking at something on the diagonally
placed shelf. Approach these shelves and press Action and Lara will find the
third (and last) ROPE on them. Notice two keyholes on the right-hand side of
the room from the entrance and finally, notice three lamps hanging on the N wall. These lamps
are jump switches, so use them all to open the toilet door. Inside Cindy's
toilet you will find LASER SIGHT in the pot with flowers. Now when
you obtained this important item, you can go and search for keys required in
Cindy's house. You have to go back to Beth's house, for a start.
On
your way back you can collect the secret. When you exit the kitchen, go right
and around the corner. You'll see a small snowman near the E wall. To the right
of this snowman there is a CS hidden behind a bush. You will find the GOLDEN CROSS inside.
TORCH:
Return to Beth's hose and go up the stairs. Approach the ladder in the corner
along the S wall and stand below the trapdoor above. Use the revolver with
laser sight and shoot to break the lock of the trapdoor. Go up the ladder into the attic. Now,
shoot to break the chest
on the big crate N to find the GRENADE LAUNCHER and go further into the attic
(to the right or to the E). In the other part of the attic you will find a doll where you have to place
the Battery in order to open a door nearby. Return to the middle of the room
(along the N wall) where the crates are stored. Find a pushable crate near the wall and pull it out
from the corner. Push/pull it somewhere where it won't be in way. Return to the
crates and find another pushable
crate just behind the place where the first crate initially stood. Pull
this crate out as well, to reveal a passage where you've just opened the door.
Inside the small room there is a button, cleverly hidden behind the chair in the corner. This
will lower the block in the other corner, so pick up the TORCH. In my opinion, the
nearest flame can be found in the Boiler room, on Crypt of Treasures level (you
already visited that room). So ignite your torch there and return to Beth's
living room.
CODE CARD,
POOL KEY, BEDROOM KEY: Ignite the fireplace with your torch to open the door to the right of it.
Throw your torch somewhere where you can find it and enter the room. Straight
ahead, in the window opposite the entrance, you will find some BULLETS.
In the corner NE there is a cabinet with greenish curtain at the base. Crawl
through this curtain to obtain BEDROOM KEY. Return to the living room and
approach that vase
Lara mentions at the beginning of the level. Blast it away with your grenade
launcher to find the POOL KEY hidden inside. Go upstairs and unlock
the only remaining locked door at the gallery. Enter Beth's bedroom and go
through the wooden door
on the opposite wall (open them using Action). In the small toilet you'll find CODE CARD
on the shelves to the right. Don't forget to pick up the LM from the window of the
bedroom.
If
you want to pick up a secret here, push/pull the wooden crate in the near right corner of the bedroom
(from the entrance) so that it stands in front of the bed, below the monkey
swing on the ceiling. Climb on the crate, then jump up to grab the monkey bars
and swing forwards. Drop to land on the roof of the bed and crawl into a dark
CS where you will find the GOLDEN CROSS.
Crawl backwards and drop onto the floor of the bedroom.
Also,
return to the torch below and go for
another secret. Exit the house through the entrance door and go right and
around the corner. Go through the gate you opened earlier with the crowbar.
Approach the small red fondue lying on the ground to the right. Ignite this fondue
to open a pit in the corner near the entrance to the storage. Pick up another GOLDEN CROSS in this pit and return to
the living room of Beth's house.
MOUSE:
Return to the living room and enter the piano room. Approach the glass bottle
near the corner of the big desk, facing N. Press Action to place Cheese on the
floor. Enter the passage leading back to the living room, to trigger a camera:
a mouse comes out from his hole to steal a piece of cheese. Return to the
cheese and take the MOUSE with you. Finally, enter the Garage and
use the Card in the card
reader to open the gate to the left.
CASETTE AND
LITTLE STONE: Enter the dark passage and go over the crate to enter
the small storage. Blast away the wooden barrel standing in the way (with a grenade) and pull the
small crate from the
left corner once to the middle. Now pull that crate towards the entrance, so
that it stands between the second such crate and the switch. Pull the second crate across the first
and place it below the switch.
Use the switch to open one gate back at the attic. Return through the garage to
the living room, up the stairs once again and up the ladder to return to the
attic. If Lara refuses to climb the ladder, simply save your game here, reload and try again. Find the opened gate in the far right corner and open the cabinet (take one step away
from the cabinet and press Action). You will find the CASSETTE inside. Remember that
cassette player you saw in Johna's bedroom? Return down the stairs to the
gallery and enter the second door on the right. Use the cassette in the cassette player and trigger
a flyby. Watch it, pointing out to a swarm of fireflies outside Beth's house,
showing you a pit that opened outside. Climb through the window and down the
ladder back into the garden and drop inside the pit on the right, to find LITTLE STONE
hidden inside. Take it and return to the Beth's house.
Level two: CRYPT OF TREASURES (second
visit)
ATTIC KEY: Now
you have an important item and you can open that big golden circular door you can
see each time this level loads. This time go through the flooded basement and
enter the passage straight ahead. Crawl under the low ceiling and through the
triangular opening in the far left corner (keep as close to the left wall as
possible). Follow the low passage until you emerge at the big circular door.
Before you open it and go through, make sure to pick up a sneakily hidden key
nearby. Crouch and crawl into NE corner of the room, where the ceiling is very
low. Press Action to pick up the ATTIC KEY almost completely buried in the
dirt. Finally, place the Little Stone in the receptacle to open the big circular portal.
GHOST:
Follow the big round passage to the first pit with switching ledges. Stand jump
onto the first as soon as it appears, count to two, jump onto the next when it
appears, count to two, jump to the third ledge and quickly jump to the other
side of the pit. Enter the big hall with the ghost who actually made all those
noise... The dialogue between the ghost and Lara can be read in author's Readme
included in the download package. In short, this ghost (Ghost of Christmas
Present) visits the house every Christmas eve in order to meet the Ghost of
Past Christmas and the Ghost of Future Christmas who lost some time ago. One is
in the Cemetery and the other somewhere in the garden and Lara would need a
ghostbuster in order to catch them. The Ghost also says that Lara should enter
the Spectral Realm hidden below the Church. According to the Ghost, the portal
to Spectral Realm can be opened by playing a Christmas song.
WATERSKIN:
So, that is now your next item of interest. It is hidden nearby, so back to
work. You can first go to obtain the Waterskin if you want. After the dialogue
with the Ghost is finished, go to the right and open the gate there by using two switches located at the
back side of two pillars. Enter the room with the pool and pull the crate from the corner on
the right twice towards the opposite corner. Jump into the pool, swim along the
left-hand wall and find an UW
lever. Use it to open the gate in the opposite corner of the pool and
swim through there and climb into the shaft. Approach the wall with flowers
(ladder) and press Up + Action to grab the ladder. Climb exactly eight times up
and press Jump + Roll + Action to make Lara jump off the ladder and grab the
ladder behind her. Climb up into the Attic. Unlock the door using the key you
found earlier.
Now,
run to the right and find a GOLDEN CROSS
hidden between big wooden crate and roof corner.
It is now time for Lara to make a good use of those
three ropes she found along the way. So, if you look at the ceiling of the
attic, you will notice that some tiles are textured differently (as wooden
window shutters). This is supposed to be a hint for you to place the ropes onto
these tiles. So, stand under the first such tile directly in the middle of that
tile facing North and press Action. If Lara does not want to place the rope
there, just pivot a bit to the left or right, until you find the correct angle.
Place all three ropes in this way (all facing N) and return through the UW
passage back to the big pool and climb up to the entrance. Run jump from the
wooden crate to grab the first rope. Carefully turn Lara to face the second
rope squarely. Swing and jump off to grab it, then do the same with the third
rope. Finally, jump off the third rope onto the other side of the pit and pick
up the WATERSKIN
from the rock in the corner. Return to the room with the Ghost.
CHRISTMAS
SONG: Now approach the big closed gate opposite the entrance
and behind the Ghost. To the right of this gate there is a pedestal with bluish crystal. Use the
Laser sight to target at it and shoot to break it. Approach the pedestal and
use the Look button to read the note
on the pedestal (from above). Memorize four coordinates written on the
paper: I = C4, II = B2, III = A3, IV =
D1. Enter the left-hand doorway that opened during the dialogue with the
ghost. There are four lyres
placed on chess tables across the room. Each lyre has its number 1 to 4. Each
lyre has to be placed on its proper coordinate by referring to that note you
found in the main hall. So, the lyre with number 4 (IV in Roman numbers) has to
be placed onto D1 field. Each time one lyre is placed correctly, a blue
lightning will ignite. Once all four lyres are placed onto their associated
tile, the middle of the room will be lightened with rainbow beams and an LP
will appear. Pick the CHRISTMAS SONG up and return to the hall with
the Ghost. If you have already obtained the Waterskin, you can return to Beth's
house. Once you're back to the pool with switching ledges, drop into the
shallow water and fill the Watersking with water.
Make
sure to collect the GOLDEN CROSS
hidden beneath the steps on which you have to climb up.
Return through the CS back to the basement and
finally, back to the first level.
Level one: BETH'S HOUSE
CHURCH KEY:
So, leave the Beth's house and head back to Cindy's house. Make sure you have
the Pool Key, Mouse and Waterskin filled with water in your inventory. Once
back in Cindy's living room, go right and unlock the room with the pool. Stand
on the right-hand side of the pool and face the big window with flower pots and
water scales. Use the Laser Sight to target the grating under the water in the pool and shoot to
break it. Go to the other side of the pool and approach the water scale. Pour the water
from the Waterskin (use it from the Inventory) to open the UW gate below. Swim
down the passage and through the gate to obtain the BEDROOM KEY. Return to the living
room and unlock the bedroom just to the right. Enter and find the cat in the
far right corner. Stand on the tile adjacent to the tile with the cat and face
the Christmas tree. Enter the Inventory and select the Mouse. Place it onto
that tile and wait for the cat to start chasing the mouse. You can now take the
CHURCH KEY
on which the cat was sitting all the time.
If
you want to take a secret at this point, use the lever on the right-hand wall
(from the entrance) that is shaped as a wall lamp. This lever will raise a
block outside Cindy's house. Exit and go left and around the corner. Climb onto
the raised block against the house wall and climb onto the roof from there.
Find a GOLDEN CROSS in a small alcove on the roof and drop down into the
courtyard.
Return outside and go left and around the corner.
Along the W wall, you will see a closed double gate. Take a look at the tree to
the right of this gate and locate the swarm of fireflies in the vicinity.
They point out a CS hidden in the leaves of the fence. Jump up to grab the edge
of the CS and crawl in. Use the button
inside to open the double gate outside and return there. Follow the passage
between the double gate to enter another level. NOTE: If Lara burns to her death inside this concealed CS, the only solution
I could find for this bug is: if this happens in your game, before you climb
into the CS, go to the Cemetery level, just to load it. Then return back here
and climb into the CS without any other problems.
Level three: GARDENS OF THE CHURCH
When you enter the big church courtyard, go right and
follow the path to a small building with a keyhole. In the second bush to the right of this
building you will find a GOLDEN CROSS.
Use the key in the lock to open both gates and push/pull two statues of knights
standing nearby through these two gates and onto the marked tile. This will
ignite the fire between these two statues. Now you need to find a torch. So, go
right again, towards the frozen lake and find a small triangular opening in the
snow just to the left of this lake. Follow the short passage into the lake
below the ice, and pick up one TORCH there. Return with the torch to two
knight statues and ignite it in the fire there. Bring the torch towards the
(diagonally) opposite corner of the courtyard, where you can see a horse statue
surrounded by four angels. Ignite the angels to open the entrance door to the church. Bring the torch
along and go to the other side of the church, where the entrance is.
In the church you have to ignite five candles in the windows
in order to lower a trapdoor near the entrance. Return to the entrance, drop
the torch, climb up the ladder on the pillar on the right and through the
lowered trapdoor. On the gallery above, go left and save before using the switch on another
supporting pillar. It will raise some ledges around the church, but only
temporarily. So, press Camera button immediately to force finish the camera
flyby (and save some time), flip to the left and run. Jump from the edge to
land on the ledge ahead. Keep running, jump from the edge and grab the next
ledge. Quickly pull up, run and steer to the right. Jump to land on the nearer
edge of the metal ledge. Run to the right, jump to land on the middle metal
ledge, and stand jump from there to land on the last metal ledge. Run and steer
to the right, and jump from the edge, steering to the right even more, in order
to grab the edge of the rock ledge above the window. Now you don't need to rush
any more. Run jump to grab the edge of another stone ledge and walk to the
other end of it. Run jump diagonally to the right, steering to the right and
press Action to make Lara grab the small stone ledge above the entrance. From
here, jump over the fence into a small alcove with a switch. Use it to lower a trapdoor outside in
the garden. Jump back onto the stone ledge and safety drop onto the floor of
the church. Pick up your torch and leave the church.
Go right around the corner and approach the smaller
building with the sundial in front of it (the building where you've just opened
the trapdoor). Approach the sundial and observe the Roman numbers written on it
(IV, VI, IX, III, VI, VIII). When
you add them up, you get 48 as a
result. Remember it, then drop into the pit with the torch. When you reach the
closed gate, ignite two
burners with your torch and drop it somewhere. If you crawl through the green curtain to
the left, you will find another GOLDEN
CROSS. Now, you have to blow up two crosses in the corner (use grenades if
bullets won't work) to open the gate. Go into the room with five switches.
So, now you have to use the hint from the sundial.
Observe the numbers above the alcoves with the switches. Roman numbers are written
as follows: left-hand wall, from left to right: alcove 1 (VII - VI), alcove 2 (IV - VI),
alcove 3 (IX, III, XII). On the
right-hand wall there are two alcoves, from left to right: alcove 4 (VIX - I), alcove 5 (VIII - VI). So, you need to sum up the
numbers above the alcove. Only the switches in three alcoves whose numbers sum
up to 48 are the correct switches.
So, press the switches in alcoves 2, 3 and 5 to open the gate ahead (IV + VI + IX + III + XII + VIII + VI = 48).
In the next room, place the Christmas Song onto the gramophone to be teleported through the portal
into the Spectral Realm.
Level four: SPECTRAL REALM
Now, brace yourself. This level is particularly hard,
even if you don't seek to collect all secrets. It involves many difficult jumps
and a lot of nerves, so arm yourself with patience and save before attempting
anything, as well as after every successful jumps. There are many routes
through this level, and this is one with least backtracking imo. You have to
collect three crystals first, performing super-human acrobatics to find a way
to retrieve them. It does not matter which route you take, it will be difficult
anyway ;) The best recommendation for this level is: use your Binoculars and
whenever you have a good look at any large floating building, use it to take a
look from afar. Sometimes you can discover many important hints and smart ideas
how to get somewhere in this level.
You begin the level on a middle-sized island among
many smaller and some larger. First take a good look around: NW there are a big
building with moveable orbs on the left and alley with gates, currently blocked
off by a block. Between them, a bit below and between, there is a cross
floating in mid-air. You can nicely see it with your Binoculars if you use Action
during the binoculars view. When you go a bit more further to the right, you
will see many small rocks floating in mid-air, leading to all these buildings
you can see around Lara. The only floating rock near enough is located NW - N near the starting island. Run jump without
Action to land there and go for the secret first if you want.
Walk
around this floating rock towards and turn SW to face the floating cross you
saw through your binoculars. You need to take a hop back and perform the
running jump to land on the invisible ledge with the cross. But the crystal on
the floating edge is standing in the way, so save your game before attempting
to jump onto the invisible ledge. Once there, walk and pick up the GOLDEN CROSS. Run jump to grab the
floating rock from which you landed here and climb up.
PURPLE
CRYSTAL: Turn N and run jump onto the next ledge. There turn
right (E) and run jump to land on the next rock. Finally, run jump to land on the
neighboring island. Walk there around counter clockwise until you reach the S
edge of the island. Run jump to grab the left (lower) side of floating stone in
that direction and pull up. Run jump SW to land on the next rock and jump on
the next. From there, shoot
to break the blue seahorse
just above the gate you see ahead (use laser sight) and the gate will open. Run
jump with Action and pull up. Stand jump onto the small rock S and turn right.
Stand jump onto the next rock, run jump to the last one, and run jump again
into the building. Notice four big vases on the other side and go right. Run
jump to land on the island with a fire.
Notice this fire as well.
On
this island, go left (W) and before you jump onto the rock there, look a bit to
the left, on the big blue floating rock with crystals. If you use Zoom and
Action functions of the binoculars, you can locate the cross easily. It is
annoyingly hard to get there and take it, but you also are not forced to go and
take it. The mission to find the torch is already enough hard ;) So, run jump
to land on the rock ahead (W) and run jump to land on the next one. There is
one crystal on all these rocks, on the left side, so you have to land onto the
right part of these rocks and to walk around the crystals (sometimes to shimmy
below them). Run jump to land on the next rock and stand jump onto the ledge of
the big blue rock formation floating in mid-air. Save here, as the following
climb for the torch is legendary hard.
To
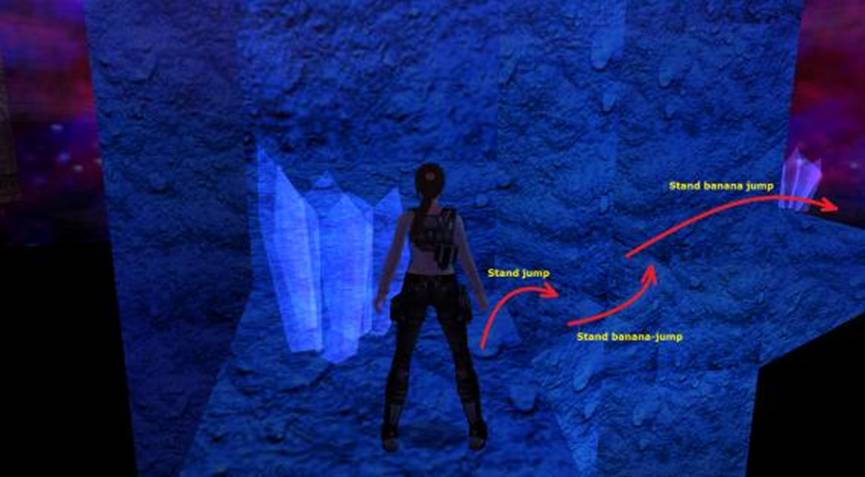
the right of Lara there are two triangular slippery ledges and it is not easy
to land onto them. Stand jump diagonally to land on the first, then a small
stand banana jump to land on the next one (see this screenshot for reference).
From
there you have to jump onto the ledge to the right and around the corner. From
there you have a nice view of the building with large blue crystal in the
middle. However, you have to climb further. Turn to face the blue rock you're
standing on, and look up and to the right. Shimmy into the nearer outer corner
of the ledge you are standing on, and stand jump to grab the edge of the alcove
with the crystal. Shimmy to the right
and pull up. Climb one step further onto the rock to the right and pick up the TORCH.
All you need to do now is return to that island with the fireplace. It is not
easy. With your torch in the hand, standing directly on other torches, turn to face
N and stand jump onto the slanted blocks ahead. With a bit of luck, you will
land on the ledge with a crystal below. From there, you have to stand jump
three times across two triangular ledges until you reach the next ledge with a
crystal. Now you have to run jump across three floating ledges until you reach
the island with fireplace (watch out to land on the part of the rock which is
free from the crystal). Once back there, ignite the torch and run jump back
into the building with four
big vases. Ignite them to lower a trapdoor and also, to drop a pushable object down to the
lower level. Now move this object and place it under all three tiles on which the small friendly
ghosts are standing. Each time you find the correct position, the blue
lightning will let you know about it. Once you did that, the fire on that
island will stop burning and you'll see a camera shot of it. Run jump to land
near the fire and explore it: you will obtain your first crystal: PURPLE CRYSTAL,
the first of three you need.
If you want to do some
more acrobatics on that big floating rock with torches, in order to get the
secret, be my guest. So, jump again from the island with no-more-burning
fireplace and across three floating rocks until you reach the big blue rock.
Jump around across two triangular ledges as the first time, and onto the square
ledge with a crystal around the corner. Jump to grab the alcove as you did the
first time, and climb onto the rock above, but do not climb further from there
onto the ledge with torches. Instead, face N and drop on the very left edge
near the crystal below. Walk around the crystal counter clockwise and go onto
the triangular ledge to the right. Stand on the right-most edge of this
triangular rock and jump up to grab the crevice in the big blue rock. Shimmy to
the right until you can drop down onto the rock with the GOLDEN CROSS. Pick it up, follow the crevice back to the ledge with
crystal, and from there, you have to make a hard running banana jump around the
corner of the big rock, to grab the square ledge near two triangular ledges.
Once there, return to the island with the fireplace and run jump into the
building to the right.
BLUE
CRYSTAL: Once you obtained the crystal, you can return via the
floating rocks and through the seahorse gate back to the next floating island.
Once there, walk around the circle of fire counter clockwise and run jump onto
the first floating rock N. Repeat the same run jump until you reach the last
floating rock, where the camera angle changes. Jump up to grab the monkey swing
ceiling above and traverse along the ledge until you can drop onto the next
floating rock below. From there run jump S to land on the left side of the next
rock (because the crystal is placed on the right side of it), and turn right.
Stand jump from the corner onto the next rock, then turn W and walk around the
crystal to where you can take a standing jump to grab the next rock. Pull up
and run and jump onto the block diagonally on the right. Walk carefully around
the crystal here and run jump to land on the last floating rock. Jump onto the
platform with the switch and save. Use the lever to disable the burning
floor temporarily, run around the ledge and sprint along the disabled
burning floor W. Quickly pick up the BLUE CRYSTAL and sprint back to the safe part
of the platform. NOTE: If you cannot
manage this timed run, there is a useful glitch you can use to return back to
the safe part of the platform: pick up the crystal and grab the edge of the
platform. Shimmy back to the safe side of the platform and pull up.
Now you have to return to the crossroads of the
floating rocks. First stand jump onto the nearest rock, stand jump with grab
onto the next one, go around the crystal and jump onto the next rock. Stand
jump or stand jump with Grab across all other floating rocks until you come to
the monkey swing. Traverse back to the floating rock there, run jump onto the
next rock, stand jump to grab onto the other, and run jump to land on the last
floating rock. Finally, run jump to land on the island and walk to the right
towards the floating rock on the W edge of the island. Pick up BULLETS
if you had not done it the first time. Run jump to land onto the first rock,
then run jump to grab the left (lower) edge of the next stone. Walk to the
highest edge of this rock and run jump to grab the next one. Run jump to land
on the last floating rock and finally run jump to land on the island with
sarcophagus. Straight ahead there are three gates with receptacles for the
crystals, but the entrance is blocked by a huge grey pillar. You have to lower
this pillar and find the third crystal, before you return here near the end of
the level.
OPENING THE
EXIT: Run jump to land on the island S, with a big
structure and four moveable orbs. You will see a switch on the supporting
pillar, but don' use it as yet. Climb onto one ledge above and jump to land on
the ledge with the orb and raised block. Push/pull the orb onto this raised block, drop down and use
the switch to lower
that block with the orb on top of it, and to raise another block. Pull the orb on the lowered block
back once to place it onto the marked
tile. Climb to the upper ledge again and now move the second orb onto the raised
block. Use the switch
below again to lower this second block with the orb. Place the orb on its
nearest marked tile,
and move two other orbs
on their corresponding marked
tiles. The blue lightning will indicate each time you place the orb on
its correct spot. Doing this will lower the big block at the island with three gates
(N). Once you have all crystals, you can run jump there and use the crystals in
their receptacles.
If
you want a secret on this island, go to the S side of the island. Near the edge
S there is a bluish crystal "growing up" from the ground. Stand on the
same tile as this crystal and blast the crystal with a grenade. The GOLDEN CROSS will appear, but only if
you stand at the same tile when you blow the crystal up.
ORANGE
CRYSTAL: Now, go to the W side of the island with four orbs.
Run jump to land onto the floating rock there. Run jump to grab the next block,
then again the next. Pull up and run jump to grab the block with the burner. Do not pull up but shimmy into the left
corner. There you can pull up and be safe from the flame.
When the burner goes off, run and jump to grab the next burner. While hanging, shimmy to the left and just around the
corner there. When the flame goes off, pull up and run jump to land on the safe
and bit larger ledge. There is a building on the S side, but you need to open its
gate first, so keep going N. Stand jump to grab the burning ledge, pull up into
the corner and wait for the burner to go
off. Run and jump onto the safe ledge ahead. Save your game here. From there,
stand jump to grab the higher ledge with the crevice. Shimmy along the crevice
to the other side and drop to grab the JS below. Quickly press Camera button to cut the camera flyby
and return back to Lara's perspective. From the JS you will land onto the
slanted block. So press Jump and land onto the next slanted block. Slide to the
edge and jump without Action to land on the very edge of the burning ledge. Wait for the burner to subside,
then run and steer to the right. Jump and grab the higher ledge there. Pull up,
run jump onto the burning ledge when the burner
goes off and quickly stand jump from the edge to grab the safe and longer ledge
ahead. Keep jumping across the floating ledges leading S to the big building
where you have just opened the gate. Inside the building you can see a huge
blue crystal floating in the middle.
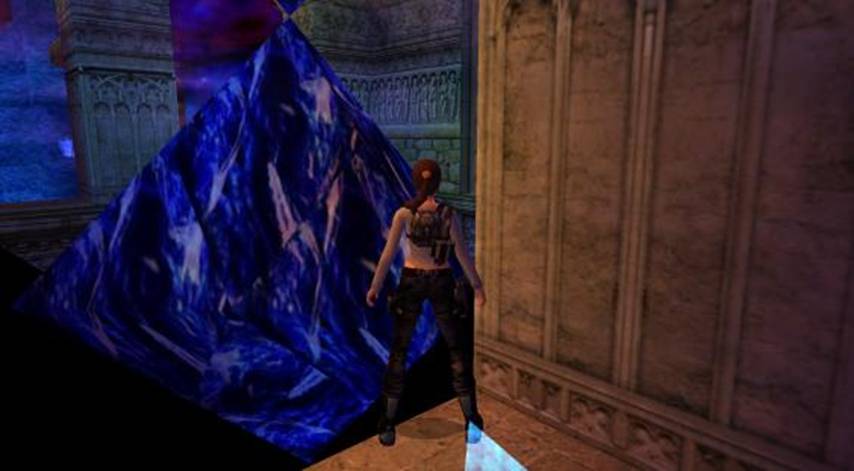
From the entrance, jump diagonally to the right to
land on the window there. Now, walk to the S end of this ledge and face the big
blue crystal. You have to run jump onto the crystal and bounce off of it
backwards in order to land inside the second window on this side of the
building. So, make a running jump facing the same direction as Lara on this
screenshot and land inside the second window, or perform a very hard running
banana jump around the supporting pillar in order to get there - depending on
what you find easier to do.
Once in that window, run jump diagonally to land
inside the next window around the corner. In this window, take a look outside
to the ledges and run jump to get to the nearest. From there run jump to land
on the next ledge and jump up to climb onto the ledge above. Stand jump to land
on the burner ledge when the flame goes off
and walk to the W edge. When the burner is off, run jump to grab the ledge W.
Walk around the crystal and perform a running jump to land on the next ledge W
around the corner to the right (a bit steering to the right in mid-air is
necessary). From there, run jump with Action to land in the window of the
building. Jump to land exactly on the corner of the burning
ledge inside the building and walk/shimmy along the edge into the NE
corner, from where you have to run jump to land on the ledge ahead. Run jump
from there to land on the ledge E, and finally, stand jump to land on the ledge
SE, outside the building.
Run jump from there to land on the burner ledge when the flame is off and turn right
there. Jump up to grab the edge of the building roof and pull up. Run jump
diagonally to land on the roof ledge on the N side, and turn towards the blue
crystal (S). From here you can see a crystal lying on the big blue crystal in
the middle. Run jump to land on that triangular ledge and pick up ORANGE CRYSTAL.
The easiest way to return to the entrance is to run jump back onto the ledge N.
From there you can drop onto the small ledge below, from where you can jump
with action to land into the window with the raised gate below. From there, you
have to run jump onto the floating rocks, until you land on the corner of the
burning ledge. From there, run jump with grab to the right, towards the next
burning ledge. A couple of more running jumps with grab and you will land back
on the island with four orbs. From there you can run jump to land on the island
with three gates (N). Use three crystals to open three gates and enter the room
with another portal. You have to stand on the step in front of the portal,
facing portal. Press Action to pick up the GHOSTBUSTER that is invisible and is supposed
to be found by intuition. The portal will open and you will be able to return
to Beth's house.
Level one: BETH'S HOME
Just
approach the gate ahead and it will open for you. Crawl through the passage and
climb out into Cindy's courtyard. From there, go directly towards the NW corner
of the courtyard, where you will find a passage with trees, leading to the
Cemetery level.
Level five: THE CEMETERY
When
you enter the courtyard of the cemetery chapel, go right around the chapel and
locate a triangular opening in the rocks behind the chapel. Jump in with Action
and use the switch
there to open a trapdoor inside the chapel. Return to the chapel entrance, open it with the
crowbar and go through the passage to the tomb. There are three closed gates
here, with two movable
knight statues. Push/pull the two statues so that they can stand to the
left and right of the gate E. The gate S will open for you so enter the big
hall there. In the big hall, you have to push four knight statues toward the centre of the
room as far as they will go. Once you do it, crawl into the opening near the
candle in the passage E, and climb the ladder almost to the top. Back flip with
Roll and Action to grab the JS
behind Lara and open the gate above. Climb the ladder again almost to the top
and back flip with Roll and Action to grab the edge of the opening and pull up.
Enter a small room with opened trapdoor and statue. Push this statue from the back side
into the opening ahead and drop down through the trapdoor. The door S has
opened by dropping the big statue down, so use the switch there to trigger an amazing flyby: four
knight statues energize the main statue and open the gate back near the
entrance to the chapel. NOTE: You have FIRST to open the trapdoor by pressing that button outside, and then to push the statue through the opening. If you first push the statue onto the trapdoor and then open the trapdoor by pressing the button outside, the door S will remain closed.
Before
you leave the small room with the switch, remember three wall tiles on the wall
with the switch. You can see a tree, a
star and a horse on these tiles. Run across the chamber to N, go through
the N gate that opened at the entrance and enter the room with five switches. In order to
open the gate E, you have to press three correct switches. So, use the hint you
got at the first switch and press the switch behind which you can see a tile
with a tree, a star and a horse. The gate opposite the chapel entrance will
open, so return there and go through. Climb the ladder to the closed gate and
flip backwards to land in the alcove with a switch. Use the switch to open the gate and jump
across the shaft to enter the graveyard.
Run straight ahead
towards the W all the way up to the fence. The second tree from the left along
the W fence is climbable. So climb it until Lara is standing above the
top of the tree, then jump backwards to land on the roof and pull up. You will
find the GOLDEN CROSS here. Take it
and drop down to the ground.
Go
towards the building in the SE corner of the cemetery. If you look through the
closed gate, you can see some torches there. Go around this building to the
right and find a JS
on the wall, directly behind a tree. Use it to open the gate to the building,
return there and pick up a TORCH. In a camera shot you will see another swarm
of fireflies near the grave directly ahead. Go there (stand on the tile
where the swarm of fireflies stands). Look to the right and locate another
swarm of fireflies behind the big tree. Go there and stand between the
fireflies. In order to locate where the third swarm of fireflies appears, look
towards the E and go there. Notice a ghost inside the fenced corner to the
left. Take a look to the right (S) and spot another swarm of fireflies
(directly in front of the fireplace). Go there. If you followed the fireflies
correctly, the fire on the fireplace will
ignite and you will be able to lit your torch. Once you do that, find five golden burners around
the cemetery and ignite them to open the gate to the third building in the
cemetery.
Go
to NW and climb down the ladder inside the building there. Use the floor lever to open the
gate to the ghost in NE corner. Climb up again and run into the area with the
ghost, where you've just opened the gate. Approach the ghost and press Action
to pick up the GHOST
OF PAST CHRISTMASS with you. NOTE: You can find the ghost here only if you previously visited the
Spectral Realm level and found the Ghostbuster. Now you can return to
Beth's house, by climbing down the ladder in the building in SW corner, and via
the chapel at the beginning of the level.
Level one: BETH'S HOUSE
As
soon as you return to Cindy's courtyard, go around the house and back into the
Beth's courtyard. Turn left there and go all around the Beth's house near that gate
you first opened by the crowbar. Take a careful look around, near the fence and
locate the white, almost invisible female ghost. Approach it and press Action
to take the GHOST
OF FUTURE CHRISTMASS. Now you need to return to the level Crypt of
Treasures, to that hall where you met the ghost. Enter Beth's house and go
through the small door below the staircase.
Level two: CRYPT OF TREASURES (third visit)
Return
to the hall where you talked to the ghost (via the switching ledges pool).
Approach the big gate and find two
brown floor tiles to the left and right of your friend ghost. Remain
facing W. You have to stand a step or two in front of the brown square in order
to make this puzzle work. If you positioned Lara correctly, she will place one
ghost on the brown tile. Repeat the same with another ghost and floor tile to
open the big gate ahead and finish the game. Watch two flybys and screen with
your statistics.
THE
END
In Hamburg, January 4, 2014