RELICS OF POWER (PART 2)
Levels by Richard Hill (Seth94)
Note: The compass is backwards.
I'll indicate directions according to where the red needle points.
Level 1: STREETS OF FRANCE
Walkthrough by Phil
Lambeth
Secrets: 3
Head down the narrow street or the raised sidewalk that flanks it on
either side. Pass an opening to your
left that leads to a closed gate. Just
beyond that, pull up left onto the ledge for shotgun
ammo. Continue E and shoot a dog and an SAS. Pause for uzi
ammo in the SE alcove. Head N
past a car and a closed trap door.
There's another closed gate to your right. Go down the stairs, loop around right and
face the S wall near the corner. Jump up
to grab a partially-obscured crawl space.
Crawl inside, down the other side and pick up the flares on the ledge. Pull down the wall switch to lower that trap
door you saw earlier.
Get back out, shoot the SAS and
take his uzi ammo. Stand near the opened trap door facing the
car, hop back and climb down into the sewers.
Follow the catwalk S, turn the corner and enter the passage to your
right. Hop onto the SW block and push
the mesh block W. Return to the catwalk
and jump into the water. There's a large medipack near the SW corner. Locate the hole in the floor and swim
carefully straight down. Approach the
spinning fan and turn sharply left, fighting the current into the alcove. Pull the underwater lever and exit the same
way. Swim up out of the hole and get
some air. Return through the hole,
approach the fan and this time turn sharply right and enter the opposite
alcove. Follow around and emerge on the
other side of the fan. Turn right into
the opening and swim straight up through a hole in the SE corner. Pull out and push the button to lower another
trap door.
Swim back down, left in front of the fan and around to exit through the
hole back to the sewer. Swim N, pull out
of the water left and climb the ladder in the NE corner. Pull up into the passage and shoot two rats.
Follow to a shallow pool and climb the ladder left through the trap door
you lowered. Shoot the SAS who comes to greet you. Run to the E wall, turn right and pull
up. Go to the corner and pick up the UZIS. Pull
up onto the blue-striped awning and run down the other side for shotgun ammo.
Get down and go N to alert two SAS,
one to your left (uzi ammo) and one to
your right. In the W wall, near the NW
corner, is a partially obscured opening that leads to SECRET #1 and grenade
gun ammo.
In the SW alcove is a wall switch that opens a gate somewhere
nearby. Pull up onto the blue-striped
awning here, jump S into the windowsill and go to the E end for the HOUSE KEY.
Drop down and run S under the arch.
Locate the opened gate in the far SW corner. Enter an area you visited earlier and use the
House Key in the E keyhole. Go up the
stairs and find a wall switch to pull.
You can see the door opening out of the corner of your eye, down and to
your right. Go back down to the streets,
turn left and through the opened gateway to the previous area. Pull up onto the central blue awning in the S
wall and locate a pushblock. Push it
forward two times and go down to your right to pull a wall switch. Another gate opens nearby.
Safety drop from the awning and engage the SAS
who emerged from the opened SW gateway.
Take his small medipack and enter
the gateway to alert a dog. Continue forward through the passage and up
the stairs. Jump into the water and
locate the S passage. Follow to the end
and swim up to greet a crocodile. Turn left
and exit through a hole in the grate.
Pull out onto the SW block and kill the croc. Turn to the W wall and climb the ladder. Drop down the other side and time a run past
the stomper. You'll have to make this
trip several times. Vault up left
and step forward to face a gauntlet of swinging blades and flame-protected
blocks. You can jump down to the corner
of the nearest block, but it's easier just to take a running jump E and grab
the elevated platform. Do the same to
the next platform and note the crawl space ahead in the E wall as you pull
up. You can't access it from here.
Turn left from the second elevated platform and jump S to a third
one. Hop up SE past an opening in the
grate. Take a running jump SW across the
water onto a slope. Slide down, grab the
edge and shimmy left to the far end.
Pull up and back flip onto a ledge.
Jump SW with control to glide onto a grated ledge. Pick up the flares
and drop down into the water. Pull the W
underwater lever to open up a shortcut behind you and to your left to the
flaming block area. Before you forget,
however, swim to the E end for some shotgun ammo. Return W to the ledge over the underwater
lever and pull up onto it. Face S and
jump to grab the ladder. Climb up and
shift left to drop onto the grated ledge where you got the flares. Face slightly NE from the grated ledge and
take a running jump up to the ledge to your right. Turn left and take a running jump to the
slope. Allow Lara to slide down
backwards without jumping or grabbing, and she'll land inside the alcove below.
You can also access the alcove
directly with a curved running jump from the grated ledge, but I found that to
be more difficult. Save your game in
front of the W wall switch for a timed run.
Pull the switch to turn off the burners outside, side flip right into
the water, swim out N and turn right to pull up onto the block. Run forward, jump to grab the ladder, climb
up and run off the other side. Get past
the stomper and hop up left. Take a
running jump and grab to the first platform, pull up and repeat. Hop down to your right onto the block and
line up for a running jump toward the crawl space in the E wall. Grab it, pull up inside and crawl around the
corner. Stand up and shoot two rats.
Continue past a grated window to a button. Push it to lift a grate that was covering a
crawl space outside. Get back through
the crawl space and drop into the water.
Swim back to the underwater lever and make your way back to the timed
switch as described in the previous paragraph.
Repeat the timed activities described at the beginning of this
paragraph. When you reach the second
platform, however, turn left and jump to the third one. Hop down right onto the nearby block, pick up
the uzi ammo, turn to the S wall and
take a standing jump to grab the crawl space.
Pull up inside and pick up the GATE KEY.
Drop back into the water, swim down through that hole in the floor grate
at the W end and follow the underwater passage.
Swim up at the end and pull out E.
Exit N to the streets. Go through
the SW gateway to the next section where an SAS
is waiting for you. Use your Gate Key in
the W keyhole and enter the next area.
Shoot the dog, note another closed
trap door and a gate requiring a key. To
the right of the gate where you entered is another one of those
partially-obscured openings. Go there,
climb the ladder to a balcony and run around the corner for some uzi ammo.
Jump N over the railing onto the bridge below. Take a running jump W to the next bridge,
grab and pull up. Run to the S end and
enter the building.
Drop down into a confined area and pull down the wall switch to lower
the latest trap door. Push the block E
one time, go around and pull it once, and finally go around and push it N once. Use it to pull out of this area. Safety drop to the street, go to the opened
trap door and climb down into a new area of the sewers. Your ability to roam
around is even more restricted here than it was in the other section. There's no hole in the floor, but there are
openings at the N and S ends. Let's take
the S opening first. Swim through and
pull up onto a ledge. Move the grated
block E as far as it will go. You can
see above it in the next room the block you moved earlier. You need to get around to push that first
block onto the second block, so you can access a higher area. That's for later. Pick up the
flares that were under the block and swim back out.
Go across into the N opening and follow the winding route up until you
can pull out into a passage. Go past an
alcove with a protected button and pull the wall switch in the second
alcove. This does two things: it lifts
the cover over the button and it drains the area below. You're not quite ready to navigate the dry
basin, however, so push the lever back up to flood the area again. Push the button to open a door below. Go back down and pull out on the E
ledge. Enter the opened doorway and
shoot the waiting SAS. Note the closed door leading to the next
basin and push the button to open an underwater gate elsewhere and also to open
the other door behind you.
Go E into the connecting basin area.
Run along the catwalk to the S opening and go inside. Push the grated block W on top of the one in
the adjacent room. Go back through the
connecting doorways to the W basin, jump in the water and swim through the S
opening. Pull up into the room, get up
onto the fixed block and jump SE to grab the top of the grated block. Pull up and jump SW to grab the opening. Pull up into a dark passage and shoot a rat. Crawl
forward and turn right at the intersection.
Pull up S and find a button to push.
Crawl back out, turn right and find a ladder leading up past a lowered
trap door. Pull up into a new area of
the streets and shoot a dog and an SAS (uzi ammo). Go W up the hill and into the SW
opening. Continue forward for the SHOTGUN and a small
medipack.
Exit to the street and go down to where you see the street lamp. Stand against the N wall to the right of the poster
(all the way in the corner) and jump up to grab the roof line. Shimmy all the way left, pull up and take a
rolling back flip with a hard right curve to land on the facing roof. Slide down, grab the edge and shimmy left as
far as you can. Pull up and take another
rolling back flip with a hard right curve to land on a balcony for SECRET #2.
Run forward, pick up the uzi ammo
and MP5 ammo, and slide back down to the
street. Pull down the switch in the N
wall and shoot the SAS who emerges from
the opened gateway.
Follow the passage down to where you began this level. Climb down the nearby trap door into the
sewer area. Now it's time to drain the
place. Swim across and pull out W. Go through the opened doorways into the next
basin area. Jump into the water and swim
into the N opening. Follow the winding
route back up to the passage and pull down the wall switch in the second alcove
to drain the basins. Get back down,
crawling this time instead of swimming, and when you reach the bottom you need
to get over to the adjacent basin.
You're not going to like this, but the only way I found to get there was
by jumping up into the S opening, going up to the stacked grated blocks,
accessing the higher passage and using the open trap door up there to get back
to the streets. Then head N and NE to
the next trap door and climb down to the catwalk. Safety drop to the basin floor and jump up
NW.
Locate the grated pushblock in the N wall, pull it out TWO TIMES (or you
may miss out on a secret later) and enter the passage. Go past the gateway you opened much earlier
and jump up the slope. Pull up left and
follow the passage around to a button that lowers another trap door. Go back the way you came, pull up N twice at
the end and climb the ladder to the streets.
Shoot the dog that's been awaiting
you impatiently. Head E as Lara's theme
music plays briefly. Climb the ledges
and pick up the SANCTUARY KEY. Get back down through the trap door, return
to the grated block and use it (without moving it from its present position) to
pull up to the higher catwalk. Use the
connecting doors to return to the other basin.
You can leave now if you like, but if you want the final secret of this
level you need to flood the basin areas again.
To get the secret, slide down to the floor, hop up into the N opening
and get back up to pull the flood switch back up. Swim down to the basin and use the connecting
doors to get to the W basin. Swim past
the grated block you moved earlier and into the N opening. Swim straight forward into the alcove and up,
pull out for SECRET #3 and pick up flares and a large
medipack.
Get back to the basin, use the connecting doors to return to the W
basin, swim across to the other side and climb the ladder to the streets. Engage two SAS
(uzi ammo) and a dog. Use
the Sanctuary Key W to open the gate and follow to the next area, shooting a dog along the way.
Find one of those partially-obscured openings in the W wall and follow
the passage to a wall switch that opens a gate outside. Go back around and through the NE gateway to
end the level.
Level 2: SANCTUARY OF SECRETS
Walkthrough by Phil Lambeth
Secrets: 4
Turn left from your entry point, go E through the opening, note the
closed door ahead and turn right (N) to go down some stairs. There's nothing to do in the viewing area
below other than pull down the wall switch in the alcove near the N end (opens
a door somewhere). Go back the way you
came, up the stairs and left across the threshold and into the W opening. Follow the stairs down to an open hub area,
where you can choose among three different routes to take. Pulling down the wall switch opened the door
to The Jungle, so we may as well go there first. Head through the W opening, turn left and
come to The Jungle. Enter W and jump
over the balcony railing to the jungle floor.
Three snakes immediately slither
up to greet you. Someone has mutilated
the tree in the NE corner. Step inside
for a small medipack. Go through a
partially-obscured opening in the W wall to meet up with another snake. Hop
up onto the short block for uzi ammo. Go to the W wall, turn around and look up to
locate a climbing surface. Jump up to
grab it and climb up a bit (at least eight rungs after Lara's feet get set). Take a rolling back flip to grab the wall
behind you and continue climbing up a long distance. When you near the ceiling (two rungs from the
top), take a back flip onto a ledge.
Beyond the metal fence you can see a presently inaccessible
artifact. Go N through the vine cover
and take a series of hops down. Follow
the passage at the bottom to a wall switch that lifts a gate in the tree-filled
area.
Go back up to the ledge and all the way to the S wall. Stand facing E and hop backwards to slide
down the slope. You'll drop down onto a
lower slope. The instant you land, jump
off with a left curve to land inside an opening. Follow around for SECRET
#4 and pick up the flares and
shotgun ammo. Go back and hang from the opening, drop onto the
slope below, slide, grab and safety drop to the ground. Exit E and cross the glade to the S
wall. Locate the ladder and climb
up. Release at the top and grab the
crack in the wall. Shimmy left until you
can pull up into the opening. Run
forward and ignore for now the passage leading off to your right. Drop down into the water below and swim down
the NW hole. Follow the passage to a
hole in the ceiling and surface. Swim
toward the W end of the short canal.
Pull up S near the corner and slide back to grab the edge. Shimmy left as far as you can go, pull up and
take a rolling back flip with a sharp right curve to land on the ledge. Pull up into the W alcove and pull down the
wall switch to open a timed gate directly above you.
Pull the switch, roll and run back to the lower ledge, turn left toward
the S wall and roll. Back flip onto the
slope and jump off to grab the upper ledge.
Pull up and run right into the timed doorway. Pull up higher and slide down into a room
with colorful blocks. The two solitary
blocks are moveable. Move them against
the W wall to form a continuous line of blocks.
Note that the block designs alternate between a parrot and a tiger, so
don't break this pattern in placing the blocks.
When you've done this the trap door at the S wall opens. Go down and pull the wall switch to open a
gate in the passage that I suggested you ignore in the previous paragraph.
Leave this area and return to the ledge outside. Drop down into the water and swim back to
where you can pull out onto a block.
Jump to the next block, pull out of the pit and jump over to the N
side. Enter that NE passage and follow
through a crawl space to find the gate you opened. Save your game here, for if you miss the next
jump you'll fall and die. Slide down the
ramp and jump off to grab the monkey bars.
Monkey swing forward and drop at the end to grab an ivy-covered
limb. Pull up and go right around the
tree. Hop to the W limb, stand left (low
ceiling) and jump W to the ledge. Walk
to the NE corner and jump NE to the next limb.
Turn to face W and take a running jump and grab to the upper ledge. Pull up and claim the SANCTUARY KEY that you saw earlier from the other
side of the fence. Jump back to the
previous limb, face E and hop down to the long limb connecting two trees. You can't reach the balcony from here, so
safety drop to the ground and go up the ladder in the S wall and into the high
opening. Take the NE passage again, use
the monkey bars to reach the limb, and simply stand jump down NE to the balcony
(losing a slight amount of health).
Exit the Jungle Room and turn left.
Across the way is a S room with a closed gate requiring a key, so turn
right (E) and return to the hub room. Go
S down the stairs and engage a tiger. In the far SE corner is a receptacle for your
Sanctuary Key. On the nearby block is
some shotgun ammo. Open the door, follow the stairs up and
around the corner are some flares. Is this all?
No, going back a bit you'll find an opening in the ceiling, so pull up
and find a wall switch to pull. A gate
opens elsewhere, so return to the hub room and take the NE passage. Crawl as necessary until you reach a room
with a wall switch. It opens a gate in a
tigers' den (but they don't appear anxious to escape). You can't do anything else in here right now,
so return to the hub room.
Go through the W opening and return to the Jungle Room. The opened gate is opposite the entrance to
the Jungle Room. Enter the new area
E. There's a door in the N wall
requiring a key, so head straight through E and slide down into a caged
area. Now you know why those three tigers didn't want to leave. Dispatch them and get the MP5 ammo on the SW block. Grab the large
medipack on the NW ledge and jump into the E water trench. There's nothing at the end of the E passage
except a breathing hole, so swim through the narrow SW opening and follow the
long winding passage until you can surface in a pool. Wade out and hop into the S windowsill for uzi ammo.
Pull out the block in the N wall, push it aside and enter a new
area. A gate closes behind you and two tigers come to greet you.
Go up the W ramp and push the pink block forward two times and get up on
it. Move the upper block to the SW
corner and get up on it. Pull down the
wall switch to lower a nearby trap door.
Get down, go across the room and find a wall switch to the right of a
door in the E wall. Pull the switch to
open that door and release two more tigers. Go where they came from and find that the
trap door is no longer lowered. It must
have been timed. Pause for the shotgun ammo,
then return to the wall switch and pull it down again. This time you're not hindered by tigers or a
cut scene. Sprint across E to the far
room and pull up before the trap door rises.
When you get there successfully the trap door falls back down again.
Turn around and jump to grab the crawl space. Pull inside and crawl until you can stand
up. Run forward onto a bridge spanning
the room. Go across and pull down the
wall switch to lift the N gate below.
Safety drop from the lowest part of the bridge and go up the N ramp
through the opened gateway. Shoot the tiger so you won't be distracted by him
later. Go back out to the main room and
locate the ladder in the E wall to the left of the doorway. Climb up, shift left and drop down onto a
ledge. Locate the wall switch and pull
it down. Use the ladder to climb back
down to the floor and run N across the room into the opened gateway, go up the
stairs either right or left, enter the opening at the top and monkey swing S
across the room to the opened gateway.
Drop down and run through. Slide
down into a small room, vault onto the raised tile and pick up the KEEPER'S KEY.
The door ahead opens, so go through and drop down into the tigers'
cage. Run S along the wooden path and go
up the stairs to the spike bed you may have seen earlier from a different
angle. Turn right and jump up to grab
the crack in the wall. Shimmy left until
you can pull up into a crawl space.
Crawl around the corner, pull up right at the end and drop down into a
passage. Slide down into a familiar room
and exit via the W crawl space. Back in
the hub room, go across W and loop around left past the Jungle Room and E into
the area where you'll find a receptacle for your Keeper's Key in the N
wall.
Go through the opened doorway and up the stairs. Follow the ledge at the top to the W end for
a small medipack. Go back a bit, pull up onto the S ledge and
turn around. Jump up to grab the thin
grated ledge. Pull up and crawl forward
to the N end and pick up the MALLET. Crawl back, drop down onto the ledge and hop
back until you're against the railing.
Turn slightly to your right and side flip right over the railing to land
on the sloped roof. Slide down, shimmy
all the way to your right and back flip to a ledge. Enter the W crawl space for SECRET #5 and pick up the uzi ammo.
Get back down to the floor and exit N to the hub room.
Turn right into the SE opening and go up the stairs. Go across at the top to the SE alcove and use
your Mallet at the closed door. Go
inside and follow around to where you can drop down into a lower area. Crawl out E and around the corner. Stand up, face S and back flip to the
slope. Jump off and grab the ledge. Pull up in front of a zip line. Grab the zip line and slide down N into an
area that for the moment seems devoid of animals. Pick up the nearby AVIARY KEY near the E wall and slide down into the water. Locate the opening in the N wall near the NE
corner and swim inside. Follow around to
the left and pull out at the end. Turn
around and jump to grab the E opening.
Pull up and make your way E to an opening.
Drop down onto a beach-like area and engage a trio of lizard monsters that I bet you never saw in a zoo
or anywhere else. If you wade thigh-deep
into the water you can shoot them with relative safety. You can't explore the water because of the
strong current, but you can pull up into a niche in the rock for some desert eagle ammo. Go around to the NW corner and jump up into
the W opening. Deal with another lizard monster and follow the passage over a grate
to a gap. Jump across the gap and climb
down the ladder. Climb down further and
jump into the water. Swim W past the
alcove on your right and loop around left.
Pull up E onto a ledge and turn left to pull up onto a block. Turn left again and stand jump to the next
block. Turn left a final time and take a
running jump N to grab the ladder. Climb
up into the alcove.
Turn around and take a running jump S to grab the sloped ledge. Shimmy right and drop down onto a ledge. Enter the passage and pull down the wall
switch to lift a gate in the caged area where you landed with the zip line. Drop down, hop into the water and swim
E. Pull out S and climb the ladders back
up. Back flip at the top of the second
ladder, turn around and follow the passage around to the lizard beach. Loop around left and hop into the SW opening. Follow to the water hole and swim W past an
air hole and pull out onto the island in the zip line caged area. Follow the wooden pathway through the opening
in the N wall.
When you reach the end, take a running jump N to grab the bridge. Pull up and make your way to a wall
switch. When you pull it down you hear a
door opening, but you have no idea where it is.
Remember this for later. Go back
along the bridge and jump back to the S opening (using the action key to glide
inside). Hop back, grab the edge and
shimmy left along a crack in the wall.
Drop at the end to grab a lower crack, and shimmy left until you can
pull up into a crawl space. Follow
around to a ledge on the W side of the previous room. Run forward and pull up S. Follow to a water hole and swim to a familiar
area. Wade out N and pull out in front
of a tree. Follow the wooden pathway S
through the opening and up the stairs to the spikes bed. Use the crack in the wall and the crawl space
to get back to the hub room.
Go up the SE stairs. When you
reach the top, run straight across into the E opening. Turn right and go N down the stairs. Find the opened doorway at the N end of the
viewing room and go inside for SECRET #6. Drop down into the hole and pick up the small medipack and shotgun
ammo. Get back out and return
to the hub room. Go through the W
doorway and turn right. Use your Aviary
Key and enter.
Not a very friendly aviary. As
soon as you enter you're met by three vultures. There's nothing on the upper bridge, so hop
down and find some shotgun ammo near the
S wall on a SE block. Jump into the water
and pull out NW. Shoot another vulture, then vault up S onto the tree root and
climb the W ladder. Pull up into the
partially-obscured passage, go to the W end, turn around and pull up
higher. Walk out onto an upper ledge and
deal with another vulture. Be careful that you don't fall of the
edge. Hop SE and walk around SW. Hop to the next ledge and walk SE until you
can go no further. Jump slightly NE to a
stable surface and continue forward until you can jump NE to a pillar with a
zip line.
Ride the zip line into the S passage and crawl forward to a wall
switch. Pull it down and hear the faint
sound of a door opening. Crawl back,
safety drop to the ledge below and engage another vulture. Walk out to the N end of the ledge. Take a running jump slightly NW and grab the
upper ledge. Pull up and drop down onto
the vine-covered ledge below with the tree for a small
medipack. Jump back into the
water and pull out E. There's a
partially-obscured opening in the E wall, so enter and follow the passage to a
chamber with a ladder. Climb up into an
area with a closed gate. There's another
partially-obscured SE opening leading to a closed gate, so go to the NW passage
and find the door you just now opened.
Follow the upper area around clockwise and crawl through to a
ledge. Jump NW and grab the monkey
bars. Monkey swing a long distance W
across the aviary and drop down onto a railing.
Vault up left and follow to a block with the GRENADE
GUN. Continue W to a wall
switch that lowers a trap door in the water (as well as opens the door that
leads to the final secret in this level).
Shoot two approaching vultures,
get down onto the metal railing near the W wall and take a running jump S to
grab the tree limb. Pull up, turn left
and follow the path down to the water.
Jump in and locate the opened trap door against the N wall near the NW
corner. Before going down there, swim
over to the E side and pull out in front of the partially obscured
opening. Go inside and follow the
passage to a ladder. Climb up and enter
the other partially obscured SE opening.
The gate at the end is now open, so drop down for SECRET #7.
Shoot the tiger, grab the shotgun ammo and large
medipack at the corners and go through the opened NE doorway. Continue across N and return to the aviary by
turning right once you're in the hub room and right once again. Jump into the water and locate the opened
trap door NW. Swim down and follow the long underwater passage to a trench. Wade forward and look right for some flares. Get back into the water, face the W wall and
jump up to grab the crack. Shimmy left
and pull up into a crawl space. Crawl to
the other end of the passage and pull up higher. Drop down the other side and run forward to
end the level.
Level 3: TEMPLE OF RATHMORE
Walkthrough by Nina Croft
Secrets: 3
MAZE WITH SWITCHES AND DOORS: The level starts near the maze, at
the intersection. First go right and use the switch
to open a timed door nearby. Roll, just touch the Sprint button shortly, steer
around the corner to the right, again touch the Sprint button, steer around the
other corner to the right, and finally, sprint through the open door before it
closes. The door will close behind Lara. You have just entered a maze with six
levers and many doors you need to open using these levers in one specific
order. Don't worry, it's easier than it looks. Refer to the map provided below
if you have any problems. Make sure to save your game at the entrance, before
using any switch, just in case you get confused and make a wrong step.
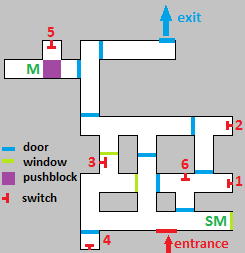
As you enter, go to the right and
pick up a SMALL MEDIPACK (SM) lying
on the floor. Through the window you can see the timed lever you have just used
to get here. Turn around and enter the first passage on your right. The door ahead
is closed, but the door on the right is open. Enter the passage with two
switches (#6 and #1). Don't use switch #6 now. Just pull the switch #1 to open the door next to it. Go
through the door and use the next switch #2.
Now return to switch #1 and use it
again.
Turn around, go
to the T-intersection and turn left. Go around the corner to the right, then
again around the corner to the right, until you find switch #3 . Use it to open the door in front of switch #4. Go
there and use this switch #4 to open a gate in front of switch #5. Go through
the open gates to the passage with the pushblock and push it twice. You'll pick up some MINES (M) and gain access to switch #5 . Use it and retrace your steps back to switch #6 . Use it to open the exit and finally leave the maze
safe and sound (special thanks to Manarch2 who helped me through this maze).
PIT WITH RADIOACTIVE GOO - Now, this is the central part of
the level. There will be many smaller missions around this main area, but this
is the place that you'll re-visit for many times. The exit is also accessed
from the radioactive pit. Watch your steps, as you can easily fall down into
the goo and die.
Take a look to the left and notice
two ladders, one of them blocked with the trapdoor. Look to the right and you'll
spot a goon near the burning barrel. He's ignoring Lara for some
reason, but you better kill him now, as he can stand in your way later. Use
your pistols, he is an easy enemy. Trust me, you'll need your mines for
much more dangerous enemies, so spare them diligently.
Your goal here is to get to the
opposite side of the pit, into that alcove with the switch you can see from
this side. In order to get there, you have to go around the pit. First drop to
the lower ledge and go left (when facing the pit). When you reach the first
corner, turn Lara's back to the pit and drop to hang from the edge. You see
that crack below? Drop to grab it and shimmy to the right to the crawlspace
(CS). Drop on the other side, follow the passage and kill a goon with your pistols. Ignore the switch on your
right and take the other passage. You'll emerge in a big cave with a pit
straight ahead.
BIG CAVE: Do not even think of dropping or jumping into the pit
ahead, it's deep. Walk carefully around the pillar ahead and locate a bit
higher rock in the pit near the left-hand wall. Stand jump to land on it and
safely drop into the pit. You'll have to dispose of two
enemies in the Horseman slot. But still spare your explosive ammo, these
enemies are killed by shooting at their chest with pistols and hopping back as
you shoot.
Explore the pit a little bit. Don't
take the ladder on your right yet, but pick up the FLARES
in the window nearby. You'll also get a glimpse of a switch in the next room.
If you explore the area behind the ladder, you'll notice two closed gates. So,
let's go and open one of them. Retrace your steps to the other side of the pit
and locate an opening directly below the entrance. Climb to the other side of
the white block and enter the passage behind. Kill one goon as you go and go up the ramp. Straight ahead
is a pushblock you cannot move, so go left and kill a goon near the burning barrel, who is also ignoring you. Go
towards the window in the pit, pick up some SHELLS
and use the switch to open one of
those two gates back in the cave. However, before you leave this area, make
sure to use the other two switches as well, to avoid backtracking later.
Go towards the closed gate near the
burning barrel. Remember this gate, as it leads to the exit and you'll
need to do a lot of work before you can open it. From this gate go right and
around the corner, to access the pushblock
at the entrance from the other side. Pull it twice, go around to the other side
and push it once into the corner. Again, go around to the other side of the
block and pull it once. Climb on top of it and then up to the ledge above. Use
the switch ahead to open the trapdoor
on Lara's right (you can see it through the bars, as well as some goodies lying
around). Stand jump with Action to land in the window to the left of the switch
and pick up some FLARES. From here,
take a running jump to land on the ledge on the opposite side. Use the switch here to open a gate on the other side
of the wall. If you look through the bars to the right of this switch, you'll
see an item. You have just opened the gate in that passage. Drop to the floor
and go back to the big cave.
Go to the opposite side of the cave
and locate the open gate. Slide down to it and walk towards the pit with radioactive goo. No, you cannot jump
to the rocky formation with Medipack ahead. You will pick it up much later. For
now, carefully drop onto the safe block just below the entrance and go left.
Jump up to grab the crevice in the rock and crawl into it. Crawl backwards to
grab the other crack which is on Lara's right. Now shimmy to the right and
crawl into the crevice before you reach the corner. Crawl diagonally to the
right and through the next passage. Follow it, but don't go up the stairs and
towards the closed door yet. Instead, locate a high opening on the right, just
before the stairs. Jump to climb into it and use the ladder to climb up to the
passage above.
BACK TO THE RADIOACTIVE PIT: Climb on the higher ground, then
once again. Here in the farthest corner you can collect UZI CLIPS. Keep climbing up and carefully go
through the opening ahead (walk!). You'll emerge on the other side of
the radioactive pit. As you go out, turn left and run jump onto the man-made
ledge. Enter the alcove and use the lever
inside to open a gate elsewhere. If you want, you can pick up a secret here
(highly recommended, as the secret here is a Large Medipack, a very precious
item you are going to need before you finish this level).
SECRET #8: When you exit the alcove with the
switch, drop and grab the edge of the man-made ledge above the pit. Shimmy to
the left side of the ledge and drop on the flat rock below. Crouch and crawl
into the opening and drop on the other side. You'll find SECRET #8: LARGE
MEDIPACK. Pick it up and crawl back to the rock above the
radioactive pit. Save your game in case you miss the next jump. Turn to face
the pit and carefully walk diagonally towards the rocks on Lara's right. Pull
up onto the flat triangular block there and turn to the right. Stand jump onto
the slanted rock between the opening where you entered and the man-made ledge
with the alcove and switch. Bounce off of the block backwards to land on the
man-made ledge.
BACK INTO THE BIG CAVE: Run jump back to the opening and
return all the way back to that ladder leading to the big cave you visited
earlier. This time, when you climb down the ladder and drop into the passage
below, climb the blocks up and the gate will kindly open for you. Go through,
then right, jumping across some steep blocks and kill another Horseman. This time take the large ladder which is
now on your left and climb up and hang on the fifth rung from the top. From
here, back flip with Roll and grab the protruded rock behind you. Go right and
jump across the steep rock. In the left corner you'll find a rocky pillar.
Climb on top of it.
Now, save your game here. If you miss
the next jump, Lara will die. Run jump towards the rocky bridge ahead and press
Action at the last moment to grab the bridge. Pull up. If you look
carefully ahead, you'll notice a ledge with goodies directly above the
entrance. It's a bit tricky to get there, so save your game again. Sidestep to
the right, and stand on the last block near the right-hand wall (when facing
the ledge with goodies). Turn to face the pillar ahead (diagonally to the left,
but just a tiny bit). Now, run jump and press Action at the last moment, to
grab the pillar. If you miss the grab, reload the game and try again. Once you
grab it, climb on top of it, slide all the way to the edge and jump to grab the
ledge with goodies. Pick up MINES and
SHELLS and safety drop to the ground
in front of the entrance. Go through the passage back to the wall switch and
ladder. This time, use the switch to drop
the trapdoor above the ladder, climb up the ladder and return to the ledge near
the entrance to the big cave with radioactive pool below.
SEARCH FOR THE LAIR KEY: So, you're back where you started.
There are two passages, the right-hand one leads back to the maze, so ignore
it. Take the left-hand passage instead. Push the block
ahead as far as it goes and climb up the stairs. At the end of the passage
you'll see a ladder. Save your game before dropping into the opening.
Here's the problem: as soon as Lara touches the ground, the spiked wall will start sliding from right to
left. You have to use the switch and escape the room before the spikes kill
Lara. So here's the easiest way to beat this run:
Run off or jump to grab the ladder
ahead. You can see the spiked wall on
your right. So, drop onto the floor, take a split of the second to turn Lara a
bit to the left and run as mad to the opposite side of the room, diagonally,
towards the switch (sprinting is not practical here). Use the switch and immediately flip to the right
through the now open gate. Lara will start sliding. Quickly jump off and steer
Lara a bit to the right in mid-air to make her grab the ladder ahead. Now
you're safe. There are three routes to take from here. First go down the ladder
and slide backwards along the steep block below. Grab the edge of the block,
pull up and back flip to land into the alcove behind Lara.
Once in the alcove, grab the ladder
below and climb all the way down. Lara's feet have to be on the second rung
from the bottom of the pit. Also, Lara has to hang on the left-hand side of the
ladder. From here, jump off with Roll and grab the block above radioactive goo.
Climb up and walk carefully to the other side. Run jump with Action to land
into the dark opening ahead. Don't go any further. First light a flare and
throw it into the cave to shed some light around. Then take your Grenade
Launcher and step into the cave. A huge toxic mutant
will attack Lara. You have no space to fight it, so shoot two mines to kill it.
It can also hit Lara and poison her. If that happens, Lara's vision will become
blurred, so use a Medipack to heal her. Find the switch
and use it to open a trapdoor nearby.
Return to the entrance of the small
dark cave and stand jump diagonally onto the block ahead. Run jump to grab the
ladder, climb up into the alcove, run jump to grab the other ladder from there
and this time climb all the way up. Drop into the other opening, take your
pistols and kill a goon. Find a switch at the end of the passage and use it to
drop a trapdoor in the room with the spike wall (you can see it through the
window). All you need to do now is go back there ;)
So,
go back to the big ladder and this time, climb down a bit, then to the
left into the passage. Drop and walk to the other side of the passage. You are
now high above the pool with radioactive waste. Drop to grab the edge of this
opening and shimmy to the left. Crawl into the opening above and use the ladder
to go up (through the trapdoor you opened from the small dark cave). Follow the
passage to a ledge high above the toxic pool and turn diagonally to the left
(towards the burning barrel). Run
jump to land on the ledge next to the barrel
and go to the other side. Use the ladder to climb to the upper ledge. Take the
second passage on the right and return back to the room with spiked wall (it is
safe now). Drop into the opening where you lowered the trapdoor and climb up on
the other side facing right. Use the other ladder to enter a room above. Follow
the passage down the stairs. As you approach the pushblock ahead, one goon will come from behind and attack. Kill him
and pull the block once.
Return back to the room with spiked
wall, go up the stairs and towards the exit. But don't go out yet. Instead,
find that pushblock you pushed
earlier (it's on Lara's left now). This time you can push it twice into the
passage to reveal a passage on the right. Follow it down the ladder and through
the trapdoor you opened earlier and finally, pick up the LAIR KEY. Return to the outer ledge above the toxic pool. Drop to the lower level and enter the
passage here. When you turn left around the corner and spot a closed gate
ahead, locate a brick wall on the left, with a black
"hole". Press Action here to place the Lair Key inside and
open the gate. Go through and left, drop into the opening and pick up MP5 AMMO and DESERT
EAGLE AMMO. Climb back up and save before you take the other
passage.
LAIR: Jumping across the first
knife is very tricky, due to the low ceiling above Lara. I managed
to clear it losing 10% of Lara's health. Here's how: stand as close to the
right-hand wall as possible, when facing the blade. Walk as near it as you can
without getting cut. Watch its cycle. Stand jump across it when it starts
moving from the left-hand wall towards you. Use the same principle to jump
across the second blade, only this
time you'll lose no health, because Lara has enough space above her head to
make the jump correctly. Follow the passage to a switch
and use it to open the gate to the Lair.
As you enter, a toxic mutant will also enter into the arena
through the gate straight ahead. Start shooting at it with your dual pistols.
Here at least you have much space to jump and run around and escape its toxic
nails. Once it's dead, enter the cage it came from and pick up UZI CLIPS. Use the switch
to open another cage in the arena, return there and this time kill two mutants coming from your left. Use Grenade
Launcher to dispose of them safely. Enter their cage and use the switch there to open the third cage. Return to
the arena and kill one mutant ahead.
Enter its cage, pick up the SMALL MEDIPACK
and use the switch to drop the
trapdoor blocking the ladder on the other side of the arena. Use this ladder to
get to the upper ledge. Run jump diagonally over the railing on the adjacent
ledge.
Climb into the crawlspace, turn so
that you can climb backwards on the other side and make sure to save your
game before you start dropping from the crawlspace. This will probably be the
trickiest part of this level. Drop from the crawlspace backwards, hugging
the wall on Lara's right. As soon as she touches the floor, a spiked wall will start moving towards her. The
problem here is that the wall is directly next to Lara. So, hold your breath
here. As soon as you touch the floor, side flip to the right, turn Lara just a
bit to the right, run a bit in the same direction, face the wall again and
quickly climb into the second crawlspace. If you're lucky, Lara will lose a
part of her health, but she'll survive. If not, reload your earlier save and
try again. Once you clear the spiked wall, crawl back into the room and use the
lever to open a gate down in the
arena. Use the second crawlspace to leave the room and pick up SHELLS from the ledge above the arena. Make sure
to have at least 50% of health and jump over the railing into the arena below.
Cross it and go through the gate you have just opened. Follow the passage to a
ladder, go up and back flip into the upper passage leading to the middle level
of arena. Enter the next passage (on the left), then up the ladder and through
the rocky passage, and emerge on the top level of the arena.
FOUR MUTANT STONES: At this point, you have to collect
four Mutant Stones in order to open a gate which is in the far left corner as
you enter the top level. You can collect them in any order you want,
these four side missions can be done in any order.
SPIKED WALL CHALLENGE: As you enter the top level from the
bottom and middle level, go right along the ledge, ignoring two bridges on your
left for now. Enter the first passage you reach from here (counter-clockwise,
SE corner). Before you slide down into the room below, save your game. Slide
into a big room below facing downwards. A long
spiked wall will start approaching Lara. You have to turn Lara just
a bit to the left, then sprint like mad to the left, keeping as close to your
left-hand wall as possible. With a little luck, you'll reach the window before
the spikes kill Lara. Once the coast is clear, go around the spiked wall and pick
up a SMALL MEDIPACK. Finally, enter
the passage in the far left corner, just behind the metal bars, and follow it
to a small cave where you'll find the first MUTANT
STONE. Pick it up then climb into the crawlspace in the far right
corner of the cave and follow it to the ladder. Climb up and back flip into
another small cave. Pick up FLARES
and save your game before you drop through the opening in the floor. There's a toxic mutant waiting for you and you can easily
fall off the ledge and die during the fight. Dispose of it quickly and as
safely as you can. Make sure to pick up MINES
from one alcove nearby, as you're going to meet another mutant soon.
TIMED FIRE CHALLENGE: There is a passage in the NW corner
where you can see a burning fire. In order
to reach the opening on the other side, you have to extinguish the fire at
least temporarily. Safety drop into the pit ahead and dispose of the toxic mutant before it poisons Lara. Find the
alcove with a switch in the far left
corner and use it to open a nearby trapdoor. To the left of the alcove there is
a dark passage (where the mutant came from). Make sure to pick up a very
precious LARGE MEDIPACK on the right
as you enter. Then go left and up the ladder, through the trapdoor you have
just opened. Before you use the switch ahead, save your game. Use the switch to temporarily extinguish the fire. Go
right from the switch and crawl into the small opening there. Quickly turn to
the other side and crawl out backwards. Don't drop but keep hanging. Shimmy to
the left towards the entrance as far as you can. Drop onto the ledge near the
entrance, roll and run diagonally to the right a little, then steer hard to the
left to face the pillar in the centre, jump from running to land on the nearest
edge of the pillar, keep running and jump to grab the opening ahead. Pick up
some SHELLS in the corner and the
second MUTANT KEY from the centre of the
room. Drop back into the pit and take the dark passage on your right. Go up the
ladder to the passage with the timed switch. Ignore it, but do climb through
the small opening you have just used. Shimmy from there back to the entrance
and return to the arena.
PUSHBLOCK CHALLENGE: Enter the passage in the SW corner.
Drop in the opening on the left. You'll notice a pushblock here (with
inscriptions). However, you cannot use it yet. From the ladder, go left and out
to the middle level of the arena. Enter the next passage, notice a pushblock on
your left here and the closed trapdoor ahead. Go right and again right to
approach the first pushblock from the
back side. Pull it out once. Then go around to approach it from the other side
and push it once. Climb on top of it and into the dark crawlspace above. Crawl
first to the right and use the switch
to drop the trapdoor nearby. Crawl again and take the other passage. Drop
through the open trapdoor and go to all the way around to the first pushblock.
Push it once into the corner and go to the second pushblock.
Pull it out once. Go back to the first
pushblock and pull it back once. Again, climb onto it and into the crawlspace,
go left and through the trapdoor to approach the second pushblock from the
back. Pull it once and return through the crawlspace to the first pushblock.
Now you can enter the passage hidden behind the second pushblock. Pick up some MP5 ammo here and use a switch to open a gate nearby.
Return out and back to the ladder
near the first pushblock. Climb up and go right and back to the top level of
the arena. Now you can drop through the open trapdoor ahead and pick up the
third MUTANT STONE behind the open gate.
Use the lever in the adjacent alcove
to open another trapdoor and climb the ladder here. If you haven't picked up
the MINES earlier, do it now. Return
to the top level of the arena.
TIMED GATE AND KNIFE CHALLENGE: Cross the bridge and look to the
right. You can see a metal door and a passage to the right of it. Take this
passage, go down the ladder and find a switch
on the middle level of the arena. Save your game here. Use the switch to open
the metal door, cut the camera view with the Look button, roll and start
running diagonally to the right. Quickly enter the passage, turn left at the
corner and sprint towards the ladder. Climb up, take a left turn at the corner
and a U-turn, and enter the gate before it closes. Now select your Grenade
Launcher and kill one toxic mutant in
this passage. You will have a little space for maneuvering here. However, you
can run away from it into the cave ahead and kill it there, because there you
have more space, but be careful not to fall down into the pit.
As you enter this cave, look to the
left. There is a trapdoor you have to raise in order to reach the stone bridge
there. So carefully go down the blocks into the pit below. Find the passage in
the far left corner and climb up into a small room with a switch. Use the switch to raise the trapdoor
(not timed). Climb onto the block with the switch, jump to grab the crawlspace
and return back to the cave. Climb up the rocks on the other side to reach the
top near the entrance. However, make sure to pick up a secret before you leave.
As you climb up the blocks here, when you reach the last block, turn Lara's
back to the bridge and look down and to the right. You see an opening there?
Save your game here. Stand near the edge of the block, the bridge is behind
you. Turn diagonally to face the opening below. Run off the block with Action
to land into the opening below. Here you'll find SECRET
#9: SHELLS and UZI CLIPS. Slide back to the bottom of the pit
and use the blocks again to climb up.
Climb up to the top and run jump to
grab the trapdoor near the bridge. Run jump from the bridge onto the rocky
ledge ahead and proceed carefully through the opening ahead. Save your game.
Yes, the nasty noise you hear are the blades
mounted in the shaft with the ladder. Jump diagonally to grab the ladder, drop
onto the slanted block below as near to the left wall as you can, slide
backwards, grab the edge just for the second and quickly drop down into the
passage. Hopefully, the blades won't hurt Lara much. Pick up the last MUTANT STONE and again, save your game. You have
to go up the ladder shaft with the blades. However, this is much easier than it
seems. Actually, you will lose no health at all, even if you lost some health
when dropping down through this shaft. This video
shows the exact way to climb up safely.
Description of the climb and video:
Jump up to grab the ladder in the middle of it. Climb twice up, so that Lara
can lift her feet against the wall. Now climb to the right as far as you can.
Climb once up again, so that Lara's hands are exactly below the ornate strip
below the blade. Now, watch the
blade. Once it hits the wall above Lara's head, jump off onto the slope behind.
Immediately bounce off and grab the ladder above the first blade. Climb up to
the next ornate strip below the second blade and to the right. Once the second
blade hits the wall above Lara's head, jump off with twist in mid-air and
Action to grab the ladder behind Lara. Now you're safe. Climb up and drop in
the passage on your left. Proceed ahead, drop on the lower ledge and run jump
onto the bridge ahead. Run jump onto the ledge on the other side of the cave,
pick up the secret if you haven't already done it and return back through the
passage to the arena.
Once you have four Mutant Stones, you
can open the gate and leave this area. The easiest way to do it is run jumping from
one bridge onto the ledge with receptacles.
Place two Mutant Stones there, use the crawlspace between the receptacle to
return to the top level of the arena, go to the other bridge, run jump to the
ledge with receptacles, place the
other two Mutant Stones to open the gate and use the crawlspace here to return
to the top level of the arena. Finally, go through the open gate and leave this
area for good.
BACK TO THE BEGINNING: To your surprise, you'll notice that
you emerged at the top level of the starting area: large cave with the toxic pool below. As you re-enter this cave
again, go left and pick up UZI CLIPS.
Now return to the opposite side of the ledge and climb onto the single-standing
block next to the wall. You have to jump diagonally from this block to grab the
monkey bars ahead, but it can be dangerous. If Lara misses this grab, she can
fall down into the pool. So, turn
Lara's back to the pool facing the entrance and jump diagonally to grab the
monkey bars there where they begin. In this case, if Lara misses her grab,
she'll be alive and kicking to try again. Once you hang, monkey swing to the
other side of the bars, then right and drop on the rocks below. Walk to the
right and run jump to land on a man-made ledge ahead. Use the switch here to open that gate back in the big
cave you visited much earlier. Go out to the ledge above the pool and take a
diagonal running jump to land on the ledge next to the burning barrel. Now you need to return to the
big cave. Hang and drop to grab the crack as you did the first time and crawl
into the passage.
EXIT: Once back in the cave, jump on the rocky pillar near
the left-hand wall as you did the first time and enter the passage below the
entrance. Follow it to the open gate and go through. Go down the ladder and
down the stairs. You'll see a pushblock you cannot use right now. Take the
passage on the right and enter a small room where you have to kill a goon. Drop into the opening in the floor, go up
the ladder and use the switch to open
the gate in the first room. You cannot go back the way you came, so locate the pushblock and pull it twice. Climb on it and
crawl backwards to the other side. Push the next
block once to reveal the stairs on your right. Go up the stairs and take
the passage on the left and back to the first room where you killed the goon.
The gate in the far right corner is open, so go through. Do not run blindly
here, as the passage ends abruptly above the radioactive goo.
From the opening, take a running jump
to grab the metal block ahead. Climb on top of it and turn right. Jump
diagonally to SE on the flat natural block and jump up to grab the edge of the
higher block. Shimmy all the way to the right and drop in front of an opening.
Climb into the opening to retrieve SECRET #10:
FLARES and UZI
CLIPS. Return to the pit, jump to grab the crack which is now on
your right and shimmy all the way to the left, as far as Lara will go. Once
there, pull up onto the steep block, jump off and land on the second metal block
behind Lara.
Face SW and run jump onto the steep
block ahead. Jump off immediately to land on the flat block ahead. Walk to the
NW corner of the ledge and jump onto the central rocky formation. Keep jumping
diagonally counter-clockwise until you reach the ledge with the LARGE MEDIPACK. Pick it up, walk to the outer
left edge, face SW and stand jump to grab the monkey bars above. Monkey swing
to the next opening. Drop to grab the block below and climb up into the
opening. Jump across the steep rock in the passage and WALK afterwards, as
again, the passage ends abruptly above another toxic
pool. Stand jump to grab the monkey bars and monkey swing to the
other side. Drop onto the steep block ahead, slide backwards and grab the edge.
Shimmy to the left and climb up onto the flat block. Turn left and run jump
diagonally onto the block in the middle of the toxic pool. From the other side
of this block, run jump diagonally to the right to land on the last block.
Here, save your game by all means. This last jump is very tricky. You
have to run jump across the toxic goo to land on the big ledge in front of the
temple. But Lara will usually land in the pool and not on the safe ledge.
Here's the trick: start running and press Jump just for a split of the
second and let Lara clear the pool
and land on the safe ledge ahead. This will make her jump a few inches further.
TWO HORSEMEN: Once on the big flat ledge, you'll
see two Horsemen riding up and preparing
to prevent Lara from accessing the temple. They are not hard to kill. When they
are mounted, jump/run around to avoid them and shoot them from the side. Just
be careful not to fall into the toxic pool.
Keep shooting and avoiding their horses until they fall to the ground. Now kill
them by shooting at their chests. When they die, pick up two MUTANT STONES from them. You can also find a SMALL MEDIPACK in the far left corner.
Finally, enter the temple and use two Mutant Stones in receptacles to open the gate ahead. Go
through, climb on the block ahead and slide down to the last level.
Level 4: LAIR OF THE BEAST
Walkthrough by Phil Lambeth
Secrets: None
Slide down and run through the passage to the first of several swinging
fire bowls. Note the closed door to your
left, run past the bowl and pull up into the crawl space. Lower Lara down the other side and carefully
walk to the W wall switch. Pull it
down. Turn around and you can see
another wall switch in the E wall. Make
your way there and pull it down as well.
Now you have to jump the gap S past another fire bowl. Pull the block back twice, get up on it and
pull up E through the lowered trap door.
You're in an upper area with several closed doors. Pick up the shotgun
ammo in the SE corner and draw weapons. Hop backwards toward the S wall and prepare
yourself for an attack by one of those toxic mutants
that emerges from a door that opens in the E wall as you pass it. Go where it came from, light a flare and
follow the dark passage for some replacement flares. Go back a short bit and climb up W into a
still higher area. Jump the ledges to
the W side and pull down the wall switch.
Safety drop to the next lower level and find that the SW door is
open. Enter and follow the water-filled
trench as it gradually gets deeper. Swim
down into the hole and follow until you can pull out. Pull up higher N and take a running jump SW
over the railing. Pull up S into the
crawl space and drop down the other side.
Pull up E, crawl forward and pull down the wall switch. Continue crawling E and drop down into a
familiar area. The NW door is now open,
so enter to draw out another toxic mutant. When it's dead, go back in for a large medipack before dropping down N.
Pull down the wall switch to open the exit gate, then pull out the block
from the NW corner. Pull it three times
into the next room and go back to the revealed alcove. Push the next block two times and turn right
into the alcove. Pull up E two times and
pull down the wall switch. Pull up
further E and go through the opened doorway back to a familiar area. Go through the opened NE doorway and deal
with another toxic mutant. Follow the passage to a small medipack, then face the S opening and save
your game.
Stand as far left as you can and slide down the slope. A boulder pursues you, so crouch as soon as
you land and the boulder should bounce harmlessly over your head. Wait until it comes to a complete stop, then
follow it and turn left into the opening.
Hop up the ramp and climb the ladder.
Stand at the edge of the ramp and evaluate your position. The slope ahead leads to a deep pit with
toxic material at the bottom. There seem
to be no openings in the far wall. A
huge wheel with grinding teeth is poised to descend as soon as you trigger
it. Turn around at the edge of the
slope, facing the E wall, turn slightly left and save your game. Side flip left past the metal barrier onto
the slope, slide and grab, immediately release and grab the crack below, shimmy
to the right corner and release to grab the lower crack where you'll be safe
from the descending wheel. Shimmy left,
release to grab the crawl space and pull up inside.
Follow around until you can drop down into a lower passage. Turn around, walk forward and save your game
again. You're about to embark upon a
harrowing boss fight. Step forward into
the next room but stop as soon as the gate slams shut behind you. You'll want to delay awakening the giant spider you see in front of you as long as
possible, so loop around right past the doorway pillar and jump up N into the
opening. Jump up right and grab the
crack, then shimmy right until you can pull up onto the ledge. Loop around left into the side room, grab the
shotgun ammo and uzi ammo, and vault up onto the central platform
(the blue electricity won't hurt you).
You get a screen shot of the giant spider. When you've stepped on two more platforms
just like this one, the barrier separating you from the spider vanishes,
allowing you to shoot effectively at it.
It won't be easy.
Now you have to wake up the spider.
Get back down the same way you arrived, hop down to the ledge and run to
the SE corner as the spider starts raining deadly thunderbolts upon you. Unfortunately, because of the barrier you
can't fire back. Face the ladder far off
in the W wall and hop back to land on a safe block below. Drop down into the hole and follow the
underground passage to a ladder. Climb
up and keep on climbing until you reach a crawl space. Lower Lara down the other side and quickly
shimmy right as the barrage of thunderbolts resumes. Pull up into the alcove and jump to the
adjacent ledge. Push the block E as far
as it will go. You can drop down either
side into the room below, but beware, there's a toxic
mutant waiting for you. If
you have any grenades left, lobbing two of them down there will do the
job. Vault up onto the central
platform. Two down, one to go.
Approach the W gate and it opens automatically. Sprint diagonally across the ledge to your
left and go to the NW corner out of the range of the spider's
thunderbolts. Face S, hop back to grab
the edge and release to grab an almost invisible crawl space. Pull up inside and follow past an opening on
your left to a wall switch that lowers a crucial trap door. Return to the opening, slide and jump to a
slope in the central pit, and jump again onto a safe block. Pull out W, run forward and jump to grab the
ladder. Climb up past the lowered trap
door, shift left and drop down onto the ledge.
Push the block forward as you did with the other one across the
room. Deal with the toxic mutant below, vault up onto the central
platform, and now you're ready to engage in mortal combat with the giant
spider.
There's a large medipack and uzi ammo on the S side of the ledge, pickups that
you were probably too busy to notice earlier.
When the spider finally expires a gate opens in the pit and a boulder is
released. Drop down onto that safe block
in the pit and face the open SE gate.
Save your game, because the jump into the opening is a pretty tricky
one. What I did was to stand at the SE
corner, take one step back and stand jump into the opening. Climb down the ladder and follow the S
passage. Pull up higher three times and
hop up NE into a small room behind the spider's perch. Climb up onto the block. Grab the forever-unnamed hand artifact you
find there, as the game abruptly ends when you do so.