Aspidetr Easter Time 2016 - The Secret of the Forbidden Town
Levelset by Greywolf
Walkthrough by manarch2
Thanks to: bene, DJ Full and the forum in general for helping me to find the way through the levels and also all the secrets.
Story: Lara is in the forest in Belize and she's exploring a mysterious Mayan pyramid looking for a legendary crystal skull. But something happened in the sky over a wide forest...
Go directly to...
|
Volume I |
Volume II |
|
|
|
|
|
|
|
|
Volume I
Start a new game and before the first level a message shows up:
"In these levels you'll find several riddles and, sometimes, you'll have to quest information and clues out of the game (e.g. on Wikipedia). If you don't like puzzles or mazes you'd better change level. If you want to deal with this long Lara adventure you'll find several clues and informations in the readme.txt file. If any video (FMV) doesn't start, try to use the script.dat in the folder 'emergency script'. If at its end, the game doesn't start again, press the Esc key. HAPPY RAIDING!!!"
Watch the following cutscene and afterwards the first playable level loads.
Chapter 1: The Mysterious Pyramid
Secrets: 3
Belize, present day...
Getting Started
Pick up a Small Medipack, the Shotgun, 2x Shotgun Ammo, Wideshot Shotgun Ammo, Uzi Ammo and Flares around the room. Now use the three levers around this room (SW/W/E), better use that E one last to avoid health loss as parts of the floor collapse, namely along the W wall and in the NE corner. Drop down the ladder in the NE hole and climb into the W opening. Get through the crawlspace. As soon as you can stand up, turn left (W) and spot another crawlspace high up. Climb into it and around the corner you can find Secret #1, the Uzis and a Small Medipack. Return out, then approach the ladder, run off the ledge so that Lara can grab the ladder and get down the deep shaft. Shatter the two nearby vases for Uzi Ammo and Wideshot Shotgun Ammo.
Spikes and Deadly Water
Follow the SW passage and kill two spiders at the crossing. Go left first, follow the corridor and take the first left into a chamber where you can pull a lever to open a door in the first area of this level. Exit this passage, then go left, right and into the greenish room. Shatter the vase in the second left alcove for Flares. You can open the central trapdoor from the S side for a shortcut down, I didn't use it though. Exit, go right and follow the winding passage, killing a bat along the way. You'll arrive in a room with many spike traps which remain inactive unless you stand on the tile. Run-jump over the first set to the right, turn around and quickly dispatch of the panther who attacks you. Now jump over the next set of spikes (noticing a door along the way) and do two short jumps to reach the lever you saw from the entrance. It's a timed one and opens the door on the W wall for some seconds, so quickly turn right, jump twice, turn precisely to the open passage and jump into the doorway before the door closes again. The water in the next room looks deadly and is deadly. However, all pillars in this room are climbable, so jump to the nearby one, shimmy around two corners and backflip with a midair turn to the W one. Using this strategy jump S, W and finally N to land on the ledge with the lever. Kill a bat and use it to open a door in another corridor. Now make your way back over the deadly water using the various ladders; the wall to the left of the exit is climbable too so you can grab it, shimmy right and climb up. Get out of the spike room via the entrance, head back.
Through the Maze
Now go straight three times at the crossings, then left, and climb up to the higher ledge. There are three bats and six spiders around here so kill them, then enter the N and S passages to use two levers, both of which open a door to a globe each. Next to the S lever shatter a vase for a Small Medipack. Now drop down and follow the SW passage, go straight twice and shatter the vase to find Shotgun Ammo. Now return, go left and you arrive at an outside area. Slide down the slope of the pyramid and shoot three panthers. Approach the rear side of the tree NW of the pyramid exit, jump up the slopes and from there to the branch of the tree. On the E side you can find a Small Medipack. Go to the W side, the palm tree is a climbable pole here so climb up and backflip onto a high E alcove. Here is Secret #2 and you can pick up a Large Medipack, Shotgun Ammo and Flares. Drop down to the floor, return to the entrance to the pyramid and jump up the slope. Back in the maze go left and directly right to arrive at a staircase.
The Door Key in the Lower Floor
Go down first and both paths at the first junction lead to the same place, but there are two reasons why you should go left. First, the vase in the left passage contains Revolver Ammo so shatter it. Furthermore, there's a high crawlspace to the right of the vase, so climb into it, get out on the other side and pick up Wideshot Shotgun Ammo, Uzi Ammo and Flares for Secret #3. Return out and get on further. Kill a bat and go straight at the junction. Follow the passage into a larger chamber and use the two levers in the rear alcoves, one (A) shows a screenshot of a still closed door , the other one opens another door in the globe room. Return, go left at the junction, follow the path and go left again on the first occasion. In the left vase you can find Flares and a Large Medipack. Use the lever in the SW corner (B) to open a door near to where you entered the maze. Return, go left and to the end of the passage to use another lever. I don't know if it does anything else than triggering a panther behind you, but it's safer you use it. Now you can return upstairs - go back and straight and left at the junctions, head up the stair to the higher stage. Before returning, go up the stairway to the top, kill six bats and go right twice at the junctions to enter a room with a bat and a lever (C) which opens a door somewhere else. Now go out, left, right and left at the junctions and enter a room with a lever to the left (D). Use it to open a door of which you saw a screenshot earlier. There's another lever here on the opposite wall that opens a door SW in this part of the maze. Go there (straight twice at the junctions, then left), killing a panther along the way, enter the chamber and shatter the vase for Uzi Ammo and a Large Medipack. Pass through the next opening (open by using lever C), kill two bats and use the lever to the right to open another door in the globe room. Enter the E chamber which is open by using levers A and D and pick up the Door Key. Go out of this area, back in the maze go left, straight twice and downstairs, right at the middle stage, right, straight, right, straight twice and left to enter the room you opened by using lever B.
17 Lever Puzzle for the First Jaguar's Eye
Pick up the Revolver, Revolver Ammo and a Scroll which reads:
"Divide the total number of triggers by 2, 3 and 9 and you'll get the numbers to open the gateway."
Go out of this room, then right, straight twice, left, straight and left at the junctions, run down to the lowest stage. Follow the passage and go right at the first real junction, go on a bit and around the corners you can use the Door Key to open a well hidden door. Run down the slope and as soon as the music plays and you can see a boulder behind you sprint down, around the corner and run-jump over the deadly gap to avoid it. Staying along the left or right side, jump further to avoid steam and arrows and in the next hallway crawl below more arrow traps (or jump over them). Get in the crawlspace and pass it. Use the lever to arrive in a room with many levers.
"Here levers have numbers... I think there's any clue..."
You just found a clue, and now you have the matching puzzle. All 17 levers have a symbol above them that represents a Mayan number. Those are defined as following:
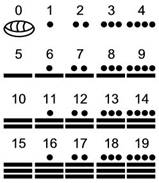
You now have to divide the total amount of triggers (equals levers here) in this area (actually 17, but seemingly the lever that opened this room counts in as well so it's 18) by 2, 3 and 9, which makes the correct solution:
9, 6 and 2
Pull the three levers with the corresponding tiles and the pool turns safe. Dive in and grab the well deserved Jaguar's Eye from the floor. Climb out, exit this room and return through the crawlspace, the arrow alley, jump over the gap, run up the ramp - watch out for a boulder in the corner tile, just be sure to pass it very quickly -, back in the maze go left twice, to the middle stage, right, climb the right ledge, go down E and then into the S passage.
Globe Puzzle for the Second Jaguar's Eye
Enter the globe room with several lines on the floor.
"On lines tracking this star there're Mayan numbers... I suppose I have to place other numbers on boxes without numbers... well.. in which way? I may solve this riddle watching a line where are all the four numbers..."
All lines contain four tiles that represent either a certain number or are completely empty - this is where you have to place the five globes around the room which contain another number too. The sum of four numbers in a line must equal 26, as you can see in the only complete line. Here is a map of the puzzle, facing W:
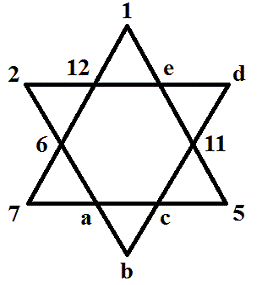
The letters a to e are the places where you have to move a globe to. With the globes representing the numbers 3, 4, 8, 9 and 10 there is only one correct solution.
a = 10
b = 8
c = 4
d = 3
e = 9
Place the globes on the correct tiles (a flame is triggered if the placement of any globe is correct) and after all the hard work you deserved the Jaguar's Eye you can grab from the pedestal behind the S door that opens after the last correct globe.
Placing the Eyes, The Crystal Skull
Now that you have both items, you can search for the receptacles to place them. Exit this area via the W passage, climb over the ledge, go W, left, left, upstairs, right, straight twice, left twice and right at the junctions (here you would've landed if you dropped in the other hole right at the start), killing two bats. Then place the two Jaguar's Eyes in the receptacles and a cutscene shows the fire going out. Pass the extinguished fireplace, run up the ramp and pick up the Uzis. Turn around and jump up to climb an upper ledge. Go ahead and pick up the Crystal Skull from the pedestal to triggers the end of the level.
Secrets: 0
Thalien: Hmm --- good thing that I haven't turned up at a fashion show as I did last time. Who are you?
Lara: Out of politeness you should introduce yourself at first.
Thalien: My name's Thalien and I'm looking for Richard Croft.
Lara: Why?
Thalien: I need his help.
Lara: You're unlikely to find him: He passed away many years ago.
Thalien: It's impossible! I followed Elven-Flame's tracks and --- I understand. I must tell you a long story.
Many, many millenniums ago, when mankind was still young and Atlantis an idea lost in the future, in this world there had already been the Elves' civilization. At some point a few elven wizards discovered how to enlarge their mind's faculties... and how to reach such a deep state of meditation that their souls could leave their bodies and wander free through far and unexplored universes. Some worlds of these ones were inhospitable, other ones were inhabited by demons or hostile beings, some other worlds were so strange that they were beyond all wizard's understanding... but among these ones there was one world whose beauty struck the astral wanderers' hearts.
An archipelago of islands and little mainlands scattered in a blue and quiet sea. An awesome wilderness, full of plant and animal life and never polluted by any civilization (or it appeared thus at any rate...). By joining their knowledge the Elven wizards opened gateways between your world and those far lands, which they had named Lost Paradises. And the whole race of Elves moved here, where, in a wide and magnificent mountain valley of this world, they built their first capital, Glorindal, the town with alabaster walls and one of the most wonderful dwelling of the Elves. But the gateways still existed and were used several times, e.g. to receive in the Lost Paradises all the refugees from the continent of Atlantis. Many years ago a man found one gateway and he could cross the split between our worlds and he fell, as far as I know, in the midst of an official feast of the Elves's king. That man was Richard Croft and he would have probably spent all the remaining days of his life in a deep dungeon, if the princess Shandril hadn't fallen in love with him. Pleas, entreaties, callings upon wisdom, threats and blackmails of the King and of her whole family were through-and-through useless: Few forces in nature are stronger than a princess putting her small foot down. And so Sandril and Richard shared the Flame of the Elven-magic, that is to say they married. And about one year later I was born, and I was the first demi-elf belonging to the Elven court. But probably love and passion couldn't overthrow all the millennia of differences and conventions which tore apart the two races, so, after some time, my mother and my father left. My father came back to his world after he had sworn on his honour that he will have never disclosed anything about the Lost Paradises (also because Elven wizards arranged for a curse that would have killed him if he had just broken his word). And I suppose he found a new partner here, because you are his daughter, aren't you?
Lara: And, at this point, your sister too...
Thalien: He had to love you so much, because he could give you the Elven-Flame's benefits somehow and, when I was looking for him by following the tracks of that ancient Elven magic, I found you.
Lara: I knew my father, when he was young, had been lost in South-American jungle for some years. He told he had been gravely ill and a native's tribe helped and treated him, but he needed a long time to come back to civilization...
--- loud noise ---
Ignore the giant spider S (you can't use any weapons here either) and head up the N stairs. Thalien will follow you and activate a portal.
"JUMP THROUGH THE GATEWAY!"
Yes, indeed, jump through the N wall landing on a slope. Slide down and soon the level changes again.
Secrets: 3
Thalien: Welcome to the Lost Paradises!
Lara: Finally, you did it! You took me here. Now tell me why you needed the help of my (pardon, our) father.
Thalien: I'll have to tell you another story.
Many ages ago a great civilization arose on the Earth, it was Atlantis. Which later blew over in a disastrous way. Back then the Elves' king was Feanor, and he, since he was realizing the terrible state of the world where also his race had its origin, came to the decision to allow survivors in that terrible cataclysm enter the Lost Paradises. But all the refugees should have left every technological knowledge that had taken Atlantis to its own ruin and live in harmony with Nature and Mother Earth. The refugees, under the aegis of Elves and of their Magic, settles forests, mountains and deserts in the Lost Paradises, many of their heirs forgot their terrestrial origin and in this world new realms and new communities arose: the Lost Kingdoms or the Forgotten Kingdoms. As long as one day, many years later, an earthquake brought about the re-emergence of an island hidden under the sea surface of the Paradises until then. On the island first explorers discovered ruins left there by unknown beings who had clearly lived in that lands much earlier than the Elves' coming. King Feanor ordered that all relics found out among the town ruins were carried into a secret vault dug deep under the Elven palaces of the capital Glorindal. And there he began to study them totally in secret. But dark clouds were thicken in southern island groups. People coming from Earth always couldn't stand the dominion of Elves and their whole control of every magical knowledge. Until a necromancer called Vanderghast openly rebelled against the elven court and, after he had rallied a huge army around him, he invaded the lands of Feanor's people. Vanderghast was controlling horrible monsters and spells never seen before in the Lost Kingdoms and the source of his power was unknown to everyone. During the following war wide areas of this world were devastated in bloody battles between the Elves and those who they themselves had contributed to put in a safe place. One by one the Elven towns and fortresses were falling down until the necromancer and his allies broke down the walls of Glorindal, where the last defenders were sheltered to protect their king. Throughout the war King Feanor had been poisoned by resentment and regret. He had dreamed about setting up a new world in which different races would have lived in harmony under Elves' steer and now his kingdom and his people were relentlessly wiped out. He was spending longer and longer time in the vault where he was conducting his feverish studies on the artefacts rediscovered in the sink island and, when he seldom came out, his counciliors were seeing an insane light shining in his eyes. As long as, in the two hundredth anniversary of the emigration from the Earth, the human army invaded the Elves's capital. Feanor and Vanderghast clashed in the rooms of Glorindal. And that day the town ceased to be. The two armies and all the inhabitants of the town died in the same moment. Their death scream let go insane half psychics of the Lost Kingdoms and the last scream of Feanor branded in the minds of Elven princes of weren't involved in the war: It was a curse! Any elf who dared to come to the ruins of Glorindal would have died immediately and horribly. So the war ended and no one ever went again to the ruins of the town which from then on was named the Forbidden Town and nobody ever discovered what had been the secret of Feanor and Vanderghast's power and what kind of fate in the end struck them and their peoples.
Filling the Inventory
Now that was a lot of text, and finally you can do some raiding, so off you go. Head NW and run down the stairs where Thalien is waiting for you. In vain, because you can drop in an E gap when the stairway takes a right turn. Follow the passage and drop into the hole for Revolver Ammo. Climb out on the other side and pick up Uzi Ammo. Now return outside and get on the stairway again. Run down in the valley and head SE behind the tree to spot another opening. Climb the blocks and find Shotgun Ammo and Explosive Crossbow Ammo. Get outside again and head in the NW corner. In the S opening you can find a Small Medipack.
Timed Jumps
Follow the passage, climb down the ladder and follow the crawlspace. Climb out, pick up another Small Medipack and Wideshot Shotgun Ammo and jump over the islands before diving in the water. On the way around you can find Shotgun Ammo, Flares and Uzi Ammo. You arrive in front of a closed door so dive into the water, swim SE and use the timed lever (that's why you should pick up the ammo first) which opens the door above you - so swim back to the entrance, jump back over the islands and enter the door quickly. Run into the left alcove to avoid the moving blade trap, pick up a Large Medipack and wait for the trap to move towards the rear part of the corridor. Follow it and dash into the right passage, picking up Revolver Ammo, Flares and Shotgun Ammo. Follow the passage and if you don't want the next secret just drop down in the room. Otherwise jump onto the left slope and in the correct moment (you need several tries for this most likely) jump to grab the monkeyswing in front of you. Get above the crawlspace, drop, grab the ledge and get in for Shotgun Ammo and Uzi Ammo, which is the well deserved Secret #1 (4).
Trap Gauntlet for the First Dragon's Eye Part
Then drop down. Immediately sprint towards the end of the passage and get into the crawlspace to avoid all possible traps in here. Follow the crawlspace and climb up into the next chamber. Get Flares, Revolver Ammo, Shotgun Ammo, a Small Medipack, then the first Dragon's Eye Part from the pedestal and leave this room through the NW water tunnel. At the only junction swim right for a Large Medipack, then swim into the other direction, use an underwater lever at the end. You'll arrive back in the last pool room so get out of the water where you entered this area, avoiding the sea hag (which you might want to shoot from dry land). Use the crawlspace and the ladder to return to the outside area. Go SE a bit, then to the W wall and climb the flower ladder. Climb the next ladder of this kind, shimmying to the left a bit and then getting to the very top for Secret #2 (5), Uzi Ammo, Poisonous Crossbow Ammo and a Large Medipack.
Following Thalien
Get down again and now go with Thalien through the SW alley. In a S passage you can find Uzi Ammo, on the regular path is Revolver Ammo. Follow the track and jump behind the W waterfall for a Large Medipack, in the pool is Poisonous Crossbow Ammo. Get out and follow up the track. Kill five griffins (with the help of Thalien). Get further N, into the cave and kill another three griffins. W you can find Wideshot Shotgun Ammo and a Small Medipack. Head down and follow to another outside area, kill another griffin coming around a corner and head to the pool. Kill a sea hag and dive in, E is a passage with a Small Medipack, Flares and Revolver Ammo; use the underwater lever SE and swim back out. Down in the pool are Uzi Ammo and Shotgun Ammo. Get out NW, you might climb up to the higher ledge (multiple possibilities here) for Crossbow Ammo and Uzi Ammo. Get W and N into the opening, shoot a griffin and climb the various blocks to the top for Flares and the Uzis. Now drop down and into the hole you opened up with the underwater lever. Get in the crawlspace, pick up Flares and get further, then dive into the water cave. Following the tunnels you can pick up a Small Medipack, Uzi Ammo, Shotgun Ammo, Revolver Ammo.
Multi-Stage Pushable Puzzle for the Second Dragon's Eye Part
Climb out S, shoot two griffins and pick up Wideshot Shotgun Ammo and Uzi Ammo. Jump up to the higher ledge from the elevated floor N. S in this room is Explosive Crossbow Ammo. Your quest in this room is to move a dragon statue on the top floor with the help of the levers, so off you go.
Left lever: raises/lowers the blocks SE and W on the lowest floor and W on the middle floor
Use this left lever and drop down, head SE on floor level and enter the just revealed passage where you can find the pushable statue. Pick up a Large Medipack and pull out the dragon statue, then to the W wall. Climb back up to the middle floor and pull the left lever again to lower the block in front of the statue, move the statue on it and then use the left lever again. Now push the block S twice, use the left lever again and push the statue on the W block, use the lever a last time to raise the block. Push the statue in the interlinking passage (first pick up Shotgun Ammo, Uzi Ammo and Poisonous Crossbow Ammo) until you come to a gap in the floor. Return to the three levers.
Right lever: raises/lowers two blocks (first and second in the way of the statue) in the interlinking passage
Middle lever: raises/lowers the third block in the way of the statue in the interlinking passage
Use the right lever and move the statue over the gap into the alcove. Now return and use the right lever again and also the middle lever to be able to push the statue to the end of the passage. Use the middle lever again to raise the statue on the third stage. Now go to the W wall and climb the ladder in the middle to arrive on the third stage. Jump to the walkway, head S and pull the statue out, go around it and push it onto the marked tile in the middle. The N block lowers and gives you access to the second Dragon's Eye Part which you can combine with the first one to the Dragon's Eye. Get down, dive into the water and swim back to the entrance to this cave, climb out, get through the crawlspace, climb up and head outside.
The Dragon
Head back E into the cave, a bit up and then drop into the N room. On the way down you can find a Large Medipack, Uzi Ammo and Shotgun Ammo. Place the Dragon's Eye on the portal to open it. Explore the perimeter for Wideshot Shotgun Ammo, Flares, Revolver Ammo and a Small Medipack. Enter the N hall and a dragon appears out of the central pool. It's best to simply be quick and avoid it - head into the SW passage, pick up a Small Medipack, follow it further and pick up Flares. At the end climb a ledge, pick up another Small Medipack and push the button. A block is lowered somewhere up in the cave. Return to the dragon's den, avoiding some locusts and fires, then head SE, follow up the ramp and pick up a Large Medipack at the junction, then go straight, down and pick up a Small Medipack. Use the next button to lower another block high up, then return to the junction, go right and up. Jump N (right) and into the passage, pick up a Small Medipack, then take one Torch off the stack. Ignore the (timed) lever for now, as you first have to light the Torch. Take it back, jump to the middle walkway and head down to floor level again. In the NW opening where you used the first button is a wall torch where you can light your Torch. Now return upstairs, go to the lever and leave the torch in front of it. Use the lever to raise a trapdoor on the walkway, quickly pick up the Torch, jump back to the central walkway and run-jump over the gap before the trapdoor opens again. Head up the ramp, pick up a Large Medipack and Shotgun Ammo and at the ledge jump up from the right side. Pick up Uzi Ammo and a Small Medipack, then jump up with the Torch in hands at the rope to ignite it. A few seconds later the boulder crushes down on the dragon and leaves nothing of it behind. Get down again (leave the Torch there) and to the lowest stage where a block has lowered N. Enter the alcove and grab the Gold Dragon off the pedestal (screenshot of a cave). Get into the dark crawlspace behind and pick up Shotgun Ammo, a Large Medipack, Flares, Uzi Ammo and Poisonous Crossbow Ammo. Shoot the E wall with a weapon, then get through the passage and stand up next to a button. Use it to lower a block in the outside area. Now get out of this crawlspace into the den, head S and get all the way up into the far S cave near the start of this level.
To Telengard
Head down W and follow the left wall until you spot the block you lowered. Follow the passage and sprint through the boulder alley and find Secret #3 (6) - Shotgun Ammo, Wideshot Shotgun Ammo, Uzi Ammo, Revolver Ammo, Explosive Crossbow Ammo and a Small Medipack. Dash back through the boulder alley and return outside. Head W and you can see you can now enter a cave here. Run up and approach Thalien to trigger another cutscene where Lara and Thalien are flying away with the eagle.
Lara: Where are we going?
Thalien: Towards Telengard, the present capital of the Elven kingdom, where Lord Lorac and Lady Shandril will bring you (or rather will bring us) up to date with developments of the situation which is why they sent me seeking help.
Lara: Is Shandril your mother, isn't she?
Thalien: It will be better not remind her that. She looks at me as the "scandal": I'm her demi-elf daughter that recalls everyone her marriage with a human, not to mention the following divorce! Now that she's so busy to pave the way for her political career with that social climber of Lorac (who, since the King is ill, assumed the regency of the kingdom!), now she is only concerned with building my image and rebuilding her one.
Lara: I'm sorry the things are going this way between you and her. I lost my mother when I was just a little girl and I was wishing things were going better for you.
Thalien: Do you mind if we let it drop? We're almost arrived.
Secrets: 0
Lord Lorac: Who is this yound human woman, Thalien? Didn't you get the order of finding Richard Croft?
Thalien: My father passed away many years ago, she is Lara Croft, his daughter, who inherited the Elven Flame by him. You should have perceived Flame's aura.
Lady Shandril: It's more feeble than the original one, but yes, it can be perceived. However she'll be able to help us?
Lara: Why don't you ask me personally, Lady Shandril? And perhaps, if I was clearly explained why I'm here and what I should do, I'd be extremely grateful to you.
Lord Lorac: While the King has been in a coma since three weeks ago and while I'm the regent in his stead, I think we can't delay any more: It's a tough time and dark clouds are thickening over our heads. About one week ago one flying ship of ours, while it was flying over the lands near the borderline with the kingdom of Valkinord's knights (with whom we have signed a non-aggression agreement not long ago), was attacked by mysterious riders riding awful flying beasts and controlling unknown and mighty magical powers, so much that the whole crew was destroyed. Some patrols of Vakinord's knights witnessed the attack, but they could do nothing. However they saw the mysterious riders directing with the stolen load towards the Forbidden Town.
Lara: And so, since you can't set foot on there, you want me going there in order to have a glance.
Lady Shandril: Quite precisely: Lord Lorac here, since some months ago, was having someone secretly leading diggings among some ruins recently discovered on Emerald Islands and dating back to the mysterious civilization inhabiting this world before the Elves. The ship's load was containing relics from that diggings. But the agreements among several peoples living now in this world are clear and this event has only been able to threaten the non-aggression agreement between Telengard and Valkinord and to lead to a new war between elves and humans.
Lord Lorac: Hm yes --- but in the latest Races' Council was established to not go on without having gathered more information about the Forbidden Town. So we elves undertook to send a human in whom we place our greatest trust, like Richard Croft, in order to reconnoitre among that ruins and report to the Council within three days. You are not obliged to fight or run other risks.
Lara: I only play for sport. I agree.
Lord Lorac: This one will give you a magical protection. (you get a Magical Sword = crowbar) You can ride my eagle to reach your destination and to come back.
Lady Shandril: And take this small jewel too (takes out the Amulet of Astolphus): it will bring you good luck.
Secrets: 1
This is the forbidden town of Glorindal. You can look for the royal palace and the two golden stars that will open its doors, or you can explore the whole town from top to bottom and solve some riddles to reach the only secret of this level. You won't find any medipacks, weapons and ammo in this town, but you'll be able to get in a supply of many items if you'll find the secret.
If you don't want to find the secret, you only have to absolve the Golden Star tasks and open the last door with them. If not, this is the complete walkthrough for this level.
Underwater Lever Puzzle for the First Spearmint
Dive into the E lake and be careful that the stream doesn't take you over the waterfall, as this means your definite death. Instead swim down W below the stairs and through the tunnel. You arrive in an underwater hall with several chambers. Swim into the SE one and down the hole, in the next room you can swim up for air. Follow the S chamber now and you arrive in an underwater area with eight corridors, one is currently blocked off. Seven passages lead to underwater levers you need to use to open up the blocked off passage - the problem is that they close off other passages to the levers so you need to use them in a certain order Start by numbering the passages (the left N one is #1, the right N one #2, then you go clockwise around to the left W one which is #7). Here is a working solution, though there are certainly others as well (note that you must not use a switch twice as that blocks the passage again, you need to use it another time then). After using two to three switches you also have to return for air in the previous chamber.
#1
#2
#3
#5
#6
#1
#4
#7
#1
The right W passage opens so get through and pick up the Spearhead. Return all the way through the underwater tunnels to the hall with several chambers, ignore the hole in the far NW corner and follow the tunnel in the middle N chamber until you can climb out S. Get up the stairs.
First Golden Star
For a shortcut you can open the SW gate with the Magic Sword. But for now head W to the closed gates and open them with the jumpswitch to the left. Enter the hall with the mirrored floor (there's no puzzle with it, though) and follow the SW passage. Open the trapdoor from the S side and drop down (here you would've arrived if you chose the NW route in the underwater hall, but this way it's much faster). In this area are four coffins. Open the N one for a Music Scroll and the E one for a plate called The Four Doors which is a hint for a later puzzle:
There are 4 rooms: red, yellow, green and blue. In green, the treasure. In the others, death. 2 pulleys for each door. A pulley for green room next to each red one. A pulley for yellow room next to each green one. A pulley for blue room next to each yellow one. Pulley for the same room aren't close. Yellow and red rooms’ aren't close, but they can be diagonal.
Head into the NW corner and spot a Golden Star on the wall you can pry off with the Magic Sword. By now three skeletons woke up - either ignore them or shoot them in the pool with the Shotgun. Climb up the SE ladder again, head N, open the doors, get upstairs and open another set of doors. Head E and here you can use the Music Scroll to open the large gates down W in the building - essentially not much more than a shortcut, but you still can use it now.
A Coin and some Jumps
Get down and W to find the doors, enter the courtyard and get W to that fountain where you can pick up a Coin. Head up the N stairs. In the next area head NE and down the ramp to the receptacle for the Coin. Place it to open up the path and follow the passage. Drop down and you arrive in a room with a large pool and many platforms. Jump over the platforms to the N, shooting a skeleton down in the water on the way, then jump on the left part of the slope, jump further on the next slope and now with a left curve into the alcove. Turn SE, jump to the platforms and make your way far S shooting another skeleton down. Use the lever in the S alcove to see a cutscene of a pool (it's one of three to activate something), then climb the ledge behind it, then up the ladder. Follow the passage and safety drop down in the passage where you came from, exit S.
Through Town
Head down some ramps and you arrive in another courtyard. Kill three knights who attack if you roam around a bit, then open the NE doors (the N ones just lead into an empty mansion). Run upstairs, then jump to the E alcove. Drop into the E courtyard, open the N doors, kill two knights and open the NE trapdoor from the N side. You can drop down in the wine cellar and meet a skeleton but you can also leave it. The E door also leads to an empty room. Just head up the stairs, jump over the tables S and open the door, use the floor lever on the balcony to open a door somewhere else. Return to the lower courtyard, climb the ladder and safety drop down on the other side. Head S and you arrive back at the starting area. Head far S and open the door with the Magic Sword (another shortcut), then go further and notice a door to your left, ignore it for now and head up the ramp.
Second Golden Star and Second Spearmint
Three skeletons appear, you can shoot them over the ledge where you came from. Run down a S ramp, open the doors and head up the stairway. Shoot down two skeletons, then use the floor lever to fill a pool with water. Head down and out of this building, go NE and down the ramp, then S to find said pool. Dive in, follow the W passage and climb out in another hall. Watch the cutscene with the knight who mounts a horse, then shoot him off the horse and finish him off on foot. Take the Spearhead he leaves with you and pry the Golden Star off the N wall, then dive down in the water again and swim all the way back to the first basin. Climb out and kill another knight. Head right and now open a previously ignored pair of doors. Open the left door to see a fireplace. Now open the other door, follow the passage and open the blue doors to arrive in another hall. You opened the SE door with a lever a while ago, so head in and use the floor lever to open a door back in the building with the wine cellar. Backtrack all the way there (killing another knight on the way), run upstairs and enter the open door N.
Block Puzzle for the Third Spearhead
Open another door in the passage, then jump over the deep pit. Here you see the first two blocks of an elaborate puzzle. Push the left one in twice, turn right and push the next block twice. Turn right, push the block on the outer walkway, go around it and push it all the way in the corner (out of the way). Now pull the second block out, go around it, pull it once, go around it and use the floor lever to trigger a little earthquake. Now push the second block out and against the third block. Go inside again and pull the first block out twice, go around it and push it on the outer walkway, then go around it again and push it between the two passages. Enter again and pull the block left of the floor lever twice. Climb over the left block and get in again, then go to the new block in the NW corner, pull it twice, go around it and push the other block out of the way to reveal a passage. In here you can use another floor lever. If you used all three floor levers (two here and one in the large pool area) the flyby shows you a flooded pool down in the deep pit, so return there and dive in. Swim in the NW passage, climb out and use the route of your desire over the various platforms to get up to the high E alcove with the Spearhead. Jump to the NE ledge, open the door and exit.
Chain Puzzle for the Fourth Spearhead
Head down in the courtyard, climb the ladder and safety drop down in the streets. Head up S to the starting area, then S, through the crowbar door and open the blue doors you previously ignored. Open the door ahead of you and head upstairs, opening more doors. Only the SW doors can be opened so head upstairs, open more doors and you are in a room where you have to place four Spearheads, but you only have three until now so ignore them. Head N and E to open the next two blue doors and you arrive in another puzzle room. A message shows up:
FIRST OF ALL YOU'LL NEED A CLUE TO SOLVE THIS RIDDLE. THEN SAVE BEFORE YOU START PULLING THE ROPES; BECAUSE, IF YOU'LL PULL A WRONG ROPE, YOU WON'T BE ABLE TO OPEN THE RIGHT ROOM ANY MORE.
The clue about the four doors is helpful here. If you try to solve the puzzle, there are several possibilities for the other colours but only one for the two green ropes. Looking from the S this is a working (and the real) solution:

So pull the two green ropes to open the safe green passage SW to the Spearhead. Open the door to return to the room with the four Poseidon statues.
Placing the Spearheads for the Secret
Place all four Spearheads and a door NW opens. Head through and you hear the chimes of Secret #1 (7). Open the door and shatter all objects for Uzi Ammo, Shotgun Ammo, a Small Medipack, Revolver Ammo and Flares. Follow the other passage for a Small Medipack and Shotgun Ammo. Open the door and pick up a Large Medipack, the Crossbow, 2x Uzi Ammo, Poisonous Crossbow Ammo, Explosive Crossbow Ammo, 2x Shotgun Ammo, Wideshot Shotgun Ammo, two Small Medipacks, Revolver Ammo. Head all the way out of this building.
Placing the Stars
Go W, head up the ramp, then in the far NW corner of this garden, follow the streets back to the courtyard with the fountain, go N, into the next courtyard and here go W to place the two Golden Stars to open the door. Head up the stairs and the level changes.
Secrets: 4
Painting Puzzle for the Sunlight Crystal
Run up the stairs and head right at the junction. Go either left or right (both paths lead to the same room) and open two sets of doors to enter a hall where you can fight a bird. Take a note of the yellow paintings high left and right above the throne, which is a clue for a later puzzle Open the NW doors and run up the spiral staircase. On top open the hatch from the E side and climb up. Kill two ninjas and open the chests for three Crossbows and 3x Uzi Ammo. Head back down and now open the S doors and the following ones. Jump on the E roof (if you jump down you are warped back into the previous level) and head into the SE corner to spot a crawlspace. Get in for Secret #1 (8), Uzi Ammo, then exit again and jump back on the S balcony (approach the doors for a bit of magic, you can also open them normally from the other side though). Now approach the lever puzzle. Only use the second lever from the left to open the door (matches the paintings above the throne), enter and pick up the Sunlight Crystal from the pedestal. Now return to the entrance hall (a shortcut is to drop down in the previous level, run inside the palace again and head upstairs there).
Some Preparations
Now go straight at the junction. In this chamber open the near (right) N door, open the chest for Flares and use the lever. Get out, head N and open the left N door, open the chests for 2x Shotgun Ammo and 2x Uzi Ammo, use the jumpswitch on the W wall (dark corner) and the two levers, then head out and SW to find the open gates. In the next hall ignore the stairway and head to the closed gates.
Dragon Puzzle for the Nature Crystal
Open the doors to the left and enter the puzzle room. A cutscene is triggered and you get important information:
Forests' Dragons always tell the truth.
Fire's Dragons always lie.
Ice's Dragons alternate a truth and a lie, either starting off with a truth or with a lie.
Only Fire's Dragons can open the gate.
Ask to every dragon:
"How many dragons come from forests?"
"Where do you come from?"
"From where does the dragon on your right come from?"
And compare their answers.
Now approach the various fire statues to receive their answers.
North Dragon:
"How many dragons come from forests?" - "One"
"Where do you come from?" - "Forests"
"From where does the dragon on your right come from?" - "Forests"
East Dragon:
"How many dragons come from forests?" - "Two"
"Where do you come from?" - "Ice"
"From where does the dragon on your right come from?" - "Forests"
South Dragon:
"How many dragons come from forests?" - "Two"
"Where do you come from?" - "Forests"
"From where does the dragon on your right come from?" - "Fire"
Right West Dragon:
"How many dragons come from forests?" - "Two"
"Where do you come from?" - "Ice"
"From where does the dragon on your right come from?" - "Ice"
Left West Dragon:
"How many dragons come from forests?" - "One"
"Where do you come from?" - "Forests"
"From where does the dragon on your right come from?" - "Fire"
Note that "right" in this context means "counter clockwise". You can solve this puzzle by assuming that one of the dragons is a Forest one (there's a possible solution in which there are no Forest dragons at all - all first answers are wrong this way - but this is not the intended one and doesn't work). See if the answers fit to the right neighbour's ones and so on. This way, you'll find out that there's only one solution:
N dragon: Ice (right/wrong/right)
E dragon: Ice (wrong/right/wrong)
S dragon: Fire (wrong/wrong/wrong)
Right W dragon: Fire (wrong/wrong/wrong)
Left W dragon: Forest (right/right/right)
So pull the S and right W levers to open the gates SE. Get the Nature Crystal from the pedestal and exit this room shooting two ninjas.
Detours for Two Secrets
Now open the doors to the right of the gates, kill another two ninjas and open the S doors. Shoot the attacking three birds (the last one appears if you run on the large balcony). On the balcony jump over the fence W, then S to the far crevice on the leaf-covered wall. Shimmy left until you can climb up and pick up a Small Medipack, Shotgun Ammo and Explosive Crossbow Ammo. Get through the crawlspace and you can see a timed lever. Ignore it for a moment, turn around and climb up into the higher crawlspace. Get through and use another lever at the end, then turn around and use the high up jumpswitch to open a door back in the palace. Now get back through the last crawlspace and use the timed lever to open a door down in the gardens Turn around, pass the crawlspace, get up and drop down at the end, then head W, drop down the ledge, turn around and enter the E doorway before it's closed off again. Inside you can find Secret #2 (9). Open the four chests for 4x Flares, 4x Shotgun Ammo, 4x Wideshot Shotgun Ammo and 4x Uzi Ammo. Get out and make your way down to the lowest part of this outside area (you run into a ninja on the way). Open the trapdoor from the S side. Drop down into the water and pick up a Small Medipack, a Large Medipack, Shotgun Ammo, 2x Uzi Ammo and Poisonous Crossbow Ammo. Get back out and up E, killing two birds. Now head back inside, you'll find the doors you opened in the hidden passage. Enter the tunnel for Secret #3 (10) and open the chest for Flares, Explosive Crossbow Ammo, Shotgun Ammo, Uzi Ammo and a Small Medipack. Now head out and go left back in the hall.
Chess Game for the Mystery Crystal
Head up the N stairs into a larger hall, shoot three birds here and go NE to open the doors here. Follow the passage into the chess area.
It's a pity the chess game was stopped... One white piece could make a double attack and simultaneously threaten black Queen and King.
Kill a bird and three ninjas of which one leaves a Chess Strategy note.
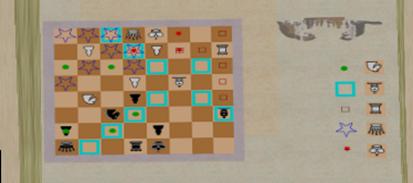
First of all head to the SW corner and climb the W side of the pillar, then backflip into the high W alcove to find Secret #4 (11). Get Shotgun Ammo, a Small Medipack and Flares off the chest. Drop down and use the four levers around the perimeter and also a hidden jumpswitch on the W side of the NW pillar. A door opens in the outside area so head back to the previous hall (E passage). Open the far SW doors. Head down and use the lever to create a shortcut to the outside area. Go there and find the open gates S, use the lever here to open the next gates to the chess arena.
You now need to place one of the white pieces so that it both threatens King (D8) and Queen (H8), which is usually best (and only) done with the horse (G5). Push it on the field F7 (twice W, once S).
The E door opens granting you access to the Mystery Crystal. Head out of the chess area, then up the stairs.
Into the Throne Room
Go S and follow into the hall where you came from last and here you can place the three Crystals in the E receptacles. Two golden griffins wake up so kill them and pass the S gates. Follow up the stairs and the passage and kill not less than five golden griffins. Use the lever at the end of the hallway and enter the throne room.
This was one of the most beautiful throne rooms, here Feanor was receiving the dignitaries from other nations and here, at the end, he chose to come up against his own downfall ---
Lara: Who are you?
Feanor Demon: I'm the owner of this place. I am Feanor. Take off each magical thing: Tonight we will start the ritual!
Now it's explained how to play the second part of the game:
What lies ahead? If you want to know exit the game, open the folder "Vol. II" and copy English.dat and Script.dat in the main folder. Then launch a new game (and DON'T USE PREVIOUS SAVES!!!).
Do that and you can play the Vol. II levels...
Volume II
Secrets: 3 or 4 (depending on the route you take)
Starting Thalien's Help Mission
Watch the cutscene where Thalien goes on the way to help Lara.
Thalien: Lara is in a great danger!
When the cutscene ends you arrive in a treasure room. Pick up the Amulet of Astolphus (although you already have one in your inventory), Light Charms (flares), two Lara's Guns, Lara's Shotgun and a Lara's Uzi (though you can't use the weapons yourself, but you have Wound Charms which work the same way as pistols). Head NW and pick up Empowered Astral Energies and Light Charms. Use the lever to raise a block for later. Now head NW and pick up the Magic Sword.
Thalien: Uh! This is impossible!
Further on pick up another Lara's Uzi and a Small Healing Potion on the ledge, then kill two bats and pull out the griffin statue. Pull it out of the passage, then N and on the lowered raising block S of the golden ledge. Now use the SW lever to raise the block. Climb on the block row and pull the griffin statue on the golden ledge. The doors down the W stairway open so exit this room via the doorway.
Eight Lever Puzzle
You arrive in a room with eight levers and some sleeping griffins.
Thalien: This place must be somewhere in the ancient town of Glorindal. I wonder why I can stand here. Maybe the curse, with the passing of time, lost its power. Or my partially human nature allows me to stay alive. But maybe I think I just gave up my Elven nature a long time ago.
To solve the lever puzzle just watch the painting above the W door.
There are two missing symbols and you have to use the levers where you can see the correct symbols. You have to look the symbols in the same row to find the missing ones - use these two levers to open the door:
Right E lever
Left N lever
Up to six golden griffins are making life hard if you use any of the other levers.
Mirror Room
Enter the W chamber and search for 2x Empowered Astral Energies, a Small Healing Potion and Light Charms. What you don't have to search for are five bats which will hunt you. Head into the W part of the area and search the NE pillar for a jumpswitch, use it to open the SW gates. Get in and find a Large Healing Potion. Go on, kill two golden griffins and climb the SE ladder to enter a crawlspace. Pass it and at the end of the passage pick up Light Charms, then use the lever to open a door S in the eight lever room. Head back all the way there, enter the hall but be cautious, there are some hidden spike tiles in here. There is a large mirror that tells you which tiles on the floor are safe and which are deadly. Your goal is to place the statue in the NW corner on two certain tiles (marked in the mirror) so pull it out of the passage and push it around the deadly tiles on the tiles in the SW and NE corners of this room. A rope appears in the middle and a block raises, so climb the block, run-jump and grab the rope and from here swing and jump into the W passage. Use the lever to open the N door in the eight lever room. Return there.
Circular Blade Room and Doors Puzzle
But before you enter this area, head back E into the starting room. In the NE corner a block has lowered so drop down there and pick up a Gold Sphere for Secret #1 (12) in the crawlspace. Get out, then down the W stairs and into the eight lever room. Head into the W passage, thereon enter the next treasure area and search the room for Poison Arrows, Empowered Astral Energies, Light Charms and a Large Healing Potion. Head up the N stairs and climb up the right ledge. You are in a large circular room with a giant rotating blade. When it passes climb the E ledges to the end, let it pass again, then climb the left ledge. Now jump to the other side and climb to the top of the room (the trap can't hurt you here). Get into the NE room, pick up a Small Healing Potion and see the first three of a total of six levers. In the SW room are Light Charms and the third three levers. Each lever opens (or closes) several of the six doors (that all need to be open) in the W part of the area. Try out each lever to see what it does.
Left N lever: Door #2
Middle N lever: Doors #1, #5
Right N lever: Doors #2, #4, #5
Left S lever: Doors #1, #4, #6
Middle S lever: Doors #2, #5
Right S lever: #2, #3, #4, #6
To open all doors you need to use the following levers:
N: Middle and Right
S: Middle and Right
Now jump down W (here you have to avoid the trap as it's pretty deadly on that platform). Enter the passage. Two of the burners can be used without catching fire - the second and third ones. Afterwards you can see a cutscene showing an item on the floor level of the previous area. You can return here now, drop down when the blade moves away and get back in the hole where you came from. Grab the Bronze Sphere from the pedestal which is also Secret #2 (13). Make your way up again to the burner passage and at the end you can decide in which hole you drop.
Left Hole: Water and Griffins (2 secrets)
Safety drop down and climb out of the small pool. Enter the room with the wheel, shoot five bats. Enter the two NW and SW passages and time the grab in the reach-in holes when the fires are out. This raises two blocks in the previous room. Drop in the small pool W, pick up a Small Healing Potion and climb into the crawlspace from the very right side. In the small passage use the two levers to trigger two poles in the previous room, then jump on the previously raised block SE. Standing in the E corner stand-jump to the pole, then make your way to the W platform, climb up, pick up Empowered Astral Energies, jump over the wheel and thereon on the second raised block. From here jump up to grab a monkeyswing, then get far E and use the jumpswitch.
You drop deep into a pool. Swim a bit E, but don't let the sinks carry you away; swim around the S structure and use the underwater lever to open the door you just passed. Enter and pick up the Silver Sphere for Secret #3 (14). Now let the stream carry you into the NW hole. Follow the tunnel, swim right to find the Empowered Wound Charms (equals the Uzis). Swim out in the other passage and get air, then quickly swim NE to climb out of the water since four sea hags are chasing you. Kill them from the shore. After you finished them off, dive down, pick up a Large Healing Potion and swim NW into the passage. Use the underwater lever to open the door, then swim through the tunnel, climb out.
Kill two sea hags and now push the four griffin statues on the four tiles in the middle of the room so that they face the water shaft, which is unfortunately always the farmost tile. When all statues are correctly placed the water disappears and you can use the chain to open a door in the previous area. Return there through the water passage, two sea hags attack you on your way back so quickly climb out again and you can shoot them if you like. Jump W and find a Small Healing Potion and the Bow in the NW corner, then jump back E and follow the E tunnel. When you come out of the dark narrow passage turn around and jump up to use a jumpswitch. Head further, climb the ladder to the left of the closed door and pick up Empowered Astral Energies and Light Charms, then use the NE jumpswitch to open the door below. Drop down and enter the passage. Kill two bats, pick up Empowered Astral Energies and follow up the stairs.
Shoot two bats here, then use the tightrope (only save when Lara is going forwards and always keep moving forwards) to get to the other side. Shoot the bat, use the right tightrope to get to the Gold Sphere (Secret #4 (15)) and return over the tightrope. Follow the passage, drop into the hole and follow the stairs a high hall with a staircase going around, avoid the fire trap just before the room. Head downstairs, kill four bats and pick up Light Charms, a Small Healing Potion and Empowered Astral Energies. Now head up the stairway to the top, shoot another five bats and open two doors in row with the Magic Sword. Shoot four golden griffins and open the S crowbar door. Follow the corridor and drop into the pool at the end. Here the two paths come together.
Right hole: Mystery Lever Puzzle (1 secret)
Drop onto the slope, then down into a dark corridor. Follow to an outside area where you can fight three golden griffins. In the pool is a Small Healing Potion. Search the area for the Bow, a Large Healing Potion and Empowered Astral Energies. Jump over the gap W and climb into the crawlspace, pick up a note called The Series of Levers which states:
The dragon is 3 places after the winged horse,
the basilisk is in the middle of the series
and the winged horse is 2 places before the basilisk.
The unicorn comes after the basilisk so many places as
those ones the centaurs are before the dragon.
And the griffin comes in the series before the unicorn.
Pull the levers in the right corner.
Note a raised block in the crawlspace, then return to the courtyard and now head up the NE stairs, go right for Light Charms and head to the alcove to the left of the stairs for Empowered Wound Charms. Head upstairs, kill four bats and there are two crowbar doors, but only the NE one can be opened. Do so using the Magic Sword. Use the lever to open the next door and kill the birdmonster. Pick up Empowered Astral Energies and step on the central tile (if you haven't done so during the fight) to open the next door. Follow the tunnel, use the lever to open the door to the balcony. Pick up Poison Arrows S and face the seven levers. You have a hint for this puzzle, but first you have to identify the various paintings, from left to right:
1. Winged Horse
2. Basilisk
3. Centaurs
4. Dragon
5. Winged Monster
6. Unicorn
7. Griffin
You have to pull all seven levers in a certain order, which you can get out of the hint. The correct solution is
7., 1., 3., 2., 4., 6., 5.
This raises some blocks down in the courtyard. Return there (either by jumping over the fence or via the passages you came from). Before you move the statue, again climb into the crawlspace where you found the hint. The block here has lowered too so climb down into the hole and pick up the Silver Sphere for Secret #3 (14). Now get out, head SW and push/pull the statue on the marked tile in front of the crawlspace. The other crowbar door in the upper room opens, return there and follow the corridor. You arrive in a pool room where the parts come together.
Paths Coming Together
In the NW corner of the area are 2x Explosive Arrows. Search the pool for Empowered Astral Energies and a Large Healing Potion, then open the door with the nearby underwater lever. If you have all three different globes, you can follow the tunnel. If not, ignore the following walkthrough of the bonus level - just climb the ladder in the NW corner (N wall) to trigger a cutscene.
Secrets: 3
Placing the Spheres
Swim through the tunnel until you can climb up a left ledge.
This is a bonus level: If you found at least three secrets in the previous level and three different spheres (a bronze one, a silver one and a gold one) you are allowed to explore the town and to search some artifacts and some secrets. When you will want you'll be able to go back and to carry on the game looking for Lara and trying to help her.
So in case you found three different Spheres place them in the hand receptacles and the door in the underwater tunnel opens. Dive back into the wet and follow the now open passage. Climb out at the end.
Getting the Torch
Head down the NE stairway and you might be able to lure the knight away of the horse so that he doesn't mount it and you can kill him directly, otherwise you first have to shoot him off the horse. Head NW and open the crowbar door with the Magic Sword. Pick up Empowered Astral Energies and Light Charms in the garden, then return, head up the E stairs and enter the next courtyard. You don't have the key for the keyhole yet, but SE you can pick up one Torch. Return all the way to the pool area where you entered this part of the town.
A Bar and the Gold Key
Head through the S passage, ignore the stairs to the left for a while but leave the Torch here. Go further in another large area. Kill the birdmonster and pick up Empowered Astral Energies NW. Exit this room again and now head up the stairs picking up the Torch again, arriving in a new large courtyard where you have to fight a total of five knights, one leaves Explosive Arrows. Leave the Torch again and head to the tree to the left (S) of the central structure. This one is actually a pole so you can climb it up and backflip onto the structure. Open the doors to the right of the throne to find the Bar. Now head down the stairs and open the doors to return to the last area. Find a passage in the S (coming from W) and open the doors here. Head up the stairs, open the first door and enter the bedroom. Search the chests to the left and right for Explosive Arrows and Empowered Astral Energies. Shatter an attacking skeleton and pick up the Gold Key it leaves behind, then exit. You might want to open the upper doors for a balcony view but there's nothing to do there, head back out.
Pillar Jumps
Go to the E doors to the right of the hallway where you entered this large courtyard. Open them and explore the pool for Empowered Astral Energies SE and a Small Healing Potion NW. After finding the latter two sea hags appear so avoid them and climb out of the water anywhere, kill them or not. Get to the S passage and get in the crawlspace in front of the stairway, use the lever at the end to raise several pillars in the pool room, but don't try to climb them from below. Head up the stairs, pick up 2x Empowered Astral Energies and a Large Healing Potion, then run to the higher part of the pool room, drop on the first raised pillar. All greenish tiles are safe so just don't touch the left red ones (deadly) and jump around the platforms in a counter clockwise manner until you reach the SW alcove. Use the lever to open another door in the large courtyard, shatter two skeletons and pick up Empowered Astral Energies from one of them. Get back out and make yourself out of this area.
Painting Puzzle
Now enter the open doorway NW. Head E and enter the next hall (there's nothing to be done in the entrance hall), pick up a Small Healing Potion and Empowered Astral Energies. There's nothing to do up the N stairs so head down S, pick up Light Charms and Empowered Astral Energies. In this puzzle you have to complete a painting on the floor of which only one part is fixed already. There are three yet immovable pushblocks in this room: One in the W wall and two high up in the N wall. Use the lever in the SW corner to "fill" the gap in the middle of the room. Now pull out the W block three times and push it once S. Now head up the passage behind the block. Use the lever to raise another block in the previous room. Head further, light a flare and push the first pushable to the right once (it's now standing on the just raised block). Head back, use the lever to lower this block again and pull the block twice S. You can check if the painting is correct by using the SW lever again, but be sure to use it again before going on.
Get in the passage (you can use the shortcut alcove for now) and E, pull the block here twice and use the upper lever again. Now climb onto the raised block back in the room, pull the block once here, go around it and push it onto the raised block. Now use the upper lever once more and get to the pushable, move it twice E and once S. Enter the upper passage again and go E to find a third lever. Use it to raise another block in the puzzle room, then push the nearby S block on it. Use the lever again to lower the block, get down and (for time saving reasons) push the block three times W, once S and once E. Now only one pushable remains, get back in the upper passage, find it N near the third lever. First use the lever, then pull the block out twice, go around it, push it on the block, use the lever again, then pull it once W. Now the S blocks is preventing you of placing it directly - simply pull it once E for a moment, then pull the sixth block S, finally you can move the other block back W and the SW passage opens (providing a way back to the large courtyard) because you've solved the puzzle. You can use the lever SW to see the results but it's not necessary. Don't go out but return to the upper passage where you found most blocks, NW a block has lowered. Use the lever to flood the previous hall.
In and Around the Canal
Return there via the SE stairs, a block has raised here so you have to run up the stairs and drop down into the room from the top. Swim W and climb up in the opening. Climb the right ledges and jump over the gap to a canal. Shoot a flying griffin and follow the canal E, dive in it and swim into another area. Quickly swim left and climb out to avoid two sea hags (shoot them from safety). Pick up the Gold Sphere. Now follow the slopes (jump them up where needed) clockwise around the room. Drop into the passage and climb the ledge for Secret #1 (15/16), Explosive Arrows and a Large Healing Potion. Dive back into the pool, get the Light Charms and swim back through the canal. Climb out, head back to where you entered this area and drop down the slopes here (don't pass the entrance!). Get into the N crawlspace, climb down on the other side and shatter three skeletons. Open the E doors, get on the balconies and shoot three knights. In the last E room are Explosive Arrows.
The Level from Above
Head back W a bit and see that one part of the balcony is more grey than the others, this one is shootable. From here you can now jump to the far S crevice. Shimmy left until you can drop down on a high ledge. Jump into the N caves, run up the ramps and pick up a Small Healing Potion. Climb the next ledges and use the tightrope to get to the other side. Passing a griffin nest run onto the slope, but soon after jump to grab a hidden ladder. Climb up and at the top backflip in a passage for Secret #2 (16/17), a Large Healing Potion and Light Charms. Drop down the ladder and onto the slope, slide down, pick up Poison Arrows, drop down further, pick up Empowered Astral Energies, go on, shoot the next flying griffin and follow the ledges around previously visited parts of the level. Use the tightrope and enter the building, in a NW alcove are more Empowered Astral Energies. In the NE alcove is a jumpswitch you can use. Dive in the pool, climb out on the other side, get up the stairs and the ledge and find the door you just opened. Jump onto the roof and use the NE jumpswitch to open more doors in a not yet visited area.
Lighting the Torch
Drop down and here three knights roam around, kill them and one leaves a Large Healing Potion. Here is the keyhole for the Gold Key, you can use it to open the main gates, but don't go in yet. Instead, head back W, down the stairs into the other courtyard, killing another two knights of which one leaves Empowered Astral Energies. Go W and you arrive back in the hub area, retrace your steps in the courtyard with the many doors where you left the Torch. Open the N doors, get the Torch and inside open the left NW door. Enter the cellar and light the Torch on the already lit one. Get out and open the nearby door, then light the fireplace carefully (don't stand on the same tile). A block lowers back in the cellar, so return there, get into the NW crawlspace to get the Bronze Sphere. Shatter a skeleton and drop into the gap created by lowering the block, then into the crawlspace for Secret #3 (17/18), Empowered Astral Energies, Light Charms and a Small Healing Potion. Get out and now head to the top stage of this building.
Silver Key, Griffin Egg, First Ocular Part
Open either E door, then go S and open two doors in row. Open the chest for the Bow, Empowered Astral Energies, a Large Healing Potion and a Book:
The first crystal was set in Feanor's Scepter. The second became the Smaragd Ocular and the circle will shine completely.
Another block in the cellar lowers - return all the way there, find the lowered block SW and in the crawlspace you can find the Silver Key. Get back out, retrieve the Torch where you left it and exit this building. Now backtrack all the way to the building you opened with the Gold Key, which is a pretty long path. Go right and find the doors you opened with the jumpswitch on the roof. Now light the two candleholders with the Torch, kill a knight and pass the open doors to find a Griffin Egg (does a bell ring?) and the first Ocular Part. Now return all the way to the hub area (the one where you climbed out of the pool).
Picture Puzzle for the Second Ocular Part
Head back down the NW stairs and go to the keyhole you saw ages ago, place the Silver Key here to open the nearby doors. Inside open only the left (N) door and ignore the other two, run upstairs and open the second right door. Open the chest for the Silver Sphere and use the jumpswitch above the entrance. What has happened? Run downstairs again and open the farmost left door - a block has lowered here. Drop down and follow down the spiral staircase into another puzzle room.
Jump on all the nine pictures, starting from the three griffins and ending on the basilisk. But your feet must track only four segments.
The quest is to safely pick up the item on the NE tile without getting killed by the spikes so you have to deactivate them. To do so, run over the three S tiles (from SW to SE), then off the puzzle pattern. Run N and spikes on the middle E tile appear. Roll on the tile and immediately off. Now run to the N of the puzzle, in front of the middle N tile and spikes appear here too, do the roll trick to trigger it too. Now go left in front of the NW tile to do the roll trick again, then W and do the roll trick a last time. Now run onto the first tile and jump to the central tile, the NE spikes are triggered off and you can run on it safely to pick up the second Ocular Part, which you can combine with the first one to the Smaragd Ocular. Run up the spiral staircase again, climb the ladder and exit this building. Head up the stairs to the hub room.
The Crystal
Do you remember the griffin nest you passed a while ago on the way to the jumpswitch on the building? You need to return there now, and it's a major backtrack because you have to do the whole sequences to there again, starting in the large courtyard with many doors, drop into the hole in the floor there after returning to this area, return to the flooded hall, climb out, get up to the canal, drop down to the crawlspace, pass the balconies, use the crevice and jump and climb up some more to the tightrope, use it again and... phew, finally you arrived back here. Place the Griffin's Egg in the nest so that mother griffin appears and gives you a Crystal (she's obviously ignoring you killed two of her kind on the way to the egg). Combine it with the Bar to form Feanor's Scepter. Use the slopes and drop down various ledges, then drop down to the hub area. When you have found the two main items and the three secrets, you can dive back in the pool and follow the passage back to the previous level where you can climb the ladder and trigger a cutscene.
Chapter 2: The Lord of Glorindal
Secrets: 0
Feanor Demon: Finally I'll be able to come back what I was and to leave the carcass I still fill! I'm a creature dwelling in an abyss where life's light never shines... I'm the horror! For thousands of years the beings living in this world worshipped me and other fellow beings of mine. They were chained by the power I gave them, they didn't realize I was actually feeding by their own spirits. Until at the end I totally wore out them and now they are completely disappeared. And so, when elves and humans arrived at these places I decided I won't have done the same mistake. It wasn't hard to appeal two of the most ambitious exponents of the two races. One king named Feanor and one warrior necromancer named Vanderghast: I offered them the power of my magic, then I made them ambitious, I appealed to the difference among their peoples and I led them to the clash. And when they met, in that time the joining of Elven magic and human hone, which both I had tainted, pulled out souls from all their followers' bodies and it trapped them in the Soul's Crystals, where they would have been worn out by the spell to open the dimensional gateway that would have been me allowed to enter into this world for good! But unfortunately when Feanor and Vanderghast realized what was happening, they understood the rate of their own insanity and when they watched my dark form they stopped fighting and they made a terrible sacrifice: They set free from their bodies all the magic I had given them and they totally destroyed this town, but they were saving the remaining kingdoms. And they trapped me in their own bodies and they enclosed me among these ruins for thousands of years. Till now! Thanks to this human woman who brings inside her tracks of Elven magic, to the magical things soaked with my power and to the Soul's Crystals the ritual will come to an end and I'll be able to go about this world freely and to conquer it!
Thalien: Don't make bricks without straw!
Take out a heavy weapon (preferably the Bow with Explosive Arrows) and shoot the Feanor demon; you can also use the Empowered Wound Charms and duck in front of him so that you don't get hurt, but be careful to not shoot at Lara because you will lose health with her. When the first demon is killed, a few seconds later the main doors open and four ninjas and the Vanderghast demon appear.
Vanderghast Demon: Chaos Riders, my emissions, catch that demi-elf! She could be very useful ---
Thalien: Vanderghast!
Shoot the ninjas with a single explosive and take care of the second demon as well. When you finished him off, a cutscene starts.
Evil Skull: Foolish! You have just destroyed the deadly bodies hosting me: I can't be defeated! I still exist everywhere stand hatred, clash and ambition: Sooner or later anyone rather crazy and long for power will think I'm the key to dominate this world and he will set me free! And I will conquer this world like the other ones where I existed! I have always existed and I will exist forever: I have all the time of the universe!
Thalien: NO! Listen to me, Souls of Glorindal! Your sovereigns are dead! You are free now! Get up, souls of Glorindal!!!
The souls are free and stream out of the palace...
Thalien: They tell that day many psychics in realms perceived in their minds something sounding like a song: The voices of spirits that had found again their freedom after a long imprisonment and they were singing their wish of revenge. And then another awful voice: The scream of death throes of the absolute evil. Then everything blew out and those voices were never heard in that age of the world.
Secrets: 0
Lord Lorac: What you have just told, Thalien, is really terrible, but luckily everything turned out for the best.
Thalien. I'm sorry to contradict you, Lorac, but the case hasn't still come to an end. In the treasure room I found many things taken away from Lara. Among those ones the magical artifact you had given her to protect her by spells. Well that thing hadn't any magical power! And the only possible reason is that you agreed with the dark entity to set him free!
Lord Lorac: How dare you? I'm the Regent of Elves!
Thalien: I dare, I dare. First you began carrying on secret excavations on the ruins dated back in the Elven Kingdom, then the Chaos Riders attacked one of our ships and an incident and a conflict situation between elves and humans happens, so you call Lara who is a human, but she has got the Elven Flame, on the pretext of having your bacon saved, but actually because the Dark Entity could complete the ritual to enter this world.
Lord Lorac: Stop this inference! You have no proof of what you're telling!
King: I'm the proof!
Lord Lorac: Sire --- but you ---
King: Shut up, Lorac! You originated my illness, by putting a spell on me as the Dark Entity had dictated you. You were trusting to kill me, but you have just been able to let me go in a coma. Because you are a shitty wizard and in addition you are a traitor!!! And my fool daughter had started to go out together with you!!! Thank goodness Thalien was here, my favourite granddaughter, my pride and my joy! Stop now! This jail will be your sentence and a warning forever to all traitors!
Some days later...
Thalien: Then, with the blessings of the Elves' King, Lara went back to her world. And I learned an important lesson: Lorac underwent an exemplary punishment, but he has just been a silly social climber. The evil isn't an abstract entity anymore when it meets hatred, ambition and thirst for power that cause clashes. At this stage it becomes a kind of a creature as monstrous as brilliant. But a genius has his own limits. One idiot, no.
Congratulations - you've made it through the game!
THE END