ZEITGEIST
Level by Drobridski
Walkthrough by Treeble
PART 1
The adventure begins as Lara falls into a pool near a cryptic message on the wall in a code we don't (yet) understand. Quickly get out and shoot the rat swimming around, then proceed to a small alcove near the strange glyphs and pull the wooden block in the back once or twice so that we can push it from the other side when the right time comes.
Turn around and enter the icy opening on the right side, beneath the open mouth sculpture, and kill a lion near the top. There's a small medipack hidden in an alcove to the left, and a door just beyond a series of spike traps to the right. This is a timed door, so it was in our best interest to get the lion out of the way now. Head back to the pool.
Before heading up the incline to the floor above, you can squeeze through a narrow passage just to the right of it for a large medipack. At the top, get the shotgun shells from behind the small pedestal and step on the break-away floor tiles beyond the railing. Once it's broken, safely climb down the ledge and grab the walkway below, populated by two rats, to find a lever. This is a timed lever and it opens the door we've just secured our path to, so throw it and make haste to the hole in the ceiling, jump and grab the ledge above, backflip off the slope and take a shortcut dropping down to the open mouth statue. Run through and stick to the right hand wall to steer clear from the spikes.
Make sure you cross the doorway in time, but watch out for the swinging axe right behind the door! Behind the pedestal is a RUSTY KEY. Retrace your steps to the upper level of the cave and notice a tall column at the upper end of the incline. Climb it and from the top you can jump to a nearby slope. As you slide in, a curious tune plays. Get the shotgun shells to your right and save your game.
Facing the passage to the left of the entrance, turn around and slide backwards, grabbing the edge at the end. Shimmy all the way to the left and let go, you'll fall in a safe spot amidst the spikes below, walk through the spikes to retrieve SECRET #1: a large medipack, and then climb out through the opening on the opposite wall. As you run down this tunnel, a boulder will come along. Roll and race back to the spike pit, jumping over it and bouncing off the slopes to grab the edge of the top one again. Keep jumping back and forth at the top while you steer Lara to a flat spot on the side, then glide into the upper pathway and drop to the tunnel below again, where only the darts should bother you now.
At the end, turn left and use your key. The door leads you right to the alcove behind that wooden block we moved in the beginning; push it all the way and make the long way back, climbing to the top of the spike pit the same way you did before and retracing your steps down to the pool.
On your way, you'll certainly notice that the three underwater gates are open. Let's do some side activities, then! Swim through the rightmost gate to get a small medipack. Through the glass, you can spot an underwater lever on the wall with a face (Plum Uncle's?). Swim back for air and now take the middle door and down into the hole, carefully swimming past the gnashing teeth. Take the SHOTGUN from the center pedestal and locate a narrow crack on the back left side wall, through which you get to that underwater lever we'd seen before. Pull it to open a timed door elsewhere, then go back for air.
Don't swim into the leftmost door just yet. Instead, get out of the water and use the wooden block to the right of the glyphs to shimmy to an opening on the left. Climb up and as the mysterious tune plays, rush into the open door on the right side for SECRET #2: the UZIS. Get out and take a look at the wall for the key we needed to decypher that writing on the wall!
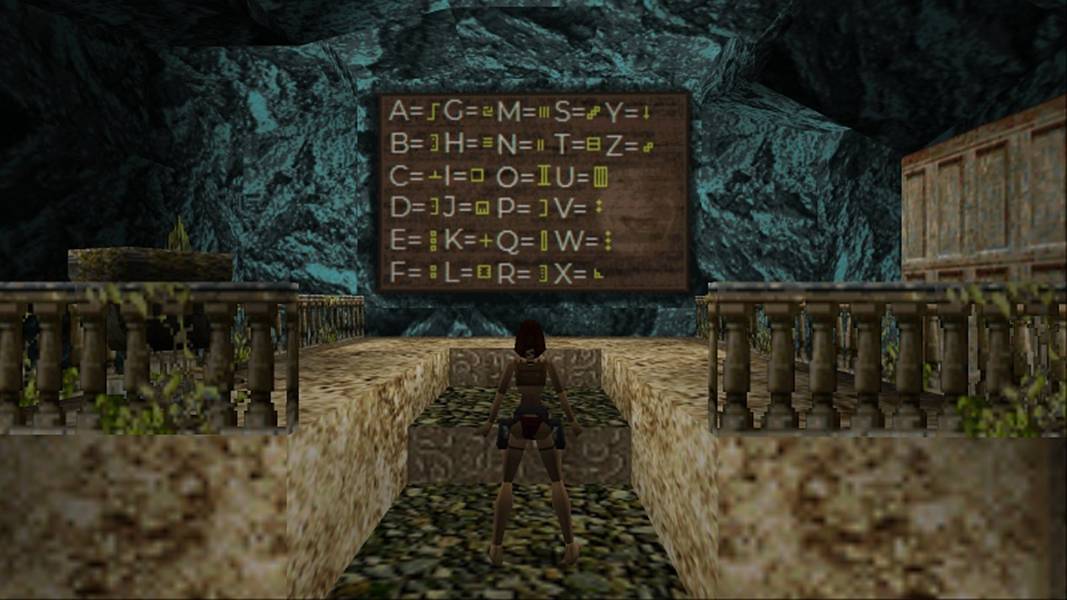
Back at the pool, we can finally crack the code. The ominous message turns out to be the directions we need to navigate the three-dimensional underwater maze in the leftmost door:
LEFT PATH
UP RIGHT DOWN LEFT
STRAIGHT STRAIGHT
UP DOWN LEFT RIGHT
RIGHT
I tried to map this area out but it was too confusing, so my recommendation is to make a separate save just as you cross the underwater doorway. The directions, starting on the second line, only begin once you get to the first junction (a characteristic tune will play):
Swim up, right, down the first hole, left (left) at the bottom; then straight all the way to the end, ignoring all four side passages, and up; swim around the bend and down the next hole all the way for the passage at the bottom, going down another level before you can take a left. Stick to the right hand wall as you loop around it to find a door which opens upon approach and takes you to the second part of the level.
PART 2
As you swim inside, another cryptic message right below an underwater lever. TRAIN YOUR BRAIN, it says, so that's what we'll do. Pull the lever to open an underwater gate, then swim to the chamber with many underwater levers and straight through the open gate to lure the crocodile to the next chamber. Get out of the water to a dry passage above and save your game.
Run across the passage and drop on the other side, right on top of the first lever and pull it again. If you're lucky, the gate will lock the crocodile away (the camera is placed within the room with underwater levers; if you're not seeing the crocodile, you scored! Otherwise, reload and try again, maybe dropping into the water to try luring it again before rushing through the dry passage.)
Now that the area is safe, you can proceed to pull the eight(!) underwater levers on the chamber to open two large doors. Swim back for air as needed, then through the open doors to emerge on another pool. Get out of the water and face the pack of primates, then scan the area. In addition to a door with two locks, there are four gates tagged with faces above them, a fifth doorway leading to a row of five levers, and some rocky stairs leading up.
No doubt the huge glyph stone caught your attention, you can check the footnotes for a translation. In the room with five levers, first activate the fourth lever (always counting from the left) to open the door near the stairs. Head inside and find a push block in the back, drag it out of this chamber.
Without resetting lever four, throw levers one and five to open the other door near the glyph stone. Push that block inside this new room and use it as a stepping stone to reach the RUSTY KEY up in an alcove. If you want a secret later on, bring the block back outside, otherwise just leave it be and move on.
Return towards the pool you came from and you'll see that both gates on that side are also open. Take the one of the far side first. As you cross the doorway, you'll see three rolling boulders. To safely avoid them, just run around the room sticking close to the right hand wall and stop shortly after the wall switch. Save your game.
This switch is timed and opens a gate inside the other passage near the pool. Quickly go there and run over the first set of break-away tiles. When you get to the second set, one of the tiles falls ahead of time, so when you reach the middle of the path you'll want to jump to the gnashing teeth and then quickly get past it and through the open door.
Get the second RUSTY KEY and get back out, the locks are right in front of you. Inside, run towards the wall of faces and claim the GOLD KEY, a camera shot shows the second blue door in the room with the glyph key opening, and on your way out the centaur statue comes to life. After dealing with it, you can claim that secret we spared the push block for.
Head back to the room with the levers and deactivate lever one (ie. levers four and five remain down) to open the door where you originally found the block. Push the block inside and use it to reach a high alcove near the entrance where SECRET #3 lies: shotgun shells, hooray. Return to the previous run and now finally head up the rocky stairs.
At the top, hop over the water pit towards another message (check footnotes for translation if lazy). Step on the short incline nearby side step so you are touching the sandy pillar on your right. Backflip and keep the jump button held down as you steer towards the slope at the top of the pillar and negotiate the next two jumps to land into a small corridor containing SECRET #4, a small medipack.
Now finally dive into that water pit near the last set of glyphs and swim through the open doors to return to the pool the level began at. Another centaur statue will be taking pot shots at you, so quickly get out of the water to obliterate it and also the primate which might want to capitalize on the moment. When you're in the clear, use the wooden block to shimmy into the opening above to find the second door now open.
Walk into the light to finish the level.
_____
Footnotes:
1. The glyphs in the area with five levers read:
POLITICS RELIGION
LOVE OF MONEY TOO
ITS WHAT THE WORLD
WAS BUILT FOR
NOT ME AND YOU
2. The glyphs just before the water pit read:
IS THIS THE WORLD WE CREATED