SECRET
OF THE SKULL TEMPLE.
Multi-level game by abbath81.
Walkthrough by G&D Productions
Not going for Secrets?
You can skip the dark blue parts.
Be careful, in this game you only have
limited ammo for the pistols.
Level 1 – Into the Jungle.
1 Secret.
Lara dismounts the bike and slides down.
2
Small Cogs.
First go left around the tree and find Pistol clips at the rock face. Go
straight W to a little tree and in the plant are Flares. Follow the valley
along the right hand side and come to some pillars,
grab up to the rocks W, pull up and back flip onto the short pillar, jump to
the higher one and then S to grab the plateau. Go right, jump to a small corner
ledge and then to the Next where you’ll find a floor
lever. This will open an underwater door in the tunnels to the Cenote.
Jump back the way you came and hop down to the pillar,
safety drop down. Go W a bit and right to a pedestal with a small medipack.
Go right to the big face on the pillar (W) and just right
of it is a hole in the ground, a Cenote. Hop in and grab Small Cog #1 from the bottom. Get air, swim into the tunnel S, left
and around a corner. Left again and in the end of that tunnel is Shotgun ammo. Roll and swim back.
For a Secret, look up there for a tiny
tunnel right, at the ceiling, get in there and climb out to claim Secret #1 (1), the Sun
Dragon. Get out of this tunnel.
Keep swimming left and near the end of that tunnel go
up to where we the trapdoor we opened, climb out. Go E and bump into the rock
wall in front, grab up to that. Run jump grab NW to catch on to the monkey
climb and follow straight to a tall pillar with Small Cog #2. Drop down and go E, into the next cave and up N into
a small side cave, shoot the snake and get the Uzi clips from the back.
Now go to the W end of the valley, left is the pillar
with the face, on top of the pillar are Uzi
clips, you can jump grab up there from a slope behind it. Drop down, go to
the W slopes and follow to the N and left is some Shotgun
ammo under a plant. In
the NW corner is a gate, shoot the snake and place the two Cogs in the
machinery to open the gate.
Follow through and slide down…
Level 2 – Three Towers.
3 Secrets.
Coming out of the tunnel you’ll
get a flyby of the Valley.
First a tour for some pickups and the general layout,
there are some nasty Owls around, I won’t mention
them. In the grass just to the right
are Pistol clips. Walk to the edge and safety drop down
to the valley floor (or follow the path SW down), go
NE for 2x Pistol clips behind the 2 boxes.
Go W from there and at that yellow tree, go right up
the slope against the rock pillar, with a right curved run jump you can get up
into a niche with Uzi clips. Slide out, keep going right around into
a tunnel to find more Pistol clips
in a niche right.
A
Shotgun.
Go to the slopes opposite the niche where you found
the ammo, climb up (N) onto a path along the slopes, right a bit and grab up
once more, to the right you can spot a gate. Go left and at the end hop over to
the path NW, right around is a Timed lever for that gate. Pull, hop back twice and hop to the path towards the gate, you have to pull
up onto the higher path a bit further, then get into the gate fast and grab the
Shotgun (Yes!!).
Out of the gate, drop down to the lower path again, and further down to the
ground.
Tower
I, a Crowbar.
Head W keeping along the right hand
slopes, in the NW corner of the Valley are Pistol
clips in a fern. Head further S and right into a cave with green crystals,
shoot the spiders and grab the Flares.
In the back is a rock you can pull aside to get the Shotgun ammo and Pistol
clips from underneath. In the S wall is a crawlspace, grab up to a slope,
shimmy to the right and pull up, back flip and jump back with a right curve to
end up at a gate. There’s one torch that has to be
ignited, so keep it in mind, we’ll be back. Hop up into the opening left of the
gate, follow the tunnel to a plateau and go right into the next tunnel. In the
wider part are Pistol clips in the
fern left, you’ll reach another plateau, grab up right
up to the higher path and enter the Tower. Go right and down one of the chains
to the lower floor, shoot the pots NW and grab Shotgun ammo. Now go use the floor lever in the other end of the
room, a hatch opens up. Shoot the two Natives of which
one will drop a Crowbar. Go up to
the higher floor again, up the chain there (7 grabs from the floor) and back
flip onto a ledge. Hop to the break tile and jump to grab the ladder under the
hatch you opened. Back flip off and in the corner left of the window is a
contraption that proves to be a Crowbar lever. It will open a gate* near where
we got the Shotgun. Shoot the pots right for Pistol clips.
Go down the ladder to the bottom and back flip off,
out of the Tower, to the W end of the path and drop down from the side. Get
back to that cave in the far NE corner of the valley. Climb up to the N paths
again and go towards the gate (Shotgun), drop from the side to the path below
and go along the E side and jump to the path S. Follow to some hanging plants
and hop into the tunnel behind those. This is where that gate* opened. Follow
through to a plateau. On the ceiling is a dark surface, grab up to that and
monkey swing to the end, Lara will automatically turn around and go up the
ladder. On the plateau above, a Native will attack. Go E and just before the little tree below right, drop down to the
path below, jump SE to get some Shotgun
ammo there. Jump back, run jump down W and hop left around the corner, grab
up right. Grab Pistol clips from the
grass on that ledge and grab up (W) again to the upper plateau.
For a Secret: Turn around and hop S,
follow to the end and turn around facing N, stand
against the rock wall and hop backwards off the ledge, slide and grab the edge
of the ridge, shimmy right to the end where you can pull up and find Secret #1 (2), the Valley
Dragon. Shimmy back left and at the end drop/grab the crawlspace, get
through (this is where the Uzi clips were). Grab the crack N and shimmy left to
the path, climb back up N at the tunnel entrance.
Tower
III.
Follow the ledge to the end. Run jump and grab the
Tower N, pull up and follow through, where the camera changes, hang and shimmy
to the left, pull up in the corner and hop up to the triangle ledge. Then jump
up onto the protruding ledge. Shimmy left to the other corner again and grab up
to a crack in the wall S (near the left corner). Left around and drop in a niche, run jump without Ctrl to the S.
Grab up to the top of the cliff and go get Pistol-
and Uzi clips S, drop back down from
the E side. Go over the bridge to Tower III.
For a Secret: As soon as you step in,
grab up to the ceiling and monkey swing to the other end where Lara will
transfer to a climbable vine, go up to the top of the Tower for Secret #2 (3), the Sun
Dragon. Climb back down and drop.
Jump over a gap in the next bridge and end up on the E
side slopes. Go up NE to a yellow
tree and find some Flares in the
grass, to the left are Skull spikes. From
there go S keeping to the high path along the slopes and find more of those
pikes S, a Native attacks and he will drop a Medipack. A bit further on (SW), in the grass is Shotgun ammo.
Return to those Spikes N, go left (W) and keep right
to get behind that big cliff, down a slope and keep going along the right hand wall, jump and grab the ladder block, left around
and up. Then back flip/roll and grab the ledge, enter the structure and on the
back of the NE pillar is a lever opening a gate** we might have seen at the
start. In a vase SE are Pistol clips,
shoot the Native, there are also some spiders around.
A
Torch.
Go down the steps W into the Spike pit.
On the second step, climb down SW and
get Secret #3 (4), the Mountain Dragon, climb back up.
Stand right facing the far break ledge and run jump
there, hop and grab into the niche in the back wall, get the Torch left. Run jump to the remaining
break ledge and a running jump over to the steps. Go up, hop up to the floor
and go outside.
Run jump straight over to the S, go left and up the
sloped path (E ) behind that structure again. Right
and follow the slopes back to that broken bridge, throw the Torch down and keep
track of where it ends up (probably in the niche with the small medipack I missed). Back up the
slope E and right where you can drop down onto a plateau below (where this
level started), go S to the paths on the S rock wall, to the W is the Tower
where you opened the gate**, we’ll go there later.
Ignite
the Torch.
First go down the path and go get the Torch (and that small medipack),
take the Torch to that path up the S side and go W to that gate, jump in and
carefully run down onto the floor below, out the W side and out on the path run
down right. Go into the tunnel W, right and follow to the outdoors again, left
into the next tunnel, around a right corner and be careful at the end where you
see some light. Hop out left, not to end up in the shaft with the slopes.
Ignite your Torch and then burn the wall torch to open that gate, slide down…
3 secrets.
Turn right and go to those poles near the green
crystal and grab the Revolver from
next to the skeleton, two Natives appear. A little dark grey box nearby will
break when you shoot it, but it is empty, the ones SW however have Pistol clips. SE are more of those
poles and some bats too. There’s one box you can
shoot, it contains Flares and Pistol clips. Well, that’s as far as
the Torch will go (in case you took it with you)…, hop
into the water.
In the far NW corner are Pistol clips, SE are two tunnels to choose from, the left one goes
around left and there are Pistol clips
to be found, you’ll get back to the Main cave. Now
take the tunnel SE and against the S wall.
It turns right to a large cave with a statue on an
island. Wade up and pick up some Revolver
ammo, then get the Laser Sight and
two Crocs show up. Go to the statue and a message appears “When Evil’s Eye no longer sees, Angel’s Light shall show
the way…”
Evil’s
Eye.
In the water, hidden in a plant SE are Flares. On a ledge W, are Pistol
clips and some more Pistol clips
on an underwater ledge near where we entered (NE). Get back up onto the island and walk to
the water’s edge W side. Turn right (N) and spot the red gem (Evil’s eye) and
shoot that after saving (if you miss you can reload). The Light of the Angel
shines on a Jump lever NE.
The
Jump Lever.
To get there, swim down into the NW corner of the
cave, follow the tunnel and in the end up through a now open trapdoor, get out. Follow out to a ledge along the water
and first go left (E) to the end and right down to a lower ledge. Standing
against the rock face left you can run jump down and land on that corner ledge
with the Shotgun ammo. Stand in the SE corner, face N and run
with a 100 degree turn left and jump back onto the ledge (or make your way back
through the water). This time go W and left along the wall to the S and after a
jump you’ll see a ladder. Run jump with a roll onto the slope, jump and grab the ladder, go
up and near the top back flip off onto a ledge. Up the Ladder there and Lara
will step off by herself when you hit the left key. Sprint down that ledge and
left around the corner, follow the plateau using the flatter parts.
When you hit the E wall, there’s a plateau up right, you can grab up in the corner,
go get Secret #2 (6), a Sun Dragon. Drop down.
Proceed N, jump over to the grassy ledge and follow to
that pillar with the ornamented corner. Hang from the edge of the ledge and
spot the jump lever. Drop to operate that and turn right after hitting the
water, find the low tunnel left where a gate opened.
The
Underwater Cavern, Blade Traps.
Surface first to get air and dive in, keep going right
and find an underwater lever which will open a trapdoor*. Now swim going
straight (E) and then left around the corner in the back, immediately to the
left is a small medipack
and up above is an air pocket allowing you to get air. Face E, swim down and
left/left (at the next crossing straight ahead should be the lake entrance)
take a right, keep going a bit right/left to the N and just before a Blade turn
left to come to some Pistol clips on
a side ledge. Swim W there, left/right and up for air
Down again and keep left and find Uzi clips in the plant in the NW corner of the Cavern. Go right
around the corner and come to the only Blade you have to
conquer, go straight E and right around the corner to find that open trapdoor*.
Climb out, and SE and in the S part is that air pocket
where we got air before.
Timed
Fire Run.
Make your way up that central rock from the SE corner
of it.
From the second flatter part, turn left
and hop over the steep part to the path W, walk around to Secret #3 (7), a Mountain Dragon. Walk back and hop E.
Face N and hop around the right hand
side where you can grab up even higher to a ledge above. Go up to the top.
From the top of the rock, run jump N and grab a crack
in the hanging rock. Go left around to a ladder, down and back flip to the
ledge N. Two Timed levers there and along the E wall are ledges with spikes and
a burner. The left lever shuts down a burner in the S end of the cave. Pull
left, get to the other one fast and use it, roll and
time the popping spikes on the first ledge to jump to it and do a running jump
to the burner ledge, a hop to the grassy ledge and wait a bit to time the
spikes, run jump to the ledge and sprint through the second burner at the S
wall. Hop up into the SW corner and grab up to a crack, shimmy right and pull
up for Revolver ammo. Drop down and
run jump N, once more and you are at a Zip-line through the Angel cave. Ride
the zip line and run through the dark tunnel…
Level 4 – Dino Temple.
3 Secrets.
Go left and in the corner from the high
ground you can grab the monkey climb ceiling, follow to the end and then up the
vines to get Secret #1 (8), a Sun Dragon. Hang from the vines and back flip onto the ledge N.
Without the Secret; jump over
to the ledge N…
Hang from the edge and shimmy right past the pillar to
get the Shotgun ammo there. Go along
this ledge to the W, or slide down somewhere and run
up the sloped cave, shoot 2 bats. When you emerge from the building, look up
left in the SE corner, there’s an opening we’ll need
to go to later. Follow the valley and some tiny raptors attack. In the grass SW
are Pistol clips. Go around the corner into a foggy cave
and shoot some more raptors. In the fern in the den where they came from are Pistol clips.
Jump
lever for the Temple Door.
Head down N, near the bottom of the sloped path and
right around at the tree are Flares,
two more tiny raptors attack, in the cavern they came from (N), are Uzi clips. Another tiny raptors will show up. Go back up the slope SE a bit and left
around up a path, through a hole in the rock. At the end, near the small tree,
run jump up left around the corner onto a small ledge. Stand jump/grab the
ledge N, turn right and run jump up onto the ledge E
(right a bit) and at the end of that are Pistol
clips.
Without a Secret: Walk down S and run jump/grab the
plateau, shimmy right a bit and pull up.
With a Secret: From the Pistol clips go
back a bit and hop up right onto a corner ledge (NW), turn right and hop up NE,
walk right to the tree and stand jump SE to the fern, grab Secret #2
(9), the Valley Dragon. Run jump as
far as you can to the S turning a bit left, so you can grab the edge of the
slope, shimmy right and at the end pull up and back flip/roll steering left to
land on the plateau (you may have to grab the edge, shimmy right and pull up).
From the SE corner of the plateau, jump/grab up to the
ridge E and shimmy right to a jump lever* hidden in a plant, the Temple door opens up (for later).
The
Cave, Elephant Key, open the gate to the Uzis.
Once more follow the path N, go up as before to grab
up to that ledge up N, step left a bit and grab up the rock face N. Go left,
hop up right to the dark ground against the rock face and proceed, seeking out
the spots where you can stand, to get to that yellow tree where Lara looks left
to where that Temple door opened. If you want a small medi,
slide down backwards just after the yellow tree and get down onto a ledge with
the small medipack,
there are also Pistol clips there.
Make your way back up by jumping to the ledge NE with a left curve and climb up
N again, go to the yellow tree. Follow the slopes carefully, there are more Pistol clips in a fern right. At the W
end, hop down onto the ledge with the tree and grass. Walk down W and look
right around to spot a cave entrance, run jump down there and get in.
For a Secret, go straight to that grass
S, crawl underneath the rock and get Secret
#2 (10), the Mountain Dragon.
Head straight S and right/left to the cave entrance.
Slide down backwards and go SW to that skeleton, get the Uzi clips, hold Ctrl so Lara picks up the Shogun ammo after the cut-scene, shoot the Raptors. Then go into
that Raptor lair (SW), climb up the ridge and grab up left (W), shimmy left and
pull up at the corner to get Revolver
ammo. Drop out, roll and run out.
Go E to the Temple wall, SE near the tree are Pistol clips, go to the left corner
(NE) and go down onto a lower ledge. Hop to the corner of the rock and then to
the grassy ledge E, follow right around to a tree and hop up W through the gap
between tree and wall. In the grass on top of the rock are Uzi clips. Go down N and safety drop from the ledge. Go under the
Temple where that gate opened, go in and get the Uzis.
Into
the Temple.
Go out and right around, go up the dark slope (SE) to
the foggy cave, left around the structure and at the E end where you have the
cave left, look up right to spot a crawlspace in the corner. Grab up there and crawl in to find a
ladder, climb up and right. Pick up a Medipack and run jump with a left curve down to the grassy
ledge left, go along that ledge, I thought a shimmy was the easiest because of
all the steep parts. You’ll reach the W side hills. In
the first fern are Pistol clips.
Head S into a cave and shoot two tiny raptors, there’s a spike trap in there,
so keep hugging the right hand wall and in the back
are Uzi clips.
Go back out minding those spikes and loop left up the
rocky path SW and then right passing through the gap N, keep left along the
upper slopes and through a tunnel where you’ll find
more Pistol clips. Out the other end
and down the slope a bit, to the left and run jump over a steep part to the N
to find Grenades and Revolver ammo there. That’s it for
this side, turn back, jump back over the steep part (or grab the edge in case
you miss the jump and shimmy left to a niche below and pull up there). Go S along the left side of that big
rock (with the tunnel) to the rock SE and keep going E along the high part of
the cliff that connects to the Temple. At the trees do a hop down left (NE) to
the stone path underneath the trees, walk forward and hop over the steep part
to the Temple wall. Follow the ledge N and in the second niche are Pistol clips. Go back and use the slope
S to back flip/jump and grab the vegetation under the ledge above. Go to the
end and around the corner you can drop. E and around the corner are some Flares, then enter a Puzzle room in the
Temple (the Gold door was opened by the jump lever*
earlier). A flyby will show you symbols on wall and ceiling.
Make a note of the symbols (the 3) on the wall next to
the two gates S and the one on the ceiling (the 4). There’s
a block in the W wall, pull it out and aside to get a clue. Use the block to
get up to the ledge above and vases NW have Pistol clips, the ones NE a small
medipack.
Get back down and find the two spots where the symbol
clue on the ceiling connects with the symbol clue on the wall (there are two
instances, one for the left wall clue and one for the right wall clue), get it
right and the bottom gate S opens up. Before you
leave, pull that block out of the wall for a Timed run later (in case you
pushed it back in).
Go through the gate, nothing in the vases, but 3 tiny
raptors come greet you. Out E and
down to the right is the cave where we passed through before,
but run over the ledge SE and shoot vases for Flares. Go back and out N, over the ledge left (shoot a raptor) to
get Uzi clips from the fern left.
Back inside and open the gate E with the Elephant Key. Vases left have Uzi clips and on the pedestal in the
back is a nice little bonus, the Grenade
Gun. Walk back out and from the steps you can do a run jump and grab a thin
ledge up W. Go to a spike trap. Time
the popping spikes and run on when they go down, immediately walk slow through
the static spikes and go to the Timed lever. Pull, roll
and walk through the spikes, run to the end of the ledge, roll and grab the
edge to drop down, sprint W and right through the gate to the Puzzle room, jump
on the block, onto the ledge and get through the Timed gate S. Run over the
rock bridge, into the dark tunnel and slide down…
Level 5 – King’s Lair.
2 Secrets
Turn around at the end of the tunnel and do a safety
drop down to the valley floor. Turn left (N) and go to
the corner, left around into a narrow gorge, step down into the lower part and
shoot a couple of tiny raptors, notice the gate W and go back, climb up the
ridge and turn right to grab up to the steep block. Pull up and back flip to a
ledge, walk up E a bit and turn right at the point where you can run jump and
grab the rock S. Walk left a bit and turn left, run jump
and grab the plateau E. Walk up to the E wall and turn left.
Opening
the Gates.
You can see a crack in the rock wall N, covered by
leaves. Run jump and grab that crack, go left around till you can pull up in a
cavern, shoot a tiny raptor and go get the Revolver
ammo and Pistol clips, 2 more
raptors show up. Run jump out, landing back onto the plateau and run jump to a
ledge S, then jump into that opening S. Inside behind the crates are Flares (you may have to duck), then get
through the blade trap W, run jump over to the W ledge and go to the right end
(pick up Uzi clips from the grass). Run jump N landing on the far side of
that corner block, so you can jump off right and land on a rocky plateau, climb
up left and use the floor lever to open a gate*. Down to the plateau and run
jump SW with a right curve and Ctrl to land on the path in the rock face and
find another floor lever left, this one will open an underwater gate**.
Get out of the pool and right around to that cave we’ve been in before (from the other end) and in the W wall
is that open black gate*. Go through to the Valley with the Round Door. Left
around, at the yellow crystal is a box with Shotgun ammo. Left of the Round Door is a Medipack and right (NW) are Grenades. Ready yourself and throw that
lever to open the Door, a Big T-Rex (the King) comes out, stay close under his belly and shoot it. It will leave behind a Guardian Stone.
Go into the King’s Lair and all the way
in the back, in the grass is Secret #2 (12), a Mountain Dragon.
Back out and to the crates SE, just
right of those is a hidden passage in the wall (vines), go through and
hop on a block right for Pistol clips. Then go use the Guardian Stone right of
the gate, go through…
Level 6 – The Skull Temple.
2 Secrets.
Hang out of the tunnel, drop/grab the crack and shimmy
left around into a cavern. In the
passage NE is a Snake and in the cave behind that is a crate (right hand one)
with Pistol clips. Back to the
cavern, run jump SW onto a ledge, standing on the higher ground, grab up to the
vegetation and go forwards to the edge and up a ladder to the cavern above.
Shoot a Snake and not the empty crate. Go through the tunnel S and at the edge
of the ravine, safety drop down onto a sloped rock, grab the edge. Pull up,
back flip roll and grab the top of the very tall
pillar. Run jump E with a bit of a right turn to jump off and grab that crevice
right. Get in and hang from the right hand side, shimmy right around to drop onto a ledge. First go W to get the Pistol clips from the grass, turn back
and go through the crawlspace.
For a Secret: When you exit the tunnel,
turn around and grab up to the vines, climb up onto the ledge. In a fern is Shotgun ammo and up on the ledge SW is Secret #1
(13), a Valley Dragon. Get back down
and climb down the vines E.
Run down to a lower ledge at the end of the path and
stand jump down onto the pillar N. Run jump onto the sloped pillar NW, just let
Lara slide onto the next one and then jump to get to the third, a last moments
jump to grab a ladder ahead. Go up to the ledge, left is a Timed Lever opening
a gate.
Pull, back flip/roll and run into the passage NE, at
the end grab up right and hop over a spike trap, grab up left to a crack, go
right around the corner and pull up right to where that gate is, get in quick. Be careful once through the gate… Run
jump to the far end of the dark ledge sliding off backwards and grab the edge,
find the crack below and drop/grab down, right around the corner to drop at a
long tunnel. Go up and you arrived at the Skull Temple. To the right you can do
a run jump up into a niche with Grenades.
Back to the ledge and over the bridge.
In the Skull’s mouth is a Big
door we’ll have to open… Go left (N) to the rock wall, hang from the edge of
the cliff (NW), drop and grab the edge of the slope.
Detour for a Secret: Drop and slide/grab
once more, hanging from the edge you’ll see an opening
below, pull up and let go, just after Lara passed the edge, use Ctrl to land
inside that opening. Climb up the roots in the back and shoot the two spiders
when going into the next room. Run over the corner of the break tile left (near
the ladder) to get to the pedestal. Grab Secret #2 (14), a Mountain
Dragon. Hop back into the pit where you broke the tile and get the Uzi clips. Go up the ladder, back
flip/roll onto a slope, jump twice to get on a ledge with vases, there are Pistol clips inside. Climb into the
tunnel W, safety drop out the other end. Hang from the edge of the cliff (NW), drop and grab the edge of the slope.
Pull up and back flip/roll to grab a block, jump over
the gap and go up a ladder, from the
top a back flip roll and a stand jump grab up to the next block. Grab up to the
vines, turn right near the outer edge and go forward to transfer to a ladder.
On top of the ledge go E and run jump over to the E ledge, through a crawlspace
and grab up left on the dark bricks, pull up, back flip
and jump again to grab the passage above. Slide down and you are in the Eye of
the Skull. Slide down to the Nose and turn around to find a lever. That big
door in the Mouth opens up. Slide forward down (N) and
grab the edge of the slope you’ll land on to safety
drop down. Go through the Big Door and run into the darkness (into the throat)…
7 – Temple’s Secret.
2 Secrets.
The level is pretty linear
once you know the route, this is how we did it…
Hop through the opening in the wall into the Main
Hall, look left and right for vases with Shotgun
ammo and Pistol clips. NW is a
closed gate and when you go to the opening NE, a Horseman will come out. Upon
entering again a second one will appear (or they may
attack together). For now go straight through the
chains (there’s a room right I chose to go to later and first go for items we
need and the general layout), to the far end and left around the corner is a
gate to a Lava room, above the gate is the number
3. Proceed through this passage and around the corner another Horseman
shows up. In the S end you’ll come to that closed gate we saw,
you can open it with the chain (shortcut leading back to the Main Hall you can
use later). A Skeleton appeared, you should have the
Grenade gun… Otherwise you will have to take him along
with you to the next part where you can shoot him into a lava pit, or shoot him
in the head with the Revolver.
Horseman’s
Gem 1.
Go through the opening W in
this passage, keep right to that purple light from a crystal and pick up more Grenades. A Skeleton awakes. Going
back, go right around the “wall with the claws” to the S and another Skeleton
wakes up, you could take care of that one by shooting him down into the deep
lava room S. Go there, follow the ledge left around (mind the gap) to the back
and get a Medipack
and Uzi clips from a higher ledge.
Return to the N and up N to the wall with the claws.
The
Block Puzzle, Horseman’s Gems 2&3.
Go out W and right around the corner, at the end of
the slope is a pool room right, the pool is empty… We’ll
do something about that later. Go
straight and come to a hall with a push block. There are some vases, only the
one SW contains Shotgun ammo.
Secret Detour: In the W wall are stone
carvings of Lions, go the left one of the 3 and grab up into a hidden passage,
crawl out onto the ledges above the Pool, to the right, hidden behind that
Phoenix statue is Secret #1 (15), a Mountain Dragon. Go back to the Hall with the Pushblock
the way you came.
Pushblock.
On the floor are Fire tiles, they are deadly and the block has to go onto the skull. Push E once,
pull S once, push W once, pull W once, push S and move it onto the Skull. A
gate opens and two Horsemen show up, one leaves a Horseman’s Gem (2). Go down S into the next hall and a skeleton
wakes up.
Sword
Walk.
In the room down W, where that gate opened are Swords
on the ceiling waiting to kill you. Find the path to that pedestal in the far left corner and grab the Horseman’s Gem (3).
Behind the short column N are Uzi clips,
you can take them after the Sword fell by crouching (sometimes not). Leave the
room, back to the hall with the Pushblock and up a
ladder in the far right corner (NE). Back flip off.
The
Math Puzzle, opening the Gates.
Up the slope and in the N
wall is an opening, get in and grab up right. You are in a room with numbered
levers, in the left vase at the doorway are Pistol clips, all other vases are empty. In the central “green”
room is an equation on the wall, stepping on the “clue tiles” underneath will
show gate 3 and gate 6.
Gate
6, Lava Dungeon I.
Each combination has the 4 as a constant, so the 4
(lever) can be pulled down and stays down. To get the 6 (easiest to go there
first) result we need 3/4/6. You can step on the right hand “clue tile” under the equation to
see if it worked… Go out of the room
and left to the Main Hall, loop right around into the shortcut gate and then go
left, we’ve been here, go straight down into the
sloped passage, right/right and right around the corner is gate 6.
From gate 6 follow the passage and come to a ledge
overlooking the Pool Hall. Run jump right into that opening in the wall. A huge
Lava Pit with break ledges, hop to the right hand
corner of the first, a running jump curving left/right to the next so you’ll
have enough space on that one to do a running jump to the next, another curved
running jump onto #4 near that skull on the wall, side flip right into the gap
in the pillar.
Boulder
Alley, Filling the Pool.
Go right and a skeleton in the corner gives you fair
warning… Up the slope some boulders are released, sprint back and around the
corner. Back up and right around is the next trap, keep ahead of then while
jumping over a pit and run left around the corner and come to something
similar, only upslope. If you’re fast enough, you can
jump/grab over the pit and wait it out. You’ll come to
a room with a gate and a lever right next to it. Pull the lever, it is #1 to
fill the pool, the gate also opens up. Go through the
gate to the pool room and loop right around the pool to another gate you can
open with a Horseman’s Gem. A Horseman comes out, shoot him. Inside the room is
lever #2 for the Pool. In the W end of the Pool room in a vase NW are Pistol clips.
The
Laser Skull, the Crystal’s Base.
Hop into the pool, you can now reach that opening E,
go past that gate* and up left. The
chain pulley in the back is to open that gate* you just saw,
that gate is for later. Left is a room with a Laser Skull. Keeping close to the
wall, walk right (the entrance will close) and first grab the Revolver ammo and have that gun ready
with the sight. Approach the Skull and it wakes up, maybe if you’re
fast, zoom in, you can shoot both eyes while he’s charging up. Otherwise side flip and aim again. Go get the Crystal’s Base, push the block SW to
the block in the niche, so you can pull that one out once. Go behind it and use
the chain pulley to open up the entrance gate again.
Go out and right, over the block and left through the gate. You’ll
arrive back in the hall with the Push block puzzle. Go right around and to the
NE corner, up that ladder to the floor above, up the slope NW and into the
opening N, grab up right into the Math Room.
For
Gate 3, Lava Dungeon II.
Using levers 2/4/5 will give an outcome of 3, so 3
back up, 2 down, leave 4 as it is, pull 6 up and 5 down. Check the left skull
tile to see if gate 3 opened. Go out W, right into the chain alley and left in
the back to get to the now open gate 3. Stand against the left wall at the
edge, wait for the blade to pass and do a stand jump onto the nearest block,
run forward a bit and hop to the block near the axle the blade is turning on,
forward a bit and wait for the moment to hop over the blade to the next and
another hıp to the one S, landing on the right
hand side, so you can turn left and run jump (when the moment is there) to the
block E and stop at the far edge. Turn right and jump to get to the ledge S. Up
the ladder left and into a dark tunnel, grab up right and you’ll
end up in the upper region of the Main Hall.
Hop over the gap to the beam and keep left to come to a gate you can open
with the 2 remaining Horseman’s Gems (In case you came here with NO or not
enough Horseman’s Gems, in the NE corner is a slope below the beam, so you can
drop own and go look for the items you missed. This would be the case if you
came through gate 3 before finding the Gems).
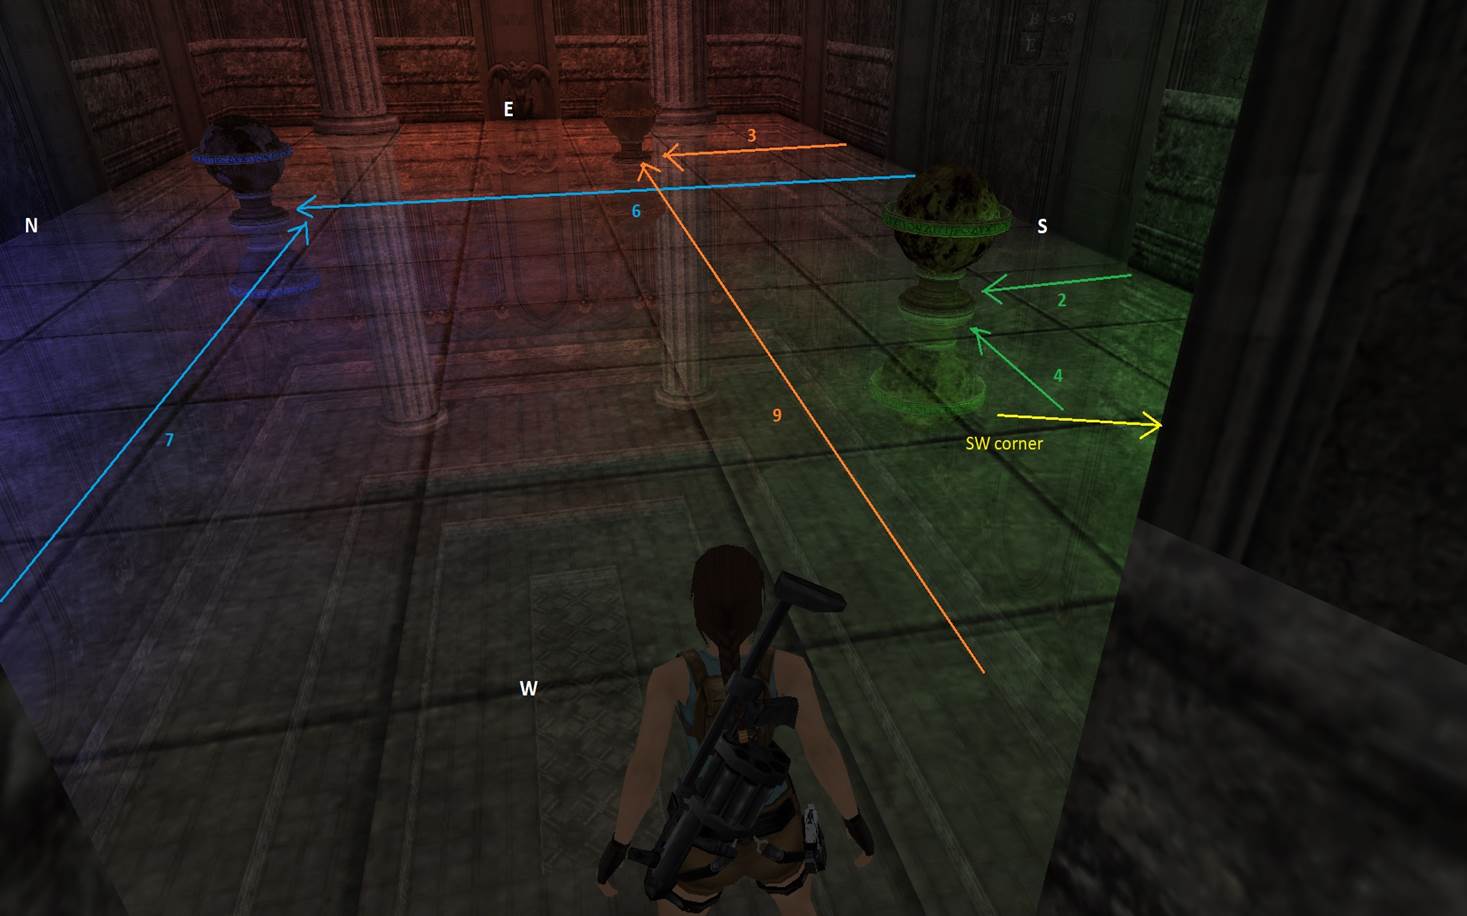
Globe
Push Puzzle, the Orange Crystal.
There are 3 Push able Globes, in the S wall is a gate
and there’s a clue/riddle. The 5
letter word GLOBE of which 3 have coordinates behind them.
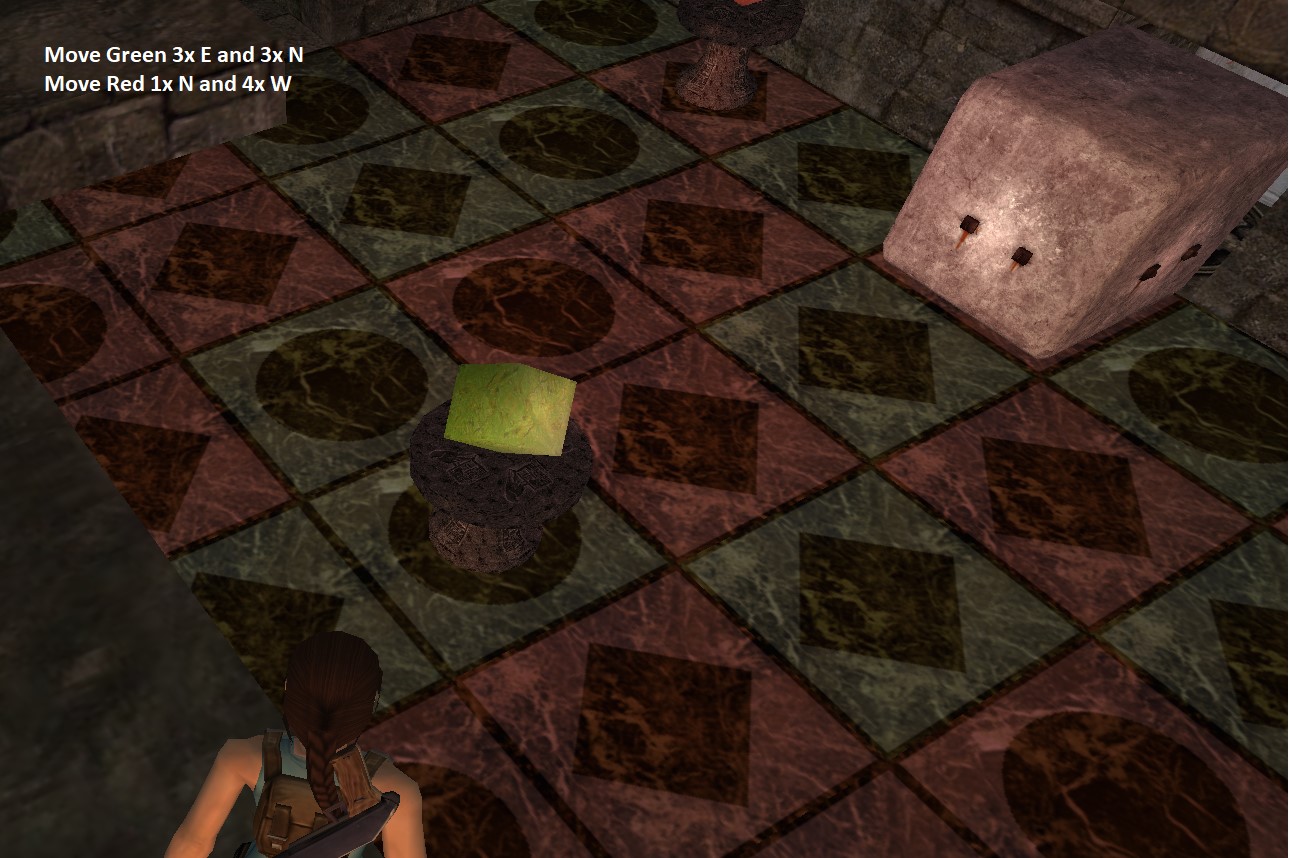
After you figured it out, push the 3 Globes into place
(Seen from the SW corner, Green; 2
to the N and 4 to the E. Blue; 6 to
the N and 7 to the E. Orange; 3 to
the N and 9 to the E).
The gate S opens, get in and grab the Orange Crystal, combine it with the
Crystal’s Base and obtain the Power
Crystal. Go out W, right/left onto the beam, hop up W, jump W and then
right to the terrace. Loop around left to jump to the other beam and get to the
far S end (shimmy past columns). Jump/grabs up the blocks E and jump grab to
the high beam. Turn around and go up the ladder to place the Power Crystal
(face N).
Final
Battle for the Purple Moon Diamond.
The gate opens N, back down the ladder to the beam and
to the N end, safety drop down and jump over to the terrace N, go through that
gate. Pick up Grenades, Revolver ammo, a small medipack and Uzi clips from the 4 corners before laying your hand on the Purple Moon Diamond. A Giant Guardian
“storms” into the room, he throws deadly gas at you…Shoot him a couple of times
and run away, look if he dropped and if not repeat till
he’s dead, when he freezes and doesn’t aim at you anymore, he’s about to drop…
When you approach the gate E after the battle, it will
open. Go in and slide down to end the adventure….
June, 2021