ANCIENT SHORES.
Levels by BigFoot.
Walkthrough by G&D
Productions.
We’re using the compass for
directions, the red needle. Could be we made some errors here and there, but
I’m sure you’ll figure it out. If it’s not W, look E etc.
You need to find at least 10 of the 15 Secrets to
enter a Bonus level…
1 - Historic
District of Safi.
3
Secrets.
Right at the start you’ll get NATLA’S HOUSE KEY and a Page for the Notepad.
Facing the tracks, take a right (S) and enter the
tunnel, shoot a fence in an opening up left, grab some Flares and make your way down the passage and shoot two rats,
open a blue door. On the grated floor, shoot one of the barriers and drop into
the water below. Swim up W and climb out. On the crate are Flares, then enter the
passage SW, shoot a rat and climb over the crates.
Pull the wooden one at the E side once E and look behind it for a passage
leading to a Medipack and Secret 1/3, an Ornate Plate. Get out, into the passage SE and follow up to a room with a floor
lever opening a door way back at the tracks (start
level). Through the fence you can see the Rusty Key, can’t reach that.
So, make your way back over the crates to the pool
area, from the crate where the Flares were a jump and grab to the crack E and
shimmy right, ledge jump up to the next crack, right again and back jump up to
the grated floor. Out W to the tracks and into the tunnel N, take a right to
where that door opened. First go straight, up the stairs, through a curtain to
a corridor and take a right.
At the end of the corridor, look up and spot a hatch,
open that and climb up. Throw the floor lever in the windowsill and see a door opening up. Get down, follow the corridor back to the
staircase and keep going left to end up at a workbench with a small medipack and that open door ahead of you (S).
Back Streets, Rusty Key.
You are now behind that big fence at the tracks. Open
the small door S and follow the corridor up to the far end where you can open a
blue door left, follow the passage down to that workbench with the RUSTY KEY.
Make your way back out to the street, head NE through to a small square and
then right to the gate you saw when you grabbed the Key. Use the Rusty Key to
open the gates.
The Way into Natla’s
House.
To the NE is Natla’s House,
but the gates are closed as the Notepad says. Take a right (S) and go through a
small arch into an alley, open the door E and step into a room with 3 floor
levels. In front and left is a box you can shoot and inside is a Timed switch
opening a door two floors up. Let’s prepare the route, as this is a Timed run…
Timed Run.
Open the blue door SE and go out into the yard. On the
terrace E is a crate, pull that 4 times so it’s under
and opening in the fence of the balcony above. Grab the top of the crate (face
E) and ledge jump up to the balcony. Turn right and run jump onto the right
sloped side of the roof S, so you can jump off and land on the balcony going W.
Go to the small door NW and kick it open. Straight to the W is the Timed door. Take the passage N to get one
floor down and jump over the fence to the lower floor where the switch is. Save
at the switch, run out and do running jumps over the fences aiming straight for
the crate. Get up to the balcony, jump onto that roof S and get inside fast and
through the door.
The Sewers.
Jump/grab the roof W and shimmy all the way left, then
one grab back and drop/grab the jump lever. You’ll end up in the sewers. Climb
out at the stairs E, go right around and pick up Flares, go through the
opening S and shoot a rat. There are some burners in this room, in the W wall
is a block. Pull it out, place it on the nearby burner and that will shut off
the burner upstairs too. From the crate NE you can grab up to the floor above
and go to the W, pick up the small medipack and use the floor
lever, that will lower one of two blocks in a passage E downstairs. Well,
you’ll know what to do now, move the block over to that other burner and use
the second floor lever upstairs. Both blocks E are now
down. Push the block into that passage, all the way to the end.
Leave the burner room NW, hop into the water and swim
through E, right and into a pool with a floating crate, climb up on the crate.
Jump/grab the block (you pushed) in the W wall and ledge jump up to the niche
above. Shoot the cover and use the switch to open a door in the entrance to the
Sewer. Drop back into the pool.
Swim out N and left back to the entrance pool, climb
out at the stairs and find the open door E, follow
(watch out for the incoming oil barrel, to a floor lever opening the hatch up
W. Climb out there and you are inside the courtyard of Natla’s
House.
Natla’s House, the 5 Switches for the Main Gate and a Torch.
Heads over and use
that House Key on the door N, step inside and a flyby gives you the tour. Open
the doors W, in the kitchen go right into the laundry room and flip the switch (1/5) in the window. Go back out to the
entrance and straight over into the lounge E, take a right and open the doors
into the Dining room. Behind the curtains of the second window left is switch 2/5.
In the fireplace (save before going in if you want to
view the flyby again) are Torches. Grab one, go onto the higher floor W and leave the Torch near the door
there (you can open the door with the button left of it).
Go out of the Dining room (N),
straight and left up the stairs. Left (S) and at the window open the blue doors
right. In this bathroom is switch 3/5 in
the window next to the toilet. Back out to the corridor and keep right (E), to
the right is an empty bedroom. Climb over the pile of linen E and open the
doors to the right. The Notepad
reveals a new Page, this is Jaqueline’s Office, we
need two Keys. Open the doors W and step out onto the balcony.
Open the Gates.
Go to the terrace SW and hop onto the courtyard wall
below. Follow to the end (NW) and grab up to a crack in the N wall, shimmy left
around and pull up at Secret
#2/3, an Ornate Plate and a Medipack. Shimmy back around and drop onto the wall, just over the high point
(above the gate), hang down into the courtyard and spot the jump lever just
left of the big gates. The Gates open up.
Now we can take the Torch out to the street. Go inside
the house, right to the Dining room and open the door W, take the Torch out
through the open door and hop over the fence.
Go into the workshop SE, down the hatch taking the
Torch with you. Follow the passage down the barrel slope to the Sewer entrance
and ignite the Torch at the wall torch, make your way back up to the courtyard
and go through the gates W, follow the street left around the compound and in
the end of the N alley is a wall torch in a niche to the right, ignite that. Go
down into the tunnel, shoot some rats and get some Flares right. Then hop onto
a crate N to open the hatch above. You are now at another side of Natla’s House.
The Blue Key.
Head W and left of the pool is the
backdoor, open it and go in, left around in the window is switch 4/5. Open the doors W and that is the connection to the front
part of the house. Go back outside (N) and right at the pool and at the next
corner of the walls is a ladder up (S), climb it. Run S and grab a small medipack, return to the ladder and head W, you can already see our next switch.
Open the doors and in that bedroom, on the nightstand next to the bed is the
BLUE KEY. Go E into the bathroom, in the window is switch 5/5, the gates to the back courtyard open up. Go
back into the bedroom, the doors S open the way to the corridor (front part of
the House) in case you missed a switch there.
The Yellow Key.
Go out N, right and down that ladder. Through the
gates N, shoot the guard dogs. In the NE corner is the entrance to a small
maze, just keep going right till you come to a little yard with chairs. Go in S
and left to use a jump lever there, go back to the little yard and behind a low
wooden a hatch opened up. Drop down and follow to a
wooden crate, move the crate through the NW passage till you come to another
grated ceiling above. Jump on the crate and up to the ceiling to monkey swing
along the outer walls (in that dark corner is an opening leading to Secret #3/3, an Ornate Plate and a Medipack. Get it now and make your way back to the crate. All the way at the end
of the monkey climb (over a spike pit) is a crawlspace, drop/grab and get in.
Go right into a machine room, use the floor lever to start the pumps flooding
the swimming pool. Open the door E with the switch and go SE through the big
gates and right to the pool, dive in and in a gap near the diving board is the
YELLOW KEY (SE).
The Code.
Go up that ladder (SE), head W and go
left into the house through the bedroom, open the door S if you didn’t yet, go
left over the linen pile and follow right into the Office, use the Keys S. Go
into the file room and shoot the cover NE to use the switch, a fan will blow
some paper away. Go back into the office and grab the SCRAP OF PAPER, examine
it. So, we’ll have to find us a code. Go N into the corridor, left over the
linen and left into the bedroom, on the wall is a painting with Two Pyramids. Go out, left (W) to the
intersection and left into the bathroom, on the wall is a painting with Three Cats. Go out and N, right down the stairs and right, straight into the Dining
room. Above the fireplace is an image of Venus and to the left is a diagram of
the solar system, left (not shown is the Sun). Venus is in position number Two from the Sun. Out of the
room N, left into the corridor and straight through the hallway into the
kitchen, there are two paintings with in total Nine Cakes
(2329).
Make your way back upstairs to the Office and into the
File room, use the code on the pad to open the door. A new Page for the Notepad as you enter.
Go to the Map on the wall, with the red dot and you
will be taken to the next level.
2 - Cap Beddouzza.
3
Secrets
Caves.
Climb up NE, follow through to a deep gorge. Jump
right onto the slope and grab the edge as you slide off, shimmy left as far as
you can and pull up. Back flip with roll and grab the edge of the opposite
slope, shimmy right to a spot where you can stand (a bit before the corner).
Turn around and hop into the tunnel. Go all the way up to the back wall and
face N to grab up to a slope above, shimmy left to where you can’t go any
further, back jump (not pull up and back flip) and grab the crack in the
opposite wall.
For a Secret: shimmy right past a horizontal part and
on the part sloping down again, back jump into a niche with Secret #1/3, a Starfish. Jump out right to grab the slope there, shimmy right, back jump and
shimmy left to a sandy part where you can pull up. Go up into the tunnel,
follow through to where you’ll slide onto a beach and get a Page for the Notepad.
Beach, lowering Cages.
Remember you got an OXYGEN CAPSULE in the inventory,
this helps you breath under water. Whenever the camera
angle changes to wide view, you are in an area that’s none of your business.
Go about straight to the edge of the water and looking
at the sunset, you can see a rock a bit right of the sun. Underneath that rock
is a tunnel, swim in there and in the last chamber is an underwater ceiling
lever under a block. A cage will lower at a chain (1). To the S you can see
another cage if you look up through the fence. Swim back through the tunnel and
up to the sea, a bit left and climb out onto the beach near that little
fortress. Go N over the beach from there and up left into the NW corner
(there’s a trapdoor near that green plant on the higher ledge, we’ll get into that
later). Once on the higher ledge, go S and passing the palm trees and fort, go
right around the corner, then left around the next and a father passing a palmtree you can’t go further. Hang from the edge and
shimmy left, around a corner till you see an opening below, drop/grab and get
in. Grab Flares and follow the tunnel into the water, keep left, sharp around a corner
into a triangle opening and find Secret
#2/3, a Starfish. Swim straight out and keep left
again, in the end you’ll come to another underwater ceiling lever under a
block. A cage will lower at a chain (2).
The Sidi Chachkal
Key.
Swim back out SE, right around and up a sloped part.
Swim into the opening SW and follow through to the
beach and you’ll end up in the water. Swim to
the E.
For a Secret: In the first deep part of the bottom is
a plant (S) and hidden in the plant is Secret #3/3, a Starfish.
Get onto the beach near the fortress, and up in the NW
corner to that nice green banana plant. Go down into the tunnel there (N), grab
Flares and get to the room with the chains. Pull both of
them and go through the opened barrier N to get the SIDI CHACHKAL KEY.
Go back up the tunnel SW to the beach, go use the Key
at the little fortress and the barrier opens up. Go in
and use the wheel pulley to open that trapdoor in the far N. Run over the beach
to the N, then go up a dune NW and get onto the higher grassy ledge. Between
those stone blocks is the open trapdoor, get down and in the next chamber
you’ll get a Page for the Notepad. Pick up a small medipack SE.
Collapsed Mine.
Go into the tunnel W, straight and over the rubble and
keep going left to come to an ancient room with a corroded floor lever. Using
it will open a barrier near the start of the level. So, make your way back to
the hatch (keep going right) and climb up to the surface, get down to the
beach.
The Huge Cave.
Run S to that rock plateau with the slanted pillar and
get into the tunnel W, carefully follow down till you are at that really deep cave. Jump across and grab the slope, shimmy
right around to the end where you can pull up. Jump over to where the barrier
opened and enter, do safety drops down till you are overlooking that huge cave
below. Across to the right you can see a Medipack, Jump to the slope right, grab the edge and shimmy to the Medipack. Head into the passage and a danger sound will alert you to the arrival
of some scorpions. Just keep following the tunnels from plateau to plateau and
you’ll come to a wide, sloped tunnel. Take some fun slides down and end up in a
tunnel with a grey sandy floor and two scorpions. Go out to where you are
finally at the bottom of the cave. To the N, left of a waterfall is a tunnel we
need to get to, but that requires some creative thinking.
Go into the far S end of the cave, stand on the yellow
fallen pillar, face N and stand on the right hand side, see screenshot.
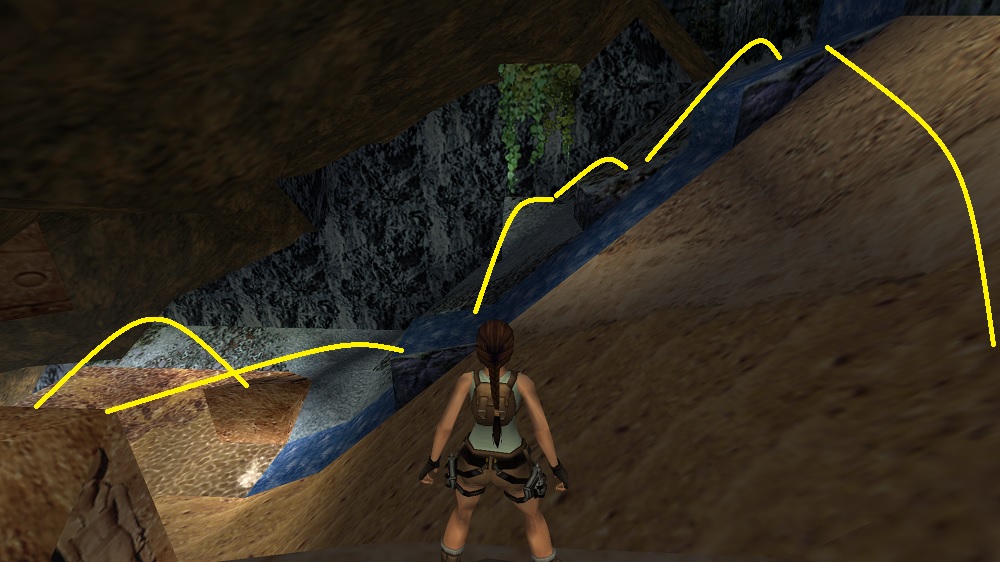
Run jump and grab the pillar N. Run jump SW to the
block in the waterfall (be careful, the water will push you down). Do a running
jump SW again onto a ledge near the wall. Stand jump N to the ledge next to the
waterfall and aim for the block in the upper end of the waterfall. Jump up, and
a running jump as far as you can to the N sandy slope, you’ll have to slide
facing down, then jump hard left to end up on the ledge along the N wall.
Jump up 2x NW and get a Page for the Notepad. Slide down and end up at another waterfall, hop N and run jump/grab
the pillar E, then just follow the path to that tunnel N…..
3 - Tighaline’s Sunken Realm.
3 Secrets
Lower a Block.
Follow the winding tunnel to the Main area of the
Sunken Realm. Turn a bit right (NE) and swim to the ruins, the first broken
wall has a sloped block against the E wall. Pull up on that and back jump to
the wall behind you, you’ll get a Page
for the Notepad. Jump NW, go N a bit and turn
right to get to a triangle opening in the E wall, get through to a small space
with big doors (we’ll be back) and a jump lever (#1) in the NE corner, that’s
for a raising block in the Main area.
Get back through the triangle opening, swim W and then
right (NW) into the grey corner and just when you see a small arch and a gap in
the N rock face, look in the E sandstone wall for a triangle opening, inside is
Secret #1/3, Orichalcum. Now swim through that low gap in the N wall, up to the surface and
climb onto a ledge S, jump to the SE corner and from there N to the floor. Use
the jump lever (#2) right of the Crowbar door (we’ll be back) and you’ll get s
screen of the block/door in the Main area lowering. Swim back through the gap
S, and to the SW corner of the Main area. Into the now open structure.
The Ocean and Shipwreck, Crowbar.
Follow the winding tunnel to the ocean with a wreck
halfway buried in the bottom. Secret; Swim SW over the
wreck and in the bottom, near those ruins in the SW corner is an opening, get
down and find Secret #2/3, Orichalcum. Back out, aim NE to the wreck and follow the deck to the left and just
before the bridge you can go down; to the S a bit and up left through a tiny
crack and go N, then NE where you see the railings and all the way down.
Through a tiny opening N, surface there and get out on a life
boat, grab a small medipack and get a Page for the Notepad. Jump into the SE corner, turn around and grab up, follow through to
drop into water and get to the W side, dive down there and find the UW lever
SW. A hatch opens in the wreck. Turn around, surface and climb out S, hop over
the slope and swim down SE through the opening, make your way back SW to the
tiny hole and swim up to the hull. Head N and just behind the midships bridge
is that hatch you’ve seen.
Follow through going down and then S, through a tiny
gap and surface in the wheelhouse, up to the N is the CROWBAR, get a Page for the Notepad. Make your way out of the ship and for a last Secret, swim straight N
to the stern, there’s a dent in the bottom, next to the deck, go in and right
around the corner are a small medipack and Secret #3/3, Orichalcum. Swim out, to the E side and follow to the S, you’ll come to that
tunnel we came from before (not the upper tunnel). You’ll come to the Main area
with the sandstone ledges.
Turn left and swim NW underneath the grey wall (N) and
surface, turn around and climb out on the ledge as before, go left to jump over
to the N floor. Up the steps and use the Crowbar on the door. In the back pull
up E, S and follow through S and slide down to where you see a sandstone wall.
Walk out onto the ledge N, run jump and grab the high
slope left, shimmy right and safety drop down. Make your way over those pillar
tops to the S and on the last one you can jump/grab up N, follow through and
come to yet another area of the Realm. Get over to an opening in the E (NE)
wall. Take a right inside, crawl through and follow to a boulder, push it down.
Follow the boulder out, walk out onto the grey ledge, safety drop down. Turn
around and swim down into the first hole in the floor, a small tunnel opened
there (to the S). Follow through and surface in the end. In the NE corner (E
wall) you can just stand and be able to grab up to a corner ledge. Hop over and
use the pulley to open those big doors at the first jump lever we used.
Swim back to the Main area, to the E wall and pull up
to that sloped block (SE) again, back flip to get onto the ledges. Jump around
that grey rock again to get to the ledge N of it and hop into the triangle
opening E. Go straight through those big doors and find the TEMPLE CRYSTAL KEY
I (we need one more as the Page
for the Notepad indicates). Hop into the water,
swim through the structure SW to the Wreck and as soon as you exit the tunnel,
go up and left to find another tunnel. Follow through and surface.
Up the stairs W and fight off a poisonous Crab. Not
much else to do than continue, as the Temple Key on the upper floor cannot be
reached from here. Stand in the hole in the E wall, run jump onto the low block
in the water (there’s
a strong current), continue to the ledge SE and then S to the bank. Climb up
twice, grab the Flares and climb up straight again, then up to the right to slide into a
tunnel with big doors and a puzzle hole (Behind those doors is that Key we saw
where we shot the Crab, for later).
Just follow the tunnel to the S and left into a
smaller one, turn right and the level changes….
4 - Dolphins and
Palace Ruins, First visit.
3 Secrets (2 this visit)
Follow through and get a flyby, seems we have to set that captured Dolphin free to access the other
side of the area. Just hop down into the water below, climb out onto the basin
wall E. Well, the Page for the
Notepad you’ll get there confirms my thoughts. The mentioned
rock is located SE in the corner of the E basin. Hop into the water there and
find a small tunnel E. Take a left and surface, pull up on a sloped rock and
back flip roll to face E and grab the ridge behind you, shimmy left a bit and
back jump, grab the ledge W. Turn around and run jump up NE into a tunnel,
follow to a wider tunnel with a cascade.Mind you, the
water will try to take you down, so don’t dilly dally, go up E and hop up left
into an opening, follow through and hop onto the central blocks in the next
part, follow up E and shoot another Crab.
The Nasty Cascade.
Here comes a nice ordeal, look up SE from the last
part of safe ground and you can already make out the path you have to take up
that cascade, see screenshot
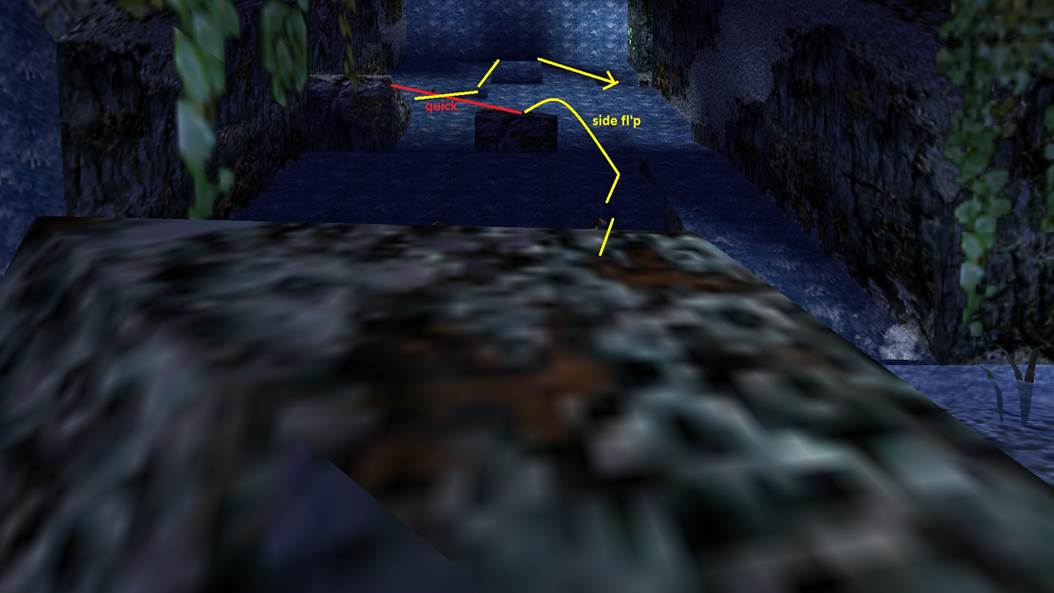
Be sure to save whenever you are on a firm rock. (the first safe spot will release a boulder though…, so
quickly jump to the one at the wall. Or just jump out of the way and try
again. Once in the opening W, you could
turn around, run jump out straight, along the left side of the opening and side
flip right as soon as you land. That upper ledge doesn’t have much current, run
through the waterfall and grab Secret #1/3, Orichalcum. Run jump out curving left to get into that opening again. Push the
rock in the NW corner, it will hit the rock plugging the basin, the Dolphins
will rejoice and as a thank you, a door will be opened for you.
Just follow the boulder passage down and slide down
into the basin, down
through the hole in the bottom where that boulder was stuck and find the open
door S, nearby. Inside swim W and up into the upper part, continue and surface,
pull up on the left side of the slope NE, back flip
and slide, then jump hard left to end up on a ledge. Climb up E, jump S, climb
up and jump N, back over to the S end again and take a left at the river. You
are now on the other side of that big canyon where the Dolphins were.
The Palace Puzzle, Scarab
Talisman I.
Go SW through the opening to the Palace, an artifact
is shown. Run to the far E end and find a glass floor, up E you’ll see some
symbols, make a note of those. Turn around and go back a bit, right through the
opening at the obelisks and step on a blue tile inside. This will reveal the
path over the glass floor, first row left (hand), first row right) (feathers
and 3rd row center (dotted line, and in that order). Don’t touch other squares
and if all went well, the 3 fires under the symbols are lit and a door opens
left under the falcon face.
Go in there and use the big button, double doors are
shown. Get back out, over the glass floor (doesn’t matter how). Go left (S)
into the first opening and throw the floor lever in that room to switch over to
the “cleopatra” part of the puzzle. Get out, look E over the glass floor to see
which symbols you need this time (Snake/Eye/Falcon and in that order) and turn
around to go into the clues room N and look where they are located. Go into the
“cleopatra” door right and use the big button, double doors are shown, opening up this time.
Head back W and at the fountain left/left through
those big doors, upstairs you’ll find the SCARAB TALISMAN I. A door opens up in the passage SE of where you are, behind that
obelisk.
Hall with the Lever/Symbol/Fire
Puzzle, Scarab Talisman II.
SE in the next Hall are 5 clue symbols on the floor
and a big pit to the S. In the SW corner are 4 floor levers and a 5th is inside
the area with the fires. NW is a door and near the levers is second door.
Let’s start with the Levers as we have
to reach that lever you can just see left of the fires inside that
passage. Use (from left to right) 1.3.4 (other combinations might be possible?)
and go around to the SE where the deep pit is, you can bring up blocks in that
pit by stepping on some symbols. I did the Falcon, Snake, skip the next by
hopping over to Feathers and then step left onto that “Sail”, the Eye E is
“reset”. You’ll now should have 4 sets of blocks to cross the pit. go right and
find a big button on the W wall. The door at the levers opens
up. Make your way back over the pit, loop around left and follow the
passage behind the open door to to to that floor lever in the Fire passage, the door in the NW
corner of the Hall opens when you use the lever.
So, back through the door and straight N, left through
the door near the back wall. Follow the winding stairs and corridors to a
corridor with big doors on either side. Through an opening N you can reach the
SECOND SCARAB TALISMAN. Take it and the big doors E in the corridor open up. Follow through and come to a puzzle floor.
“Cleopatra” Puzzle.
Step on the elevated tile right and the doors across
the floor open up. Step on the tile left and you’ll see
a transparent tile along the left wall. But if you look closely, you’ll also
notice some symbols with black spots on them. That’s the safe path to the door.
For a Secret, first go to that transparent tile, follow through and get Secret #2/3, Orichalcum from the room above the puzzle floor. Safety drop
down, or take the long way back, the doors will be closed anyway. Re-open the
doors with the right hand tile and follow the safe
path without touching other tiles.
Water Puzzle, Open doors.
Next room has a water room under a floor that’s only
partially solid. Step on the clue tile to get the path (if you happen to make a
mistake, you can get back up through the NW corner). In the next room is a big
button up on the steps, those other big doors, in the corridor where the
Talisman was, open up. So, back through the water room
(hop in, swim through NW and up), through the Cleo room and make your way W
through the winding corridors. Through the now open big doors, pick up a Medipack and go up the ladder wall.
Using the Scarab Talisman, the
Hand of Orion.
Back flip/roll off and jump onto the nearby great
block to shoot a Crab. Follow through to a dark portal and in the room with the
transparent floor are two receptacles for the two Scarab Talisman. A Demigod
arises from the floor, run up close, duck and fire away, or do it the old fashioned way by jumping around. He will leave behind
the HAND OF ORION. The Dolphins are happy once again.
Back to Tighaline’s
Sunken Realm.
Leave N, a rope is shown over the Dolphin Pit. Follow
the corridor to the ladder wall and get down, go E and
first left (this is a fast way down, if you want to trace back your steps, take
the second left). Walk up to the balustrade under the left side of the arches
in the room entrance and look down, there’s that fountain. Just hop over the
balustrade landing in the water down there. Leave NW and go N
to the Dolphin pit. Jump to the rope, swing across and
follow up, in the end up left into the dark corner and walk left up to the wall…
3 - Tighaline’s Sunken Realm, just passing through.
The Temple Crystal Key.
To the right of where you enter the tunnel is that
door where you can use the Hand, inside is where you can finally grab that
TEMPLE CRYSTAL KEY we saw a while back.
Opening the Temple.
Hop N over the balustrade, into the water and into the
tunnel in the bottom (N), follow through and come to the Ocean with the
Shipwreck.
Swim to the Temple N, find the 2 openings left and
right of the Main entrance and place the two Crystal Keys. Swim into the Main
entrance and up in the end, run forward…
4 - Dolphins and
Palace Ruins, Second visit.
1 Secret.
Temple Crystal Keys.
Run N, the Dolphins are here… Dive in with them, go
down into the opening NE, follow around left and find Secret #3/3, Orichalcum. Back to where the Dolphins are and into the NW corner, follow the
tunnel to the end and surface, use the two levers on the wall to open doors.
Swim back and get out of the water. E and W of the high stepped structure are
these doors, enter both sides, shoot the Demigods and take the TEMPLE CRYSTAL
KEY. Place them in the back of the rooms. A CRYSTAL ENERGY CELL will appear on
the pedestal, a Red one W and a Blue one E. They can be used in the previous
rooms, on the blocks. Once completed, a Teleport will activate on that stepped
structure, let’s hop in….
5 - Hearts in
Atlantis.
3 Secrets.
A Yellow Crystal Energy Cell.
Walk out of the teleport chamber and after the second
set of grey pillars, look right to spot a transparent triangle part of wall,
get through and take Secret
#1/3, Orichalcum. Back out and N to get to a
receptacle for an Energy Cell, go left (W, can be done in random order) and
keep along the left wall, get through the Lava wall
and push an energy node onto the tile W, a door opens. Back through the Lava
wall and loop around left into that opened door, take the YELLOW CRYSTAL PART
I. Head out E back to the main corridor and enter E
side this time, keep left, walk to the edge and take a step back, then hop
back. Run jump onto the platform and a running jump across to the opposite
side, push the node onto the tile. Back the way you came
and loop left around through the door, pry the YELLOW CRYSTAL PART II from the
wall, combine both parts to get a YELLOW CRYSTAL ENERGY.
Back to the Main corridor and use the Crystal on the
block. Watch the cut scene.
Go over that magic bridge (just run), down a slope and
after the obelisks another bridge to cross to that head. At the end of the
bridge, grab up to the climb wall on the nose and go up over the head, through
the opening and find a floor lever you can’t use. Two receptacles and two ways
to go. Up to you…
W Side: Pyramid of Fire.
The Lava/Water Cave.
Left (W), follow through some lava flows, grab Flares and step on the
lower grey tile, the wall in front opens up to a Lava
Cave.
When you slide down, you’ll get a warning NOT to go
(swim) directly over Lava spots, they’re deadly. So, best slide straight down
and swim over that broken bridge to the W side.
The Pyramid Key.
Turn left (S) and through an opening. Up a cooled down
Lava flow and keep right going up and follow the path of the same textures to
the N, then the floor changes, after the high grey part you’ll find blackish
lava tiles, run jump from the first to the next, a bit to the left and a hop up
right to the light grey floor at the right hand wall.
In the next room notice a block (x) in the left wall.
Go to the far N end into a tunnel, follow the sand
floor and get into the water, to the right, near the end, is an alcove with an
UW lever. That block (x) goes down, so return to that block and enter the
passage. Over the lava pit is a TIMED lever bringing out a platform in the
tunnel where the UW lever is. The Run-Swim isn’t that hard, but careful once
around the corner after passing over the platform…. Swim left around along the
wall and turn right to get over that high sandstone block, swim straight up and
climb out on the block at the surface. Grab the wall with the Crystals and
climb left around to the other side. Back flip/roll to grab the next rock and
go left around one corner. Back flip/roll and grab the ledge. Jump SE, E and
follow to the N end. Jump to the slope and make your way to the S over the lava
flow, then up in a zig zag pattern, not too hard to figure out.
At the top travel right (S) and end up on that sandy
ledge. Hop up left (E) into the opening. Follow through to a Small Pyramid,
climb to the top from the N side and grab PYRAMID KEY. A screen will show you
where to use that, top of the first slope. Slide down W, down to the sandy
ledge and left, hop down a bit to the right and use the Key. Doors open at the
bottom of the slope, slide down straight and swim down a bit to find those
doors under the small roof.
Detour for a Secret (this time I recognized those
black tiles in the Lava): Swim W over the bridge again, right around that
obelisk and swim to the broken part of the balustrade, look over the edge and
spot blackish lava tiles, this are cooled off, so, safe but they will still
take some health. Swim down hugging the W wall, go up above the sloped side and
left (N) into a tunnel in the corner. Pick up a Medipack there and swim over to the gap E, while monitoring your health. Grab Secret #2/3, Orichalcum and quickly make your way back to those black lava tiles, go up and up
over the floor. Swim back over the bridge and straight down through the doors.
Into the Pyramid, the Cube
Artifact.
Be sure to swim over solid floors or sandy ledges and
in a back room you can surface, swim over to the N side and climb up to a
raising block. Jump over to the S, and pick up the
CUBE ARTIFACT (to the S, behind the glass is one of those rooms where you
pushed an Energy Node before. The block N is now down, so jump back there and
go through, left into a teleport, then you can pick up a SCARAB TALISMAN I. Use
the lever on the wall to lower the block and once through you will find
yourself back at the Floor lever… Place the First Talisman and head into the
other passage.
E Side: Pyramid of Water.
Slide down, a moving platform and a crack in the left
wall. As long as the platform moves, it isn’t solid,
so only jump to it when it is fully extended and jump/grab up to the crack (I
did a side flip to the platform and a jump forward to grab the crack). Shimmy
right and back jump to grab the crack behind, shimmy left and back jump again
to the next crack, ledge jump up and shimmy right to the passage. Jump over the
lava in the next chamber and in the second chamber after that are some Flares. Walk up to another
one of those pyramid slopes.
Killing the Flames.
Go down the right hand side
and go next to the second obelisk. Turn facing W and hop backwards to grab the
ledge of the obelisk, shimmy to the jump lever (1) and use it to kill a flame
in a crawlspace,. Turn around and swim straight E to
an UW lever (2) for a second flame in that crawlspace. Turn around, swim a bit
left (S) and find a dark pillar nearby, under the SE
corner of it is an UW ceiling lever (3) for the flames in the crawlspace.
Swim to the far SW corner of the cave and alongside
the pyramid to a ledge W. Get out, jump to the flatter spot in the pyramid
slope and make your way up to a lever (4) for the flames in the crawlspace.
Swim back where you came into this area (NW), climb out on a ledge
and hop to the stairs S. Jump over the broken bridge parts to an entrance E, go
straight and left around the corner is the now safe crawlspace. Get through and
follow through to a balcony with a floor lever which will raise a block near
where we came down the pyramid slope before.
For a Secret, walk up to the broken balustrade next to
the lever, stand jump and grab the grey rock pillar with the green crystals and
shimmy right around. Pull up and go get (the last) Secret #3/3, Orichalcum.
Into the Pyramid, Pyramid Key.
Swim W, climb out at the sloped ledge and go up the
steps a bit to that block, jump N to the flat spot and make your way up the
ledges, enter the Pyramid. Go up that Pyramid inside and take the PYRAMID KEY.
Back the way you came, go down one or two steps along the slope and jump to the
keyhole S.
Cube Artifact II.
A passage opens up under
water and it is located in the S slope of the Pyramid. Use the UW lever inside
and swim back out, straight and up to go through the
big doors. Straight ahead is CUBE ARTIFACT II. The door behind it opens up, once through you’ll find a teleport to the left,
go through and get the SCARAB TALISMAN. Use the lever S and go through the
opening, right and you are back at that floor lever. Place the Talisman and now
you can use the lever, the throat of the “head” opens up.
Go down S, climb down the nose and safety drop onto the transparent bridge, go
through the mouth, pick up a Medipack and step into the next Hall. Watch the cut scene and hit esc a few
times to scroll through the story.
Fight the Robot by jumping around to avoid his bolts
and watch the health. Pick up BACILLUS'S HEAD and doors open in the back, you’ll get a Page
for the Notepad. We’ll probably have to open
that black pedestal in the back, two passages, take your pick and place the two
Cube Artifacts, the pedestal opens up and reveals an
ANCIENT SCROLL, the entrance door opens, so leave S, the Teleport is shown. A
bit further along you’ll see the glass cracking, then you’re almost out of
time, quickly run to that Teleport straight ahead and hop in.
4 - Dolphins and
Palace Ruins, Third Visit.
When you arrive back in the Dolphins level, a door is shown and that door is where the two levers are for the
doors E and W of the Teleport. Hop SE into the water below, follow the tunnel
NW, surface in the end and climb out. Go through the
new door N, to the right of the trapdoor is a floor lever for the BONUS LEVEL
(Only accessible if you found at least 10 Secrets)
The left side lever opens the trapdoor in case that’s
how you have
to leave, for the Bonus level, look below.
Follow the tunnel E, left through a small opening and
up E again to where the Dolphins are waiting for you, swim up to the surface
there….
Bonus Level, Sink or
Swim.
No Secrets.
When you use the lever, a big door opens up and that’s
in the Hall where the Teleport is, so head back through the water, get out and
go S and right near the end, go up the blocks and just run forward to slide
down a slope, quickly get out of the way with a jump left as a boulder comes
down behind you. Watch out, there are boulders everywhere in this part. You’ll
come to a deep pit just around the next corner, jump over, jump to a pillar and jump to grab the next. Pull up over, slide and
jump grab the ledge, Lara will drop her Oxygen capsule. Up the blocks in the
far back and up through the floor (who’s taking pictures…?). Down a hole and a
cut scene will show the route we have to take…without Oxygen….So,
swim in, straight across and out to the Shipwreck, to the SE where those
Dolphins are waiting (the left tunnel). Just inside is an air pocket, then
continue left (E) dodging boulders, up in a shaft and climb out N.
Excavation Site,
.
Over the ridge and in the sandy cave where the shaking
finally ends, swim to the far NE sloped rock and get out. Jump into the tunnel
and shoot some critters. Take a right and in the lower chamber another critter
awaits. Use the lever in the E tunnel and see a gate open up
(1). Get back outside and swim SW, pull up on a sloped rock and back flip to a
pillar. Jump to the block N and left into the tunnel, more critters, loop
around right and go up a slope, grab up left to find Flares and another critter.
Hop onto a nearby block and enter the tunnel to find the opened gate (1). Follow
through to where you can jump over to the suspended ‘workshop’, on the lower
walkway of it is a small medipack. All 4 ropes are
climbable.
The Gate Puzzle.
First - NW or SW: both go up to the same tunnel, back
flip off and find a closed steel gate N with a lever to the right of it. Use
the lever to open the gate, but blocking the passage
in the wall left (and that’s where we want to go). Go N and right up the slope,
down the other side and use the lever in the left opening N. This will open
another gate to the S of where you are. Go through and find a small shack
there. Go down one of the ropes W to the workshop, up one of the ropes W to the
W tunnels and go right to that first gate. Use the lever again to close the
gate, but opening that passage left. Now we have to go
around again, down to the workshop, up E, left and left over the sandy slope
and left to the opening that’s now available (NE). Some critters to deal with
and then up onto the shack, get through the narrow gap in the back and up on a
block is a lever opening a wooden gate to the row of pillars.
Get back over the sandy slope, right to the shack and
down to the workshop. Once again go to the low block NE, into the tunnel and to
the N, right and through the open gate. Jump to the pillar, jump/grab to the
next and climb up. Face S and jump up to grab the hatch, get up into the
workshop. Pick up BigFoot’s BROKEN GLASSES from his
poster SW, step through the broken fence NE and pick up the RUSTY KEY. Get down
through the floor, into the water and up in the SW corner, into the tunnel
there, right around up the block and follow through right. Jump onto the
workshop, drop down on a walkway S and use the Rusty Key, back up to the roof
down onto a now raised platform N. Jump over the pillars to the opening N and
make your way up the steep tunnel into the bright sunlight….
G&D 07/06/23