Mess 2
Deki Janes
Level by Skender Buqaj (October, 2001)
You start in the sewers facing south-west. The attached
map is not necessarily to scale.
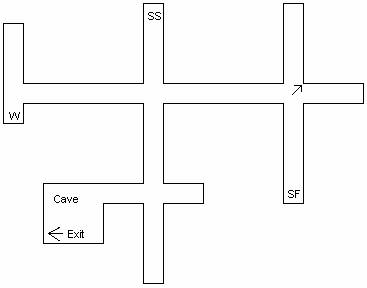
Go north and climb the wall to get to the surface (SF). Go
to the north-east corner to pick up a small medipack.
Then turn and kill three wild pigs. Go back into
the sewers and go south and then east. At the first junction go south for red shotgun shells (SS). Return and continue east to
find a hole with water (W). Dive in and pick up flares
and the Pharos Knot. Return and go to the cave
denoted as an exit on the map.
This cave has a very uneven floor. Work you way to the
north-east corner and there is an opening into another cave. Go to the
north-east corner and find a crawl space. Follow the crawl space and stand up
on a ledge above a deep room. Safety drop or use the ladder in the south-west
corner to get to the ground floor. Go west and find a receptacle on the west
side of the pyramid structure. Use the Pharos Knot and the gates in the west
wall open. The key lock was just a fake so just enter the room. To the south is
an alcove needing an item. Go to the north alcove and pick up the shotgun. Now exit this room and go back to the first
room and notice that the north gate is open. Go north, then east, and then
south to pick up red shotgun shells. Then go north to the end, then west to the
end, Jump over a slope into an alcove to pick up a Horseman's
Gem. Go back to the room needing the item in the south alcove.
On the way back you are attacked by a skeleton and can do nothing. Use the Horseman's Gem in the south alcove.
Exit this room and go back to go through the open gate in the east wall. At a
junction go left and straight ahead is a fire pit. Run up some steps and get a
flyby of the area. There is a large pyramid surrounded by lava. Go north
between two face tiles into a tunnel. Ignore the north room and go west to
climb blocks. Pick up flares but the flare bug is in effect now. Continue
following the tunnel and get into a room with a slope and a view of the
pyramid. Go to the north-west corner to pick up a Pharos
Knot. Follow the same rout back to the room with the lava. Go to the
south wall and run up the steps into a cave.
Continue south until you see another room. If you look over
the east and west blocks, you will see two crawl spaces for later. First go
into the room and go straight to the back to find a receptacle. Use the Pharos
Knot and exit to the north. Make a wide loop around the wall to get to the
south-east corner of the room. Get into a crawl space near the floor. I heard
the secret sound but got no secret. Look in the north-west corner for the Hathor Effigy. Then exit back to cave, as the rest of
the room has nothing. Now go into the west crawl space for a large medipack. Exit and go into the east crawl space
for flares. Exit and go north to the room with
the lava.
Go to the north ground floor and see an open gate and some
water. Swim north and at a junction swim west. You should enter a large room
with you can get some air. Enter the tunnel again and look up for an opening.
Go there and swim in a small cave and look for a hole in the floor. Pick up a token and go back to the big room. Pull up to any
ledge and kill a crocodile. To the west you can
see another sewer. This is easier than the previous sewer. At the first branch,
go south and pass all the branches. At a T-junction, go west to pick up blue shotgun shells. Return and go north and take the
first branch to the west. A skeleton should be on your tail by now. Continue
until you can and see a hole with water. Shoot the skeleton
into the hole and dive into the water. Swim south for revolver ammo. Turn and swim north for red shotgun shells. Then swim west to pick up a revolver in a small hole. Exit and follow the sewers
back to the cave. The other sewer branches contain nothing. Swim back to the
junction and swim east into a room to pick up the laser
sight. Then swim back and exit the water back into the room with the
lava. There may be a skeleton in the lava but
you are out of his reach.
Start at the north-east corner of the pyramid and jump to
the top. Then jump down the south-west side to use the token in the receptacle.
Climb again and slide down the east side and jump to a wide ledge. Go north
into the open gate. Inside you hear the old mummy-in-a-box trick. Go west into
another room and pick up revolver ammo between the stairs. Then run up the
stairs into another room. Loop around to the north-east alcove and pick up the Ornate Handle. As you return down the stairs, kill
another skeleton by shooting him off the top
step. Hop back onto the pyramid and jump to the top. Now jump and grab the
floating ledges. Jump the ledges to the south-west to reach the receptacle.
Make the Portal Guardian and use it. The gates in the pyramid have opened. Get
down to the ground floor and get inside the gates.
Go to the bottom of the steps and go into the east tunnel.
You emerge into a wider set of tunnels. Ignore the first branches and the next
alcoves. At the second branch go south and find a small
medipack. Then go north and drop into a hole and land in a large room.
Pick up red shotgun shells in the north-west
corner. Climb the blocks in the south-east corner to get a Horseman's Gem. Get back out of the room and continue
east. At the next branch, go south and follow to another hole and land in a
room. Go to the north-east corner for red shotgun
shells. Go to the north-west blocks to pick up a Hathor Effigy. Return and go into the north branch of the tunnel.
Just follow the tunnel into a large room. Go north and
then east to climb a block in the corner. Enter an alcove and pick up the Ornate Handle. Exit and go west. Your way is blocked
by a slope so turn south and notice a place for the Horseman's Gem. Use the
Horseman's Gem and continue to the south-west. At a depression in the floor,
cross over it and go to the west exit. The south exit contains nothing.
Continue north-west to find a crawl space. Get inside and follow the crawl
space to the end. Stand up in front of an open door in front of the ocean. Dive
into the water and approach the pyramid from the south side. Walk up to the top
tile and pick up revolver ammo.
Dive into the water and find an underwater tunnel on the
west side of the pyramid. Follow the tunnel to pull up into an outdoor valley.
Follow the valley and when it splits, go to the south-west. Make the Portal
Guardian and use it. Return to the valley split. Kill a wild pig and enter the open gate in the south-east. Run down the
steps and level ends by crashing to the desktop.
27-apr-2006