TREASURE AND GRAVE
Levels by Hendrik Kunze
Walkthrough by Dutchy
Sweetwater
The Streets:
Go right, left, right and in this street, look for the door on the left,
open it with the button, enter and take care of 2 Ninjas, open the next door
and go up the stairs, one more Ninja waits for you, look for the button behind
the book case, take the ammo there first, after the flyby of a gate opening up,
another Ninja enters, when he's gone, climb the book case and up the ladder,
take out the Ninja and get the ammo, Uzi, and the “Guardian Key”. Go down and
to the streets, turn right, right, left and right and enter the building with
the pillars, shoot 2 Scorpions and get the ammo on both sides of the pool.
The Sewers:
Dive in and follow to the other side, when you climb out a flyby shows
you 3 Crocs coming for you, run to them as soon as you can and start shooting,
just jmping back to stay out of reach. Go to the
passage on the other side and take left or right passage, 2 more Crocs, same
trick. Climb a block on the right hand side to get a medpack
and go on, dive into the next pit and get upstairs, take care of the Ninja,
push the button on the book case and climb the ladder, get into a fight with
the Ninja there and go through the scissors, kill all the Scorpions and get
some ammo, take the 1st “Canopic Jar”, back through
the scissors and outside.
The Streets:
Go straight on left side walk and at the small slope against the house,
climb up go right and on to the next roof. Use the “Guardian Key” after you
took the medpack and 2 Ninjas storm out as you enter,
deal with them and take the ammo in the vase, drop down on the South side,
you’ll take some damage and shoot 2 Scorpions, be careful, there are poison
darts at the pedestal, crawl into the corner and take the “Golden Vreaus”. Push the button on the wall and leave. Go left and
under the bridge you can place the “Vreaus”. You’ll
hear a door opening up, do a sidejmp to the right and
climb up, climb left over the slope on the bridge and drop, getting ready to
rumble again. After the 2 Ninjas, dive into the tunnel follow past the door and
get the flares, open the door now and go back for some air, follow next tunnel
into a big room with a croc, turn left and behind left pillar look for the
tunnel near the ceiling, get in to claim Secret #1, some goodies (quite
a climb), return to the big room and look for the hole in the ceiling along the
North wall. Get out and shoot the right hand vase to get a medpack,
run through scissors and poison darts to the room with the 2nd “Jar”. Runjmp to the square to the right of the pillar and dodge
the darts, climb and get the “Canopic Jar”. From up
here jmp to the exit and go all the way back to the
streets. Backflip from the bridge, over the slope
onto the street below and go West and then South to the end of the street,
there is a wall with a fence on it, climb up and runjmp
to the roof with the vase, turn and see the ledge along the house left, runjmp there and sprint to the other side for the medpack, dodging the Ninja, drop down and get onto the roof
again, go South and left, meet 2 Ninjas (try to get the ammo and medpack before they do) and find the reachin
switch, use it to open the gate below. Drop down and enter, turn left and place
the Jar in the back of the statue, shoot the vase to get some ammo and go place
the other Jar.
Tip from secrethunter: Behind the statue for
Jar #1 you can climb at the wall. Get the pistol and push the button, a flyby
show you the way to Secret #2, some pistol ammo. Go back to the room
with the two statues and leave Sweetwater through the door.
Don't shoot the vase here, but leave Sweetwater through the door.
Labyrinth of the Dark
Enter the North room by walking to the door and pull a lever there,
enter the room in the West and in SW corner pull the lever, pull up on the
sloped pillar in the SE corner and slide off, get into the crawlspace to claim Secret
#3, ammo and flares. Go out and climb the pillar again, now slide/jmp to the next and slide/jmp/grab
the high pillar on the East wall to get the Shotgun. Drop down, go back to the
previous room and enter the open passage in the South, slide into the room with
the high ledges, go left to push the button on the NE pillar and go climb the
pillar in the SW corner, go over to the NE corner and jmp
into the alcove there, shimmy the crack to the left and get ammo in the end,
turn and standjmp to the high ledge, climb to the
pole and backflip to the highest ledge, the Skeleton
is taking a nap, but will awake as you approach the passage in the NE corner,
blast him off the ledges, enter next room and go up the stairs around the pool.
At the room with the hot sandy floor, runjmp
to the pole, climb a bit and turn/ backflip to the
ledge under the ladder, get another Shotgun and climb up to claim Secret #4,
ammo. Down the ladder and standjmp
to the pole, turn and backflip to the exit. Go
take a dive into the pool and follow to a large room, turn left along the wall
and get the ammo behind the pillar. Swim to opposite corner and up for the hole
in the ceiling (if you want the flares, better get back later, for you have
still a long way to swim and not that much air, if I'm not mistaken).
Tip from secrethunter: Get enough air and swim
back, take the flares and find a hole in the wall (E) behind a pillar to get Secret
#5, medipack and flares.
Get out and find 3 Orange vases to shoot and take all the ammo they contain, now up the pyramid
and take the “Pillar”. A flyby shows you all the Skeletons, but don't waste any
ammo on them, just sprint to the NW corner of the room and up the ledge there,
place the “Pillar” and exit.
Use the monkeyswing to go over to the pillar
with the Lasersight and then to the far pillar on the
other wall, turn and runjmp across, to the next ledge
and on the rope, swing to the door and exit. Next room, stand on the edge
facing SW and sidejmp right to the sloped pillar, so
you’ll slide forward, jmp 8 times and on the last,
grab the wall in front, pull in and go left, get the medpack
and in the end, back off the edge and drop onto pillar below, backflip to pillar behind you, turn and jmp
to the rope, swing to the exit. Run down the stairs, a long way down to reach
the Labyrinth.
The Labyrinth:
You will run into the button, push it. Use the map (below) to find your
way if you're stuck.
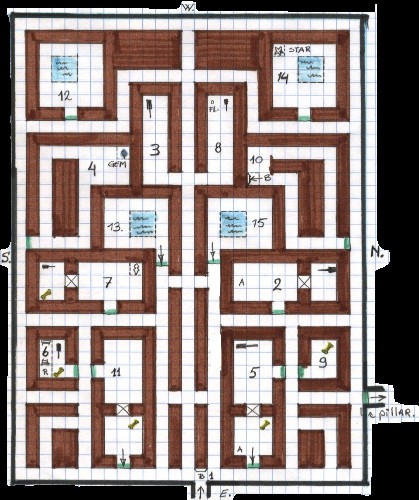
1. Push the Button
2. Go to room 2, ammo in vase, lever in crawlspace.
3. Go to room 3, use lever,
4. Go to room 4, take the "Gem".
5. Go to room 5, open with "Gem", use lever, ammo in crawlspace (and
bones to shoot later, go to door and exit.
6. Go to room 6,pull the lever, climb the ladder, backflip/roll/grab
and climb up, get Revolver, drop down to 1st. floor and shoot bones Make a
little detour past room 5 to shoot the bones there.
7. Go to room 7, take the "Knot" pull the lever and shoot the bones
in the crawlspace.
8. Go to room 8, place the "Knot", take flares and pull lever.
9. Go to room 9, shoot the bones.
10. Go to room 10, push the button.
11. Go to room 11, shoot bones in crawlspace.
12. Go to room 12, Blow the Skeleton in the pool and jump after him, swim R/L
and on top of the ledge on the 2 pillars is the "Pillar", get the
ammo in the corner and go back out, go L/L/up and take the medpack,
get back in the water and swim back to the room with the 2 pillars, now go
right and through the arch and aim for the vase, next to it is the Crowbar, get
it and go back, out of the pillar room and R/R and up to get the
"Star". Exit the door and go to the North passage, the door with the
Pillar receptacle is there.
Follow the passage and enter the lower part of the monkeyswing
room, go to the other side and use your “Star”, slide backwards from the slope
and grab the edge, hang there till the ball went overhead and pull up/backflip/roll/grab the floor. To your right and down is the
lever for next gate, jmp in the next opening and jmp to the 1st. rope, swing to the 2nd. (I had to aim right
of the 2nd. rope otherwise Lara did not grab it) turn right and swing to the
ledge and runjmp to the pillar, another rope drops so
you can swing to the big ledge in the South, get the medpack
and stand facing the rope, standjmp and fall into the
pool below, get out and meet the Mummies, go to the North an get the medpack there, wait a bit for the mummies to get here (this
will buy you some time) and sprint to the South, push in the statue twice so
you can enter that room and get the “Star” around the left corner (hungry
beetles start pouring out), back out and go left, taking a flare, so you can
see the spike pit you have to jmp. Place the “Star”
and leave, climb the pole and backflip into the passage
(left) on top, jmp over to the roof in the room where
you took the Star and take the “Scroll”, run straight for the Scroll and go
forward, drop down and place it on the pedestal, don't run around here to much,
go straight for the door and to the next level.
Treasure and Grave
Get into the North pool and swim to the end, get out and claim Secret
#6, flares and ammo. Get back and take the South pool, pull the lever in
the end and be careful, the water is gone, so don't just run in and land on
your face, but use the ladders, go back to the North pool and use the lever on
the bottom, now go to the centre pool and climb out the other side. Exit and
the music makes you believe that you have to hurry, not true, jus jmp over the pillars (there are poison darts on top) and
turn around on the last one (if you happen to see a Ninja in front, better take
him out now or he will shoot you in the back) climb down the last pillar and go
over to the other side of the pit, take care of the Ninja coming to greet you and
pull the lever, run back along the North wall and take out another Ninja, now
go push the statue to the brown square along the North wall and get back out of
the pit and to the ledge with the vase, don't shoot it but take the ammo on the
crate and go into the open room, shoot some Scorpions and get the “Hand” on the
crate, get down the pit once more and place the “Hand” to open the gate, use
the rope to get in and use the lever which will open the Big Doors in the room
you got the “Hand”.
The Big Hall:
Enter the big hall and start shooting all those Scorpions, vases and get
ammo from them, climb the ladder on North wall, backflip
to the yard with the Landrovers. Take out all the
Ninjas and get some ammo in front of one of the Jeeps and find the lever to pull
in the South (a flyby shows you that the gate downstairs is open). Go there and
enter. Go left and into the crawlspace, take the medpack
and proceed, just around next corner, shoot 2 Ninjas from the crawlspace
(otherwise you'll be dead before you exit). Go left and take the 1st.
“Cartouche Part”. Another Ninja, climb the ladder on West wall to top of 1st.
part and backflip to the ledge on the pillars, pull
the statue to the other side of the ledge and enter the gate, shoot the Ninja
in the pool room and get ammo from the vases, take the ammo in the pool and
follow, to shoot the Ninjas as you get out, get the ammo on the crates and
shoot some Scorpions. Go to the next room and 2 more Ninjas appear, get the
“Hand of Sirius” and a medpack on the high stack of
crates.
Go all the way back to the room you pushed the statue and go left as you
exit, climb the ridge in the end and see the dark pit (with the burning floor),
use the binoculars to find the crawlspace, jmp to the
square in front of it and claim Secret #7. Get out and from the non
burning square standjmp/grab to the ridge you came
from, back through the crawlspace and to the big hall to use the “Hand” to open
the big doors. Take out the Ninja and shoot all vases, get all the ammo and
pull the lever. Use the pole in the North alcove to climb up so the 2 Ninjas on
1st. floor don't notice you, take them out before they turn around and shoot
all vases again to get more ammo, pull the lever and go back down to get the
crossbow in the South alcove. Back up and in to the room in the West for the
2nd. “Cartouche Part”. Runjmp/grab
the sloped pillar in front and pull up/slidejmp to
the next, slide and jmp/grab the ledge, climb up and runjmp to the brown pillar at the pedestal, climb to get
the “Cartouche Part” and drop down to ground floor, climb the crates in the
other corner and runjmp into the exit. Go to the East
room, combine the “Cartouche” and use it to open the last gate to the Big
Treasure room and start filling those pockets. You will hear in German “Congratulations,
You've made it!!!.
End of these fine levels. (Great job for first level build.)
**** I Did It My Way****
Dutchy.
Addendum by SecretHunter:
I played this level in last days and find
some more secrets.
Secrets:
Sweetwater = 2 Secrets
Labyrinth = 3 Secrets
Treasure & Grave = 2 Secrets
Total = 7 Secrets
And this is the way to get the missed secrets.
Sweetwater - The Streets
Drop down and enter, turn left and place the Jar in the back of the statue,
shoot the vase to get some ammo and go place the other Jar. Behind the statue for Jar #1 you can climb at the wall. Get the pistol
and push the button, a flyby show you the way to Secret #2, some pistol ammo. Go
back to the room with the two statues
and leave Sweetwater through the door.
Labyrinth of the Dark:
Go take a dive into the pool and follow to a large room, turn left along the
wall and get the ammo behind the pillar. Swim to opposite corner and up for the
hole in the ceiling. Get enough air and swim
back, take the flares and find a hole in the wall (E) behind a pillar to get
Secret #5, medipack and flares. Now return get
out and find 3 Orange vases to shoot ....
In the part Treasure and Grave you find two secrets, but you named then
booth secret #4. That's secret #6
and #7!