Fearsome
1 and 2
Level by Harly Wuson (March, 2001)
Walkthrough by Harry Laudie; map recreated by manarch2 in Oct 2016
Level 1
You get a cut scene stating that this is level 1. You
start in a dark wooded area. Go east and kill three bats. Go to the back south-east corner
for secret #1 and a large medipack. Go north to trip over a dead body and find flares. Go north into an open section and
kill two dogs. Climb a north pillar and jump east into a valley area. Kill two bats and jump over first
pit and drop into the second pit. Pick up flares and kill a bat. Then go east to enter a cave. Follow the cave to drop and slide into a
lower cave. Kill a dog and two bats. Go to the north wall to climb over a block and drop into a hole. Pick
up secret #2, crossbow normal ammo, red shotgun shells,
blue shotgun shells, flares and a large medipack. Go west and then north-west to some water. This arouses two dogs and four bats to kill. Go
to the back of a north-east pillar and climb a ladder. Back flip to a ledge and
then monkey swing west to another ledge. Face south, drop and jump to another
ledge. Jump to another south ledge and use the floor lever to get a cut scene
of a wall descending. Get down and go to the south-west part of the cave. Climb
a ladder and back flip into a small cave.
Enter the cave and exit out the other side into a
valley area. Slide down and go west. Pick up flares and kill two
dogs. Go south and at a dead-end, pull up west to a block.
Jump over to the blocks on the east. Go north-east to drop into a hole. Pick up
secret #3, blue shotgun shells and the shotgun. Exit and now go west through the rock archway. On the other side, look
to the north-west and kill the two guards near the barricade. Get down and go forward and get a flyby of more
guards and a motorcycle. Go to the south-west and kill two guards. Go south to get flares and red shotgun shells near the motorcycle. Also search the ground for a large medipack, a small medipack and blue shotgun shells. Climb the tree stump for secret
#4, small
medipack, red shotgun shells, and blue shotgun shells.
Get on the motorcycle and run over three guards. Then drive
around to gain speed and go north to drive up a slope and jump over a deep pit.
Drive over two guards and stop to pick up a large
medipack and blue
shotgun shells. Get on the motorcycle and drive into a north valley.
Run over three guards and return to the shelter of the rocks. Then step out to the north to
kill two guards high on the rocks. Get the motorcycle and drive to the north cave
entrance. You face a water room with some gaps that need to be filled. Dismount
the motorcycle and go east to enter a large maze.
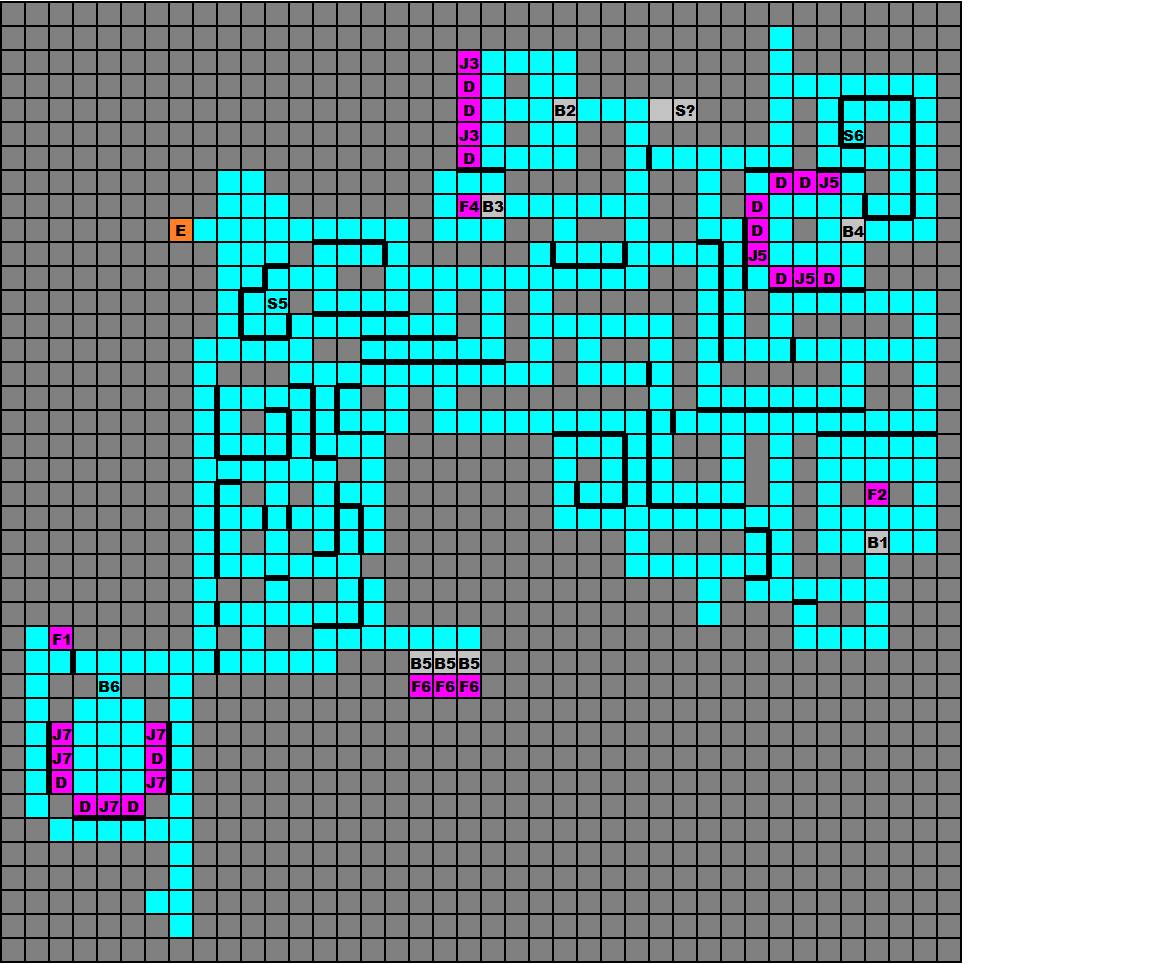
In the diagram below, the "E"
square depicts the entrance. The sequence is numbered and you start by going to
F1. F# is a floor lever. J# is a jump switch. B# is a block that is lowered by
the lever or switch. Sometimes, more than one switch is required and they have
the same number. The final J7 switches raise the blocks in the water room. D is
a death tile if you use that switch. S# is a secret, the S? area is a secret
that seems to be unreachable as it's blocked by a solid wall but perhaps you
might find a way to get there with a hidden flipmap? The dark grey blocks and
the thicker black lines are solid walls. The thin black lines are to denote a
square and the light blue tiles are the passages you can explore. That's it, so
just follow the diagram.
In your travels you will have to kill many
dogs. You also find an assortment of medipacks, shotgun shells and flares. Get secret
#5 for a large medipack, red shotgun shells, blue
shotgun shells, and two
flares. Get secret
#6 for blue shotgun shells, red shotgun shells,
revolver ammo, large medipack and flares.
When finished pulling the J7 jump switches, go back to
the motorcycle. Drive through the water room and up the slope. Follow the path
and drive up a slope into some trees and the level ends by crashing to the
desktop.
Level 2
You get a cut scene stating that this is level 2.
Start with the motorcycle in front of a closed gate. Go west and use the rock
to the right of the gate to jump over the brown fence. You get a cut scene of
the large gate opening and two guards appearing. I found it easier to run pass them to get the motorcycle to
run them down. Pick up the Uzi ammo and a small medipack that they drop. Then drive to the gate in the north-west and park the
motorcycle there in front of a closed gate. I never found a way to open that
gate. Go south to the gravestones and use the ledge to jump over the brown
fence at the south wall. Get secret #1, revolver ammo, large medipack and a small medipack. Climb the rock at the east side to get back outside and enter the
large gate again. Go into the center of the gravestones and shoot a small white
bell jar and the font doors of the building open. There is a jump switch on the
west wall to the left of the doors. Do not use it or the doors close again.
Enter the doors and go west and get a cut scene of the
doors closing behind you. Go to the north-east corner and hop into an alcove.
Get secret #2, large medipack, red shotgun shells, and grenade normal ammo. Go up the stairs to the second floor. All doors are locked here so go
up the other stairs to the third floor. Go left and follow the balcony to the
south-east corner and open the door. Emerge onto an outside balcony. Run and
jump over the balcony to the south-east to land on an invisible ledge. Get secret #3, small medipack and the revolver. You also hear the front gates open again. Go west, light a flare, and
drop and hang to see an invisible ladder. Climb down it to the end and then
drop to the ground. You can see the jump switch that you should not touch.
Re-enter the building and go west as the front doors close again.
Go west and enter the left archway. Go to the back and
open the door in the north wall. You see an empty pool and a black door. Go to
the north-east corner and hop on a block for secret #4, revolver ammo and a small medipack. Exit and return towards the front door area. Go west and this time
enter the right archway. Pick up a small
medipack and flares from the table. Enter the door in the north wall. Follow to a room and
look east. Shoot the white bell jar and pick up the crowbar. A wraith will attack you so
run back to the pool and the black door and use the crowbar to open the door.
Run west and jump over a pit. Go to the back wall and look left behind a pillar
for a jump switch. Pull and then exit back into the pool that is now filled
with water. The wraith will die in the water. Now go back to the pit for flares. Return and search
the room floor for two small medipacks. Go to the north-west corner and pull up into a crawl space for secret #5, red shotgun shells and the shotgun.
Exit and dive into the pool and swim through the east
underwater tunnel and into an underwater room. You find Uzi ammo and revolver ammo on the floor
and then pull up to a ledge. Climb east on a ledge and jump to grab another
east ledge over the water. Pull and get down the other side. Pick up flares and crawl into a
hole. Roll and climb a ladder. At the top, back flip into a tunnel. At the
first branch go south and pull down a trap door from the ceiling. Get into the
upper tunnel and follow to a crawl space. Go west into the crawl space. Follow
it to shoot a brown bell jar and pick up a small medipack. Exit the crawl
space and go north to stand up at the end. Pull up to a slope, slide, and jump
for a jump switch. Pull it and hear a trap door open. Go west and get into the
open trap door. Drop into a room above the pool. Go east for a large medipack and north for flares.
Go west to see a floor lever behind a fence. Enter the
doorway to the north and follow the tunnel. Enter a room with the switch behind
a door to the east. Kill six bats as you go to the south side of the room. There are two gates and two
black doors. Open the east black door with the crowbar. Enter a use the
floor lever. Exit and go east to the open gate. If you shoot the brown bell
jar, insects attack you. Use the floor lever and hear a gate open. Exit and go to
the west gate for a small medipack. Use the floor lever and go east to the open door by the floor lever
behind the fence. Use the floor lever and get a cut scene of the door at the
poolside opening. Now go back south and open the right black door. Use the
floor lever and a wraith attacks. Run back out and onto the blue glass floor of the first room.
You fall into the pool and the wraith dies. Pull up and enter the open door in
the north wall.
Enter the room and go east to pick up flares off a bed. Pull the
jump switch on the north wall and get a cut scene of a door opening in a
corridor. Exit and go through the pool room. Enter the corridor, go through the
open door in the south wall and enter a library. Walk south and Lara looks into
an aisle. Enter there and climb the south bookcase. Jump the bookcases in the
north-west direction towards a jump switch. Pull it and get a cut scene of a
door opening. Get down and go between the west wall bookcases to find the door.
Exit the door into an outside area to kill another four bats. Pick up grenade super ammo by the dead guard.
Get two close to him and insects attack. Go south to use the crowbar to open a black door and enter the
building. Use the jump switch to the left of the door to get a cut scene of a
door opening in the corridor back in the house. Notice a trap door in the
ceiling to the right of the closed door. Go back to the house and go east in
the corridor to find the open door.
Enter the auditorium and stage room. Slide down a
slope at either wall and jump to grab the stage. The east has a closed door, so
go west up the stairs. Enter a room with a mirror and continue west. Just
before the doorway, look up to the south and pull down a ceiling trap door.
Pull up into the room for secret #6, small medipack, large medipack, and Uzi's. Get down and enter the west doorway. Pull down a jump switch and get a
cut scene of a door opening in the outside area. Exit the door to your
right and out into the yard with the dead guard. Go south and enter the door at
the south wall. Hop on a block and jump onto the wall. Go east and jump to pull
a jump switch on the south wall. You get a cut scene of the door opening back
on the stage.
Back though the house into the auditorium and slide
down again to grab the stage. Enter the room and pick up red shotgun shells, blue shotgun shells, small
medipack, large medipack, Uzi ammo and flares. Notice a closed
door to the north-east. Hop the box in the north-west corner and pull up into a
crawl space. Crawl west over the catwalk and stand up into a room. Use the
floor lever and get a cut scene of trap doors opening on the stage. Get down
and drop into the pit. Carefully shoot six bats and be careful of the bell jars.
There are closed doors at both ends of the pit.
Face the north bell jars and number them from the
left.
Bell jar #1 has insects
Bell jar #2 has a wraith
Bell jar #3 has bats
Bell jar #4 has a small medipack
Bell jar #5 has bats
Bell jar #6 opens the east door
Face the south bell jars and number them from the
left.
Bell jar #1 has insects
Bell jar #2 has a wraith
Bell jar #3 has bats
Bell jar #4 has insects
Bell jar #5 has insects
Bell jar #6 has a small medipack
Shoot the good bell jars and go east to use the floor
lever. Roll and go west through the open door. Pull a jump switch and the traps
doors above you open. Go west to use a floor lever and get a cut scene of the
trap door dropping into the outside building. Climb out of the pit and go west
to find the outside building. Enter and go to the trap door and pull up south
into a crawl space. At the other side drop in a room. Go west and grab a
crevice. Shimmy around the room to the east side to pull a jump switch. The
block at the south wall has dropped. Get into the crawl space there and follow
it to drop into some water.
Search the water for grenade normal ammo, grenade super ammo, blue shotgun shells, crossbow
poison ammo, crossbow explosive ammo, revolver ammo, and flares. Get into the crawl space at the east wall. Follow it to drop into a room.
Use the floor lever and get a cut scene of the door opening in the room off the
stage. Hop on the corner slope to grab the crawl space and pull back up. The
open trap door is now closed so crawl over it and continue crawling. Detour to
the right for revolver ammo and flares. Then continue north and exit back onto the stage. Go east into that
room and go north-east to the open door. Slide down and the level ends.
Level 3
You get a cut scene stating that this is level 3. You
slide down and land in a room. Use the crowbar to open the black door to enter
a corridor. Go east and then north to kill a guard. Kick open a west door and enter the room to kill a dog. Shoot all the bell
jars and the block drops. Pick up a small
medipack and two Uzi
ammo. Use the floor lever and exit the room. Go right and
then west and north to kill a guard. Kick open an east door and carefully enter. Kill the guard and the dog. Crawl into the room
to avoid the wall darts. Use the floor lever and get a cut scene of a door
opening. Exit and go north to enter the open door. Pick up red shotgun shells and kill a guard. Use the crowbar to open the black door. Enter the room and kill two dogs. Shoot all the
barrels and pick up red shotgun shells,
blue shotgun shells, large medipack, small medipack, Uzi ammo, shotgun and flares. Use the floor lever and get a cut scene of a block dropping.
Exit the rooms and go to the north-east corner of the
corridor to find that open doorway. You enter a room with colored tiles. The
first pink tile is safe. Stand jump west to the next safe pink tile. The
south-west pink tile is safe. Stand jump west to the next safe pink tile. Jump
to the north wall for the next safe pink tile. Stand jump west to the next safe
pink tile and the three blocks drop revealing a floor lever. Kill a guard and
use the floor lever to get a cut scene of a door opening. On the way back, use
the safe green tiles, as the pink tiles are now deadly. Exit the door and go to
the left to find the open door. Go up the steps and kill two guards. Approach the
floor lever and turn to kill another guard. Use the floor lever and the level ends
8-mar-2006