TOMB OF THE CYBERMEN
Level by Terry Barrett (Dhama)
Written walkthrough by Phil Lambeth
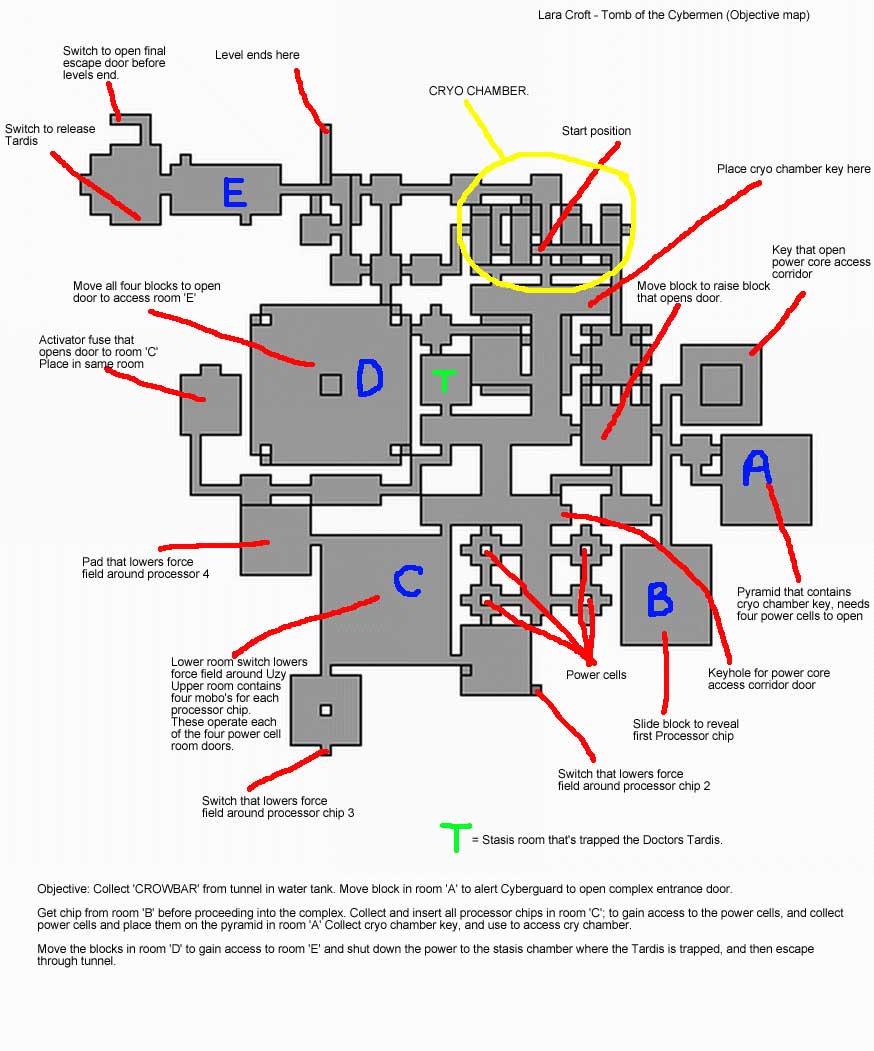
The author, in a unique twist, has provided the graphic
"walkthrough" reproduced below. Although it's certainly adequate to
guide the gamer through the level, a more orthodox written version has been
added for whatever further assistance it may afford. Please also note that the
top of the author's map is oriented west rather than north.
Lara, bedecked in new hairdo and outfit, receives verbal instructions from an
unseen advisor as her adventure begins. Pick up the shotgun and ammo and run
north down the tunnel. Turn right at the bend and continue until Lara slides
down a slope into some green (but non-toxic) water. A hungry shark awaits, so
swim down and into the south opening. Turn left at the intersection and follow
the tunnel until you're able to swim up to an air hole. Turn around and climb
out into a small room. Move away, as the shark is able to nibble at your heels
even while you're standing on dry land. Turn around and use your pistols to
dispose of the shark.
Jump back into the water and swim the other way through the tunnel. Go
past the opening to your right and follow until you reach an irregular alcove. Pick
up the crowbar, swim back to the larger pool and surface for air. Then swim
back down and time a spurt past one of the scissor blades into the east room. There
are items of note in each of the corners. You can shoot the translucent boxes
in the NW and SW corners for target practice if you wish. Stay away from the
computer-like device in the NE corner, for if you climb up onto it you'll burn
and die. Go to the SE corner and move the globe onto the gray tile to raise a
block nearby. Climb up onto the block and activate the jumpswitch to open a door
behind you.
Reverse roll, run up the ramp and draw weapons to kill the SAS who steps
out to challenge you. Go into the corridor where he came from (bypassing for
now the passage to your right) and approach the wall schematic to your right
for more verbal instructions. Then reverse roll and run down the short
corridor. The door to your right opens silently as you approach. Go inside and
survey the dangerous conditions below.
Your goal is to reach the other side of this large room (Room B on the
map), where you can see two globes. The burners are the obvious dangers, but
the lighter colored squares are the only safe areas; if you touch any part of
the pink slopes, you burn and die. There may be more than one way to do this,
but here's what worked for me: (1) Take an angled standing jump to the first
safe square to your immediate left; (2) standing from the middle of this
square, take a standing jump to the square that's down and slightly to your
left; (3) turn to the right and take a running jump over the lower burners to
the SE square; (4) turn around and take a standing jump across the burners to
the NE square; (5) turn and take a running jump up to the SE square; (6) take a
standing jump up to the next SE square; and (7) pull up to the ledge.
Take from the central box-like structure the first of four processor
chips that you'll use later (and which will likely show up in your inventory
simply as "load") to gain access to the power cells. Then push the
two globes to the gray tiles on either end of the ledge, as this seems like the
right thing to do while you're here (although no clue is provided as to what
you may have accomplished). You can take the chip before moving either
globe. However, if you approach the central structure after moving both globes
and hit the action key, the box lowers to reveal what looks like a giant
computer chip. It's unknown whether this has any significance.
Return to the other side of this room, retracing your steps as described
above. The door ahead, which had closed behind you upon your entry, now
re-opens, so run forward up the ramp and do some exploring. Go past the opening
on your right, where you see a yellow-green chamber inside, and turn into the
alcove beyond and to your left for some verbal instructions on opening certain
doors. Now note the hole to your left as you exit the alcove, and climb down
the ladder into a lower passage. Reverse roll and run into the next room (Room
A on the map). Watch out for the shimmering dark green squares placed
intermittently on the floor, as they're deadly. There are a total of four giant
pill bugs in this room, but they won't all come at you at the same time. After
shooting them, head toward the NW corner and pick up the Core Key. You'll use
this later to open the door to the power core access corridor.
Climb up the ladder and go back into the passage where you saw the
yellow-green chamber (but stay outside lest you burn and die). A robotic voice
says something unintelligible as the door to your right opens.
The next room, as the unseen instructor intones, contains the pyramid on
a suspended ledge, for which you need to find and bring back four power cells
(or what the ancients called beetles) in order to reveal the cryo chamber key. Safety
drop off the east end so as not to alert the SAS stationed in the room below,
and pull the globe onto the adjacent gray tile. A cut scene shows an
SAS-cyberman running across a bridge to open the door on the other side. Now
you can go around to the other side of this room to surprise and kill the SAS. Use
one of the three blocks to climb back up to the ledge with the pyramid, then
run across the bridge through the south opening.
The SAS awaiting you is not your friend, despite the good deed he did
for you just now, so dispose of him before moving on. The door opens, so turn
left at the yellow-green chamber and go back to the alcove where the door was
closed moments earlier. It's now open, so go inside. As you cross the bridge
over the area you explored earlier, listen for more instructions. When you enter
the next room, draw weapons to kill the giant pill bug that's scuttling toward
you.
Turn to the right and go through the opening after the door obligingly opens. There's
a gap in the floor ahead with a deadly burner underneath, so open the door to
the alcove up to your left. Shoot the SAS, whose muscles must surely be
cramped, and activate the jump switch inside the alcove to turn off the burner.
Drop down into the passage and step forward to drop down into another
hole. Turn to your left and go down the corridor into the next room. Shoot a
trio of giant pill bugs. The large medi-pack on the block is protected by a
sputtering laser beam. I was able to turn it off momentarily by stepping around
on the white tiles, long enough to jump up onto the block and claim my prize.
Go back out and climb up into the corridor where you activated the jump
switch. The area beyond the west door leads to the cryo chamber, but you aren't
able to access it yet. Instead, go through the east door and turn right in the
passage. The camera angle abruptly changes, so that if Lara were wearing a
skirt she would find herself in a very compromising position. Turn left and go
through two east doors, then turn left and go through the north door. Use the
Core Key to open the east door in this room. Go inside and then reverse roll
with weapons drawn to kill the SAS sneaking up behind you.
In this small room are three closed doors. Only the east door will open,
so go in there and find a small room with a suspended artifact in the middle
and a colorful force field in the far wall. You can't do anything here,
however, so go back to where you got the crotch shot of Lara and go through the
south door. In the next room is a purplish force field to your right. Step up
to it for more instructions, then reverse roll and go through the east door. Run
along the corridor until you reach a subway-like area with a psychedelic moving
wall strip. Another SAS may decide to stalk you at this point, so be prepared.
Continue down the ramp and into a room with two rolling spike balls. Shoot
two more SAS, one inside and one behind you, then turn your attention to the
spike balls. Don't simply run across the tracks when the coast is clear,
because they're like live wires that burn and kill. Take an angled standing
jump (to avoid the low ceiling) over the first one and note the pedestal to
your left. Then take a similar jump over the next spike ball track and pick up
the fuse in the west alcove. Jump back across and insert the fuse in the
pedestal to open a door allowing access to Room C on the map.
Go back along the subway tunnel to the crotch-view area and take the
east doors. Shoot another SAS and turn right into the now-open south doorway. Go
down the ramp and turn left onto a ledge overlooking a huge room (Room C on the
map). A demigod is shooting at you from the red helix on the suspended slabs in
the middle of the room, so take a running jump and grab to the ledge to get
closer to your adversary. Pull up, quickly draw weapons and get rid of him so
you can survey the room without being distracted.
On the ledge where you came in is a pedestal. There are four of them
scattered throughout this room, and they act as receptacles for the processor
chips (three of which are also scattered throughout this room). You're already
carrying one that you picked up back in Room B with the burner tiles, so go
ahead and use it now if you wish. A cut scene shows a door opening in the power
cell area.
Go back to the central slabs and make your way over to the east end. Turn
left and take a running jump and grab to the ledge against the north wall. Go
inside the NE opening and use the ledges in this impossibly deep room to get
down to an alcove in the NE corner. (It's a laborious but easy process with a
mixture of standing and running jumps, with a few grabs thrown in for good
measure, so I won't bore you with the details.) Go inside and activate the jump
switch, then go back up the same way you came down. If you happen to slip and
fall you're dead meat, not so much from the distance you may fall but in that
the flooring consists of burner tiles.
Back on the central slab you find that the blue force field formerly
protecting the second processor chip has been lowered, so pick up the chip and
jump back over to the ledge against the north wall and use it on the nearby
pedestal to open a door leading to one of the power cells. You may also have
noticed by this time that someone is shooting at you from below, so try to stay
out of range.
Go back to the central slab and head over toward the south wall. Turn
left and take a running jump and grab over to the ledge against the east wall. Go
into the SE opening, and you sense without having to be told that the green
stuff in here is deadly. Use the white tiles to jump around to an alcove in the
east wall. Go inside and activate the jump switch. Return in either direction
you prefer and jump back to the central slabs. The white force field formerly
protecting the third processor chip has now been lowered, so pick it up and
jump back to the previous ledge and use it in the pedestal. Another door opens
in the power cell area.
Now go over to the west wall and turn left to make your jump and grab to
the ledge against the south wall. Surprisingly, the water in the next room is
safe, so jump down and swim into the west opening of the central structure and
lure out the shark. Pull up onto the white tile at the opening and shoot it
dead. Even though the water is safe, the remaining nonwhite tiles aren't, so
dive back in and return to the central structure through the west opening. There's
a blue tile on the floor and a white tile in the ceiling. Swimming close to one
or both of them lowers the yellow force field protecting the fourth processor
chip back on the central slab. Go there, pick it up and jump back to the
previous ledge to use it in the pedestal. Another door opens in the power cell
area, across the hall from the one you opened with the first processor chip.
One more force field to go, the one that's protecting the uzis, and it's
also just about time to get that SAS who's been taking pot shots at you. Head
over to the east wall, where you see the wall ladder. However, don't try to
reach it from the central slab. Rather, jump back to the ledge to the right of
it. Walk out to the NW corner and from there take an angled standing jump and
grab the right hand side of the wall. Climb down quickly, releasing and
grabbing again and again so the SAS can't draw a bead on you. When you get to
the floor, reverse roll and take out the bastard.
Locate two small medi-packs on the floor near the middle of the north
and south walls, then climb up onto the block in the SW corner and pull the
chain to shut off the flames under the jump switch in the west wall of the
central structure. Activate the jump switch to lower the force field around the
uzis, then draw weapons to kill the demigod who has suddenly appeared on the SE
block. Climb back up the ladder in the east wall, shift to the right when you
get above the ledge, and drop down onto it. Jump back over to the central slabs
and pick up the uzis, then jump back to the ledge against the west wall and
leave this area.
Run up the ramp and turn right. Go through the north door and turn right
into the east opening. You're now in the area with the power cells, and your
activities in Room C have enabled you to get them. Let's try first the opening
to your left. There's a central shaft that goes way, way down, so you don't
want to make a false step here. Save, to be on the safe side. Take a running
jump either into the right or the left alcove, holding down the action key so
you'll land safely inside. Then turn around to find that a bridge has magically
appeared on the back side of the central shaft. Take a standing jump there,
listen to some verbal pats on the back, and pry off the first power cell with
your crowbar. Jump back to either alcove and save again, because the running
jump back into the opening is the trickiest of all.
Run across the hall into the south opening and repeat the foregoing
procedure to obtain the second power cell. Return to the hallway and go through
the east door into the room with the suspended blue ball. Repeat the foregoing
drill to obtain the third and fourth power cells, then leave this room through
the west door and turn left in the room with the keyhole. You're headed to Room
A to place the power cells in the pyramid, so turn right into the room where
you lose camera control. Go straight ahead through the next door where you get
the infamous crotch shot, and turn right to run back across the bridge. Once
over, turn right, then a quick left, and turn right at the yellow-green chamber
and go through the doorway. Follow to Room A and place the four power cells in
the pyramid, doing your best to ignore the irritating earthquake. Step forward
and take the Cryo Key as some robotic sentinel announces a meaningless threat.
With key in hand, go back over the bridge and take the first right at
the west doorway. Jump over the gap in the flooring and continue through the
doorway into the next room. Turn right and go through the north doorway and use
the Cryo Key on the button device on the wall to your right. Immediately
reverse roll and shoot the SAS who shows up all of a sudden. Go out into the
hall and enter the new west opening into the cryo chamber.
Turn right, then left and walk across a strange translucent surface to
the reddish opening on your right. Here you'll get your first taste of a
cyberman, who acts a lot like a mummy. If you shoot him he'll appear to die,
but in a short time he'll return to life and thereafter retain a higher degree
of invulnerability. There's nothing of interest in his little pink chamber,
though, so you can let him sing to you for a while if you wish and then move on
(since he won't come out to follow you).
If you go south into the next area, however, you'll disturb two more
cybermen who WILL follow you, so beat a hasty retreat in the other direction. If
you take the first right and retreat into one of the openings, you'll go around
in a little circle and alert a pill bug to kill. So continue south down the
main corridor and disturb yet another cyberman. Run past him into his lair and
down the ramp. Oops, closed door. In the previous corridor you'll notice
climbed surfaces you can use for refuge, although they won't take you anywhere.
Have you ever had three cybermen surrounding you, all singing to you at once? Enjoy
the concert for as long as you desire, then drop down to the floor and run back
to the middle corridor. Alas, the climbable surfaces here also lead nowhere.
But back in the far corridor with the translucent floor there's an opening high
up in the south wall. Climb up either adjacent ladder and shift to the left or
right as appropriate to drop down into the corridor.
Follow until you reach a passage headed south and run that way for a
short distance. Then reverse roll and shoot the giant pill bug that's following
you. Continue south and shoot the SAS who comes up to challenge you. When you
reach the end of the passage, use the crawl space and turn left. Drop down into
the hole and activate the jump switch. Crawl back out and find a new opening to
the east. Run down the corridor into a room with numerous green pyramids and
several globes on the floor. On the central block are four cyber-simulacra of
Lara. Shudder!
Run around this room freely with weapons drawn before doing anything
else. You'll shoot four SAS and four giant pill bugs before things settle down.
Be sure not to shoot at the simulacra, even though Lara targets them. Move the
four globes onto the nearby square gray tiles to open the access door to Room E
on your map. Go back the way you came, past the singing cybermen, and return to
the southernmost section in the cryo chamber where you alerted the third
cyberman earlier. Go down the ramp again, and this time you find the door is
open.
Go down the south corridor and turn right. Take the first left and climb
down the steep shaft. Head down the west corridor and pick up the Grenade Gun
and two stashes of grenade gun ammo. There's a closed door to your right, so
run down the corridor to the south into a room with deadly green goo and a
spike ball poised high overhead. Take a standing jump forward and grab the
wall. Climb to the top and look around if you like, but don't pull up or you'll
catch fire and die. Climb back down and back flip to the north opening. Turn
around and run back down the corridor. Climb up the north face of the steep
shaft and pull up at the top. Run forward and make a horseshoe turn to the
left. You'll come to a downward sloping room guarded by two rolling spike
balls.
Stand slightly right of center and step forward to slide down the slope
after the first spike ball rolls to your left. Jump over the deadly track and
continue sliding. Jump off the second slope with a midair swerve to your right
to land on a safe ledge. Take a standing jump forward when the spike ball moves
away, then continue forward into the next room.
Immediately draw weapons to kill the demigod firing at you from your
left, then reverse roll and kill the second demigod who materializes behind
you. Locate and activate the jump switch on the east wall to open the door in
the west wall and (according to the map text) release Dr. Tardis in Room T on
your map. A recorded message bids you farewell, so go into the new opening and
activate the second jump switch at the end of the short corridor to open the
nearby exit door.
You can play in the electricity for a while if you like (it won't hurt
you), then exit this room and jump over the spike ball track to the safe ledge.
Jump forward, hang from the edge and drop down to the ledge below. Step forward
into the north opening and run down the corridor. The door to your left that
was closed earlier is now open, and it leads to the exit. However, instead of
an exit trigger I encountered a black wall at the end of this corridor, so
there was no way I could "legitimately" finish the level. Also,
although this isn't completely clear, the map text seems to call for Lara to
make her way back to the central room marked with a green T on your map, to
rescue Dr. Tardis before leaving. However, when I got back to the cryo chamber
(and gleefully blew away the three singing cybermen with my grenade gun, which
was reason enough for the return trip), I found the door into the chamber
closed. As I was unable to find any other way back to the T Room, that's where
I finished this engaging and fascinating level.
(The author has cleared this up by saying there's nothing to do back in the
green T room, and that the walkthrough is therefore complete.)
http://forums.eidosgames.com/showthread.php?s=&threadid=39632&highlight=cybermen