OCEAN MOON
(ASTRODELICA EPILOGUE)
Level by Richard Lawther
Authorized walkthrough written
by Selene
[Many thanks to Richard for helping me out with some
important points]
STORYLINE:
After the conclusion of Astrodelica 4:
Showing off to Lara, King Penguin tried to balance the Magic Thing on
his crown but it fell off and smashed. Captain Astrodelica
was furious.
Somewhere in another galaxy, quite far away, lies a small moon whose
surface is entirely covered by an ocean of frigid water. There, exists ancient
alien technology that can be used to create a new Magic Thing. Captain Astrodelica has dropped Lara and King Penguin off on this
moon with instructions that one or other must make it to the Provider
Apparatus.
IMPORTANT NOTE:
Do go through the readme file before starting
the level. This will give you a lot of helpful information on the level, how to
get the secret etc.
Pickups: Flares, Provider
Gem, small medipack, revolver, lasersight, large medipack,
revolver ammo, Magic Thing + 1 Secret (the Eagle-Eyed
Certificate)
Enemies: None
Identify the 4 rune symbols is the
message that greets us as the level starts and we find Lara on a small rocky
slab of land. You’re on the moon now and the water here is freezing cold, so do
NOT under any circumstances tempt yourself into going for a dive (technically
you can, but Lara will die and you’ll have to reload the game so what’s the
point?). Another good idea here is to keep a pen and paper ready so that
you can jot down each of the rune symbols as you come across them.
There are three bridges leading off the island: the N
one down to a boat where King Penguin is waiting. You can’t get anywhere from
there yet, so that leaves us with one option less. As of now you can go either E
or S as you like. The preferable thing is to locate the revolver/lasersight to begin with, so head S to the Isle
of the Platforms.
ISLE OF THE PLATFORMS- THE PUZZLE OF FOOTSTEPS:
Pick up the flares to the
left and cross the island to the bridge leading up into no where. Pointless you’re
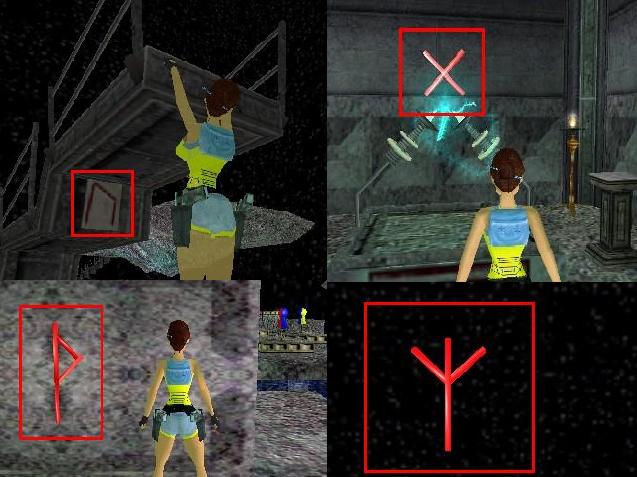
saying? Wait and see….or simply walk up to the end of the
bridge, turn around, drop and hang from the edge. Now look up underneath the
bridge. That’s right…..you will see a
rune symbol- one out of the four you’re looking for.
This rune is according to the Futhark (the ancient
runic alphabet) called Uruz and it
symbolizes strength/power.
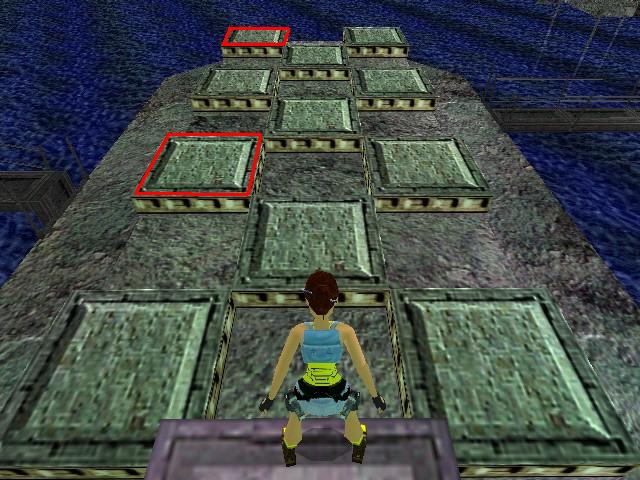
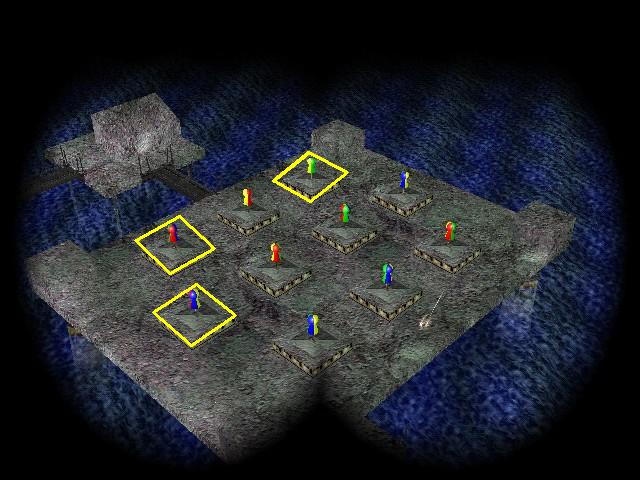
Examine the 11 raised platforms and turn the volume up
high. Walk across each of the platforms and take a note of the sounds of Lara’s
footsteps as she walks onto them. Most of them (nine to be exact) will
be just the same- a sort of hollow sound as it would be when walking across
metal. The sound accompanying her footsteps as she walks across two of the
platforms will be different from the rest. What you have to do is to run across
these two platforms and none of the others. You can try solving this puzzle
yourself or have a look at this screenshot for the
location of the two tiles in question
When done correctly a block rises at the S end. Climb
onto it (being careful not to step onto any other platforms- if you do so
the block will lower again). Do a standing jump to
grab the isle above and pull up. You might notice a tile with a frame around it
at the middle of the isle. There is a column tucked away in the corner and this
is moveable- your next task is in other words to find a way of moving it onto
said tile. However, you can NOT under any circumstances move it across
the tiles that have tiny green squares on them- spears will pop up and impale
Lara if you do this. You can retrieve the Provider Gem placed
upon the white pedestal at the far end now or after moving the column. After
you’ve done both a pair of flame emitters will be put out down at the Isle
of Fire.
The secret here is quite simple: NEVER stop on
the spear tiles, just continue pushing it until you‘re standing on a safe tile.
Stand behind the column and push it 6 tiles forwards. Go around it to the left
and push it 2 tiles S, then move around to the left again and push it straight
onto the middle tile.
ISLE OF FIRE- TRIAL AND ERROR/THE REVOLVER:
Now you can head over to the white pedestal and
retrieve the gem if you haven‘t already. As you do so you’ll see the Isle of Fire down below and some flame
emitters are turned off. Head down the stairs beyond the pedestal and follow
the path around to the right and then left to pick up a small medipack. Stay away from the elevated platforms
though- Lara will catch fire if she gets too close to them.
Return to the stairs where you came down and go around
to the right, then climb the elevated block in the corner. The
moment you step onto this block look to the left to see that a second pair of flame emitters that have been put out in front
of a second flight of stairs. The moment you step off this block a timer
will start and you have to reach the stairs BEFORE the flame
emitters come back on and saying this timed run is difficult is
a major understatement. Here’s my way of doing
it:
Stand on the left tip of the block and run off. Sprint
forwards a little bit, release the sprint key and veer right, then sprint down
the next part. Let go of sprint before turning the corner, run to the edge and
jump. Press Action in the last moment to grab the edge ahead and pull up.
Immediately do a standing jump forwards and keep running and start sprinting
just as you turn the corner of the fire platform.
Sprint a bit forwards, release the sprint key and start jumping in zigzags
between the fire platforms (just take care
that you do NOT get close to
them, jump across them, run across them etc.). At the end veer right at the corner of the last platform
and dash up the stairs before the flame emitters come
back on.
NOTE: Sprinting during
the timed run can be rather difficult and it leaves you with less control when
turning the corners etc. You can do it if you like, that’s how I did it and it
worked fine for me. It is also fully possible to make the timed run with runs
and jumps only. In the words of the level builder: The critical step
is jumping before the gap so you can run/jump from the edge and save some time.
Cross the floating isle on top and the next bridge W.
Walk around and enter the building. Pick up the revolver and lasersight from the pedestals
(you’ll need
it for finding the secret). Combine the two and aim for the huge eye
up in the ceiling (Lara will actually aim for it by herself, even if you
only have the pistols drawn). Shoot it and the second rune appears: Gebo- the rune symbolizing gifts.
Return to the Isle of Fire the way you came (the
flame emitters will not come back on at all, but you’ll still have to avoid the
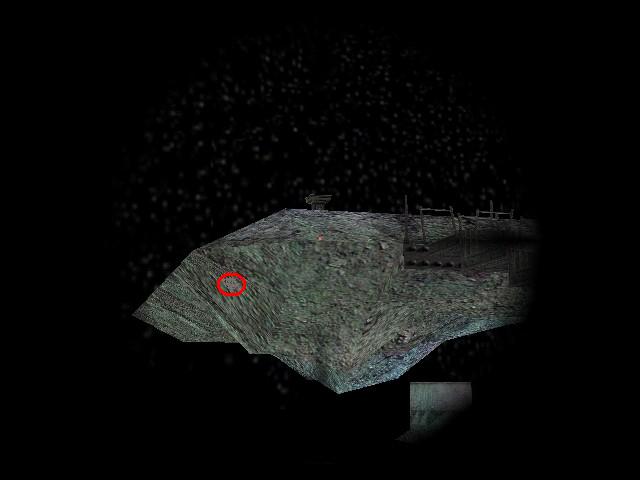
platforms). Before the stairs leading up to where you found the gem draw
the revolver and look up to the left underneath the rocks. Here you’ll find Sphere #
1 (screenshot),
shatter it before continuing up the stairs and drop back down onto the Isle
of the Platforms. Now return to the starting point the way you came before.
ISLE OF THE RUNES- ANOTHER SPHERE:
Head down the E bridge- you’ll reach the Isle
of the Runes. Here you’ll find 8 raised platforms, each one decorated with
a rune. You might recognize Uruz at the
middle of the far left row and Gebo at
the bottom of the middle row. We have yet to find out the remaining two runes
so cross the island and locate a row of platforms floating in the water to the N/W.
There’s also a bridge to the E, but you won’t be able to go all the way
to the next island as there’s a closed gate at the approximate middle of the
bridge.
Stand at the N/W corner rune and do a running
jump to reach the first platform. In this case you’ll have to be a bit cautious
in your attempt to follow across the trail of platforms. Normally Lara would
stop at the edge if you’re walking, but in this case she won’t and so she’ll
die if you step off the edge of the platform. You’ll have to reach the third
and last platform by a series of running jumps. Just avoid stepping of the
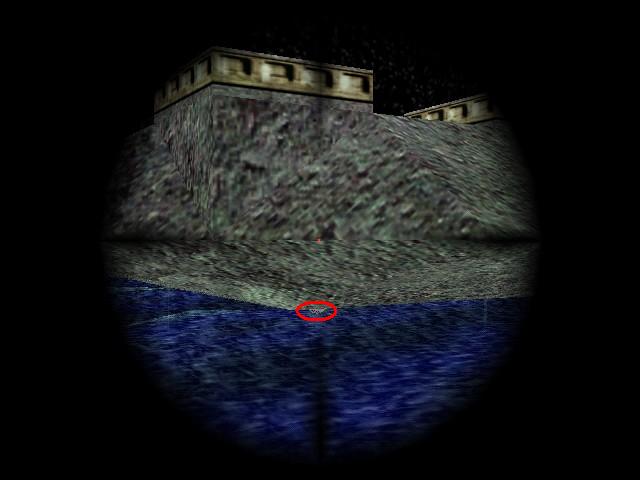
sides and you should make it there. But first of all: standing on the first
platform turn around to face the Isle of the Runes. Now arm Lara with
the revolver again and start searching underneath said isle. Here you should be
able to find Sphere # 2 (see screenshot if
you‘re having trouble locating it). After shooting it you can
continue the jump sequence across the platforms.
ISLE OF THE GLOBES- THE MOON GLOBE PUZZLE:
>From the last platform do a long
running jump to the island with the rainbow glow underneath it. Walk
around to the opposite side and here you’ll find what looks like a raised
bridge. You’ll have to reach the level above and to do this walk to the edge (facing
the bridge) and hop backwards. Start running, jump
at the edge and in mid-air roll so that Lara ends up facing the opposite
direction right before she hits the bridge. Continue pressing Jump and as she
leaps into the air press Action. If this is done correctly she’ll grab the
ladder opposite and you can climb up to the top.
Here you’ll find a multi-levelled
walkway, two moon globes and two levers. Notice that there are two corner tiles
here: N/E and S/W decorated with a picture of the moon Your ultimate goal is to place the moon globes on each their
corner tile and this is done by raising and lowering parts of the walkway.
The rules are as follows:
Smaller rising block up on its own - globe is pushed one block
high.
Taller rising platform up on its own - globe is pushed two blocks high
(lower platform)
Taller rising platform up and smaller rising block up - globe is pushed
three blocks high (upper platform)
Face S and pull the rightmost lever (this we’ll call Lever #
1- the other one is # 2) to raise some platforms and lower others. Now move
one of the moon globes onto the nearby lowered platform. Return and push the
second lever to raise the platform up to the second level. Climb onto the
walkway and pull/push the moon globe all the way to the end. Now return to the
ground and push Lever # 1 once and then push Lever # 2 back into
its original. Go back up to the moon globe, push it onto the “elevator” and
head down to the ground. This time push lever # 2. You can now go and
move the moon globe onto the nearby moon tile. A blue diamond surrounded by
electrical currents appears on top of the globe.
Now you know what to do. To cut things short I will
simply list which lever/s to push for each move. It’s obvious that you’ll need
to climb up to the globe and push/pull it further along the walkway every time
you push a lever and as said before your goal is to move the globe onto the
second moon tile. I’m not going to go into a lengthy explanation here: if
you’ve moved the first globe all the way around you shouldn’t have any problems
figuring out how to deal with the second.
Once the second globe has been positioned in the
correct spot you’ll see a camera shot of a zip line appearing somewhere nearby.
Push both levers again and you can now climb up to the zip line and ride it to
the island at the far end. Just keep pressing Action and when Lara drops
>from the zip line she’ll automatically grab the edge of the island.
ISLE OF THE LADDERS- THE THIRD SPHERE:
Now you have to find a way upwards. Climb the ladder
in the corner N/E. Stand with Lara’s back to the slope, walk forwards
and stop at the edge, then backflip onto the slope.
Immediately jump forwards and grab the ladder. Climb up and around to the
opposite side. Climb down as far as possible, Lara still with her legs tucked
up on the ladder, and backflip/roll/grab to reach the
next ladder. Climb around to the right and on the other side climb down as far
as you can again and backflip to land on top of a
stone pillar.
Do an angled standing jump to grab the next ladder.
Climb around to the left and down until Lara is about one step from the bottom
of the ladder, then backflip/roll/grab the ladder
behind. Continue climbing around to the right, then down and left around the
corner. Climb down until Lara is hanging from the bottom rung, drop and grab
the edge of the platform below. Shimmy around to the left until she can pull up
onto a pillar.
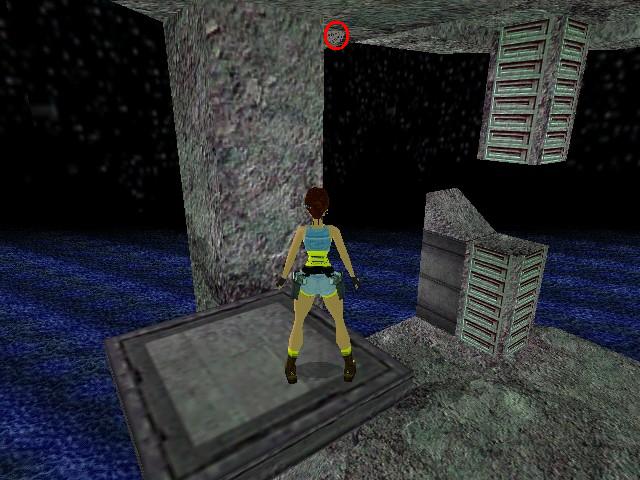
From here do a long running jump and a grab in the
last moment to reach the floating platform N. At this point look up at the
ceiling to locate Sphere # 3 (screenshot). When
you find it arm Lara with the revolver and shoot it. Now turn around towards
the pillar you came from and look left to find another row of ladders. They can
easily be reached from here by an angled standjump
and grab >from the edge of the pillar. Climb around to the left until you
can climb upwards and pull up into the room above. You‘ll see a pillar rising
down on the ground.
Up here you’ll find two empty pedestals and two
levers. Push the leftmost lever and a large medipack + some revolver ammo appears
on each of the two pedestals. Now push the rightmost lever to uncover a zip
line over at the edge. Note that when riding this it is essential that you drop
off at the last moment, otherwise Lara won’t survive the fall. You have to estimate
the drop so that she lands on the taller block in the corner of the next
island. This will cause her to lose about 2/3 of her health (provided that
you have absolutely no health loss from before). The only other options
are: A) Having her bones crushed against the hard rocks or B) Drown
in the icy water. Apparently losing more than half of her health is by far the
preferred alternative.
ISLE OF THE PAWNS- THE COLOUR PUZZLE:
First of all push the lever near the W bridge.
This opens the two gates on said bridge (you now have free passage between
this island and the one with the rune platforms). Now cross the island and
the E bridge. There’s another bridge going N and also two gates
preventing you from going across. Walk around to the back of the sloping block
and on the wall here you’ll find two pieces that combined make up a rune
symbol. When you pulled the lever these pieces started rotating so watch them
closely until they merge into one symbol. This is the rune Wunjo,
standing for joy, comfort and pleasure.
Return to the island with the rotating pawns (personally
I think they look a bit like rotating pins of some sort) and watch the colour schemes of the three pawns near the lever closely.
There is one combination in particular to take into consideration:
Blue- Red- Green- Yellow
Now you have to step onto the raised platforms with
pawns that have colours matching the combination
mentioned above. There are three of them altogether, you can try to solve this
puzzle yourself or if you need further assistance see screenshot.
ISLE OF THE TELESCOPE- RUNES AND SPHERES:
When this is done correctly a camera shot comes up
showing the two gates on the N bridge being raised. Cross the bridge over to Isle
of the Telescope. Approach the binoculars, stand in front of it and press
Action. Lara will look into the binoculars, seeing a telescope appearing out of
the globe on the rocks ahead and through the telescope you’ll be shown the
fourth and final runic symbol: Algiz- a rune relating
to protection. Do not leave yet though, from the N/E corner of the isle look up
across the sky and you’ll find Sphere # 4 (see screenshot if
you‘re having trouble locating it). As you shoot it an item will
appear on the pedestal up at the Isle of Fire.
You have now found all four runes and all you need is
to retrieve the secret. Head back across the bridge to the Isle of the Pawns
and from there cross the second bridge to the Isle of the Runes.
Step onto the four elevated platforms depicting the four runes you have seen: Uruz- Gebo- Wunjo- Algiz (see screenshot if
you’re having trouble).
A short fly-by shows a zip line stretching across from
the starting point over to an isle we haven’t visited yet, go back there and
climb the raised block. We’ll get there soon, but first we’re going to
backtrack a bit to get the level’s only secret.
ISLE OF FIRE REVISITED- THE EYE OF THE EAGLE:
Return to the starting point and head across the bridge
to the Isle of the Platforms. You might have to solve the puzzle again
to raise the block so that you can reach the island above. Cross it and go back
down to the Isle of Fire, then follow the path left like you did during
the timed run. Jump across the gap and head around to the left, but instead of
continuing turn around again and look slightly right towards the poles with the
spheres on top. Standjump over there and (provided
that you’ve found and shot all four spheres already) pick up the one and
only secret: the Eagle-Eyed Certificate.
THE MAGIC THING- A BOATRIDE TO THE STARS:
It’s time to go back now, so return to the Isle of the
Platforms and cross the bridge back to the starting point. Climb the block here
and ride the zip line across to the other side. Stand in front of the octagonal
receptacle and place the Provider Gem inside. The odd-looking helmet is lowered
down onto Lara’s head- reading her mind and once done she can pick up the Magic
Thing from the pedestal. A block rises underneath the zip
line on this isle too, so you can get back where you came from.
It is now time to leave this place so go down the
stairs towards the boat where King Penguin is waiting and sail off into the
horizon to end another splendid adventure.