THE
QUEST FOR THE SERAPH
AUTHOR:
LEANDRO DUBOST
WALKTHROUGH:
LUCAS (TREEBLE)
These
walkthroughs were written under consent of the author. They might not point out
all the secrets nor pick ups.
LEVEL 1
- MARINE RESEARCH BASE
Lara
starts the level being sucked into this Brazilian base. The only way out of this
room is a pretty tight path at North. You might have trouble swimming through it
(and several tight paths later), if Lara is stuck, roll underwater and turn her
around. This usually gets her in to the right position. The door will open as
she approaches and reveal a dead monk, as well as a guard. Check the monk's body
to find a Chip, then crawl by the pipes.
After
picking up the harpoons near the windows, you can go through the door (it's animations are a little screwed, but don't worry: this
doesn't affect the gameplay). Now you have three doors
- two will open as you approach them, one will not. First go to the bathroom one
and look up. You can climb through the lights. On top of that ladder, you'll
have the first massive strike on the level. Dispatch the four guards (watch your
health!) then pick their goodies. Behind one of those crates there's a switch,
that'll open the huge doors of this storage room. Out there, you can use the
Chip on the machine to open a door in the rooms we just ignored. Get back there.
In the
bedroom, press the switch on top of one bed to open the last door in the
previous room. Now you can get through the door we opened a couple minutes ago.
Going downstairs you'll be hit with a little nostalgia - remember that song?
Remember such room? Yeah, at last. In the room with the
oxygen supplies you can put your hands on to the rare Harpoon Gun, but
unfortunately time didn't do any good to it - it won't work underwater anymore.
Still, you can keep it as a treasure for this adventure or you can use it. It's
not very effective though.
Let's go
for a swim. Underwater you'll find yourself in a maze like room, but it ain't a maze. It's quite easy to find yourself there. There
are three places where you can surface. Right now, you have to surface at the
central one. To get there, swim through the pipes, take a right and then a left.
Now surface. Done.
When
surfacing, you'll realize you're inside another maze! Pretty
easy as well, so no mapping required. All you must do now is to find the
dirty water (there's an oil barrel underwater, probably it is damaged. This is
quite a problem in Brazil, where
the level plays) past the yellow keyhole. Swimming through it and surfacing on
the other side, you will find another switch to activate. This one will open the
door behind the fan that you saw when you dove at this maze. Get back there
(don't worry about the fan, a little bug in the Matrix will prevent it from
cutting Lara into pieces) and you'll find a stairs room. Go way down to find, in
another monk's body, the Red Card. Now, get back to the underwater maze.
This
time, swim through the pipes, then a left and ahead. Surface and you'll find
that in this part of the maze, you can only use the Red Card. Use it and a door
will open way back, near the bathrooms... do I need to
say you have to get back there? Oops, I already said. Watch out with the ceiling
sentry gun. (They're a little buggy when shooting, but if you get close they
will throw flames and usually you'll get Lara burning. If you stay one square
away from it, you'll see that these flames follow a pattern, and all you must do
is to time your moves correctly to get through safely).
You're
in the machine room. Dispatch the guards before climbing through the lights. Up
there you'll find the Yellow Card. Do you remember where we saw it's keyhole? Yes... time to get back there. A camera will
show you something happened in this room, if you didn't realize, dive into the
oil again. Now a trapdoor is open and you can pick up your Green Card way down
there. Go back to the machine room and use it.
Now
you're close to the end. First off, go to the control panel and push the button
to open a door to your right. Time to swim in the Ocean! It's pretty easy to get
lost here (and pretty easy to find your way too), so don't fool around, don't
play with the sharks either, and don't pretend you can punch them as Lara did in
the Cradle Of Life. All you must do is to swim to the
Southwest to find a place before your air supply is empty. In this place, you
can pick up a Floppy Disk.
This
Floppy Disk can be used in the Machine Room, however, I don't know of what good
it is, but use it anyway. Now you can dive into the central pool at the room you
just left. Swim to the bottom and then follow the obvious (and unique) path.
Climb up through the floor (?!) to get to the second and last massive strike.
Time to use all you learned! Behind one of those crates, you can get your dirty
hands on the Seraph! But to leave, you'll have to find the Green and the Yellow
cards. After picking the Brazil-set of cards, use them on the wall and, outside,
wait for your chopper.
End of
level.
LEVEL 2
- COPACABANA
PALACE
Note:
TombRaiderChronicles.com received a bogus TOM file and therefore all the sites
that hosted the level from that source, hosted the bogus TOM file as well. In
this bogus level, you'll start in the main hall, and you can't do much because
the level is incomplete. The correct file has this data: AUG-17/2001 1.023KB.
Lara
starts at the bathroom, don't worry about the shower, though. As you approach
your room door, it will open. Look for an alive soul on
this floor, he holds the Room 407 key. Enter his room and, in his bathroom, on
his sink, grab the crowbar. Use it to open the door to the little basement,
where you'll find the Room 404 Key. This room is two doors ahead to the right
from where you are now.
Inside
room 404, push the switch to trigger the first strike. They'll come through the
windows! Watch out. After dispatching them, go out onto the balcony to recover
the Seraph! This will open another door on the hotel. Inside this small room,
you have to pushable blocks. Behind one of them is the
Rusty Key, and behind the other one is the Rusty Keyhole. Pick the key and use
it, then leave this room and go to your right, to find the hotel stairs.
From the
highest point in these stairs, jump to the chandelier, then jump to the lower
chandelier and activate the jump switch on the wall. Watch your health, since
there's quite a fall from there. Enter through the door you opened to find the
second floor rooms. Look for the one which is open and activate the switch.
Surprise! Fiama Nera strikes
again. Dispatch them and pick up their goodies, including the 1st Floor Key.
This one you can use downstairs. Ah, push the switch again to open the door.
On the
first floor, go to the left to find the dining room. All of sudden, Fiama Nera will strike for the
third time while Delerium plays. Dispatch them and
push the block by the aquarium. You will find a button behind the aquarium that
will activate the sprinklers. These will put out the flames off this room and
you'll be able to pick the System Circuit on one of the fire pedestals. Then go
behind the aquarium again, pull the movable block and use the circuit to open
the door to the garage.
Don't
ask me how the cars got here, but what matters is that they're here. The bad
guys will usually hide themselves behind the cars, so they can shoot you but you
can't shoot them. On the lower floor, after dispatching the dogs, pick the Laser
Sight on the center of the room and shoot the small grate. Crawl under and climb
up to activate a switch that'll flood the garage.
Now,
swim around to find the lever switch. It opens the door to the main hall. Get
there and prepare to the last Fiama Nera strike here. Watch out for those "snipers" or so to say
on the higher balconies. To shoot them, use your Laser Sight from upstairs,
otherwise you won't hit them. Upstairs, there's one part of the banister that
you can break. Then hop down to activate another jump switch. This switch opens
the exit door. Out there, in the garden, push the button by the central gates
and get to the vehicle on the street.
End of
level.
LEVEL 3
- RETURN TO TIBET
Ok, now
Lara disappeared to up there in the mountains. In the hut, pick the Seraph
(you'll need it to finish the level! Don't forget it!!) and also pick the car keys. For the next minutes you'll be
driving, so there ain't much to explain - just be sure
to avoid the traps and pits. And run over whoever cross
you! After being chased for six rolling balls, you'll have to leave the jeep
behind.
Then
you'll have to climb up the hill. Watch out for the boulders that'll try to
smash you into the ground. Once you're up, you'll have to go down. Again, watch
out for the boulders. In the pit, there are some tall rocky columns, one of them has a brownish side. This side is
climbable, so climb down the pit and crawl through the passage to find SECRET
#1.
Climb up
again and, in the next room, cross the pit, grab the rope and try to hit the
ground without losing too much of your health, recover it if needed to fight the
leopards. Keep going and finally you'll find the Monastery. Before entering,
though, look at the windows. Try to climb up to the one which has cement
beneath, then you'll find SECRET #2. Now push the lever and enter the Monastery.
You can
go and have a glance at the monk. Celibacy is a hands-on job, so don't you worry
if he doesn't give attention to our miss. On the next room, you will pick up a
torch, light it up in the monk's room. Then, back to the room where you picked
it up, light the panels on the floor to open the door.
Entering
this door you'll enter the dangerous part of the level. However, no problem to Lara. Here's a map of this maze:
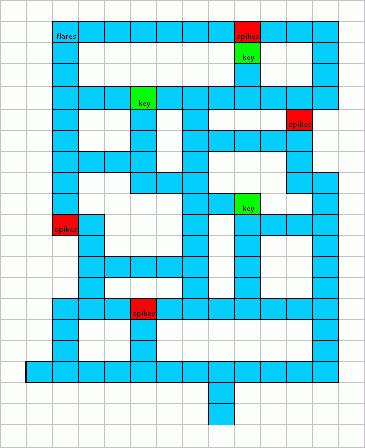
Enter
the room behind the water wheel. Here you'll also find a not so nice trap. Climb
up the ladder, jump and roll in mid-air. You MUST grab the edge, if you land on
it, you'll catch fire and most likely you'll die. When you grab the edge, shimmy
around to climb up in a safe place. Going down, Lara will have a glance at a
lever. Hmm, this room smells like death, can you feel it? Make your way to the
lever, push it, and then go back to the water wheel.
Now, on
the other side, there's a pole you can climb. Climb it up and at the top jump to
the entrance on the wall. In this room, there are various rolling balls that
will chase Lara. At the top, climb up to get to the higher
area of the main hall. Another monk posing. Hah,
these guys are so weird, but if they like to meditate, let it be. Pick the
Basement Key by his feet and jump down. Go to the basement now that you have the
key.
In the
end of the basement, you'll see a door and various panels on the floor. Look
behind and light up your binoculars - can you see something hidden up there?
That's your map to the exit. Pick the torch by the door, go to the nearest room
and light it up. You can light up that candle if you want to pick the SECRET #3.
Now get back to the panels room and light the correct panels. (the third one in the left side and the fourth one in the
right side).
Now, you
have a trap here that would catch any tomb raider in a hurry. Except for Lara Croft, obviously. See something on the floor?
Follow that pattern and look up... yes... On the left wall, you can climb up
through (?!) the wall. Push that lever and you'll activate an earthquake. Now,
use the Seraph.
End of
level.
LEVEL 4
- THE HIDDEN CITY BENEATH BARKHANG
In the
gates of the city, at first you might think there isn't anything to do, but if
you did read the readme file you'll realize the author
did this intentionally. Climb the cracked walls. I know it's not quite a
climbable thing, but if the author did now it's done. Atop, you'll find a switch
that will open the gates to the city.
Ignore
everything and climb up the first set of stairs, where there's a small skin
table and two chairs. Activate the lever and get back to the gates, two doors
opened, revealing a small ladder. Climb it and hop to the pole. Climb it up to
get the Guardian's Mask, then go down and into the city again. Go past the
chains and use the mask on the receptacle to open the cages and a door somewhere
else. Go upstairs again.
Watch
out for the squishy blocks walls. Make your way through it and you'll arrive
downtown (hah, very funny). Climb down and kill anything that moves. Now enter
the hallway and look at the ceiling. There's a certain pattern you have to
follow to arrive to the other side. Pick up the torch and light it up, then go
back and light the pots by the statues feet. And inside you go.
This is
the hall of the kings. You need two masks. One of them is beneath you, just fall
through the energy gaps and pick up the Queen's Mask. Activate the ice switch to
go back up. The other mask is in the room by your side. Activate the lever on
the wall opposite to the door, then go through it. Go
down and pick up the Laser Sight. Climb back up and jump into the invisible.
Walk over the invisible path until you get to the King's Mask. (Bug warning: if
you activate the lever in the pit, that would make part
of the ceiling fall revealing the invisible bridge, you will stumble into an
invisible wall later, which will prevent you from going on, so don't push it.)
Go back
to the kings chamber and use both masks. This will open
a gate in the central area. In the end of that passage, Lara will meet the other
tomb raider, and he isn't nice either. Listen to his laughter and drop down,
slinding until you find some stairs. Keep going until
you reach the fire pit. Look at the ceiling, rather easy isn't it? Just avoid
the broken tiles and monkey swing to the other side of the pit.
You'll
reach a room with a gate protecting a golden structure. Climb up the ladder you
find near the arch and, at the top, jump and roll to grab the edge. If you time
it right, the chain won't push you down. Push the lever to open the gate and go
take a closer look at the golden structure. It's just like... THE SERAPH!
End of
level.
LEVEL 5
- THE SECRET
PALACE
This
level starts exactly where level 4 finished, in front of the huge Seraph. Slide
down and get those icemen out of your way. Pull the lever to open the door.
Watch out for the squishy blocks. You'll find yourself in a huge pit. Watch your
steps and don't get too close to enemies - they might just push you down. Go
down one level via the ladder and, after dispatching the baddies, go to the part
of this bridge where it just ends, with a different texture. Look way below - a
crawl space, and that's where you gotta go. Grab the
edge, let go and climb up. Don't slide down to the gold or you'll die!
Crawling
through that passage, you'll get to a squishy blocks maze. Take the path to the
right and keep going until you find an opening in the ceiling. Then, find the
lever near you. Activating it will stop the squishy wall that blocks your way,
so you can climb up safely. You'll be in another huge pit. Climb up and jump to
the central platform, climb up the pole to get outside.
You will
eventually hit another bridge. A flyby will show an ice monster running to you,
kill him before he throws you out of the bridge! Then, in the ladder, you'll
have a difficult jump to do. It's more like trial and error. While climbing
down, after about 10 steps down, jump and roll to grab the edge to find the only
gun that affects the final boss. Jump back to the ladder and keep going down.
Before
hitting the arena pit, you might want to jump to the other side of this room, so
you can get some ammo that will hurt the final boss. Any other ammo is useless
against it. Then, when you jump down to the bottom of the arena, it will come
out. One shot and it's gone. It drops you a mysterious gem, which Lara will
research later. Enter the small area where it came from and you'll see other two
raiders that were victims of this palace. So, the guy that pulled up the bridge
and laughed at you in the level before is now dead and he had a partner! If
these guys had not left Lara behind they'd be alive. Maybe it was their destiny
to die here... Push the switch and, at the arena, climb up.
You'll
be in a spiked crawl space. Just find your way to the lever and then to the
other side to the door it opened. Slide down and there's the chopper waiting for
you. Recognize that symbol? Yes... and it is ready to take you into hell
again...
End of
level.
You can
read "The End.doc" now. Leandro had plans to do a
sequel to The Quest For The Seraph, but he gave up
before starting it. His other project, "Tomb Raider Is Not Enough", which he
briefly mentions in the readme also was cancelled. It's a pity,
but such is life I guess.