LOST ISLAND
Levels by Joker
Walkthrough by manarch2
WARNING: Be sure to get the Shotgun in the first level or you’ll be
stuck in the last one!
Level 1 – Coast (1st visit)
You start this level near the sea. Go up the dunes and head N, up the ramp and
run as far until you can see two huts. Go behind the right one and climb the
block, then up the hut to find a Little Medikit. Get down and run back down the
dunes, turn left and find another hut area. Go ahead and S of the huts to find
a closed door – simply shoot the right one with your pistols and the way is
free. Run further and then left, keep close to the wall until you find another
shootable door, behind it you can find the Crowbar. Return all the way to the
huts again and find another S passage, follow it to its end and open the door
of the big hut at the end with your crowbar. Inside, you can find Normal and
Wideshot Shotgun Ammo, right of the door you can pick up the Shotgun. Get out
again.
SECRET 1: Go E of the hut and pull the stone two
times away, a hole will be revealed, get in and follow the crawlspace to
another outdoor area. Shoot the rightmost block for Dino DNA, then return to
the big hut.
Follow all the way back to the area where you found the crowbar, head S and
open the door with your item to get access to Site B. Follow the track, when
there is another right way ignore it first and head left into the next level.
Level 2 – Island Road (1st visit)
To your left is a currently blocked path, so go right around the big stone and
come to a large pit. Drop on the ledge below you and jump to the platform
ahead. Follow the platforms and at the end you can drop down safely. To your
right there is a block structure – go around it and kill a bug, then jump up
the structure and from there to the N, hang from the ledge and shimmy left
around the corner and to the end, drop and turn around. Jump up the slope and
climb the blocks, then jump to the tree and from there to the NW corner to find
the Gate Key. Now get down and climb up the E blocks once again, jump to the E
platform, climb the right block and run-jump to the slope. Jump to the ledge
where you dropped onto the ground and work your way back up, jump on the slope
and to the ledge in the last moment. Now climb the high block and jump to the exit
again, return to the first level.
Level 1 – Coast (2nd visit)
Drop down the left blocks and follow until you get an audio cutscene where you
hear a raptor, when you go left you can find a skeleton and the raptor running
away. Get back to the junction and now left and use the Gate Key to open the
door beside you. Now enter and see a cutscene of a big area. Follow the gardens
NW and you will find a way on the bridge. Go left and follow the walkway until
you can find a slope left. Go down until you find a closed door and a switch
nearby, simply shoot the switch and the door opens to lead you into a maze. Go
two times right to find some Flares, then turn, go ahead and right and pull the
block once. Go around to the other side of the blocks, push the first block
until you get to see the right passage, then pull out the second block twice,
go around it and enter the new room where you can pull a floor lever to raise a
platform elsewhere. Get back out and up the ramp. Go right and then around the
corner and enter the warehouse to find Normal Shotgun Ammo left, climb up the
blocks and find more Normal Shotgun Ammo, from here jump to the raised
platform, climb up and get the Grenade Launcher.
SECRET 2: Jump around the walkways clockwise and
shimmy right to avoid the block, then shoot the rightmost window. Get down into
the garden and drop into a hole hidden by plants. Climb down the ladder and get
into the passage – at the end you can find Dino DNA in a hole. Get back to the
warehouse.
Leave the warehouse and return to the area with the gardens and the lake, from
there all the way back to Site B and enter the second level again.
Level 2 – Island Road (2nd visit)
This time go left and take your Grenade Launcher to jump up and blast the jeep
away. Once finished, run-jump to the opposite ledge and climb up. Follow the
valley to a big area. A cutscene shows some dinosaurs in a bigger valley. Get
down there, find Normal Shotgun Ammo in a valley W, then pass the brachiosaurus
and the stegosaurus near the mansion, then head SW to the water and dive in to
find a Key SW, get back out and N of the mansion. Climb on the block, from
there on the palm and shoot the wooden grating in the mansion to jump into it.
Obviously no-one there, so explore the mansion and start by running through the
central corridor. Get downstairs and left, find some Flares, then turn and go
into the opposite chamber to kill two scorpions. Back upstairs, open the door
with the Key. In the room with broken floor, jump to the E and kill two bats.
Climb on the slanted block and from there to the jumplever. This opens a door
on the top so get back there and then E to find the chamber with the door to
find the InGen Card. Get out of the mansion and drop down, running E.
SECRET 3: Look up S shortly after starting
running E, there’s a safe ledge and a slope. Jump up the ledge and backflip on
the slope, jump up and climb the high platform, from there jump to the crack in
the wall and shimmy left, drop on a slope and jump on a ledge with a right
crawlspace where you can find another Dino TNT.
SECRET 4: Only one lamp is low, it is the switch for the Secret.

Get back out and drop
into the valley. Run up the E ramp you once came down, then S into another
little valley. Shoot the box at the end and insert the InGen Card to open the
door. Run left through the corridor and slide down into the dark to make the
level change.
Level 3.1 – Research Center (1st visit)
Follow the dark passage to a room with many boxes, jump onto the middle right
one and find Normal Shotgun Ammo in a hole. Back out shoot the E planks and get
outside. Follow N and pull a box away to get Flares. Go a bit back S to the
forklift and shoot the planks right of it, drop in the hole and run through the
corridor to another courtyard, go into the N maze (far right) to find Flares,
get out and go NE, shattering the bins doesn’t effect anything so directly run
into the SE corner and push the boxes out of the way to open the door with the
crowbar. Climb on the right block, shatter the opposite grating and monkeyswing
there, drop and climb in. On the junctions crawl ahead and right, eventually
you will drop in the room below. Run towards the S.
SECRET 5: Run NW and climb up there, crawl into
the opening and find the Dino DNA in the far left corner, then return.
Go SE and climb up into the crawlspace to find a Key here, get back out. Push
or pull the S block away, then shatter the next one to enter the previous room.
Go back out and run to the bigger courtyard, use the Key left to open the door.
Go into the SE corner and shatter the left grating. Pull the switch to let a
block fall in the hall, then return and climb the ladder in the opposite part.
Jump up to the right, then run further until you find a little depression, jump
to the right block and from there, as there’s nothing that blocks your way, to
the grating ahead. Run into the dark corner to find the Generator Battery. Get
back out of the hall and run N around the truck and further N. Run into the
house and go around the central machine to insert the Generator Battery. Go E,
use the slope as a boost to get to the ladder and climb up to the walkway. Jump
to the central and then to the opposite walkway to find a Little Medikit.
Drop down and leave this place, run back through the courtyard, around the
truck and left again, to the room with the monkeyswing. A door is open here so
head through and follow to a big hall with many receptacles. Run upstairs and
right towards the E wall, follow the little tunnel left around the corner to a
room with many doors. Open the first left one to find Wideshot Shotgun Ammo,
the second one for Flares. Progress and see two toilet doors for women and
gentlemen – open the womens’ door and find a pushblock right, push it in,
follow the passage (crawl under the pipes) and dive in the pool, swim until you
can climb out and follow the tunnel until you get to a room with many pipes.
Crawl under the far right one and pull the switch. Return all the way to the
toilets and go downstairs, one of the two doors is now open. Head through and
get to the cellar. Shoot the first three raptors that escaped from their cages,
then head left.
SECRET 6: Go to the NW cage and get into the
crawlspace, at its end run, then crawl and find a dark room. Find Dino DNA
behind a shelf and return to the cellar.
Find a switch behind a pipe in the NE corner to open the last cage and shoot a
raptor. Go in, left around the corner and in the left cage, shoot the fence and
get the InGen Card. Go a long, long way back to the big hall at the start of
this mansion, and downstairs, then right to insert the InGen Card. Go through
the passage and find two doors. Open the left one first and get Flares in the
far right corner. Climb the block that is nearest to the door and from here to
the central pillar. Monkeyswing to the gas block and time your jump down to a
switch. Using it raises a curtain somewhere else. Go back out to the big hall
and run upstairs once more. Go right, in the tunnel, then right; open the door
and you will get to the curtain room, get up there and find Dr. Grant’s Card in
the corridor, head back and downstairs. Use this card in the passage with the
toilets, on the glassdoor and enter. Get the Embryo Lab Disk from under the
table in the far right corner and leave again. Now get back down to the main
hall, downstairs you can use the disk on the N wall. Go in and see a cutscene
and then shoot ten little dinos.
SECRET 7: Run into the N room. The Dino DNA is
on the table, but a laser prevents you from getting it – you have to time your
jump perfectly to get it, the laser sometimes makes a longer rest, jump in the
moment the laser starts before this break and you’ll get it.
There is a timed button in the room NW of the one with the clones – push it,
get to the clone room and right, climb up the container and jump to the
platform, then to the bridge and the other side and sprint, then jump to the
door and get the Main Gate Plug. Get out of this room to the main hall, then
left to open the door with Dr. Grant’s Card, at the end of the halls find a
Large Medikit and Shotgun Ammo. Back to the main hall. You can open the S door
now but first run up the stairs again to the top, turn around and see a
different marked tile of the ventilation shaft. Go there and run-jump to that
ladder tile, climb up and get to the opposite part of the room. Jump to the
balcony and pry a Velve off the wall. Drop down, run S and use the Main Gate
Plug. This opens the big doors beside you, run out and at the junction go left.
Go right around the corner and make the level change.
Level 3.2 – Research Center
Run ahead and then left. Follow into a large room. Jump over the broken
platforms and then to the pipes, you can grab a ledge here, shimmy right and
drop over the stairs. Go up and then right to find Normal Shotgun Ammo in this
room. At the end you can see a painting on the wall that will be important for
later.
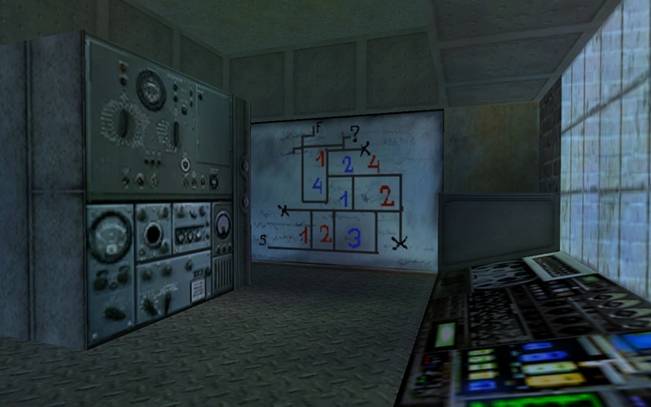
Now turn and go ahead, then right and outside. Kill four little dinos and
shatter the left part of the fence. Enter the new part and look to the left.
There are two Valves you cannot use, but they give you a hint where to place
the one in your inventory. Go right and place it on the block. Go behind the
tank and a door opens to get in an earlier part of this level. Go right and
you’ll see the big room is flooded now. Jump into it and into the E tunnel. You
have to remember that painting above and swim into the blue marked numbers.
First swim into the tunnel with a 3, then in the 1, afterwards in the 2 and
finally into the 4. If you swim into the other tunnels a stream will take you
to deadly rotating fans. After swimming through that puzzle you reach a
crossing. First of all swim left and get some air. Swim back and to the
crossing.
SECRET 8: Swim ahead and when a stream begins,
swim left into the passage to get the next Dino DNA. Swim back, right and
against the stream.
Swim into the left (with secret right) passage and enter a big room with an
attacking plesiosaurus in the pool. There are three tunnels leading away from
this room. Swim into the left one and into the one ahead to find an underwater
lever each. Pull them down, afterwards swim into the right tunnel and climb out
of the water at its end. Progress a bit S through the container passages, then
shoot two raptors coming from a red container. Now go NE in this room, fighting
yet two more raptors that also come from a red container. You can find Wideshot
Shotgun Ammo in it. Go to the NW (not far NW, a bit more S than that) and find
a block. Climb it and use the containers to jump over them. In the far SW
corner you can find a Large Medikit after a little passage. Go to the middle of
the room and do a little curved jump into the N passage. Go left and drop into
the room to find a greenish Key. Go to the far NE corner and climb up the
stairs. Shoot a raptor and use the Key at the end to open the nearby door. Pick
up Normal Shotgun Ammo in the control room. Go towards the N wall and climb the
block. Shatter the electric box and use the switch. After a short flyby run out
and shoot three raptors. Climb the NE box again and make your way E to the
containers just near to the control room (use the N passage mentioned above,
then jump over the E gap).
Jump to the open container and kill a raptor inside. Climb up the left rock and
from there to the top stage of the room. On the top jump over to the SW
container, avoiding the pliers. Kill a pterodactyl and get to the middle of the
room, to a single pillar with an item and two pliers. Sprint and grab the edge
of the pillar. Climb up while holding the crawl key, and get the bluish InGen
Card. Get up and quickly jump to a near container before a pliers gets you.
Drop down to the floor again and go S. Open the door with the old Dr. Grant’s
Card, enter the passage and grab a Large Medikit. Open the next door using the
InGen Card. A flyby shows you the way – you have to be quick as this room takes
down your health when the yellow bar is down. First, go right and get a Little
Medikit. Return to the start to restore the yellow bar. Unfortunately, the way
to the button is blocked – you have to do a little block puzzle first – with
lowering health bar! Always pull a block, then return to the entrance. So –
let’s start. Run to the opposite block and pull it. Go back and restore the
yellow bar. Do it three times more, get back and then run to the button, push
it, see a trapdoor raising, and sprint back.
SECRET 9: Pull the block in the right passage
once. Go back and restore the yellow bar. Now run around the block ahead of
you, in the right passage and in the (safe) crawlspace to get Dino DNA.
Return all the way back to the pool area with the plesiosaurus and swim up NW
to find the raised trapdoor. You can shoot the saurus if you wish now. Jump up
to the ages ago raised trapdoor (with the left underwater switch), to the next
platform and to the ladder. Climb it up to the top. Go into the left passage
and shoot three little dinos. Run up the right stairs and shoot a pterodactyl
in the courtyard. Nothing to find here yet but a keyhole. Return to the room
with the dinos and shoot the NW grating to gain access to a crawlspace. Get to
its end, shoot the grating and in the next room three more attacking little
dinos. See a receptacle for an item you don’t have yet, so enter the right
passage to get into a storeroom. Climb the middle S shelf to the middle stage
and run-jump E and grab the ledge. Get up and use the timed button that opens a
door NE. Drop down to the floor and sprint into it. There are two openable
cabinets – open the one in the far right corner to find another greenish Key.
Return to the storeroom. Go S and find a door, open it and find another, a bit
more uncoordinated storeroom. Go to the far right corner and pick up a Large
Medikit from a box. Return outside and return to the receptacle room. Get back
through the crawlspace and re-run up the stairs. Since you now have a green key
use it in the right receptacle to open the door. Find a switch NE that you
first have to shoot free. Use it and run downstairs again, then left to find
the room has changed a bit since your last visit. Climb the block and from
there run-jump to the W ledge. Pick up the Circuit Bulb. Now return all the way
to the receptacle just before the storeroom. Place the Circuit Bulb there to
open the door. Follow the passage and you get back to the first part of the
level.
Level 3.1 – Research Center (2nd visit)
Run a few steps and you get to notice an earthquake (no fear, it will calm down
after a few seconds). Run through the passage and into the next office. Climb
the block in the NE corner to claim a System Disk. Exit this room NW through
the tunnel. A door opens and you are downstairs of the corridor with the
toilets. Go up the stairway and follow back the corridor until you find a left
door you haven’t opened (or, at least, could’t do anything in) yet with Dr.
Grant’s Card, so do it now and enter the office. Run to the SE corner and use
the System Disk in the machine. You hear a voice saying the system is activated
now, and a flyby shows a now open door outside. Get in the corridor again,
hearing noisy steps… Run to the main hall of this level and downstairs, meeting
a (probably stuck in the doorway) T-Rex. Take your Shotgun, if you near
yourself he will enter the hall, and kill him with a single shot in the front
while he attacks. Go out, left, right and find the open door to your right.
Follow the passage to a red car and the level ends.
Level 4 – Through the Island
Lara could escape that research center, she is now on a railway, unluckily
without the red car from the last level. So, run to the right hole and take a
long dive into the pool.
SECRET 10: Swim under the rock formation NE and
climb out of the water there. Sidejump left on the slope and grab the ledge.
Shimmy left until you can stand up. Go to the highest point and run-jump to the
NW opening in the wall. Follow the corridor, partly crawling, and run-jump to
the crevice to your right at the end. Shimmy left until you can stand up and
get into the cave, picking up Wideshot Shotgun Ammo and, of course, Dino DNA.
If you didn’t go for a secret swim S and find a underwater passage, swim
through. If you found the secret, drop into a hole in a nearby passage and swim
through the passage. Both ways find together and you find yourself on a beach.
Climb up into the passage left of the waterfall and gain the Uzis. Return to
the beach and look for Uzi Ammo left of the tent, Wideshot Shotgun Ammo and a
sort of alarm clock button right of it. In the S passage you seem to need
another item to proceed, so first go W. When the passage first turns left climb
the blocks ahead and get down in the cave, using the crawlspace entrance. Get
2x Wideshot Shotgun Ammo, 2x Uzi Ammo and a Large Medikit (sorry, no DNA here).
Get out, go right and follow the passage until you can slide down. Shoot
another raptor (a species that is a bit harder to overcome than the raptors
before) here.
Take out a more powerful weapon and follow the passage to three raptors. Kill
them and ignore the crawlspace for now, go into the NW passage, shoot another
raptor, get to a bigger area and shoot another one. Find some Flares N, then
start climbing the W rock formation (first pick up a Little Medikit left of
it). At the junction (you can go up the formation or jump to an E ledge) choose
the E path, jump into the crawlspace, get out and grab the ledge, shimmy right
until you can drop and stand safely. Follow the passage to a big and high rocky
area. Jump on the first pillar right of you and from there to the right
platform near the rocks. Jump to the platform left of you, grab the ledge and
climb up.
SECRET 11: Jump to the lower slope left of you
(with a mid-air turn), then to the alcove in the rocks. You can find Dino DNA
in the tunnel, return, jump to the right pillar and climb the ladder.
Use the slopes to get to the E platform, from there jump up to the higher green
ledge and kill two (maybe even three) pterodactyls. Jump to the next platform
and further NW until you have to slide and grab a ledge, then do this again and
get into the rocks. At the end of the passage slide down and run through the
valley and shoot a raptor. Go SE and find Wideshot Shotgun Ammo, N, hidden
behind a stone, is a maze entrance. Go there and first grab a Little Medikit
right. In the maze go left (right is a dead end), then left to get Uzi Ammo and
a Large Medikit after a crawlspace, return, go left, ahead, left as right is a
obvious dead end, right (kill a dino crocodile), left is a passage and
crawlspace, after which you can find Uzi Ammo and a Large Medikit, right a
passage with a lever that raises a cage somewhere else (kill another dino
crocodile). Return to the start of the maze and get outside again.
Go back SW and climb up the long ladder again. Get out, run-jump to the right
platform again, turn and run-jump to the left one, jump to the slope and jump
left of the next platform, which actually is the starting ledge of the area.
Exit, drop down and climb the W ledges again, this time go up that ramps (jump
over side slopes), get to the crevice, shimmy left around some corners until
you can climb up into a crawlspace, and find a cave with a now accessible
Purple Crystal. Get back out, drop and leave this area SE, going back to the
place where you once shot three raptors. Look for a SE crawlspace. Crawl
through and follow until you can’t seem to proceed. Climb the green ranks here
and after a short run through the tunnel climb some big stairs. Drop down the
waterfall and you will shortly find yourself in a very familiar place – the
beach near the beginning. Climb out, run S and place the Purple Crystal in the
receptacle to finally open the door. There are more ways to go but since they
end soon, you can’t call it a maze. Simply progress, on the only real junction
go right, find some paintings from the Stone Age and also a Torch.
Leave and go left at the junction, a cutscene shows an helicopter arriving. Go
down the ramp and right (taking the Torch with you, of course). Throw it down
and climb afterwards down yourself, shoot down three primeval men, find a Large
Medikit NW, take the Torch and light it at the fireplace. Go NE, shoot another
one of these men (behind it there is another receptacle). Return to the last
room, with the Torch, and climb the S block, run-jump W with it, run up the
ramp, follow back the passage, now go ahead, then left, through the caves, at
the end light two wall torches with your one. The door opens, Leave your Torch
here and get in the next room; watch out for falling stones. Get into the NW
crawlspace, down at the end shortly after and step on the first breakable tile.
Drop onto a safe ledge. Look through the lower part of the room, seeing more
safe pillars, and run over the tiles, to drop down there. You can find some
Wideshot Shotgun Ammo, but also an Human Skull SE (you have to leave some tiles
to jump back to them and to the entrance).
Return all the way to where you lit the torch, kill the very last of these men
and place the skull in the dark passage. The passage beneath is no longer
blocked by the boulder. Get after it, watching out for another boulder that
will be soon triggered. Jump up to the orange monkeyswing and get to the other
side before the boulder hits you. Get out (a boulder will block the way back,
so be quick) and find 2x Uzi Ammo left of you. Go through the N valley, finding
a closed door on its end. Return and now head through S of the two valleys,
pick up a Little Medikit and find a invincible tricerandon (well, you see it’s
good that it is unkillable). Sprint and jump back all the way to the closed door
in the N passage, place Lara close to the red button left of it. Let the
dinosaur run towards her, in the last moment side-jump away to let the beast
push the button and open the door. Escape him quickly, running left, finding
Normal Shotgun Ammo in a little trench. Follow the valley, just before the door
turn right and follow the passage, a cutscene kicks in showing another T-Rex.
Run few meters, getting armed with the Shotgun, and kill him with the
single-shot method. The T-Rex kindly leaves the Gate Key after passing away, so
return and open the door using the Gate Key in the left hand keyhole. The door
– no surprise – opens and you can go around the rock and head to the helicopter
to finally escape from this both terrific and terrifying level…
THE END