BtB 2011 - Last Train to Paris
Level by José
Walkthrough by D&G Productions
Lara will fall from the airship into a canal, get out at the stairs and
on top watch the flyby (In the street W you’ll encounter 2 dogs).
The Crossbow Secret.
Lara is looking up to a kite, we’ll get to that later, so go to the
left along the canal (S). Shoot the ninja girl and go around the corner right,
then at the pool left and straight ahead (S). Climb the wall there and on top
shimmy to the left and drop down at the end. Pick up Secret #1, Crossbow and Arrows. Drop down to the ground.
The Magic Closed Book.
Go all the way to the W to that small house surrounded by grass and
jump up the roof standing at a corner of that roof (place
Lara facing one of the corners with a 45 degrees angle from one of the walls of
the small house, a single jump back and a standing jump straight ahead onto the
lowest edge of the roof, it makes no difference which corner), Then jump to the top to get the Magic Closed Book.
The Grenade Gun Secret.
Slide down and go N. Stop at the pool on the right and in the middle on
that small island is a Medipack (duck to get it). While we’re here we
might as well have a go for the next Secret. Dive behind that pipe SE and find
the opening in the plants, there is an underwater ceiling lever. Use it to open
the door in the pool, swim out and look for the underwater lever opposite that
door. This will open a trapdoor in the tunnel we go into now.
Surface near the door and take a deep breath, swim into the opening and
left, there’s a strong current here, but if you follow the path of the sticks
(go along the wall), you should be able to reach the open trapdoor in the
middle. Get some air and swim NW to the wall and follow the sticks to the end
where you can surface to get Secret #2,
the Grenade Gun and 2x Grenades. Swimming back out is easy.
When you get out of the pool, a snake will approach from the S. Go NW
and around the corner, pick up Flares and open the door.
Push Puzzle, for the Red Key.
Your task here is to get the grated cage in the SW corner on the tile
that has the same texture. In order to do so you have to push three more crates
around. The safe places you can put the crates on are the ones with the smoke
under it, you have to move the crates in a continuous motion, when you stop in
between you’re dead. Pull out the middle of the wooden crates three times back
in one go to the tile where there is smoke underneath. Back to the wooden
crates and now push the right hand one to the corner (NW) also in one go. Turn
around and now pull the third wooden crate back once. Hop over this crate to
get to the cage and push it into the corner S, then pull it E three times in
one go. Go to the W wall and move the left hand crate S into the corner. Now go
back to the first crate and push it straight W on the smoke area. (S).
Pull the cage from the S wall onto the greenish different looking floor
tile and a door will open outside in the alley. Go out and the door on the left
is open now. Go up the stairs and on top shoot the ninja girl. You cannot use
the weapons in that room upstairs, so shoot her from the top of the stairs. If
you want to see the fight, you can use the “Look” key while shooting.
Go to the body as she dropped a Red Key. Go out and to the
waterfront (all the way E) and use the Red Key on the door.
Timed Platforms.
On the wall S are three buttons. Save as this is a timed run. The
buttons activate some raising platforms so you can go to the opening up S.
I started at the right hand button; turn left to the next button and
finally the last left hand one. Back flip with roll and run to the low
platform, hop on and curve left to jump and grab the next platform (note by author: there's no need to back flip with roll.
You'll have enough time, just roll and run to the first timed platform, jump
onto it when running). Jump to the corner pillar and curve left to jump
onto the sloped pillar, quickly go forward a bit on the breakable platform and
jump to the last one, line up for the curved jump into the opening in the S
wall, immediately save again because a flying bug will come bother you. So
stand with your back against the wall and shoot it (savegame 1).
Jump to the other side (S) pick up the Shotgun, aim down at the window
and shoot it (Aiming with the shotgun can be done by
using the look key). Jump down (use CTRL) and end up in the opening. Get
the Flares, go E and jump (use Ctrl) into the opening down there.
The Thumpers.
Save and run passing the first two thumpers (or do a standjump), behind the second is a safe spot. Two more
thumpers (sprint works best) and a safe place on the right again (savegame
2). Jump over the knife and at the end jump forward (N) and grab
an invisible crack and shimmy left around the corner and pull up. Turn around
and jump into the opening W, go left and take a running jump to the other side.
Get the Flares and prepare yourself for a push block puzzle.
Store House Puzzle, a Red and Yellow Key.
Jump down and in the far SW corner is a Medipack, you might want
to go for that first. Climb the crates in the middle of the room and pick up
the 2x Shotgun ammo one by one, a ninja warrior will attack, she leaves
a Red Key. There is another ninja warrior; that one leaves a Yellow
Key. If you save and reload, the corpses will be gone.
For the Laser Sight Secret.
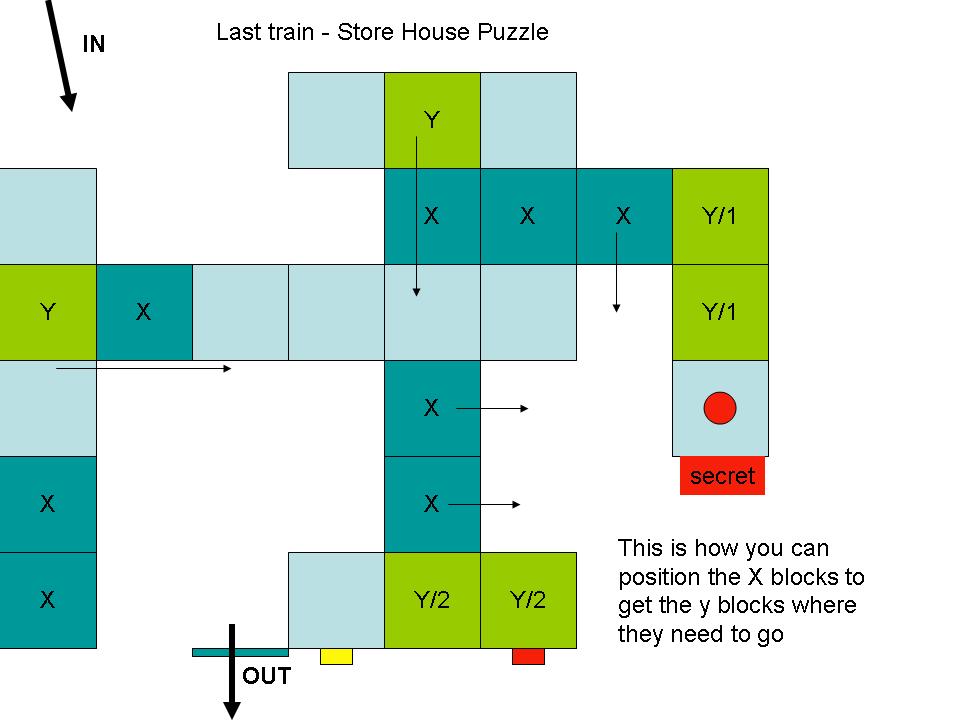
There are two movable crates in the NW corner. Use one to get two
crates from the second layer (N and E) onto the row of crates in the middle.
Then move both ground floor crates to the S side so you can move both crates
from the middle row onto the row at the S wall. Now you can pull the top one S
aside to get to Secret #3, the Lasersight underneath. Push the top crate back to
where it was. Now move the 2 second layer crates back onto the middle row and
use the ground floor crates to get them onto the row at the W wall
Go into the alcove in the W wall and use the Red Key. Pull the top
crate at the W wall once S, because the other keyhole is behind it. Jump around
the top crate to use the Yellow Key and the door will open.
Outside, the Book Key.
Jump to the ledge W, go right (N) and just before the first tree a jump
to another ledge E. Go to the end and crawl in that bush to pick up the Book
Key. Go jump back to the ledge W and to the right again (N) and after the
last tree jump right (E) and combine the Book with the Key and open the door.
Before going in there is a Medipack at the E end of this ledge. Shoot
the bird.
The Torch Puzzle.
Get in dodging the rotating knives, pick up the Flares and save
(I did two run jumps to get over the knives).
Jump over the deadly tiles on the floor, landing straight into the pool. Climb
out at the pedestal N, only safe spot for now (different texture). All the
other floor tiles are deadly. Look NW and NE and shoot the glass panels there.
This will turn the floor safe.
Get into the water and pull the underwater lever E. Climb back out and
use the wheel in the SW corner. Climb down in the now empty pool (ladder of
vines SW) and use the button on the W wall. Now pick up one of the Torches
and put it onto that lowered block W and climb out of the pool. Go back to the
valve and fill the pool, back into the water and use the underwater lever
again, climb out onto the raised platform and get the Torch.
Ignite the Torch.
Go to the N side of the pool and jump SW onto the lower platform, jump
up N. Then one more up (N) onto the thin ledge. Save here, your goal is to
ignite the torch so now you have to throw it to the E where the fire is, in a
way that you will not burn yourself while getting it when you are on the other
side. Best is to stand at a 45 degree angle to the wall.
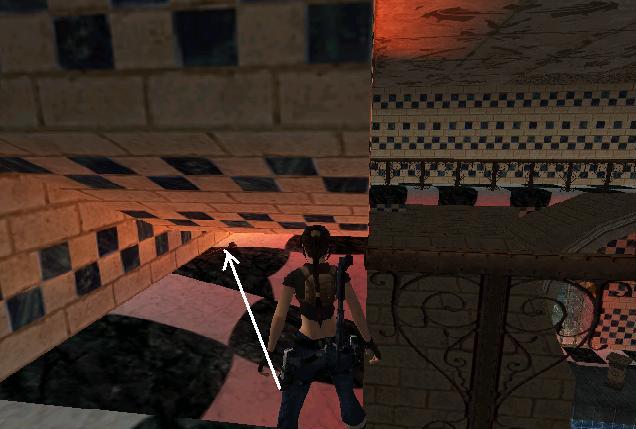
Get onto the walkway W and see spikes popping up. The spikes alternate
and there are no safe places in between them. Run onto the first when they go
down and run one square, wait for the next to go down and run one square, keep
doing that and end up at the other end.
The next hurdle, safety drop and grab the edge and shimmy passing the
balls, next hurdle is to get through the knives (face
the fence close to the knives and sideflip when
they are open). Jump over the corner of the Boulder and go to the Fire.
Side flip along the wall or stand jump from a corner over the Fire and get the
torch.
Ignite the torch carefully and hop SW over the railing onto the
platform there. Ignite the 4 pedestals from standing on the lower floor, the
door opens E.
A Torch Secret.
But first we go for a Secret. Take the Torch and go back out (S) over
the knives and go W to throw it on the ground floor. Go down and take the torch
to the far away SW corner (where you got the Book) and ignite that pile of
wood, the doors W open up. Go get Secret #4,
the Revolver and 2 x ammo for it. You can leave the torch here,
as you don’t need it anymore.
Go out and on the NE corner of this square is a raised platform, get on
top of it and make your way back N, then to the door where the book was used,
get in and go through the door you opened with the torch. Get the Flares,
run through the passage and wake up the wraith, get rid of it back in the pool
and continue through this booby trapped corridor. Climb up at the end and use
the kite to get over the water.
The Terminal.
Kill a dog and a snake and grab the 3x Shotgun ammo W near the
kite then go to the other side and enter the large Terminal and watch the fly
by. At the far wall are goodies, so get the 2x Medipacks,
4 x Uzi ammo, the Uzi and 2x Shotgun ammo. Watch out for some
girl power, one of them leaves Flares. Go up the ramp (N) shoot more
female warriors, one also leaves Flares. Jump over the fence in the
water and use the ceiling lever in the SE corner. This opens a door in the S
wall to the right. Get out at one of the pointy ledges E (facing straight E at
the tip you can climb out).
A Yellow Wheel.
Go in and better lure the lady outside to kill her, because when you
step in a fly by starts and she will kill you before it ends. Use lever (#1)
straight-ahead (E), then jump in the opening in the floor on the left and use
the button (#2). Turn around to face the trapdoor and crawl through it, to find
Secret #5, another Revolver.
Go back out and climb up, shoot the ninja. Then
shoot out the window up SE and climb in to use the button (#3) (Note by author: that window
can also be shot with the shotgun, using the “Look” key. But if the players are
out of shotgun ammo, they can always shoot the window from the opposite high
corner (where the raising block will elevate) aligning Lara correctly, jumping
up while firing the pistols).
Back to the ground floor and side jump over the fence S, swim through
the crawlspace, at the end down and use the under water lever. Go up through
the open trapdoor and see a platform went up NW. Get on the platform, face NE
and jump/grab the balcony.
Jump from balcony to balcony and get a Yellow Wheel and Shotgun
ammo, do NOT get the Revolver on the red balcony as that is a red herring.
Safety drop down and get out this room to the Terminal.
The Red Fuse.
Go down the ramp and up the other one S. In the
far end is a push block, pull it out once and go behind it, crawl in and use
the button there (for a door further down). Crawl out and push the block back
on it place; this opens the door nearby (hint is the
“wrong” texture on the floor where the block was initially).
Go in there first and save before entering the
lava pool. It looks tempting to grab the vines on the N wall, but that’s not
where you have to go… Run onto the triangle block curving right and grab the
vines on the S wall. A tight jump, but possible. Go all the way left against
the wall and up to the ceiling, take 3 grabs back to the right from the very
corner, now a backflip and you should just land on
the corner of the ledge. Hop into the opening with a grab to get the Red Fuse. Make your way back in
the same manner, only along the N wall this time. Go out to the hall and to the
right and jump in the water so you can open the last door. There is a ceiling
lever in the SE corner (face N to use it).
A Torch.
Climb out onto the flowerbed in the middle of the pool and find the
Torches there, grab a Torch and jump N to the floor. Leave the Torch
here for now.
Risky Business, the Metal Disk.
Enter the NE door of this hall. If the ninjas inside notice you they
will run for a button which will turn the room deadly. You have 2 options.
1: Run in and jump onto the crates to kill the girls
before they can run to the button S (crossbow + explosives if you were lucky
enough to get that Secret). Pick up the Medipack from the boxes and then
go right of the button S and get the Metal Disk. No need to try that
button S
2: Here’s a second option you have: walk S to the end
of the row of crates (stay behind them) and just around the corner is a button;
this will raise a platform near the Metal Disk. Go back, go around the crates
and crawl to that platform, get the Metal Disk and get back to the exit. In
this version however you will miss out on that Medipack.
Pick up the Flares on the way out to the hall.
Pushing Crates for the Glass Fuse and a Crowbar.
Pick up the Torch and go N down the ramp, drop the Torch where you can
find it again. Go up the N ramp, the last doorway in the back is also open
(that lever in the pool S). Another push puzzle, push the block once and get on
top. Your goal is to get the block in the NE corner away from the wall there.
This is how I did it.
I pushed this block back (W, probably not needed) and the block on the
N wall also to the W wall. Then the block S also to the W, then to the N wall.
Go E and pull the block there out as far as and then the one in the NE corner
as far as out the way as, behind it is another one.
Get that one out as well and to the side. Get in and jump up for the Glass
Fuse. Jump down from this block and now push this block once S so you can
pick up the Crowbar from underneath.
Ignite the Campfire.
Leave this room and S down the ramp to the Terminal, down the other
ramp S and use all the Items you have collected. The door opens slowly. After
entering go left and pick up 4x Uzi ammo and
when you go N, 2 huge bugs will come for you. Then go to the 4 levers at the E
wall and from left to right, they should be: down – down – up – down. Go N and
jump on the block and use the jump lever there. The pool drains and the other
pool will be filled. Jump in the water and use the underwater lever S.
You’ll see a pile of wood outside catching fire. Get out and out of the
pool, N up the ramp and go look for your Torch. Go outside (W) to ignite the
Torch at the campfire SW. Take the torch and go to the small shack near by and
ignite the campfire there. Throw the Torch away and enter the small hut. Use
the Crowbar on the lever, this opens the door SE, enter and see the Locomotive
is fired up and ready to go…
The level
ends.