Tomb Raider Sanctum.
Level
by chromatic
Walkthrough
Dutchy.
There’s no compass in the level, so
I will guide you through the best I can.
1- On The Search.
The Lagoon, a Crowbar, a Rusty Key.
In a corner of the lagoon, under the exit is a
small hole with the Crowbar. Swim out and right, walk up to the rocks
nearby and face the wall. To the right is a crawlspace (for later). Look up
left where you see a crawlspace up in the wall. Get in there and follow through
to a waterhole.
A Maze and a Rusty Key.
Dive in, go straight and take the second left.
Straight to the end and a bit left forwards, left around the corner and up to
climb out. A room with push able crates, push the first crate left in and go
around to push it once again. Turn around and go to the second crate left, pull
it once, go around and push it once. You now have an opening to a pool. You
have to jump across and it is a long jump. I lined up like this, jump into the
pool and grab the Flares while you’re there, climb back out at the same
opening and just roll (don’t turn Lara). Now hop straight up once and run, jump
at the last moment and grab at the very last moment (savegame 0).
Go to the alcove with the bright light and get
the Rusty Key. Swim back across and follow back to the maze (there’s no
need to move any of the other crates).
Swim back through the maze and drop into the
Lagoon.
Turn right and go along this wall to the other
opening you saw (near where the Crowbar was).
Crawl into the opening, follow through to a
crossing with to the right a closed gate, so keep left and come to a deep
canyon.
Timed Climb/Jumps, a Golden Star.
Jump over to the lever you see on the left
wall, save and have a look above, there’s a Timed gate which will open with the
lever. Route is: Roll, run to jump to the corner ledge with the ladder, climb
up high enough to back flip and roll landing on a higher ledge, jump to the
sloped block in front and bounce off to the block on the right, a running jump
with grab at the end to get under the rock hanging over the Timed gate (savegame
1).
Pry the Golden Star from the wall and
use the lever (maybe twice) to open the gate. Turn left and run down onto the
ledge with the lever, leave through the crawlspace you came in from. Follow
back to the Lagoon and dive into the water, look for a small tunnel in the
right hand wall. Follow through to a shaft. Pull up on the sloped side and keep
jumping till you end up on a flat ledge. Turn around and drop down on the other
side and come to a lower room where you can use the Star and open a gate. To
the right of the gate is a Large Medipack. The passage left of the gate
is blocked by fire and will be visited later.
The Artefact.
At the waterfall pool a bit further we can use
the Rusty Key on the opposite ledge. The underwater gate below opens up, go in
and get the Artefact. Back out and to the cave with the receptacle for
the Star, to the opened gate.
Open the gate to place the Artefact.
Step in and hop back again, fighting the Wasp
is easier inside.
Then go jump the ledges to the second
waterfall, get behind the waterfall and use the jump lever to open an
underwater gate (might be another Wasp here). Jump back to the room with the
Star receptacle and go to the right around the corner into the passage with the
fire trap. No escaping this, just start with full health, sprint through and
end up in water. Use the underwater lever to the right and swim through the
open gate at the other end. Climb up and use the lever which will open the gate
in the crawlspace near the lagoon. Go back, through the fire trap passage and
to the room with the receptacle. Climb up the right hand ledge, climb up left
and drop down the shaft with the slopes to swim back to the Lagoon.
Use the Artefact.
Up the rocks left and through the crawlspace,
this time take the right hand tunnel and through the opened gate to use the
Artefact. The gate opens up, slide down to the River.
The River.
Lara thinks to herself “I have to be careful with the River”
(She will die instantly when she gets into the
water.)
Jump from the big tree to the opposite side
where you’ll see some Flares. Jump back and go left to the far corner to
jump over to a ledge along the bank. Hop onto the higher ledge and shimmy left along
this ridge. Pull up on the next corner and look left, an island with a big
tree, run diagonally over the corner and jump to that island.
Two ways to go from here:
Intended route: Walk straight past the tree and jump to the rock in the river, then to
the tiny ledge a bit to the right, from there a bit left to the corner ledge
and over to the big rock on the left. Walk to the other end and left to jump to
a grassy corner of the island with the big tree you were on before.
Shortcut: When you get to the island with the big tree, turn left and jump over
the slanted grassy rock to a flat ledge, turn right a bit and hop onto the top
of the hill, turn left a bit (looking downstream) and hop over the top of the
rock down to the same grassy corner of the island you would reach with the long
route.
A couple of stand jumps will get you to the
last small ledge before the river goes down a slope. You can spot some Flares
on an island with a rock pillar, Save here. If you want the Flares you’ll have
to be quick about it, because Wasps will come for you and you cannot shoot them
before they push you off the rock. Stand on the tip facing downstream and hop
onto the slope where the river goes down (you can slide from it) and jump to
the next rock, a running jump with a right curve to get to the Flares, grab then
quick and turn around to jump in the direction of the next rock pillar island,
slide and jump from the sloped waterfall and land on that rock (savegame
2). There’s a hole in the ground next to the pillar, drop in there.
The Caves.
Crawl through to the end (where’s the
crawlspace roll?) and stand left in the opening. Jump out left to that
waterfall where you can stand. Looking to the ceiling you can spot a monkey
climb. Stand back against the steep part and grab up, follow all the way with a
couple of right and left turns and drop where the monkeyclimb ends. Follow the
cave going left everywhere and end up in a room with a push crate. Push the
crate to the end of that passage and use the lever you see left of you (will
lower a block in the other side of the room). Move the crate to the other side
of the room and onto the lowered block. Use the lever again to raise the crate
to the ledge and push it down from the higher block onto the ledge (only one
push), then go around to pull it to the opening in the ceiling. If you push it under the opening in one go, there will be
a bug with you not being able to climb the crate.
The Sun Disk.
Get up through the ceiling and go into a tunnel
at the other side of this canyon, first go straight when you crawl in and then
go left around corners to get to a Small Medipack. Turn back and left to
the opening to drop out to a river. Walk to the drop off and stand in the
river, just run down into the river below. In the other end of this part is a
hole in the bottom, get in and follow the long and winding tunnel into a Lagoon.
Quickly get onto dry land as there are Sharks about. Not much safer on land as you
will be attacked by a herd of Natives. Take them out and one leaves a Small
Medipack. Look in the rock wall near where you came into the Lagoon and
spot the gate. A Timed lever for it is located at the other end of the beach.
Tight run, be sure to hit “roll” as soon as you run against the gate (savegame
3). Pick up the Sun Disk and get out.
Use the Sun Disk.
Swim back through that long tunnel to get to
the cave with the high waterfall. Go behind the waterfall and find a crawlspace
in the wall. Follow through to where the Sun Disk can be used to open the gate.
Slide down into a deep shaft and the level will
change.
2 – Sanctum.
Follow the tunnel to where you can climb up
into a cave with some Bats. In the other corner of this cave is a hole in the
ground. To the left a gate that needs a Bronze Sphere and to the right a
passage to a closed underwater gate (exit from the maze later).
Leaves us with that hole in the ground.
Mighty Maze and the Spheres (Balls).
I’ve made a map of the maze for you, also a
video which follows the route of this walkthrough (video).
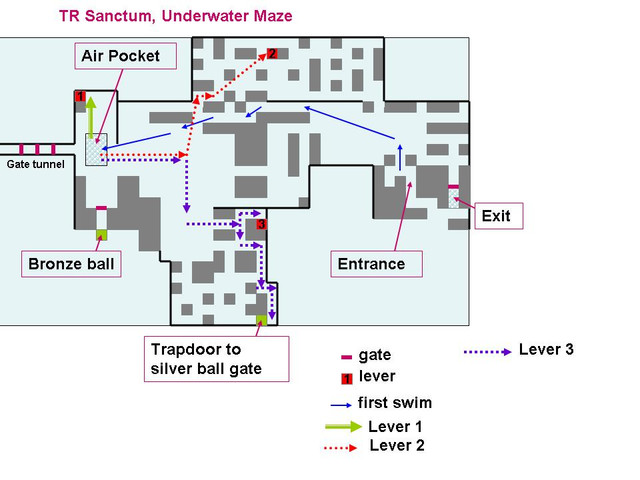
The objective is to get to the 3 underwater
levers and there’s a Air Pocket in a far away room. Maybe get there first and
take it from there as you can reach all levers from that Air Pocket.
Swim into the maze and a gate closes behind
you, take a left when you reach the big cave and swim straight to the end, take
the right hand opening in that back wall and down, a bit left right turning,
but keep going straight around some pillars. In the end of the next cave you
can see gates in a tunnel (for later), just before that gate tunnel is the Air
pocket in the ceiling. You’ll have to swim at an angle to break the surface and
get air (savegame 4).
While facing that gate tunnel, turn right and
swim down, into the small cave ahead, left around the corner in the back is an
underwater lever (#1 on the map) and it’s the Exit gate that opens up.
For the Bronze Ball.
Back for air and turn away from the gate
tunnel, swim down and forward, then left to the wall and keep swimming high
along that left side to get to a small tunnel left, it goes up to another cave,
when you swim to the larger cave, turn 45 degrees left and swim diagonally to
the next underwater lever on a pillar (#2 on the map) and a gate opens up near
the Air Pocket. So, roll turn left a bit and again swim diagonally towards the
back left corner to get down through that shaft, turn right in the next cave to
get back for air (savegame 5).
Facing the gates tunnel, turn left and find
that opened gate, swim through and climb out to get the Bronze Ball.
Swim back for air.
For the Silver Ball.
Face the gates tunnel and turn 180 degrees,
swim straight to the mount in the middle of the large cave, turn left there and
into the opening, immediately right and up to a hole in the left wall at the
end. Coming into the first cave, swim straight across to the opposite wall and
take the right hand opening in that wall, right again and straight to where you
can climb out where the gate opened. You are back at the start of the Maze (savegame
6).
Climb out, turn right then left and go straight
to the passage with the crystals on the wall. In the end is the receptacle for
the Bronze Ball. Through the gate is another but smaller maze. Run in and go
straight forward from the way you dive in and keep along the left wall to get
to an underwater lever, turn right and keep to the left to get back to the Silver
Ball behind some vegetation. Roll before you pick it up (I had to roll
before Lara picked it up). Swim straight out to get back to the exit (savegame
7).
This one goes to the Maze again, so go out of
this place to the small cave. The old entrance is still closed, so go straight
behind the plant curtain and into the water there, left and to the other end of
the cave, the right hand opening in the back wall and swim down to the cave
with the air pocket. From the air pocket turn 180 degrees again and swim back a
bit, turn right and go through a wide opening in the right hand wall of that
cave, immediately left into the first opening and keep left to get to an underwater
lever in the back (#3 on the map). It will open a trapdoor where we go now,
swim back out and go immediately left, keep following the left hand wall to get
to a shaft up in the ceiling. Climb out (savegame 8)
and place the Silver Ball.
The Golden Ball.
Jump to and fro on the sloped sides to get to
the other end and get the Golden Ball in the left and some Flares
in the right hand corner. Make your way back to the Maze. Swim to the Air
Pocket and then into the gates tunnel, use the underwater levers to open the
gates and climb up to where you can use the Golden Ball. Go through the opened
gate…
Damn! How am I supposed to get back
now?
Just slide into the pool and swim straight to
that island, get the Flares from it.
Pushing Frenzy, the Staff.
From the direction you climbed up to the
Flares, turn left and swim down to the lower part of the wall, there’s a small
triangular hole. Climb up in the next room and find a pushable vase on a
pedestal on top of a block. The vase has to go to the other end of the room,
onto the greenish block. In the walls are a bunch of pushblocks, get them out
to create a path for the pushable. Once the thing is in place, a trapdoor will
open in the bottom of the pool, get in there to pick up the Staff.
Yet more Pushing for the Crystal.
Swim back to the other pool and straight
across, near the bottom of the opposite wall is another opening leading to a
similar pool and another push puzzle.
First move the Faberge egg to the same tile on
the other side, then the vase, next is the statue on the small stone (green)
and last is the Inca relic.
The trapdoor in the pool gives you the Crystal,
combine with the Staff to get the Crystal Staff.
Through the Caves.
Swim back to the other pool, turn right and
find the last opening next to the island where the Flares were.
Climb out on the mushroom pillar and place the
Staff. An underwater gate opens up, take a deep breath and swim up that steep
tunnel. Walk through the pool and left into the opening to get to another pool,
walk into the deep part and swim through the tunnel. Climb the ladder and back
flip into the passage above.
Climb a ridge and slide down.
Keep a save you make here because
you could get into trouble reloading saves in the next part, I got a lot of
crashes.
You won’t have much air in the next
part, so it may take a few tries and you might even have to take some medipacks
to get to the next air pocket.
The current takes you through the next tunnel
into a small maze. When you swim against the pillar, take the left hand passage
straight, in the end a bit right to the bright light and into the wider
passage.
The Ancient Treasury, the Sanctum Crystal.
As soon as you enter the Treasury a flyby takes
over where you can just get a glimpse of that green crystal, be ready to get
swimming again, to the back of the room and the right hand corner where you’ll
find the Sanctum Crystal on the floor. Roll and swim into the triangular
opening behind the broken pillar.
So they died, drowned… Oh my God, I
don’t want to end like them!
Keep going along the left side wall and in the
end turn right into another maze. Take the second right and swim all the way
straight to the back and left where you can get air again (savegame
9). I had to use 1 Medipack.
Place the Crystal and follow up a ladder, back
flip into a passage and come to a Huge Cave. Go to the other end and into the
bright light.
The End.
July 04-2012