The Dream Quest of Unknown Kadath
Levelset by Scourge05
Walkthrough by BlackWolfTR with help of DoggettTV's videos
I have provided much savegames because game is itself very challenging. Here is download link for folder with all of them: Savegames
Level 1 - House in the Desert
After flyby kill two scorpions and enter the mansion. Turn right, shoot three boxes and take shotgun normal ammo and shotgun wideshot ammo. From the entrance go ahead and one guard will appear which drops flares. Turn left, go upstairs and again go on left to find dead soldier and BATHROOM KEY lying near him. Take flares from this room, back and go on left to use Bathroom Key. Enter to bathroom, go ahead until you will reach a small pool room and then dive into it.
Get out from water and now you will find yourself in small cave. Turn left and go through crawlspace to find SECRET #1: SHOTGUN, Shotgun Normal Ammo x2 and Small Medipack. Back through crawlspace and turn left to enter passage. Try avoiding falling shards from ceiling and rollingballs. Go to SE corner and jump from ramp to ramp to finally get to higher place but be careful of rollingball. Jump on rocks to reach ramp and jump on it. Slide down and jump to grab a ledge. Press button to open a door in previous cave. Get down, back to previous cave and turn left to see two blades and hole. Try jumping into hole without dying from blades and go further through previously opened door. Now there is quite hard moment. Go on right and fastly run through circular blade and jump on left to water to escape from rollingball behind you. There is savegame.0 in downloadable folder if you didn't managed to make that.
Pull underwater switch to open door on second floor. You can get out from water and take Health Crystal. Swim through only passage in there and get out from water. You are now in place where you previously shooted three boxes. Kill two guards and go through stairs to second floor. Turn right and again right to opened door. Climb on crates and then climb to crawlspace. After crawling shoot guard and take Small Medipack in SE corner and Large Medipack in NW corner. Shoot barrier and go through crawlspace.
You are now in strange room. Go onto left and enter mines. Go ahead to find three passages. For now turn on left and climb down on ladder. Turn left because in front passage there isn't anything. Now you will find yourself in small cave with rope. Jump and grab rope and then facing onto NW start swinging and jump on small rock where you can normally stand. From it jump on ledge for SECRET #2: Shotgun Normal Ammo, Large Medipack, Small Medipack and Flares.
Back and again get on rope. This time facing SE swing and jump through alcove. Go through small cave and slide down. Now you need to jump on high rock and from there jump on ledge to the left. Go ahead into tight passage until you will find crawlspace. Crawl through it and now you will be located in some underground tunnel.
Turn right, take Large Medipack at the end of tunnel and crawl into alcove on W side of tunnel. Go on right, open door and open trapdoor in ceiling. Climb on to crawlspace and turn on left. Go ahead in this passage to find three different passages. All leading to nowhere. On the middle between passages there is ladder above. Jump and climb on it. Go ahead to open a trapdoor in floor. Drop down and stay right to enter passage. Shoot two guards. Go further to climb a ramp and jump backwards to find LASERSIGHT. Back and stay right to find another passage. Now quickly run ahead to front corridor because on left there is turret gun which shoots to you. Go upstairs and climb up on ladder. Turn left and take REVOLVER. Now go to opposite site where another flame is, combine revolver with lasersight and shoot oil canister of turret gun from there. Drop down on place where was turret gun and push the button. It opens doors in front of you where CROWBAR is located.
Back to pool room and get out from this room by climbing a ladder on right. Wayback all way through corridors and crawlspaces to back again to large underground tunel. Get out from crawlspace, turn right and go at the end of tunel into small passage. You can see here three levers; one of them needs crowbar to use which you have found previously. Pull them all and you will see that some location got flooded with water. Back and get out from this large tunel with crawlspace that you have came here by (it's on E wall).
Again wayback all the way you have came here, through passages, big cave with cliff and cave with rope. Climb a ladder and now turn on left. Go there and you will meet a guard. Crawl into crawlspace and you will get to the location which you have flooded. Jump into the water and get out of it on structure located on N. On this structure is lying CARTOUCHE PIECE 1.
Dive again in water, swim and get out at rocks in NE of this room. Jump on further rocks where you can stand to finally reach passage. Quickly run across flames into crawlspace and go ahead passing small lake into alcove. Now you will encounter hard jumping sequence. As you enter here, you will have limited time due to poisonous gas. Jump from platform to platform collecting Health Crystals x10. You can use medipacks in mid time if your health is low. At the end jump into hole which will drop you into small lake. If it was too hard for you, you can use my savegame.1 from folder located after sequence.
You probably heard opening door so get out from water at E direction and at right doors have opened. Go into that room and collect Small Medipack x3, Large Medipack, Flares x3 and CARTOUCHE PIECE 2. Now back across crawlspace and flames to half flooded location. Climb again on structure at N. Turn right and jump on rock at SE. Jump on right on ramp, slide down and jump at left to platform. Crawl across alcove and head back to branch of passages through cave where you killed guard. Now go on left corridor and jump on ledge onto right. Climb up, combine two cartouche pieces that you have collected and put it into receptacle. A trapdoor has opened in previous cave.
Back there and slide down. You will drop to water. Get out from water and you will see some ruins in front of you. Climb on rocks at E, music will start playing and you will get into enormous cave with cliffs. Climb on rock at left and jump on further platform. Then jump right on protruding rock. Now equip revoler with lasersight into your hands, face E and shoot a yellow thing. The fire have stopped burning at your right so you can jump now on moving from down to up platform.
Go ahead and jump above deadly hole. Open door and you will encounter a neutral soldier. You can kill him if you want. Take from table on your left a ROOM KEY. Go into only passage there and jump above deadly hole. Now you will need to jump on ramp facing at SW then bounce back from it on another ramp and from it jump straight to the button. Pull it and door that you have seen a while ago have opened. Jump on left corridor, climb up and get down to a soldier. Go across opened doors and you will get to another big cave with cliffs.
Jump on raising platform, wait a while when it will raise you up a little higher and then jump on another raising platform. Now jump at rock at the direction of doors. Door will automatically open when you will land on rock before it. Now you have back to place where you was before. Stay left and slide down to a garden of mansion. Claim Health Crystal and head back to the mansion.
Go upstairs, turn right and use room key. One guard will attack you after you use a key. Enter the room and use a switch on left. Stand before door at left and they will open. After those doors there is anything except mutant which will escape from there. The second button in this room is time trial. Push it and door to other bathroom will open at first floor. Quickly run downstairs and head up S to door which opened at front of you. As you did it and entered to bathroom you need to avoid some falling ceiling and drop down to hole to finish first level.
Level 2 - Ulthar
In folder there is savegame.2 on beggining of this level.
Before you will go anywhere, take a look up to notice ladder. Jump and climb on it to find SECRET #3: Revolver ammo and large medipack. Back down and go ahead until a bookcase will open in front of you. Shoot a dog and on left is lying uzi ammo and health crystal. As you entered here go at right to find entrance to the city. On right to the entrance is lying small medipack.
Go ahead and kill soldier which drops shotgun normal ammo. You can also see a health crystal in this alley. From where you have came there stay right and enter a house. Go straight to basement and crawl through alcove. Climb on right on block, turn back and jump onto above ledge. Jump for a wall switch which will raise block near you. Turn right and jump on ledge. Climb on raised block, then on another block, turn back and jump diagonally into hole on wall. You will hear opened door. Go ahead to meet a flying head. Take your revolver with lasersight and shoot his two eyes. After he will die take a GARDEN GEM.
Go on S and push button which will open door in previous location. Back up on ladder and head back to previous room. From top jump to left platform and facing S shoot a barrier which will open a door from which you have came here by. So now get back to that door jumping through platforms and crawl across crawlspace back.
Get out from house, stay left and go to gate which has hole for garden gem that you have got a while ago. Enter garden and take GOLD KEY from ground. (If you want you can back to mansion from where you have started level and kill a soldier which leaves uzi ammo).
From garden, back again to that house where you was before but now turn left and press a button which opens a door next to you. Enter there and turn right to use a gold key. A door has opened on second floor in house. Back to previous room and go at left upstairs.
Stay right to get to other room and pickup small medipack and uzi ammo. Back and now stay to left and get into corridor with water up to ankles. Go at the end to step at tile with different texture. A door will open in previous room from which one baddy will came dropping uzi ammo after he dies. Enter newly opened room and notice two keyholes. Go through crawlspace and shoot a barrier.
Drop down and push button at right. It will open a door next to you to main alley. One baddy will came from here dropping uzi ammo after dying. Ignore second button for now. We will get to it later. Take also small medipack from this room and go into second passage. Go ahead and kill a dog. Turn right but without pulling a switch next to gate because it's a troll which will block you way!
Take health crystal and go across long alley until two dogs will attack you. Go through passage and take flares at right. Drop down and go ahead to room with pushable puzzle. Firstly push two moveable blocks at lower floor onto texture of grate. Don't push any buttons/levers for now because they will block your way to move pushable blocks at lower floor! After you moved two pushables on lower floor onto grate textures now you can push button on lower floor and pull underwater lever. They both will raise two platforms. Now you can move two pushable blocks on higher floor onto grate textures. After you did that a door will open on higher floor. Behind opened doors there is lying a SANCTUARY KEY on pedestal.
Back, face E on higher floor, go and climb on block where is ladder. You will hear opening trapdoor. Climb on ladder and go on left. You will get to room with Cistern textures. One baddy will attack you which drops shotgun normal ammo. Take a large medipack and a soldier will appear down below. If you want you can drop down to water to take flares and shotgun wideshot ammo dropped by soldier. Climb up and go to another passage.
Drop down and you will get to place where you was before. Now you can pull that switch which will open a door next to you. Enter and you will find yourself in room with some traps and platforming. Jump onto left ramp and continue jumping on them until you land on solid floor. Now climb up but beware of burning flame. Jump over blade and take small medipack. Jump on other side trying to avoid swinging box. Now just jump, grab monkey swing and swing on it until you will reach floor where you can stand.
Drop down and go through door. You will get into some garden. Go ahead until you will notice crawlspace. Crawl into it and shoot box. Push button and back through crawlspace. Turn right and enter house. UZI and uzi ammo is lying in one of corners in this house. Go into passage and turn right for small medipack. Go outside and take second SANCTUARY KEY. After you have taken key two soldiers, one baddy and one dog will attack you. Kill them and back across house to previous garden.
A new door has opened in there so go after them. You will back into place where you was before. Stay right and go through cistern room to passage and again drop down. Go on right and you will get to room where you have killed a soldier before. Now if you want to get additional supplies push second button in this room which is time trial. Quickly go ahead to main alley, stay right and go into house. Run upstairs and again stay right to cross timed door and enter room with bonus supplies. Here you have SHOTGUN and small medipack.
Quit this room and go into second passage at left where two keyholes were. Use two sanctuary keys on them and you will see that some door have opened somewhere. (Also if you want you can again back into mansion from where you have started level and kill soldier which spawned after using two keys. He drops a small medipack). Go downstairs and turn right to kitchen across door which you have opened with button some time ago. Turn left and shoot a dog. At right you will have pushable block. Move it one time so you will can get on wall. Get down and cross door which you have opened by two sanctuary keys.
Go ahead through that alley and go on right. Enter some house and go upstairs. Stay right and shoot box. Climb on hole in ceiling and go further until you will get into large temple room.
Light up flare and notice invisible platforms to jump on and get on second side. Take PNAKOTIC MANUSCRIPT from pedestal. Main goal here is to pull three switches to open wayback door. Face E side and jump onto invisible ledge then on another platform.
Go ahead and you will find yourself in quite hard room with traps. You need to jump on pillar trying to avoid spikes and quickly jumping forward to invisible ledge avoiding some another flying traps under you. Jump on another pillar (those burning cats can't really burn you) and then jump into hole. Push first button which will show you door that you have came here by. Two switches to push left. Now you need to back through those traps to main temple room.
Now we will go on other side for second button. Face S, jump onto invisible ledge and then on another ledge. Go ahead and you will reach to library. Get on top of bookshelves and pull switch. It opens a door below. Get down and go there. You are now in another large room. Jump on pillar in the middle of water and grab a rope. Face SW or NW to swing and jump on ramp and then bounce back from it. It's hard jump and you need know let's call it a "super rope jump" to make this jump from rope onto ramp. There is savegame.3 in folder if you didn't managed to make it.
After you made "super rope jump" and bounced from ramp now turn back and jump on ledge. Then jump on another ledge and press second button. One switch left. Jump into water pool and get out from it. Back to main temple room through library.
Now we will go on another, last side where third lever will be. Face W, again jump onto invisible ledge and jump onto further platform. Don't dive into water but go across on dry passage. You can notice a lever on pool. You can't pull it for now as you will fall into water. Go on NW corner and find ladder on pillar. Climb on it and pull all five levers. A door have opened on the opposite side of room. Get down, go SW corner and find ladder on pillar. Climb on it and go across into opened corridor. Push button and ice ghost will appear. Get back and jump into water. Wait until ice ghost will hit water and then back on top through underwater passage. Now as ice ghost have hit the water you can now pull third and last lever which will open wayback door.
Back to main temple room, face N and jump through invisible ledge on another ledge. Back across long tunel and hop down into hole. Now you need to do a tricky move. You can't go normally through this gap after you hoped into hole. You need to run and at last second click crawl button so Lara will squeeze through that gap.
Get back by downstairs and after garden turn on right. You will see that this door are now opened after taking Pnakotic Manuscript. Go across them and hop across hole with spikes. A short flyby will activate showing nice beach and wooden ship. After flyby go ahead to reach the end of level.
Level 3 - Mountain Ruins (first visit)
In folder there is savegame.4 on beggining of this level.
(If you want additional supplies after flyby, go at left across upstairs and you will reach crawlspace. Now, you can't normally get through to it as floor is too high to get down. You need to stand before crawlspace and jump through corner on right. It's the only way to do this. If you did this, open door, shoot box and take large medipack and small medipack. Push button to open door and drop down from balcony)
After flyby turn back and go on right. After you turned right, you will see a wall on your left. Climb on it and jump on rocks where you can shoot barrier and climb onto balcony. Go along barriers to reach SECRET #4: flares x2, shotgun normal ammo x2 and uzi ammo x5.
Drop down and go on E passage to reach cave. You will see a small monument which is portal. Run into it and you will be teleported to another level.
Level 4 - Mountain Villa (first visit)
You are now in enormous area.
*For secret #5: From the beggining go at right and jump into first passage between pillars. Get around column and facing N make banana jump (180 deegre jump). Push button which will lower block revealing switch somewhere else.
Now from beggining you can go at left to small alley. In one of three entrances you can find grenadegun flash ammo and revoler ammo. Back to portal where you have started level and turn left to go at stairs. Somewhere on those stairs there is button. Push it and flyby will be activated. It will open you a door in labirynth and also will show you this whole area.
From button go ahead on S until you will reach a big wall. You can search for uzi ammo x2 near the wall. Head back to button which you have pressed a while ago. From the button go at E and stay right and go upstairs. Still stay to right but don't enter the mansion. Climb up on wall and go ahead passing by ladder. You will notice health crystal on top of some ruins. Climb on top and take it. Now facing W shoot two barriers in window. It's necessary for later.
Back to ladder that you have seen previously and climb up on it. A flyby will activate to you. You will see some strange light point on W. Shoot it and it will open a trapdoor elsewhere. You can take small medipack and large medipack lying at bottom of opening at roof.
Now you will need to make hardest jump in the game. Go at E side of roof, near the ladder that you have climbed up by there and stand near ramps with barriers. Take a look down a notice a window where you have shooted two barriers previously. You need to jump there from roof. While falling you need at last second raise Lara's hands because without raising them this jump is imposibble. Here is screenshot where Lara should stand to make this jump:
It's very hard jump so I of course provided savegame.5 in folder to those who didn't managed to make it.
After you have did this jump get down and you will find yourself in some church. Go at the end and push button. Get through door and you will have at front of yourself a wall of labirynth. There is one entrance on this wall so go into it. Turn right at entrance and dive into water. Get out from water and take TORCH.
Back to church with torch (you can swim on water surface with torch if you didn't know, just slide down on ramp and you will can). Light up torch from pedestal in church and back to the ruins where you have collected a health crystal. Around those ruins at the bottom there is trapdoor opened by shooting a weird light on roof. Drop down there and go ahead.
Light up weird postument (you need to light up it from specific direction). A flyby will appear. Drop the torch, back and turn at left to door which has opened. Jump on ramps through lava, go on left and climb up.
Go at left or right and jump on monkey swing. It can be a bit tricky but you should make it. Swing to jumpswitch avoiding some flames. Pull it and fall into water. Get out from water by ladder. Get back by corridor which you have came here by, turn left to pull switch. You will see some door opening elsewhere.
Grab monkey swing and back above lava and ramps. Get out from those undergrounds across trapdoor. From trapdoor go at N until you will reach a small building. Enter to it and go on one of motorbikes. Quit this room and ride with motorbike at NE. You can see a gap with leaves. Ride through them and try not to fall in water. Ride down by ramp and get out from motorbike. Go through crawlspace and jump on rock in the middle of water. Jump on further ledge and go inside a tunnel. Jump on left ramp and bounce from it to reach a jumpswitch. It will open a doors inside a mansion.
Jump into water and back by underwater tunnel taking a large medipack from ground. Get up from water and back down via ramp for motorbike. Back with motorbike up by ramp, trying not to fall in water and ride across leaves that you have came here by.
Leave motorbike in some place but don't forget where you have left it. Not that far from the ladder where you climbed on roof, there is entrance into mansion. After you entered, turn left and climb up on ruined stairs. Turn right and go across door that you have opened with jumpswitch.
They will close behind you. Stand in front of spikes and you need to quickly climb on front block. Don't climb on left or right block because spikes will kill you.
After you have climbed on block, jump on left and jump on jumpswitch located at wall of mansion. A door to other church has opened. Go where the entrance to mansion was and enter through opened door to another church.
Pull switch and back again into mansion through ruined stairs. Go on left and again turn left to the passage at the end. Go across opened door and take CABIN KEY from pedestal. Now back to portal where you have started this level. Don't go to previous level but facing N turn on right alley and stay left. Use a key and enter to opened room. Push a button and second door in labirynth will open.
Go back for your torch, enter labirynth and find second door (if you entered to labirynth from mansion side it should be on left). Light up torch on wall and door somewhere will open.
Drop torch, get out from labirynth and back to button on stairs which you have pressed sometime ago. Go on E until you will reach wall and search for an entrance alongside this wall. Enter into entrance and stay right. You will get to place with fountains. Find stairs and go upstairs across them. You will notice opened gate. Enter there and take second PNAKOTIC MANUSCRIPT. Quit room and you can also turn onto right to see three passages which contains shotgun normal ammo and shotgun wideshot ammo x3.
Now take your torch from where you have dropped it and go to previous level running into portal on start of this level.
Level 3 - Mountain Ruins (second visit)
Go ahead and at bifurcation turn on right. Drop torch on block (where texture flashes). Climb up on balcony and jump to opposite site above barriers. Turn right and notice a gap in wall. Jump into it through barriers. From that gap jump onto another balcony. This jump is hard so there is savegame.6 in downloadable folder.
Push a button which will raise a block with your torch. Get down and for now go at right to enter passage. Open a door and pull switch which will open a door above you. Back, climb on raised block and take torch. Turn back and jump on next balcony above barriers. Go ahead and jump into gap where the torch on wall is. Light it up and door below will open.
Get down, cross the opened door and take JERRYCAN. Drop torch and get back to previous level through portal at cave.
Level 4 - Mountain Villa (second visit)
Just get back for your motorbike and head back again to third level.
Level 3 - Mountain Ruins (third visit)
Ride ahead and turn right when you will can. Then again turn right entering a small corridor. Before door turn on left and you will get into a waterfall area. Ride onto ramp and ride on top where waterfall is. Quit motorbike and jump on S ladder. Climb on left across corner and quit from ladder when you will reach it end. Pull switch which will open door in this area.
Back and jump on ladder again crossing around corner and jumping back from it. Door has opened at the E side. You need to jump to them with motorbike from a ramp.
After making jump ride ahead and you will get to some cave. Quit motorbike. You will see three hydras at the bottom. Don't kill them for now. Fire ghost will attack you as well. Drop down and climb at rocks on N side. Enter blueish room and take revolver with lasersight. You need to shoot four wooden barriers at the top.
After you have shooted them back to cave, drop down and climb on the opposite side on rocks. Go through opened doors and jump into water. Wait until fire ghost and newly spawned ice ghost will hit water and die. Get out from water and press a button which will open a door behind hydras.
Back to main cave and kill three hydras (you can kill them with motorbike though). After you have killed them take a motorbike and ride across opened gate. Ride ahead upstairs and when you will get on top just leave motorbike there. Turn right and go between some pillars. Again turn right and facing W go down through trees and greeny terrains. You will find two wells with water. One of them have passage to fourth level. Jump into it to water and water current will flow you again to fourth level.
Level 4 - Mountain Villa (third visit)
Turn back and facing W get out from water.
*For Secret #5: Do you remember a button which you have pushed when you was first time in Montain Villa level? You get to it by doing a banana jump (180 deegre jump). It lowered a block and I said that we will get there later. We are now in place where this lowered block is. So as you got out from water at W side. Face S side and make again banana jump (180 deegre jump).Now you can see a switch there. This switch is timed and it's opening three doors in this room. In those three doors there are green gems which you need to shoot to open another door for secret #5. So pull switch and first door with green gem to shoot are next to you. Now on E wall there are second door with second green gem to shoot. If door has closed pull again switch. Third doors are on N wall but you can't shoot green gem from there. To get it you need to jump on ramps to reach place where you can shoot green gem. After shooting all green gems door for secret #5 are opened in next room. You will get there in a while.
As you get out from water at W side pull switch on your right. This switch is timed and it's opening a door on E side. You need to quickly jump across ramps to get on other side of room and go through door. If you did this go ahead and if you did the sequence for secret #5 door at right will be opened. Go there to get SECRET #5: Crossbow explosive ammo, small medipack and large medipack.
Go at left and take SILVER KEY from pedestal. Door in previous corridor has opened so go through it. You was in this place before. Turn left and grab monkey swing. Swing above ramps and lava and land on solid floor. Get out from this undergrounds and from trapdoor go at E side through entrance in wall. Stay right until you will get to place with fountains and then again go onto E side across pillars and use silver key.
Enter and you will find yourself in room with many levers. Ignore them for now and jump into left passage. Go ahead until blocks will raise up. Again don't push any lever for now because you need to find a hole where you can fall with lever to pull. After you found it, get up from hole and push first level to the left on E wall. Some block will raise up and some will lower down. So now you need to find another two holes with two levers around those blocks. After you found them on E wall pull up first switch from the left and pull down second switch from the left. Blocks will again raise up and lower down revealing another two holes where you can fall and pull two levers. There were overally five holes with five levers. After you have pulled them all you will hear rolling ball falling after grate.
Back to area with 12 switches. On E wall you have hint which levers you need to pull. So at side from where you have came here pull: second and fourth switch from left.
And from opposite site pull: first, third and sixth switch from left. If you would press other levers spikes would damage you. A door have opened somewhere.
Back from this room and go ahead facing W to reach opened door. Here is the place where you can use your two Pnakotic Manuscripts. Put them on reading desk and double gate will open elsewhere. Back and go at NE passing by fountains. When you will reach greeny terrain go at E to find opened double gate. Go across them and run into portal to teleport to third level.
Level 3 - Mountain Ruins (fourth visit)
Turn back and get out from this building. Head back for your motorbike, drive with it into the building and ride with motorbike into portal to teleport to previous level from which you have get there a while ago. It's quite tricky to make it but you should manage to do it.
Level 4 - Mountain Villa (fourth visit)
Get out from cave and ride to area with fountains. As you will get there stay to right and drive in W direction. Drive up on ramp and take ACCESS CARD. Now go back into the portal but not the one from which you have came here a while ago. Back to the second one near the mansion and run into it to back to previous level.
Level 3 - Mountain Ruins (fifth visit)
Go ahead but don't turn on right. Pass the fountain and go to the end of street. Climb on wall and use access card. Enter across door, and stand on right end of small river. Jump on second side and go through portal. It will teleport you somewhere else but you are still in same level.
*For Secret #6: after teleport go at E and stand at back to the cliff. Drop down raising hands immediately after you dropped down to reach a ledge below. Go through passage but don't drop down for now. Jump at left into a gap in wall and pull switch. It will open a door for secret #6. We will get there later. Drop down and take flares. Climb up ladder and get out from tunnel. Jump on other side of rocks and jump on ladder to climb up.
Climb on rocks at S side. Go ahead through small valley until you will reach cliff. Jump across ledges and climb down by ladder. Go into passage and you will get into quite large cavern. (If you want additional large medipack, it's lying on top of rocks near the ladder. There is almost no visible ladder that you can climb there up).
Get down and at N side you can jump and grab a ledge. Get up and jumping on two ramps try to jump into a gap in wall. Go across doors which you have opened with secret switch and you will get SECRET #6: GRENADE GUN, CROSSBOW, DOGGETT DOUGLAS MCDOG and shotgun normal ammo x2.
Back and hop down. Climb on rocks in the middle of cavern and jump on rope. Swing facing E side and make a jump. Pull switch and zipline will appear on beggining after teleport. Back down and at W side get on top. Go back through water up to ankles and climb up ladder. Jump back and go back through small valley.
Get down by rocks and turn left to use zipline. After you landed on solid floor jump on ladder and climb up. Go downstairs and you will find yourself in location with church and lake. Find entrance to the church on the one of sides and enter there. Inside church you will see another portal. Jump into it and you will be teleported elsewhere but still in same level.
Face E and notice a gap in wall below you. You need to get there. Turn back, stand as most on left as you can and drop down raising Lara's hands immediately after you dropped down to get on ledge below. It's kinda hard so there is savegame.7 in folder.
Pull a switch and back. A trapdoor has raised below so try jumping on it. Jump onto left on ladder and climb up. Go through opened gate at W side to reach end of the level.
Level 5 - Plateau of Leng
In folder there is savegame.8 on beggining of this level.
Go ahead to reach large cavern. Shoot tribesmen and take health crystal. Go at the only one passage there. You need jumping on rocks at both sides reach second side. It's hard so there is savegame.9 in folder if you can't make it.
Go ahead, jump above lava to reach flyby. Leave pushable planets for now and go forward to climb up ladder. Jump back and go upstairs. Climb up to crawlspace. You will reach a room with skeleton but if you will equip weapon you will burn and die.
Try avoid skeleton and crawl through crawlspace. Pull switch and flyby showing up falling boulder will activate. Back across crawlspace and take flares and large medipack from this room. Again back through crawlspace and go downstairs alongside wall to find entrance to another room.
Stay left and jump above ramps on solid floor. Turn back and jump on ramp turning right to land at solid floor. Turn back, jump and grab at NE ramp. Slide down and jump onto left. Pull switch which will lower down block so boulder will can fall further.
Get down and again turn left and go upstairs. Near where crawlspace was climb on small block and drop down on ledge losing some health. Go ahead but don't turn at right for now. Go upstairs and at the top where boulder in ceiling is, light up flare and jump at left on invisible ledge.
Continue jumping invisible ledges until you will reach a passage in wall. Avoid swinging traps and flames and pull a switch which will make second boulder fall. Climb up ladder and go through passage. Drop down and you will be before traps. Again drop down losing some health.
Go into passage and jump on ledge for large medipack. Drop down and take health crystal. Get up on blocks to find and enter corridor. Pull switch which will lower down block so second boulder will can fall further.
Go ahead and gate will open at front of you. Try to safely drop at the bottom where the planets are. Now we will make puzzle with planets. Each planet on beggining are standing on some symbol. Now you need to move all three planets on second symbol coressponding to first on which they are standing. If you will place planet on correct symbol you will hear falling boulder. After placing three planets on right place a double door will open next to you.
Jump where a double doors has opened. Pull first switch opening a gate in this location and second switch which is opening a double doors in main cavern where you was before. Notice also a keyhole to which we will find a key later.
Back to platform with planets and jump through lava to the opposite passage. Go downstairs across opened gate and shoot a tribesmen. Take large medipack from small corridor and go down into hole by ladder.
Go ahead and grab monkey swing. Swing to ladder and pull it. Door has opened in previous room. Take a running jump onto monkey swing and back to ladder. Climb up and go through opened door.
Beware because if you stand on floor it will burn you. Jump straight through block on ramp and from it jump onto ladder. Go by ladder on right but not to the end. Jump back with roll on ramp and from it quickly jumping onto right on another ramp. Pull switch for secret and climb up on ramp. Jumping from ramp to ramp jump into gap at wall.
Go alongside tunel and don't drop down. Jump as far as you can at right on ramp with roll and then jump from it at left to opened gate. Here is SECRET #7: Crossbow explosive ammo x2 and shotgun normal ammo x2.
Drop down and go upstairs. Climb up ladder, quickly pull switch, jump back and jump on side escaping from spikes. Go at gap and drop down. You have back to main cavern. Go at newly opened double doors. You will find yourself in outside area. Climb on wall and jump into water pool. Swim into underwater tunel and at the end of it get out from water.
Go ahead and turn on right. Jump into water and climb on ledge where candles are at N side. Turn back and running jump on opposite ledge. Take SECRET MASK from postument which is key for secret #8 to which we will get later. Again dive into water.
Swim into hole at ground. Get out from water, turn back and jump on jumpswitch. Again get out from water and drop down to place where you was before. Enter to newly opened door and jump at left into passage at wall.
Kill two tribesmens and take BLUE MASK when fire goes out. Pull switch and go through passage where door has opened. Climb up ladder and again drop down to main cavern. Again do through opened double doors into outside area and dive into pool. Swim across underwater tunnel and get out from water.
Insert blue mask into receptacle and enter on left. You are in nicely decorated oriental room with psychodelic music. Go at W passage. Turn right, go upstairs and climb up on ladder. Drop on right ramp and jump on left at ledge behind pillar. Go ahead and door will open automatically. Go upstairs and pull switch. Wait until boulder will fall down and go downstairs to a hole and don't fall for now. Turn back, equip pistols and drop down into hole shooting with pistols to shoot a window which will lower down spikes below you so they won't kill you.
After dropping down you are now in water. Pull underwater switch which will change lava into water in room with planets. Swim up to get out from water. Go ahead and drop down to known location for you. Back to large room with planets puzzle and drop down now into water.
Find underwater passage in water and swim into it. Get out from water, go ahead to reach new location. Get down and notice a square hole in ground. Drop down into it on solid floor and insert your secret mask into receptacle for secret #8. Door opened behind you. Jump there and go ahead to reach SECRET #8: AMULET OF HORUS, CROSSBOW, small medipack, large medipack and crossbow poison ammo.
Get out from this room and go behind secret mask receptacle. Jump at left on ledge and jump at E wall where you can see small alcove to grab unmarked ladder. Climb up and jump back. Go upstairs at E side and enter passage to get to another snowy cave.
Climb at E wall, go at left to the end and again climb up on E wall. Pull switch and short buggy flyby will appear. Go downstairs to reach large hall. Now you need to jump at tiles, above which there is symbol on ceiling. If you will land on tile which don't have symbol at ceiling Lara will burn.
At the end you will jump into a hole with switch. Pull it and gate elsewhere will open. Turn back and climb up ladder. Turn back and jump further on pillars. At the last pillar turn left and jump on beggining. Go upstairs, drop down and stay left to climb a wall into another passage.
Go down and now becarful because now we gonna have tricky thing. Drop down into hole, pull switch and quickly get out from hole escaping from falling boulder. Switch has opened a door next to you. Enter there and take first MONASTERY LOTUS to which you have opened door in hall with jumping on tiles.
Back upstairs and get down. Find ladder at W side and climb up on it. Go ahead through opening door and again climb up ladder. Now as you climbed up look at left. You can see a hole and passage at second side. You can't normally jump through it and grab a ledge because Lara won't reach it. You need to make so called "tunnel jump". It's hard jump to make but I will tell you how to make that. You need to take running jump and hit at the same perfect time wall and ceiling so Lara will got a boost and she will can grab a ledge. There is savegame.10 in folder for those who didn't managed to make this.
After you made it go to reach a hole and drop down to ramp. Climb up on block and on both sides you have large medipack x2. Go at the only one passage here. Go ahead and jump into "portal". It will flow you at the top of planets puzzle room. Now there are two ways, both leading to same place. If you want go faster way, jump up, grab ladder, climb up and go ahead across long tunnel. When you will reach a hole drop down. If you are masochist and want longer way, grab monkey swing and swing through whole this room.
After one of way which you have chosen go ahead to reach room with some platforming and spikes. Jump on right pillar quickly trying to jump on another pillar. Jump on another pillar with spikes and quickly jump into gap with switch. Pull switch, turn back and jump onto left passage.
Go straight ahead and pull switch which opens a gate somewhere. Back and go on right downstairs. Jump into water and get out from it. Go ahead and climb on left block. Turn back and jump higher grabbing a ledge. Turn back, jump on ledge and jump above ramp onto other side. Jump to the ladder and climb up on it.
Get on motorbike and fall down into hole where you have climbed on ladder. Now another very hard sequence with motorbike. There is passage leading to main cavern. You need to fall with motorbike on bottom without exploding. Drive onto a ledge on left and from it try to safely drop down with motorbike without dying. In folder there is savegame.11 if you can't make this.
As you have fallen down, drive into passage where lava was. Now you need to jump above lava with motorbike at right side from entrance. As you jumped there ride upstairs into hole. Avoid four falling boulders and at the top before water get out from motorbike.
Enter temple and flyby will show you weird thing. Come to it and notice colors and world directions. It's a hint for puzzle in next level so you need to remember it or write on paper about it to not forget that.
Now there is a hole in this temple. Jump there, pickup second MONASTERY LOTUS and quickly get out from there or spikes will kill you. Get back to your motorbike and ride down. Turn left and drive into main cavern.
Quit motorbike and go through double doors on S side. Again jump into waterpool and swim by underwater passage. Get out from water and turn on left. You are again in this nicely decorated oriental room. This time go into passage at E wall.
You will reach a gap that Lara can't go through. To get through it just stand in front of it and jump forward. Then jump diagonally onto another ledge and from it jump at SE to reach a switch. Turn back and from running jump onto ledge below. If you want additional large medipack drop down and take it from gap at wall. To back on platform above, jump into gap at W side and jump onto ladder. Climb up on it and move forward into passage.
Take health crystal and go downstairs. Turn back and get down. Go ahead and you can see third monastery lotus on pedestal. You can't take it for now because you will burn. Drop down into opened trapdoor. Slide down and avoid falling boulder.
Jump onto middle rocks trying to land on solid floor and from them jump on rocks at SE. Then jump NE at the platform below. Jump forward to grab a ledge and climb up. Slide down and jump ahead on platform. Turn back and jump on right to grab a ladder. Climb up and shimmy at left across ledge. At the end of ledge, climb up and jump back with roll to grab another ledge. Climb up and crawl through crawlspace.
After crawlspace turn left and pull a switch. Go at S wall, jump into the nearest window to a ramp, from windows jump on ramp and from ramp jump forward to grab the ledge above. Climb up (if fire is igniting you, wait until it will stop burning and then climb up) and jump at gap onto E wall. Take flares and TORCH from pedestals.
Now with torch go at W wall and light up torch from bowls with fire. Now you need to ignite 8 torches below on main middle pillar. Light them trying to avoid burning flames. After you have lighted up all 8 torches on wall two doors should open on W wall with two switches. Pull both switches to open a gate next to you.
Now door opened where the crawlspace is. You can't crawl normally through this crawlspace because it's one step lower. You need to do trick to get through this crawlspace. Run into it and at last second press crawlspace button so lara will can squeeze through that gap. You previously did this in second level of game.
As you went through that crawlspace go ahead to reach room with frozen pool. Take your revolver with lasersight and shoot at window above. After you have shooted window a waterpool have thawed out. Dive into it and take FLAME KEY and flares.
Back throughout crawlspace using same trick as before. Get out from room with flames crawling across crawlspace at W side. Drop down onto right ramp and from it jump forward to grab ledge. Climb up and go upstairs through opened door. Climb up ladder and go forward to reach automatically opening door.
Jump forward onto ladder and climb up into passage. Turn back and jump on left into another passage. Go through room where you previously got a blue mask and climb up ladder. Drop down to get again to main cavern.
Back for your motorbike and ride with it through lava valley at W side of main cavern. After you did that go to room with planets puzzle and jump at right to double doors. Use your flame key on keyhole and it will show you pedestal with third monastery lotus which you have seen before. Now you will can take it without burning.
Back with motorbike to main cavern through lava valley (savegame.12). Quit motorbike and go at S side through double doors. Again dive into pool and swim through underwater passage.
Get out from water and go at left. As you entered again this oriental room again go at passage on E wall. Go ahead jumping across gap with the same trick as before (stand in front of it and jump forward). Jump diagonally on platform and drop down at ledge below at SW.
Go downstairs and drop down. Go ahead jumping across hole in ground where you previously falled and take third MONASTERY LOTUS from pedestal. Go through newly opened door after you have taken monastery lotus and jump ahead onto ladder. Climb up to a passage above. Turn back and jump at left to the passage. Go ahead and climb up ladder. Drop down to get again to main cavern.
Yet again go through double doors at S side and dive into water. Swim through underwater passage, get out from water and again turn on left to enter oriental room. Climb up on one of ladders at S wall. Here you can use your three monastery lotuses on dharma wheels. Use them and second double doors in main cavern will open.
Get down and back through underwater tunnel that you have came here by. Get out from water and go to main cavern. Go through newly opened double doors at E side and flyby will activate. Now you are in another big location.
Jump on left pillar, face N and jump down below onto platform. Climb up a block and take two small medipacks. Climb up on chain and jump back from it. Take SHOTGUN and shotgun normal ammo. Face E and jump ahead on rocks. Don't climb the ladder now. Jump diagonally on further rocks and from it into S main building.
Go straight at S to jump on another rock platform. Jump to second rock platform and from it don't jump at right. You need to jump ahead on ledge at S. From there jump on left to a passage. Don't drop down for now. You need to make second "tunnel jump" in this level. It's even harder than previous one because second side is one block higher. Take a running jump, perfectly hitting wall and ceiling at the same time and grab a ledge. It's very hard so there is savegame.13 in folder.
After you have did this, pull a switch and now drop down. Go downstairs and kill two tribesmens and two stone guards. Climb up on ladder at E wall and pull a switch. Get down and climb up ladder on the opposite side.
Now you will get to room with burning flames and three passages. All three passages are leading to three levers. Take a look at ceiling of alcoves between three paths and notice a symbols. You need to jump on tiles which are next to symbols at ceiling in alcoves trying to avoid flames. After you have did that and pulled three levers back from this room and get down.
Back upstairs and climb up ladder. Jump at left to rock platform and from it jump on rocks at N into main building of this huge cavern. From main building of this cavern jump onto rocks at N and now climb up at ladder. Get around left corner on ladder and jump backwards on ledge behind you.
Jump SW at roof of building. From roof jump at NW and go ahead into passage which has opened from three levers at room with burning flames. Climb up ladder and pull switch which is time trial. Turn back, jump onto raised up trapdoor and pull another switch which is also timed. Jump at left ledge and quickly go through crawlspace where timed door are.
Get down by a ladder and go at right into water up to hips. Take a large medipack at the end of corridor and go further through water. Get out from water and kill two stone guards. Go ahead and take WEIRD KEY from the podium.
Go back through water and climb up ladder. Back to huge cavern. Now get back again into main middle building at this huge cavern. From it jump through rocks at E side and use your weird key at small postument.
Go through opened double doors to enter some green cave. Pickup revolver ammo x3 at both sides of bridge. Go alongside bridge to reach huge cliff. Jump through two flying platforms and jump into cave in the wall to reach end of level.
Level 6 - Kadath
Savegame.14 on beggining of this level is in folder.
Jump on second side of cliff and go forward. Now you should get to room. Jump on blocks to a switch which opens door next to you. Jump there and push big button which opens trapdoor below. Drop down there.
Kill a dog and go ahead. Kill a mutant and push pushable block to reach and pull a switch. Gate has opened at left and kill a dog. Go through opened gate upstairs. Light up flare and jump across invisible ledges to reach a ladder taking a uzi ammo on one of invisible platforms.
Kill flying mutant and climb up ladder. Go ahead across corridor and drop down to lower block. Pull a switch and quickly drop down escaping from falling ceiling. Go at left to newly opened gate. Take health crystal and avoid chain.
Drop down to lower floor and push two pushables onto circle at ground. A gate will open above. Climb up ladder and go through circular blade. You will get into greece styled cavern. Take shotgun normal ammo, shotgun wideshot ammo and large medipack lying somwhere in there.
Go at E side passage and turn left. Go upstairs and pull a switch. It will "create" a ladder elsewhere. Back to cavern and now go into passage at W side. Climb up ladder "created" by a switch in previous room and pull another switch. Main double doors will open. Back to cavern and go through opened double doors at S side.
Go ahead and notice three bowls for element puzzle. For now leave it by and go forward. Go at left and flyby will appear. You will see some pushables puzzle. Ignore it for now and go at passage on E wall to reach another flyby.
Jump through ramps to reach a bridge. Jump on jumpswitch which will lower some blocks in previous room with puzzle. You can't back normally across bridge because symbols at floor will burn you. Jump at right rock and continue jumping across rocks trying not to fall into water. Pull up on bridge and jump at W opening in wall. From it jump at S making banana jump to back on beggining.
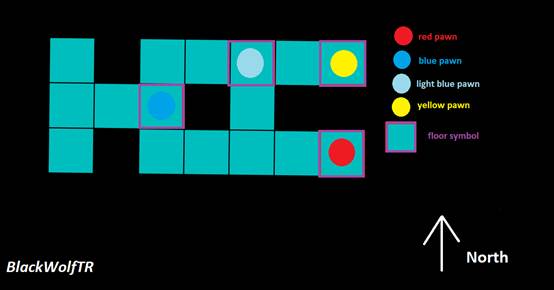
Back to pushable puzzle room. Now we will solve pushable puzzle. Do you remember a weird thing from previous level conatining colors and world directions which was a hint? It was hint for this puzzle. You have there four pushable pawns with same colors as on hint from previous level. Each color pawn need to go at floor smybol nearest the world direction corresponding to the hint. + there are also two pushable blocks which are just for impediment.
HINT FROM FIFTH LEVEL:
Light blue - North
Blue - West
Yellow - East
Red - South
For first move out two square pushable blocks outside the "pedestal ring" so they won't disturb you. Then move all color pawns on floor symbols coressponding to the world directions from hint. After you will put pawn on correct symbol, you will hear falling boulder. Here is image how final placement of pawns should look like:
After you have did this puzzle at S side in water trapdoor has opened. Dive there and swim across underwater tunnel. Get out from water and jump through ramps and blocks trying to avoid flames and chains. Pickup BAG OF SAND and pull a lever which opens a door behind you. Go through it and jump forward across gap. Back to previous room through underwater passage.
Back through corridor from which you have came here by and now go at N passage. Go forward to reach another room. Climb on blocks at middle and from them jump above to grab higher ledge. At higher floor, the passage should be somewhere at N side.
As you entered through passage you will get to room with much platforming. Jump at left to the ladder and climb up. Bounce back from ramp to the bridge. From bridge jump at S at the gap on the wall below. From it, face W and take a running jump, making banana jump and raising Lara's hands at last second to get to the gap in the wall below. Here you have last from game SECRET #9: large medipack.
Pull a switch to raise trapdoor next to you. Climb up ladder and bounce back to a bridge from ramp. Jump onto pillar and from it into gap at the wall. Pull a switch to open a trapdoor in ceiling. Jump back to a pillar, then on bridge and now facing NE jump on white platform losing some health.
White platform will be slowly go up. Face E and when platform will rise up jump forward into passage. Grab and climb up ladder then jump on another ladder. Climb up ladder and go ahead. Before hole, face on left side and run while raising hands to land on below bridge.
Go ahead at W avoiding traps and take a TORCH from pedestal. Turn back and go ignite torch from flame on another pedestal at left. Go ahead on S corridor. Drop down torch into hole and climb down by a ladder.
Ignite a wall torch near the hole from which you have fallen there. A trapdoor has opened in the middle of this room. Drop torch and don't forget were it is, drop down through trapdoor and crawl through crawlspace. Get down and turn back. From left side, turn first and fourth switch (if you will pull wrong switch, three centaurs will attack you).
After you have pulled two correct levers a gate next you you with another switch will open. Then second gate with second switch will open and then third gate with third switch will open which will open gate at the end of corridor. Go at the end of corridor killing two mutants. Go through opened gate and pickup SMALL WATERSKIN.
As you have picked it up a centaur will appear. Go ahead jumping on ramps above spikes to reach opening door. You will get to place where you was before. Climb up ladder and get across blades. Go through double doors at S side.
Go ahead passing by three bowls and fill up with water small waterskin from small pool where bifurcation is. Go back for your torch and pick it up. Back to place with three bowls. Into first bowl from left pour the water from waterskin. Into the middle bowl pour petrol from jerrycan which you have collected from third level and then light it up from torch. Into third bowl pour sand from sand of bag. Unfortunately if you didn't found jerrycan in third level you gonna softlock yourself because it's not lying anywhere in this level. There is savegame.15 in folder to people who didn't collected it from third level.
After you have filled up three bowls a middle door opened at bifurcation. Go cross them and kill two ninjas. You are now in some opera. Shoot another ninja on balcony and crawl through alcove at left. Go forward, avoiding floor spikes and pull a switch which opens door in opera.
Go ahead and climb up blocks. Drop down and at SW corner go cross opened door. Reach room with several boxes and kill another ninja. Go into another corridor and go through automatically opening gate to reach desert area.
Go ahead through desert to reach some temple with cat statue in the middle. Crawl through alcove at left and pull a switch. Go back and enter opened doors at the middle of temple. You will reach big location with two pyramids. It's big location but there isn't much to do here though.
Kill two mutants and one flying mutant between two pyramids. Dive into water and swim through passage at N side. Get out from water, jump on ramp and from it into left at gap on wall. Turn back and grab a ledge to shimmy at right through cornice. Pull up and turn back. Jump onto ramp and from it jump forward to grab a invisible cornice. Shimmy left and pull up. Turn back and jump onto right on pressure plate which opens some gates elsewhere.
Jump up to grab a monkey swing. Swing all way to reach beggining and drop into water. Get out from water and go upstairs between two pyramids. Go upstairs and cross opened gates. Go ahead to reach another big location.
Kill ninja on higher floor and go into corridor at E wall. Jump through blocks to reach a switch which opens another gate. Then back across blocks to previous location.
A switch has opened another gate on E wall. Enter there and jump into water. Swim at passage on E and swim ahead passing by demigod. Get out from water and pickup your revolver or crossbow with lasersight. Now using lasersight, kill demigod shooting through a underwater gap at S wall.
After you have killed demigod swim back to where he was and take ULI KEY that he dropped. Back to place from where you shooted to him and use uli key. Enter a door and pull a switch which will show you a door which aren't opening for now. You need two more levers to open it.
Back through water to previous room and now swim into S passage. Get out from water and climb up on rocks. Jump into passage to get to room with music playing. Climb up ladder, shoot vase and take flares.
Pull cog switch few times (in my case I pulled it five times), dive into water and fastly get through opened gate. Pull second switch for a door in main hall and pull few times cog switch to get out from this room. Back from those caves through water that you have came here by and now swim into W passage.
Get out from water and go upstairs. Jump on the middle and pull two levers trying to avoid blades. Now go at W wall to pull another switch. Go downstairs and again on W wall is third switch which finally opens a door in main hall. Back through underwater tunnel and go to main hall.
Go to SW corner and go upstairs. Jump through invisible ledges and kill falling ninja. Go at right and enter to a opened room. Run to corner and climb on block avoiding falling ceiling. Jump to a switch and pull it. It opens a gate elsewhere.
Quit this room and climb up ladder. Head onto SW corner and go upstairs. Go across bridge and jump onto right windows. Crawl through alcove and then get through another crawlspace. Climb up ladder and get at W side jumping across windows. Get down by a ladder and enter opened gate.
Jump through blocks, collecting large medipack and avoiding chain. Pull a switch which opens another gate above. Back across trapdoors and climb up ladder. Enter through opened gate and jump into portal to a final battle.
Kill two mutants, two flying mutants, two centaurs and three demigods. You can't kill seth. You can collect four health crystal in middle of battle if your health is low. After you have killed them, climb up at ladder on S wall. Go forward and jump and grab a cornice. Shimmy left to reach a ledge. Drop on it and go ahead to jump on rope. Swing and jump on other side. Jump into a gap in wall and pull switch to open gate below.
Drop down and kill another three centaurs and one mutant. Go through gate and go downstairs to reach end of game.