Trident of the Invictus
By Jonson
This walkthrough is meant as a general guide only. It
may not include every pickup or secret. There may also be alternative ways of
approaching situations within the game.
* Pickups
and Items
* Enemies
* Secrets
WALKTHROUGH by Lizard Queen
The Invictus Tomb - South Wing
The level starts with Lara sliding down into a small
pool below. Swim to the right side of the stairs into an underwater tunnel,
surface and pull the floor lever. Swim back and head through the newly opened
door. Pickup FLARES
in the south/west corner. Shoot the vase in the south/east corner and pickup the SHOTGUN
AMMO. Head to the ledge with the round column, face north and take a
running jump and grab the crack in the north wall. Shimmy to the left, around
the column and pull up into the alcove. Head through the corridor and take a
running jump and grab to the roof. Push the button on the east wall and watch a
flyby of the door opening in the previous area. Reverse roll, safety drop down
to the lower area, climb the two sets of stairs and head east into the Main Hub
area.
Main Hub – South Corridor
From the Main Hub, head south through the corridor,
shoot the brown vase on the west ledge and pickup the
SMALL MEDIPACK.
Continue south, around the corridor and pick up the FLARES, SHOTGUN, SMALL MEDIPACK and CROSSBOW
in
the various alcoves. Exit this area back to the Main Hub.
Main Hub – East Corridor
From the Main Hub, head east through the corridor up
the stairs, shoot the 1st set of Bones on the south/east ledge and
see a cutscene of a closed door. Head north past the first glass floor to the
start of the second glass floor, turn right while still on the glass floor,
crouch and shoot the 2nd set of Bones in the east corner. Cutscene
shows the door still closed. From the third glass floor, face east,
crouch and shoot the 3rd set of Bones at the bottom of the stairs.
Face west, crouch, shoot the vase and pickup the CROSSBOW AMMO. Head to the
north/west alcove and pickup the LASERSIGHT. Cutscene shows
the 1st bones (if you couldn’t get them
with the pistols). Reverse roll, head onto the final glass floor and with
pistols crouch or use the crossbow + lasersight and
shoot the 4th and 5th set of Bones in the north corridor
and east corner. Cutscene now shows the door opening. Head into the corner and pickup the FLARES
before exiting back through the south corridor. Turn right and at the top of
the stairs, hop onto the south ledge. Angle to face north/west and take a
standing jump to the next ledge. Face east and take a running jump and grab
across to the next ledge. Pull up and enter the newly opened door on the
left. Head through the corridor and while facing south, push the floor
lever and watch a cutscene of doors opening in the previous area. NOTE: If you
push the floor lever while facing north, the door will close, so always face
south to open. Reverse roll, exit the corridor, safety drop down and head back
east then north and up the stairs of the temple through the newly raised door.
East Corridor Temple – East
Take a standing jump over the spikes, slide a bit and
another jump to the slope ahead. Run, face south/east and push the floor lever
avoiding the MUMMY. Pickup
the FLARES and SMALL
MEDIPACK in the corners and head to the north/east corner. Face north,
backflip to the slope and jump and grab the slope ahead. Pull up and backflip
to the platform behind. Angle slightly left and take a running jump to the
opening in the north wall. Push the wall button and return via the slopes to
the east platform. Head north, keep left to avoid the darts and take a running
jump over the first set of spikes. Continue through and take another running
jump over the second set of spikes. Push the wall button and exit the corridor
with running jumps over the spikes while avoiding darts. Drop and head to the
middle of the main floor and while facing north/west push the floor lever. Head
to the south/west corner, face south, backflip to the slope and jump and grab
the slope ahead. Pull up and backflip to the platform behind. Head through the
west door and slide down a slope into the next area.
East Corridor Temple - West
Pickup the FLARES ahead and SMALL MEDIPACK further on the outer ledge.
Safety drop down, face west and hug the left wall to
avoid triggering the MUMMY. Continue south to
the end, then west and pickup the SMALL MEDIPACK. Head east
and pickup the SHOTGUN AMMO. Head back north and into the first east entrance,
avoid the MUMMY and push the wall button. Exit
and head into the west entrance, avoid the MUMMY
and push the wall button. Exit, head further north and into the second east
entrance, climb into the alcove, angle to face south/west and take a standing
jump into the opening. Angle north/west and take a standing jump with
grab (or a run hugging the corner) to the next ledge. Continue north/west
and take a running jump to the north ledge. Go to the end (north) and grab the
monkey swing above. Monkey swing to the west ledge, pickup
the FLARES and take a
running jump to the south ledge. Head through the west corridor to the end,
angle to face north/west and take a standing jump into the opening ahead. Pickup the FLARES
and CROSSBOW AMMO in
the corners and step onto the raised trigger tile. Face north, arm the crossbow
+ lasersight and SAVE your game (trigger tile is
timed). Run north, curving to the left and take a running jump to the block.
Without stopping continue running with a curve left and take another running
jump to the higher block. SAVE your game, turn left to face east
and shoot the vase before the timed door closes. Drop to the floor and exit via
the newly opened door. Head out to the ledge to the north wall, face south and
grab the monkey swing above. Swing south, then drop into the west opening. Head
through the corridor, continue through, turn right and pickup
the SMALL MEDIPACK in
the north alcove. Continue east and pickup the FLARES in the north/east
corner. Climb the south block and take a standing jump to the next ledge.
Face north/west and take a running jump to the next ledge. Push the floor lever
and watch a cutscene of the area now flooded. Head down the west corridor and pickup the SMALL
MEDIPACK. Climb the south block, face west and take a running jump with
grab to land onto the west ledge. Push the wall button (prep for Secret#6) face
east and drop down to the room below. Exit through the north/east corridor into
the newly flooded area. Dive into the water and swim east, then north.
Secret#1: Continue swimming through the
north opening, then east and surface into an opening in the north/west corner. Pickup the CROWBAR and LARGE
MEDIPACK reverse roll and exit back to the
water. Swim west, then south and surface for air.
Swim into the north/west entrance blocked by rock but
now accessible via swimming. Surface and climb the stairs.
Prep for Secret#5: Head through the
opening in the east wall, pry the LONDON
STAR off the wall using the crowbar from Secret#1 and exit.
Continue north, then east and pickup
the first PHAROS KNOT.
Reverse roll and exit via the south/west opening just to the left of the main
exit door. Climb the ladder, push the wall button and
exit through the newly opened door. (HINT: If you are in need
of a health refill, first head down the east stairs to the level change,
then reverse roll back through the level change and head back up to the
Temple). Continue to the end towards the south wall then down the stairs back
to the Main Hub.
Main Hub – North Corridor
Head through the north corridor to the end and jump
into the south ledge. Reverse roll and take a running jump and grab the north
ledge and pull up. Run to the edge of the bridge and take a running jump
north/east to the ledge and pickup the FLARES. Take another
running jump back to the bridge, head forward and pickup
the SMALL MEDIPACK to
the left of the Temple doors. Head back to the bridge, face north and
jump into the water. There is a cutscene of a drain. Start swimming to the
right and enter the drain. Pickup the SHOTGUN and climb out of
the water. Head through the opening, up the stairs and while facing south, push
the floor lever. A cutscene shows the temple doors opening. NOTE: If you push
the floor lever while facing north, the door will close without showing you a
cutscene, so always face south to open. Continue south through the corridor and
a door opens back into the North Corridor. Continue west and jump into the
south ledge. Reverse roll and take a running jump and grab the north ledge and
pull up. Run to the bridge and enter the newly opened temple doors.
North Corridor Temple – West
Slide down the slope and immediately hang from the
ledge while shimmying left to let all the beetles fall to the floor. Pull up,
head to the south/east corner near the drain and the beetles below will fall
into a pit in the floor or get stuck in the wall but they will not bother you
anymore. Head north and pickup the SHOTGUN AMMO. Safety drop
to the floor head south/west to find a wall button on the north face of the
structure. Push the button and immediately backflip to the slope behind and
jump/grab the ledge ahead to avoid the boulder trap. Head north/east to find
another wall button on the south face of the structure. Push the button and
immediately backflip to the slope behind and jump/grab the ledge ahead to avoid
the boulder trap. Return to the south/west structure, backflip to the slope
behind and jump/grab the ledge ahead. Pull up and head to the north/west corner
of the ledge. Take a running jump and grab the ledge ahead and pull up. Head
forward and pickup the LLARGE MEDIPACK. Arm the
shotgun (or crossbow with lasersight) and exit
through the newly opened door. Shoot the two SKELETONS
into the pit provided (or drop into the pit and shoot their heads off with the
crossbow +lasersight). Pickup
the extra SHOTGUN AMMO in the north wall and climb the stairs. Run east across
the bridge into the entrance triggering another SKELETON.
Lure him out to the bridge and shoot him off with the shotgun. Continue through
the east entrance, follow the corridor and push the
wall button at the end of the room. Reverse roll but before exiting, take
notice of the marked tiles in the glass floor. They are the clue to the floor
puzzle below. Exit back to the bridge where another SKELETON
materializes. Shoot him off the bridge.
Secret#2: From the middle of the bridge,
facing south take a running jump off the bridge to a small rocky outcrop below.
Take a standing jump up to a small platform and pull up into a crawlspace
above. Pickup the SHOTGUN AMMO and LARGE MEDIPACK. Crawl to the end, pull up through a newly opened door and head right
(north), down the stairs west, then right (east) back to the bridge.
Face south/west and drop off the bridge to a ledge
below. Drop down again and climb the newly exposed block. Jump up to grab the
monkey swing and swing across the water to the other side. Enter the room with
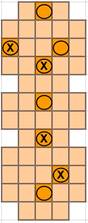
the floor puzzle. Facing east, jump only on the marked tiles in the grid to open
the door on the left. You can do it in any order and
you can also come off the grid as long as you don’t touch any other tiles, the
door will open. And don’t forget to pickup the SMALL MEDIPACK in the north/east corner before
exiting via the newly opened south door and climb the ladder to the rooftop.
North Corridor Temple - Rooftop
Head south and push the floor lever in the south/east
room. Then push the floor lever in the north/west room. Head south again and
push the floor lever north/west. Head through east room door and push the floor
lever north/east. Head south then west through the newly opened tunnel in the
middle of the room. Pickup the second PHAROS KNOT and exit via
the north/west opening behind the sarcophagus. At the opening, angle north/west
and drop onto the slope and grab at the end. Drop down to the next ledge, face
east and take a standing jump and grab to the bridge. Head to the north/east
corner of the bridge, face east and take a running jump to the lower alcove. Pickup the SHOTGUN
AMMO, drop into the water, swim north and let the current take you into
the next level.
The Invictus Tomb - North Wing
Swim south and pickup the CROSSBOW AMMO in the
south/west corner. Swim east then south and pickup the FLARES
and CROSSBOW AMMO
from under the ledge. Pull out of the water, arm crossbow + lasersight,
face north and shoot the two vases in the water. Swim north then west into an
underwater tunnel and surface at the end. Pull up, head to the north/west
corner, face east and climb the ladder above. Pull up and climb the south
block. Take a running jump south over the gap and another running jump and grab
south to the alcove ahead. Head to the platform with the wraith extinguisher,
face north and jump up to grab the roof above. Pull up, walk to the edge and take a standing jump and grab the crawlspace ahead.
Lower down into the room below and push the floor lever north, opening the
temple doors in the previous area. Reverse roll and climb back into the
crawlspace and safety drop into the room below. Pickup
the SMALL MEDIPACK in
the south/west corner and exit north. Take a running jump over the gap
back to the temple.
North Wing Temple – West
Head west, slide down the slope and jump over the
spikes. Arm the shotgun or crossbow + lasersight and
shoot the SKELETON. TIP: He seems to fall off
the rising platform if you shoot him into the wall. Or shoot his head off with
the crossbow. Jump to the west ledge which activates a WRAITH.
Head south, then east, then south, then west and pickup
the LARGE MEDIPACK at
the south wall. Head east to the end then north and safety drop into the pit
ahead while avoiding darts. Push the button on the south wall, reverse roll and
exit north to the Temple. Head east then south, climb the ledge between two
columns and take a running jump with grab to land in the alcove. Run forward
and stand or crouch near the wraith extinguisher until the wraith explodes.
TIP: You can avoid all of that and shoot the wraith with pistols until it
leaves you alone. The only caveat is that it will never extinguish. From the
wraith extinguisher, head forward into a room above fire blocks. Note the
markings on the glass floor indicating which tiles are safe. Continue forward
and drop into the pool below. Note the wraith extinguisher in the north opening
and surface to a new area.
Flooded Currents Area
Notice the direction of the currents follows the
direction of the floor lever handles. Without touching anything, take a running
jump to the west platform and enter one of the doors. Face east, climb the
block and a cutscene shows an underwater door opening. The door is timed but
stays open as long as you are on the block. Take a
backflip off the block, into the water and swim forward. Follow the current
left, then right and quickly swim through the door before it closes. Pickup the CROSSBOW
AMMO. Pull out of the water, step on the trigger tile to open the door
and take a running jump and grab the ledge ahead. Push the floor lever south to
change the middle current and take a running jump back to the west platform.
Enter one of the doors, climb the block east and take another backflip into the
water. Swim forward, then follow the current right, then right again and
quickly swim through the door before it closes. Pull out, climb the stairs, arm
the shotgun and shoot the SKELETON
off the ledge. Pickup the HORSEMAN’S GEM off the pedestal. Drop to the
ledge below and exit via the south/east door. Take a running jump and grab to
the ledge ahead and pull up. Take another running jump to the south platform
and push the floor switch east. Return to west platform and enter one of the
doors. Climb the block east and take another backflip into the water. Swim
forward, then follow the current right, then left and quickly swim through the
door before it closes. Pull out, climb the stairs, pickup
the FLARES and place
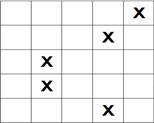
the Horseman’s Gem in the receptacle to open the door. Follow the diagram
(X=safe blocks) or the description below.
Angle to face north/east and take a running jump past
the first block onto the second block. Take a standing jump to the third block
and a running jump over the fourth block to grab the edge of the fifth block.
Pull up, angle to face north/west and take a standing jump to the sixth block.
Angle to face north/east and take a running jump directly into the opening in
the north wall. Grab the SMALL
MEDIPACK on the pedestal and exit via the door onto the east platform.
Push the floor lever north to change the middle current and take a running jump
to the north platform. Push the floor lever west and return to the west
platform. Enter one of the doors, climb the block east and take another
backflip into the water. Swim forward, then follow the current left, then left
again and quickly swim through the door before it closes. Pull out, pickup the SMALL
MEDIPACK and SHOTGUN AMMO from the pedestals and notice the closed door
at the top (for Secret#3 later on). Drop to the lower
floor and exit via the door in the north/east corner. Take a running jump and
grab and pull up onto the west platform. Take a running jump to the east
platform and climb into the north/east opening. Reverse roll to face south and
jump up to grab the ledge above. Pull up, jump over the SKELETON, arm the shotgun and shoot him
off the ledge. Head south, then west and take a running jump off the roof and
grab the edge of the west roof ahead. Climb the stairs and pickup
the first PHAROS PILLAR
from the pedestal. Reverse roll and head back down the stairs.
Secret#3: Turn north and run to the end
where there is a trigger tile opening a door in one of the underwater timed
doors. Reverse roll onto the tile and see a cutscene of the door opening. The
door is timed, so save your game then run south, then east out to the roof.
Take a running jump across the water to the east platform below. Reverse roll
and take a running jump to the west platform and through one of the doors.
Climb the block east and quickly backflip into the water. Swim forward, then
follow the current left, then left again and quickly swim through the door
before it closes. Pull out, climb the stairs and enter
the door before it closes. Pickup the TINNOS SCROLL, SHOTGUN AMMO and SMALL MEDIPACK. Head to the south/east corner, climb the block south and
around the corridor back to the bottom of the west roof stairs.
Continue east and take a running jump and grab the
east roof and pull up. Head through the opening, turn south and climb the east
ladder. Follow the corridor around, exit via the newly opened door and back to
the Temple entrance. Arm the shotgun, head east and shoot the two SKELETONS off the bridge. Climb to the top stair, turn
north, climb the ledge and take a standing jump off
the bridge to the sloped block with the grate, slide and grab the edge. Pull
up, backflip with a twist to land on a ledge under the bridge. Follow the
corridor and push the floor lever to open the east doors of the Temple. Drop
into the water, swim north then west into the underwater tunnel and surface at
the end. Pull up, head to the north/west corner, face east and climb the ladder
above. Pull up and climb the south block. Take a running jump south over the
gap back to the Temple bridge. Head across the bridge east through the newly
opened doors.
North Wing Temple – East
Turn north and slide down the slope, avoiding the
spikes and jump to land on the floor below as a swarm of BEETLES attack. Immediately head left, then right and
at the bottom of the slope, turn right to face east and jump up and grab the
crack in the wall. Quickly shimmy right, pull up, angle left and backflip to
the ledge behind. Face north and take a running jump and grab the ledge ahead.
Take another running jump north to the next ledge. Head east and a SKELETON jumps out. Run past him or shoot him off the
ledge with the shotgun and head to a small bridge at the end of the corridor.
Safety drop down, push the wall button on the east
wall, face west and jump over two sand pits as they contain hidden spikes. More
BEETLES attack so run forward, jump into the
water, swim south and surface. Pull up and head into the south/east archway,
turn right and climb the ledge on the right. Pickup
the FLARES and SHOTGUN AMMO
and drop back down. Exit north, turn left and run west
on the bridge. Turn left and enter through the south archway, then west into
the next room. Walk to the middle of the room where there is a spiked pit. Turn
around, jump back and grab the edge of the pit. Shimmy
right to the corner, then let go and grab the crack in the wall. Shimmy left
until you reach the crawlspace and climb up. Crawl to the end, climb the ladder
and pull up.
Secret#4: Angle left and take a standing
jump north/west to the archway. Jump up and grab the crawlspace in the corner.
Pull up, then drop down, climb down a ladder and pickup
the very special EXPLOSIVE CROSSBOW AMMO
at the end of the corridor. Return to the ladder, climb up back to the crawlspace
and exit back to the archway.
Jump to the north ledge (or running jump if you
avoided the secret) and another running jump over the second ledge north. Arm
the shotgun and shoot the SKELETON off the
ledge. Head north to a corridor and take a running jump and grab the north roof
at the end. Walk east and take a standing jump into the alcove. Head around the
corridor, drop down and push the wall button in the north wall. Watch a
cutscene showing the location of two key items. Exit via the newly opened door
and pickup the HORSEMAN’S GEM on the pedestal outside. Head south, then east
and south back to the pool area. Head south/west through the room south, then
south/east back to the pool Continue south/east through the archway, then west
back to the pit in the floor. Walk to the edge of the pit, turn around and jump
back and grab the edge. Shimmy right, let go and grab the crack then shimmy
left to pull up into the crawlspace. Crawl through, climb the ladder and pull
up. Take a running jump north across to the north ledge and enter through the
newly opened door in the east wall. Head across the bridge, climb the ledge and
drop into the structure. Take a standing jump to the next ledge and use the
Horseman’s Gem in the receptacle. Climb the ledge ahead, angle to face
north/west and take a running jump to the north ledge. Take a running jump and
grab to the ledge across and pickup the second PHAROS PILLAR from the
pedestal. Immediately reverse roll as a WRAITH
attacks, run out to the exit and into the pool below. Swim east, then pull out
north and head through the archway. Quickly turn right (east) to the end of the
cave and crouch near the wraith extinguisher until the wraith explodes. Exit
the cave back to the pool area. Head west, then south, then east back to the
pool area. Continue south/east through the archway, then west back to the pit
in the floor. Walk to the edge of the pit, turn around and jump back and grab
the edge. Shimmy right, let go and grab the crack then shimmy left to pull up
into the crawlspace. Crawl through, climb the ladder and pull up. Take a
running jump north across to the north ledge and enter through the newly opened
door in the east wall. Head across the bridge, climb the ledge, angle
south/west and take a running jump to the south ledge. Turn right and take a
running jump and grab across the gap to the ledge on the other side. Follow the
corridor around to the end and watch a wide angle
camera shot of the outside wall.
Detour for Secret#5: Angle to face
south/west and take a running jump with slight curve right to the grate on the
rocky ledge. Enter the alcove, climb the grated ladder west and pull up. Place
the London Star in the receptacle and head through the newly opened door. Climb
the ladder north, head east through the east door. Take a hairpin turn right
into a small room and push the floor lever, lowering a block. Exit north/west,
around the central block into an alcove. Pull up west, arm the shotgun and
shoot two SKELETONS
off the ledge. Pickup the LARGE MEDIPACK, EXPLOSIVE CROSSBOW AMMO and SHOTGUN
AMMO. Drop to the lower floor and exit via the west door.
Head south, down the ladder then down the grated ladder back to the open water
area.
Jump into the water, swim south, pull up onto the
south ledge and through the entrance for a level change back to the South Wing.
The Invictus Tomb - South Wing (Revisited)
Follow the corridor around, south across the glass
floor panels, then around and back to the Main Hub. Head into the South
Corridor.
Secret#6: Head west through doors you
opened at the beginning of the level (see East Corridor Temple – West). Place
the Tinnos Scroll on the platform east and enter the
newly opened doors. Head to the north/west corner and follow the corridor
around to an opening in the wall. Climb up, arm the shotgun
and shoot the two SKELETONS off the ledges. Angle to face south/west and take a
running jump into the opening in the west wall. Push the floor lever and use
the ladder to lower back into the room below. Climb the stairs in the south
wall. Pickup the SMALL MEDIPACK in
the west alcove, the GRENADE
GUN AMMO in the north alcove, the LARGE MEDIPACK in the south alcove and the SHOTGUN AMMO in the east. Safety drop down
into the room below and pickup the GRENADE GUN in the middle of the room. Climb the stairs in the
north/west corner, down the next set of stairs back to the main room. Exit via
the east door back to the South Corridor.
Head south through the archway, then west and place
the two Pharos Knots and two Pharos Pillars in the receptacles. Enter the newly
opened doors, climb the stairs for a level change.
The Invictus Tomb - Run Lara, Run!
First head to the east wall and pickup
the LARGE MEDIPACK.
Save your game then pickup the TRIDENT OF THE INVICTUS.
Arm the crossbow + explosive ammo (if you have it) and shoot the three SKELETONS. Otherwise, arm the shotgun to keep them at
bay and run through the south door. Position at the middle of the slope, then
slide down and jump to grab the rope in the middle of the cavern. Swing to the
other side and save. Run to the middle of the slope then crouch right into the
crawlspace to avoid a boulder. Crawl out to the opening. Take a running jump
and grab the sloped wall ahead. Shimmy past the grate with hot steam, past the
darts and past another grate and pull up into the safe alcove. Push the wall
button and the floor begins to rise. Climb up, enter the room
and climb the ladder. Exit outside as the level ends.