Deathwish
Levelset by Neltharion
Walkthrough by BlackWolfTR
Note: This levelset can be completed in different ways with different "skill ranks". Those skill ranks are: E, D, C, B, A, S. Each skill rank is in a different place. If you find any skill rank ending you will be able to finish the game. Beware because if you finish the game with not the highest skill rank S you won't see all the content from the game. The lower skill rank you get, the less content of game you see. This walkthrough will lead you through all the content present in this levelset and it will lead you to gain the highest skill rank S.
Abbreviations: N - North, E - East, S - South, W - West, NE - North East, NW - North West, SE - South East, SW - South West.
Level 1 - Ruins of Lemuria (first visit)
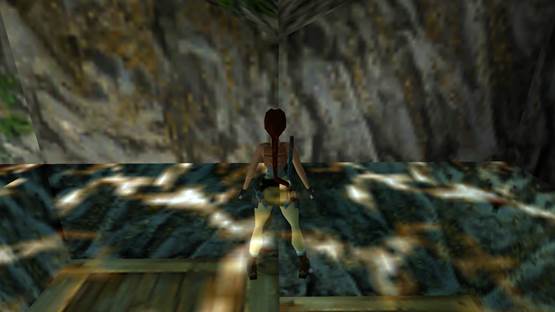
After slide turn on left and jump on the slope to get on the save ledge. Jump and pull the jumpswitch. Go through opened door and pick up shotgun normal ammo. Ignore the passage on W and go upstairs (on W there are receptacles to put syzygies, ignore them and don't insert any future syzygies there unless you want to finish game earlier and with skill rank E). Turn on left within waterfall and you'll get to a small canyon area. Turn left and before passage to another level, jump onto slope, bounce back and grab a ladder. Climb right and go through tunnel until you'll get on top of that small area.
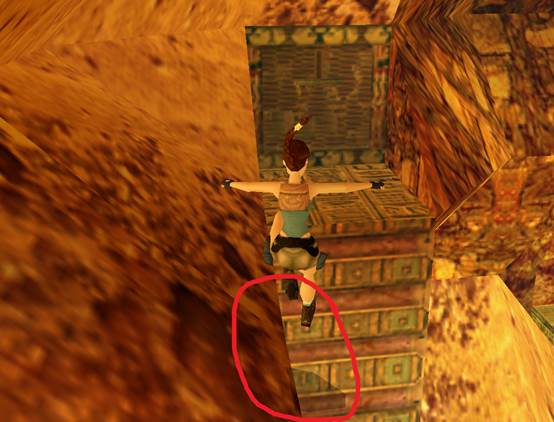
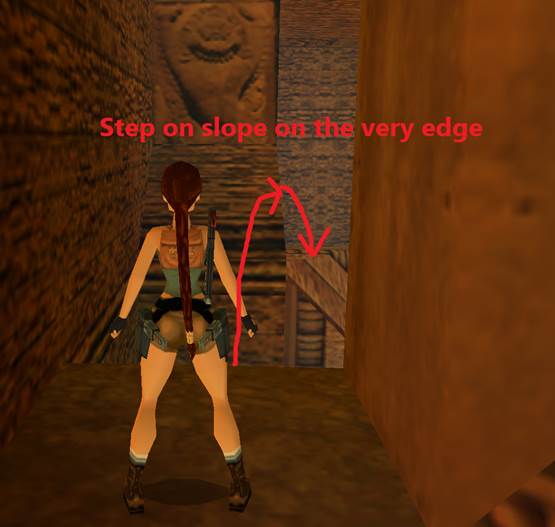
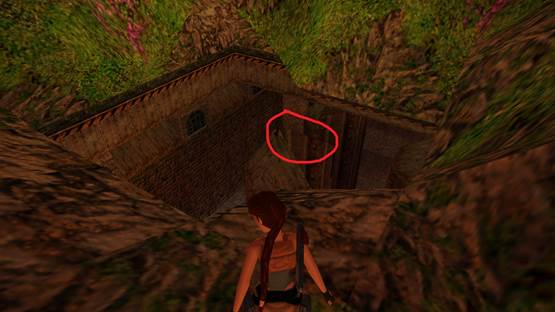
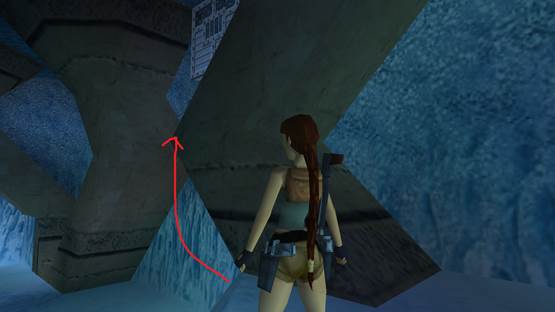
Now you'll need to perform first very hard jump. Get as near as posibble to E ledge and try to make a running jump on a slope between the triangular slope and normal slope. Here's screenshot to assure where you should exactly jump:

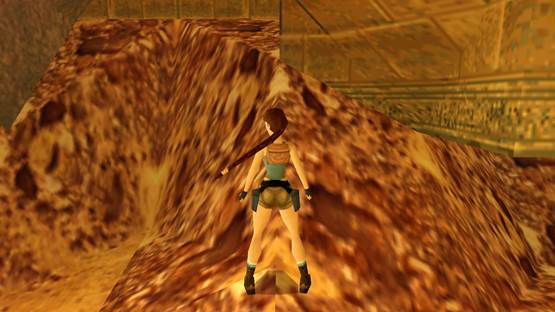
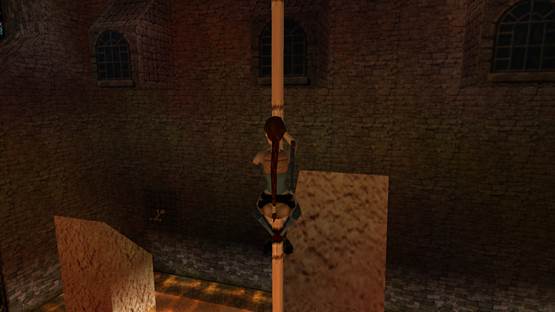
Bounce from slope and grab a ladder. Climb up ladder and be leftmost. You need to perform a very precise jump with usage of glitch (the only one in the levelset). Climb up, bounce back from left side of slope, roll in air, try to land with Lara on the very edge of slope so she will step on it but won't slide (if you'll jump too far on left Lara will just slide from it or if you'll jump too far on right you'll miss it) and after Lara has stepped on slope, hold ctrl and up arrow, she'll perform a ledge bug grabbing a ladder. Here is screenshot how she should jump on a slope:
Climb a ladder and pull a switch which will open door underwater. Turn right on W and make a running jump to grab the platform. Now jump into triangular opening in wall and pick up first LIGHT SYZYGY. Drop down and hop into water (ignore the passage to another level for now). Swim into hole and swim along tunnel through opened door. Swim down through hole and you'll get to a small pool. Swim into E passage and get out of water.
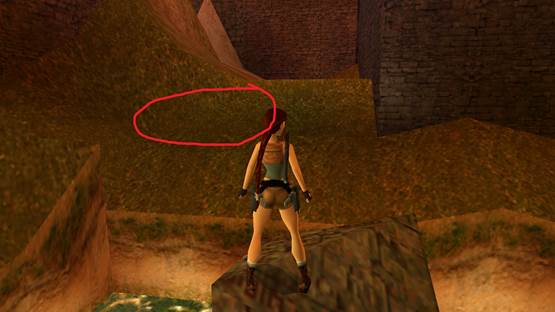
Now at S side of area you have brown rocks. There's one spot where you can jump and stand, it's quite tricky to jump up there. Stand in front of it and align the center of Lara's head on edge of yellow bricks, then jump turning a bit on left on beginning, then turn right and press forward arrow to get to that safe spot where she can stand. You need to hold whole time forward arrow or Lara won't get on safe spot. Here is screen how you should position yourself for this jump:
After you got up there jump on N rocks (you need to jump at very edge of it). Turn left and jump into window in cyan wall. Pull switch and jump back on previous rocks. Jump into opened window on E wall and go ahead. Go ahead on N through area with water and plants to get to a room with motorbike. After cutscene pull a switch which will open a door elsewhere.
For now leave the motorbike by and go on W. Jump on slopes to get to upper place. You'll get to location with India textures and with lot of traps. For now jump at right platform and perform banana jump (180 degree jump) on W, through wall to get on other side. Ceiling can irritiate you a bit so curve that banana jump a little bit.
After you've done it turn right and go through passage. You'll get to an egyptian area. Go through passage in N wall and climb up on a wall. Jump on platform between slopes and jump to the higher ledge. Jump on the second ledge and now on NE you can see two openings in wall. Take a running jump to a further opening. You'll get to another big location.
Drop down from a wall and stay to left wall passing water pools. Climb up ladder and pick up large medipack at right. Jump down into a smaller water pool. Swim into passage and swim forward until you'll get to a branch. Swim on left and you'll get to underwater switch. Now the switch will open two things: trapdoor in ceiling and door in other half of this maze. At first you'll need to get to a door on other half of this maze. But beware; it is timed. Pull the switch and roll. Swim ignoring the opened trapdoor at ceiling. Stick to left side and at some point you'll get to opened door. Pick up second LIGHT SYZYGY and pull a switch two times to open closed door after you. You can take fresh air. Back to the underwater switch and pull it again. Roll and swim into opened hole in ceiling. Get out of water and you'll get to another area.
Now to get on ledge at E of area you'll have to sprint down the ramp, sprint through shallow water and at last second jump onto ledge. Now make a running jump onto ladder and climb up. Shimmy as far as you can on left and climb up. Bounce back to another slope, slide and grab it. Shimmy to right (don't be too close to wall), climb up and bounce back with roll turning on left to get into window. Now jump at S wall and grab a jumpswitch.
Jump into opened passage. Go ahead and jump onto pillar with spikes. Jump to second pillar and grab it (you need to grab it when spikes are down, otherwise they'll kill you). Climb up and make a side jump on right. Jump into opening and go upstairs. Pick up first DARK SYZYGY and pull a switch which opens door underwater. Go through opening in wall and you'll be back in area where you was before. Jump into water and swim into opened passage. You'll get teleported to other part of the level.
Swim into pool where you was before and now you'll need to get back to the motorbike. Swim into passage at right, make a tricky jump in same way as before, jump into opening in wall and go to the motorbike through area with plants. Get on motorbike and back with it through area with plants to previous area with tricky jump. Drop down with motorbike.
You need to ride with bike through passage at W wall. Carefully try to drive round water (if bike will touch water it'll explode). Drive into a tunnel with waterfall and turn carefully on left trying not to drop down to water. Stick with motorbike to the left until there won't be anywhere to drive. Drop with bike onto slope on right and from it onto slope with waterfall.
After you made that jump drive upwards on left, then drive on right as there isn't anything at left. Door will open and you'll get back to a familiar area. Drive upwards alongside waterfall and turn on left. Drive into cyan portal and you'll be teleported to another area. Drop down with bike carefully and get out of it. Take flares from ground and climb up on block. Jump on block until you'll get to a switch.
The switch is timed. Light up flare, pull switch and roll back. Jump forward and do a flare cancel (drop a flare before landing on ground to prevent Lara's stumble animation, it's necessary to make that timed run). Run on S and hold for whole time sprint button to run through shallow water. After water quickly jump up on blocks and run upwards along ramp to opened gate.
Now don't go further. Back to your motorbike and with it drive onto brown rocks and drive on them through S tunnel. Drive up to opened previously gate. Kill a baddy and pick up shotgun normal ammo from small corridor. Drive up along ramp and you'll get to room with puzzle.
Get out of motorbike and from left pull up second switch. Get on motorbike and park it on lowered block. Pull second switch again and block on which stands motorbike will raise. Then pull third switch, get on motorbike and park it onto lowered block. Back to switches and pull third and fourth switch. Get again to motorbike and park it again on lowered blocks. Back to the switches and finally pull third switch yet again. Now your motorbike is lifted up all the way on the top.
Now you'll notice two blue tiles on ground. Save before them as this whole sequence is timed. Drive through them with motorbike and drive through lowered block on right. Pass through another blue tile and turn left where block has been lowered, then turn left again. Now stick to right and at the dead end drive onto blue tile. Quickly back off, turn left and then right. Drive forward whole time until you'll get to opened door. Quickly drive through it, turn on left to another room, drive on blue tile and return through door you've got there. Turn right, then turn on second passage on left and drive on blue tile under lowered block. It'll open door on E wall of room (it's timed too).
Get out of motorbike and pick up second DARK SYZYGY and a small medipack. Pull switch two times to open closed door. Now you can leave motorbike as it won't be useful anymore. Back to the previous area where the switch for timed run was. Go on E to another area. Drop down and climb down a ladder. Go downwards alongside with waterfall to back to a familliar area. Turn on left and go into passage. Go alongside tunnel until you'll get to the second level.
Level 2 - Remnants of the Aqueduct (first visit)
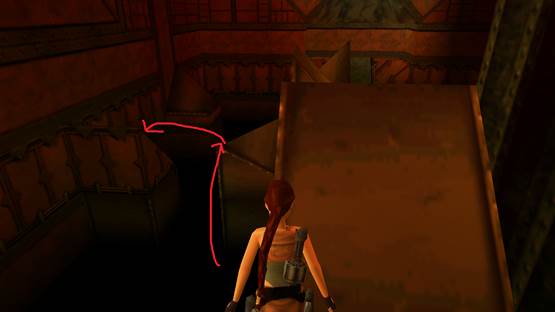
Go forward until you'll get to a small room. Go through the only passage. At forward you have room where you will insert all syzygies in future. Go into left passage and jump on S rocks, roll and jump onto pillar. Now you'll need to curve jump to grab a jumpswitch. Here's screenshot how you should position yourself:
After pulling the jumpswitch a door has opened nearby. Get out of this room and turn on right. One of doors on E wall is opened. Enter through it, slide down and jump into opening on right. Go alongside corridor and by bouncing on ramps get into triangular opening in a wall. Go ahead and you'll get to a room with cyanish atmosphere.
Get through circular blades and go into passage at N wall. Jump on platform with spikes and quickly jump on NE platform. Now position yourself on SW edge of platform looking at NW:
You'll see slopes at the bottom. You have to get onto black slope at the bottom, other slopes will kill you when you'll land on them. Now what you gonna do is: roll from the very edge, raise hands, bounce back from slope rolling in mid air to get on another slope, slide and grab it. Now shimmy on left edge of black slope, pull up, slide and immediately raise hands (without grabbing the ledge) so Lara will get to a block at the bottom.
Jump on SE cornice and shimmy on right. Get on ladder, get around corner and drop down. From slope jump on a safe spot. Go ahead and you'll have to perform a very hard jump. You need to jump on second slope that is behind the first slope. You should position yourself like this:
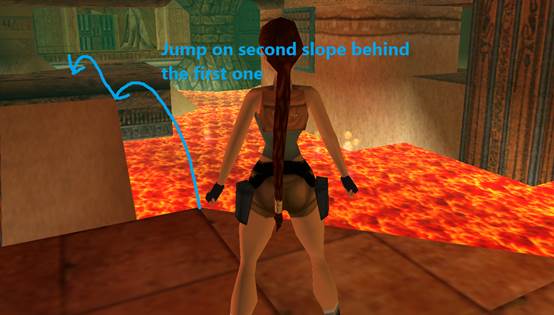
You have to jump from the very edge and while jumping you need to turn a bit on right to make a small banana jump (180 degree jump) and at the end turn on left to get on the second slope. From the second slope just bounce forward and land onto platform.
After you made it run ahead and jump to a switch. Pull it and door will open elsewhere. Jump back and there is door opened at left. Jump there and now you'll have to perform one of the hardest jumps in the entire levelset. Position yourself like that:
You need to jump onto right platform, passing through corner of wall. At start run a bit towards wall and then turn right jumping through corner and holding right arrow whole time. Run forward and jump into opened hole in wall. Go ahead and jump up into water that will bring you to the top. You'll get to another small area.
Pickup shotgun wideshot ammo and UZIS from pedestal. Go through passage at W wall and you'll hear opening trapdoor. Take your uzis into hands, slide down and shoot the vase (be careful with ammunition). Climb up ladder, bounce back and drop down to get to the previous area. Now on left trapdoor has opened that leads to a very challening area with shooting vases sequences. You'll need to shoot 5 of them in overall.
So let's begin. Drop on a slope at bottom shooting first vase with uzis. Bounce back to another slope and from it jump forward on left on a pillar (hide your guns or spikes will kill you). From that pillar jump onto NE slope, bounce back from it onto another slope. Slide down backwards and grab a ledge. Shimmy furthest on left passing through a corner. Pull up and let Lara slide for half of a second and then jump backwards (without roll, otherwise Lara won't reach to the slope). Bounce from slope with roll and grab a ledge of another slope. Shimmy left through corner and pull up. Take your uzis and jump with roll shooting the second vase.
Now get down to tile where spikes will raise and quickly jump through corner avoiding fire on another tile. Quickly jump on a left block and pull a switch that opens a grate to one of vases. Grab and climb a ladder. Get around a corner and make Lara shimmy on two hands on ladder. Get as much on right as you can, pull up, allow Lara to slide for a bit, bounce back with roll on right. Slide and grab a ledge. Get around a corner and don't shimmy any further, be rightmost. Pull up, draw your uzis, bounce back from slope shooting a vase and rolling at the same time, after you rolled in air direct yourself on left to drop into water (you can't land on slope). Get out from water and jump into another water which will take you on top. Door will open and drop down to previous location.
You are still missing two vases so you have to get back to that area with vases. Drop down through a hole and repeat everything as previously until you'll get to a slope where you dropped down and jumped through a corner avoiding fire. Climb up on the slope, take your uzis and while bouncing from slope to slope you will need to shoot vases on NE side of room. From slope jump maximally on right, trying to shoot vases and landing in the end in water. If you didn't shoot one vase you can back there again and shoot it. Return to the area where you collected uzis before.
After you returned to area where you collected uzis before, notice that trapdoor in ceiling is opened. Jump up on a slope through opened trapdoor in ceiling, bounce back and jump on a ladder. Climb up and pull up. Jump back with roll, bounce from slope and jump into a gap. Pull switch and you'll hear an opening door. Back down and go through the opened door on a W wall.
Go ahead and jump onto a slope, jump forward, bounce back with roll and land on another slope. Jump forward from it onto blue slopes. Your Lara will stuck between these slopes. You have to try to jump towards W. It's actually based only on your luck whether Lara will jump in correct or wrong way. At the end roll in mid air and then jump onto safe spot.
Go ahead through corridor and climb down a ladder. Jump above a hole and drop down at the end of a tunnel. You've returned to a familiar area. Go back on S to a room with cyanish atmosphere. Turn on left passage and pick up third LIGHT SYZYGY from fountain. Go back through E passage and drop down. Go ahead and slide down a ramp.
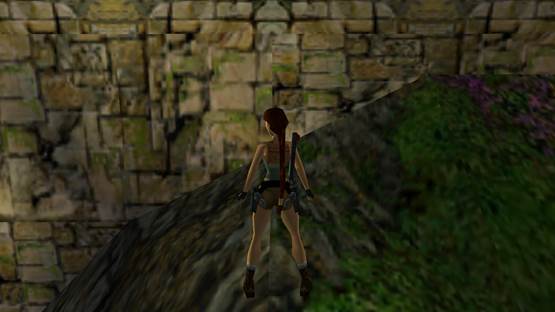
You'll get to a big canyon area. Jump on the left rocks and continue jumping until you'll get to a ladder. Climb up and pick up the CISTERN KEY from a small corridor, you'll need it later. Now you'll have to get on a slope at S but you'll need to be backwards on it. To make Lara land on it backwards you need to stand on a very edge of the rock you are standing on, having one feet on rock and second feet in air:
To make Lara stand like that you have to jump up towards the edge and press forward arrow in air so Lara will move a little bit landing with one feet in air. After it just position yourself and you'll be able to jump on a slope and slide being backwards. Shimmy right and climb up on a safe spot. Jump at S rocks aiming at the safe tile. Jump through the triangular rock and jump down to the lower path. Go ahead and get into ruins to move to the third level.
Level 3 - Sewers (first visit)
Use the Cistern Key and enter inside to the temple. FlyBy cutscene will be activated. Jump through slope on N and slide down. Jump on platform with fires trying to be nearest to the wall. It is luck based, sometimes it will ignite you, sometimes it won't. Pull up, pull a switch and go down N. Go through opened passage and pick up SKULL KEY.
Pull switch in passage that is next to you. Switch is timed. Turn back and run into second passage. There is monkey swing but you can't swing on it because it is too slow and you won't get to door on time. You need to perform a tunnel jump. Jump and at the same time touch wall and ceiling. It will give you boost and you'll be able to jump over gap. You need to do it without grabbing opposite ledge at the end otherwise it'll be too slow.
If door closed behind you then you can open them again by switch on left. Slide down and quickly pick up UTURNUL KEY. Bounce from slope and jump to a higher platform. FlyBy cutscene will apear. Now in the crawlspace on the left you have wayback, for now don't crawl there. Crawl forward on W. Pick up shotgun normal ammo and pull a switch.
Go upstairs and kill a baddy. He has dropped CROWBAR. Pick it up. You don't have to pull a switch cause it will close door behind you. Go upstairs, turn left to get into second level to open a shortcut. Now back to third level. Go alongside tunnel. Get up by bouncing on slopes. Go through tunnel and you'll get to bigger location.
Climb down ladder and kill a baddy. Climb up on blocks and jump to a switch. Pull it and double door will open and a platform will raise. Jump on raised platform with ankh symbol, take your shotgun and shoot vase with it on S wall (use look button to aim). Be careful with your ammo. Door has opened on S wall. Go through them and climb up ladder. Pick up third DARK SYZYGY. Back through tunnel and go across door opened on N wall. Drop down on slope.
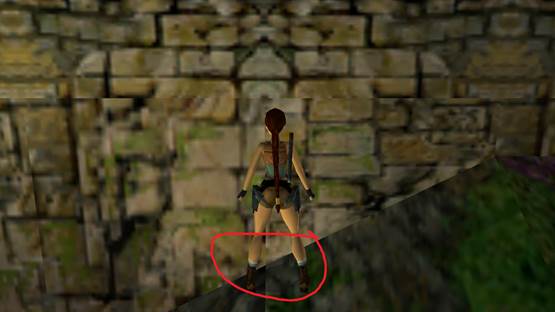
Don't drop into water or it will lead you to death. You have to jump on safe platform on E rocks. Position yourself on right side of edge. Jump from the very edge curving jump a little on left then at the end on right. Here is screenshot how you should position yourself:
Jump on NE platform and then onto another. Now perform banana jump (180 degree jump). Then jump on SE and then S. Go alongside tunnel to get to another area. There is another very challenging jump. You have to jump from the very edge of triangular edge onto slope at left then bounce back with roll navigating on left and try to grab a ledge.
Jump on higher blocks and from triangular elevation jump and grab far platform. Go alongside tunnel and slide down into a pool. Pick up fourth LIGHT SYZYGY and swim upstream through passage on S. Get out of water and pull a switch. Jump into water and swim into opened corridor. Try to avoid circular blades and get out of water. Go upstairs, door will open and you'll get at the bottom of the big temple area from beginning.
There isn't anything in water. Enter into passage at N wall. Door will open. Go through them and pickup uzi ammo at right. Don't pull a switch for now unless you want to get smashed. Climb up into hole in ceiling at NE side of room, jump over a hole, pass through circular blade and pull a switch. It will close door so boulder won't smash you. Jump up to a higher platform, go ahead and door will open. Drop down and you've returned to previous room.
Pull the switch and FlyBy cutscene will be activated. Go through passage opened on left and slide down. Jump on trapdoor, pull a switch and jump on right. Jump on left slope, shimmy right and bounce back. Bounce on slopes until you'll get on safe spot. Now you have to get to another Syzygy. Ceiling is going to disturb you. You need to jump from lowest posibble point turning on right and sticking to a wall while being in air. You can't grab a ledge so don't try this. You have to do this without grabbing. Pick up fifth LIGHT SYZYGY from pedestal.
Go alongside right tunnel and enter into left room. Quickly kill baddy falling from ceiling or he will steal you a small medipack. Pick up small medipack and enter greeny room. Pull switch and go back to tunnel. Go forward, climb up small block, jump over gap and go through opened door. Drop down and and you'll get to previous room. Climb up into hole in ceiling and back to the main temple location.
Now find a ladder on W wall and climb it up. Turn left and pull switch to open a door next to you. There is also green switch but don't pull it otherwise you'll end level quicker with skill rank D. Go through opened passage and back to the second level.
Level 2 - Remnants of the Aqueduct (second visit)
Go back to the canyon and jump into water. There is triangular hole in floor in water so search for it and swim down into it. Get out of water and use Skull Key. You'll get to bigger area. Climb up ladder on E and jump back with roll grabbing a cornice. Jump on on triangular platform and from it onto another platform in corner. Climb up ladder and jump back with roll sticking to wall. Jump on another platofrm and then onto another.
Now from triangular elevation jump on second grey slope (raise hands at the end of falling to make Lara fall further). Jump and grab ladder. Climb up, curve your jump and grab another ladder. Shimmy right and crawl. Go and pull a switch. Go alongside tunnel and turn right. Climb up ladder and pick up crossbow explosive ammo x2 and small medipack from shallow water. There isn't anything else in this room so back and climb down with ladder. Turn right and you'll get to another big area.
Jump onto left slope and bounce on ledge. Jump through opening at S and bounce on slopes trying to get onto higher block that is next to you. It can be a bit tricky but after some attempts you should make it. Jump forward, grab a ledge and go forward. Jump on slope and slide. Jump onto block at SW and then onto slope at W. There are TORCHES. Pick up one torch and now you'll have to back with it through the same way you got there.
Jump through slope on E onto block behind it. Jump onto left slope and from it bounce on block. Jump onto ledge on SE and now you can see yet another triangular elevation. You have to perform banana jump (180 degree jump) jumping from that triangular elevation, getting over slope and getting through small opening in wall (remember to hold forward arrow whole time).
After you've made this go forward and jump onto ledge. There is another triangular elevation. Jump from very edge and try to pass over that slope (yet again remember about holding forward arrow whole time). Jump onto ledge and jump over slope onto another ledge. Then jump into direction of burning torch. Ignite your own torch from it and jump into opening in W wall.
Pull a switch and two things will happen: first thing is that spikes in previous area will neutralise so you can back there anytime if you lose your torch without doing all that platforming. And the second thing is that door has opened next to you. Go through them with your torch and you'll get to the third level yet again.
Level 3 - Sewers (second visit)
You've returned to the corridors where you were before. There is a hole in the ceiling, jump up on slope and bounce back. Go ahead and door will open. You've got to the main area of this level. Jump forward on blocks and now there is block where you can't normally jump on it with torch because it is too high. You need to jump up with the torch and in air press "2" or "3" so Lara taking weapon will drop torch on higher block. Pick up torch and get up. There is green switch but do not pull it otherwise you will end level sooner with skill rank D.
Go on S and pull a switch to open door next to you. Go through them and you'll be back at the beginning. Get to the edge and look down. There is opened stone door, under you on the S wall. Jump down there with torch and go alongside tunnel. Pick up ZONE ONE artifact from pedestal, you'll need second part too. Pick up large medipack too and get out of this room. Get onto lower safe spot and from it you can carefully drop down torch. Pick up your torch and go through S passage (there is corridor on left with fire if you forgot to ignite your torch. You'll get to another bigger area.
Drop your torch in a safe place and go to the SE corner of room. Jump across opening in wall and climb up ladder. Bounce back from ladder and pull a switch. Water will disappear. Jump into pool where water was before and go through opened crate. Another crate will open and hop down.
Climb up to a crawlspace on S wall and crawl to a switch. Pull it and water will appear elsewhere. Now climb up to crawlspace on E wall. Go alongside passage and drop down to water. There is second hole in ceiling. Get out of water and climb up on a block to pull a switch. Two grates will open. One above you which will lead you back and second in water. So you should go to the second one in water.
Swim through it and swim alongside tunnel. At some point there will be a hole in ceiling. Pass it by and pull an underwater switch. Swim back and swim into the hole in ceiling. Get out of water and go ahead until you'll drop to water. Get out of water in the hole in ceiling that you came here by. Go ahead and climb down a ladder.
Climb up to a crawlspace on S wall and pull a switch again. Go back for your torch and now try to throw it through a gap on W wall. Now climb through the crawlspace on E wall and climb up ladder. Go ahead and drop down. You torch has gone out. You will have to ignite it once again but not now. At first climb down a ladder. Pull a switch which is timed, turn back and quickly run through opened door. Pull first switch that will raise a block and pull second switch two times to reopen closed door.
Pick up your torch and jump on raised block. Yet again the wall is too high to jump normally with torch so you have to do the same trick as before. Jump up with torch and in air press "2" or "3" so Lara equiping weapon will drop torch to a higher place. Ignite your torch with fire and drop down to ignite torch on wall which isn't ignited. After you ignited torch on wall a door in previous location will open.
So with you torch you need to back there. Get up doing the same trick as before and get up on higher block then onto another higher block. Drop down, go ahead and climb down the ladder. Get out to dried pool and making same trick transport your torch on a higher block. In W wall grate is opened so get there and pull a switch. A yellow block has lowered so get to it and take the fourth DARK SYZYGY. With your torch back to the main temple area through passage at N wall.
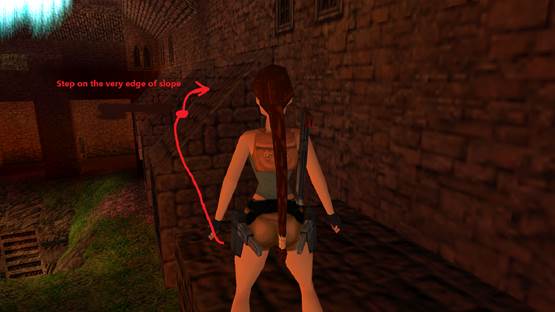
Enter into another area through E passage in main temple area. Drop your torch into safe place and jump on left side. Go ahead until you'll reach end of floor. Now you have to jump forward, stepping on the very edge of slope to land a little further onto block:
Jump on left and making the same thing as before, jump on SW, trying to step at the very edge of the slope so you'll land a little further onto block behind the slope. Climb up and a block will raise. Don't go upstairs for now. Drop down and go for your torch. Back on raised block. Still don't go upstairs. Turn back and jump onto wall on N and climb down ladder through hole with torch.
Now again do the same trick with dropping torch in air by pressing "2" or "3" key. Pick up the torch and ignite the torch on wall. Go ahead and a grate will open. Climb up across raising block again and now go upstairs. Notice the QWERTY board on one of walls. It is necessary for upcomming puzzle. Go left and enter into opened passage. At left corner there is small gap in wall. You need to squeeze through its corner in order to get further.
Pull the switch that opens one of grates in previous area and notice another hint for the puzzle at left. Back to previous area and go on right side of it. Crawl through crawlspaces until you'll get to a switch. Pull the switch to open second door in previous room and pick up a large medipack from pedestal. Back through crawlspaces and go into opened passage.
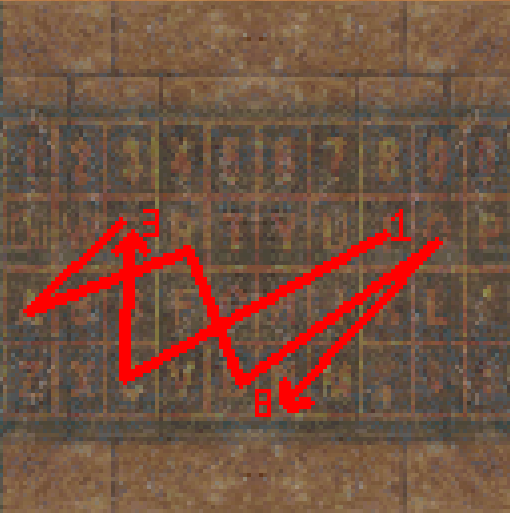
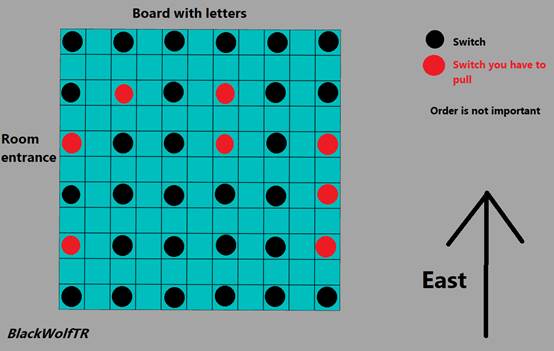
Now you have entered a room with puzzle. This puzzle is quite complicated because the letters in second hint are confusing. You have another board with letters on left side. So basically what you have to do is overlap the hint from small room onto the QWERTY board. Every point of lines in hint is different letter on QWERTY board. Overally you're going to have 7 letters: I, C, E, A, R, B, O, N.
So now after figuring out the letters, in the area with puzzle there is a board with random letters. Search all seven words on this board and now you will have to pull the levers that are in the same place as letters on that board (order isn't important). You should overlap letters from board on levers in E direction. So face yourself on E and pull seven right switches corresponding to the board with letters. After you pull correctly all seven switches two doors will open in SW corner of room. Here are few screenshots provided in order to help you with understanding how this puzzle works:
Enter through opened doors in SW corner and pick up fifth DARK SYZYGY. Pick up your torch and back to previous area. Jump on wall where you previously climbed down but now you have to jump on slope at W side. Bounce from it to land onto platform. Back to the main temple area.
In main temple area turn right and climb on yellow block. Climb up several times and go on right. Turn at first right and you have to do this tunnel jump once again now with torch. Take a running jump and at the same time hit ceiling and wall to get a boost to land on ahead ledge without grabbing. Hop onto the slope that is in hole in ceiling, bounce forward and go ahead. Jump on blocks and do the same trick with dropping the torch in air by pressing "2" or "3" key. Take your torch and take a look at the bottom. You can see a gray block on S side. Jump down there with torch and slide down to get into the second level again.
Level 2 - Remnants of the Aqueduct (third visit)
You've returned to the canyon. Jump on right on rocks, then onto another rocks and then onto platform. Jump at W platform and look at left to see a keyhole. Jump there and insert your Utturnul Key. Now look at right side and you can see that door opened there. Jump there and pull a switch that opens door elsewhere. Alongside stairs there is a dead end.
Jump into water and get out from it (there is place to get out from water on N side of room). Climb up and go into passage on W. Climb up several blocks, turn back and jump on other side. Pick up shotgun normal ammo and ignite torch on wall. You'll get on the top of canyon. Enter with your torch into the only passage and carefully walk down with your torch into the water so Lara will be able to swim at the surface of water with torch. Get on on the opposite side and get out of water.
You've entered another cavern. Jump at safe spot on left, drop your torch on safe place and climb up a ladder. Now at the top of the ladder, jump back with roll, draw your uzis and shot the vase. Bounce back from slope with roll, hide weapon and grab the ladder. Climb down, back to the top of waterfall and now jump on right side. Get through opened door and drop down a hole.
Crawl and now there is a little maze with fires. Just try to take widest path and you'll get to the end of it. Jump on slope and bounce back from it. Pass several circular blades and pull a switch; trapdoor will open elsewhere. Get close to a door and it will open. Jump into water and get onto opposite side of room.
Pick up your torch and jump up on sandy blocks. Drop down through opened trapdoor and ignite a torch on wall. Door on W side has opened. Enter through them and open with the crowbar a yellow door. Pick up ZONE ZERO and back to previous room. Combine Zone Zero with Zone One and you'll get DECIMAL NUMOGRAM. Back to previous room and insert it into a receptacle. A grate will open nearby. Enter through it and pull a switch that will open a gate elsewhere in that level.
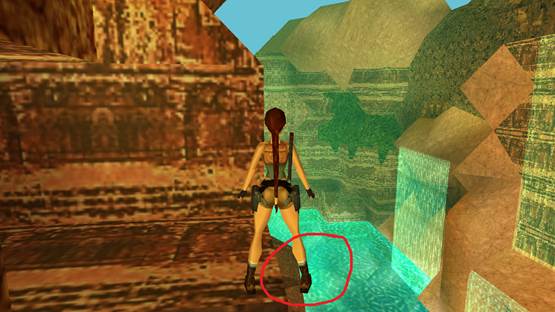
Now you can leave your torch there as it won't be needed anymore. Get out from this room through ceiling and get on waterfall. Jump into water. You can't get out in a normal way from water because there isn't such a spot. However there is a pendant triangular part of small beach. Stand in front of it, turn back to it, jump up and in air press down arrow to make Lara move slightly backwards landing on dry land:
Back to the canyon and jump down into the water. Get out of water and climb up. In N wall, next to the opening where you slid there is another opening in wall so jump there and climb up a ladder. Drop down, go ahead and door will automatically open. You'll be back to the beginning of this level.
Go W and now you can insert all five Light Syzygies. After you insert all Light Syzygies two doors will open (if there is second closed door you missed one area in this level). Enter through opened door and now insert all five Dark Syzygies. After you inserted all Dark Syzygies a door will open and behind it there is GOLDEN KEY. Now go back several rooms, turn on left and go through tunnel to enter to the first level.
Level 1 - Ruins of Lemuria (second visit)
Go ahead and jump into the water. Swim down a hole, swim ahead, in a pool swim through forward passage and at the end get out from water. Now make that tricky jump through rocks yet again. Jump onto rocks at N and then into opening in wall at E. Go ahead through area with grass, enter another corridor and get up on higher wall by bouncing on slopes.
Now you've again entered to the area with a lot of traps and indian textures. This time we will go forward. Pass through hanging blade, wait until fire will disappear, then quickly make a running jump onto left, land onto second slope that is behind first slope, bounce from it and grab a ledge. Wait until fire will disappear and pull up. Wait until another fire will disappear, quickly take a running jump onto slope, bounce from it with a roll in air, land onto another slope, bounce from it onto right on another slope and from it jump forward.
Drop down and insert the Golden Key. A door will open. In this room there are also receptacles for Syzygies but they lead to lower skill rank C. Enter through opened door and slide down to access fourth level.
Level 4 - The Ordeal
Slide down and run very quickly forward towards PNAKOTIC MANUSCRIPT. You have to do it as fast as posibble or boulder will block posibility of picking up manuscript. If you'll leave by that Pnakotic Manuscript then you won't be able to finish whole game on highest skill rank. Go through the gap in castle's wall. Climb up ladder, slide, jump on left slope and bounce back. Pull a switch that opens main door of castle.
Back to previous area and enter through castle's main door. A text will appear telling you that you should collect as many gems as posibble. Go ahead and slide down on pipe. Jump backwards and collect flares x2. Swiftly jump onto pipe on middle and quickly slide down or boulder and flames will kill you. Quickly bounce backwards and land on a safe spot.
Jump onto big slope at N, slide down a little and jump on left rocks. Now bounce back from slope to slope moving onto other side. Jump on slope with different direction, bounce from it onto another slope and from it jump onto safe block where you can stand. Climb up and get on gravelly block. Jump from very edge and grab block at SE.
Climb up ladder and go ahead to a small moody area. Pick up flares from one of windows in wall. Jump and climb up into crawlspace on N wall. Crawl, climb up ladder and crawl again. Go ahead and drop down. Pick up flares from ground and pull a switch. Door has opened behind the grates. Back through the same way you got there.
Go upstairs through opened door. You will get to a room with danger sign and crates. Pick up flares from small box and go further. Get through crates in corner and pick up STORAGE KEY. Climb up ladder and use your Storage Key. Go through opened door and you'll hear opening grate. Climb up and go on left to open a shortcut to the previous area.
Turn back and go ahead. Jump over hole, slide down and jump forward. Now you have to jump through triangular gap, land on correct side of slope, jump, grab a ladder and quickly climb right. Now there is lava and slope. Behind the slope there is a hole in wall on left. Now you need to jump directly from the place where you are standing into the hole. You can't jump on slope and from it into the hole because it's most likely imposibble. Drop down and pull a switch in front of you. It opens a shortcut to one of previous areas. In W wall there is small opening. Crawl into it and you'll get to another area.
Go upstairs and jump forward onto slope. Slide down and jump onto another slope. Continue jumping on slopes until you'll get onto safe spot. Jump down into window in wall. Pull a switch that opens a shortcut. The ladder next to switch is a wayback to previous location. Go to the second ladder and climb up. You've entered to a scottish place.
Jump into water and get onto boxes at E side of room. Now you need to climb up but ledge is too aslope. You have to stand on the very edge of higher crate (having one feet on crate and one in air) and then climb up. Here is screenshot how you should position yourself:
Jump on left over aslope rocks. Now you'll have to do almost same thing as seconds ago. The wall at E side is too high so you can't normally climb up. You have to blend in a little into the very edge of slope. Just jump into it to blend in a bit. Lara will be in a bit higher place and she'll be able to climb up (note: you have to press forward arrow + CTRL because in other way she still won't climb). Here are screenshots that should help you:
There is switch on one of columns. It is timed so save your game. It opens door in wall on opposite side of this area. Pull it, go at right and jump down on a rock. Jump diagonally onto aslope rock and bounce forward. Jump onto greeny terrain and jump several times up to get higher. Then quickly jump into the opened hole. Pull switch two times to reopen door and take one of TORCHES from pedestal.
From window take a running jump on right onto boxes in shallow water. Get carefully into water and swim on surface of water with your torch to another crates. From boxes jump onto higher blocks with your torch. Ignite torch from metal barrel and climb up on wall through greeny blocks on S side of scottish room. Go forward into another room.
Leave your torch in a safe place and drop down into hole with a switch. It is again timed. It raises block in scottish room. Pull it and quickly get out of hole if you don't want to get smashed by a boulder. Back to previous location, jump down and push a box through raised block on grey tile in ground. A door next to you will open.
Back for your torch and pick it up. Jump into opened window. Pick up flares from crate. Don't pull a switch because it will close the door through which you got there. Climb up on blocks with torch and pick up a large medipack from left. Go upstairs and kill a baddy. Ignite torch on wall and door will open. You can leave by your torch now. Go across opened passage and pick up first SERPENT GEM from pedestal. Back and go upstairs (you can leave your torch by as it won't be useful anymore). Climb up a ladder, go on left and then go ahead. A door will automatically open. Kill a baddy and go downstairs.
Jump on slopes and shimmy left. At one point you will notice the lowered ledge above slope. Hang in front of it and climb up on the slope. Bounce back, land on another slope, slide a little bit, jump and whole time hold forward arrow to get on safe spot. Now at the opposite side you can see another place where you can jump. This one is pretty hard. You have to jump from the very edge and land onto right side of the opposite ledge. Of course you need to jump in correct time otherwise fire will ignite you. Remember to hold forward arrow whole time. After you made this jump you can stand on edge of ledge without being ignited by fire. Take a running jump and jump as far as posibble on slope. Bounce forward into opening in wall.
Go ahead and pass through flame. Now you have to jump over block onto slope. It's tricky because you must jump from the perfect point; not too far from the block, not too near the block. Jump on safe tiles and you'll get to another location. You can see water in front of you. It's posibble to jump into it. You need to jump from the very edge. Press forward arrow whole time. Lara will step on a ledge a bit and then she'll fall into the water. In water stick to right wall and swim until you'll get to an underwater switch. Pull it, back and swim into second passage. Get out of water and climb up block.
Now you have to do a challenging jump. Tiles surrounding you kill when stepped on. You need to get onto opposite side by taking a running jump. But before jumping you have to run a little bit on flamable tile (without being burned).
Go through tunnel and you'll get to another room. Pull a lever which opens a door in the beginning of level. Push two boxes on grey tiles. Jump on slope and bounce up through opened door. Jump into opening in wall and pull a switch. Climb up ladder. Now you have to back on beginning of level.
Drop down into hole, go ahead whole time until you will get into the scottish area again. Go S and climb down a ladder. Turn right, climb up a ladder and bounce back. Go alongside tunnel and climb down ladder. Go downstairs and crawl through crawlspace. Go on right through opened door and climb up ladder. Go ahead, pass pipe by, go upstairs and then go ahead to the opened door.
Climb up another ladder and go forward. Now by jumping on slopes you need to get to the opposite side of room. Of course you have to avoid spikes and flames. At the end shoot a barrier and get inside tunnel. You will get into another big area. Pull a switch at W wall of that area and door nearby will be opened. Go at SW of the room and climb up blocks. Jump ahead and at the end you will have to jump into window in wall between slopes. Take a running jump and step on the very edge of slope landing in the window. Pull a switch.
There is a big hole in ground. Stand on NE edge of that hole and you need to jump diagonally onto slope that is lower. When jumping try to bypass ceiling. At the end of falling pull hands so Lara will fall a little bit further. Here is screenshot showing on which slope you need to jump:
On the slope bounce forth and back heading on the rightmost of opposite block. Jump onto another platform. The last jump is a bit tricky so you have to curve it. Go ahead and jump into triangular opening in wall. Go forward through opened passage (if passage is closed then you've missed a switch) and pick up second SERPENT GEM.
Back and get down. Climb up ladder and jump down on the same slope as before. By bouncing back and forth get on opposite block. Jump on next platform and now look on right. There is another platform with an item on it. Jump there and pick up first TWIN TRIDENTS.
Now get down, jump into the water and swim into the tunnel. Swim ahead and get out of water. You've got to a dark room with a skeleton. Try to avoid it and pull a switch in corner. A door in scottish area has opened. Climb up into crawlspace in NW corner of room. Crawl and go ahead. You've entered to the familiar area but in different place.
Jump on blocks and then into window in wall. Go ahead and door will automatically open. Go on left and go upstairs. Go forward, pass by ladder and enter through opened shortcut. Crawl through crawlspace on left. Go upstairs, turn left and climb up through opened hole in ceiling. Go ahead and climb down. Turn on left and climb up ladder. You've got to scottish area again. Climb up on S wall through greeny blocks. Go forward and enter through opened passage in corner.
Go ahead and pull a switch that opens door elsewhere. Door next to you has opened as well but for now ignore it as it is a shortcut. Go into passage on right and climb up. Pick up flares and pull a switch that opens a gate in one of areas that you have already been. Jump through flamable tiles onto tile on left and then onto another safe spot. Drop down through opened trapdoor and go in the opposite side than flames. Climb down ladder and climb up into window. Enter into opened corridor, go ahead and door will automatically open.
Jump over hole and climb up a ladder. Go downstairs and kill a baddy. Baddy has dropped UZIS. From this room pick up small medipack x2 and uzi ammo x2. Back to the hole that you jumped over. At the bottom of the hole there is closed trapdoor but don't worry. Turn back to the hole, stand in the middle of tile, draw your uzis, drop down and in the right time shot a crystal that is in a window. If you shoot the crystal, the trapdoor will be opened.
You are in water now so swim ahead and get out of it. Pick up second TWIN TRIDENTS from a ground and quickly hop backwards or spikes will kill you. Climb up a ladder and you've returned again to that big area with flying rocks. Turn left and jump into a window in wall. Go ahead, turn on left and go upstairs. Climb up ladder and go forward. Pass pipe by and still go ahead. Pass by the main entrance of castle and drop down. Climb up a ladder, go straight and climb up through opened hole in ceiling. Jump over flamable tiles onto safe tiles. Go ahead and drop down. Go forward and enter to familiar area through previously ignored door.
You can see that door on E wall is opened because of one of previous switches. You can notice that inside there is a padlock. Shoot it with your uzis so two grates will open. Climb up a ladder on left and get into crawlspace. Crawl ahead and climb up a ladder. Go forward and crawl. Drop down and insert two twin tridents. Door next to you will open.
Go through them and for now don't jump into water. On right side there is a block that is brighter than the room's lighting. Crouch and through that small niche shoot that block with uzis. It will break. Hang on a ledge and shimmy left. Pull up and go through tunnel. At the end of it there is third SERPENT GEM. Pick it up, back and jump into water. Swim into only passage and swim up.
Whole this room is covered in shallow water. Go into SW of this room and climb up on slope. Slide down, jump and grab a jumpswitch. Now climb up on pipe. You have to do a very precise jump by bouncing back on rock. You have to be on perfect height and you have to have perfect angle. Here is a screenshot showing how you should position yourself:
Bounce back from pipe but don't make roll. From the rock you have to curve your jump and grab a ladder in corner. Climb up and get on safe tile. Go ahead and spot a slope beneath you. Drop down on it, slide and jump into opening in wall. Pull a lever and a trapdoor will open. Drop down into water, climb up again on pipe, bounce back on rock then again curve your jump on ladder and climb up.
Now there is another ladder on which you have to jump on. Curve again your jump and grab the ladder. Climb up and go into only passage. You've got to room with spikes that raise and neutralise constantly, blocking access to two switches. You will have to turn them off but that will come later.
Quickly get through the middle window avoiding spikes and drop into water. Get out of water in SE corner. Jump on blocks until you'll end up in SW corner of this area. On the last block jump W on safe tile on grassy elevation. It's hard to spot that safe tile so here is screenshot:
Crawl through crawlspace and go ahead to pick up fourth SERPENT GEM. Back and jump into the water. Swim into passage on N wall. Pull underwater switch and swim up to get out of water. Pull another switch which opens gate behind you. Go through opened gate on the opposite side. Go ahead and drop down to get to another big location.
Go on the middle and pull a switch which raises blocks. Climb up higher through raised block. Now from that platform find and jump on slopes on NE. Bounce from slope to slope until you'll get on safe spot. When you got on safe spot you heard opening door. Drop down and climb up a ladder on N wall. Go upstairs and pull a switch that opens gate elsewhere. Climb up and slide down.
Jump on the platform with fires on wall and now climb up on SE ladder. Drop, grab a ledge and shimmy on left. Climb up ladder trying to be on rightmost side of it. Climb up and jump on slope on right. Grab a slope and from rightmost side jump with roll on left. Now on W there is a wall. You need to make a banana jump (180 degree jump) to the opposite side. Continue making banana jumps until you'll get to a jumpswitch.
If you get to jump switch, you will have to perform a very challenging jump to reach it. Position yourself on higher ledge, jump on the higher slope trying to be on it forward, from it jump with roll on the very edge of opposite slope and from that slope jump into direction of jumpswitch to reach it. You have to be on the very edge of that second slope otherwise Lara won't be even able to get on it after making the roll.
After you had pulled the switch a block raised. Climb up on it and jump on yellowish ledge. Go on right and at the end jump on left on block near burning fire. Wait until second flame will go off and jump diagonally to reach a jumpswitch (you need to curve your jump a little bit). After you had pulled the jumpswitch another blocks raised. One of blocks have raised under you and another next to you. Go to that second one and climb up on it. Now jump on leftmost of S ledge without grabbing.
Go upstairs through opened door and pull a switch behind one of columns. Go further and drop down. Perform banana jump (180 degree jump) through N wall and enter into another opened passage. Pull a switch on left which deactivates spikes in previous area. Go upstairs, turn left and drop down. Perform the same banana jump again, look down and spot a slope under you. Drop down on that slope and jump on right on ledge. Jump into a window in wall and go ahead to back to previous area.
You can pull now two switches. Pull them and a trapdoor in ceiling will open. Climb up a ladder and go through opened gates. You will get on top of the previous big location. Jump on the middle and pick up ICE CARBON. Jump on raised block and jump up to grab a ladder. Climb up. Don't go into passage on W otherwise you will end game earlier with skill rank B. Insert two Serpent Gems and a door will open. Go through it and insert another two Serpent Gems. A door will open in previous room. Don't go through passage on S unless you want to finish levelset earlier with skill rank A.
Back to previous room and go through opened door. You've entered some catacomb styled room. Go downstairs and insert your Pnakotic Manuscript into receptacle.
After you had inserted Pnakotic Manuscript into its receptacle a door on E wall opened. Go across them and climb down a ladder. Go ahead and you'll enter another room. Jump diagonally on left pillar and curve your jump to reach jumpswitch on W wall. Jumpswitch deactivates block.
Climb up a ladder and jump on right slope. From it jump forward and grab a platform. Jump onto middle ledge and climb up. Go on right, slide and jump forward into a window in wall. Jump and bounce on slopes to get on safe tile. Pick up INDRA KEY from pedestal and pull a switch. Go further, drop down and jump forward on pillar. Back through tunnel and ladder to previous room.
Insert Indra Key on the wall on middle of the room. Grate on left will open. Go across it and stand before the hole. Look down and notice water. You can't noramlly drop down because water is too shallow however a little bit a further water becomes swimable. You need to drop down into the swimable water. Take a big run-up, sprint with roll into that hole, raise your hands so Lara won't bounce from the wall and land into swimable water. It's quite tricky jump. You have to be on the rightmost of wall. Here is screenshot at which place you should land:
After you dropped down go ahead and pick up KEY OF GANESHA from pedestal. Climb up a ladder, go upstairs and you will get on the opposite side of hole. Don't go further for now. Jump over the hole on opposite side and back to previous room. Go through passage on N wall and drop down. Turn right and use Key of Ganesha. Enter into opened door and pull a lever. Get out of room and turn on right. Go upstairs and enter across opened grate. Go forward, climb up a ladder and bounce back. Go ahead and door will automatically open.
Pick up PISTOLS from pedestal and go further. Drop down and you will get into outdoor area. Pick up AN EMPTY BLISS from fountain. Two guardians have appeared. I suggest you to kill them with pistols to not lose ammo of other weapons as it will be needed in next level. Guardians have dropped two TWIN PILLARS. Insert Twin Pillars into receptacles and you will hear opening door.
Shoot a grate with pistols and crawl through gap. Go further and pick up GOLDEN TOKEN. Trapdoor has opened. Climb up through it and notice two receptacles for two An Empty Bliss artifacts. You have one for now. Go across only passage and enter another passage in same wall. Two baddies and a guardian will appear. I again suggest you to kill them with pistols. Guardian has dropped STORAGE KEY.
Keyhole for storage key is next to you. Insert it and go through opened door. Pick up MASK OF TORNARSUK and second AN EMPTY BLISS. Back to the place with two receptacles and insert two An Empty Bliss artifacts. Back to previous room and go downstairs. Jump over hole and enter opened passage on middle wall of this room. Use your Golden Token to open a gate elsewhere.
Go again through passage on W wall, jump over the hole, enter the second passage on left wall and drop down across hole in floor. Go downstairs and crawl through gap to get to the outdoor area. Go through opened gate on E side of room to finish this level.
Level 5 - The Beyond
Go ahead until you'll find pushable crate. Push it to uncover another crate. Push out the second crate and go into uncovered passaage. Now you need to perform banana jump (180 degree jump) through the wall. This banana jump is harder than previous because you have to avoid spikes at the opposite side so you have to time it.
Jump and pull a jumpswitch that raises trapdoors above previous hole. Go ahead and turn left to pick up a small medipack. Go on the opposite side and turn right. You've entered icy cavern. Jump on one of slopes and bounce from it to get to higher level. Now jump on NW on safe spot behind snowy slope and pull a switch that opens door. Jump down and to get to that door you need to jump on the brown slope:
Jump on next slope, slide and grab a ledge. Shimmy right through a corner and pull up into opened passage. Go ahead and notice tile on ground. It activates door on time. Quickly jump up through blocks to pass door before it closes. Go forward and now you will have to perform tunnel jump. This time its even harder because you need to jump from the triangular ledge. Jump from the very edge and hit the ceiling and left wall at the same time to give Lara boost. Grab the opposite ledge and pull up.
Go ahead avoiding spikes. You will get a small cutscene. You have to shoot three vases to open a trapdoor. Draw your pistols, jump on right slope, shoot first vase, bounce forward and slide on safe spot. Shoot two remaining vases and trapdoor will open. Climb down a ladder and kill a baddy.
Get down and enter through passage on E. A camera will show you jumpswitch. There is a hole but don't drop into it for now. You have to do now one of the hardest jumps in this levelset. You need to make a tunnel jump. Make a running jump from the very edge with roll hitting ceiling and wall at the same time, at beginning hold your arrow into direction of wall but in the middle of jump hold opposite arrow to land onto middle of opposite slope, from slope bounce forward and grab a jumpswitch.
You've fallen into room with shallow water. Pull a switch and pick up GRENADE LAUNCHER and crossbow explosive ammo. Climb up a ladder and now go through opened S passage that you opened a while ago. You've entered tinnos styled area. Climb up a ladder in SW corner of location. Jump into window in right wall. Drop and grab a ledge. Shimmy on left and pull up. Jump and grab the opposite slope. Slide and raise Lara hands but don't grab a ledge, you will get down on the slope beneath by this trick. Land on beneath slope and pull a jumpswitch. You will fall and land into water.
Get out of water and go ahead through tunnel. Jump over a slope and now bounce on slopes back and forth. At S wall below there is a small gap. You have to fall and shoot a shatter in that gap with your pistols. This place is quite buggy because it can randomly kill you but just do it few times and you'll have it done. Climb up a ladder into a crawlspace. Crawl forward and climb up. Now there is going to be a puzzle.
Jump into window in wall in SE corner. There is a switch that opens two doors on time. Pull it and quickly back. Run to the NE corner and shoot a vase through opened door. A block should lower. Return to the same switch and pull it again. Now run to the SW corner and shoot second vase through the opened door. Now push all three blocks under all three switches on wall. All these switches are timed so you have to pull them in correct order: in SW corner pull the left switch, then the right switch, quickly back to the NE corner and pull third switch. Jump into opened passage (you can do a tunnel jump; hit ceiling and wall at the same time while jumping). Run ahead and slide down.
There isn't anything in water. Climb up on block and jump on left on slope. Bounce on slopes and land on safe spot. Now jump around corner above slopes. Jump into window with switch and pull it. A grate will open elsewhere. Jump onto opposite platform and then into opening in wall. Go ahead and a door will automatically open. You've got to familiar room.
Climb up the ladder and then climb up another ladder to get on top of this area. Now get to the NW corner and climb up yet another ladder. Bounce back and now you'll have to get through plenty of moving lasers. You need to do it in good timing. After you made it pass through drill traps. On right there is ladder leading to shortcut so turn on left and pull a switch. Climb down a ladder.
You've returned to familiar place. Climb up into crawlspace through opened trapdoor in ceiling. After crawling pull a switch. Drop down and go on left downstairs. A trapdoor in ground is opened. Drop down, slide down and jump onto ledge. Quickly jump on further ledges or spikes will kill you. Pull a switch and continue jumping on slopes until you'll reach the icy ladder (on the second pillar with slope there is a ladder to grab).
Climb up the icy ladder and jump into gap in icy rocks. Now make standing banana jump (180 degree jump) over the wall to get onto lower block (you can use late grab trick by raising Lara's hands at the end to make her land further). Make a running jump onto ladder and go forward. Climb up another ladder and pull a switch that opens trapdoor elsewhere. Back and get at the bottom of this area. Climb up a ladder on the E wall of this location and go upstairs.
You've returned to the ship area. Jump into the hole on the middle and fall down into water. Swim on right and get out of water. Now you will need to perform another very difficult jump. You have to jump into window of E wall. You need to jump from the very corner of the ledge and pass a little bit through the window's wall corner.
After you did it turn around and jump onto opposite opening in wall. Pull a switch that raises trapdoor next to you. Jump on it and then jump into another window in wall. Jump to a switch and pull it. It opens a door nearby. Jump into water and climb on the raised block in water. Climb up and go forward through opened door.
Pick up crossbow explosive ammo and climb up a ladder. Go ahead and fall down. Kill a baddy and pick up TEMPLE ACCESS KEY. You got a camera hint showing where to insert this key. Bounce from slope and back to area with water. Swim through the only passage and at branch swim down. You will get to area where you previously were. Climb up a ladder and go through the passage on S.
You've entered tinnos area again. At the entrance turn on right, jump on slope and bounce from it to get onto higher ledge. Go at E and insert your Temple Access Key. Go through opened door. Jump and grab a gap in wall. Crawl through gap. Now climb up on middle of slopes, bounce back, slide a little bit and jump to reach a jumpswitch. Door next to you has opened. Pull a switch that lowers crates elsewhere.
Go back through crawlspace and go to the ship area. Climb up a ladder on one of walls and get to the SW corner of that area. Jump into the hole and pull a switch where you lowered grates. Switch opens grate in tinnos area. Back again to the tinnos area (note: don't push the pushable box for now).
At the entance of tinnos area jump again on slope on right and bounce from it onto higher platform. Jump into opened window of W wall. Push the block and climb up a ladder. Now with good timing jump with roll on slope and then bounce forward to grab a ladder. Climb up and bounce back. Climb up on ledge and drop down into water. Pull a switch and jump on crate. Now you can climb up on that grate. Grab monkey swing and swing ahead. Get down on book shelves and pick up ACCESS CARD.
Back to the ship location and now go to the upper NW corner of that area. Climb up a ladder and bounce back on the top. Go through the second tunnel on left which is a shortcut. Go ahead, climb down a ladder and then climb down another ladder. Now go: on right, then on left, then right, then left and get through hole where you previously made banana jump (there are trapdoor now at the bottom so you can normally walk on them). Go ahead passing pushable boxed by and insert your Access Card.
Go across opened door and you'll get to a bigger room. Cutscene will apear showing some lasers and a door from book shelf. Jump into passage on N side and pass drill traps by. Climb up a ladder and pull a switch on left that opens the book shelf door. Now you will have to be careful. You need to get to that book shelf door not touching any of lasers and not stepping on the metal tiles. If you fail the book shelf door will close. Throughout your way sentry guns will fire at you. You will also see 4x small medipack throughout your way.
After you entered through book shelf door pick up CASTLE KEY and pull a switch that deactivates spikes elsewhere so you will be able to pull another switch. Now back through the lasers (you don't have to avoid them now) and climb down a ladder. Back all the way to the tinnos area (you can slide down to the big icy area, then climb up a ladder to get to the ship area and from it go to the tinnos area through passage on S).
At the entrance yet again jump on right slope and bounce to get onto higher ledge. Go into E direction, then jump on right and go forward. Pull a switch which was previously locked by spikes. The switch releases ropes on your right.
Jump and grab first rope and then jump on second. Swing and jump into window in W wall (you have to make the big swing trick). Continue jumping and swinging on ropes until you'll get to the opposite side of room. Pull a switch and go to the edge. Turn back, draw your pistols and drop down trying to shoot a vase.
You've fallen into the water through opened trapdoor. Swim ahead and get out of water. Pick up shotgun normal ammo and draw your shotgun. By manual aiming (press look button for it) shoot the grate which is underwater. Swim into gap and pull an underwater switch. Get out of water and go through opened door.
Now you will have to make a very tricky movement. There is a jumpswitch above you. You can't reach it because it is too high. What you have to do is to jump on the very edge of the block and from it jump up pressing down arrow to move backwards toward jumpswitch to grab it. Here is screenshot how you should stand to reach it:

Go through opened door, shoot the grate and crawl. Ignore the gap on right and crawl forward. Pick up grenadegun super ammo x2, crossbow explosive ammo and CROSSBOW. Ignore the switch for now and jump through opening in corner. Pick up OCEANIC MASK. Back to previous room and now pull the switch. Go back crawling and turn into the previously ignored gap. Pull a switch that opens door next to you. Don't drop down for now otherwise the door that you opened a while ago will close. From this place where you pulled the switch, you have to shoot a vase that is on N wall of the icy location. Look closely, draw your shotgun, manually aim with look button and shoot it.
After you shot the vase with shotgun you can drop down. The spikes are now deactivated so you can pull the lever on the middle. Kill two guardians and two horsemens. One of guardians has dropped OCEANIC MASK. A door on N wall has opened. Go there and insert two Oceanic Masks into receptacles.
Now quickly run to the two opened grates on S side of area. Jump on breakable tiles and at the end quickly push pushable block in two times. Bounce from slope to a higher place. You've entered to another room with platforming. Go on left and by running jump, jump onto the metal pillar (the further one, not the nearer one). Bounce from it onto slope and continue jumping on slopes until you'll get on a safe pillar.
Now face NE and jump into the gap in pillar. Slide and jump forward. Drop down and climb up a ladder. Do sideway jump and shoot the vase. Pull a switch and quickly run down from a boulder. Jump over hole and bounce up from ramp. Slide down and jump on left to avoid the fire.
Go ahead and get down through gap. Jump onto right slope, bounce forward onto another slope and then jump on left onto safe tile in the middle of lava. Now from that tile jump on NW slope, from it jump forward with roll, slide down backwards and grab a ledge. From leftmost of ledge, climb up on slope, bounce back with roll and grab another slope on right. Climb up and bounce back. Now bounce back and forth, draw your pistols and while jumping shoot two vases in SW corner of room. Now shoot one vase in NW corner of the room.
Now grab the slope in front of you and climb around corner on its ladder. Bounce back onto slope, slide and jump on left onto safe tile in the middle of lava. From there shoot the vase on E side. Jump on slope on E, bounce and grab a ladder. Climb up and go into W passage. A door will automatically open. Drop down and go down through the gap again. Now jump on left slope, jump on further slope and then jump forward to the jumpswitch.
You've fallen into water. Get out and climb up a ladder. Climb around the corner and bounce back. Jump back and forth and jump onto ladder next to you on E wall. Climb as high as posibble and from rightmost jump back, draw your pistols , slide and shoot the vase. Bounce back and forth again and shoot the second vase in NW corner. A door elsewhere has opened. Grab a ledge of slope in front and get around the left corner on its ladder. Jump back on slope and from it on ladder. Climb up the ladder and pull a switch to which access you opened.
Go through the SE passage and jump on semi transparent tiles to the passage on the opposite wall of area. Go upstairs to back to the ship area. Get to the ladders in upper NW corner of this location and climb down. Go ahead and you will find yourself in location with TR3Gold textures.
Don't jump to water because there isn't anything. Jump on slope and bounce onto platform. Now jump onto higher platform (you have to jump on it from side). Now perform banana jump (180 degree jump) over the gray pillar to land on slope and from it bounce foward onto safe platform. Jump down into window in N wall. Jump on slope and bounce on left from it. Jump on another pillar, then onto slope and from it onto another platform.
Now there is another very precise jump to perform. You have to jump from the very edge of corner of the platform you're standing on and to get into window in NW corner. After you performed it climb up a ladder. Go forward through the alley and on one of pillars there is a keyhole. Use your Castle Key. There isn't anything at the bottom so jump on small roofs on E and shimmy to the opened door.
Go upstairs. At the end of the tunnel take THE SILVER KEY from pedestal and use it on a keyhole next to you. Go through opened door and jump into the water portal. You will be teleported to a different place. Get out of water and go forward. Jump onto ladder on E wall and climb up on it. Jump up on higher platforms to get higher.
Go through the opening in E wall and go straight on. You've entered to some village. There are two friendly soldiers who you don't have to kill. Now go ahead through the village to get to the end of the level. By completing the whole game you've got the highest posibble skill rank S.