THE FALLEN SUN - PART ONE (BETA)
Levels by denis25l
Walkthrough by Treeble
Note: I took the liberty of rearranging files from release version 3.0, uploaded to trcustoms.org almost a year ago. There were repeated and unnecessary files in the download, so I handpicked the most recent level files to create a less bloated package, testing each one at a time as I wrote the walkthrough. Wrong files were supplied in version 1.0, which is why early reviews state the inclusion of original TR4 levels; that is no longer the case. With help from Dominik, some fixes have been done to ensure the present levels work, except for level 2 which remains as is. The walkthrough below is written for this user curated "v3.1" release, which is currently available for download on trle.net. Should the author release a new revision of his own in the future, it's quite possible the walkthrough below might no longer be accurate. —Treeble (April 23, 2023).
[ * * * ]
LEVEL 1: CORTE DEL SOLE
Drop down from the windowsill and cross the empty hall ahead of you as warning spikes surround you. In the next area, crawl into the dark gap and bend left where it gets pitch black, at the end of this short tunnel you'll find SECRET #1, a small medipack. Return and proceed to the other end of the crawlspace, retrieve the IGNITION KEYS from the skeleton and climb up the ladder. At the top, kill a crocodile and find a lever that will open the gate you saw before entering the crawlspace, so retrace your steps back there.
Run the pathway past another closed gate and, in the next courtyard, find a small medipack behind the lonely tree. Use the stones to reach an opening up on the wall and drop down by the river on the other. Approach the river to kill a crocodile and find a large medipack on the bottom, then climb out of the water and follow to the room past the jeep to find a locked gate and flares. Get on the jeep and make an U-turn, running over a suicidal warthog as you do so, then floor it all the way to the opposite end. You can ignore the side passage as it's just an empty courtyard.
Follow the path into the building, running over two ninjas as you go up the ramps. When you reach the plains on the other side of the river, drive to the first C-shaped structure ahead and get off the jeep. Climb up the ladder on its backside to claim SECRET #2: shotgun shells. Back to the jeep, drive towards the last C-shaped structure to find a lever. A ninja might be giving chase, so dispatch him and loot his body for more shells. The lever has no camera clue (spoiler alert: throughout the entire game, none do), but it opens the gate you saw on that pathway before jumping over the wall. Before going there, let's make a small detour.
Drive back to the slanted bridge to the building you came from and stop there. If you look to the right, there's a crevice on the cliff face. Shimmy and crawl along, then hop back and forth over the river down below to get around the corner. You can climb on the cliff faces with the small patches of plants. Anyway, when you get to an empty alcove on the west side, do a running jump towards the waterfall. Doing so, you jump past the strong currents and as such you can swim to the end, where you'll be ambushed by four crocodiles. When it's safe, take the SHOTGUN surrounded by the algae in the water, then get out of the water and go through the doorway to find a chamber with SECRET #3, a large medipack and ammo, plus a ninja sneaking up to you. Back to the water, swim all the way to the other end of the river, enjoying the current, then climb up the stones and back over the wall to find that gate open in the north side of the pathway.
Dive into the water and swim to the other end, you'll emerge in a plaza with a fountain and something like seven ninjas, some attacking from vantage points. The massive round door is our end goal here (and you can easily squeeze through the gap on its side, but let's not do that), and apparently we need a pair of hands to unlock it.
Jump across the ascending vantage points the ninjas were using and enter the side passage from which another ninja appears. In the end, you'll find a lever on a ledge, be vigilant as another ninja is on his way. This lever opens the west gate in the fountain plaza, return down there and kill the ninja before entering the gate. Zoom across the grassy plains and explore a dark alcove in the north for uzi clips. A little further ahead you can jump over the slopes to get to the shotgun shells at the top. Mind the dodgy terrain until you reach a massive hill with a carved path. Unfortunately, it's too steep, so we'll need to procure our jeep. Follow the pathway all the way to the east and you'll eventually reach a small gate with a lever, this takes you right back to the river. Go get the jeep (which you've probably left on the other side of the river, so go to that building on the far side and use the ladders to get to the top) and drive all the way back and through this small gate.
Drive up that carved path on the hillside (and straight over a warthog and a ninja), step off for a second to take a small medipack from the grassy patch and drive to the statue in the end. Pick the HAND OF ORION off the floor, then circle around the back of the statue and climb down the shaft to get SECRET #4, a large medipack and uzi clips. Climb back out, get the jeep and drive all the way back to the fountain plaza. You can park it anywhere — it's served its purpose well —, and enter the doorway flanked by two Anubis statues.
Gun down the two jackals, then climb down the hole in the middle of the room while a pesky bat makes itself known. At the bottom, run through the pathway, shatter some vases for a large medipack and more ammo as a jackal tries to get the jump on you, then hop onto the opening on the west wall. Up the stairs, shoot the vase to reveal the HAND OF SIRIUS. We have all we need. Return to the fountain plaza. If you explore the remaining east passage, up the stairs you'll find a ninja and a small medipack. Use both hands near the round stone gate and it will open, revealing the exit. Slide into darkness to finish this level.
[ * * * ]
LEVEL 2: L'ABISSO
(This seems to be a massive urban environment, however, as Lara's hips floating all around you make it clear, the author has supplied a bogus version of the level. You can run around and explore for a bit and notice the many oddities, but there's no real point in doing so. You might actually stumble upon levers and doors, none of which seem to be operational. Whenever you've had your fill, quit back to the main menu and boot up the next level from the New Game menu, or better yet: use the level skip cheat to retain your inventory and statistics.)
[ * * * ]
LEVEL 3: INGRESSO ALLA CITTADELLA
Shoot the fragile vases for a large medipack and shells, then proceed into the next room. If you follow the stairwell down into the dark, you'll find revolver rounds and a bat at the end of the path. Upstairs, leap across to the other hand of the statue but don't proceed through the next doorway yet. As you approach the threshold, climb down the ledge on the right hand side to find a small alcove housing SECRET #5, the REVOLVER. Get some ammo and a small medipack from the bottom of the room, then back up to the ledge and enter the doorway.
Up the crooked steps, find a ladder and climb it to the top, backflipping to the upper tunnel. Bats populate the next chamber, so deal with them as they shriek forth, then go around the wall to find some shells and a jump switch to open a trapdoor by the entrance. Fall into the water at the bottom of the shaft and swim towards the pool, gathering two bundles of harpoons before pulling out on a fenced fountain square.
Take the revolver ammo within the fences and approach the arch to trigger a flyby. Four lions are now hunting you. When that is settled, find a small medipack on a tiled platform near the closed double gates and turn around. Head north and explore the side passage to deal with five lions, then retrieve two bundles of ammo from opposite ends of that lair.
Enter the doorway to the north and climb the ladder to a cistern area. Jump across the walkways to the west and find a small medipack near the railing, then face the pit and look down. On the opposite of the room, from where you're standing, is an underwater lever. Go pull it to open a door above, as well as one of the underwater gates letting a crocodile out to get you. Outswim it and loop around the walls to find a ledge you can pull out near the entrance, climb up the ladder and hop once more over the walkways, this time all the way to the open door on the east end.
Don't drop into the water just yet, but work your way down and pull up into the passage at the end, all the while gunning down any rats and bats in your way. You'll end up at the top of the room, jump to a walkway on your right for some shotgun shells, then hop across to the opposite side where you'll find a lever. It opens an underwater gate, so drop into the closest of the pools and retrieve the first GARDEN KEY from the alcove. Retrace your steps through the room with the walkways over the crocodiles and down the ladder to the main atrium, where an eager lion will attack.
Now go through the doorway behind the fenced fountain and down the ramp, killing the three crocodiles when you get to the room with moldy bricks. Get the shells behind the stacked boxes and loop around the fence on the left hand side of the room to the next passage. More bats and rats in the dark cave, keep an ear out. Use the slanted floor to reach the ledge against the wall, jump back over the entrance for a small medipack, then hop around the room in a clockwise fashion until you reach the exit up on the west wall.
In the next room, get the revolver ammo before dropping into the water and hold your breath. Swim southwards and then take a left, ignore the shells behind the vase for now and quickly proceed to the end to find an underwater lever on the ceiling, pull it and quickly swim back for air. It opened a door way back in the main atrium, if you want to go back for the shotgun shells you might want to make a quick visit to the other side passage for a small medipack as well.
As you reenter the main atrium, loop around to the right and throw the lever in the short tunnel. You release a monkey, do not shoot it! (It should respawn if you do, though.) Instead, follow it outside and lure him close to a monkey statue by a nearby tall ledge. The monkey needs to climb up and pull down a lever out of Lara's reach, opening the remaining gate in and granting you the second GARDEN KEY. A lion might be on the loose.
Use both keys on the east ledge and get a large medipack inside, then throw the lever to open those double gates. Exit the atrium, get flares from one of the vases and gun down the two soldiers at the top of the ramp. One of them drops the GUARD KEYS, for which you will easily spot the receptacle by the wrought iron gates, but don't go there yet! Face East to locate a crawlspace and go in for SECRET #6; shoot any rats as you climb down the ladder for a handful of goodies, just be mindful that the harpoons in the middle of the room will trigger a boulder, so disarm the trap safely before claiming them. Retrace your steps back outside, go use them keys and cross the gates to finish this level.
[ * * * ]
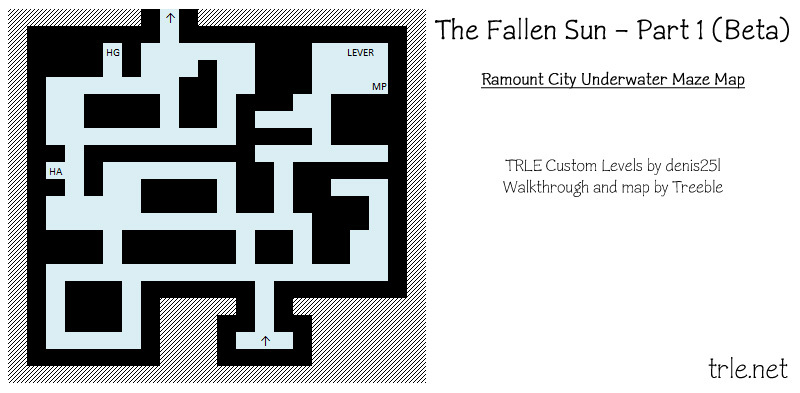
LEVEL 4: RAMOUNT CITY
Enter the narrow alley to your left to find a small medipack on a ledge, then drop down and loop around the wall to find wide stairs leading up. As you enter a library, a ninja shows up. There is revolver ammo in a nearby corner, get them before going upstairs. Two ninjas attack you on sight; kill them to loot their bodies: uzi clips from one, GUARD KEYS from the other. Back outside, follow the main street to reach a fountain square.
A guard shoots you from a vantage point on your right, you can kill him (and you should) but you can't get up there yet, so for now enter the open doors to the church, backflipping as soon as a giant scorpion emerges, then go back inside and around the altar to find an opening in the wall. Down the steps, gun down another soldier and claim his REVOLVER, then throw the lever on the ledge. A soldier gets ambushed by a giant scorpion in the church above, you can let them duke it out then take out the winner, or intervene if you're feeling heroic (and still kill both of them, like a hero).
Pull open the small side door and go down the spiral staircase to a crypt. Left around the staircase is a small medipack in an alcove, and as you head further into the room a ghost wraith appears. You could try shooting him until he loses interest in you, given his size it's much easier than usually. Several bats join in, plus a harmless boulder rolls down in front of you as you work your way up the ramps. In the end, climb up a ladder to the rooftop where you'll find SECRET #7, explosive harpoons and shotgun ammo. Climb back down and return to the square in front of the church. If you go around it, you'll find a small graveyard in the back and a small medipack for the taking near the coffin.
From the plaza, go south and at the crossing you can't go left because it's too steep. Go into the cave in the wall ahead of you to find a bat hoarding a small medipack and shells. Drop back out, handle the dog, and then proceed through the only available path. One of the double doors should be open (the lever you pulled beneath the church), enter the dark hall and find a hole in the corner with flares and revolver rounds, then go to the opposite corner and up a flight of stairs. Two ninjas, one drops a small medipack, then go another floor up. Two soldiers, gun them down and throw the lever in the back. During the firefight you might hear things shattering: those were the windows behind the curtains. Get the revolver ammo on the east side and go to the tall steps in the center of the room, from there you can reach the openings up on the ceiling. Pull up to get SECRET #8: shells and a large medipack.
Get back down and from the west windows, drop onto a black balcony surrounding the whole perimeter and then to a lower level, kill a rat and follow the path to reach an area with lots of tall slopes. Do a long running jump to the one right ahead of you, dealing with bats as they come, then to the next one to your left. Find a large medipack on a taller ledge and, from the southern edge, do a running jump to the sloped ridges and shimmy to the right until you can pull up. Do running jumps to the next platforms, you can go all the way north for clips and harpoons, but the way out is to the south. Going up, kill two ninjas, enter the building and deal with the dog on your way to SECRET #9: grenades, harpoons and shells, plus a small medipack in the bathroom. Shoot the window for a quick way back to that black balcony, get shells nearby then go around back to the previous building.
Head downstairs to exit this building, use your keys to open the wrought iron gates, gather more shells and hop on the bike, then speed up that steep ramp in the crossing you'd noticed earlier. Crash the wall at the top and the gates right beyond should be open. A soldier will be shooting at you from a balcony, you might not be able to hit him from here because of the railings, so park your bike (killing a suicidal dog as you do so), then loop around to the left and enter an apartment building.
First door to the right, just a soldier staring at the wall. Second door to the right, a ninja. Second door to the left, a bike embedded into the wall. First door to the left, get a large medipack in the dark corner then go up the ladder on the opposite side. Shoot the window and from this balcony you can gun down that soldier that's persistently pestering you, then do a long jump to the next balcony, gun down another soldier now shooting from below, and go up the narrow pathway to the rooftops, where you'll kill a ninja before throwing the next lever. A second ninja shows up when you reach for the grenades on the edge.
Get back down and enter the second apartment building, opposite the double gates you came from with your bike. First door to the right, a hurrying ninja and a large medipack (plus a guy with a deep headache). Second door to the right, nothing. Second door to the left, shoot the small crate to find the NITROUS OXIDE CANNISTER. First door to the left, get some ammo by the doorless toilet. Go back outside and find a large medipack in the garden, behind the star-shaped tree.
That last lever opened a gate in the northeast corner of the fountain square, so get on your bike and ride it back there, but go in on foot. Gun down a soldier and hop into the water at the back. I heard you like mazes, especially of the underwater kind?
Start by going for the underwater lever and large medipack, then return to the entrance for air. Afterwards go the long way around, getting the the HARPOON GUN behind the blade (a fair trade for a small health sacrifice), and quickly swim out the door and straight across the room, in the northeast corner is an air pocket. If you want, you can explore this open area for two harpoon bundles and a large medipack, but mind the two frogmen — the harpoon gun works underwater and you just so happen to have explosive harpoons, how convenient! The toxic leak in the back may impair you if you stick around. Pull out of the water and follow the pathway to kill a rat before reaching a massive spike pit.
The ladders stretching out in front of you lead to the same room, except for the leftmost one, which is a dark alcove containing revolver rounds. Start by that one, then shimmy right to the catacombs, populated with several bats and rats. The southeasternmost pillar is actually a movable block, so move it aside to use it as a stepping stone and climb onto the beam above for SECRET #10, assorted ammo. Go to the shimmering coffin on the other end of the catacombs and drop into the water which leads you to the sewers. Climb out of the water and go down a ladder on the west end to a chamber with a lever where a TR3 motif will play, foreshadowing what's next. There's no camera clue, obviously, but this lever opens a gate in that last room we entered at the fountain square, so there's a lot of backtracking to be done now as you go back through the sewers, the catacombs, and finally through the underwater maze. How lovely.
By the time you get back there the theme will be over, but — spoiler alert! — we'll soon be entering a high security compound. As you get out of the maze, enter the Bay E area and dispatch the soldier and any rats in there, then get some supplies in the water pit. Climb back out, to the upper ledge where you'll find another mystery lever. The gate for this one is nearby, as you can tell by the sound, so step outside to the balcony where a soldier once stood, long ago, and ride your bike through the newly open wrought iron gates.
Just before the corner, make a quick stop to get the CROWBAR from the slanted ledge by the tree, and then retrieve the VALVE from the jeep embedded into the wall (looks like a parking job done by yours truly, honestly). Combine it with the canister and pimp your ride. Speed up the bike to do a long jump over the massive pit to arrive at another street filled with doors. If you want, you can just race in a straight line to the end where a man is waiting by an open door and that's the end of the level, but there's still plenty more to see here.
First up, open the MJ-12 door to the right. It's a military complex, so expect heavy resistance. Make a quick stop on a recreation room to the right for shells, then take the east stairway down. The way out of this facility happens to be through the cells, so let's ignore them for a moment. Gun down the soldier downstairs and claim the large medipack and grenades from the center of the room. There's a lever by a door nearby, it opens up to a detonation area outside, and while there are a few goodies out there (plus a handful of baddies to even it out), by stepping outside you'll trigger a sentry gun you can't get rid of yet, so I advise against opening the door.
Below the stairwell, find an opening to go through in the northeast corner. Kill the soldier to your left and open the armory. An alarm will blare and draw in more soldiers, but it's for a good cause: besides ammo pick-ups, you get a SHOTGUN, a REVOLVER, and the LASERSIGHT (not to mention they seem more worried about you getting to the goodies before they do than about your very presence). Downstairs, kill all soldiers in the mess hall and enter the bathroom for some revolver rounds. Go to the opposite end and the door to the kitchen opens as you approach, from where two soldiers attack. Kill them and loot the place for more ammo and medipacks.
Further down the facility, enter a dark storeroom and jump over the crates in the back. Shoot a small box for a large medipack and get the nearby revolver rounds, then go kill those two stationary soldiers staring at you from the distance. The cells they're protecting are irrelevant, but one of the guys is carrying another set of GUARD KEYS. Get the shells near the wall and work your way back to the main cell block.
More soldiers might be sneaking around, and that sentry gun showed up anyway. Quickly run up the stairs to the upper cell block floor to get out of its sight, then run towards the other end and obliterate it with your scoped revolver in order to explore the area in peace (if you like, you can go outside now, but the explosives out there still make it more hassle than it's worth in my opinion). Open and explore all cells, none of the men leave — in fact, they're barely moving as it is —; some cells hold goodies, and the southeast cell houses the exit. When the action tune kicks in, roll and dispatch a soldier and a dog on your tail, or just outrun them and climb the ladder to the vents above, concealed by the darkness in the cell.
Rush down the freezing vents and get explosive harpoons at the end, then drop down through the hole and you're back at the entrance of the facility. Outside, enter the narrow pathway south, where you'll find ammo immediately below a keylock. Use your keys to enter the residence, kill a dog and two soldiers, then find shells among the trees and proceed inside the small house, where you can find more ammo and a large medipack, plus another dog and soldier (carrying shells) on your path.
Back to the street, loop around to the next alleyway south to find a small medipack and harpoons in an alcove, then finally cross that bridge. If you can be bothered, there are ammo pick-ups in the river and you can climb back out easily. Get the large medipack near the standing man, then go stand by his side, facing the opened door, to finish the level.
[ * * * ]
LEVEL 5: TEMPIO DELLE STAGIONI
It's rather dark in here.
Inspect the hole in the southeast corner to open a gate nearby, then negotiate your way past the swinging axes. The uzi clips at the top of the stairs are protected by floor blades which you can disarm by stepping on a corner of the tile. A skeleton will charge from the next room (explosive harpoons should still be plenty in your backpack), then head towards the balcony to find SECRET #11, a large medipack and ammo overlooking the bridge area you just left. A running swan dive will get you right in that river, if you're tempted...
Head back downstairs and just as you cross the gate to the previous room, find some ammo behind the statue and proceed to throw the lever on the exact opposite side of the room to open the remaining gate. A couple of scorpions scutter in the dark, deal with them and follow the pathway, killing a jackal as the camera angle switches briefly, until you reach a two-story chamber with four entrances — protected by four demigods (dispatch each in turn, crouching at their feet to shoot them with your pistols without a worry in the world). Then retrieve the large medipack from the center.
We need four elemental stones and, as you've correctly guessed, each colored icon represents one element. Let's start with the Earth challenge room, indicated by the green leaf. Climb down into the dark hole and ready weapons as a giant scorpion races through a spike-filled room. As you advance through the safe path, more spikes rise. Get the small medipack in your way and take notice of more items beyond the spikes: sprint through the risen ones to sacrifice some health for SECRET #12, a large medipack and ammo. Sprint the same way backwards and proceed to the sand filled room at the end.
A few scorpions roam around this area. Climb the sand blocks east to find a switch on the wall, it opens a door directly opposite it, use the blocks to jump through the open gate to stumble upon an invincible hammer demigod. Sprint past him to a huge pillar covered in ladders in the back. The demigod won't let you climb them, naturally, but there's a small block you can pull up onto right next to it and use it as a stepping stone to reach the tall ledge on the south wall. Follow the next ledge to a tall support column with another ladder in the center of the room. You're going to have to play smart here: the demigod will only strike you down if you let Lara plant her feet on the ladder, so do a running jump to grab the ladder and immediately shimmy around two corners without ever letting Lara start her climbing animation. When you're on the other side, let her pull her feet up and immediately backflip (with roll and grab, if necessary) to the next platform.
Follow the platform around the corner and stop when you hear the action music; a boulder rolls down the side opening (uselessly landing right on top of the demigod, without any effect), then grab the crooked ceiling and monkey swing to that lever. A door opens on the ground level in the northeast corner, work your way down and sprint in — the demigod won't give chase. Circle around the wall to the left for some explosive harpoons, and follow the stairway up, minding two boulders rolling down on both sides. Run around the perimeter of the next room to gather three skeletons and a jackal and blow them to kingdom come, then retrieve a large medipack left behind.
Time your stride past the gnashing teeth and the blade trap in the stairs in the back and shatter a vase for some poison harpoons. Quicksand, lovely. Press on towards the opening in the back, enduring a small (but terrifying) health loss near the end. Shoot the vases for naught, enter the next chamber and lay your hands on the EARTH STONE sitting on the central plinth. Two skeletons aren't too happy about it, though, so deal with them and proceed to throw a lever in the back; each challenge area has a hidden lever to open the path for the last secret of this level, which means this is the first of four levers. Gather shells and a small medipack and then work your way back to the main hall.
Back at the demigod chamber, you can either do the intended way (which probably was supposed to be done the first time around), or you cn play smart again. If the latter, lure him to the back of the room and then sprint like crazy to the crooked wall below the entrance — you need to climb just one rung, if he gets too close he'll knock you down. The intended way is rather harmful: in the back of the room there's another closed gate. Right next to it is a pushblock, you need to move it two tiles away from the wall, then throw the revealed switch to open the gate. Rush in, get a small medipack for your trouble, and be quick enough to get back to that switch and lock the bastard in.
Back at the main hall, which element stone do we want next? Wind sounds good, so enter the doorway tagged with a red cloud. After the giant steps you arrive at a tall room, approach the edge calmly and look down to spot a jump switch at your feet. Drop to pull it down, lighting things up a bit and revealing the existence of more floating invisible platforms across the chamber. Pull back up and jump across to the other side of the room, dodging the spiked balls that fall from the ceiling on your way, and when you reach the end a harpy will attack. When things are silent, enter the next room and notice a jump switch to the right. Do a long running jump towards it, waking a skeleton as you land, then pull it down — that's lever two. Safely drop to the pitch black bottom of the room and run around, you should find some ammo near a statue and, more importantly, SECRET #13, in the shape of lovely UZIS near the south wall. The wall beneath the entrance is climbable.
Now, turn around and use the ropes to swing across to the plinth on the other side where you'll get the WIND STONE. Work your way backwards to the central chamber and let's face our next challenge: water. Get your feet wet by claiming shells on the shallow trench to the left and go down the stairs, where you'll find a HARPOON GUN on a block and harpoons on the other side of the room. If you think you'll be doing some underwater fighting next, you're sorely correct.
It's a massive underwater cave and it looks the same all around, so it's a bit hard to describe, but generally here's what you want to do: mind the hammerhead sharks (explosive harpoons, anyone?) and swim towards the northwest. You might spot common harpoons scattered about, it's your call whether they'll be any use or not. Swim past the first cave opening on your left and take the second left, you'll notice a single gilded square tile on the other end of the larger cave: swim there and locate an underwater lever above that opening, near the ceiling. That's the third secret lever, so pull it down, roll around and swim back the way you came. Loop around to the right and enter the small cave passage you've just ignored, swim up a tall shaft for a much needed air pocket.
Lungs filled, dive back in and swim towards the northwest again, when you reach the west wall in the back, follow it around in a counterclockwise direction to another area of this cave which, unsurprisingly, looks much the same. More sharks might show up. Turn left to swim through that U-shaped rocky formation and you'll soon notice a large square opening in the ceiling, get there and climb out of water. Despite what the running fountains might suggest, that water pit is dry at the moment. Head back to the underwater cave and dive in, swimming to a formation in the far southwest corner. Swim up the shaft and a lever there will fill up that pit. As Lara's theme plays, return to the previous chamber, dive into the now flooded pit and swim through the passage at the bottom to reach the WATER STONE, plus a small medipack and harpoons. Time to retrace your steps (or rather, strokes?) back to the central chamber as we gear up to the final challenge area.
Fire. Enter the yellow flame doorway and approach the torch, a trapdoor gives and you're set on fire but instantly doused off by a small pool right beneath you. Pull out and climb the ladder at the end for a hot room. Look left and time the flame emitter there to jump when it's safe, get a large medipack near the edge and approach the burning hole in the wall, while it's off you must reach in to shut off flames elsewhere. Quickly back away, right now a fire wraith is also a matter of concern, so wait until the flame emitter dies down again, jump back to the entrance and rush to that very small pool you fell in moments ago to trick the wraith into oblivion.
Back to the hot room, the ladder in front of you should now be safe to climb. You'll need to be careful with so many flame emitters as you work your way around the wall. Grab the pillar, shimmy right around two corners, below the emitters, then climb up a bit and backflip to land on an omega tile. As you run and jump to the pathway south, a harpy starts blasting you from behind, quickly deal with it and mind the jackal which is probably biting your heels at this point.
Enter the next area and save your game. A camera flyby shows the final stone, it's so close! The button on the omega tile in the corner is timed and will not reset, so you really only have one chance to do this. It's not difficult — you can get a headstart by jumping directly to the farthest pillar possible and around the column in the middle and you're golden. A harpy shows up, this one is dangerous because it might push you off the pillar, when you're in the clear you can retrieve that shiny FIRE STONE. Pull up near the reach in wall above, activate it and that's four out of four; that secret is as good as ours. Slide down and do a jump at the last second to reach the entrance ledge.
To clear the previous room on your route back, jump to the T-shaped ledge in the center and to the platforms in the dark southeast corner. Climb to the top and monkey swing to land where you got that large medipack earlier on. Go through the corridor and up the ladder above the pool, the flame emitter is now off so you don't need to worry about it anymore.
In the central area, climb the pillar near the water entrance to find revolver rounds, then pull up to the mezzanine above to find a row of open gates. Rush in and SECRET #14 is finally yours: assorted ammo and a large medipack, plus a skeleton, but be careful as the bright sand surrounding the central treasury means instant death. The mezzanine perimeter outside houses shells and another skeleton, plus some pretty depictions of the zodiac signs on the floor. Safely drop to the floor below and say goodbye to those pretty stones as each one unlocks a gate in turn, allowing you a way out into the valley of the sun...
[ * * * ]
LEVEL 6: VALLE DI RA
As the level begins, you're under attack from two harpies. Deal with them, then retrieve shells around the pillar surrounding the exit from the previous level. Run across the valley to the cave on the other side and work your way through it, gathering grenades along the way. On the other side, you'll find two massive statues flanking a door as the camera pans to show a lever on the other side of the raging river. Find a large medipack between the pillars to your right and approach the edge.
You could take a massive shortcut here by doing simple running swan dives back and forth across the river, but since we've gone to great lengths simply to get to this point, might as well do the thing as the author intended.
From the edge, take a right, grab some revolver rounds on the ledge near the left statue and enter the next cave. On the other side, handle a giant scorpion, then find uzi clips between the pillars before crossing the stone bridge over the river. Climb the rocks by the edge of the river and jump back across, then shimmy around the corner left for a large medipack as a harpy shows up. From this corner, do a long running jump over the river to that opening.
Run through the dark cave to a room with a beaming light in the middle. Dispatch two crocodiles and shoot a vase in the back for shells. Ignore that kayak for a moment and go down the side passage to another dark room with several canopic jars, none of which you can take home, but you definitely want to blow the skeleton to smithereens for some peace of mind. Beneath one of the pushblocks in the middle is a bundle of uzi clips, get that and move on through the opening to the next room where a demigod is expecting you.
Take him out, then get flares from a shallow water trench in the back. In the northeast corner is a pushblock: move it all the way to the colored tile west, behind the obelisk ornament, and a trapdoor drops nearby: fall in and SECRET #15 is yours, collect the assorted ammo but leave the vase well alone. Now, pull back out of this pit and get into that kayak.
There are two imminent drops, so top up your health and paddle forward until you get to the river. The current will drag you in the direction you want to go. If you want a secret, paddle all the way to the end, sticking to the right hand side, to find a small opening on the cave cliffside. Dismount with the Walk key, then pull up into the dark passage, get uzi clips on your left and go up to a chamber with SECRET #16, UZIS and a large medipack protected by bats. Get back to the kayak and paddle all the way back to the stillwater bay near the lower side of the valley, now on your left side.
Kill a crocodile and get the small medipack in the bay, then go activate that lever you saw from the beginning of the level. Two skeletons will show up, blow them up and restock your inventory by getting grenades, shells and explosive harpoons in this plateau. As you face the other end of the valley, you'll notice the wall across from you is climbable. Use the kayak to reach that other bay and work your way to the top, then enter that door between the massive statues.
Inside, kill a crocodile swimming in the pool and take shells from the bottom, then pull out of water and enter the hall of columns to the south. Two skeletons crackle around this area, but there are supplies between the columns against the south wall, and they might prove very useful, very soon... Get back to the previous room, save your game and go down the stairs to the north chamber.
A quick camera flyby shows what you're in for: three demigods (of the cooperative kind) and four harpies join forces, then as you run around the room you'll also unleash two giant scorpions and two crocodiles. When the dust has finally settled, retrieve the goodies scattered around, among which is another pair of UZIS, and press the three buttons on the cardinal ends of the chamber — if a body is blocking your way, explode it. Life can be simple. A door in the room upstairs open, get back there and over the pool and into the hole to find the exit of this level.
[ * * * ]
LEVEL 7: SANTUARIO DEL SOLE
Drop into the water and make short work of two crocodiles, then get a large medipack near the south wall and shells on top of the underwater building, before drowning make your way to the entrance near the bottom of the cave. You might spot a small medipack behind one of the statues right outside the entrance, but go in and fill your lungs first. After taking it, find an opening on the ceiling right above the entrance and pull up to a small alcove above for SECRET #17: explosive harpoons and a large medipack. Get back in the water and finally enter the sanctuary — now with a speedy barracuda pestering you.
At the top of the stairs, destroy (or ignore) two skeletons, then fall into the next water pit and notice another barracuda swimming towards you. If you follow into that small alcove it came from, you'll find ammo and, more importantly, the GRENADE LAUNCHER. Swim back, find some flares in the middle of the room and pull up through the opening in the ceiling.
Save your game and go down the long slopes. Try to stay as close to the left edge as possible before jumping to the second slope, and as soon as you land jump again swerving as far to the right as possible, otherwise you will overshoot the third slope. At the end, wait until the last second and jump towards the flat platform with no grab. Do a running jump to the next slope and time your jumps over a spike trap and a gap afterwards.
Enter the main sanctuary hall. You cannot collect the gold coins and bars around the central statues, but you can shatter the benches around for assorted goodies. Up the north stairway is another bench with shells inside, and as you collect them a skeleton will creep up behind you. Return and take the south stairway to a dark room, where you will be attacked by two harpies, but be careful as there's a deadly spike trap right in the middle of this chamber. When it's safe to do so, go around the spikes to claim that large medipack as a spiked ball harmlessly falls behind you, on your way back you'll notice a lever in the dark corner. Throw it.
Go back and now take that west stairway. After the camera flyby around the inner garden, heed left and shatter a bench in the back of the dark room for revolver rounds. Walking down the stairs, you'll come face to face with a giant scorpion man, and shortly after a locked door requiring three different objects. Proceed downstairs, get uzi clips near the flame to the left if you care (a floor blade trap gets activated as you pull up) and enter the next tall area. First order of business is getting rid of the two demigods roaming about.
Enter the east alcove and light a flare to spot a GOLDEN ANKH in the darkness, it fell just a few feet from its intended place. Lucky! Time your steps past the moving walls and the blade, only to stumble upon another giant scorpion man. Mind the spiked balls atop the ramp, and maybe retrieve the uzi clips when it's safe before going up. At the top, spikes. Wait until they retreat and advance to the middle tile to disarm all of them, then time the jump past the swinging ax. You're not out of the woods yet, when you land on the next ledge, drop and grab the border and shimmy left past the spiked ball that rolled by.
Hoist yourself up when its safe, grab the ladder on the closer pillar (the one further away isn't actually climbable, despite what it looks like) and climb around the left corner all the way to the rotating cog trap, that's the only point where you can climb up as you'll get impaled anywhere else. For your trouble, a small medipack lies on the pillar behind you. Do a running jump to reach that ladder against the tall wall and climb up. Immediately hop back and grab the ladder again as another spiked ball rolls by, then pull up and deal with a bothersome harpy. Take the large medipack nearby and go around the bend to take the PHAROS' KNOT as part of the room collapses.
Slide down in the corner the ball once stood and a giant scorpion man awaits for your arrival at the bottom. Kill him and go through the corridor with the moving walls again back to the previous area. Climb the southwestern pillar to find another GOLDEN ANKH at the top. Safety drop to the support beams to get a small medipack near the northeastern pillar, then drop back to the ground floor where another demigod has spawned. Now, enter the west alcove to find a receptacle for the ankh, which unlocks a door atop the ladder next to it. Climb in and get locked inside a tall, tall chamber.
Inside the small pool, get uzi clips and a crucial yet hard to spot KEY OF THE DEAD. Get out of the water and begin your ascent via the ladder in the southeast corner, then jump to the ledge ahead. You could monkey swing to the opposite corner, but it's much faster if you do an angled jump to the nearby block and hop across to the opening in the north wall. Go in and pull a wall switch to raise a block on a pillar in the previous room, go back and use it to reach a ledge in the corner. Turn around and notice a high ladder; jump and climb it to the top, then keep working your way past the next few ladders all the way to the top of the chamber where the EYE OF RA awaits on a plinth.
We need to work our way down now, but we'll take a bit of a... suicidal... approach. Where you got the eye, safety drop to one of the platforms you've just been to immediately below you, and look towards the two columns in an out-of-reach ledge to the northwest. Beneath them, you can see some goodies at the top of a slope: top up your health — you're looking at a >95% loss here, so maybe also save your game — do a long running jump with grab so you globe onto the flat part of that area, and claim those supplies as SECRET #18. (It's a bogus trigger, the longer you stand on it, the higher your secret counter goes...). Now dive into the water and find an open door in the corner near the ladder you started at.
Save your game. As you cross the door it closes behind you, and you're either quick or dead: sprint across the hallway before the rotating blades chop you to bits. Around the bend, find some grenades around the pillar and time your steps past the next set of moving walls and blades to a gate that leads you right back where you used the last ankh.
Go use that new key in your possession in the northeast pillar to open a trapdoor. Drop into a trench of blood and find some revolver ammo nearby, then swim (ew) south and pull up to a room with lots of skeletons. Run around the room to gather as many as you can to save up on your explosives. You'll have noticed a lot of the sarcophagi have opened, but before exploring those, fetch a large medipack in an alcove east and drag the two lined up skeletons on the left alcove by their shoulders to get the LARGE WATERSKIN and the SMALL WATERSKIN. A twofer, how rare!
On the west side of the room, squeeze through the open sarcophagus and claim the SCARAB TALISMAN as beetles make your life miserable. We now possess all three required objects, but let's use the waterskins first for one final secret. As you swim back through the blood, just before jumping to grab the trapdoor above, fill up just the large one. Get out of harm's way and combine it with the small waterskin, so you have three liters in the small one and two in the large one. Approach the scale and pour the two liters into the vase.
The door on the right hand side opens — ignore the left one, it opens on approach but it's a trap —. Go inside and SECRET #19, the last one in this series, is yours, but sadly it's another bogus trigger and it will only register as a secret if you didn't collect #17. Bummer. Anyway, get a large medipack and ammo around the sarcophagus, then it's time to go back. Cross the area with the four pillars and go use those three items in their receptacles to open that one door to enter the inner garden.
It's so peaceful, isn't it? If you run around the perimeter, you can find quite a few goodies here, but most important of all is the chamber in the center of the room where the SERAPH awaits. Once you lay your greedy hands on it, however, you will be ambushed by several demigods and Seth himself. The double doors west open, so don't waste any time here and make a speedy exit, running up through the twisting corridor until you reach the end of this adventure.