The Great Maze - The Emperor’s Heart
By Dawos
This walkthrough is meant as a general guide only. It may not include every pickup or secret. There may also be (and definitely are) alternative ways of approaching situations within the game.
* Pickups and Items
* Enemies
* Secrets
WALKTHROUGH by Lizard Queen
Where possible, this walkthrough will also try to reference the following points from the builders walkthrough provided with the game.
LEVEL 1 - The Entrance of the Maze
LEVEL 2 - The Heart of the Maze
1. First way From The Heart to The Passage (2.1)
2. First way From The Heart to The Canal (2.2)
3. Second way From The Heart to The Passage (2.3)
4. Third way From The Heart to The Passage (2.4)
5. Way from the Heart to The Framework (2.5)
6. Get the Red key (2.6)
7. Get the Silver ball (2.7)
8. Get the Large Waterskin (2.8) (needed for the Ruby Stone)
9. The bronze hands (2.9)
Golden Hand Receptacles (2.10)
LEVEL 3 – The Passage
1. The Passage to the First Floor (3.1)
2. The Passage to the second Floor (3.2)
3. The First Passage To the Canal (3.3)
4. The second Passage to the Canal (3.4)
5. The third Passage To the Canal (3.5)
6. Get the Small Waterskin (3.6) (needed for the Ruby Stone)
7. Get The Silverball (3.7)
8. Push down the balls (3.8) (opens door to The Framework)
9. Passage to the Game Room (3.9)
10.The second entrance of the Framework (3.10)
11.The bronze hands (3.11)
12. Golden Ball (3.12)
LEVEL 4 - The Canal
1. The Switch to open the upper door (4.1)
2. Get the Blue key (4.2)
3. Bronze hands (4.3)
4. The switches to the central structure (4.4)
5. The door to the Room of Equality (4.5)
6. The upper way back to the Heart (4.6)
7. The Levers from the Passage (4.7) – see (3.3) and (3.4)
LEVEL 5 - The Framework
1. The Room of death (5.1) – left to The Canal and right to The Framework
2. The Framework puzzle (5.2)
3. The Door of the blue key (5.3)
4. The Door of the red key (5.4)
5. The Four keys (5.5) – the Heart (2.6) the Canal (4.2) and two in the Framework (5.5)
6. Get the four energy crystal (5.6)
7. The room with turn switches (5.7)
LEVEL 6 – The Game Room
1. The Chess room (6.1)
2. The Room with turn switches (6.2)
3. The upper floor (6.3)
4. The Central room (6.4)
Broken Frame
Emerald + Broken Frame = Emerald Stone
LEVEL 7 – The Room of Equality
1. Before the Cursed stone (7.1)
Ruby Stone – lose weapons
2. After the Cursed stone (7.2)
Ruby Stone – lose weapons, gain pistols, fight Maze Guardians
LEVEL 8 – The Bottom of the Maze
1. Get the yellow stone (that kills you??)
2. Get the Silver balls (8.2)
3. The Mecha bull (cannot kill) (8.3)
4. The way (8.4)
LEVEL 9 – The Cursed Land
1. The Tower activators (9.1)
2. The way up (9.2)
3. Get the bronze balls (9.3)
4. The part under the heart - The slope puzzle (9.4)
Stone + Empty Frame = Gem in the Stone
5. Tower solutions (9.5)
LEVEL 10 – The Temple
1. The Temple (10.1)
The Cursed Stone
Golden Ball
Cross Souvenir (one chance)
2. The Final battle (10.2)
3. The Ending (10.3)
The journey begins with a cutscene of the story of the Emperor’s Maze.
LEVEL 1 – The Entrance of the Maze
Lower Cavern
The level begins with Lara sliding down a long slope into a lower cavern. (N.B. Level changes DO NOT replenish health so conserve wherever possible). Head left to a small gazebo and pickup the SMALL MEDIPACK. Head east to a small building and pickup the FLARES. Head around the small building (east wall) and pickup the SHOTGUN AMMO. Head north to the wall then left and pickup another SHOTGUN AMMO beside the grey column. Head south and pickup the SHOTGUN AMMO (south wall). Head west and return to the middle of the cavern where an instruction to use action to climb the ledges appears. Face north and climb the blocks up to the ledge. Head east then take a running jump to the ledge south. Take a standing jump to the slope and jump to grab the ledge south. Walk to the slope, face east, sideflip right to the slope, jump and grab the upper ledge. Head north and take a running jump with grab to the small ledge north. Take a running jump with grab east to the crevice in the column. Shimmy left and drop to the ledge. Head down the stairs, shoot the vases and pickup the SHOTGUN AMMO and SMALL MEDIPACK. Head through the opening east and watch a cutscene of the area ahead.
Upper Cavern
Head around the perimeter of the area and pickup the SHOTGUN AMMO (south/east) and another SHOTGUN AMMO in the middle of the area. Climb the sloped block near the entrance and take a running jump south to the upper ledge. Take a standing jump to the small ledge east and a running jump to the top of the dome. Angle south/east, take a running jump to the platform and a standing jump east to the next ledge. Face north and take standing jumps and slides on the sloped blocks to land on the ledge north. Head through the entrance, safety drop to ground level and push the floor lever. Climb either block and take a standing jump with grab back to the upper level. Head back through the entrance, turn right and take a running jump and grab to the ledge west. Head to the south/west corner of the bridge and take a running jump to the pole on the sloped block. Shimmy around the pole then backflip to the block behind. Face north and take a running jump to the ledge. Crawl under the small opening in the wall. Take a running jump north to the ladder and climb down. Push the floor lever and watch a cutscene of a door opening. Jump up and grab the ladder, climb 3 steps up, backflip with a twist (ALT+END) and grab the ledge. Pull up, crawl through the small opening south and safety drop to the ground floor. Head to the north wall and through the newly opened door.
LEVEL 2 – The Heart of the Maze
Marathon Pickup Exploration
Sliding down the slope to the bottom, watch a cutscene of the area. Head north, take a running jump to the bridge and pickup the SMALL MEDIPACK in the left alcove. Jump back to the ledge south, head to the south/east alcove and pickup the FLARES. Head east and down a set of stairs. Arm weapons and shoot the BLUE AHMET under the dome from the safety of the staircase. Pickup the SHOTGUN AMMO under the dome. Head north down the stairs. Take a standing jump to the ledge north/east and pickup the SHOTGUN AMMO. Climb the west ledge into the dome, drop down to the stairs left (south) and shoot the BLUE AHMET. Climb back north into the dome, head to the west ledge and take a running jump to the top of the dome north/west. Push the floor lever (handle now pointing east) and pickup the SHOTGUN AMMO. Take a running jump south back to the top of the dome and a standing jump east to the ledge. Safety drop and continue east into the area with the floating plaque. Head right (south) up the stairs, turn around and shoot the BLUE AHMET from the safety of the stairs. Read the message about 4 magic stones and pickup the SHOTGUN AMMO near the column ahead (with a ladder and trap door for later). Head to the north/west corner and pickup the SMALL MEDIPACK in the alcove and take a standing jump back to the floor. Head to the south/east corner beside the stairs, drop down to the lower floor, slide down the slope and pickup the SHOTGUN AMMO.
Head to the middle of the room with a bronze hand (2.9) receptacle, reverse roll, turn right down the West Corridor, turn around and shoot two BLUE AHMETS from the safety of the west corridor (they won’t follow). Continue west, turn left and pickup the SHOTGUN AMMO in the third alcove on the left. Climb out, head up the stairs and pickup the SHOTGUN AMMO on the left. Continue west down the West Corridor and pickup the SHOTGUN AMMO at the end of the West Corridor. Reverse roll, head forward (east) turn right, climb the ledge south and pickup the SHOTGUN AMMO. Drop back down north, head left down several blocks and pickup the SHOTGUN AMMO on the left (south). Head back into the small room, check the message “Careful they feel you…” then climb the ledge east and pickup the SHOTGUN AMMO. Drop back down into the room, exit left, climb two ledges west and pickup the SMALL MEDIPACK. Head to the small slope in the north/west corner. (TIP: From the corner facing west, take three steps left, two steps back then sideflip right to the slope, jump and grab the block ahead. If Lara hits her head, adjust the angle slightly right and try the sideflip again.) Climb up, head right, climb up to a platform with a bronze hand (2.9) receptacle in the wall. Turn right and pickup the SHOTGUN on the pedestal. Drop north and pickup the SHOTGUN AMMO. Climb out, head to the south edge of the dome, angle south/west and take a running jump to the ledge. Pickup the LASERSIGHT on the pedestal, head back and safety drop to the ledge east. Hug the right wall through the corridor up a few blocks then head east back to the reddish area of the West Corridor. Turn right (south), climb the south ledge to see a golden hand receptacle down a small flight of stairs. Turn left instead and head east up a few steps to the small landing in the middle of the staircase. Angle south/west and take a running jump to the platform above the hand receptacle. Head around and pickup the SHOTGUN AMMO. Take a standing jump north/west to the platform. Take a standing jump to the north dome and pickup the SHOTGUN AMMO. Head to the west side of the dome and take a running jump and grab to the next dome. Pickup the SHOTGUN AMMO. Head back east and take a running jump with grab back to the previous dome. Turn right (south) and take a standing jump to the platform south. Climb the stairs south then west under another dome. Continue west to another set of stairs and head left (south). Climb the stairs to the top and pickup the SHOTGUN AMMO on the right. In the west wall is an opening First way From The Heart to The Canal (2.2) for later. Continue south down the stairs to another dome. Read the message about the maze guardians. Head to the east edge and take a running jump to an entranceway. Pickup the SHOTGUN AMMO in the entranceway on the left (north). Continue east to another dome and pickup the SHOTGUN AMMO on the left. Head south through the large opening to enter the next level First way From The Heart to The Passage (2.1).
LEVEL 3 – The Passage (2.1)
Main Entrance
Head to the room on the right (west) with a bronze hand receptacle (3.11) and shoot the BLUE AHMET. Read the message about the 3 ball puzzle and pickup the two SHOTGUN AMMO in the corners. Exit east, head south to the back of the room and pickup the SHOTGUN AMMO and a SMALL MEDIPACK in the south/west corner. Return to the entrance north and head east through the first opening down the stairs. Hug the right wall of the maze all the way around to the stairs back to the main room. Turn around and shoot the BLUE AHMET from the safety of the staircase. From the first opening down the stairs, head back into the maze (through the middle entrance east) and once again hug the right wall to flesh out two BLUE AHMETS. Reverse back to the stairs and take them out in safety. Head back into the maze (middle entrance), keep hugging the right wall back out to the stairs and take out a BLUE AHMET. Go back into the maze (through the middle entrance east), hug the left wall and pickup the SMALL MEDIPACK on a steel tile. Hug the left wall back out to the stairs and take out a BLUE AHMET that followed and exit out to the main lobby.
3 Wall Switch Room
Head to the second opening east down the stairs, hug the right wall until you hit a dead end and climb the block on the left. Shoot the BLUE AHMET that followed, drop down and pickup the SHOTGUN AMMO. Exit west and hug the right wall again (past a closed gate in the west wall) down two flights of stairs and up two flights of stairs to a room with another message marker. Read the message about a combination to an upper gate. Drop down west to find 3 wall levers. Pull down the 1st and 3rd levers opening the gate above. Climb out east, hug the right wall and pickup the SMALL MEDIPACK at the end. Reverse roll and climb the ledge on the left (west) to the newly opened gate. Take a running jump south/west to a column. Take a running jump west and grab the jump switch on the wall. Reverse roll, exit the alcove east, hug the right wall back into the small corridor south, climb the ledge on the right (west). Take a running jump south/west to the column and a running jump with grab (to change trajectory) into the newly opened gate. Drop into the room and pickup the GOLDEN BALL (3.12) on the pedestal and SHOTGUN AMMO. Push the floor lever, watch the cutscene of a gate opening (back in the west wall) exit the room via the opening south/east.
Route to the Small Waterskin (3.6)
Exit the 3 wall switch room, head east and hug the right wall until you see another BLUE AHMET. Reverse roll, run back and take out the monster from the safety of the stairs. Continue back down hugging the right wall and take out another BLUE AHMET. Continue following the right wall and pickup two SHOTGUN AMMO south/east corner. Head east onto a new staircase and pickup the SHOTGUN AMMO on the south/east ledge and a SMALL MEDIPACK behind a column near the staircase. Heading north will trigger a level change into Passage to the Game Room (3.9) for later on.
Return to the wide staircase south, head to the west wall through the columns and follow the right wall north until you reach an open room with a floating message plaque referring to the waterskin for measuring water. Immediately reverse roll, head north down the stairs, reverse and shoot the BLUE AHMET from the safety of the staircase. Head back into the room and pickup the SMALL WATERSKIN (3.6) from the pedestal and the SHOTGUN AMMO on the ground. Head south/west into a corridor, pickup the SMALL MEDIPACK at the end, reverse roll and exit back to the room. Head to the north/west corner and pickup the SHOTGUN AMMO. Head west down the staircase and pickup the SHOTGUN AMMO at the bottom. Head east down the stairs and pickup the SMALL MEDIPACK in the right hand corner. Continue down the slope to where two staircases go up. Head up the west staircase 2 flights of stairs, continue west through the corridor to an opened gate west wall and push the floor lever opening up a gate near a floating plaque. Exit the room east, continue through the corridor east down one flight of stairs then turn left (north). Turn right (east) down another flight of stairs hugging the right wall until you reach an upper room. Take out the two BLUE AHMETS from the safety of the stairs and pickup the SHOTGUN AMMO and SMALL MEDIPACK back in the room. Head up the stairs left back out to the main lobby. Safety drop down to the main room and head east to the first entrance of the maze.
The second entrance of the Framework (3.10)
From the first opening down the stairs, head back into the maze right, then through the left corridor then straight. Follow the corridor to reach a large staircase. Head up the stairs, pickup the SHOTGUN AMMO and continue to the top to a large open area. Pickup the SHOTGUN AMMO on the right ledge. Pickup the SHOTGUN AMMO between two columns. Pickup the SHOTGUN AMMO in the south/east corridor. Take a running jump north/east and pickup the SHOTGUN AMMO in the alcove and return to the main floor. Approach the north/west corner to see sliding blocks and watch a flyby of the area. Angle right and take a standing jump to a small metal triangle between the sliding blocks. When the block slides away and the slicer blade passes, run to the right (east) and jump to grab the ladder. Quickly head down to the bottom before the slicer blade returns. When the slider blade passes, take a running jump to the platform. Run to the end of the platform and take a running jump with grab to the ledge with the pedestal. Pickup the SILVER BALL (3.7) on the pedestal, push the floor lever and exit through the open gate where the level changes back to The Heart.
LEVEL 2 – The Heart of the Maze
Directly ahead is a golden hand receptacle (2.10) for later on. Turn left (south) then left again (east) and pickup the SHOTGUN AMMO. Reverse roll, head left (south) and take a running jump over the slope. Take a standing jump to the platform ahead and pickup the SMALL MEDIPACK. Reverse roll, take a standing jump back to the platform, take a standing jump north over the slope and head right. Turn left (north) angle north/west and take a standing jump over the slope. Angle north/west and take a standing jump to the platform. Pickup the SHOTGUN AMMO and return with a running jump south/east back over the slope. Face south and climb the block. Take two standing jumps east up to the ledge. Reverse roll and take a running jump west (no grab) to the platform. Push the floor lever and watch a cutscene to The Passage (2.3) for later on.
Head south and take a standing jump south/west to the ledge between columns. Angle to face south/east and take a running jump to the next ledge between columns. Angle to face south/west and take a running jump to the next ledge between columns. Take a standing jump east to a triangle ledge and another standing jump south/east to the bridge ahead. Pull the wall switch to open a level change to The Passage Shortcut #1 (mentioned but not assigned a number in the builders walkthrough) for later on or as a shortcut. Safety drop north/east to a lower floor and pickup the two SHOTGUN AMMO. Head west, drop down to a lower ledge to the right of the golden hand receptacle (2.10) and pickup the SHOTGUN AMMO and the SMALL MEDIPACK. Climb back out, return east and pull the wall switch to open a level change to The Passage Shortcut #2 (mentioned but not assigned a number in the builders walkthrough) for later on or as a shortcut. Head through the opened gate east for a level change to The Passage Shortcut #2.
LEVEL 3 – The Passage
Turn right (south) and follow the right wall through a corridor up two flights of stairs west then take the stairway on the right back to the Main entrance. Turn right (north) and exit for a level change back to The Heart of the Maze through The Passage (2.1).
LEVEL 2 – The Heart of the Maze (2.1)
Route to the Large Waterskin (2.8)
Turn left (west) and take a running jump to the dome ahead. Turn right (north) and head up two flights of stairs then down one flight of stairs. Turn right (east) down another small flight of stairs to a dome. Continue east and take a running jump to another flight of stairs. Go up the stairs north then east to another dome. Continue east through a small corridor then right (south) down another small set of stairs. Turn left (east) through a small opening then right (south) up three flights of stairs to the dome platform to The Passage (2.3) for later.
Continue south past the entrance up three flights of stairs to a platform with a floating plaque (re: powerful magic). Head west, angle south/west and take a running jump to the ledge between two columns. Pickup the SHOTGUN AMMO, angle to face north/west and take a running jump then jump off the dome with a slight curve right to the ledge. Take a standing jump to the alcove south/east and pickup the SHOTGUN AMMO. Backflip back to the ledge. Head north/west and pickup the SMALL MEDIPACK. Take a standing jump east and pickup the SHOTGUN AMMO. Take another standing jump east to the ledge and pickup the SHOTGUN AMMO to the left of the sloped ramp. Take a standing jump east up the ramp, a running jump east to the top of the dome. Turn left and take a running jump to the alcove north. Pickup the SHOTGUN AMMO. Angle to face north/east and take a running jump to the platform. Take a standing jump north/west to the platform ahead. Take a running jump north/east to the next platform ahead and another running jump north/east to the dome. Climb east to the dome floor and pickup the SMALL MEDIPACK. On the left is a turnwheel to open a door to The Framework (2.5) for later on. Take a running jump east to the next ledge. Head around the pillar and take a running jump south/east to the top of the dome. Take a running jump east to the ledges against the wall. Turn south and take a running jump to the next ledge and a running jump to the dome floor. Drop down east, pickup the SMALL MEDIPACK and backflip back to the dome. Take a running jump south to another ledge with two Yellow Slopes on the right.
Angle to face north/west and take a standing jump to the slope, slide a bit then jump to grab the ladder ahead. Climb the ladder and take a standing jump south/west with grab (to change trajectory) into the alcove. Take a running jump west to the column and a standing jump north to the dome. Take a running jump with grab west to the dome. Take another running jump west to the next dome. Take a running jump north to the next dome. Take a running jump north to the slope and backflip to the dome behind. Take a running jump north/east to the top of the dome. Face east then take a running jump to the dome ahead and pickup the LARGE WATERSKIN (2.8). Take a running jump east to the ledge and pickup the SHOTGUN AMMO. Reverse roll and take a running jump west with grab (to change trajectory) back to the dome. Safety drop north to a lower ledge.
Route to Red Key #1 (2.6)
Head up the stairs around the pillar and take a running jump south/east to the top of the dome. Take a running jump east to the ledges against the wall. Turn north and take a standing jump to the next ledge. Angle to face north/west and take a running jump to the top of the dome. Take a standing jump north/east to the dome with the turnstile. Take a standing jump north/west and push the floor lever on the ledge to open a gate below. Return to the dome and push the turnstile once to move the wall below to point north/south. Drop south to a lower ledge and drop south to the dome floor. Angle to face north/west and take a running jump to the top of the dome. Take a running jump north, enter the room east then left to trigger a BLUE AHMET. Immediately reverse roll to exit the room then shoot the monster from the safety of the top of the dome west. Return east to the room, drop into the hole in the floor and open the trap door. Climb out and exit the room. Face south and take a running jump to the top of the dome. Take another running jump south/east to the dome floor. Climb the block north and climb north up to the dome with the turnstile. Push the turnstile once again (wall below points east/west) and drop south to the ledge and south to the dome floor. Drop down south to the staircase, head down, enter the room and climb the ladder to the top. Pickup RED KEY #1 (2.6) on the pedestal left (north). Exit the room, climb down the ladder, climb the stairs south/east around to reach the dome floor south. Turn left (east) and head into the entrance for a level change to The Passage (2.3).
LEVEL 3 – The Passage (2.3)
Route to the 1st Rolling Ball (3.8)
Head right (south) take a running jump over the gap, climb the south ledge and pickup the SMALL MEDIPACK. Drop back down, return to the gap and take a running jump north. Continue north and take another running jump over the gap. Head right and pull/push the block to the south edge. Climb and take a running jump with grab to the platform south. Angle to face south/east, wait for the slicer blade to pass then take a running jump to the slope. Jump and slide to grab the edge. Pull up, jump back and forth with curve left then backflip to land on the ledge behind. Take a standing jump to the block left, then run quickly to the right to avoid the slicer blade. Head south/east to the east wall, turn left and take a standing jump north to the triangle. Angle to face south/east and take a running jump to the ledge. Take a running jump with grab north to the next ledge. Pull up and take another running jump north with grab to the ledge. Pickup the SMALL MEDIPACK and REVOLVER AMMO. Reverse roll and take a running jump south back to the previous ledge.
Turn west and take a running jump to the left of the rolling ball. Push the rolling ball (3.8) north to activate a large wall button. Follow the ball north down the slope careful to avoid the rolling ball. Angle to face south/west and take a running jump to the platform with the slicer blade. When the blade passes, take a running jump to the west ledge between the two columns and a running jump to the west ledge below (slight health loss). Take a running jump with grab to the pushable north. Drop down, head south with running jump over the gap and exit right (west) for a level change back to The Heart of the Maze through The Passage (2.3).
LEVEL 2 – The Heart of the Maze Entrance (2.3)
Opening the Door to The Passage (2.4)
From the entrance, head south past the entrance up three flights of stairs to a platform with a floating plaque (re: powerful magic). Continue south/west and take a running jump to the ledge between two columns. Angle to face north/west and take a running jump then jump off the dome to the ledge. Take a standing jump east up the ramp, a running jump east to the top of the dome. Turn left and take a running jump to the alcove north. Angle to face north/east and take a standing jump to the platform. Take a standing jump north/west to the platform ahead. Take a running jump north/east to the next platform ahead and another running jump north/east to the dome. On the left is a turnwheel to open a door to The Framework (2.5) for later on. Take a running jump east to the next ledge. Head up around the pillar and take a running jump south/east to the top of the dome. Take a running jump east to the ledges against the wall. Turn south and take a running jump to the next ledge and a running jump to the dome floor. Take a running jump south to another ledge with two Yellow Slopes on the right and a closed door on the left. Angle to face north/west and take a standing jump to the slope, slide a bit then jump to grab the ladder ahead. Climb the ladder to the top and take a standing jump south/west with grab (to change trajectory) into the alcove. Take a running jump west to the column and a running jump with grab south to the column. Turn left, angle south/east and take a running jump to the small platform. Turn left and take a running jump with grab to grab the crevice in the column. Shimmy right around the corner, let go then grab the jumpswitch. Slide down the slopes then jump and grab the ladder. Climb the ladder, angle to face south/east and take a standing jump to the floor below. Head east through the newly opened door into the Third way from The Heart to The Passage (2.4).
LEVEL 3 – The Passage (2.4)
Push the 2nd Rolling Ball (3.8)
N.B. WARNING about this entrance: After entering this door, if you immediately reverse roll and exit back to the Heart, you arrive at a completely different location (ie. at the entrance to The Passage 2.3). After entering the door, take a running jump to the slope east, jump and grab the edge of the slope ahead. Shimmy right to the end, pull up then backflip off the slope to land on the ledge behind. Face north and when the sliding block is moving to the left, take a running jump to the ledge and another running jump to grab the crevice in the wall ahead. Shimmy left to the end then let go, jump with a twist off the slope and grab the edge of the slope. Shimmy right, around the corner to the next slope then pull up, slide and jump off the slope to grab the crevice in the wall ahead. Shimmy right, around the corner and drop to the floor. Head north to the slope with the rolling ball, face south then backflip to the slope and jump with a curve right to land on the ledge ahead. Head north and push the ball down the slope north. Follow the ball down the slope and turn right. Facing east from the rightmost edge of the ledge, take two hops back, one step left, angle slightly right with Lara’s head slightly right of the wall and take a running jump with a sharp curve left to perform a banana jump to the room on the left. Head through the door north. Pickup the SHOTGUN AMMO on the right (east) and another SHOTGUN AMMO in the north/west corner of the room. Head to the west wall, climb the stairs on the right and pull the turnwheel 8 times. Angle left, run and jump along the blocks to a slope ahead, slide down then run and crawl (or roll forward) under the door before it closes for a level change into The Framework.
LEVEL 5 – The Framework
Head forward and watch a cutscene of the HORSEMAN mounting the HORSE. Shoot the horseman off the horse then continue shooting until he drops. Pickup the ENERGY CRYSTAL#1 (5.6) on the tile then head south to the turnwheel on the block. Pickup the SHOTGUN AMMO and climb the block. Face north, pull the wheel 8 times then jump over the wheel and head forward (north), jump up the block and through the north door before it closes.
Ground Floor Pushable Pillar and 4 Energy Crystal Receptacles
Head forward and pull the pushable pillar to the grey tile (for use later as a platform in the upper area). Head south then west and pickup the SHOTGUN AMMO in the second alcove between two columns. Continue west, push the floor lever and watch a cutscene of a gate opening in the upper area with 2 turnstiles for later. Continue west and pickup the SMALL MEDIPACK on the right. Drop down to find four energy crystal receptacles for later. Head forward, climb the block and climb the wide staircase on the left.
The Framework puzzle (5.2)
From the Wide Staircase: NORTH-WEST-WEST-SOUTH= floor lever south/east
FACING NORTH: Leads to two wheels facing east/west with no slopes down.
FACING WEST: Leads to two wheels facing east/west (doors skewed left).
FACING WEST: Leads to one wheel facing south (slope down to floor lever north/east).
FACING SOUTH: Leads to two wheels facing east/west and a slope down to floor lever south/east. Safety slide down the slope and watch a flyby of the basement area. Push the floor lever south/east (ON). (ON=handle out towards the perimeter) (OFF=handle in towards the middle) Climb the ladder then jump south into a room with two wheels facing north/south.
NORTH-WEST-SOUTH= floor lever south/west
FACING NORTH: Leads to two wheels facing east/west.
FACING WEST: Leads to two wheels north/south (no slopes down).
FACING SOUTH: Leads to two wheels east/west and a slope down to floor lever south/west with 3 ladders. Safety slide down the slope, push the floor lever south/west (ON) then slide down west to ground floor keeping to the outer perimeter of the room to avoid triggering any monsters. Pickup the SHOTGUN AMMO in the north/west corner. Continue around the perimeter until you reach the east wall with the newly opened DOOR#1 and push the floor lever inside. Reverse and head to the turnwheel. Pull the wheel 8 times, run into the room ahead and partially up the stairs. Take out as many of the BLUE AHMETS that follow from the safety of the steps. Push the floor lever to access the staircase and head up the stairs leading to The Room of death (5.1).
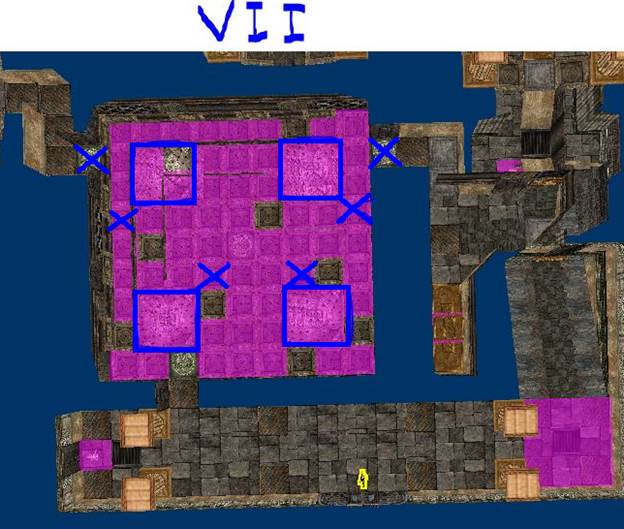
VII ceiling = BLUE X tiles are safe and X ceiling = BROWN tiles are safe. If the ceiling is VII, then follow the blue X tiles. If the ceiling is X then follow the brown tiles. Objective is to reach the exit in the north/east corner (top right on the map) back to the Framework Puzzle.
Route to Floor Lever to open Basement Door#3
Starting from the entrance from the Room of Death, pull the wheel and head up the stairs.
FACING NORTH: Forward
FACING WEST: Left
FACING SOUTH: Left
FACING WEST: Right
Push the floor lever north opening DOOR#3 in the basement. Climb the north stairs, pull the wheel, reverse roll and exit left (east) to two wheels facing north/south no slope down.
FACING NORTH: Leads to one wheel east and a slope down to floor lever north/west with two ladders. Safety drop down the slope and push the floor lever north/west ON. (ON=handle out towards the perimeter) (OFF=handle in towards the middle). Shoot any remaining BLUE AHMETS from the safety of the platform. Climb the SOUTH ladder enter the room and safety slide down to the platform. Shoot any remaining BLUE AHMETS from the safety of the platform. Climb the ladder then jump south into a room with two wheels facing north/south.
NORTH-WEST-SOUTH= floor lever south/west
FACING NORTH: Leads to two wheels facing east/west.
FACING WEST: Leads to two wheels north/south (no slopes down).
FACING SOUTH: Leads to two wheels east/west and a slope down to floor lever south/west with 3 ladders. Push floor lever towards the middle of the room to turn it OFF to open DOOR#2 in the east wall of the basement. (ON=handle out towards the perimeter) (OFF=handle in towards the middle). Slide down to the basement floor, head to the west wall and push the floor lever in the newly opened gate. Head to the east wall, push the floor lever in the newly opened gate and a new door opens in the east wall.
Multi-Flame Room for Energy Crystal (5.6) in the basement
Enter the room to trigger the flames. Kill the HORSEMAN and pickup the ENERGY CRYSTAL#2 (5.6) on the tile. Pull the wheel 10 times, reverse roll, run and jump to the gate with a reverse roll at the gate to get under before it closes. Exit the room back to the basement floor. Pickup the SHOTGUN AMMO in the middle of the room. Head to the wheel and pull to open the exit door. Run through the door before it closes and use the floor lever to open the gate up the stairs. Head back to the Room of Death (see screenshot in walkthrough above). If the ceiling is VII, then follow the blue X tiles. If the ceiling is X then follow the brown tiles. Objective is to reach the exit in the north/west corner (top left on the map). Pull the wheel for a level change into The Canal – Upper Level.
LEVEL 4 – The Canal – Upper Level
Get the Blue key (4.2)
Face south and pull the turnwheel 8 times then jump over the wheel, run and jump through the sliding blocks run through the door (or crawl) and pickup the BLUE KEY#1 (4.2) on the pedestal. Take a running jump east to the ledge, turn left (north) and take jumps to ledges and up to a platform with a floor lever. Push the floor lever north and watch a cutscene of a Bronze hands (4.3) receptacle opening up directly below. Turn right (west), slide down the slope, jump and grab the ledge with the sliding blocks and pull up. Take a running jump to the west ledge and a standing jump to the next ledge west. Push the floor lever and watch a cutscene of a Bronze hands (4.3) receptacle directly below in the maze. Head west and pickup the SHOTGUN AMMO. Jump up to a dark ledge south and pickup the LARGE MEDIPACK on the ledge (south/west). Jump to the ledge east then ledges south and pickup the SHOTGUN AMMO and the SMALL MEDIPACK where the camera angle changes. Angle to face south/east, take a running jump to the slope and grab the edge. Shimmy right, let go and grab the jumpswitch (4.4), to land on ground level. Another jumpswitch (4.4) on the slope on the right is for later on.
Safe Tile to shoot the Monsters (from the 1st jumpswitch)
From below after using the jumpswitch, head north then right (east) then left at the floating plaque then forward and left into the alcove with the opening to the Bronze hands (4.3) receptacle which is safe to shoot the monsters from. Lure as many BLUE AHMETS as you can to this spot to save on health and ammo.
Safe Tile to shoot the Monsters (from the Heart entrance)
From The Heart entrance (2.2) turn right (north) then left at the golden door to the floating plaque. Turn right at the plaque then forward and left into an alcove with a light grey tile. Lure the many BLUE AHMETS that are lurking in the black walled parts of the maze to this grey tile and take them out safely with pistols to conserve health and ammo.
From the safe tile, turn left, hit the wall, turn right then left then left. In a west corridor, push the floor lever west - The Switch to open the upper door (4.1) and watch a cutscene of a gate opening in the upper floor (to access the 2nd jumpswitch). Head to the east then south then east then north and exit east to The Heart of the Maze Entrance (2.2).
LEVEL 2 – The Heart of the Maze Entrance (2.2)
Back to the Framework (2.5)
From the opening First way From The Heart to The Canal (2.2), turn left (north) and head down one flight of stairs. Turn right (east) down another small flight of stairs to a dome. Continue east and take a running jump to another flight of stairs. Go up the stairs north then east to another dome. Continue east through a small corridor then right (south) down another small set of stairs. Turn left (east) through a small opening then right (south) up three flights of stairs to the dome platform which leads to The Passage (2.3) for later. Continue south past the entrance up three flights of stairs to a platform with a floating plaque (re: powerful magic). Continue south/west and take a running jump to the ledge between two columns. Angle to face north/west and take a running jump then jump off the dome to the ledge. Take a standing jump east up the ramp, a running jump east to the top of the dome. Turn left and take a running jump to the alcove north. Angle to face north/east and take a standing jump to the platform. Take a standing jump north/west to the platform ahead. Take a running jump north/east to the next platform ahead and another running jump north/east to the dome. Take a running jump left to the ledge with the turnwheel. Open the door and enter for a level change to The Framework (2.5)
LEVEL 5 – The Framework
Turn left down the corridor back to the Room of Death (5.1). If the ceiling is VII, then follow the blue X tiles (see screenshot above in the walkthrough). If the ceiling is X then follow the brown tiles. Objective is to reach the exit in the north/east corner (top right on the map) back to the Framework Puzzle.
From the Room of Death: Route to The Door of the red key (5.4)
FACING NORTH: Leads to two wheels facing east/west.
FACING EAST: Leads to one wheel north and a dark corridor north.
FACING NORTH: Leads to two wheels facing east/west (doors skewed left).
FACING EAST: Leads to two wheels facing east/west
FACING EAST: Leads to one wheel reverse roll east to red key receptacles room.
After entering the room, head right down the corridor, then left to the balcony above the Main Entrance. Take a standing jump to the pushable pillar. Take a running jump to the balcony ahead.
The room with turn switches (5.7)
Head through the door and push both turnstiles so that their handles both point south (walls below point north/south). Exit back to the balcony and take a standing jump to the pushable pillar. Safety drop to ground level and head north/west back up the wide staircase.
Side Route for SECRET Cog Souvenir Item
Head to the north/west corner and check for a door with a symbol above showing the positions of the floor levers to open this door (bottom left and bottom right = north/west and south/west).
N.B. Symbols: (south/east = top right) (south/west = bottom right) (north/east = top left) (north/west = bottom left)
From the Wide Staircase: NORTH-WEST-WEST-SOUTH= floor lever south/east.
Make sure the handle is pointing in towards the middle. (ON=handle out towards the perimeter) (OFF=handle in towards the middle) Climb the ladder then jump south into a room with two wheels facing north/south.
NORTH-WEST-SOUTH= floor lever south/west.
Make sure the handle is pointing out towards the perimeter.
Climb north ladder
WEST-NORTH = north/west lever (2 ladders south and west)
Make sure the handle is pointing out towards the perimeter.
Climb west ladder
West ladder (jump south) goes to wheels north/south
SOUTH= south/west lever (3 ladders)
Climb west ladder
NORTH-EAST = north/east lever (1 ladder south)
Make sure the handle is pointing in towards the middle.
Climb south ladder (jump west)
EAST-NORTH-EAST-EAST- Leads to one wheel reverse roll east to red key receptacles room.
Head to the Balcony, take a standing jump to the pushable pillar and safety drop to the ground level which leads to the entrance to the Bottom of the Maze. Head to the north/west corner and pickup the COG SOUVENIR from the pedestal. Return to the Wide Staircase.
From the Wide Staircase: Route back to the Room of Death (5.1)
FACING NORTH: Leads to two wheels facing east/west.
FACING WEST: Leads to two wheels facing east/west (doors skewed left).
FACING WEST: Leads to one wheel facing south (slope down to floor lever north/east).
Safety slide down the slope to the floor lever platform. Slide to the basement floor, use the wheel, exit the room, pull the floor lever, climb the stairs and return to the Room of Death.
If the ceiling is VII, then follow the blue X tiles. If the ceiling is X then follow the brown tiles.
Objective is to reach the exit in the north/west corner (top left on the map) back to the Canal Upper Level. Pull the wheel for a level change into The Canal – Upper Level.
LEVEL 4 – The Canal – Upper Level
Safety drop to ground level (slight health loss). Head south then east then north and exit east to The Heart of the Maze Entrance (2.2).
LEVEL 2 – The Heart of the Maze Entrance (2.2)
Back to the Passage (2.4)
From the opening First way From The Heart to The Canal (2.2), turn left (north) and head down one flight of stairs. Turn right (east) down another small flight of stairs to a dome. Continue east and take a running jump to another flight of stairs. Go up the stairs north then east to another dome. Continue east through a small corridor then right (south) down another small set of stairs. Turn left (east) through a small opening then right (south) up three flights of stairs to the dome platform which leads to The Passage (2.3) for later. Continue south past the entrance up three flights of stairs to a platform with a floating plaque (re: powerful magic). Continue south/west and take a running jump to the ledge between two columns. Angle to face north/west and take a running jump then jump off the dome to the ledge. Take a standing jump east up the ramp, a running jump east to the top of the dome. Turn left and take a running jump to the alcove north. Angle to face north/east and take a standing jump to the platform. Take a standing jump north/west to the platform ahead. Take a running jump north/east to the next platform ahead and another running jump north/east to the dome. On the left is a turnwheel to open a door to The Framework (2.5) for later on. Take a running jump east to the next ledge. Head up around the pillar and take a running jump south/east to the top of the dome. Take a running jump east to the ledges against the wall. Turn south and take a running jump to the next ledge and a running jump to the dome floor. Take a running jump south to another ledge with two Yellow Slopes on the right and enter the opened door on the left for a level change to The Passage (2.4).
LEVEL 3 – The Passage (2.4)
Route back to the Framework for Red Key#2 and Blue Key#2
N.B. WARNING about this entrance: After entering this door, DO NOT reverse roll and exit back to the Heart otherwise you will arrive at a completely different location (ie. at the entrance to The Passage 2.3).
After entering the door, take a running jump to the slope, jump and grab the edge of the slope ahead. Shimmy right to the end, pull up then backflip off the slope to land on the ledge behind. Face north and when the sliding block is moving to the left, take a running jump to the ledge and another running jump to grab the crevice in the wall ahead. Shimmy left to the end then let go, jump with a twist off the slope and grab the edge of the slope. Shimmy right, around the corner to the next slope then pull up, slide and jump off the slope to grab the crevice in the wall ahead. Shimmy right, around the corner and drop to the floor. Head north to the slope with the rolling ball, face south then backflip to the slope and jump with a curve right to land on the ledge ahead. Head north down the slope and turn right. Facing east from the rightmost edge of the ledge, take two hops back, one step left, angle slightly right with Lara’s head slightly right of the wall and take a running jump with a sharp curve left to perform a banana jump to the room on the left. Head through the door north. Head to the west wall, climb the stairs on the right and pull the turnwheel 8 times. Angle left, run and jump along the blocks to a slope ahead, slide down then run and crawl (or roll forward) under the door before it closes for a level change into The Framework.
LEVEL 5 – The Framework
Climb the block south, enter the small room and push the floor lever east (opens a gate on the other side of the moveable wall west). Exit the room, jump to the north room and pull down the ceiling trapdoor in the north/east alcove. Pull up into the upper area to access the two turnstiles once again. (N.B.: For some reason the handles seem to reset themselves to east/west. Therefore, turn the handles of both turnstiles so that both are facing south again and walls going east/west). Drop back through the ceiling trapdoor and push the floor lever west. Climb back up the ceiling trapdoor and push the closest turnstile so the handle faces east and walls going north/south. Drop back down and pickup the BLUE KEY#2 (5.5) on the pedestal. Exit the room, jump to the south room, head west and pull down the ceiling trapdoor in the west alcove. Climb up, head to the south turnstile and push the handle to face east and walls going north/south. Drop down and pickup the RED KEY#2 (5.5) from the pedestal. Climb back up the ceiling trapdoor and exit via the north door.
The Door of the red key (5.4)
From the Upper Balcony with two Turnstiles Room, take a standing jump to the pushable pillar and a running jump to the ledge ahead. Pickup the SHOTGUN AMMO, head left (west) then right (north) and use the Red Keys in the locks to open the gate.
N.B.: SAVE often in this room in different slots as it is possible that blades block the wheel after killing the Horseman with no access out afterwards. Slide down the slope, arm weapons, shoot the HORSEMAN and pickup the ENERGY CRYSTAL#3 (5.6) on the tile. Pull the wheel and exit through the door south back to the ground floor with the pushable pillar. Head back to the Wide Staircase north/west.
From the Wide Staircase: Route back to the Room of Death (5.1)
FACING NORTH: Leads to two wheels facing east/west.
FACING WEST: Leads to two wheels facing east/west (doors skewed left).
FACING WEST: Leads to one wheel facing south (slope down to floor lever north/east).
Safety slide down the slope to the floor lever platform. Slide to the basement floor, use the wheel, exit the room, pull the floor lever, climb the stairs and return to the Room of Death.
If the ceiling is VII, then follow the blue X tiles. If the ceiling is X then follow the brown tiles. Objective is to reach the exit in the north/east corner (top right on the map) back to the Framework Puzzle.
The Door of the blue key (5.3)
Starting from the Room of Death (5.1) pull the wheel and head up the stairs.
FACING NORTH: Forward
FACING WEST: Left
FACING SOUTH: Left
FACING WEST: Right
Place the two Blue Keys into the locks and enter the room to trigger the slowly rotating blades. Kill the HORSEMAN and pickup the ENERGY CRYSTAL#4 (5.6) on the tile. Take a standing jump to the blade platform in the north/east corner, walk with the blade until you can take a running jump east to grab the crevice. Shimmy left and climb into the opening to exit. Pull the wheel, reverse roll and exit south. Head east down the stairs back to the Room of Death. If the ceiling is VII, then follow the blue X tiles. If the ceiling is X then follow the brown tiles. Objective is to reach the exit in the north/east corner (top right on the map) back to the Framework Puzzle.
Route back to the Main Entrance to place the 4 Energy Crystals
Starting from the Room of Death (5.1) pull the wheel and head up the stairs.
FACING NORTH: Leads to two wheels facing east/west.
FACING EAST: Leads to one wheel north and a dark corridor north.
FACING NORTH: Leads to two wheels facing east/west (doors skewed left).
FACING EAST: Leads to two wheels facing east/west
FACING EAST: Leads to one wheel reverse roll east to red key receptacles room.
N.B. WARNING: If you already killed the Horseman in the Red Key Lock room, do not enter again otherwise the blades will reactivate without stopping and it will be harder to pull the wheel to exit. Head to the Balcony, take a standing jump to the pushable pillar and safety drop to the Main Entrance ground level. Head down the ramp, place the four Energy Crystals to open the entrance to The Bottom of the Maze.
LEVEL 8 – The Bottom of the Maze
Push the floor lever on the left (south/west) and the floor lever on the right (north/west) to open the two doors. Battle the two MAZE GUARDIANS (3 shotgun ammo at close range for each should do it). Pickup the two SILVER BALLS (8.2) in front of the north and south doors. Open the two trap doors (north and south) in the floor leading down two separate paths - The way (8.4).
North Trap Door Route
Climb down the ladder, slide down the slope and pickup the SMALL MEDIPACK and SHOTGUN AMMO (north/east corner) and two SHOTGUN AMMO (east and middle). Down here is the trigger for the MECHA BULL (8.3) (cannot kill) in the north wall and an entrance to The Cursed Land (West Passage) in the west wall for later. Make the bull smash the column tile to open a gate in the south wall. Lure the bull through the gate leading to the same room as the south trap door route. Make the bull smash the west column tile to open a gate in the south/west corner. Pickup the LARGE MEDIPACK (east wall), FLARES (north wall) and SHOTGUN AMMO (south wall). Heading to the north/west corner leads to an entrance to The Cursed Land (North/West Pathway) for later. Exit via the newly opened gate in the south/west corner to The Cursed Land (South Pathway).
LEVEL 9 – The Cursed Land (South Pathway)
Continue south across the bridge and take a running jump with grab south to the bridge ahead. Angle to face south/west and take a standing jump to the ledge. Drop down to the other side and head west to the golden floor area. Head north around the perimeter and pickup six SHOTGUN AMMO. Near the south wall are floor tiles with pictures of Chess pieces, Weigh scale, Cogwheel and Cross but you need all 4 secret souvenirs for this area for later.
Sloped Jumps to the Empty Frame -The part under the heart - The slope puzzle (9.4)
From the Chess piece tile, head north/east then north and turn left to the first sloped block facing west. Take a standing jump and grab the sloped block, pull up, slide and jump to grab the next slope. Pull up, slide and grab the 3rd slope. Pull up then jump and slide through slopes until you reach a slope with a corner. Grab that slope and shimmy left around the corner then pull up and jump to the next slope and the next slope. Slide as long as possible then jump off with a hard curve right to the slope, then jump with a sharp curve left to the next slope and a final jump to the central platform. Pickup the EMPTY FRAME on the pedestal.
Facing south, take a standing jump to grab the slope. Shimmy to the right as far as possible then pull up, slide and jump with a curve right to the next slope and the next few slopes until you reach the slope with a corner again. Grab that slope but this time simply pull up then jump to the next slope and jump to grab the next slope ahead. Pull up then slide and jump the next two slopes and grab the 3rd slope. Shimmy left, pull up, curve left to slide and grab the edge of the slope. Pull up, jump off with a twist to grab the slope behind. Pull up and slide jump off the next three slopes then slide jump and grab the 4th and 5th one. Shimmy to the left then jump (no slide) to the next slope then slide jump with a hard curve right, then left, left and right to land on the flat block. Face south and take a running jump and grab the slope. Shimmy left, pull up and jump (no slide) with a hard curve left to the small slope then jump (no slide) hard curve left to the outer floor.
Head to the north/west corner of the perimeter and take a running jump with grab west to the ledge. Take another running jump to the next ledge. Turn right and take a running jump north to the large ledge. Pickup the BRONZE BALL#1 (9.3) on the pedestal. Take a running jump south back to the ledge, another running jump east to the next ledge. From the right most corner of the ledge, aim for the lower dark tile on the right and take a running jump with grab east back to the golden floor. Head east across the floor then south then east to the bridge in the east. Head east across the bridge, angle to face south/east and take a standing jump to the ledge. Drop down to the other side and take a running jump with grab north to the bridge ahead. Continue north across the bridge back to The Bottom of the Maze for a shortcut.
LEVEL 8 – The Bottom of the Maze (Shortcut)
Head north/east then north across the bridge through the gate and west to The Cursed Land (West Pathway).
LEVEL 9 – The Cursed Land (West Pathway)
Head south/west then west and quickly head up the large staircase. Reverse roll and shoot the BLUE AHMETS from the safety of the staircase. Head down the stairs then left and push floor levers north/east and south/west outwards (make sure the north/west and south/east handles are pointing inward). (ON=handle out towards the perimeter) (OFF=handle in towards the middle) to open a door to a turnstile and wishing altar in the lower level for later. Turn to face west and climb the ledges to the top. Turn left (south) and pickup the BRONZE BALL#2 (9.3) from the pedestal. Drop down the ledges back to ground floor. Pickup the SHOTGUN AMMO south and the SMALL MEDIPACK on the ledge north/west. Head north/east and pickup the SHOTGUN AMMO which may trigger more BLUE AHMETS. If so, reverse roll and head back to the large staircase to take them out safely. Head down the stairs, make a hairpin turn right then head east. Climb a small set of stairs on the left and open the door. Push the handle of the turnstile to point south so that the wall underneath goes north/south. Exit the room and if triggered take out another BLUE AHMET. Head south across the bridge and pickup the SHOTGUN AMMO at the end of the bridge. Reverse roll, head left to the next bridge and pickup the SHOTGUN AMMO at the end of the bridge. Reverse roll, head north then east and north/east back to the Bottom of the Maze (Shortcut).
LEVEL 8 – The Bottom of the Maze (Shortcut)
Head east then south through the gate and across the bridge into the Mecha Bull room. Head west then north for a level change to The Cursed Land.
LEVEL 9 – The Cursed Land (North/West Pathway)
Route (via Mawia Drop) to a Tower Activator Receptacle
Take a running jump and grab the pedestal north. Pull up and take a running jump with grab to the pedestal west. Face north and take a running jump to the ledge. Face west and take a standing jump to the pedestal. SAVE your game (for a tricky “Mawia Drop” jump). Face north then take a running jump to the slope. Drop slightly then press CTRL (to change trajectory) to land on the ledge below (slight loss of health). Head through the opening, turn left, head to the west wall then turn north/west around the corner and pickup the STONE on the ground. Combine the Stone + Empty Frame = THE GEM IN THE STONE. Continue north to the platform and pull down the ceiling trap door to open a shortcut to the upper level. Continue to the north wall then east and head into the opening on the right. Pull down the two wall switches in the corners and exit east. Head right (south) then right (west) and into the opening on the right. Pull down the two wall switches in the corners and exit south. Head right (west) then right (north) to the ceiling trap door and climb up. Head south/east to the small staircase on the left. Enter the room and climb the ladder to the top. Take a running jump with grab south (to change trajectory) across the gap and through 4 newly opened gates.
Sloped Jump Room
Turn left (east) and take a standing jump north/east to the slope. Jump back and forth with curves left until the slope facing north is behind. Backflip to the north slope, jump forward with a hard curve left, slide and grab the edge of the slope. Shimmy to the left, pull up, jump with a twist and hard curve right, slide and grab the north facing slope. Shimmy right, pull up, jump back and forth with curves towards the wall slope with one hard curve to land and grab the edge of the slope. Shimmy to grab the jumpswitch. Reverse roll, head south then west to another set of slopes. Angle to face north/west and take a standing jump to the slope. Jump off then back and forth with curves right with one hard curve right at the end to land and grab the edge of the slope. Shimmy to reach and grab the jumpswitch. Reverse roll, head south then east to the ladder for later (TOWER ACTIVATOR RECEPTACLE – item not yet obtained). Exit right, climb down the ladder and exit the room back outside. Head west to the large staircase.
Swan Dive to Lower Level Turnstiles
Head up the large staircase, turn left (south) at the floating plaque, up a small staircase left (south) and take a spectacular swan dive south (with rolls if you like) into the water below. Swim east and pull up onto the east ledge where there is an underwater entrance to an underwater maze below for later. Quickly head east then south/east through a corridor then right to the newly opened door with a turnstile and wishing altar. Push the handle once so that the underwater wall goes north/south. Take out all the BLUE AHMETS from the bottom of the stairs in safety. Head left back to the corridor then north/west back to the ledge above the entrance to the underwater maze.
Turnstile Underwater Maze Puzzle for Bronze Ball #3, #4 and #5 (9.3)
FACING EAST: Head east to the 1st turnstile slightly to the right. Push the handle once so that the underwater wall goes east/west. Continue east to the 2nd turnstile and turn the handle once so that the underwater wall goes east/west. Continue east to the 3rd turnstile and turn the handle once so that the underwater wall goes north/south. Head south to the 4th turnstile and push the handle once so that the underwater wall goes east/west.
FACING WEST: Head west to the 5th turnstile and turn the handle once so that the underwater wall goes north/south. Continue west past the broken column to the 6th turnstile and make sure the underwater wall is going east/west. Continue west past the broken wood to the 7th turnstile. Push the handle once so the underwater wall goes north/south. Continue west, reverse roll and jump to the block to take out the BLUE AHMET in safety. Continue west to the 8th turnstile and push the handle once so that the underwater wall goes north/south. Head north and drop into the water. Swim east into the entrance of the underwater maze.
Swim forward then go right, right, left, left, straight and up to surface for air. Pull up into the room and pickup the BRONZE BALL#3 (9.3) on the pedestal. Drop into the water, swim forward hard left, left, left, right, straight and up to surface for air. Pull up onto the ledge, angle to face south/west then take a standing jump and grab to the ledge. Pull up and pickup the BRONZE BALL #4 (9.3) on the pedestal. Drop back into the water, follow the right wall back to the 3rd bronze ball opening for air. Swim forward slightly left to pickup the SHOTGUN AMMO x 2 then right, left, straight, right, left, left, right, up and surface for air. Pickup the BRONZE BALL #5 (9.3) on the pedestal. Drop into the water, head north past the fancy patterned column then right, right, left, straight, right, left, straight and up to surface for air. To exit swim straight, right, right, left, left, straight and up to surface back outside. Reverse and pull up east back to the ledge above the entrance to the underwater maze.
Location of more Stones + Underwater Pickups
N.B. There are 3 more Stones located in the Cursed Land but you only need one and only one registers in inventory.
FACING EAST: Head east past the turnstiles to the very end and pickup the STONE on the ground. Climb the ledge east, drop down and pickup the SHOTGUN AMMO on the ledge. Drop into the water, swim north/east and pickup another STONE on the underwater floor. Swim around the underwater perimeter floor for 8 SHOTGUN AMMO, REVOLVER AMMO and SMALL MEDIPACK. Head back to the east ledge above the entrance to the underwater maze and pull up onto the ledge east.
Route back to the Upper Level - The way up (9.2)
Facing east look up and notice a flat block on the left and the sloped block on the right. Head to the sloped block, turn left, backflip to the slope, jump off and grab the flat block. Pull up, reverse roll to face south and take a running jump to the broken column. Jump off and grab the edge of the flat block. Pull up, sidestep to the left, angle to face south/west and take a standing jump and grab the block. Pull up and take a running jump west and grab the column edge. Pull up, angle north/west and take a running jump to the pillar. Face north and make sure you have at least 25% health then take a running jump down to land on the lower floor. Climb the two ledges north, angle to face south/west and take a running jump and grab the pole. Shimmy to face north, pull up 4 times and backflip to the block behind. Turn around, jump up and grab the slope, pull up, jump with a twist to grab the ledge. Pull up, hug the left wall back to the bottom of the large staircase. Head to the floor levers and make sure the north/east and north/west and south/west handles are pointing outward and the other one inward. (ON=handle out towards the perimeter) (OFF=handle in towards the middle) to make sure the blocks are lowered and raised properly in the Push Puzzle Room for later on.
Route to Bronze Ball #6 (9.3)
Head up the large staircase, turn left (south) at the floating plaque, up a small staircase left (south) and turn right to face west. Take a running jump and grab the edge of the left column. Shimmy left all the way around then let go and backflip off the slope to a midlevel floor. Pickup the SMALL MEDIPACK at the west wall and return to the north/east corner. Safety drop to the lower floor (have at least 50% health before you drop). Head to the west wall and pickup BRONZE BALL #6 (9.3) on the pedestal. Reverse roll, head to the east edge and take a running jump to the column to pickup the LARGE MEDIPACK. Drop into the water, swim east towards the underwater maze entrance and pull up.
Route back to the Upper Level - The way up (9.2) (see paragraph above for details). From the bottom of the large staircase in the upper level, head to the north/east corner through the dark corridor for a level change back to the Bottom of the Maze for a shortcut.
LEVEL 8 – The Bottom of the Maze (Shortcut)
Head east then south through the gate and across the bridge into the Mecha Bull room. Head through the gate in the south/west corner for a level change to The Cursed Land (South Pathway).
LEVEL 9 – The Cursed Land (South Pathway)
Route back to The Canal (9.4)
Continue south across the bridge and take a running jump with grab south to the bridge ahead. Turn right and take a running jump to the ledge between the columns and jump right to the bridge below. Continue west, then north around the perimeter and west again until you reach the far west edge with the waterfall. Take a running jump to the lower floor and climb the blocks up the south wall to the top of the slopes with running water. Head east then take a running jump to the block. Turn around, sideflip left then jump and grab the edge of the column ahead. Pull up and take a running jump with grab to the column to the right of the ladder. Take a running jump with grab to the block south. Take a curved running jump south/east (TIP: Or try the two step running jump = SHIFT + UP ARROW let go of SHIFT then ALT) and continue to the top. Head forward and climb into the crawlspace in the middle of the south wall. Safety crawl out backwards for a level change to The Canal.
LEVEL 4 - The Canal
Down in the Basement with Water
Head south/west then south and climb the ladder on the column behind the gargoyle statue. Near the top backflip with a twist to land on the ledge.
Route to 2nd Jumpswitch in The Canal and Upper way back to Heart of the Maze (4.6)
Climb one of the ladders north and pickup four SHOTGUN AMMO. Take a running jump to the slope on the left and shimmy left around the corner. Let go and grab the 2nd jumpswitch and drop to The Canal maze ground level and watch a cutscene of a raised block in the dark maze ahead.
Safe Tile to shoot the Monsters: From below after using the jumpswitch, head north then right (east) then left at the floating plaque then forward and left into the alcove with the opening to the Bronze hands (4.3) receptacle which is safe to shoot the monsters from. Lure as many BLUE AHMETS as you can to this spot to save on health and ammo.
From the door below the 2nd jumpswitch, enter the dark maze east turn left then right then left then right. Climb the raising block, grab the slope east, pull up and backflip to the upper ledge. Pickup the SMALL MEDIPACK, head to the east to see a platform and opening in the wall. Take one hop back from the edge, then a standing jump to grab the slope to the left of the platform. Shimmy right as far as possible, pull up, slide as far as possible then jump with a curve right to grab the ledge and pull up into the opening back to The upper way back to the Heart (4.6).
LEVEL 2 – The Heart of the Maze (4.6)
Turn left (north) then right (east) and head along the ledge. Angle to face north/east and take a running jump to the ledge ahead. Climb the blocks on the left and take a running jump west to the top of the dome. Head forward and slide down the dome to a lower ledge. Pickup the 4th SILVER BALL (2.7) on the pedestal. From the south edge of the dome floor, take a running jump south/east to the staircase below. Continue south up the stairs then down to another dome. Read the message about the maze guardians. Head to the east edge and take a running jump to an entranceway. Continue east to another dome. Head south through the large opening for a level change to First way From The Heart to The Passage (2.1).
LEVEL 3 – The Passage (2.1)
Place 2 Bronze Balls for Tower Activator #1 (9.1)
From the main entrance, head to the north/west corner room. Place the bronze ball in the bronze hands (3.11) receptacle. Exit east back to the main lobby into the east maze through the middle entrance and hug the right wall to a dead end. Reverse, exit west and hug the right wall again (past the gate in the west wall) down two flights of stairs and up two flights of stairs to a room with a floating plaque about a combination to an upper gate. Turn left (south) at the plaque and climb the ledge on the right (west). Take a standing jump south/west to a column. Take a running jump west with grab west through the gate. Drop down through the opening north and pickup the SHOTGUN AMMO in the north/west corner. Continue north/east up the stairs and pickup the SHOTGUN AMMO. Place the bronze ball in the bronze hands (3.11) receptacle and watch a cutscene of a door opening back in the main lobby. Pickup the SMALL MEDIPACK in the north/east corner and exit back down the stairs. Climb the small block and take a running jump with grab north to the column. Pull up and take a running jump south/east and push the floor lever. Exit via the newly lowered block north/east. Drop down and exit east. Hug the left wall back to the dead end. Reverse, head west and hug the left wall back out to the main lobby. Head west through the newly opened door and pickup the TOWER ACTIVATOR #1 on the pedestal. Exit through the north entrance for a level change back to The Heart of the Maze.
LEVEL 2 - The Heart of the Maze (shortcut)
Head west through an entranceway and take a running jump west to the dome. Head north up two flights of stairs and west into an opening for a level change to First way From The Heart to The Canal (2.2).
LEVEL 4 - The Canal (2.2)
Place 2 Bronze Balls for Tower Activator #2 (9.1)
From the entrance, turn right (north) past the golden door on the left and head through the two columns. Head past the first 2 corridors and enter the 3rd corridor on the right. Turn right and place the bronze ball in the Bronze hands (4.3) receptacle. Exit left and head south back to the golden door. Turn right between the plaque and the golden door to the end of the wall. Turn left to the end of the wall and place the bronze ball in the Bronze hands (4.3) receptacle on the left. Watch a cutscene of the golden door opening. Exit right, hit the wall, head right back to the golden door and plaque. Enter the door and pickup the TOWER ACTIVATOR #2 on the pedestal. Exit, head south and pickup 4 SHOTGUN AMMO in the dark maze. Head out of the maze east to the east wall entrance for a level change back to The Heart of the Maze.
LEVEL 2 - The Heart of the Maze
Place 2 Bronze Balls for Tower Activator#3 (9.1)
Head north down the staircase around to the dome and take a standing jump to the staircase below then down into the West Corridor. Head east to the end then left and place a bronze ball into the bronze hands (2.9) receptacle. Exit west down to the end of the West Corridor, climb two ledges west and head to the small slope in the north/west corner. TIP: From the corner facing the west wall, take three steps sideways left, two steps back then sideflip right to the slope, jump and grab the ledge ahead. Pull up, head right, climb up to a platform and place the bronze ball into the bronze hands (2.9) receptacle in the wall. Watch a cutscene of a door opening in a wall. Head east and take a running jump to the dome. Drop down east then slide back down to the West Corridor. Head east then turn right just before the small staircase and climb the ledge south. Climb up the stairs left through several domes to a corridor east then up a staircase south and around to the middle of the second staircase. Face north, jump up and grab the ledge above and pull up into another dome. Angle to face north/west and take a running jump to the top of the dome. Take another running jump north to the ledge with the floor lever and a standing jump west to the top of another dome. Angle to face north/west and take a running jump to the ledge and pickup the TOWER ACTIVATOR #3 on the pedestal. Angle to face south/east and take a standing jump to the dome below. Take a running jump west to the dome and south to the staircase. Head west through the dome, up the stairs south then down two flights of stairs. Take a running jump to the east entranceway and south for a level change into The Passage (2.1),
LEVEL 3 – The Passage (2.1)
Passage to the Game Room (3.9)
Enter the first staircase from the main entrance to the east maze. Head south/east and take the middle corridor. Hug the right wall then facing east, take the middle corridor on the slight left. Hug the right wall, pickup the SMALL MEDIPACK, continue south past the 1st and 2nd corridors up the stairs to the 3rd corridor. Head down the stairs and hug the left wall all the way around to reach the opening east to a wide staircase. Head down the staircase to the bottom then north for a level change into the Game Room.
LEVEL 6 – The Game Room
The Central room (6.4)
Head up the ramp and push the floor lever to open the gate for a shortcut back to the Passage for later on. Proceed with caution through the east entrance ahead as there is an EVIL SKULL shooting electric beams. Flesh out the 2 BLUE AHMETS and take them out from the safety of the entrance (they won’t follow). In front of each door is a symbol on the floor indicating which floor levers to push outwards in order to open each respective door.
The Chess room (6.1)
Head to the north/east corner and south/west corner and push the floor lever handles to face outwards (ON) to open the north door. Make sure the other two levers are pointing inwards (OFF). Enter the Chess room which is actually a level change back to The Cursed Land.
SECRET Game Souvenir Item
Head up the small stairs, shoot the King chess piece on the right and pickup the GAME SOUVENIR.
Push the Pawn piece north to “checkmate” next to the other King opening a gate north. Enter the door and pickup GAME TOKEN #1 from the pedestal. Exit the room south for a level change back to the Game Room.
The Room with turn switches (6.2)
Head to the south/east corner and south/west corner and push the floor lever handles to face outwards (ON) to open the south door. Make sure the other two levers are pointing inwards (OFF) and enter the Turn Switch room in the south wall. Flesh out the 4 BLUE AHMETS, exit the room and shoot them from the safety of the main entrance west (they won’t follow). The MAZE GUARDIAN won’t shoot if you keep a distance and can be taken out eventually with pistols and patience. Turn the switches according to the following wall positions and push the floor levers in the following order in the maze below (exit via main entrance west then south and east). Flesh out any BLUE AHMETS that appear in the maze from the safety of the maze entrance (they won’t follow).
Turnstile Wall Positions to Floor Levers (N=North, S=South, E=East, W=West, M=Middle):
NORTH/WEST Floor Lever #1 = NW turnswitch(wall points east/west) ~ NM turnswitch(wall points north/south) ~ NE turnswitch(wall points east/west) ~ EM turnswitch(wall points north/south) ~ SE turnswitch(wall points north/south) ~ SM turnswitch(wall points east/west) ~ SW turnswitch (wall points north/south) ~ WM turnswitch(wall points east/west). Exit via main entrance west then south down the ramp and east to the lower maze. Push Floor Lever #1 and return to upper room.
SOUTH/WEST Floor Lever #2 = NW(east/west) ~ NM(east/west) ~ NE(east/west) ~ EM(east/west) ~ SE(north/south) ~ SM(north/south) ~ SW(east/west) ~ WM(north/south). Exit via main entrance west then south down the ramp and east to the lower maze.
Push Floor Lever #2 and return to upper room.
SOUTH/EAST Floor Lever #3 = NW(east/west) ~ NM(east/west) ~ NE(east/west) ~ EM(north/south) ~ SE(north/south) ~ SM(east/west) ~ SW(east/west) ~ WM(east/west). Exit via main entrance west then south down the ramp and east to the lower maze.
Push Floor Lever #3 and return to upper room.
NORTH/EAST Floor Lever #4 = NW(east/west) ~ NM(east/west) ~ NE(north/south) ~ EM(east/west) ~ SE(north/south) ~ SM(north/south) ~ SW(east/west) ~ WM(north/south). Exit via main entrance west then south down the ramp and east to the lower maze.
Push Floor Lever #4.
Once all 4 levers are pushed, watch a cutscene of the doors opening in the upper room. Head back upstairs and pickup GAME TOKEN #2 on the pedestal (careful to avoid the slopes with the windows as these are irreversible stuck points and will have to reload to previous savegame if you slide down either of them).
Game Token Receptacle Room and Upper Floor (6.3)
Head to the south/west corner and north/west corner and push the floor lever handles outward (ON) to open the east door. Make sure the other two levers are pointing inwards (OFF) and enter the Game Token receptacle room east. Place the two tokens to raise a block in the room. Climb the blocks to the top. Drop down quickly to the ledge where the EVIL SKULL is shooting and take running jumps south/west to the south wall. Pickup the SHOTGUN AMMO. Angle to face north/west and take running jumps across the ledges. Pickup the SHOTGUN AMMO in the far ledge and reverse roll back to the west ledge. Take a standing jump south/west, open the trap door and drop down to the main floor. Push all 4 floor levers so that all handles point outwards (ON). Climb back up the ladder in the south/west corner, take a running jump to the first ledge and enter the newly opened door in the west wall.
Climb the stairs and pickup the BROKEN FRAME from the pedestal. There are spikes below the other items to prevent pickup. Drop to the lower floor and pickup the 2 SHOTGUN AMMO and a SMALL MEDIPACK around the room. Under the north bridge is a small pushable column. Push the column east, then north, then east three times. Climb the column, pull up onto the slope north and backflip to the ledge behind. Angle to face north/west, take a running jump to the slope and backflip to land on the ledge behind. Take a running jump with grab west to the column. Angle to face south/west and take a standing jump to the column. Take a running jump with grab south to the next column and a running jump south/east to the next column. Take a running jump with grab to the next column east and a standing jump north/east to the column below. Take a running jump with grab north to the ladder and pull up. Pull up into the crawlspace east but careful as crawling forward will be in range of the EVIL SKULL electric beams. Crawl forward 5 times then turn around. Quickly crawl backwards, hang on the edge then quickly shimmy right around the corner and pull up into the north crawlspace in safety. Crawl east (careful not to crawl too close under the block as this can be an irreversible stuck point) then hang on the edge, shimmy right around the corner and pull up into the east crawlspace. Head forward and pickup the EMERALD STONE WITH BROKEN FRAME from the pedestal. Combine Broken Frame + Emerald Stone with Broken Frame = EMERALD STONE. Return to the west crawlspace, reverse and hang on the edge. Shimmy left around the corner and pull up north. Crawl west, face north and wait for the Skull to shoot a beam then quickly hang, shimmy left and pull up west. Quickly crawl forward and safety drop down. Climb down the ladder back into the room. Exit east, head right (south/west) and quickly safety drop through the trap door. Push the floor handles inward (OFF) and exit west. Exit south down the ramp to the staircase for a level change back to The Passage.
LEVEL 3 – The Passage
Route to The second Passage to the Canal (3.4)
Head up the narrow staircase north, hug the left wall all the way around to reach the opening of the second passage to The Canal. Take a running jump with grab to the platform and another running jump with grab to the other side. Continue down the corridor for a level change to The Canal (3.4).
LEVEL 4 - The Canal (3.4)
Floor Lever #1 Basement Gate
Continue down the corridor, climb down the ladder and push the floor lever. Watch a cutscene of a gate opening in the water basement of the Canal. Climb back up the ladder, return through the corridor for a level change back to the Passage.
LEVEL 3 – The Passage
Route to The First Passage to the Canal (3.3)
From the Main North entrance, enter the second staircase into the maze and hug the right wall until you hit a dead end. Climb the block on the left, head up through the corridor to reach the opening to the first passage to The Canal. Take a standing jump to the platform, a running jump with grab to the next platform and a final running jump with grab to the ledge for a level change to The Canal (3.3).
LEVEL 4 - The Canal (3.3)
Floor Lever #2 Basement Gate
Continue down the corridor, climb down the ladder and push the floor lever. Watch a cutscene of a gate opening in the water basement of the Canal. Climb back up the ladder, return through the corridor for a level change back to the Passage.
LEVEL 3 – The Passage
Route to The third Passage To the Canal (3.5)
Safety drop down into the main lobby. From the Main North Entrance, head to the first entrance to the labyrinth on the left (east) down the small staircase. Angle south/east where there are three corridors. Take the middle corridor east. At the end are three corridors. Take the middle corridor east. Turn right (south) then past the first corridor, take the second corridor on the right (west) up a long flight of stairs to the opening. Take a running jump and grab the platform and another running jump to grab the ledge into The third Passage To the Canal (3.5).
LEVEL 4 - The Canal (3.5)
Follow the corridor that leads to two ladders on one side (north) and one long ladder down on the other (south). Take a running jump south and grab the ladder. Climb down to the bottom.
Down in the Basement with Water (for access to The Room of Equality)
Head south towards the flame in the middle of the room, climb the window sill and shoot the BLUE AHMETS. Pickup 3 SHOTGUN AMMO to the end of the water corridor south. Enter the open gate on the left (north). Climb into the window sill and shoot the three BLUE AHMETS from the safety of the window sill. Drop down and pull the floor lever then exit the room. Enter the newly opened gate ahead where another BLUE AHMET attacks. Reverse roll and head back to the safety of the window sill to shoot it. Return to the newly opened gate south. Pickup the SHOTGUN AMMO on the left and a SMALL MEDIPACK further on the left. Head west and pickup the TORCH on the pedestal. Exit through the gate north, head left (west) then right (north) and light the torch on the flame by hopping back twice from the corner then jump to a corner so not to catch on fire. Head east and light 3 wall torches and pickup 3 SHOTGUN AMMO. Head west and light another 3 wall torches. Head south and light another 3 wall torches. Head east and light another wall torch. Head north and light another wall torch with 4 silver hand receptacles. Continue west then right (north) and pull the jumpswitch on the west wall. Head east then south back to the hand receptacles and place 2 silver balls. Enter the gate and shoot the BLUE AHMET. Light the wall torch inside and exit. Place the next 2 silver balls and if possible try not to disturb the MECHA BULL who’s only purpose is to cause unnecessary havoc. Light the wall torch and exit. Head south/east with the torch where there is another open gate. Enter and shoot the BLUE AHMET. Push the floor lever to open a gate in the north wall. Enter the north gate and shoot the BLUE AHMET. Light the wall torch, pickup the REVOLVER AMMO and exit. Head south/west to the far south wall and enter another open gate. Shoot the BLUE AHMET and light the wall torch. Watch a cutscene of a door opening for another level change. DO NOT push the floor lever as it only ignites a flame blocking the main ladder upwards. Exit the room and now that all the enemies are extinguished, head around the entire perimeter to pickup the rest of the SHOTGUN AMMO and SMALL MEDIPACKS in peace. Pickup the lit TORCH and head into the Room of Equality through the entrance in the north/west wall.
LEVEL 7 – The Room of Equality
SECRET Scale Souvenir Item
Fill the large waterskin and use on the scale in the middle to raise the gate. Pickup the torch, head east and light the wall torch inside the gate. Reverse roll, exit the room and shoot the BLUE AHMET from the safety of the ledge. (N.B. DO NOT shoot the Ahmet from inside the gate or you will be irreversibly stuck for eternity with the monster.) Light the wall torch in the west gate and exit. Drop the torch, drop into the open trap door in the middle, swim down, pickup the SCALE SOUVENIR. Swim up and exit back to the ground floor.
Before the Cursed stone (7.1)
Fill the large waterskin with water and combine with the small waterskin. Pour 3 litres from the small waterskin into the scale on the floor to raise two blocks. Combine the large waterskin with the small waterskin and fill the large back up with water. Combine the large with the small to have 4 litres (large) and 3 litres (small). Climb the east block and ledge and use the 4 litres (large) on the scale to raise the large red block. Pickup the SHOTGUN AMMO and return to ground floor. Fill the large waterskin with water and empty the small. Combine the large with the small, refill the large and empty the small. Combine the large with the small to have 4 litres (large) and 3 litres (small). Empty the small, combine large with small to have 1 litre (large) and 3 litres (small). Climb the west block and ledge. Use the 1 litre (large waterskin) on the scale to raise the small block in the middle of the room. DO NOT pickup the RUBY STONE from the pedestal as you will lose all weapons. Safety drop down to ground floor, pickup the lit torch and head through the south entrance for a level change back to The Canal.
LEVEL 4 - The Canal
Basement with water
Head east, toss the torch in the water to extinguish, climb the ladder and backflip with twist to the ledge. Exit right (east) and follow the corridor for a level change back to The Passage (2.1)
LEVEL 3 – The Passage
Safety drop to the main lobby and exit north for a level change back to The Heart of the Maze (2.1)
LEVEL 2 – The Heart of the Maze (2.1)
Route to the Framework (2.5)
Turn left (west) and take a running jump to the dome ahead. Turn right (north) and head up two flights of stairs then down one flight of stairs. Turn right (east) down another small flight of stairs to a dome. Continue east and take a running jump to another flight of stairs. Go up the stairs north then east to another dome. Continue east through a small corridor then right (south) down another small set of stairs. Turn left (east) through a small opening then right (south) up three flights of stairs to the dome platform to The Passage (2.3) for later. Continue south past the entrance up three flights of stairs to a platform with a floating plaque (re: powerful magic). Head west, angle south/west and take a running jump to the ledge between two columns. Angle to face north/west and take a running jump then jump off the dome with a slight curve right to the ledge. Take a standing jump east up the ramp, a running jump east to the top of the dome. Turn left and take a running jump to the alcove north. Angle to face north/east and take a running jump to the platform. Take a standing jump north/west to the platform ahead. Take a running jump north/east to the next platform ahead and another running jump north/east to the dome. Climb east to the dome floor. Take a running jump to the platform with a turnwheel to open a door to The Framework (2.5). Pull the turnwheel 5 times and enter through the door for a level change to The Framework.
LEVEL 5 – The Framework
Turn left down the corridor back to the Room of Death (5.1). If the ceiling is VII, then follow the blue X tiles (see screenshot above in the walkthrough). If the ceiling is X then follow the brown tiles. Objective is to reach the exit in the north/east corner (top right on the map) back to the Framework Puzzle.
Route back to the Entrance to The Bottom of the Maze
Starting from the Room of Death (5.1) pull the wheel and head up the stairs.
FACING NORTH: Leads to two wheels facing east/west.
FACING EAST: Leads to one wheel north and a dark corridor north.
FACING NORTH: Leads to two wheels facing east/west (doors skewed left).
FACING EAST: Leads to two wheels facing east/west
FACING EAST: Leads to one wheel reverse roll east to red key receptacles room.
Head to the Balcony, take a standing jump to the pushable pillar and safety drop to the ground level.
THERE is NOW a MAZE GUARDIAN and BLUE AHMET at the entrance heading between the two levels freely. Shoot them both from the safety of the stairs and head through the entrance to the Bottom of the Maze.
LEVEL 8 – The Bottom of the Maze
Head down the SOUTH trap door ladder and slide to the bottom. Head right (east) then south through the open gate for a level change to The Cursed Land.
LEVEL 9 – The Cursed Land (South Pathway)
Route to the Chess Pawn Room
Continue south across the bridge and take a running jump with grab south to the bridge ahead. Turn left and head east to the end of the bridge. Angle to face south/east and take a standing jump to the ledge. Take another standing jump south/east to the small ledge south. Take a running jump south (swan dive if you like) into the water. Reverse roll and swim to the north/west corner, pull up and climb the ladder to the top. Head around the perimeter of the floor and pickup a SMALL MEDIPACK and SHOTGUN AMMO. At the end, drop down and pickup another SHOTGUN AMMO. Drop into the water, swim around the perimeter, pull up onto the ledge and pickup the SHOTGUN AMMO. Turn left (north) and open the door into the Chess Pawn Room.
Chess Pawn Room Puzzle
Climb the stairs and climb the first block ahead. Reverse roll, take a running jump and grab the ledge. Pull up and push the floor lever west, then take a running jump with grab back to the block north. Drop down, climb the block underneath the pawn piece and push the pushable column forward. Head left and push the next pushable forward. Reverse and head to the other side and push the third block forward. Exit south back out to the main floor. Head south/east and pull the pushable once onto the III tile. Reverse roll south/west and pull the pushable once onto the II tile. Head to the middle, climb the block under the pawn, pull the pushable out once and exit south. Head to the south/west corner then north back into the corridor. Pull the pushable as far as possible then exit south and climb the block under the pawn piece. Push the pushable once, reverse roll, exit south out to the south/west corner then north back into the corridor. Push the pushable onto the VI trigger tile, reverse roll and exit back outside. Climb the pushable then climb the blocks north to the highest one. Face south and take a running jump with grab to the high ledge (south/west corner) floor lever. Head east and take a running jump with grab to the other high ledge (south/east corner) floor lever. Push the floor lever west then safety drop down to the middle ledge and push the floor lever east. Take a running jump with grab north, safety drop down, face east and push the pushable off the III tile. Reverse roll, head west and push the pushable off the II tile. Reverse roll, head forward, pull up north and pull/push the pawn piece south onto the III column. Take a running jump with grab west and climb the highest block. Face south and take a running jump with grab to the high ledge (south/west corner) floor lever. Push the floor lever west then safety drop down to the middle ledge and push the floor lever west. Face north and take a running jump with grab to the platform to the right of the pawn piece. Push the pawn piece west to the end to the VIII trigger tile raising a VIII block north. Pull the pawn piece back to the III column. Safety drop down, head south/west and pull the pushable onto the II tile. Jump onto and over the pushable and enter the corridor on the right. Pull the pushable out once, reverse roll and exit the corridor. Jump over the pushable, head north and enter the corridor through the middle entrance. Pull the pushable to the entrance and exit south back to the south/west corridor entrance. Head north into the corridor, around the corner and push the pushable once. Reverse roll, exit the corridor and head back to the middle entrance of the corridor. Push the pushable north into the small middle alcove. Reverse roll and exit the corridor. Head to the south/west corner and push the pushable off the II tile. Climb north and take a running jump with grab to the middle ledge floor lever. Push the floor lever east and return to the platform with the pawn piece. Push the pawn piece east onto the I trigger tile. Reverse roll, face north and take a standing jump to the ledge. Climb the block and pull the pushable onto the X (marks the spot) tile. Return to the platform with the pawn piece and safety drop down to the south/east corner. Pull the pushable onto the III tile. Climb up to the platform with the pawn piece, take a running jump to the north ledge then reverse and take a running jump with grab south to the III block. Take a running jump and grab the ladder south then climb into the newly opened door above.
Multi-Chess Piece Room
Head left through the 1st door, 2nd door and 3rd door then just before the 4th door, pickup the SHOTGUN AMMO on the right. Continue through the 4th door, 5th door and 6th door. When the 7th door opens, reverse roll and climb the newly exposed ladder ahead. Enter the room, pickup the SHOTGUN AMMO in the north/west corner. Push the floor lever in the south wall and watch a cutscene of the area and above. Climb the block facing north in the north/west corner and safety drop down two slopes to the bridge below (some health loss). Take a running jump with grab north to the bridge and head left.
Route back to The Canal (9.4)
Turn right and take a running jump to the ledge between the columns and jump right to the bridge below. Continue west, then north around the perimeter and west again until you reach the far west edge with the waterfall. Take a running jump to the lower floor and climb the blocks up the south wall to the top of the slopes with running water. Head east then take a running jump to the block. Turn around, sideflip left then jump and grab the edge of the column ahead. Pull up and take a running jump with grab to the column to the right of the ladder. Take a running jump with grab to the block south. Take a running jump south/east (TIP: Try the two step running jump SHIFT + UP ARROW let go of SHIFT then ALT) and continue to the top. Head forward and climb into the crawlspace in the middle of the south wall. Safety crawl out backwards for a level change to The Canal.
LEVEL 4 - The Canal
Down in the Basement with Water
Head south/west then south and climb the ladder on the column behind the gargoyle statue. Near the top backflip with a twist to land on the ledge. Head east through the corridor for a level change back to The Passage.
LEVEL 3 – The Passage (2.1)
Passage to the Game Room (3.9)
Safety drop to the main lobby. Enter the first staircase from the main entrance to the east maze. Head south/east and take the middle corridor. Hug the right wall then facing east, take the middle corridor on the slight left. Hug the right wall continue south past the 1st and 2nd corridors up the stairs to the 3rd corridor. Head down the stairs and hug the left wall all the way around to reach the opening east to a wide staircase. Head down the staircase to the bottom then north for a level change into the Game Room.
LEVEL 6 – The Game Room
The Chess room (6.1)
Head to the north/east corner and south/west corner and push the floor lever handles to face outwards (ON) to open the north door. Make sure the other two levers are pointing inwards (OFF). Enter the Chess room which is actually a level change back to The Cursed Land. Move the Pawn piece in the other room down the corridor to the Bishop to open the gate to the floor lever. (N.B. If the gate did not open, head to the black “trigger” tile at the base of the east corridor and the gate should now open.) Push the floor lever and watch a cutscene revealing the Tower Activator Receptacle in the floor below.
Placing the 1st Tower Activator
Take a running jump to the small ledge south and safety drop down to the lower floor (some health loss). Place the Tower Activator in the receptacle and watch a spectacular cutscene. Climb the block facing north in the north/west corner and safety drop down two slopes to the bridge below (some health loss). Take a running jump with grab north to the bridge and another running jump with grab north to the floor. Head through the corridor for a level change back to The Bottom of the Maze (shortcut).
LEVEL 8 – The Bottom of the Maze
Head forward through the gate for a level change back to The Cursed Land (West Pathway)
LEVEL 9 – The Cursed Land (West Pathway)
Placing the 2nd Tower Activator
Head south then west then north into a small room. Climb the ladder to the top. Reverse and take a running jump with grab south (to change trajectory) across the gap and through the opened gates. Climb the ladder ahead and backflip to the ledge. Place the Tower Activator in the receptacle and watch a spectacular event. Climb down both ladders and exit the room back outside. Head west to the large staircase to the floor levers area. Before leaving this area, the floor levers need to be repositioned in order to lower blocks to access the 3rd tower receptacle later on. Therefore head to the floor levers and make sure the north/east and north/west and south/west handles are pointing outward and the other one inward. (ON=handle out towards the perimeter) (OFF=handle in towards the middle) to make sure the blocks are lowered and raised properly in the Push Puzzle Room for later on. (NE NW SW)
Swan Dive to Lower Level Turnstiles
Head up the large staircase, turn left (south) at the floating plaque, up a small staircase left (south) and take a spectacular swan dive south (with rolls if you like) into the water below. Swim WEST then south towards the waterfall. Pull up and pickup the SHOTGUN AMMO. Head to the middle and pickup another STONE behind the flaming Gargoyle Statue. Head to the west wall and open the door to a new room.
Placing the 3rd Tower Activator - Push Puzzle Room - Tower solutions (9.5)
Head to the north/west corner and pull/push the small pushable column east. Jump up and pull/push the largest pushable column around the corner to the tile in front of the entrance. Pull the larger pushable column in the south/east corner three times. Drop to the lower floor and pull the small column to the trigger tile in the middle of the room to open the trap door above. Climb the two pushables and set up for a tricky jump. Angle to face north/east so that Lara slightly grazes (but doesn’t bump into) the ceiling block during the running jump to the large pushable. (TIP: For the tricky jump once you get the right angle for take off, take the running jump then a sharp curve left in the air but wait as long as possible before pressing grab (CTRL) so Lara curves as much as possible. Almost waiting for Lara to bump into the ledge before grabbing seems to do the trick somehow.) Take a running jump and climb the small ladder to the upper ledge. Climb the raised blocks to the very top, climb the ladder and place the Tower Activator in the receptacle. Watch another sensational cutscene and exit the room via the ladder, raised blocks and safety drop onto the lower floor. Exit the room through the east door, continue forward then head south and drop into the hole with the small waterfall. Pickup the SMALL MEDIPACK and two SHOTGUN AMMO. Swim north then east and pull up at the east entrance to the underwater maze.
Route back to the Upper Level - The way up (9.2)
Facing east look up and notice a flat block on the left and the sloped block on the right. Head to the sloped block, turn left, backflip to the slope, jump off and grab the flat block. Pull up, reverse roll to face south and take a running jump to the broken column. Jump off and grab the edge of the flat block. Pull up, sidestep to the left, angle to face south/west and take a standing jump and grab the block. Pull up and take a running jump west and grab the column edge. Pull up, angle north/west and take a running jump to the pillar. Face north and make sure you have at least 25% health then take a running jump down to land on the lower floor. Climb the two ledges north, angle to face south/west and take a running jump and grab the pole. Shimmy to face north, pull up 4 times and backflip to the block behind. Turn around, jump up and grab the slope, pull up, jump with a twist to grab the ledge. Pull up, hug the left wall back to the bottom of the large staircase. Push floor levers north/east and south/west outwards (make sure the north/west and south/east handles are pointing inward). (ON=handle out towards the perimeter) (OFF=handle in towards the middle) to open a door to a turnstile and wishing altar in the lower level for later. Climb the large staircase to the top and through the entrance for a level change to The Temple (10.1).
LEVEL 10 – The Temple
Lower Floor
Pickup the 2 SHOTGUN AMMO to the left and right of the staircase. Head down the staircase and watch a cutscene of the area. Pickup a SMALL MEDIPACK in the north/east corner and SHOTGUN AMMO in the south/east corner. Safety slide down one of the slopes (left or right) down to the lower floor. Pickup the 2 SHOTGUN AMMO along the north wall. Head to the south wall, take a running jump to the south/west ledge and pickup the SHOTGUN AMMO. Take a running jump west along the ledge and a running jump north/west to the column in the cavern. Take another running jump north/west to the next column and a running jump to the column west. Take a running jump north to the dome and pickup THE CURSED STONE from the pedestal. Take a running jump south/east to the column and a standing jump south/east to the next column and a final running jump south/east to the V-shaped block in the south ledge. Walk carefully east along the ledge then take a standing jump towards the large pillar east. Head to the floor between two raised blocks and climb up. Take out the 2 BLUE AHMETS and the SHIVA from the safety of the block. Facing north, take a running jump north and grab the pole on the broken column. Climb up 8 times then backflip to the ledge.
Upper Floor
Take a running jump to the floor with the TEMPLAR, reverse roll with a running jump back to the ledge and take out the BLUE AHMET from the safety of the ledge. Jump back to the floor and pickup the SHOTGUN AMMO in the west wall. Head down the stairs, climb the east ledge and pickup the SMALL MEDIPACK in the south/east corner. Head west behind the staircase to find another staircase but do not climb the stairs. Head up the left ramp to the top where a sloped block falls. Take a running jump north/west to the sloped block then slide, jump and grab the column ahead. Head forward to see more blocks fall from the ceiling. Take a running jump to the 1st slope then jump off the others then grab the ledge west. Push the floor lever #1 and watch a cutscene of the trap door back in the main floor. While on the platform, take out the 3 BLUE AHMETS in the floor below. Safety drop to the ground floor, head east, climb up and pickup the SHOTGUN AMMO. Quickly head east to the large staircase west and take out the BLUE AHMET from the safety of the stairs. Head west up the stairs back to the upper floor with the Templar. Head south/east and pickup the SMALL MEDIPACK then return to the ledge south/west. Take a standing jump and grab the pole on the broken column and slide down to the ground floor. Climb back up between the two raised blocks and take out 2 more BLUE AHMETS from the safety of the blocks. Facing south, take a running jump to grab the sloped block. Pull up, slide, jump and grab the south ledge. Pull up and climb the south wall to the upper floor. Pickup the SHOTGUN AMMO in the north/east corner and head into the corridor south. Quickly take a standing jump onto the east ledge and take out the BLUE AHMET from the safety of the ledge. Head west and take a running jump to the column on the left. Take a running jump to the column north/west. Take a running jump to the sloped block on the right, slide, jump and grab the west ledge. Pull up and take a running jump to the ledge west. Run through the entrance to avoid a large falling column that blocks the entranceway (don’t reverse roll or be irreversibly stuck) and take a running jump to the ledge ahead. Push the floor lever #2 and watch a cutscene of the trap door back in the main floor. Take a running jump to the north/east ledge and head east. Take running jumps east across several ledges. Pickup the SHOTGUN AMMO on the middle ledge and a LARGE MEDIPACK on the last ledge. Return to the 1st ledge and face the dome north. Take a running jump with grab to land on the platform under the dome (some health loss). Take a running jump south/east to the column and a standing jump south/east to the next column and a final running jump south/east to the V-shaped block in the south ledge. Walk carefully east along the ledge then take a standing jump towards the large pillar east. Head back to the main floor.
SECRET Cross Souvenir Item: Head towards the east wall and pickup the CROSS SOUVENIR on the marked tile (it materializes as you approach). N.B.: You can only get this item during this one chance. If you exit the level, you cannot come back as it gets blocked by a raised block with no way back inside.
Drop through the trap door near the south wall into a pool of water. Pull up and pickup the GOLDEN BALL (10.1) on the pedestal. Drop back into the water, swim south past the gargoyles and follow the left wall close to the ceiling to the opening outside for a level change back to the Cursed Land.
LEVEL 9 – The Cursed Land (The Final Battle)
Surface for air, swim south then left (east) between two underwater columns then left (north) and surface for air at a waterfall. A note comes up saying weapons are gone. Swim north, then east and pull up onto the east ledge above the east underwater maze entrance. N.B. At this point, you should have pushed the floor levers in the upper level north/east and south/west outwards (make sure the north/west and south/east handles are pointing inward) (ON=handle out towards the perimeter) (OFF=handle in towards the middle) to open a door to a turnstile and wishing altar. If not, then you will have to go back to the upper level via Route back to the Upper Level - The way up (9.2), push the levers and come back. From the east ledge above the east underwater maze entrance, head to the south/east corner, turn right and enter the room with the turnstile. Pickup the SHOTGUN on the “wishing altar” pedestal. Arm the shotgun, head up the stairs at the entrance and take out the BLUE AHMETS. Exit the room to take out the MAZE GUARDIANS. (TIP: Wait in the room, then exit, take 3 shots at close range then run back into the room. Repeat until all are toppled.) Exit the room, head west past the broken column to the broken wood and look up to see another MAZE GUARDIAN. Arm the shotgun and take him out from below. Head back to the east ledge above the east underwater maze entrance.
Route back to the Upper Level - The way up (9.2)
Facing east look up and notice a flat block on the left and the sloped block on the right. Head to the sloped block, turn left, backflip to the slope, jump off and grab the flat block. Pull up, reverse roll to face south and take a running jump to the broken column. Jump off and grab the edge of the flat block. Pull up, sidestep to the left, angle to face south/west and take a standing jump and grab the block. Pull up and take a running jump west and grab the column edge. Pull up, angle north/west and take a running jump to the pillar. Face north and make sure you have at least 25% health then take a running jump down to land on the lower floor. Climb the two ledges north, angle to face south/west and take a running jump and grab the pole. Shimmy to face north, pull up 4 times and backflip to the block behind. Turn around, jump up and grab the slope, pull up, jump with a twist to grab the ledge. Pull up, hug the left wall back to the bottom of the large staircase. From the bottom of the large staircase, head to the north/east corner through the dark corridor for a level change back to the Bottom of the Maze.
LEVEL 8 – The Bottom of the Maze (The Final Battle)
Head east to trigger 3 BLUE AHMETS then reverse roll, climb the south/west ledge and take them out in safety. Pickup the 2 SHOTGUN AMMO and SMALL MEDIPACK they leave behind. Head further east towards the south gate, reverse roll and climb the south/west ledge to take another 2 BLUE AHMETS and the MAZE GUARDIAN. Head east then south through the gate and across the bridge into the Mecha Bull room triggering another MAZE GUARDIAN. Reverse roll, head back across the bridge and back to the south/west ledge. Climb and wait for him to get close then even one shot at close range should do it. Head east then south through the gate and across the bridge into the Mecha Bull room. Head through the gate in the south/west corner (the block lowers as you approach) for a level change to The Cursed Land (South Pathway).
LEVEL 9 – The Cursed Land (South Pathway)
Route back to The Canal (9.4)
Continue south across the bridge and take a running jump with grab south to the bridge ahead. Turn right and take a running jump to the ledge between the columns and jump right to the bridge below.
Side Route for the SECRET Revolver
Head left (south) to the south wall and run over the floor tiles with pictures of Chess pieces, Weigh scale, Cogwheel and Cross. Push the floor levers in the openings and enter the new corridor in the south wall. Pickup the REVOLVER on the pedestal and exit.
Continue north around the perimeter and west again until you reach the far west edge with the waterfall. Take a running jump to the lower floor and climb the blocks up the south wall to the top of the slopes with running water. Head east then take a running jump to the block. Turn around, sideflip left then jump and grab the edge of the column ahead. Pull up and take a running jump with grab to the column to the right of the ladder. Take a running jump with grab to the block south. Take a running jump south/east (TIP: Try the two step running jump SHIFT + UP ARROW let go of SHIFT then ALT) and continue to the top. Head forward and climb into the crawlspace in the middle of the south wall. Safety crawl backwards for a level change to The Canal.
LEVEL 4 - The Canal (The Final Battle)
Down in the Basement with Water
Quickly run west then south, past the gargoyle ladder, towards the central flame until you reach and climb one of the window ledges in the middle and shoot the BLUE AHMETS and the two MAZE GUARDIANS from the safety of the ledge. Head to the north/west wall and enter the doorway for a level change into The Room of Equality (4.5).
LEVEL 7 – The Room of Equality
Shoot the two MAZE GUARDIANS, climb the two raised blocks and pickup the RUBY STONE on the pedestal. Notice weapons are lost, head to the small room in the west wall, pickup PISTOLS on the pedestal. Exit the small room and shoot the BLUE AHMETS. Exit through the south entrance for a level change back to The Canal Basement.
LEVEL 4 - The Canal (The Final Battle)
Down in the Basement with Water
Head south/west to the far south wall and enter the open gate. Quickly reverse, exit left and run through the maze to one of the ledges (or by the 4 hands corridor east is also a safe spot). Take out any remaining BLUE AHMETS and MAZE GUARDIANS that followed then return to the south/west gate. Push the floor lever to extinguish the flame on the ladder. Head north/east to the central flame then north and climb the ladder on the column behind the gargoyle statue. Near the top, backflip with a twist to land on the ledge and quickly climb one of the ladders. Head to the ledge and take out the 4 BLUE AHMETS and MAZE GUARDIAN below. TIP: Hang from the ledge to lure them then pull up and take them out from the safety of the ledge. Take a running jump and grab the slope on the left. Shimmy left as far as possible and safety drop to ground level. Pickup the PISTOLS on the wishing altar behind you if you still don’t have any weapons. TIP: Safe Tile to shoot the Monsters: From below the jumpswitch, head north then right (east) then left at the floating plaque then forward and left into the alcove with the Bronze hand which is safe to shoot the monsters from. WARNING! **DO NOT EXIT VIA EAST ENTRANCE - The Heart to The Canal (2.2) as this raises a block in front of the Cursed Stone receptacle and prevents final completion of the game.**
Path to Golden Ball #3
Head into the black maze to reach the golden raised block in the middle. Climb the block, pull up and backflip to the top. Head to the south/west corner, take a standing jump to the slope and jump to the platform ahead. Head south, slide down the slope and jump and grab the ledge. Pull up, head down the corridor and pickup the GOLDEN BALL #3 from the pedestal. Continue around the room and pickup the SMALL MEDIPACK and two SHOTGUN AMMO (if you like). Safety drop to ground level.
Head into the black maze to reach the golden raised block in the middle. Climb the block, pull up and backflip to the top. Head east to see a platform and opening in the wall. Take one hop back from the edge, then a standing jump to grab the slope to the left of the platform. Shimmy right as far as possible, pull up, slide as far as possible then jump with a curve right to grab the ledge and pull up into the opening back to The upper way back to the Heart (4.6).
LEVEL 2 – The Heart of the Maze
Place the Cursed Stone
Take a running jump north/east to the ledge and another running jump north/east to another ledge. Safety drop east to the dome below. Take a running jump to the platform east and place the Cursed Stone in the receptacle. Safety drop down to the stairs below and backflip to avoid the Templar.
Place the Ruby Stone
Head west then south up the stairs, across the dome floor and into the alcove left triggering a raised block. Head down the stairs south and take out the two BLUE AHMETS to lower the raised block. Head back to the alcove east and place the Ruby Stone in the receptacle blocking the electric beam.
Place the Gem in the Stone
Head north down one flight of stairs. Turn right (east) down another small flight of stairs to a dome. Continue east and take a running jump to another flight of stairs. Go up the stairs north then east to another dome. Continue east through a small corridor then right (south) down another small set of stairs. Turn left (east) through a small opening then right (south) up three flights of stairs to the dome platform which leads to The Passage (2.3) which is blocked. Turn right and place the Gem in the Stone in the receptacle blocking the electric beam.
Place the Emerald Stone
Head south up three flights of stairs to a platform with a floating plaque (re: powerful magic) west. Continue west through the plaque to the corner of the ledge. Angle to face north/west and run off the ledge to a small ledge below (some health loss). Jump up and grab the crack and shimmy right around the corner and drop. Place the Emerald Stone in the receptacle blocking the electric beam.
Place three Golden Balls
Angle to face north/east, sideflip to the slope, grab the edge and safety drop to another slope (some health loss). Slide down to a safe platform. Climb the block on the right (west) and place a Golden Ball in the golden hand receptacle. Watch a cutscene with flames showing locations of invisible platforms for later. Head east to the platform with the wall switch and turn left (north) at the column. Take a running jump north to the slope. Take a standing jump to the block north/east and a running jump north over the rock. Head around the corridor and place another Golden Ball in the golden hand receptacle in the west alcove. Reverse roll and climb the either block on the left or right. Take a standing jump to the ledge east, another standing jump east and a running jump west. Take a running jump to the south ledge between two columns. Take a running jump to the ledge south/east and another running jump to the ledge west. Take a standing jump to the triangle ledge east and a standing jump south/east to the east floor ledge. Head to the south/west corner and west down a dark corridor. Take a running jump to the dome floor with the entrance to the First way From The Heart to The Passage (2.1) on the left. Continue west through the entranceway and take a running jump to the dome floor. Head up the stairs north past the entrance to the Canal and down the stairs north. Turn right (east) down another small flight of stairs to a dome. Continue east through the dome and take a running jump to the staircase below. Head down the stairs and place the 3rd Golden Ball in the golden hand receptacle. Head back up the stairs, take a running jump west to the dome floor and a standing jump south back to the staircase with the Templar.
Route to the Emperor’s Heart - The Ending (10.3)
Take a standing jump south/east to a square platform with a column in the middle. Head to the south/west corner and use the binoculars with light to see the invisible platforms. Take jumps onto the invisible platforms around to the ladder. Climb the ladder, pickup the Emperor’s Heart and watch a cutscene of the level ending.