INTO THE REALM OF ETERNAL DARKNESS
TR1 Levelset by BlackWolfTR
Walkthrough by Treeble
LEVEL 1: CROFT MANOR
After the opening cutscene, in which Lara hears weird noises coming from underneath the manor, we find ourselves in her all too familiar bedroom. Enter the bathroom to collect shotgun shells in the bathroom, then proceed to the other end of the bedroom where you'll spot the PISTOLS and a small medipack opposite the closed door. The door opens when you're properly equipped.
Go around the landing and into the open attic. To the left of the white wooden block, you'll find two crates on a track of sorts: pull back the first one once, then move the second one close to the white wooden block, right beneath a high wall switch. Move the first block back in position, then pull up on top of them and pull back the upper crate twice so you can finally throw that switch, opening a door in the swimming pool.
Back at the landing, proceed further to enter the music room. In the windowsill behind the piano, throw a wall switch to open the fridge down in the kitchen. Before going there, walk past the TV set and up into the library. Lara will look at a block behind the fireplace, you can push it, indeed, but first take the magnum clips near the potted plant in the back. Push the block in the fireplace until you reveal a side passage.
You enter a room with several trapdoors, and a wall switch opens the first one. Inside each of these trapdoors you'll find another switch, which will open the next trapdoor at the same time as locking you inside. The way around? As soon as you throw the switch, immediately jump and grab the edge above you to pull out. As you work your way through all of these in turn, collect shotgun shells in one of the holes and more importantly, the CLOSET KEY in the last one.
Return to the bedroom and unlock the door by the bed. Get magnum clips and shotgun shells, and notice the hourglass on the wall behind the switch: it means this lever is on a timer. It opens a door on the main hall, just beneath the bedroom actually, so throw the switch and quickly run and jump your way to the landing then over the balcony to land on the stairs, quickly running into the open door. Collect the small medipack behind the table and the first COGWHEEL on the low cabinet. Throw the switch twice to open the door back to the main hall.
Now head for the kitchen, through the left archway, and enter the open fridge to claim SECRET #1, a large medipack and shotgun shells. Just as you step out, you'll spot the STORAGE ROOM KEY behind the microwave. On the other side of the kitchen, throw the switch to enter the dining room and get a large medipack from the windowsill there. Throw the next lever to enter the ballroom, where you'll find more shotgun shells on the windowsill as you tread towards the swimming pool.
Dive in and swim through the open passage. Two bats will be alerted as you pull out of water on the other side. Save your game and do a series of quick running jumps over the breakaway floor tiles, minding a swinging axe along the way. Go through the opening in the wall, killing a rat guarding a large medipack, then pull up to the upper ledge and stand on the golden plate to open a door in the music room.
To return, approach the edge and look left to find an opening there, mind a bat before jumping across, retrieve shotgun shells while the door ahead opens and you'll find yourself at the start of the room. Drop into the water and swim back into the house, go upstairs and enter the music room to find a now accessible small storage room in there. Find magnum clips and the second COGWHEEL on top of the crates.
Run around to the other side of the landing and unlock the door there with the storage room key. Take some uzi clips from between the crates and then pull back the one in the back of the room to reveal the third and last COGWHEEL behind it. Now use the switch by the main entrance door in the hall to open it and also proceed to open the entrance gates straight ahead.
As you step into the gardens, go left until you spot a cross-shaped well; get a small medipack before you drop in. Pull out of the water on the other side where an eager rat is probably nibbling at your hands then inspect the room. The golden topped pillars are protected by spikes, and the only way you'll open the door in the back end of the room is standing on all three of them. How, you might ask? Well, jump and grab the edge of the spiked pillars and pull up, through the spikes, without any worries.
When the door in the back opens, hop your way across and go in. Kill two rats, get a small medipack, then place all three cogs into their slots and throw the wall switch to flood the previous chamber. You might want to dispatch another two rats swimming around before jumping in. In this side of the room there's a narrow underwater passage which you can now swim through — ignore the closed door for now and proceed to the end. Save before pulling out.
Notice the swinging axe and try to time it, because when you pull out you'll slide to your doom, so react quickly. Once you clear the gap while hopefully also avoiding the axe, you'll trigger two boulders on the narrow ledge you land on. If you have room to do so, hop back and grab the edge and wait until the boulders settle. Otherwise, run like mad towards the opposite end of the room, jumping over the other boulder coming towards you, until you stand on the slanted floor which will be enough to stop the boulder chasing you. About halfway on this catwalk, find an opening on the opposite wall and stand jump to grab the ledge; as soon as you pull up another boulder will come from within the passage, so immediately hop back and grab the ledge to dodge the boulder.
Kill a rat inside and get the TOMB KEY on the metal plate, then hop backwards immediately to avoid prolonged exposure to the triple dart trap. Exit through the water pit in the corner and you'll find yourself on the other side of the door you've ignored recently, so simply swim back to the entrance of the spiked pillars room and get out of the well the same way you got in.
Follow the pathway in the garden all the way to the other end to find a locked tomb for which you now have the key. Go down and to the back end to find a wall switch behind a pillar, dispatching two bats along the way, then enter the open door nearby. You'll reach a room with flaming pillars, and, as the switch to your immediate left suggests, it's a timed sequence.
The lever only turns off the first two flames, so you need to be quick as you jump across to hop into the alcove in the wall for a pressure plate which turns off the next few handful of flames. The next alcove, on the left hand wall, hides a spike pit, but after that you're just two long jumps away from clearing the run. At the end, step on the golden pressure plate to open the other door in the tomb, kill two swimming rats and swim all the way back, taking some shotgun shells just before the bend.
Down into the caves through the other door, jump to the first pillar and look behind you to spot a locked gate, that's for a secret in a few minute. For now, jump across the flat top pillars in the cave to the end, killing a bat along the way. When you get to the final one, look for two rows of stepped slopes over a gap, Lara isn't as nimble in TR1 but you can keep the jump button pressed as you steer her upwards all the way to the top, but be careful as a rolling boulder will roll down the far set of slopes as soon as you touch it, so grab the edge and wait until it's rolled out of the picture.
At the top, kill two bats and continue climbing the flat topped pillars to an opening in the ceiling. Save your game, as the golden pressure plate ahead of you triggers a different timed run. Two boulders will roll on the side tracks, you must beat them to the open doors in the back otherwise you're done for, so run in a straight line, jumping as often as you possibly can, and you're golden. Quite literally so: take the GOLD BAR and the trapdoor behind you grants you a shortcut to the tomb.
Before leaving, go down to the caves a second time and jump into the now open doorway to find SECRET #2, magnum clips and shotgun shells. Get back out and jump back to the tomb to make your way back through the gardens to the manor. Use the gold bar to open the room to Lara's treasure room. Appreciate the TR1-TR5 collection as Lara spots a gap behind the fireplace. Squeeze through, enduring some damage from the heat, and kill two bats and two rats in this area.
If you look through the gratings on the floor, you'll see a series of gates and underwater levers, each of which are affected in different patterns. For starters, step on the gold pressure plates to open a trapdoor near the entrance so you can drop into the underwater tunnels below.
As you fall in, there's the underwater lever #1 right next to entrance. Pull it to switch the doors near your current location. Swim ahead and take two right turns, whenever possible, and you'll find lever #2. It opens a door just behind you, but it would be wise to return to the entrance to fill your lungs with oxygen first. Then swim back and into that open door, find shotgun shells in an alcove to the right and lever #3 in the back end. Again, swim all the way back for air.
Now pull lever #1 at the entrance again and, as you turn around, you'll spot lever #4 in the back. Pull that, then turn around and swim through the zigzagging side passage to the right until you spot lever #5. After pulling it, quickly work your way backwards to the entrance and, one last time, pull lever #1 to switch the doors at the entrance. Swim towards lever #5 but take a right turn and swim all the way to the end, to the open gate you see in the back, swim left and you'll finally claim your prize, the THISTLE STONE. Swim all the way back to the entrance, pull out and climb to the fireplace, squeezing past the flame again, and get back outside.
Open the hedge maze manor using the thistle stone. Follow the map below to navigate the maze efficiently, the points of interest being a switch to open a trapdoor and SECRET #3, magnum clips and uzi clips, hidden behind a fake foliage wall (there's a marking on the floor next to it) in the far end of the maze. Through the the trapdoor you can reach a secret area of the maze and find the fabled BASEMENT KEY.

Time to head back into the manor and open that basement. Kill the two bats, then use the switch to open that final door. Time to finally unravel what mysteries lie beneath...
[ * * * ]
LEVEL 2: MANOR UNDERGROUND
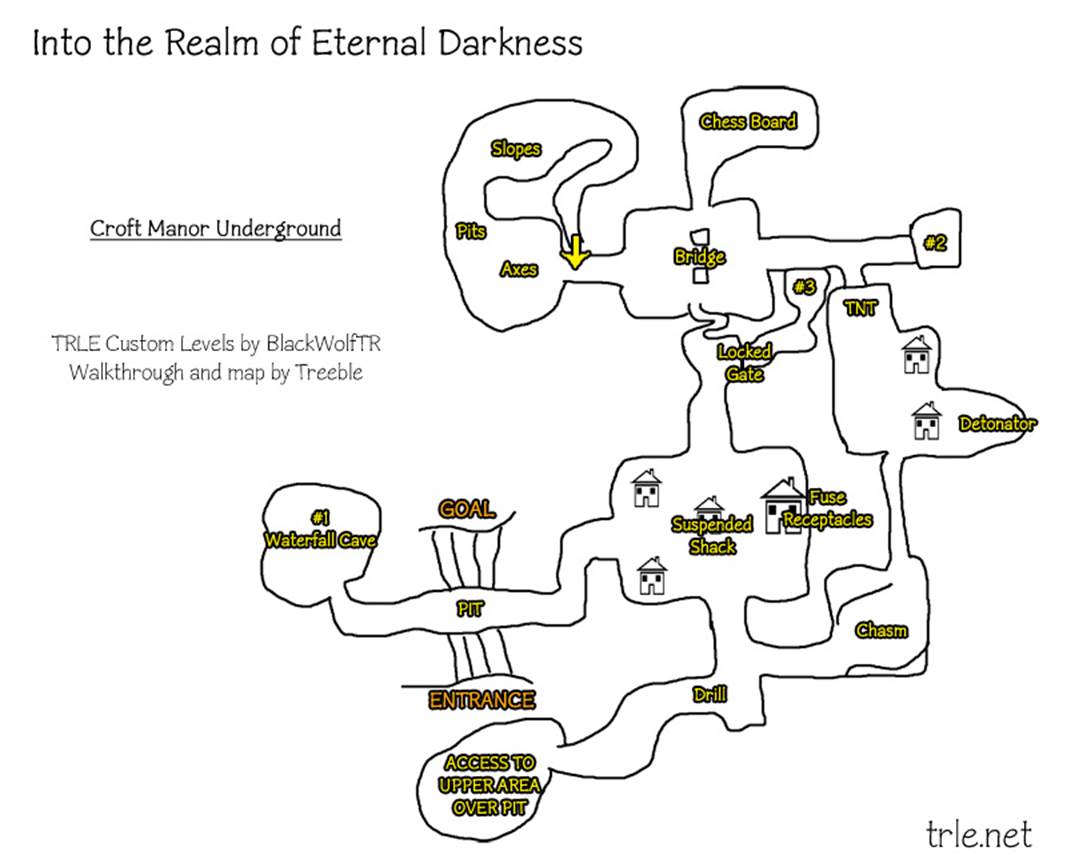
Go down the steps and find a SHOTGUN along some shells, then proceed through the opposite doorway to arrive at a huge cavern area. Your goal is to get across the pit in front of you, but you've got a long way to go as you need to find three fuses and a circuit board to lower a hanging platform.
It might be possible to do things in a different order, I'll guide you through one of such possibilities. This is a rough overview of the entire level map (poorly drawn by hand and not to scale, sorry!).
So slide down to the bottom of the pit, find a small medipack next to a skeleton, and start by going to the left side, killing two bats as you approach the waterfall cave. When you get close to the lake, a crawler will get the drop on you, and there are two rats merrily swimming on the lake.
If you search the perimeter of the room, you'll find shotgun shells next to a locked wooden door and a wall switch just out of reach. You need to go the long way around to get there, so take a dip into the water and find an opening at the bottom near the center. Swim until you can pull out on the other end, then hoist to a higher ledge where two bats attack. Look behind you to spot a trapdoor: we'll be back here shortly. For now, head deeper and pull up to a ledge higher still. Don't cross the opening in the wall to the lake area yet, inspect the stacked crates near the edge to find a sneakily hidden switch on the backside to open a secret door in the lake. Approach the opening but don't go there just yet, instead notice the rocky perimeter next to the walls and find the safe flat spots to jump your way to the wall switch across from you. You need to do running jumps at an angle, otherwise you'll just slide down to the lower area. Once you've activated the switch, you'll see the trapdoors from earlier on switch positions.
Back to the floor, go for a dip again and now swim towards the narrow opening underneath the locked door for SECRET #4, a large medipack, shotgun shells, and magnum clips. Swim through the hole at the bottom of the lake again and pull up beneath the shifting trapdoors. Save your game as you need to time your jumps to ascend, the first one is easy but leads you to a locked door. Turn around and check the second one, you need to get to a ledge right above you, so backflip to the inner corner of the upper trapdoor and quickly rotate Lara a bit to the right so you can jump and grab the flat edge at the middle of the upper platform. You disturb two bats when you pull up. The next trapdoor is easier, just jump to it and do a long running jump to the rocky pillar on the left. Clear the final gap and find a switch behind the stacked crates. The door you'd just seen opens, so get back to the trapdoor pit and drop to the lower level and go in.
A rat lunges at you as you go for those shotgun shells. Pull the switch at the end to reveal a raft from behind the waterfall, then get back to the lake area and pull up onto it to get a STOREROOM KEY, the lock for which you see straight in front of you. Unlock the door, kill two rats then get some magnum clips and the first FUSE from the crates. You're done here. Backtrack to the initial pit and now head through the other side of the cave.
When you enter a larger cave area with a few shacks, including a suspended one, another crawler lunges from above. Enter the small shack to the right and throw a switch to retract a drill elsewhere. Inside the shack on the left, a rat hoards a small medipack. The bigger building in the back has three empty fuse receptacles and magnum clips, but at the moment we just have one fuse in our backpack, so let's find the remaining two fuses, shall we?
Go towards the drill, behind the shack, and get a small medipack from the crate. There's a side passage here, might as well get to it now. It's a series of long jumps to the flat topped rocks around the perimeter over a chasm. But before you get started, approach the stacked tyres and look left to the inner corner of the chasm. Behind the sloped rocks there's a hidden flat surface, do a running jump to fall behind it and claim SECRET #5, shotgun shells and a small medipack. To get back out, turn around and jump towards the slope, as you slide jump swerving to the right to land right by the tyres.
Now proceed jumping across the rocks in this chasm in a counter-clockwise fashion. When you reach mining cart tracks again, two bats emerge, keep following the tracks and surprise — another crawler has the initiative over you. Enter the first shack to the right and notice a primed detonator on the ground. For now, head further in and kill the two rats as a rather toxic blue goo sprouts out of the could-be rusty pipe in the room. Collect shotgun shells and push the three wooden crates around the room toward the leaks in the pipe to stop them and open a door behind the pipe.
The switch within opens the next shack, go there and get some shotgun shells and magnum clips from the crates as well as the DETONATOR KEY from the floor. You know where that one goes. The TNT crates in the back of the cave will blow up and create a shortcut into another area. Go there and look to the right to spot a closed gate, we'll get to it soon. For now, head left and down the steps to find two rats at the bottom of a room with a tall bridge. Take some shotgun shells and enter the opposite opening.
The closed gate nearby is your way back, first clear the spiked pit by jumping carefully to the safe spots beneath the swinging axes. When you get to a safe spot, save your game as the next sequence involves a number of uneven slope jumps. At the end, jump and grab the ledge, then pull up to a small medipack by the skeleton. Finally, use the breakaway floors to jump to as far to the right side of the next slope, slide and jump steering towards the flat platform. Do a running jump to grab the single breakaway tile, then jump to the leftmost side of the next set and immediately run with an angled jump to avoid bumping into the pillar. When you get to the next safe spot, Lara looks up. The golden tiles indicate safe invisible platforms over the deadly water pit below, jump across and throw the switch to see a series of grated trapdoors raising over the spiked pit you just went through and go out the gate back to the room with the bridge.
Go upstairs to the top and do a running jump to the bridge. If you look right, you'll see that pathway there is blocked, and the one to your left leads you back to the shacks, so jump across to the opposite side and clear all the gaps now thanks to the raised trapdoors. Between the second and third ones, just around the corner, there's a smudge on the floor. At that point, turn left to find a movable; push it all the way in. Take a couple of steps to the left and push in a second block twice, then move the first block against the wall to give yourself some room to maneuver.
From the entrance, to your left is another pair of pushblocks. Pull the leftmost one once, then loop around it and push the last block into the spot this block was. Now get that second block from the back end of the room and pull it back once to reveal an alcove behind it, housing SECRET #6: the MAGNUMS and assorted ammo. Back to the hallways with the trapdoors, resume your gap-jumping routine to arrive at a corridor with niches. Kill two bats (they always come in pairs, how cute), and find some uzi clips before pushing the block up the steps. This block once stood in the way of that last passage to the bridge room.
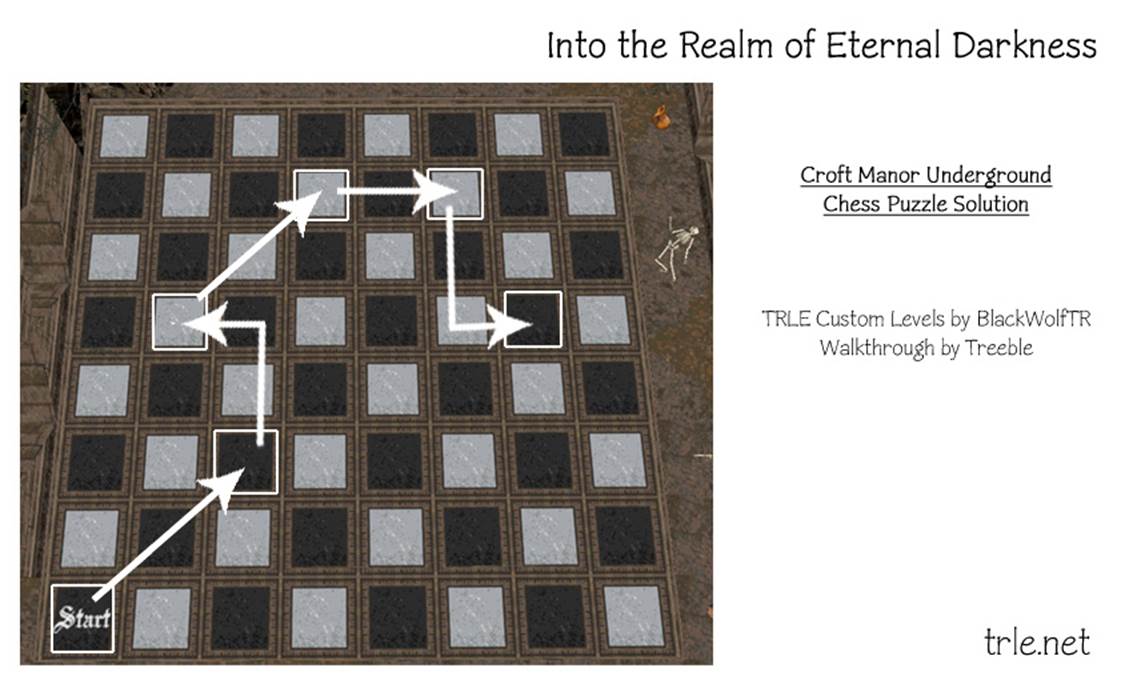
Go up the steps and check the puzzle solution on the wall. It's a five-step jumping sequence mimicking chess movements, and quite simple, actually:
1. Bishop, two tiles diagonally to the right
2. Knight, two tiles forward and one to the left
3. Queen, two tiles diagonally to the right
4. Rook, two tiles to the right
5. Knight, two tiles backward and one to the left
Jump through the diamond shaped opening to reach the board, find a large medipack near the entrance and locate the black tile tagged with a "Start" sign. Follow the diagram below if you're having trouble figuring out the moves. Avoid stepping on any other tile. When you reach the final spot, you'll hear a door opening, so simply jump off the board to the raised perimeter and go inside. The switch there opens that closed door where we blew the TNT crates earlier on.
Go back to the bridge and use it to reach the opening on the left. Go halfway down the stairs and take the shortcut to the blown TNT cave. Enter that open door in the back and finally retrieve the second FUSE alongside shotgun shells. One more to go. Back to the bridge, take the next left opening and follow the path back to the suspended shack again. On your way you'll notice a locked door on the left, we'll fetch that key now. Remember that drill, past the area with the shacks? Time to explore the path that lies behind it.
Save often, as there'll be a few boulders along this path. Follow the sprawling tunnel onwards and upwards, killing two bats as you climb a few ledges, to find yourself over the initial pit. A crawler is lurking around this area. All you can do at the moment is get shotgun shells and follow a side passage past the closed shack.
After killing two bats, Lara looks towards a slope against the wall. Jump to it and immediately bounce to the flat spot ahead. Jump around the perimeter of the chasm and again be wary of boulders as you reach the solid ground area (you might just avoid them if you run towards the wall below them where it's at its highest). At the top, jump with no grab towards the V-shaped edge and ready your shotgun immediately as another crawler shows up.
You get to an apparent dead end, but there's a side opening to the right leading you right back to the upper area of the cave. Don't fall down but instead, do as before and jump across to the flat top rock to your right to find a wall switch in the alcove. The shack nearby opens. Slide down and get in there to find the RUSTY KEY on the crates, and then proceed to step on that rusty pressure plate Lara looks at. A trapdoor drops a crate outside, you can use it as a stepping stone to reach another alcove with a switch.
This switch opens a door straight across from your position, so drop down and head there to find a receptacle for a missing board, we don't have it yet but now you know where it goes. There are some shotgun shells here as well.
Work your way back down (tunnels on the left of the shack in the upper area), past the boulders and the drill, and go straight across, underneath the hanging shack, to return to that locked door before the room with the wooden bridge. Use your rusty key, kill two bats and go all the way to the bottom. When you approach the small lake, a crawler strikes from behind. Dive in and get the final FUSE, plus a large medipack and uzi clips around the lake.
Time to put the fuses where they belong. Go back and the shack central is just to the left. Each of the fuses lower the suspended house a bit, until it eventually crashes on the floor and knocks the door open. Inside that small shack you'll find a CIRCUIT BOARD, so go back to the upper cave area (through the tunnel behind the drill) and use it on the open side door there.
The hanging platform lowers, so from the hole in the middle of this area you can drop on top of it and finally jump across that pit (jump slightly to the right so you can grab the edge, otherwise you'll slide down to the bottom of the pit). Two bats awaken as you run forward and soon enough you come to a massive slope. Slowly work your way up, jumping onto the flat spots, keeping in mind that a boulder or two will run down as you do so, and again sticking your nose to the wall might just work (and there will be more bats, of course).
When you make it to the top, another pair of bats flutter around you, and once you slide down there will be another two bats. As you approach the next pit, you'll see a portal in the back end of the room, but you need to get past two crawlers first, so equip your shotgun before dropping down and knuckle up. There are shotgun shells inside that small side cave to the right, then just go through the darned portal to finish this level.
[ * * * ]
LEVEL 3: DARK FORTRESS
As you step forward, you'll be attacked by a crawler from the battlements above the closed fortress doors and a flying mutant surrounding the area. Run past the doors into a cave opening, kill two bats and get a small medipack and magnum clips before fighting a crawler deeper into the room. It's guarding a door which requires two gems to open. For now, from the entrance point, you should notice some flat top rocks on the right hand side of the room; use those to reach the central pillar and then the opening on the left side, where you'll find a switch to open the main fortress doors (and alarm two bats). Before going back there, carefully step outside and get some shotgun shells from the bush.
As you cross the doors threshold, a crawler attacks in the purple garden. Let's make a bit of work for a secret before we start exploring the multiple floors of this massive fortress. From the garden entrance, find a ramp leading underground on the right hand side and spot a door just at the bottom of the ramp. Get that place memorized, then go back outside and enter the fortress, straight to the back, and pull up on a tall block and through the ceiling opening. Kill a crawler running around on this landing and proceed around the bend to find a crate next to a golden keylock. Again, pull through an opening in the ceiling to reach the topmost roof of the fortress.
Collect the large medipack and uzi clips on the crates stacked at the center, and in due time a flying mutant will show up. When that's taken care of, approach the hole you climbed through and safety drop to the rocky ledges behind them. Walk along the battlements to the corner in the end to find a golden pressure plate. Save your game.
It's not tagged as such, but it's on a rather short timer, so step on it and immediately jump to the garden below and run down that right hand side ramp before the door closes. Claim SECRET #7, a large medipack and magnum clips, and use the switch twice to reopen the door. Run straight ahead to a wooden walkway with balustrades surrounding a hanging boulder.
A crawler is lurking beneath you. Find the gap in the balustrade and shoot it from the safety of the many crates below. Get magnum clips on top of some crates and enter the room with the huge pool and a few pillars, some of which are burning up. Drop into the water and swim around the central pillar to find an underwater lever, pull it and head back to the entrance platform. Don't pull out yet, instead swim to the left-hand corner of the room (between the entrance and the burning pillars) to find a sneakily hidden underwater lever in there. It opens a door in the very opposite end of the room, also hidden by a tilted plate; swim inside and take SECRET #8: two uzi clips. Now get back to the entrance and pull out of water.
From the entrance, facing the room, do a series of jumps over the periphery platforms to the right to reach a switch. It raises a trapdoor to reach the central pillar, so go there and jump to the golden pressure plate in the back. It's on a timer and, as you've probably guessed it, it turns off the flames on the pillars, so save your game beforehand. Quickly jump back to the entrance and across the last set of pillars to the switch back there. A row of doors open up.
Head back to the entrance and use the crates to get back on the wooden walkway and loop around to the right. Enter the first store room to find a small medipack and magnum ammo. Following the walkway left to the next pathway you'll see that corridor of doors leading to the dormitories.
In the first room to the right, you're immediately ambushed by a crawler, but when it's out of the way you can climb on the bed and claim some uzi clips. In the room right opposite this one, take the DUNGEON KEY from the skeleton on the bed. Moving further on, in the second room on the right hand side you'll notice it's slightly crooked — find the pushblock in the alcove and pull it back three times to reveal a pathway to a locked trapdoor, which also loops into a ramp to the garden and to the dormitories. Finally, in the second room on the left hand side there is a small medipack.
Return to the wooden walkway and drop to the lower level again to use the newfound key to open the gate. The switch in the back opens all four cells, the one to your immediate left is the way forward, so check out the others first for a large medipack. When you're ready, drop through the hole and follow the tunnel until you fall into water.
This might feel a bit like a maze but it isn't one. First swim to the left and pull up into a small chamber with a rat, shotgun shells, and a golden pressure plate for you to step on. Drop back into the water and now swim straight across until you find the next exit, you'll no doubt notice a pushblock underwater along the way. The gate is open, take the magnum ammo from the back and pull out to the ledge and shoot the two rats swimming around.
The switch on the dividing wall shifts water from one side of the room to the other, so throw it and kill the two rats which are now swimming. Don't fall into the water just yet, instead go back the way you came, the area is now drained and you can find that pushblock in the corridor. Pull it out of the way, and then run around the wall to enter an alcove that was hidden to climb up into another rat lair, this one housing a golden pressure pad. Step on it and another gate opens, so go back to the sluice, as it were, climb up and throw the lever to flood it again, so you can swim and reach the open gate.
Inside this short alcove, find another switch. It raises a trapdoor on the other side of the sluice. Before transferring the water over, let's take a small detour for the final secret of this level. From the sluice, drop into the room opposite. Inspect the floor closely to notice that three of the floor tiles have a white smudge on them. Without touching any of the other tiles, step on all three in succession and you'll see an underwater door opening elsewhere — why, yes, it's just on the other side of the sluice. Jump to the block between the wall columns and go up the steps to find yourself back at the dungeon entrance. Go to the last cell to the left again and return to the sluice. Swim straight ahead into the open passage for SECRET #9: shotgun shells, small medipack and magnum clips.
Now let's go to that raised trapdoor, get back on the sluice and flick that switch again, swim to the far left corner and pull out of the water, then hop across to that switch. A trapdoor lowers elsewhere — back in the dormitories, remember? Get out the same way as you did just now and, when you get to the dungeon entrance, climb to the walkway above and loop around to the dormitories, enter the second room to the right and circle around the block you pulled earlier to find the trapdoor.
Swim all the way to the bottom and pull up into a spiked floor with a swinging axe. Carefully walk around it and pull up to find a pillar in the middle of a very spiked pit. There are two golden pressure pads, one on either side of the room. Start by taking the path to the right first, you'll easily spot the flat pillars around the perimeter of the room, but of course it's not that simple as there are breakaway floor tiles, hanging swords and swinging axes on your path, plus a handful of bats every now and then, of course. As you hang on the breakaway tiles below the axes, wait until they start swinging towards the opposite side you're hanging off to pull up, Lara should finish her animation just as the axe starts swinging away again, giving you enough time to run and jump forth. Quicksaving and quickloading will go a long way to mitigate your frustration in this area.
Once you've stepped on the golden plate, a trapdoor raises to allow you a way back, but it's not as simple as we'd hope. Walk to the edge and stand jump to the slope ahead of you, steering slightly left to slide facing forwards, then immediately jump steering left to a slope which you can bounce off to land right back on the central pillar. Mirror the entire sequence on the opposite side of the room to open the door in the back and finally lay your hands on the GOLD KEY within.
Jump back across the pillar again and retrace your steps back to the dungeon entrance (ie. swim back to the dormitories, go to the room with the wooden walkway and balustrades, then drop to the lower level). Facing the dungeon gate and lock, enter a doorway to the right and go downstairs to a still lower floor.
Dispatch the crawler and take the magnum clips and shotgun shells scattered about. Enter a small storeroom amidst the crates, kill a rat in there and collect the KNIGHT'S DIARY. Read the lore message it contains and step on the pressure plate when you're done, looks like we need to get into that basement, huh?
Enter the doorway by the harp and find a small medipack in the very middle of the room, in a narrow trench between two pillars. There are three boulders in this room, each corresponding to one of the pressure plates by the "activate" sign, so let's get to it. Step on each tile in turn and wait until the boulder action gets resolved so the gates in the tracks change position accordingly:
1) Bronze. 2) Silver. 3) Gold. 4) Reset. 5) Silver. 6) Gold.
The door next to the gold boulder track opens, get in the small chamber there and throw a switch to drop the hanging boulder from that wooden walkway area. A crawler is trying to sneak up on you, so deal with it before going back upstairs, then drop into the hole the boulder has created in the floor to find the SILVER KEY. Climb onto the crates and up onto the wooden walkway, loop around the balustrade to the left and follow that pathway to climb up onto the first landing of the fortress proper.
Use the silver key in the lock right in your face and ready your shotgun to deal with a crawler inside. Stand on the crate in the back and jump to an opening high up on the wall to drop into the next room. Get shotgun shells next to the barrels and then throw the switch to open another door in the corridor outside, approach the door and it opens so you can run straight across.
Cross the barrel room to an area with stacks of crates. Get uzi clips off the floor and notice that some of the crates have a perfect fit for Lara's hands. Your goal here is to push the two lower blocks against the opposite wall in order to drag the upper block on top of the middle one, enabling you to reach the timed switch at the top.
Before doing so, save your game: the timed door is on the upper floor, so as soon as you throw the switch, cancel the camera clue with the Look key, drop to the floor and run past the barrel room back to the corridor. Go right to the tall block and pull through the opening in the ceiling, enter the door to the right (ignore the pickups for a bit) and on the far left corner, next to the boarded windows, is the timed door, quickly pull up and drop on the other side. Take the first VIOLET GEM and approach the door. You can now return for the shotgun shells you've just ignored, then proceed to use the gold key in the lock on this same floor.
When you step inside, Lara will immediately look to the most curious BUCKET OF BLACK WATER. Take it with you, and step back to the landing and pull up through the unboarded window, left of that crate you've previously used to reach the rooftop. There might be a flying mutant around and you could do a full loop around the battlements to find some assorted pickups (check the flat rock surfaces surrounding the area as well). From the window, step straight into the rocky surroundings of the island and look down to spot some flat tiles below. Slide down a bit and the camera will pan away, revealing a cave entrance below the fortress, inhabited by a crawler.
When it's out of the picture, collect that large medipack and run dead ahead into that burning flame in the passage. Don't worry: an invisible barrier prevents you from burning, but quickly press Action to open up the inventory and use the bucket to put out that fire. Loop around to the left and voilá, your final VIOLET GEM. Now, to get back up, after dispatching another flying mutant, facing the cave you can find a handful of flatter spots on its right side, but best save your game as any misstep leads you straight down to your doom.
From the battlements, drop to the entrance garden and go through the entrance gates and into that side cave you first explored when the level began. Use both gems to open the door in the back and step on the golden plate to make one of the tombstones in the graveyard shift positions. To get to the graveyard, again get inside the fortress and pull up to the upper level, then go through the open window facing the back side. A couple of crawlers (and possibly a flying mutant, too) are eager in wait below, and you can kill them from the relative safety of the battlements.
Find some shotgun shells on another tombstone before dropping inside the open tomb and kill two bats as you drop onto a cross-shaped corridor with three wooden pillars. Drop to the floor and go straight ahead to find an opening on the wall to the right, pull up and throw the switch there to move the first wooden pillar. From the doorway, do a diagonal jump to land on top of it.
Look left to find another open doorway high up on the wall. Save your game and stand jump inside, immediately drawing your shotgun as a crawler will make short work of you otherwise. The switch inside shifts the second wooden pillar. Jump back to the first one you've moved, then across to the second one and peek further into the corridor to spot the next opening high up, again jump. No threat inside this time around, just a small medipack and a golden pressure plate.
A door has opened up above the original position of the first wooden pillar you've moved, so drop to lower level and squeeze through the corridor to climb up through that opening on the wall again and throw that first switch again to reset it, enabling you to pull up to the chamber above and find another golden pad. Throw the first switch one last time and do a diagonal jump to the pillar, then across to the other one and turn around, you'll now spot the open door to the right and the next switch just within sight.
Jump back and across to the first wooden pillar you've moved and you can now jump to the open door to the right (just across the room with the small medipack from earlier). Collect shotgun shells and throw the switch to finally shift the third wooden pillar around. From the doorway, do an angled running jump to reach it, and hop into the sideroom right next to it, the switch there resets its position and you need to do so to pull up to an opening above.
Immediately jump to the high ledge in that room as a crawler will lunge from the side. From the safety of that ledge, take it out and finally lay your hands on the UNDERGROUND KEY. To return, drop to the cross-shaped corridor and, again, squeeze to the left and up into that side passage. Get on top of the wooden pillars and simply jump across to the entrance and climb back out of the tomb.
Another flying mutant is around. Facing the backside of the fortress, you should be able to identify the flatter spots to the right to work your way back up and around the battlements, finding a small medipack next to one of the purple leaf trees.
From the entrance garden, take the right hand side ramp leading underground for a quick route to the wooden walkway. Drop to the dungeon entrance level and go downstairs to the basement level. Key goes in, door opens, level ends.
[ * * * ]
LEVEL 4: CHAMBERS OF TORTURE
Run down the steps and drop into the water pit at end. Pull out to find yourself in a corridor with a handful of locked doors. First go to the end (noticing double trapdoors) and loop around to the right: see that purple potted plant in the far back? That will be our goal in a second, so go back and run down the other corridor until the far back door gets smashed open and a biped mutant lunges at you. Step into its cell to find a golden pressure plate on a timer, it opens that door on the other end of the corridor so make haste.
Take the small medipack, go through the hole in the wall, swim to the bottom and save your game. As the sounds make it clear, there are gnashing teeth doors around either of the corners (they loop into one another), so carefully time your strokes past them to find an underwater lever in the backside. There's an air pocket immediately above it, so fill your lungs and return to the water pit and back to the corridors, dealing with another biped mutant along the way.
Go towards the double trapdoors to find an open door on the right hand wall. Pick up the UZIS near the hanging skeleton and pull out the block. You need to drag it outside and into the central corridor in order to use it as a stepping stone to reach a pair of openings high up near the ceiling. In one of the rooms, leap over the spikes and pull the switch; in the other one, just drop down to the switch and collect some shotgun shells. The exit doors open as you approach them in both rooms. With both switches down, the double trapdoors open and a biped mutant shows up, so take it down before going down through the newly opened passage.
You are in what could be described as a bit of an infernal take on the St. Francis Folly. First things first, use the spiraling ramp to go all the way down to the bottom. You see two massive doors flanked by four receptacles, we'll get to all of that eventually. For now, take the small medipack beneath the ramp and go through the arched opening in the back. You arrive at a spike pit with seemingly no way across, but Lara immediately looks up. Those silver tiles on the ceiling indicate invisible platforms immediately below them, allowing you to hop across over the spikes in safety.
When you get to the next part of the floor, mind the dart traps. Use the block in the pit to reach the opening in the wall, carefully approach the doorway as a swinging blade protects it from within (solid advice for the entire level, by the way), and throw a switch inside. Back to the block in the pit, a trapdoor has been raised enabling you to clear the pit to the next bit, which again has safe invisible spots denoted by silver plates on the ceiling — but don't hop across yet.
No, instead, hang from the edge over the spike pit and notice that they don't fully fill the trench below. Safety drop into that safe space and run through the narrow corridor to find SECRET #10, a large medipack and uzi clips. Climb the giant steps to get back to where you started from and now leap your way over the invisible platforms to the other end.
Retrieve a medipack from the middle of the dart arrows, heal up if necessary, and jump to the block in the next spike trench. The trapdoor is lowered, so you need to do an angled jump into the opening on the left hand wall, weapons at the ready as there's a crawler inside, and remember that the end of the doorway is protected by a swinging axe trap. Collect the shotgun shells and throw the switch to raise the trapdoor just outside, and use it to resume your jumping routine over the spike trench to finally reach a switch on a gold elevated tile. This opens the gates to the golden key room, at the top of the central shaft. Approach the door and head right for that spiraling ramp, dealing with a crawler that's just showed up.
As you begin your ascent, pay close attention: there's a bronze key area immediately above the huge double doors. Do an angled running jump towards the jutting ledge and head inside. Kill two biped mutants and find UNKNOWN'S DIARY in the back, which describes the tale of the Dark Crystal and its repealed invading forces. Step on the block to back off reading. There are two small alcoves in this area, take shotgun shells in one of them and step on the timed gold block to stop the gnashing teeth traps briefly in order to activate the switches they protect, in both sides, and the trapdoors in the middle of the room drop open.
Take out a crawler and enter the only open door. It closes right behind you, as Lara notices a floating switch in the middle of the room. In order to reach it, locate a movable block immediately to the left of the shackles on the far wall. The switch opens both the entrance door and a gate just outside, so go into that small storage room to find two bats protecting some uzi ammo and, more importantly, the BRONZE KEY. Return to the main shaft and run around the perimeter to the right to reach the spiraling ramp in safety.
Now make your way all the way to the top and you'll see the open gates leading to the gold key on the other side of the room. To get there, take a running jump to the lower flat surface underneath the hanging purple vegetation on the rocks, and then another couple of running jumps to cross the gates. The key is just across the gap, but sadly there's no way to reach it from here. Slide down the slope and save your game.
Collect shotgun shells and magnum clips before stepping on the golden plates in the center. When you do so, four doors open and unleash four crawlers on you. It's not going to be pretty. Your uzis work well here, but keep an eye on your health bar at all times. When the dust finally settles, proceed to throw all four switches behind each of the doors to open the double gates and go in.
As you approach the large medipack, a bird's eye view shows a series of ramps and a poor skeleton. To avoid sharing the same fate, save your game before you make a start on the series of jumps. Grab the edge of the lowest sloped block, shimmy as far left possible and keep the jump key pressed. As each jump brings you higher and closer to the top, keep in mind that for the last jump you need to swerve a bit to the left in order to grab the doorway threshold. Run up the slope to lay your hands on the GOLD KEY, and use the newly raised trapdoor to clear the gap back to the central shaft. Do a curved jump to the slopes to the right of the ledge and try to have Lara sliding backwards so that you can shimmy left to safely drop on the ramp.
With both keys in hand, we're ready to explore all side challenge rooms, so now we work our way from the top to the bottom.
Near the trapdoor at the top, enter the first challenge area. A biped mutant and a crawler waste no time in welcoming you. When they're done for, get some uzi ammo from the stacked crates and enter the open cell. Use the collapsed wall to reach an opening in the ceiling and do a series of jumps back and forth. When you get to the top, save your game as a trap gauntlet awaits you just at the top.
When you do a running jump into that opening high up on the wall, you'll find yourself sliding on a slope. Just as the slope bends around the corner, jump to a breakaway tile, wait for half a second until the axe is out of the way and quickly jump to the next tile and into the safety of the opening in the other end. Take that large medipack and safety drop to the storage room below, at the cost of some health. Find some magnum clips on the crate, then throw the switch next to the fence to open the gate from within.
As you step out and walk towards the key lock, Lara spots a pushblock nested above. Do use your bronze key, yes, but go back into the storage room and drag that darkened wood crate just underneath this out of reach pushblock, we'll be back promptly. Prepare to enter the next area, as two crawlers are roaming by; you can drop into the central trench for some shelter but avoid the gold plates in the middle as those trigger the giant hammers hanging above you.
When the coast is clear, find some magnum clips in the back and step on the central tiles, one at a time, until you hear a hammer "clank", then immediately get off the tile. With both hammers down, two blocks fall into the small silver-plated trench. Use those blocks to reach the ledge above, go into the doorway to the right and pull the block in the end. Return to the previous room and use the crate you'd moved earlier to pull up on the now open passage which was previously blocked by the unreachable block.
As you loop around the corridor in the back, save your game. Between the first and second gnashing teeth traps you will also trigger a boulder rolling from the back, so you need to perfectly time your way back around the corner to get out of the way. When the boulder stops, calmly time your strides past the traps to reach a deep pit. From the right hand side, slide to land on a breakaway floor tile and sideflip to the right to land on a flat rocky surface, alerting two bats in the process. Grab the crevice and shimmy all the way to the left, let go and backflip past the closed door, we'll be back in a second. For now, climb the rocks to find a switch and open the door back to the ledge in the area with the hammers.
From this ledge, approach the pillars on either side of the room and perform a series of jumps over the jutting and hanging platforms until you get to a small room at the top. Collect some uzi clips, throw the switch to open that door we've just backflipped past, and hear the unnerving sound of a flying mutant coming your way. Now, to work your way back down safely, what I found best was to jump across the hanging platforms to the slanted jutting one, then approach the edge while facing the wall and run off to land in the pillar below. Otherwise, a safety drop is possible but at a hefty cost of blood.
Use the blocks to reach the ledge again, you can now go through the shortcut into the cave and go down the rocks and into the newly opened door. As you enter, mind the swinging axe, and dispatch a centaur before claiming the first UNHOLY PLAQUE from the altar. Return to the room with the hammers and head left through the doorways all the way back to the shaft. Go down the ramp one until you come to the entrance of the next challenge area.
As you can see, a door has been kicked down already, but the biped mutant comes from the back of the room instead. Enter the three open cages to find a golden plate in each, step on all of them (one cage has uzi clips, while two bats live in another) and the fourth door opens. Enter the storage room, get shotgun shells on the crate to the right and go out the other side to find yourself in a flooded room with multiple timed switches. Before anything else, scoop a small medipack underwater in the other side of the room; to climb out of the water, go to either end of the ledge by the entrance side.
Facing the room, start jumping across to the first timed switch on the far left corner. Save your game before you throw the switch. Immediately after doing so, roll and perform a series of running jumps in a U-shaped pattern to get to the second switch in the very middle of the room. From the second switch, roll and repeat the U-shaped turn pattern to reach the opposite corner of the room thanks to the raised trapdoor which is on a timer. From the top tip of the alcove you land in, jump and grab the catwalk above and, if you were fast enough, the trapdoors in the far corner will still be raised, so quickly jump to it and do a curved running jump to grab a ledge above the entrance.
Take the magnum clips below the next timed gate, high on the wall, and go out the other side of the ledge. Three long running jumps get you to the next timed switch, then quickly work your way back to the middle of the ledge before that gate closes and pull up. Do a running jump across to the next hanging platform and finally reach the main switch above the gold plate in front of you. Drop into the water and swim back to the entrance, you can now go through the next open doorway, past the small storage room.
This is a fun and unique room. Lara looks at a wall with a massive arrow. Get on the first wooden pillar to summon a bat, then line up with the track of spikes in front of you, following the direction the arrow is pointing to. Take a leap of faith, and your faith will be rewarded. Use the stone pillar in the middle to reach the next wooden pillar and repeat the pattern, making a short stop for a switch in the corner opposite from the entrance to bring the next wooden pillar closer to you.
Hop over the spiked track until you get to the next moving wooden pillar. From the next stone pillar, mind the dart arrow trap as you line up to do a running jump to the wooden pillar in the middle of the room. Kill a bat and jump to the switch on the wall, then back to the previous track and use the pillar there to reach another switch, making one of the pillars retreat.
Approach the edge next to the torch and look down. A slope leads to a secret passage beneath the spike tracks; safety drop and climb up on the other end to find yourself in a nasty pit of blood. That's SECRET #11, by the way. Retrieve the large medipack, uzi clips and shotgun shells and climb out of this place through the opening in the ceiling in the corner. As you land back in the room with the spiked tracks, a trapdoor raises, enabling you to leap across to the far wooden pillar and into the open door straight ahead (hold Action to prevent bumping into the wall).
Take the shotgun shells and enter the second unholy chamber. It works much like the one before: mind the axe at the end of the doorway and dispatch the centaur before taking the UNHOLY PLAQUE from the altar. That's two down, two to go. As you return, you'll notice an open door to the right leading to a water pit at the end. Proceed through and the current brings you right back to the entrance of this challenge area. Go back to the shaft and proceed down to the next challenge room.
Two biped mutants attack in this area with the grated roof. From the entrance, inspect the back of the pillar on the left to find a sneakily hidden switch which opens the door to the last secret in the level. Take some magnum clips from one of the side rooms and approach the central door. The camera pans out to reveal a thunder sphere over a pentagon of metal-plated pillars.
Jump over to the stone pillar with a large medipack and save your game. You need to step on that gold-plated pillar in the back, so do your best to jump across as lightning strikes elsewhere and quickly roll and drop to a safe spot just beyond the gold pillar to prevent being zapped. The bad news is that now you need to go back to that first stone pillar, avoiding the lightning bolts again, as two trapdoors have raised in corners flanking the entrance.
From either of the trapdoors you can pull up an upper area. There are two side rooms you need to clear. Facing the thunder sphere, leap across to the hanging ledge on the right side and walk towards the edge next to the wall. Jump while holding Action to glide into the opening below. Ignore the path leading upwards for a moment, pick up a small medipack and go down the long ramp to the next area.
Kill a crawler and find some shotgun shells in the back, then assess the situation. There are four boulders atop some ramps, and each of the tracks they will follow offers two possible outcomes: a death skull trigger, or a gold plated tile that the boulder can only reach if you step on the respective arrow nearby to raise the trapdoor in time. Time is of the essence, that much is obvious. So, save your game, and throw that switch to set things in motion.
Immediately get to the first (closest) bronze arrow to raise the trapdoor and keep yourself primed to jump forward as soon as you confirm the boulder lands where it should. Once you see the boulder roll over the trapdoor, quickly jump forward twice as the third boulder begins to roll down. Keep a close eye on the boulder and, again, when it's safe to do so, backflip to the second arrow. Afterwards, two standing jumps forth and you raise the fourth and final trapdoor. With all boulders in proper place, the door opens and you can throw a switch inside. Return to that ramp you'd ignored and now take it so you can return to the entrance of this challenge room.
Back to the thunder sphere, use the flanking trapdoors again to reach the upper area and now go to the left-hand side platform, again gliding into the open door below the suspended platform. As you run upwards the next ramp, keep in mind that three boulders will roll down, all of which you can easily dodge by bouncing over them with the side slopes. Take a small medipack from the corner and do a long running jump over the room below to the ledge in the back.
You are on top of that grated ceiling now, and you are not alone as a crawler immediately shows up. Collect uzi clips in the back and then make a series of simple jumps looping around the perimeter of the room as you work your way to a switch at the very top of this area. The door beyond the thunder sphere opens. Work your way back down to that grated ceiling and drop into the room below to return to the entrance.
Again, use the flanking trapdoors to reach the upper area, but this time around jump all the way to the back, making a quick stop for the small medipack in one of the corners. Behind that door is another spike trench; use the opposing slopes to jump back and forth as you steer towards the switch. Once you throw the switch, the hanging swords will be activated, so it might be a good idea to save your game. Dodging the first one is easy, just take a long running jump to cover as much distance as you can. For the second one, you need a bit of luck as not only it can hurt you as it falls, but it can also block your bouncing back and forth routine as you try to return to the room with the thunder sphere.
Work your way back to the lower level of the area, to that first pillar where the large medipack once stood, and jump across the metal-plated pillars avoiding being zapped as best as you can. From that safe spot just behind the gold pillar, you can now jump across to a block you dropped by pulling the switch above, and finally pull up to the pathway ahead. The next unholy chamber is within reach.
You know the drill: mind the axe, dispatch the centaur, claim the UNHOLY PLAQUE. But this time there's more: drop into the water trench for a large medipack, and then enter that treasure room in the back for SECRET #12, housing shotgun shells and a small medipack. Now return to the shaft, it's pretty much a straight line from your current position, and go down to the final challenge room.
As you enter, a biped mutant shows up. The second cell to the left, where it came from, holds some shotgun shells. Ignore the door for a moment and enter the first cell to the left instead, where the walls have crumbled allowing you to explore further. As you run around, you'll see a locked door in a small cubicle and a pair of doors behind all that gravel. Keep moving through the rooms until you get to a water pit.
Save your game. As you swim through the passage, two crocodiles will make your life miserable, as you try to time your strokes past the opposing gnashing teeth traps in order to reach the gold plated alcoves in the back. When you've swam into both, a gate opens in the middle of the room, so quickly get in there and pull out of water. The switch you find opens trapdoors beneath some of the gravel. While you're here, it might be a safe spot to take out those annoying crocodiles and, on your way back out, get a large medipack at the bottom of the underwater chamber.
Drop through the trapdoor and follow the corridor. When you get to the large, "empty" area (a perfect spot to dump all the gravel above...), be wary of the crawler rushing in from the back. Find a small medipack nearby and a NOTE next to a skeleton on the other end of the room. Proceed through the narrow tunnel and kill two bats over the massive pit. To get across, spot the slightly flatter spot on the gravel surrounding the left hand wall and do a long running jump to grab the left side of the slope with the boulders in the back. Pull up and immediately hop back to grab the edge as the boulders fly over your head, then proceed to throw that switch to open the door in that cubicle we'd seen moments ago.
To get back across the pit, use the flat spots again, this time on the other side of the room. Move through the rooms to climb up through the open trapdoors, and as you run through you'll eventually find the open door. Step inside to pull a switch, the door behind the gravel opens but we still can't reach it. But now we have a note, so we can work on that puzzle behind the locked door we'd ignored when entering this challenge room, so keep walking until you get back to the locked door.
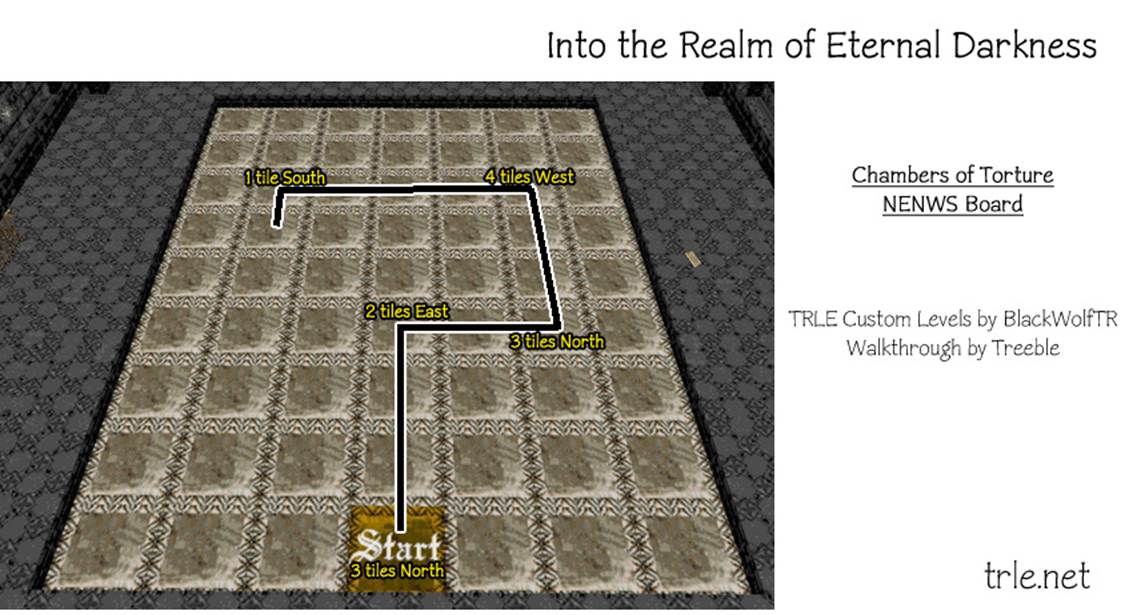
Use your golden key and go down the slope. A camera hint shows you the writing on a wall above a locked switch, spelling out "N E N W S". Collect another NOTE next to the massive board and some magnum clips from the corner, then run around the board to position yourself in the Start position. Time to inspect the notes in our possession:
North - 3, South - 1, West - 4, East - 2
Use your compass to reveal the plaque. Remember, it ALWAYS points towards North!
As luck would have it, you already start facing North, so this is incredibly simple. Following that writing on the wall, walk three tiles forward (North), then turn right (East) and walk two tiles, then turn left (North again) and walk another three tiles, now turn left (West) and move over four tiles, and, finally, left again (South) to move one final tile. The gates open, so jump off the board and throw that switch, removing the gravel blocking your way to the doors you've already opened.
Get back up there to find the final unholy chamber. As before, dodge the axe, kill the centaur, claim the UNHOLY PLAQUE. We're done! Return to the shaft (by following the gravel path to your right) and run down to the bottom, this time in possession of the four plaques. Place all of them in the receptacles and the massive doors open. Go in, drop through the hole in the floor, and approach the bridge to finish this level.
[ * * * ]
LEVEL 5: BLACK PALACE
Cross the bridge into the distant darkness until you enter the black palace. This place is massive, this terrible sketch should give you a general idea of the layout, although it's not to scale.
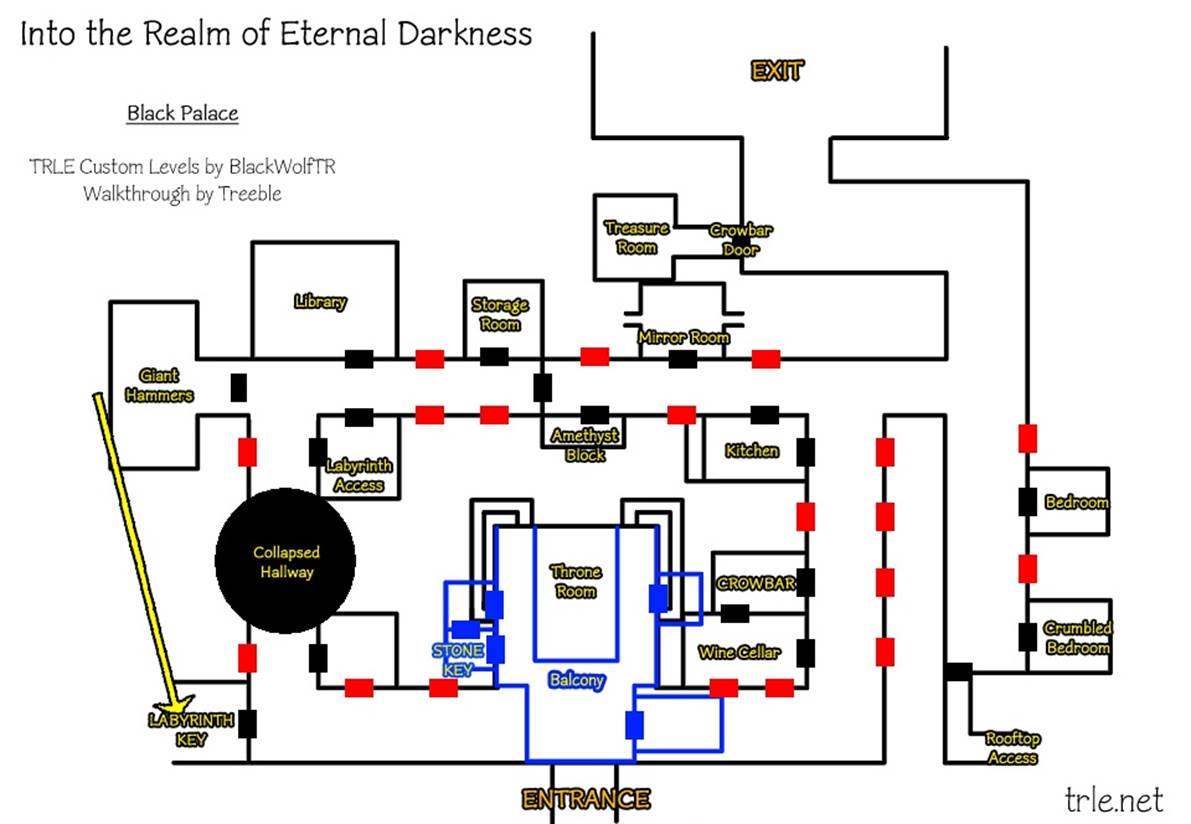
Ignore the throne room for now and take the left corridor to arrive at a massive hole in the floor — no way across, but you can enter the only open doorway for a small medipack, uzi ammo and some more lore in the shape of a SURVIVOR'S DIARY. Step on the block when you're ready and head back to the throne room.
Find an opening on the left hand wall and go up the stairs to a balcony over the throne room. As you walk forward, a door opens to your right, enter a bedroom for shotgun shells and squeeze through the gap in the wall for another bedroom where a STONE KEY lies on the bed. As you collect it, the door in this room opens, so back to the balcony and continue to loop around the room. A crawler might either follow you on your tracks or open fire from below.
You soon come to an antechamber opposite the throne below, where you can pull up onto the outer balcony for some shotgun shells. As you're about to reach the opposite stairway leading back down to the throne, spot a ghostly black painting framed above a suit of armor. You can pull up right through it into a small bedroom where you'll find SECRET #13: uzi clips, a small medipack and shotgun shells (plus a framed painting of a black wolf, hmm). Throw the switch and head back out and downstairs.
Proceed towards the right wing corridor now. A crawler will soon show up. When you come to a junction, you'll find an open room in the corner to your left, go inside the kitchen. Lara's gaze is immediately taken to the KNIFE, but make sure to collect the small medipack and throw the switch next to the flames as well (behind of which are two closed trapdoors...) to open a door nearby.
Back to the T-junction corridor, go left a bit to find the door you've just opened to a dining room with a massive mirror in the back. If you inspect the reflection closely, you'll find two narrow openings on opposite sides of the room. Facing the room from the entrance, squeeze between the potted plant and the blue painting on the left-hand wall.
When you reach the other end of the passage, a flying mutant will strike. Mind the spike pit and jump to the rocks to the left, where a box of shotgun shells await, and find a crevice to shimmy on the wall opposite the entrance. When you pull up to the upper area, beware the gnashing teeth door and dart traps. Jump around to the right to a timed switch and save your game; it raises a trapdoor in the other corner which you need to use to hop your way all the way to a crevice leading to an opening above the entrance.
In this tight corridor, notice an eager boulder just above your head and proceed to throw a switch in the back. It shifts a wooden pillar in the spike pit from the previous room, but also sets off the boulder so immediately hop back twice to the safety of an alcove. Get back down and use the revealed wooden pillar to get to a switch, which operates a trapdoor back in the mirror room.
Now return back to the mirror room and enter through the opposite concealed passage, between the purple potted plant and the bone lady portrait, it's not on ground level so you need to find the proper spot to pull up and through. As you go up the ramp, you'll find a trapdoor you've just opened. Climb to a room with several skull tiles, which, I'm sure you've guessed, spell instant death.
Pick up shotgun shells on a crate to the right and drag the upper wooden crate through the safe path until it rests on a silver plate. Get off the board and collect a small medipack next to the switch, then throw it to shift the skull patterns. You're now safe to move the crate in the trench, position it just below the upper crate in order to create a makeshift bridge for it. Pull the switch back up to reset the board and push the upper crate over the lower one and onto that next silver plate, then get back to the trench and pull the lower crate onto the golden plate in the opposite end of the track.
Use the switch one last time to flip the board again, and now pull the upper crate onto its respective golden plate and a door opens. Kill the sole bat inside and throw the switch to open the trapdoors behind the flames in the kitchen. Get back to the mirror room and out to the corridor, we're done with this room.
Back in the kitchen, carefully jump through the middle of the flames, avoiding being set ablaze, and walk through the spikes as you stumble upon magnum clips and a rat. Pull up on the other side to a meat locker, collect uzi clips next to a broken switch and find the meat marked with an X, close to the wall. Chop it down with your knife to reveal the ROOFTOP KEY. Get back to the palace corridors through the kitchen, taking care with the spikes below and the flames above, as you climb up right in the middle of them. Jump past them with minor heat burn (if you catch fire, you're as good as dead).
Back in the corridor, now head to the right for another T-junction and go all the way right to a golden keylock in the distance. Lara will spot another lock halfway down the corridor; we'll be back for that one in a minute. Use the key and go up the ramp to pull up into one of the corner towers of the rooftop. Run past the low crate and through the spike pit to the next one. There's a closed trapdoor above some magnum clips, which you might draw and put to use as two crawlers and a centaur should have zeroed in on you by now.
When silence is restored, run through the bridge with the crates to the next corner and find a crate you can move beneath the opening in the tower. Pull up, find some uzi clips in the corner and throw the switch in there. You hear a crawler lurking below, drop down and get it gone. Just so you know your next goal, follow the empty bridge to find a trapdoor on the floor; it's on a rather tight timer so knowing where it is might help matters. Return through the bridge with the crates to find the open trapdoor in the tower corner and climb up. Just around the crates is the timed golden plate to open that trapdoor, so quickly drop back down and proceed with running jumps to make it in the nick of time.
Collect a large medipack in the corridor and safety drop to a crooked bedroom where you'll finally find the first LEAD BAR. The door opens and you find yourself back in the dormitories above the throne room, with a crawler keeping you company. Work your way back down to the corridor to the rooftop, but this time use your key in that lock halfway down the corridor.
Enter another bedroom and, as you approach the harmless uzi clips, a crawler drops through the trapdoor above the window. Use the bed as a stepping stone to pull up through the hole in the ceiling, mind the spike traps and get some shotgun shells. Follow this trap-filled corridor, dealing with two pesky bats as you climb up to a higher area and slide jump over the next spike pit. You eventually come to an opening to a larger area (protected by a swinging axe, indeed) with a lot of breakaway tiles and a few resident bats. Skillfully navigate across to the other side and wait until you're clear to jump and glide into the opening behind the opposite axe. Slide to the switch and throw it to fall down into a storage room.
There are uzi clips and a small medipack on the crates. When you go out to the corridor, you find yourself on the other side of the locked gates, so throw that switch nearby to open a shortcut, and deal with a crawler before it gets the jump on you. Go to the next storage room in the corner, just before the collapsed corridor, and throw a switch inside after collecting the large medipack. If you check the back corner, you'll find a manhole leading down to a labyrinth, but we still need a key, so for now enter the library just across the hall.
First things first, remove that centaur from the equation. There are four switches hidden in this room; from the entrance, follow the right hand bookshelves around the corner to find the first one. Still following the right hand wall, move that crate to the gap between the bookcases to reach a high switch on the wall; then enter the narrow corridor behind the table with the potted plant in the back to find the third switch next to it. Now use the crate to reach the top of the bookcases and find the final one by the skeleton just above the entrance.
Hop across to the open painting, making a short stop for shotgun shells, then collect uzi clips by the next switch which causes the massive hammers to wreak havoc in the next room, conveniently opening a hole in the wall. Go out of the library and enter the now collapsed hammer chamber. There are some magnum clips in the floor but your purpose here is to climb through the hole you've just created on the wall.
A flying mutant is lurking in the darkness. When you're safe, drop to the ledge below the opening and face left, we have a series of difficult jumps to make over the void. When you get around the corner, you need to jump left to a ledge in order to reach the next windowsill, but before jumping there, hang off this side ledge and let go to grab an invisible platform immediately below you. Pull up and throw that sneaky switch for a secret later on.
From the windowsill, use the ledges again and pull up to a small medipack. From this crooked part of the wall, you need to do an angled running jump with grab to the right (towards the side where the secret switch was) to reach a narrow high ledge. Another flying mutant emerges from the darkness, so kill it for some peace of mind and jump to the next jutting ledge. Now, grab the crevice above and shimmy all the way to the right, where you can let go to a ledge below and jump through another hole in the wall to enter a ruined bedroom holding the LABYRINTH KEY.
The door opens and you're back in the corridor next to the collapsed hallway. Run all the way around back to the small corner chamber in front of the library and drop through the manhole you'd seen before. Get uzi clips on the corner crate and unlock the door to the labyrinth.
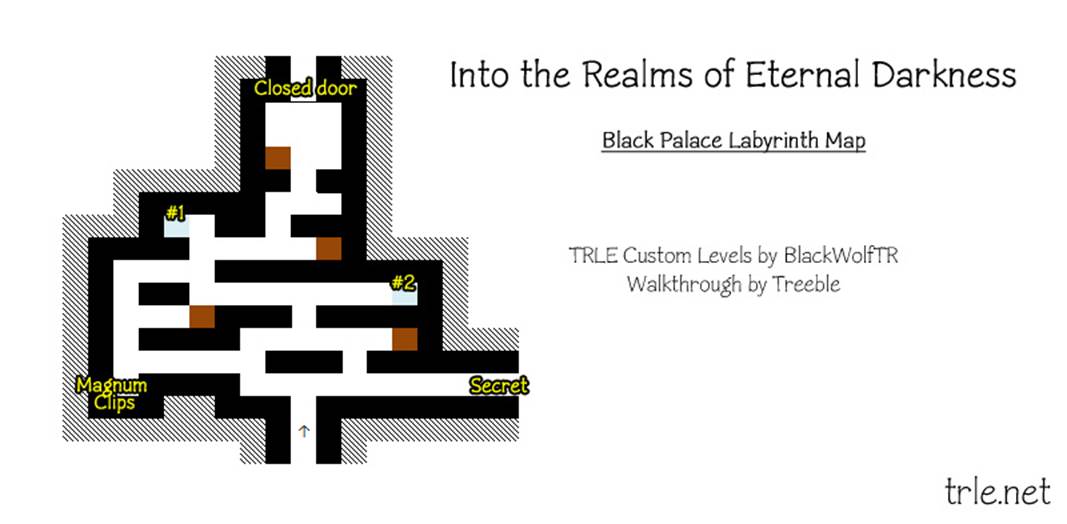
From the entrance, go right towards the switch you see in the back to claim SECRET #14; shotgun shells and magnum clips, plus a small medipack and uzi clips inside the closed cage you can open with said switch. Now, back at the labyrinth entrance, stick to the left wall to find magnum clips on a crate in the corner and shortly afterwards a water pit. Swim through and pull out on the other side, kill a rat, find some uzi clips and the first of two switches. Swim back to the labyrinth, as you pull out turn right go towards that crate with the books on top, then down the corridor to the left to the second water pit. As before, kill another rat and throw the second switch. Swim back to the labyrinth, hop over the low crate and loop around the wall to the right to find the door you've just opened being guarded by another rat.
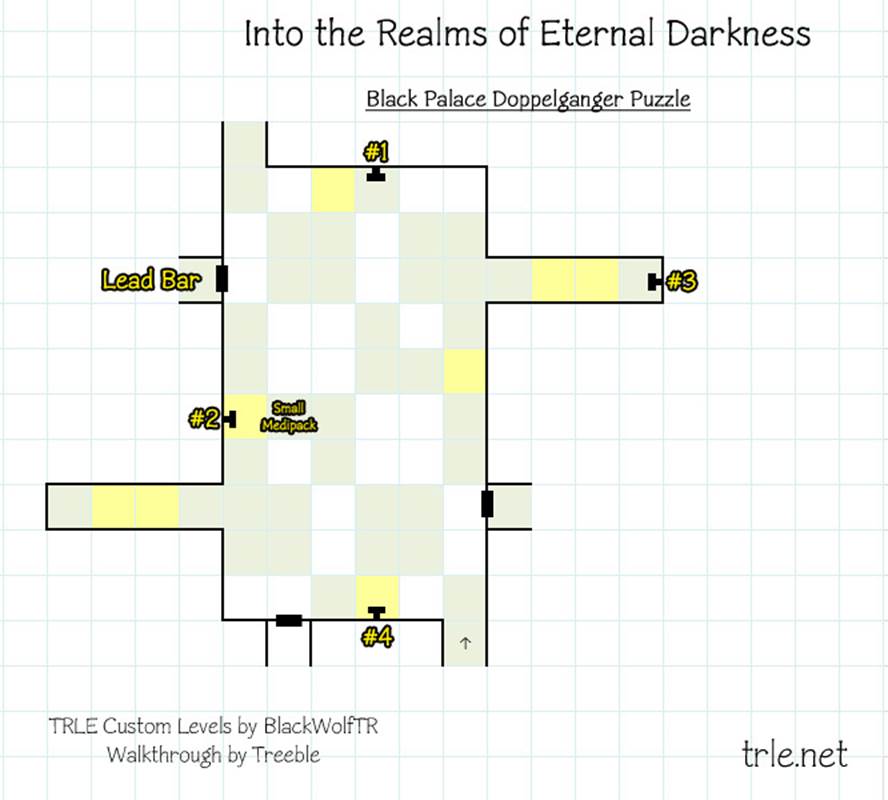
Save your game once you slide down because you're about to face the amethyst doppelganger. She works just like you'd expect her to, but the floor is filled with pitfalls which will make short work of her, and yourself at the same time, if you're not paying close attention to both characters since the room is not perfectly mirrored.
Check the next map for reference. The tiles colored green are safe at all times, so skillfully jump across to the switch #1 in the distance to raise a trapdoor in the center of the room. This trapdoor enables you to operate the timed switch #2 over the yellow colored tile in the map. It's a rather tight timed run, so save beforehand. Once you throw the switch, the trapdoors in the corridor near you raise for your doppelganger, so you need to roll and jump through the safe tiles to the opposite corridor for switch #3 in the end and quickly return to a safe tile in the room, otherwise the timer runs out and the doppelganger dies. The switch in the alcove raises a trapdoor next to the first switch, which means you can now throw switch #4, next to your entrance point, in the opposite end of the room. This final switch opens both side doors in the room. Jump across to the other side of the room again and jump and glide into the side room there, as otherwise the doppelganger falls into a death trap. Inside, take the second LEAD BAR and watch as the mimicry comes to an end.
The exit door next to the entrance point opens, so climb up the huge steps until a door opens in front of you. Jump over the slope and you're back in the labyrinth. Retrace your steps back to the labyrinth entrance but don't climb up to the palace corridors; instead, take the side path to the left for a jumping sequence. Kill the bats and rats first and drop into the spike pit below for some shotgun shells, then use the crate to climb back up to the entrance and jump around the safe platforms to the other side of the room.
You arrive at a bridge in the void. Before you go any further, turn around and spot a dark rocky area with a couple of purple plants to the left of the doorway you just came through. Jump there and claim SECRET #15, the last one in this series, comprised of a large medipack, uzi clips and magnum clips. Get back to the bridge and run forth for your doom...
But not quite. Some mysterious force breaks Lara's fall and instead pits her against four panthers in the dark. When you no longer hear their growls, approach that switch you can see and open the door. Head upstairs and take a large medipack before climbing through the open trapdoor.
As you finally finish ascending the huge steps, Lara's attention goes straight to a NOTE on top of some crates in the middle of the room, even though two rats are happily nibbling her feet. Gather the magnum clips on the other crate and then check the note. It reads:
The Moon is born of black. Switch is to be used only once. Save the game.
Do that. If you pull the switches in the wrong order you're doomed and have to reload. Facing the moon phases on the wall, you want a full moon turning into new moon and then back, throwing each of the six switches just once. It's born out of black, as the note states, so you know you must start with the rightmost switch.
Facing the wall and counting from the left, activate each of the switches in turn: #6, #2, #5, #3, #1 and #4. If you've input the phases in the appropriate order, you'll see a door opening in the back of the room. Go through and kill two bats, then throw another switch by the crate and go up the steps to find yourself back in the palace corridors.
Run down the corridor to the junction and loop around to the left then look for the newly opened door on the right hand side with the bone lady to enter a wine cellar. Kill two rats and find some shotgun shells next to the wine crates by the entrance and magnum clips in the back corner.
Save your game before dropping into the water opening: you have to fight a very strong undertow to get to four underwater levers around the room. Doing so locks the sink so you can freely (but quickly, as your oxygen is probably depleted) swim to an air pocket just above that nasty gnashing teeth trap. Pull out of the water and find a switch to open a trapdoor beneath the leaking wine crate above, then safely get that large medipack next to the disabled underwater trap before going back up.
Swim through the wine filled passage and emerge in another room with more wine crates. Find a CROWBAR and then deal with a rat and a bat before heading through the door back to the hallways. Head left to the T-junction and turn a right, and this time go down the steps to the left and just around the corner you'll find a barred door you can smash through with your newly-found crowbar and enter the treasure room. Gold matters little to Lara, as the only thing she cares for right now is the final LEAD BAR, which seems to be the pet stone of a crawler that rushes in from behind.
With all three bars in your backpack, go back to the upper corridors and loop around to the right, running towards the gate you had opened aeons ago. Just before the gate, enter the side passage to the left and climb up the tall ledges to the top, finding a small medipack along the way. At the top, save your game and hop on that pretty block at least once, you know you want to. Otherwise, approach it and use it to upgrade all three lead bars into AMETHYST BARS, then proceed down to the hallway and again down the steps to the final chamber, just beyond the treasure room you just came out of.
Collect uzi clips in the middle of the room and go upstairs through either of the side openings in the room. In the walkway above, you'll find the receptacles for the bars and a large medipack. As you insert the bars to unbolt the final door, two crawlers loom freely in the room below, so beware when you go back downstairs. If you don't want to engage, you can simply race to the finish and slide down to the final level...
[ * * * ]
LEVEL 6: SANCTUARY OF THE CRYSTAL
This is it. Remember to save often.
Run down the platform flanked by bubbling dark, gathering some uzi clips and a WARNING. Beware of him... as the camera shifts to a robed figure standing watch of the sought after crystal.
The first jumping sequence is fairly easy as the platforms are still, so run jump to that large medipack and slide jump your way to the left hand wall, then shimmy along the crevice to the far corner corner for a switch. It lowers a bridge to the passage on the right hand side of the room, which you can easily reach with just a couple of running jumps.
The second chamber will require a lot more effort. Start by the right side, with the shifting purple blocks: there are five golden tiles on the ceiling, you need to step on the purple blocks below each of them while they're visible. Best way to clear this is doing one or two at a time as you jump from one side of the trench to the other, carefully timing your jumps to avoid falling into the deadly dark. With all five tiles taken care of, another bridge lowers and enables you to reach the next jumping sequence, still in this room. Around the center pillar you can collect shotgun shells and magnum clips, all of this firepower will soon prove necessary.
You need to get to the switch in the far right corner, but you have to go the long way around clockwise. The silver plated tiles are safe, while all the others will keep shifting regularly, so again time your jumps and slides carefully as you hop your way to the switch. You're going to need some well timed running jumps to have enough momentum to clear some of these. When the switch is down, the exit gate opens, so jump back to the first silver plated tile and then across the lowered bridge to get in.
Go up the ramp but be careful as a gnashing teeth door will make short work of you just around the bend if you're too hasty. Collect a small medipack and glimpse through the fence for what's to come. Around the next corner comes a boulder, quickly hop back, and as you go up the next ramp keep your eyes peeled for another gnashing teeth door halfway through.
Gather all the uzi clips and medipacks by the door threshold and you'll hear an ominous warning. As if we hadn't done so thousands of times on the lead up to here, right? Either way, save your game if you haven't yet and run towards the crystal.
As you slide down, bounce from one slope to the next until you see a faraway ledge, you need to jump at the last second to grab the edge. You're not out of the woods yet, so you might want to save your game as you being pulling up. As soon as possible, draw your weapon of choice and focus fire on the two crawlers who are very likely to push you either off the arena or into the many traps, it might take a couple of tries to find your footing here. When they're done for, you can more easily manage the giant abomination as you loop around the edges pumping it full of lead.
When it's finally defeated, gather uzi clips on the edges of this arena before going through the open door. Get a large medipack and save your game just before entering the next arena.
Time to face the big bad, and he's not alone. Again, try defeating the two centaurs on either side first so you can focus your attention on the flying robed figure who keeps spamming explosive attacks. When it first falls to the ground, it's not quite over so keep an eye out for an attempted comeback.
When the dust has finally settled, hop over to the high switches: beneath each of them is a block you must pull out in order to operate them. With both switches thrown, the gate to the crystal chamber opens... Head upwards and you can finally lay your hands on the DARK CRYSTAL. As you do so, the place begins to collapse, so save your game (often, and in different slots) as you go through the side door which is now open.
Running in a straight line, wait on the rocks until the boulders come to a stop before running around the next corner. Avoid the center of this corridor as well as the next one, after jumping over the boiling dark, as that's where the debris will fall. Save before sliding through the gate: the camera will shift to show the dark creeping onto you so quickly throw that switch before it's too late and run in the opposite direction to get out of harm's way.
But not quite. A gnashing teeth door at the end of the hallway, and then a series of sliding dark and breakaway floor tiles over spike pits will test your mettle. Keep on the move, making quick saves along the way whenever you think it's safe to do so. When you see the purple plants on the wall, take a quick breather to assess the situation: as you run down the ramp, two boulders will chase after you, and you need to jump off to a pillar towards the right from the bottom of the ramp, so stick to the right lane and run in a straight line and none of the debris along the way should hit you.
When you land the jump, two bats attack. Leap to the next pillar and then use the slopey rocks around the perimeter to shimmy right until you can pull up and backflip onto the next pillar, topped with a large medipack as two bats flutter towards you. Jump to the next pillar and finally to the cave area ahead. Stay on the right side again to avoid the falling debris and when you get to the area ahead the whole room gives way.
As you slide down, bounce skillfully over the obvious death traps. At the bottom, a simple series of running jumps over the dark. The final jump should be in a straight line ahead to avoid falling debris, and be warned two crawlers will rush in from either ends of the area. When you're in the clear, head left for that switch in the back, which opens the door on the opposite side of the room; again you should stick to the right hand side of the area to avoid more debris. Once you cross that doorway, all that separates you from the ending cutscene is another short series of jumps over the void towards that portal.
You've certainly earned some rest.