SUBMERGED RELIC (DEMO)
TR2 Levelset by JoshDun
Walkthrough by Treeble
Save often and in different slots.
LEVEL 1: NIGHT MANOR
Lara finds herself recalling the events of last night while standing at the start of her outdoor assault course. Whether you complete the course as intended or not is up to you, but at any rate head forward all the way to the end. When you get around the first bend (next to the underwater tunnel you're supposed to swim through), inspect the outer corner of the backyard to find a satanic sign stuck on the crates: the floor immediately below it is fall-through, bringing you to a whole other place...
Swim through the nasty tunnel in a somewhat linear path. When you find the water surface on the other end, swim around the corner for a small medipack before getting out. Climb up the ladder to reach a lava pit. Walk to the edge and look to your left: there's a crevice on the wall there, do a standing jump to grab it and shimmy into the nearby alcove to the left. From there, do a running jump to a slope past the wall with the crevice, climb up and jump off the slide to a series of break-away tiles, curving your way around in a U-turn motion to reach another slope at the top.
You must get lucky here as two spinning blades might kill you before you even hit the floor, so try jumping over them to mitigate the damage and, when it's safe to do so, seek shelter in one of the alcoves down the hallway. Wait until you're in the clear to get to the opposite end, minding both blades and spike pits alike, and climb into the opening in the left corner. Halfway through this tunnel is a smashing door trap, be careful.
Past the trap, slide and then jump into a corridor with a lowering spike ceiling as a pair of barrels start rolling immediately behind you. If that wasn't enough, there are a couple of wall blades and a spike pit along the way as well. Run and jump your way to safety, then save your game as you walk to the edge of a sandstone shaft. If you look to the bottom of the lava pit below, you'll spot a mysterious arrow pointing towards a wall with a flickering pattern. Jump straight ahead to land on said slope with the arrow and slide backwards, grab the edge, pull up and backflip with a midair roll to grab the edge of the secret walkthrough passage. Your reward? LARA'S WARDROBE KEY. Slowly walk through the red wall pattern on the other side to emerge on the spike pit from the previous hallway, then pull up and go to the sandstone shaft again.
This time around, we go all the way to the top. First comes a series of slope jumps to grab a flat corner, then you need to time your jumps past two swinging spike bags. Climb the crevice up on the dark segment of the wall above and shimmy to the alcove, pull up and run off the edge at an angle to grab the adjacent crevice, shimmy to the next platform and pull up to the red corridor with the blade swinging statues.
In the other end of this corridor, drop into the water and loop around the wall to your left to find an alcove higher up housing a large medipack and flares, then again stick to the left to find an underwater lever before swimming up the tall shaft and emerging in the water fountain on Lara's front yard. Run towards the assault course access, making quick stops for two sets of flares amidst the gardens, then go back to where you'd left off originally — in that underwater tunnel is a bundle of four stacks of harpoons.
At the very end, the shooting range hasn't been installed yet but you'll find your PISTOLS and a large medipack next to a closed door which you can open with a nearby button. In the sectioned garden area ahead, draw your weapons as a handful of thugs (both gun and wrench wielding types), a couple of dogs, and even a tiger are out for blood. When things settle down, run towards the back end of that area and find an alcove in the hedge wall with a button, which opens the backside gates to the training course and reveals another gunman who is very likely to find you in a moment or two.
Cross the front yard again and go through the narrow alley to the back side of the manor, as if you were going back to the start of the assault course. Instead, as soon as you cross the newly opened gate, look at the wall to your immediate left to notice a slight change in the brick pattern: this means you can climb it. From the pool house roof, you can find another ladder leading to the rooftop. Shift to the right at the top to reach the rooftop, turn right and run almost in a straight line towards that tall brick block you see in the back.
There's a button there, push it to open the door to the basement. Time to go inside; either safely climb back down or take a quicker route by diving into one of the pools of the assault course. Open the main doors in the front yard by pushing the button. Two thugs answer the doorbell ring. Go into the kitchen and rescue a hostage (probably Lara's) from the freezer, then open the back door for a shortcut for later. In the dining room there is a selection of tracks for the stereo system, should you like to switch it up.
From the main hall, go down into the basement to find Lara's underground aquarium. Pull the nearby crate twice to reach the opening in the ceiling, get the HARPOON GUN plus some extra harpoons and then drop into the aquarium. Swim around to the other end, dodging some barracudas along the way, to get the SNOWMOBILE KEY sitting below a floodlight. Work your way back to the main hall and now head upstairs.
Open Lara's bedroom and find some flares resting on her bed. You have the key, so open Lara's wardrobe for a big nasty surprise before you can claim SECRET #1: a large medipack, shotgun shells, and a golden mug. Throw the nearby switch to turn on the bathroom lights and find a small medipack behind the potted plants by the windows.
Back at the landing, open the door to the attic. Deal with the three giant spiders before retrieving a small medipack on the bricks. Pull both wooden crates out of your way to find a small room connecting the fireplace in the library to the attic. In this middle room, push the wooden block next to the skeleton in order to reach a button high up on the wall. You could go down the chimney and explore the library and music room, but there's no point. Instead, go back to the attic and find a hidden niche with flares and a window you can shoot. Slide down onto the bedroom balcony and get shotgun shells and a large medipack, then drop down using the gap in the railing and go through the open kitchen door back to the main hall.
There's a wooden crate behind the newly opened door, pull it out and place it in front of the open main door in order to grab the windowsill above. From the inside, push a button, then drag the crate through the door and grab the same windowsill from the outside to get a large medipack. The latest button showed a camera hinting at something going on in the pool, so go there and dive in.
The pattern is slightly off in one of the corners: you can swim through that wall to find yourself in an underwater tunnel. At the end of which is SECRET #2: a small medipack, flares, and a silver mug. Swim back to the pool and now let's go use that remaining key in our backpack to open the door to the racetrack in the garden.
Just as you unlock the door, draw your weapons and gun down a dog waiting inside. Just a bit further in is a spike pit but the break-away tiles give in much sooner than you'd expect, so quickly hop to the other side but don't relax just yet: when you touch the floor, a spike wall starts moving towards you, you need to wait a bit and then time an angled jump to the slope to slide behind it.
Ignore the wooden crate for now, that's our way out for later. Instead, jump into the opening in the wall and immediately hop on the snowmobile so the mafia boss kills himself. Next up is a precarious race track, I'd suggest saving often. Remember you can hold Action for a speed boost, which will be necessary for some of the jumps.
Your goal is simply getting to the other end, riding around pits and straight over any thugs you come across, but there's a secret along the way. After a narrow bridge, you ride up a snowy hill, and a couple of zigzagging later you get to an area with two separate narrow snowy bridges: dismount in the central ledge and find a ladder going down into the second pit. Climb down safely to the bottom and light up a flare, because as soon as you step into an alcove nearby some barrels will roll out. Quickly hop back and out of the way and then you're good to go and take SECRET #3: the SHOTGUN, shells and a jade mug.
Climb back out and resume your bloody snow ride for just another couple of jumps until you come to a barrier. Dismount and take a small medipack and the MAIN GATE KEY in front of you. A side door opens. Follow the long corridor to the end, collecting flares and flicking the switch to open a gate back to the area where you started the snowmobile ride. Jump back through the opening and now move the crate against the slope — three eagles show up as you do so —, so that you can use it as a platform to do a long running jump over the spike pit back to the entrance. Unlock the entrance gates in the front yard of the manor to move on to the next level...
[ * * * ]
LEVEL 2: CAVERNS OF CONTRABAND
Take the flares immediately below you, and either slide backwards and shimmy to the flat spot or bounce off the waterfall slopes to reach it. Jump across the glass shard-filled trench to grab an invisible crevice in the foliage and shimmy all the way left. Follow the tunnel to another waterfall slide leading to a flame pit, jump at the bottom of the slide to grab a ladder and climb up to safety.
Don't drop into the next hole just yet, but instead roll and grab the edge opposite the ladder, then shimmy all the way to the right to come up to another high opening. Save your game and negotiate the simple jumps over slopes to reach SECRET #4: a small medipack, shotgun shells and a silver figurine. Climb the ladder back to the top and reach the entrance of this secret area, now you can safety drop to the area below.
Move the pushblock into the alcove, revealing flares, and then use it as a stepping stone to pull up to the higher alcove opposite from the entrance. At the end of this short tunnel is a switch which lowers the trapdoor in the previous room; go back and fall a long way into a water pit. Swim to the alcove on the left to find an underwater lever, and then loop around the wall to find the open door and surface on the other end.
As soon as you pull up to the higher ledge in front of you, barrels roll down, so quickly hop back and grab the edge to avoid them. Pull back up and save your game, to clear the acid pit at the bottom you need to jump (without grab) at the very last second of the slide. When you make it, save your game again so you don't need to repeat that feat, and throw the wall switch to open the next door.
You enter a hallway with many doors. As you can't go to the right just yet, first run left past a closed door until you come to two valve doors. Open the one to your left first and save your game. As soon as you jump over the glass shard pit, barrels roll down, so backflip over the pit again. At the end of the hallway, you come to a tiered pushblock puzzle, but it's much simpler than it might seem.
Drop to the bottom and move the block on the near left corner twice so it rests by the entrance. You can now move the middle tier block from the entrance around the perimeter over the blocks until it rests in the far back left corner and, from there, a simple running jump will get you to the switch alcove above the stacked blocks. A door opens in the hallway, letting out a baton thug who will make a rush for your current location, while a shotgun thug will wait for you as you retrace your steps back.
Now open the valve door opposite from you and find an underwater lever below the dry platform. It opens another door in the hallway. Climb back out, noticing an unreachable ladder for later, and head right further in the hallway to find the two doors we've just opened next to a fire extinguisher. If you look just a bit further ahead, you'll see a door which requires four keycards, so we seem to have a lot on our plate right now.
Start by entering the door on the left, with a slope leading to a pit filled with glass shards. As you can tell, barrels at the top will roll down as you work your way upwards through the slightly flatter tiles on the slope. Save after every successful jump and slide retreat to the entrance every time you hear rumbling. At the top, press the timed button in the corner, sideflip left and quickly run and jump down the corridor where the flames once stood, minding the shard pits; the door on the other end opens up when you approach.
As you drop into a ledge on the water filled room, make a sharp U-turn to the right and dive in through an opening at the bottom. Swim past the open door and find SECRET #5: a large medipack, flares, and a jade figurine in the other end of the long tunnel. Keep swimming in an almost straight line to clear the lowering spike ceilings and you'll find yourself back where you started. Swim to the right and surface for some much needed air.
Find some flares to the right and then swim to the opposite corner of the room to find a narrow alcove at the bottom of a ladder. At the end of this passage, pull an underwater lever to drain this room. Grab the ladder and climb two rungs, then backflip to clear the slope. Loop around the next pillar for another ladder, backflip off the top and jump to the open door to find a GREEN KEYCARD. Now, perform a simple series of jumps across the top of the pillars to get back to the entrance. Clear all shard pits on your way to the hallway, where a baton thug and two dogs are now expecting you.
Straight ahead is another open door leading to the dormitories. You can find flares in the bathroom, then examine all bunk beds for more flares, automatic pistols ammo and a small medipack. Next to the entrance, on the upper row of bunk beds, is a switch for a very, very, tight timed run. The trapdoor opens at the end of the dormitories, you need to pull up to a bunk bed next to it and jump through the trapdoor while it's closing.
Please refer to "Bit 1" in this video for a visual aid of this timed run.
When you make it in, immediately save your game. Light up a flare and be very careful as there are two hard to spot trapdoors ready to spell out your doom right in front of you. As the ceiling is low, make running jumps to clear them and then safety drop down at the end, doing a series of jumps across the short slopes and eventually grabbing a hidden crevice over the white wall. Shimmy all the way to the right, then drop and grab a lower crevice and shimmy back to the left, at the end you can safely drop to the BLUE KEYCARD below. Walk through the shard glass to throw a wall switch and collect a large medipack before taking the exit.
Save your game. There's a shard pit in the very middle of this corridor, and as you approach it barrels will roll towards it from both directions. When you get to the edge, first backflip over the barrels coming from behind you. After jumping over the gap, another wave of barrels roll down, I'd suggest trying to jump over the ones coming from your entrance point because, when you go a little further, why, yes indeed, a third and final wave of barrels are triggered. When all is said and done, flick the switch inside the small room and drop into the water at the end of this hallway. Get the shotgun shells and in the other end you'll find yourself back in the bathroom, and you're not alone as two baton thugs and a rifle mercenary have been alerted to your position.
Now, go back to the hallway. We're still short of two keycards, so run down the hallway to the first set of valve doors you'd opened earlier on and notice that the room with the underwater lever has been flooded and the floating platform is now raised, enabling you to reach that hanging ladder. Drop in the other end of the passage and gun down the baton thug, right in front of you, and a rifle mercenary just beyond the first water tank. There is a large medipack in a niche hidden behind the pump.
In the first water tank, pull an underwater lever below the pump to open a door in the second tank, then make your way there and surface in the other end to a stairwell with flickering lights. Following the catwalks around the perimeter of the room would be such an ordinarily easy task, but there are several boulders which get triggered along the way, so keep that in mind. Save often and hang off the edges to avoid being flattened.
When you first loop around the back to an inner row of catwalks, first disarm the two boulder traps and then turn around to look back where you've just looped from: there's an alcove into the wall hiding another catwalk. Take an angled running jump and climb down the tall steps to a switch at the bottom, which opens the door for a secret later on, plus a large medipack and assorted ammo which you might have spotted from above. Climb up the steps back to the catwalks above. After the two wall blades, the YELLOW KEYCARD is within reach, but don't stop to bask as a sandbag will snap over you as soon as you take it.
After the string of break-away tiles, mind another boulder on the catwalk and negotiate a series of jumps past the wall blade towards the tall steps. Flick the switch and do a long running jump to the ladder, pull up and, as you slide down, jump off to find yourself back at the entrance of this area. Go down the steps, exit the area with the tanks by climbing the stripped wall in the corner and go back to the main hallway.
The door next to the entrance (with the acid pit) is now open, so go there to find a switch and the door you've opened at the bottom of the area with the hellish catwalks. Let's sidetrack for a secret first, so go through this door and save your game. The wall switch will deactivate the flames in this area briefly, so negotiate the timed run by combining either slope jumps or simple jumps over the shard pits. At the end of the corridor, jump veering to the right and bounce back and forth while forcing Lara to the flat ledge. You cannot afford to lose any time. Then, do a long running jump over the acid pit, pull up and immediately hop backwards to grab the edge, wait until the boulder rolls past and do a final couple of running jumps over the obvious trapdoors before that flame comes back alive. At the top of a long ladder, perform a series of bouncing jumps off opposing ramps until you get to the top where you can finally lay your hands on SECRET #6: the AUTOMATIC PISTOLS, assorted ammo, and a gold figurine. Run down the dark hallway and you're back where you started after a short break for some flares.
For a visual reference of this timed run, you can refer to "Bit 2" in this video.
Now flick that switch to open the remaining door for another trap gauntlet. You slide into a shallow puddle with razor disks, so try sticking to the middle as you wade your way to safety. Run over the break-away tiles and up the block to the zipline, but don't ride it. Instead, walk to the edge and roll off to a slope in front of you, jumping from the lower slope to a flat surface. Do a curved jump to the next flat spot behind the pillar, and from there a long running jump to the back end of the room. Use the slopes to jump upwards and find the RED KEYCARD right in front of you, surprisingly not triggering any barrels or boulders in the process. The door in front of you opens, jump to the gray opening behind the slope and you're back at the hallway with many doors, this time around packing all four keycards.
Run all the way to the other end and slot them in. When you enter the next room, an alarm starts blaring and you find a switch tagged with "2X" over a diving bell. As soon as you flick it once, many men (with assorted weaponry but none carrying any loot for you) will storm towards you. You can fight them off if you're feeling like it, or you can just flick the switch a second time to remove the barrier over the diving bell and make a run for it. Either way, swim inside the bell from underneath, collect a small medipack, flares and ammo and then flick the switch on the wall to finish this level.
[ * * * ]
LEVEL 3: DEPTH OF DISCOVERY
Warning: you can get permanently stuck if you advance too far ahead without all Copper Keys. To be safe, don't engage with the button labeled "Timed" after the elevator ride unless you already have three Copper Keys in your possession.
The diving bell has taken you to the ocean floor. This is a massive area with a lot of ground to cover, please refer to this silly image (not to scale) for a general overview:
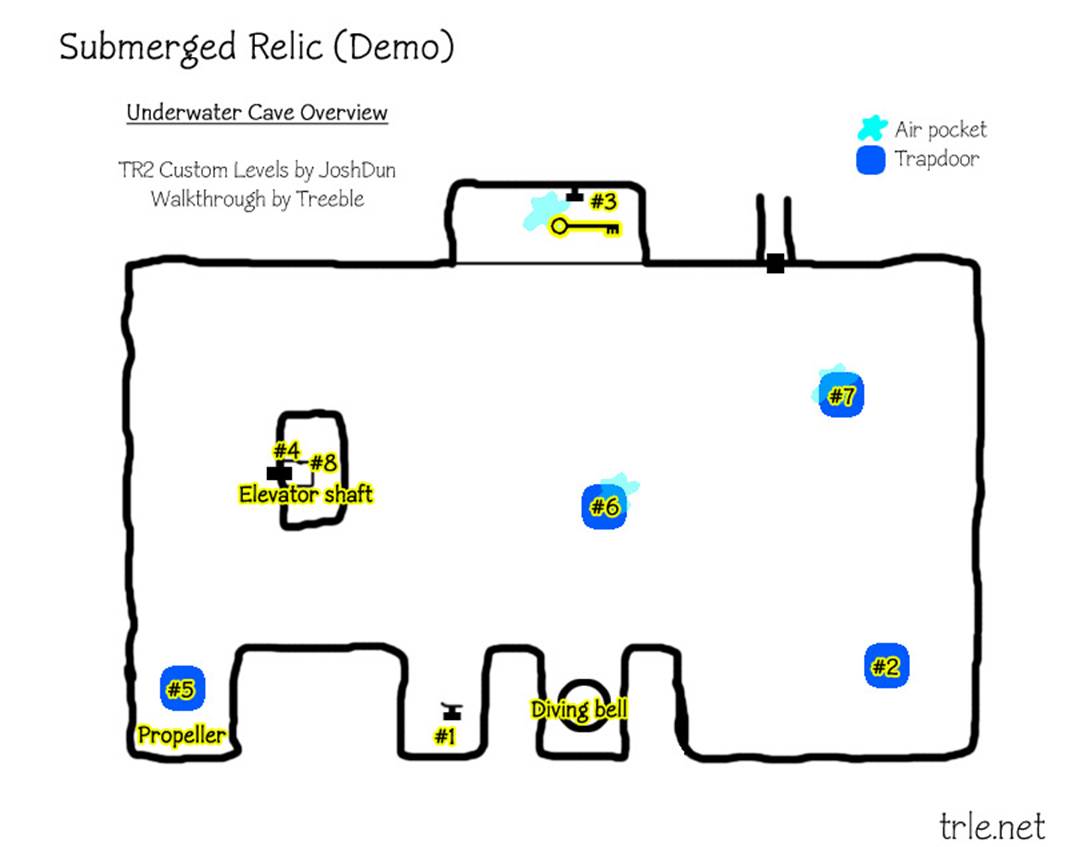
As the level begins, retrieve the two bundles of harpoons before diving into the water. Swim towards the top of the diving bell alcove to find SECRET #7, a silver diving helmet, on it. Before going back in for air, you could take a quick peek into the cave ahead to try and lure a few frogmen and some speedy barracudas so you can shoot them from inside the bell.
Loop around the left wall and find an underwater lever among the rocks, next to a window (#1 on the image above). It's timed, so after pulling it immediately follow the rocks around to the right and swim past the bell alcove towards the right hand side corner of the map to find the open trapdoor (#2). There's an air pocket down the tunnel, fill your lungs before claiming SECRET #8 — harpoons and a jade diving helmet — just after the smashing door. Make another stop at the air pocket before swimming back to the cave.
Now, swim to the lower cave floor straight opposite the bell alcove to find COPPER KEY 1/4 right in front of another underwater lever (#3). Pull it to open the door to the elevator shaft and swim into the buggy air pocket above. You can't surface, but your oxygen meter gets reset, so use that to your advantage.
Now, facing the bell alcove swim to the right to find the elevator shaft roughly around the middle of the map towards the back end of the cave and swim into the open door tagged with stripes (#4), get some goodies and then surface to a small corridor. Climb the ladder at the end and make a mental note of a locked door, we'll be back much later (and not too soon, otherwise we're stuck for good!). Push the button to open the door in the far end of the room.
From the entrance, you can safely drop to the hole beneath the second break-away tile for a small medipack (mind the glass shards, still). Then, proceed to throw the switch in the back to open another trapdoor in the main cave. Retrace your steps back and into the water and, as you swim out of the shaft, swim in a straight line to the left towards a giant rusted propeller embedded into the floor; there's a hard to spot opening on the ground (#5). Swim through said opening and emerge on the other side.
Throw the switch to open the door to a room with a bottom filled with flames and glass shards. Negotiate a simple series of running jumps around the perimeter to reach the opposite opening, climb the tall ladder and backflip at the top. Two small spiders attack, after disposing of them find another switch in the back to open a final trapdoor in the main cave, then drop into the hole to find COPPER KEY 2/4 sitting on a trapdoor. You might want to save first, as the trapdoor gives way, indeed, and drops you on the previous room with shards and flames — except the room has changed and you're immediately sliding to your doom. Just bounce off the short slopes and you'll be back at the entrance unharmed.
Back in the cave, swim towards the open trapdoor in the very middle of the area, in between the bell alcove and the lower cave (#6). There's an air pocket above, you might want to fill your lungs before going in. At the bottom, go up the steps and take a long running jump over the shard pit, then bounce off the slope in the corner to a higher ledge. Save your game here, as the next bit seems a bit unpredictable. What I found worked for me was sliding as close to the left wall as possible and jumping off in the last moment, veering left to clear the shards below. Claim the ELEVATOR SHAFT KEY and drop off on the other side for a shortcut back to the underwater cave.
Now swim towards the last trapdoor, next to an antique clock (#7). Before swimming in, surface at the air pocket and pull out into a small alcove with shotgun shells and a small medipack. At the bottom of the trapdoor, get out of the water and pull up to a series of quick slide jumps, but be quick to grab the invisible crevice behind the striped paint on the wall otherwise you'll fall into deadly acid. Shimmy all the way left, slide and backflip with a midair roll, so that you can immediately clear the next two gaps before the boulders hit the very floor you're standing on.
Around the bend, do a long running jump over the acid pit then into an opening in the corner where you'll find a ladder. Save at the top before sliding down, as you need to jump off late in the slide but not too late otherwise a boulder gets to you, and immediately steer left as a sandbag will fall on the tile in front of the closed gate. Turn around and spot COPPER KEY 3/4, plus assorted ammo, in an alcove embedded into the slope. Take them, and the gate opens.
Past the gate, there are three switches you need to operate before the lowering spiked ceiling gets to you, afterwards just follow the underwater tunnel through a secret door back into the cave. We have what we need, swim back to the elevator shaft and use your key to unlock that door we'd seen much earlier on. Press the button and wait until for the elevator, then press the button again and quickly step in before it goes up.
At the top, get off the elevator and press the button on the left wall to send it back again. Wait until it completes its trajectory and press the button to summon it back up again, but this time around you want to be standing on the elevator roof before it comes to a stop, that way you can pull up into a small alcove housing SECRET #9: a gold diving helmet plus UZIS. Push the button to send the elevator back down again and quickly step off in the upper floor.
Warning: Check your inventory and make sure you have three Copper Keys before initiating the following timed sequence. At this point, you can still go back and retrieve any you might have missed.
Now, save your game in front of that "Timed" button and prepare for a long gauntlet of traps. There's a lot of trial and error along the way, so save often and in different slots to mitigate the frustration, but generally speaking it's not too difficult. You can never stand around as you have to make it to the end in time, but mostly the only thing you should care about are the break-away floor tiles breaking at uneven intervals and messing up your jumps.
Please refer to "Bit 3" in this video if you need help with this final gauntlet.
At the end of the trap sequence there's a tall drop, so keep that in mind and heal up if necessary (you can slide backwards and safety drop to suffer less damage), you land right on top of assorted ammo. As Lacrymosa starts to play, safety drop to a small medipack, and once more to lay your hands on the final COPPER KEY 4/4. The trapdoor gives way and you find yourself back in the main cave, except it's now completely dry and remains of a shipwreck seem to have been raised somehow...
As you dramatically move through the bowls, they go up in flames, and the door at the far end opens upon approach, unleashing a couple of dogs and many, many men. Keep firing as you backflip away, then go inside and place the four copper keys in their receptacles. The tall doors open and this adventure comes to an end.