The Great Mechanical Puzzle: Remains of Astrash
By Dawos
This walkthrough is meant as a general guide only. It may not include every pickup or secret. There may also be (and definitely are) alternative ways of approaching situations within the game. Compass needle assumed RED as the directional indicator. Press the H key for hints.
BONUS LEVELS: GOLDEN PORTAL needs 3 GOLDEN secrets, SILVER PORTAL needs 7 SILVER secrets and BRONZE PORTAL needs 24 BRONZE secrets.
* Pickups and Items
* Enemies
* Secrets (43)
WALKTHROUGH by Lizard Queen
LEVEL 1 – Mechanical Ruins
Room 1: Levers and Rising Blocks
The journey begins with a story and cutscene of an ancient underground room “somewhere underneath the surface” with Lara sliding down from a cliffside into this area. The plaques in the middle of the room are clues. Head around the perimeter of the room, shooting vases and pickup SHOTGUN AMMO, SMALL MEDIPACK and SECRET#1 BRONZE ball. Push the floor lever on the north/west block and climb the raised block. Grab the crevice, shimmy right and pull up. Take a standing jump south and push the floor lever. Drop down and pull the floor lever in the south wall. Climb the raised block south/east and pull up to the higher ledge. Push the floor lever to open the door. Safety drop down and enter the newly opened door east. Shoot the vases and pickup two SMALL MEDIPACKS and SHOTGUN AMMO. Slide down the slope into the next room.
Room 2: The Power of Fire
Head around the perimeter shooting vases and pickup two SHOTGUN AMMO. Head to the middle and shoot the AHMET. Head north up the stairs, pickup a TORCH on the pedestal and light on the fire. Head to the east wall and light the wall torch east. Head to the unraised block at the dome south, jump up and press 1 to drop the torch on the higher floor. Reverse roll and push the floor lever north/east. Reverse roll, climb the raised block at the dome, shoot the vases and pickup the SMALL MEDIPACK. Pickup the torch, jump to the lowered block and press 1 to drop the torch. Climb down, return to the floor lever north/east push again to raise the block and return to the dome floor south. Standing jump and grab to the raised block west. Pickup the torch and jump to the higher dome west. Light the wall torch west wall then take a running jump with the torch to the unraised block north and drop to the ground floor. Drop the torch in a safe place.
Route to SECRET #2: Climb the alcove north/west and push the floor lever to raise the block. Climb the alcove south/west and push the floor lever to raise the block. Climb into the dome south/east, climb the raised block west, take a running jump to the dome west and a running jump with grab to the raised block north. Take a running jump to the ledge north. Take a running jump to the ledge east. Take a running jump to the dome east. Take a running jump east and grab the crevice. Shimmy right around the corner to the end and drop. Take a standing jump to the raised block east and to the ledge east and pickup SECRET #2 BRONZE ball on the pedestal east. Safety drop to ground level.
Pickup the lit torch (from where you left it), take a running jump to the unraised block south/east corner and press 1 to drop the torch. Head to the north/west alcove and push the floor lever so the handle faces west. Exit and climb the block into the dome south/east. Take a standing jump with grab to the raised block east, pickup the torch and take a standing jump to the alcove east. Light the wall torch to finally open the door east. Use the raised blocks to return to the dome floor and drop the torch. Take a running jump with grab to the raised block north/east and a running jump with grab to the ledge east and enter through the newly opened door.
Room 3: Pushable Blocks
Shoot the vases around the perimeter and pickup the SHOTGUN AMMO, SMALL MEDIPACK and SECRET #3 BRONZE ball. Push the pushblock west and take a running jump with grab to the crawlspace south. Push the floor lever and exit through the newly opened door. Shoot the vases around the perimeter, pickup the SHOTGUN AMMO and push the floor lever. Climb the raised block and take a running jump with grab to the crevice in the column west. Shimmy around to the back, pull the jumpswitch and exit through the newly opened door east.
Room 4: The Combination
Take a running jump to the ledge south/west and climb down the ladder. Shoot the vases around the perimeter and pickup three SHOTGUN AMMO and SMALL MEDIPACK. Head to the north wall and pull the wall switch on the column south (lights the flame above and cuts to the door). Take a torch from the pedestal north/west, light on the fire pedestal south and drop it for now. Head to the small pushblock south/east and push it towards the column west. Head to the medium pushblock west and pull it out once. Pickup the lit torch and jump onto the small pushblock. Take a running jump to the column west, a running jump to the medium pushblock west and a final running jump to the alcove west. Light the wall torch to open two doors on the west wall. Hop back to ground level and drop the torch. Facing west, head to the door on the left and push the floor lever to turn the flame above ON. The door on the right, the flame above should be OFF. Pickup the lit torch and head to the north/east corner. Take a standing jump to the unraised block and a standing jump to the wall alcove east. Light the wall torch to open two doors on the east wall. Run off to land on the block and drop the torch on the block (for a secret much later on). Facing east, push the floor lever on the left to turn the flame above ON. The door on the right flame should be OFF. The upper door now opens. Push the floor lever south/east to raise the block south/east. Push the small pushblock to the raised block east and climb up to the ledge south/east. If not going for the secret, exit through the door.
Route for SECRET #4: Before exiting through the door, take a standing jump with grab south/west and pull up onto the block. Take a running jump to the top of the dome and a running jump to the alcove and a running jump to the ledge west. Pickup SECRET #4 BRONZE ball from the pedestal. Run off the edge east back to ground floor and climb the raised block south/east back up to the ledge south/east and exit through the door.
Room 5: Portals
Head north through the unlit portal, shoot the vases and pickup the SMALL MEDIPACK and SHOTGUN AMMO. Head back through the unlit portal, push the floor lever and the wall switch and head through the newly opened door. Pickup the SHOTGUN AMMO. Head through the unlit portal north, shoot the vases and pickup the SHOTGUN AMMO and SECRET#5 BRONZE ball. Exit the unlit portal, push the floor lever and head back through the door west. Pull the wall switch back up and head through the portal north. Head through the newly opened door south.
Room 6: The Otherside
Shoot the vases around the perimeter and pickup the SMALL MEDIPACK and two SHOTGUN AMMO. Take a torch from the pedestal and drop it (Press 1) onto the unraised block south. Push north/east floor lever raises the block in front of the flame pedestal north wall. Push north/west floor lever raises the block in front of the unlit wall torch north wall. Pull the north/east large pushblock under the unlit wall torch north wall. Pull/push the north/west large pushblock as far south as possible. Drop east and pull the east large pushblock one tile west. Head south, hairpin turn left through unlit portal and push the large pushblock west. Head back through the unlit portal, hairpin turn right and climb the bottom stair north/west. Face east, jump up and grab the pushblock, shimmy right around the corner, across to the next pushblock and pull up. Take a standing jump to the ledge north/east, a standing jump to the block north/east, a running jump to the triangle ledge north/east and pickup the torch on the raised block. Light the torch and take a running jump to the large pushblock south/east. Take a standing jump to the pushblock north and light the wall torch north wall. Take a standing jump south back to the pushblock. Jump up, press 1 to drop the torch on the block south. Climb the block south, pickup the torch and take a running jump north/west back to the triangle ledge with the flame pedestal. Take a standing jump to the small pushblock south/west and a standing jump to the raised block north/west. Light the wall torch and drop to ground level.
Take the torch to the south/west corner and drop the torch. Push the floor lever south/west corner and pull the medium pushblock east onto the raised underwater block. Push the floor lever south/west corner to lower the medium pushblock. Pull the large pushblock in the south wall out from the wall once. Return to the floor lever south/west corner and push again to raise the medium pushblock. Pickup the torch and take a standing jump onto the medium pushblock. Take a standing jump to the large pushblock south. Light the wall torch in the south wall. Take a running jump to the upper ledge north. Drop the torch, head up the south/west stairs and push the floor lever to light a portal flame. Exit the alcove down the stairs and pickup the torch.
Take a running jump to the large pushblock north. Take a standing jump to the ledge and drop the torch. Head up the stairs west and push the floor lever to fully activate the portal linking the upper and lower levels. Head down the stairs and pickup the torch. Head through the newly activated portal with torch in hand.
Head to the south/east corner lower floor and drop the torch in a safe place somewhere near the medium pushblock. Drop into the water and push the medium pushblock west, south and east onto the unraised block. Push the floor lever east to raise the medium pushblock. Climb out, head to the large pushblock north and push it west. Head west and push the small pushblock east as far as possible. Head to the middle of the south wall and push the floor lever to raise the block in front of the closed door above. Pickup the torch you left south/east, head west and take a standing jump onto the small pushblock. Face north/east and take a running jump to the large pushblock. Take a standing jump to the upper ledge. Head to the south edge and take a running jump to the raised block below the wall torch. Light the wall torch south to open the upper door south. Take a running jump to the raised block west and a standing jump to the ledge south. Drop the torch (you don’t need it anymore).
Route for SECRET #6: Before exiting, return to the raised block north, standing jump to the pushblock west and a running jump with grab to the upper ledge north. Pull up, take a standing jump north/west and a running jump to the large pushblock north. Take a standing jump to the ledge north/east, standing jump to the block north/east and a running jump to the triangle ledge north/east. Head to the triangle ledge east and take a running jump to the large pushblock south/east. Climb the block south and take a standing jump to the ledge south/east. From the 2nd step angle to face south/east and take a standing jump with grab to the alcove ledge. Pull up and grab SECRET #6 BRONZE ball. Take a standing jump north/west out of the alcove and safety drop to the lower floor. Head to the south/west corner and climb the medium pushblock south. Climb the large pushblock south and take a running jump to the raised block east and a standing jump to the ledge south.
Head through the door, shoot the vases and pickup the SHOTGUN AMMO. Continue towards the floor lever for a flyby of the area ahead.
Room 7: The Compass
Shoot the vases and pickup the SHOTGUN AMMO (the flames are harmless). Push the floor lever to raise and lower blocks in the next room. Enter the next room, head through the south opening and climb the ladder to the right of the portal. Backflip, enter the alcove east, shoot the vases and pickup the SMALL MEDIPACK. Push the floor lever to light a flame on a high portal north.
Route for SECRET #7: Climb the alcove west, angle to face north/west and take a running jump with grab to the ledge. Drop down and pickup SECRET #7 BRONZE ball. Climb out and take a running jump back to the opening south/east.
Climb down the ladder, head right, shoot the vases and pickup the SHOTGUN AMMO. Push the floor lever to light a portal. Exit to the outside hub and push the floor levers in front of the south and east entrances to raise the blocks in front. Head through the north entrance, shoot the vases and pickup the SHOTGUN AMMO. Push the floor lever to activate the portal and head through it to reach the floor lever (south entrance). Push the floor lever to shut off the portal, exit and climb the ladder. Backflip to the ledge and head to the opening east. Take a running jump to the raised block north/east and a running jump to the raised block north/east. Climb into the alcove east and push the floor lever to open the upper door west. Safety drop to ground level outside. Push floor lever east to lower the block east. Head through the east opening and push the floor lever to raise the block north/west. Push the floor lever in the west alcove to turn on the portal east. Push the floor lever north to raise the block north and the floor lever west to raise the block west. Head through the portal east to land on the raised block above the north entrance. Take a running jump to the raised block south/west and another running jump to the raised block south/west. Head through the opening west and down the staircase.
Room 8: The Motion
Shoot the vases around the perimeter and pickup the three SHOTGUN AMMO and SECRET #8 BRONZE ball. Push the floor lever to light a flame above a portal. Climb the medium pushblock, take a running jump with grab into the alcove east and push the floor lever to activate two upper portals. Drop down and push the medium pushblock to the south wall. Head north and pull/push the large pushblock in the north/east corner to the tile below the jumpswitch on the column. Pull/push the large pushblock in the north/west corner to the tile below the wall switch on the column. Climb out, head south, climb the medium pushblock and take a running jump with grab through the portal south and grab the jumpswitch opening a door in the west wall.
Route to SECRET #9: Take a running jump with grab to the pushblock north/east, a standing jump to the north/west pushblock and push the wall switch to raise the door in the west wall. Safety drop to ground floor and push the large pushblock one tile west. Climb out and take a running jump with grab to the pushblock north/west. Take a running jump with grab to the alcove west. Pickup SECRET #9 SILVER ball. Run off the edge to land on the pushblock and safety drop to ground floor.
Exit through the newly opened door west.
Room 9: The Slopes
Head up to the top of the stairs, take a standing jump to the slope south and jump back and forth with curve right to jump towards the ledge on the right. Take a running jump east and grab the jumpswitch to open the door. Take a standing jump to the slope south, jump back and forth with curve right to the ledge on the right. Head behind the column north and pickup the SECRET #10 BRONZE ball. Exit through the door west.
Room 10: The Turn Switch
Head around the perimeter, shoot the vases and pickup the two SHOTGUN AMMO. Push all three floor levers, drop into the hole south and push the floor lever. Climb out and enter the newly lit portal. Shoot the vases and pickup the SMALL MEDIPACK. Push the floor lever for a cutscene of a door. Step on the trigger in the alcove for a camera shot of another floor lever. Exit via the portal. Turn the wheel once so the wall underneath is pointing east/west and re-enter the south portal. Push the floor lever and exit via the portal. Head through the portal east, push the floor lever and exit via the portal east. All three portals are now active in the main hub. Shut off the east portal by pushing the east floor lever to the middle. Enter the north portal and push the floor lever showing a cutscene of a door. Exit via the portal back to the main hub and turn the wheel once so the wall underneath is pointing north/south. Push the south floor lever so the handle is pointing to the middle to shut off the portal south. Head through the portal north, push the floor lever to open the door. Head through the portal back to the main hub.
Route to SECRET #11 & 12: Head to the south/west corner of the main hub and pickup SECRET #11 BRONZE ball behind the column. Head to the north/west corner and push the wall lever to lower a block. Shut off the east portal, turn the wheel so the wall underneath is pointing east/west and enter the north portal. Head east and pickup SECRET #12 SILVER ball on the pedestal. Exit via the portal back to the main hub.
Exit via the newly opened door west. Shoot the vases in the hallways and pickup the six SHOTGUN AMMO. Head through the opening at the end to the next room.
Room 11: The Run Switch
Shoot the two HORSEMEN, shoot the vases around the room and pickup the two SHOTGUN AMMO. Head to the turn wheel north, climb the block west and pickup SECRET #13 BRONZE ball on the statue. Drop down to the turn wheel and jump to the ledge behind. Face south and pull the wheel 6-8 times then run at the wheel with a running jump over the wheel. Sprint down the room and roll when reaching the door to head through before it closes.
Room 12: The Ball Race
Shoot the vases around the perimeter and pickup the LARGE MEDIPACK, three SHOTGUN AMMO and the SHOTGUN on the pedestal west. Pull the small pushblock in the water 2 times east. Push the floor lever in the south/west corner to lower the block in front of the pushblock. Head back north/east and push the pushblock south onto the lowered block. Head back to the floor lever south/west and push to raise the block. Climb up the middle structure and push the pushblock west. Climb the pushblock and take a running jump with grab to the ledge north. Shoot the vases and pickup the SHOTGUN AMMO. Face south, arm the shotgun and shoot the lion gem switch to drop two boulders. Take a running jump with grab to the crevice, shimmy left to the end, let go and grab the jumpswitch to raise a platform (for later).
Boulder #1: Climb the middle structure and pull the pushblock 4 times east. Head up the ramp south and push the boulder down the 1st slope. Make sure the floor lever handle is pointing north and push the boulder down the 2nd slope. Push the floor lever so the handle points south and push the boulder down the 3rd and 4th slopes and the boulder should drop into the bottom ramps and hit the 1st switch for the door.
Boulder #2: Climb the middle structure and pull/push the pushblock 4 times west. Climb the pushblock and take a running jump to the ledge north. Take a running jump with grab to the column with the crevice south/west and shimmy around to the other side. Drop to the platform, take a running jump to the dome and a running jump with grab to the ledge to the right of the boulder. Push the boulder north off the ledge. Safety drop down and push the boulder east to hit the 2nd switch for the door.
Boulder #3: Head to the north/west corner and jump up and grab the jumpswitch on the east side of the column. Climb the raised block on the left and push the boulder down the ramp to hit the 3rd switch to open the door.
Route to SECRET #14: Head back to the middle structure and climb the pushblock. Take a running jump to the ledge north. Take a running jump with grab to the column with the crevice south/west and shimmy around to the other side. Drop to the platform, take a running jump to the dome. Turn around and take a running jump with grab to the ladder. Climb up and backflip to the alcove behind and pickup SECRET #14 BRONZE ball. Jump to grab the ladder, climb down and drop to ground floor.
Head to the south wall and enter through the newly opened door.
Room 13: The Circle
Head around the perimeter, shoot the vases and pickup the two SHOTGUN AMMO. Push the floor lever in the middle block and watch the cutscene of the area. Head through the portal, shoot the vases and pickup the SHOTGUN AMMO. Hug the right wall, head down the corridor and push the floor lever to light the flame (1st left of centre) of the circle. Exit, hug the right wall and head through the portal east. Push the floor lever in the corridor north to turn on a portal (for a secret later on). Hug the right wall, head through the portal west to another portal north. Shoot the vases, pickup the SHOTGUN AMMO and push the floor lever to light the flame (2nd left of centre) of the circle. Exit, hug the right wall through the portals, hairpin turn right through the portal north and push the floor lever to light the flame (1st right of centre) of the circle. Exit, hug the right wall through the portals back to the upper level.
Head to the centre turnstile and push the turnstile so the wall underneath points north/south.
Head to the north/west corner and push the turnstile so the wall underneath points east/west. Head to the north/east turnstile and push so the wall underneath points north/south.
Head to the south/east corner, push the turnstile so the wall underneath points east/west.
Head through the portal again. Hug the right wall and do not go through anymore portals and push the floor lever to light the flame (2nd right of centre) of the circle. Shoot the vases and pickup the SHOTGUN AMMO. Jump/glitch through the ceiling back to the upper area.
Route to SECRET# 15: Climb the central block and push the floor lever to re-activate the portal. Upper level turnstiles are as follows: South/east turnstile, wall underneath points north/south. North/east turnstile, wall underneath points north/south. North/west turnstile, wall underneath points east/west. South/west turnstile, wall underneath points east/west. Centre turnstile, wall underneath points east/west. Re-enter the upper portal, follow the left wall through the corridor and enter the portal on the left. Head down the corridor with the floor lever. (If the portal ahead is not on, push the floor lever to activate the portal ahead). Walk through the portal, take a running jump to the alcove and pickup SECRET#15 BRONZE ball from the pedestal. Take a running jump back to the portal ledge and through the portal. Head down the corridor through the portal south, a hairpin turn right and through the portal back to the upper area.
Climb the central block, push the floor lever to light the centre flame and exit through the large circular door into the next room.
Room 14: The Vertical Portals
Shoot the vases around the area and pickup the three SHOTGUN AMMO.
Route to SECRET #16: At the top of the stairs, climb the ledge east and take a running jump to the ledge north/east. Push the wall switch to open a door on the opposite side. Safety drop to ground level, head around the stairs to the other side and up the slope north to an alcove at the top. Pickup SECRET #16 SILVER ball on the pedestal and head back down the slope to the bottom of the stairs.
Head east past the stairs, north then east. Shoot more vases and pickup the SHOTGUN AMMO. Head to the bottom of the stairs and watch a cutscene. Shoot the vases around the area and pickup the two SHOTGUN AMMO. Head north to the back of the turnwheel. Face south, turn the wheel 6-8 times, run then jump over the wheel to the raised door before it closes. Push the floor lever to raise another door. Slide down the slope and pull the large pushblock out of the alcove south to in front of the jumpswitch. Climb the pushblock and take a running jump with grab to pull the jumpswitch. Push the pushblock as far north as possible.
Head to the slope in the north/west corner. Backflip onto the slope then jump and grab the crevice in the column. Shimmy left and pull up onto the ledge above. Take a running jump and grab to the jumpswitch to activate the vertical portal in the ceiling. Climb the pushblock, take a running jump with grab into the portal. Head around the upper ledges, shoot the vases and pickup the three SHOTGUN AMMO, SMALL MEDIPACK and SECRET #17 BRONZE ball. Slide down the slope into the next level.
LEVEL 2 – The Caverns
Room 15: The Pit
Shoot the vases around the area and pickup the SHOTGUN AMMO. Head to the north/east corner and take a running jump to the ladder east. Shimmy right around the corner, climb a bit then jump and grab the column behind. Shimmy left around the corners, then backflip with twist to the slope and jump to grab the slope ahead. Shimmy right around the corner and backflip to the flat ledge behind. Climb the ledge east, take a running jump to the far side of the slope north, slide then jump and grab the crevice north. Shimmy right around the corners, drop to the slope then jump with twist and grab the ladder. Shimmy right around the corner then backflip with twist and grab the crevice. Shimmy right around the corners, drop to the slope then jump and grab the slope ahead. Shimmy left, pull up then jump with a twist to grab the slope behind. Shimmy right to the end, pull up and backflip to the flat ledge. Take a running jump over the small slope west and grab flat ledge west. Jump and grab the crevice south, shimmy right and drop to the ledge. Shoot the vases and pickup the SHOTGUN AMMO. Arm weapons and shoot the AHMET. Avoid the spike traps, pickup the SMALL MEDIPACK and SHOTGUN AMMO.
Route to SECRET #18: Push the wall switch in the north/east corner to open a gate near a previous slope. Avoid the spike traps back to the ledge west. Grab the crevice north, shimmy left around the corners and drop to the flat ledge. Take a running jump with grab to the flat ledge east. Pull up and take a running jump through the opening north. TIP: Jump up first then take the running jump to gain a bit of extra distance. Pickup SECRET #18 BRONZE ball. Slide then jump to the flat ledge, a running jump with grab to the flat ledge west, grab the crevice south, shimmy right and drop to the ledge.
Avoid the spike traps and head through the opening east.
Room 16: The Trigger
Shoot the vases around the perimeter and pickup the two SHOTGUN AMMO and SMALL MEDIPACK. Climb the block in the north/east corner and grab the crevice in the column. Shimmy left around the corner, drop to the slope and backflip to the ledge behind. Push the floor lever to raise the block in the north/east corner. Take a running jump with grab to the raised block and a running jump to the ledge south/east. Head to the boulder south and push off the ledge. Safety drop to the ground floor and push the boulder down the ramp north to trigger the spikes. Pickup a torch on the pedestal north and light on the flame pedestal south. Take a running jump avoiding the spikes to the block north, a running jump to the block north/east and a running jump to the ledge south/east. Light the wall torch on the east wall to open the door on ground level. Safety drop to ground level.
Route to SECRET #19: Climb the ramp south/east and take a running jump with grab to the ledge west. Take a running jump to the ledge north/west and a standing jump to the ledge with the portal north. Push the pushblock away from the portal and pickup SECRET #19 BRONZE ball. The portal is for later on. Safety drop to ground level.
Push the boulder through the door east to trigger the spikes in the hallway. Run through the spikes with a jump at the end into the next room.
Room 17: The Fountain
Shoot the vases around the perimeter and pickup the two SHOTGUN AMMO and SMALL MEDIPACK. Push the pushblock into the north/west corner, take a running jump with grab and pull up. Climb the ledge and pull the turnwheel 6-8 times to raise a door across the gap. Sidestep once to the right then run forward and jump over the wheel. Take a standing jump onto the slope left, jump and grab the edge of the ledge ahead. Pull up and enter the door before it closes. Take a running jump with grab to the ledge and push the floor lever for a cutscene of an underwater door not open yet.
From the middle of the tile, angle to face south/west and swan dive into the pool below. Pull out south, shoot the vases and pickup the SHOTGUN AMMO. Push the floor lever to light the portal behind the west wall. Drop into the water, pull out north, shoot the vases and pickup the SMALL MEDIPACK. Push the floor lever east to light a portal somewhere. Push the middle floor lever to open two doors in the area above. Drop into the water, pull out onto the east ledge, take a running jump to grab the ladder west and push the floor lever to activate the portal south/east. Drop into the water, climb out south and take a running jump through the portal to land on the opposite ledge above. Safety drop into the previous area below. Head to the pushblock in the south/west corner and pull/push 2 tiles east. Climb the slope in the south/west corner, backflip with twist to grab the ladder behind. Climb and shimmy left then backflip to the pushblock behind. Take a standing jump to the ledge south/west and push the floor lever to activate the portal behind. Head through the portal to land back on ground floor.
TIMED RUN: Return to the pushblock south/west and push 1 tile south and one tile east. Head to the turnwheel in the east wall and pull 6-8 times to raise a door above. Run forward then jump over the wheel and run through portal. Take a running jump to the pushblock, a running jump with grab to the ledge and head through the door before it closes. Take a standing jump to the ledge south/east and a standing jump to the ledge east. Push the floor lever to open the underwater door. From the middle of the tile, take a swan dive north/west into the pool below.
Route to SECRET #20: Pull up onto the ledge south, take a running jump through the portal to land on the ledge ahead. Turn around and take a running jump with grab east to the portal ledge. Shimmy left around the corner and pull up. Pickup the SECRET #20 BRONZE ball. Head through the portal.
Swim through the opened underwater door. Swim through the corridor and pull up into the next area. N.B. Do not shoot anything to avoid death blasts from the Shiva.
Room 18: Nyctophobia
Head to the pedestal south and pickup a TORCH. Climb the stairs north and light the torch to expose safe pathways. N.B. Stay on the pathways at all times to avoid the AHMET enemies. Holding the torch, follow the path around to the end and take a standing jump west to the Shiva platform. Continue west and take a running jump to the pathway west. Light the 3 wall torches around the pathway and 1 wall torch beside a door west. From the door, head north then west to the large platform. Toss the torch then take a running jump with grab to the column north. Take a standing jump to the platform north/east. Take a running jump to the ledge north/west. Push the floor lever to raise a nearby block and lower one south/west. Take a running jump to the raised block south. Take a running jump to the dome west (north/west from the Shiva).
Route to SECRET# 21: Take a running jump to the ledge north and a running jump to the ledge west. Pickup the SECRET# 21 BRONZE ball. Take a running jump back to the platform east and a running jump back to the dome south.
Head to the west part of the dome, angle to face south/west and take a running jump to the slope. Jump and grab the ledge ahead. Take a standing jump to the block south and a running jump to the dome south. Head down the stairs south and push the floor lever to raise a block east. Take a running jump to the block east and a standing jump to the platform east. Push the floor lever to open the door and raise a block. Grab a TORCH from the pedestal and light it on the wall torch east. Take a standing jump to the raised block, a standing jump to the raised block west and a running jump to the platform west. Climb the stairs and light the flame pedestal for a cutscene of a door in the north wall not opened yet. (1/5) (west from the Shiva)
Head back down the stairs south, take a running jump to the raised block east and a standing jump to the platform east. Head through the door east, then north on the pathway then west to the large platform. Drop the torch and take a running jump with grab to the block north. Take a running jump to the ledge north/east and a running jump to the small platform east. Angle to face south/east and take a running jump with slight curve left to grab the platform. Push the floor lever to open the nearby door opening a north/south pathway. Take a standing jump south/west into the newly opened doorway below. Walk south through the doorway to the next marker (straight line between markers is safe) then west past the flame and back to the large west platform. Pickup the torch you threw down previously and return to the pathway east. Head east then north through the door, then east along the pathway to a small platform east. Take a running jump to the next small platform east and a running jump to the ledge north. Light the wall torch and push the floor lever so the handle faces west to raise a platform south/east. Take a running jump to the small platform south. Take a standing jump to the dome south and light the flame pedestal for a cutscene of a door in the north wall not opened yet. (2/5) (north from the Shiva)
Take a running jump to the raised block east and a running jump to the large platform north/east. Light the wall torch in the north wall. Take a running jump to the block south and a standing jump back to the pathway. Head south to the marker then left (east). Take running jumps across 3 small platforms and onto the pathway. Head south to a large platform with an inactive portal, turnwheel and floor lever. Light the wall torch south/east (for light only), drop the torch safely and push the floor lever to raise the block. Climb the block and grab the jumpswitch south to light the portal. Pickup the torch and take a running jump to the platform west. Drop the torch (press 1) onto the lowered block and take a running jump back to the large platform east. Push the floor lever so the handle faces south and take a running jump with grab to the raised block west. Pickup the torch and take a running jump to the dome north. Light the flame pedestal for a cutscene of a door in the north wall not opened yet. (3/5) (east from the Shiva at the south/east portal)
Take a running jump to the platform west. Drop the torch and push the floor lever to open a door in the east/west pathway below. Pickup the torch and take a running jump back to the pathway north. Head east along the pathway and jump across the 3 small platforms. Head south and drop the torch onto the large platform. Take a running jump into the pathway north and head north to the marker (straight line between markers is safe). Climb the block with the inactive portal and take a standing jump to the large platform north. Push the floor lever to raise the block beside and lower one to the west. Climb the block and jump to grab the jumpswitch to activate the portal. Push the floor lever again so the handle points south. Take a running jump to the platform south and head into the portal. Pickup the torch and enter the portal north. Head to the north/west corner and take a running jump to the slope, slide a bit then jump to the block ahead. Take a running jump to the raised block south and a running jump to the dome south. Light the flame pedestal for a cutscene of the door in the north wall not opened yet. (4/5) (east from the Shiva at the north/east portal)
Take a running jump down to the small platform south and head west back to the Shiva statue platform. Take a running jump to the pathway west and continue west to the large platform west. Drop the torch and take a running jump with grab to the column north. Take a standing jump to the platform north/east. Take a running jump to the ledge north/west. Push the floor lever so the handle points west. Take a running jump to the platform south/east, a standing jump to the block south/west and a running jump to the large platform south. Pickup the torch and head east to the pathway. Head south then west through the door. Take a standing jump to the block west and a standing jump to the next block west. Take a running jump to the platform west. Drop the torch and push the floor lever so the handle points west. Pickup the torch, climb the stairs and take a running jump to the raised block north. Take a standing jump to the block north/east. Take a running jump to the raised block east. Take a running jump to the dome north. Light the flame pedestal for a cutscene of the door in the north wall now opening. (5/5) (north/west from the Shiva) Take a running jump to the ledge north. Slide down the slope and jump to the ledge east. Take a running jump to the ledge south/east. Take a running jump down to the small platform east. Follow the pathway east then north to reach the newly opened door in the north wall.
Route to SECRET#22: From the Shiva statue with torch in hand, take a running jump to the pathway west. Turn left (south) and jump to the small platform south/east. Drop the torch and take a standing jump to the left side of the column west. Take a standing jump to the next column. Take a standing jump with grab to the slope south. Pull up, jump and grab the next slope. Pull up, jump between the two slopes with curves right to land on the flat tile. Push the floor lever (handle points north) to open a door back on the main floor. Drop to the flat tile, angle to face south/east and take a running jump back to the main floor. Grab a torch from the pedestal and light it on the flame pedestal. Head through the door west and take a running jump to the ledge north/west. Light the wall torch and watch a cutscene of a door still unopened. Take a running jump back to the ledge south/east and take a running jump to the ledge south/west. Light the wall torch to watch the door opening in the previous room. Take a running jump back to the ledge north/east and head back to the previous area east. Drop the torch, head through the newly opened door east and pickup the SECRET# 22 GOLDEN ball on the pedestal. Pickup the torch, head up the stairs north, drop into the pathway and around to the Shiva statue platform. Take a running jump to the pathway west, head north through the pathway door and follow the pathway around to reach the newly opened door in the north wall.
From the newly opened door in the north wall, drop the torch and head west. From the left side of the ledge, take a running jump and grab the crevice in the column. Shimmy around the corner and pull up onto a small wooden platform. Take a running jump to the slope north, slide and jump to the ledge west. Head north through the opening into a new area.
Room 19: Light Bridges
Head west and take a running jump over the gap. Pickup a TORCH from the pedestal and take a running jump east back over the gap. Take a running jump east over the gap and light the torch on the flame pedestal. Take a running jump over the gap west and face north. Take a running jump to the light bridge north and continue running jumps north to reach the far ledge north. Drop the torch and push the floor lever to raise two blocks. Pickup the torch and take a running jump to the light bridge south and another jump to the middle light bridge south. From the higher ledge corner south/west, take a running jump to land on the small light bridge west. Take a running jump to the next light bridge north. Angle to face south/west and take a running jump to the slope. Jump back and forth between the slopes with curves right to eventually land on the flat ledge west. Take a standing jump south, drop the torch and push the floor lever to open a gate below.
Route to SECRET#23 (Part 1): With the torch, take running jumps south then east over light bridges to a ledge on the south wall. Drop the torch and pull the wall switch to open a door high in the north/east corner. Take running jumps west and north back across the light bridges to the middle ledge with the floor lever.
From the north/east corner with the torch, take a running jump to the small ledge across the gap. Take a running jump to the column north and a standing jump to the ledge with the wall torch. Light the wall torch for a cutscene of the door below not opened yet. Drop the torch down so it lands on the north ledge below.
Route to SECRET#23 (Part 2): Take a running jump to grab east to the column with the unlit wall torch and a running jump to the raised column east. Angle to face south/east and take a running jump with slight curve left into the alcove with the newly opened door. Pickup the SECRET#23 BRONZE ball from the pedestal. Angle to face north/west and take a running jump with hard curve right back to the raised block. Take a running jump to the ledge west with the unlit wall torch.
Safety drop to the ledge below and push the floor lever to lower the raised block. Pickup the torch and take a running jump to the light bridge south. Take another running jump to the middle light bridge. From the lower ledge corner south/east, angle to face north/east and take a running jump to the slope north/east and slide to land on a solid platform. Take a running jump to the column north, standing jump to the light bridge and a running jump to the lowered block north. Drop the torch onto the lowered block (press 1). Take a running jump to grab the column south. Take a running jump to the small ledge south/east. Take a standing jump to the ledge south/east and climb the blocks south. Slide down the slope and jump to the large ledge south. Take running jumps over the gaps west and pickup another TORCH. Take running jumps over the gaps east and light the torch on the flame pedestal east. Take a running jump over the gap west, face north and take a running jump to the light bridge north. Take running jumps across the light bridges north to reach the far ledge north. Drop the torch and push the floor lever to raise the two blocks. Pickup the torch and take running jumps across the light bridges south to reach the far ledge south. From the north/west corner of the ledge, take a running jump to the small light bridge north/west. Take a running jump through the opened gate to the small light bridge north and another running jump to the next light bridge north. Angle to face south/west and take a running jump to the slope. Jump back and forth between the slopes with curves right to eventually land on the flat ledge west. Take a standing jump south and head to the east edge of the ledge. From the north/east corner, take a running jump to the small ledge across the gap. Take a running jump to the column north and a standing jump to the ledge with the wall torch. Drop the torch (press 1) and take a running jump with grab to the ledge east. Take a running jump to the raised block east and pickup the torch. Take a running jump to the ledge west and light the wall torch for a cutscene of the door opening below.
Safety drop to ground level and head through the newly opened door. Head right (east) through the corridor and turn right (south) down the stairs to the edge of a set of spike trapped slopes. Climb the low block and take a running jump to the slope south. Slide down and jump just before the slope changes direction to the next slope. Continue to slide down and jump just before the slope changes direction to the next slope. On the final slope take a jump and grab the edge of the ledge ahead. Pull up for a cutscene of the next area ahead.
Room 20: The Cathedral
Take a standing jump to the block north then slide down the slope left with a sharp left curve to the ledge below. Head down the stairs north and take a standing jump to the ledge below. Shoot the vases and pickup the two SMALL MEDIPACKS and two SHOTGUN AMMO around the perimeter and under the domes. In the dome south, push the floor lever to light a vertical portal. In the dome east, pickup a TORCH on the pedestal. Head north and take a standing jump onto the ledge north. Head to the east side of the ledge and take a running jump to the slope north. Jump to the next slope (no slide) and jump to the ledge north. Drop the torch, shoot the vases and pickup the SMALL MEDIPACK. Pickup the torch, head up the stairs and light the torch on the flame pedestal. Take a running jump to the light bridge south and a running jump to the ledge south. Head to the light bridge west but don’t cross yet. Drop the torch turn around and jump to grab the jumpswitch on the column to raise a block on the ledge above. Pickup the torch, jump to the light bridge west and head to the south/west corner. Take a running jump with a hard curve right to land on the ledge west. Shoot the vases south/west and pickup the SHOTGUN AMMO. Pickup the torch, climb the stairs, head down the stairs north, shoot the vases and pickup the SHOTGUN AMMO and SMALL MEDIPACK. Pickup the torch, climb back up the stairs, drop the torch and push the floor lever to activate the vertical portal. From the dome, take a running jump with grab to the ledge across the gap east. Climb the raised block and jump to grab the jumpswitch to lower a raised block in front of a pushblock. Drop down west then take a running jump to grab the ledge across the gap west. Pickup the torch, run off the ledge east to land on the light bridge below. Take a running jump to the ledge east, drop to the floor and drop through the newly activated vertical portal with the torch into a room with 4 wall switches.
Drop the torch, pull the pushblock 2 times and push the pushblock as far as possible north. 1) Push all wall switches down. Climb the block in the east wall. Climb the block north. Take a standing jump to the next block north. Climb the ledge west and follow the pathway west and drop down to the pushblock. Push the pushblock as far as possible east. Climb the ledge north, head east around the ledge, drop east then south and back into the room. 2) Pull up 2 wall switches south/east and north/west. Climb the block in the east wall, take a standing jump to the block north, drop north and pull the pushblock once. Climb the block south and drop back to the floor. 3) Push all wall switches down. Climb the block in the east wall, climb the block north, standing jump to the block north and climb the ledge west. Push the pushblock once north then pull to the middle trigger tile to light the portal above, locking it in place and removing the peak on the pushblock. Head east, then south and climb the stairs south/west. Pull the pushblock out of the alcove east, head back down the stairs north/east. Head north then east and climb the pushblock. Climb to the inactive portal north, turn around and take a running jump with grab to the ledge south. Pull up, shoot the vases and pickup the SMALL MEDIPACK and SHOTGUN AMMO. Head to the east ledge and safety drop to the wooden bridge below. Push the pushblock 1 tile forward then push 1 tile south onto the raised block to open a door across the cavern east. Safety drop down and drop back into the room below. Pickup the torch, jump to the block east, jump to the block north, jump to the next block north and jump to the ledge west. Jump up the stairs south/west and head to the bridge east.
Route to SECRET#24: Drop the torch, safety drop to the block below, shoot the vases and pickup the SECRET#24 BRONZE ball. Take a standing jump to the slope south/west and jump with a hard curve right to land on the ledge south/west. Climb the block north and drop back into the room with 4 wall switches. Jump to the block east, jump to the block north, jump to the next block north and jump to the ledge west. Jump up the stairs south/west and head to the bridge east. Pickup the torch dropped earlier.
Jump to the light bridge east and a running jump with grab (to change trajectory) into the room east. Drop the torch, shoot the vases and pickup the SHOTGUN AMMO. Push the floor lever to lower the pushblock in the room below the turnstile and notice a handle is now ON the turnstile. Pickup the torch, jump to the light bridge west and jump to the small ledge. Drop the torch and take a running jump with grab to the ledge west. Pull up and turn the turnstile so the wall below faces east/west. Head to the ledge east, drop to the wood bridge, pickup the torch and take a running jump to the light bridge east. Take a running jump with grab (to change trajectory) into the room east. Drop the torch, push the floor lever to raise the pushblock in the room below the turnstile (and notice the handle is now OFF the turnstile). Pickup the torch, jump to the light bridge west and jump to the small ledge. Drop the torch and take a running jump with grab to the ledge west. Pull up, head to the ledge south and drop to the lower block south. Enter the room, pull the pushblock 1 tile west then pull the pushblock 1 tile south. Side step left, angle to face north/east and sideflip at the corner back into the room. Push the pushblock south as far as possible onto the trigger tile to activate the portal above. Climb the pushblock, turn around and take a standing jump into the room with the turnstile. Head to the opening east, drop down to the wooden bridge and pickup the torch dropped earlier. Take a running jump to the ledge north/west, head west and take a running jump to the pushblock west. Take a standing jump to the active portal north. Take a standing jump to the light bridge south and a running jump into the room with the turnwheel south.
Route to SECRET#25: Jump to the block west, run off on an angle and slide down the slope. Drop the torch, shoot the vases and pickup the SECRET#25 SILVER ball. Pickup the torch, angle to face north/east and take a standing jump to the platform below. Head north to the right side of the slope west and slide down the slope with a sharp right curve to the ledge below. Head down the stairs north and take a standing jump to the ledge north/east. Take a running jump to the floor north/east and drop into the vertical portal back to the 4 wall switches room. Jump to the block east, jump to the block north, jump to the next block north and jump to the ledge west. Head west and take a running jump to the pushblock west. Take a standing jump to the active portal north. Take a standing jump to the light bridge south and a running jump into the room with the turnwheel south.
TIMED RUN: Drop the torch at the opening of the door, shoot the vases and pickup the SHOTGUN AMMO and SMALL MEDIPACK. Head to the right side of the turnwheel and pull 6-8 times. Run to the door, pickup the torch and take a running jump to the light bridge. Take a standing jump to the portal and a running jump through the portal to the light bridge. Take a running jump to the door before it closes. Drop the torch, shoot the vases and pickup the two SHOTGUN AMMO and SHOTGUN. Head to the west ledge, arm the shotgun and shoot the two gem switches in the lion heads across the cavern to open the gates.
Detour for SECRET#26: Pickup the torch and take running jumps across the light bridges. From the last light bridge, take a running jump to the ledge south. Drop to the block south and drop down to the next ledge south. Drop the torch, shoot the vases and pickup the SECRET#26 SILVER ball. Pickup the torch, take a standing jump to the stairs south and head up to the dome. Run off the edge east to the light bridge below. Head east and take a running jump to the ledge east. Drop through the vertical portal to the 4 wall switches room. Jump to the block east, jump to the block north, jump to the next block north and jump to the ledge west. Head west and take a running jump to the pushblock west. Take a standing jump into the portal north and a standing jump to the light bridge south. Take a running jump into the room south with the turnwheel. TIMED RUN: Drop the torch at the entrance, head to the right side of the turnwheel and pull 6-8 times. Run to the door, pickup the torch and take a running jump to the light bridge. Take a standing jump to the portal and a running jump through the portal to the light bridge. Take a running jump to the door before it closes.
Pickup the torch and take running jumps across the light bridges west and a running jump to the solid ledge west. Take a running jump to the next ledge west and drop the torch. Take a running jump to the crevice west and shimmy left around the corner. Drop to the slope, slide to the end and backflip with twist to the ledge behind for a flyby of the area ahead.
Room 21: The Path of the Dead
Immediately run forward with a running jump across the gap, running jump across the next gap, continue running with curve right and a running jump with grab to the ledge. Pull up and take a running jump with grab to the ladder on the column ahead. Quickly shimmy right around the corner and jump with a twist to grab the ladder behind. Shimmy left around the corner and backflip with a twist to the ledge behind. Jump back and grab the edge of the ledge. Shimmy right to one tile short of the end, pull up and sideflip right to the block right. Jump back and grab the edge of the ledge and shimmy right around the corner to the end. Pull up for a safe spot from falling blocks and enemy blasts. Pull up onto the ledge west, quickly turn right (north) and take a running jump to the slope north. Jump to the next slope, slide a bit then jump and grab the ladder. Shimmy left around the corner and jump with twist to grab the ladder behind. Shimmy left around the corner and backflip with twist to grab the edge of the slope behind. Pull up, slide and jump to the next slope and jump to the ledge ahead. Drop north and climb the ledge west. Shoot the vases and pickup the SMALL MEDIPACK. Climb the ledge south to the middle of the higher tile south. Angle to face north/east, arm pistols and shoot at the GLADIATOR across the cavern until he falls. Take a standing jump with grab to the slope south. Shimmy right, pull up, slide and jump with curve right to the slope ahead. Jump off the slope to the ledge for a cutscene of the area ahead.
Shoot the vases around the perimeter and pickup the SMALL MEDIPACK and two SHOTGUN AMMO. Head north and push the pushblock west and then north to the far end. Climb the pushblock and take a running jump to the ledge east. Take a running jump to the ledge north/east, shoot the vases and pickup the SHOTGUN AMMO. Take a running jump to the ladder on the column south. Climb the ladder to the top, shoot the vases and pickup the SHOTGUN AMMO and SMALL MEDIPACK. Head north and take a running jump to the ledge north/east. Shoot the vases and pickup the SMALL MEDIPACK. Take a running jump to the ledge south/west and climb the block west.
Route to SECRET# 27: Take a running jump with grab to the ledge north. Climb the ledge north and pickup the SECRET#27 BRONZE ball. Safety drop down, head west and take a running jump with grab to the higher ledge south.
Option #1 to SECRET#28 (with health loss): After picking up the bronze ball and dropping down to the lower ledge, take a running jump south/east to the platform with the hint plaque. Take a running jump off the ledge east (with health loss). Pickup the SECRET#28 SILVER ball from the pedestal. Take a running jump to the slope south/west. Jump to the next two slopes and jump to the ledge west. Climb the ledge west and climb the blocks south. Take a standing jump with grab to the slope south. Shimmy right, pull up, slide and jump with curve right to the slope ahead. Jump off the slope to the ledge. Climb the pushblock in the north/west corner of the ledge. Take a running jump to the ledge east. Take a running jump to the ledge north. Take a running jump with grab to the ladder south. Climb to the top and climb the higher block west.
Option #2 to SECRET#28 (no health loss but long detour available later in Room 22).
Take a running jump to the slope west, slide and jump to grab the crevice north. Shimmy left around the corners, let go to grab the crevice below and let go to grab the jumpswitch below to light the vertical portal. Slide down the slope south, jump and grab the pushblock. Drop to the floor and head to the south/east corner. Take a running jump to the ledge east. Climb the ledge east and take a running jump with grab to the ladder south. Shimmy to the right just around the corner and quickly backflip with twist to grab the ladder behind. Shimmy left around the corner and backflip with twist to grab the ladder behind. Shimmy right around the corner and quickly backflip with twist to grab the ladder behind. Shimmy left around the corner and climb to the top. Shimmy left then down the ladder and backflip with twist to grab the crevice behind. Let go and grab the crevice below. Let go and grab the jumpswitch to activate the vertical portal. Reverse roll, slide down the slope and jump to the ledge ahead. Head north to the middle of the large platform and run into the hole to drop into the vertical portal below.
Swim to the ledge east and pull out. Shoot the vases and pickup the SMALL MEDIPACK, two SHOTGUN AMMO and SHOTGUN. Head out to the cavern east and take a running jump to the ledge north. Head right to the first alcove east and take a standing jump with grab to the ladder north/east. Shimmy right around the corner then climb to the top for a cutscene of the area.
Room 22: Entrance to the Tower
Arm pistols and shoot the GLADIATOR which removes the barrier and explodes the two HORSEMEN. Shoot the vases and pickup the four SHOTGUN AMMO and SMALL MEDIPACK in the middle of the platform.
Head north, shoot the vases and pickup the two SHOTGUN AMMO. Climb the stairs south, climb into the inactive portal east and face west. Arm the shotgun, jump up and shoot the gem switch in the lion head west. Take a standing jump west for a cutscene and shoot the two AHMETS that emerge. Keep close to the structure to avoid the SKULL head shooting laserbeams from above. Head around to the other side of the structure. Face east, quickly backflip three times and shoot the gem switch in the lion head east. Run forward to the structure and head north. Pull the pushblock once then sideflip left to avoid the laserbeam. Pull the pushblock once again then sideflip left to avoid the laserbeam. Take a standing jump with grab to the pushblock north, reverse roll, arm shotgun and shoot the gem switch in the lion head south. Drop down to the structure to avoid the laserbeam. Head south to the other side of the structure. Pull the pushblock once then sideflip right to avoid the laserbeam. Pull the pushblock once again then sideflip right to avoid the laserbeam. Take a standing jump with grab to the pushblock south, reverse roll, arm shotgun and shoot the gem switch in the lion head north. Drop down to the structure to avoid the laserbeam. Watch the Skull explode and the barrier disappear.
Climb the pushblock and take a standing jump with grab to the roof of the structure. Push the floor lever to activate the portal east. Safety drop down, shoot the vases and pickup the two SHOTGUN AMMO around the perimeter. Head north and push the pushblock north once. Climb the pushblock and take a standing jump with grab to the ledge north. Pickup the SHOTGUN AMMO and head to the ledge north. Take a running jump across the gap west and drop down to the stairs. Shoot the vases and pickup the two SMALL MEDIPACKS and two SHOTGUN AMMO around the perimeter. Climb the block north/west, face north, backflip to the slope and jump with grab to the ledge north. Take a running jump to the ledge south and push the floor lever to activate a portal in the opposite room south at the west wall (used for Secret#28 Option 2 see below). Climb the blocks south back to the ledge south and safety drop into the room south. Head south and push the pushblock south once. Climb the pushblock and take a standing jump with grab to the ledge south. Take a standing jump to the block north/east and pickup the SHOTGUN AMMO. Drop to the ledge south/west and to the ledge south. Take a running jump across the gap west. Drop to the block south/west and climb to the ledge with the active portal west. Shoot the vases and pickup the SMALL MEDIPACK. Safety drop to the floor below and head through the opening east. Safety drop to the floor below and head up the stairs west. Pull/push the large pushblock to the raised block east. Climb the stairs north and climb the pushblock south. Head to the ledge south and safety drop into the room south. Head through the opening east and take a running jump to the ledge south. Push the floor lever to raise the pushblock. Safety drop down and pull the pushblock south to bridge the gap in the ledge above. Climb the stairs north and make a hairpin turn south. Climb the pushblock south. Head to the ledge south and safety drop into the room south. Approach the “bull” to awaken it and lure it to the switch across the bridge east to open two doors in the middle platform.
Head north across the staircase and push the large pushblock north and pull once east. Climb the stairs south, make a hairpin turn to the right, climb the pushblock north and take a standing jump with grab to the ledge north. Drop to the block north, face east, slide down the slope and jump to grab the pushblock east. Take a running jump to the ledge north/east. Jump up and grab the crevice, shimmy right around the corners and let go to grab the jumpswitch to lift the gate to a “bull” switch. Climb the stairs west, then south with a hairpin turn to the right. Climb the pushblock north and take a standing jump with grab to the ledge north. Drop into the room north, approach the “bull” to awaken it and lure it to the switch in the alcove east to open two doors in the middle platform.
Climb the steps west, climb the block south, climb to the ledge south and safety drop into the middle room. Push the wall switch in the north/west alcove. Reverse roll, head south and push the wall switch in the south/west alcove. Head to the ledge east and enter the active portal east. Exit through the opening east, head north and take a running jump to the ledge north. Shoot the vases and pickup the SMALL MEDIPACK. Take a running jump to the raised block in the pool west and a running jump to the ledge west. Pickup a TORCH on the pedestal, take a running jump to the raised block east and a running jump to the ledge east. Head to the ledge east and take a running jump over the gap south. Continue east and take a running jump over the gap south. Head west, take a running jump to the raised block in the pool and a running jump to the ledge west. Light the torch on the flame pedestal, take a running jump back to the raised block in the pool and a running jump to the ledge east. Take a running jump over the gap north and turn left to the active portal west. Head through the portal back to the previous middle room. Head west up the stairs and light the wall torch in the north/west corner west wall to open the large circular door in the west wall.
Option #2 to SECRET#28 (no health loss but long detour): Climb the pushblock south with a running jump to the ledge south. Take a running jump over the gap to the west. Drop to the ledges south/west. Take a standing jump to the ledge south/west and walk through the portal. Take a standing jump south and safety drop to the floor below. Head through the door east avoiding the spike traps. a) You can repeat the timed run through the portal to reach the upper level timed door OR b) move the south pushblock closer to the already opened double doors (pull west, pull north, push north, pull east) and head through the portal onto the pushblock and climb to the ledge east. Drop into the water, swim through the underwater door and pull up into the next room. Grab a torch, light on the pedestal, head through the pathway to the Shiva platform then to the next pathway west. Head north, follow the pathway through the door north, drop the torch, head west, grab the crevice west, shimmy right, drop to the wooden platform, running jump to the slope, jump to the ledge west and through the opening north. Grab a torch west, light east, head north on the light platforms, and through the door north. Head east, then north, slide down the spiked slopes and grab the platform. Slide down the slope west to the stairs north/west, running jumps to the middle floor north/east, grab a torch east, light on the portal flame and drop into the portal. Jump east, north, north, west, jump to the pushblock, into the portal, onto the light bridge and into the room south. TIMED RUN: Pull the turnwheel, pickup the torch, through the portal onto the light bridge and into the room north before the door closes. Head onto the light bridges west, onto the ledges west, drop the torch, grab the crevice shimmy right and pull up. Drop into the room west and pickup the SECRET#28 SILVER ball on the pedestal. Take a running jump to the slope south/west. Jump to the next two slopes and jump to the ledge west. Climb the ledge west and climb the blocks south. Take a standing jump with grab to the slope south. Shimmy right, pull up, slide and jump with curve right to the slope ahead. Jump off the slope to the ledge, drop into the portal, swim out east, head north, then west through the portal back to Room 22.
Route to SECRET# 29: Head to the ledge east and take a running jump with grab to the ledge across the gap east. Climb the ladder to the top, take a standing jump north/east and a standing jump south/east. Pickup the SECRET#29 BRONZE ball. Take a standing jump to the slope north, jump back and forth with a hard curve left to land on the flat ledge north/west. Take a standing jump to the flat ledge south/west and climb down the ladder. Take a running jump to the ledge west and back to the large circular door in the west wall.
Head through the door for a level change.
LEVEL 3 – Tower of Astrash
Shoot the vases and pickup the SHOTGUN AMMO. Head to the south ramp and shoot the vase in the alcove. Climb into the alcove and drop to the lower ledge south. Take a standing jump to the slope south/west and jump to the ledge. Safety drop to the lower floor, shoot the vases and pickup the SMALL MEDIPACK. Climb the ledge north, take a standing jump to the slope south/west and jump to the ledge. Climb to the ledge south and take a running jump to the ledge below. Head down the stairs, shoot the vases and pickup the two SHOTGUN AMMO and two SMALL MEDIPACKS.
Room 23: The Sanctuary of Fire
Head into the water and shoot the three AHMETS from the safety of the stairs. Shoot the GLADIATOR to raise a block in the room. Head to the platform south and pickup the two SHOTGUN AMMO.
Route to SECRET# 30: Head into the water south/west corner and pickup the SECRET#30 BRONZE ball.
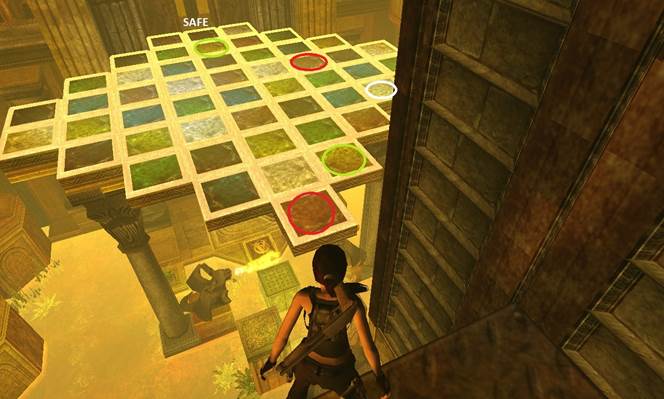
From the platform south and take a running jump to the raised block south timed to avoid the flames. Continue jumps across the columns north to the final ledge east. When the flame subsides, face north, backflip to the slope, jump and grab the ladder above. Climb then jump with twist to grab the ladder behind. Shimmy left around the corner and drop to the ledge. Take a standing jump with grab to the ladder south/west. Shimmy left around the corner, climb down and when the RED tile flame on the wall is OFF, backflip with twist then jump back to grab the edge before the flame lights again. COLOUR SEQUENCE METHOD: RED, GREEN, SILVER are a consistent pattern to help traverse the grid towards the safe tile in the alcove south (see screenshot). To make it easier, shimmy to the right around the perimeter to the SILVER tile on the right then SAVE. Look up at the flame pattern above and when the SILVER is OFF, pull up and jump to the RED tile, then the GREEN tile and a final jump to the safe tile in the alcove south. Pull the wall switch to open a door north/west and shut off all flames.
Head to the north side of the platform and take a running jump to the ladder. Climb up, shimmy right around the corner and drop to the ledge. Take a standing jump with grab to the ladder north. Climb down and drop to the ledge when the flame subsides. Take running jumps to the column and ledge west. Shoot the vases and pickup the three SHOTGUN AMMO and SMALL MEDIPACK. At the top of the stairs, take a running jump with grab to the ledge east. Shoot the vases and take a standing jump with grab to the crevice south/west. Shimmy left around the corner and drop to the ledge. Backflip to the slope west and grab the ledge ahead. Shoot the vases and pickup two SHOTGUN AMMO. Jump to the ledge north and through the entrance for a cutscene of the area.
Room 24: The Sanctuary of Light
Head to the ledge west, angle to face north/west and shoot the GLADIATOR releasing triangle orbs and a DRAGON. Shoot a few ORBS from this ledge then head to the opposite ledge north, hug the north wall and shoot a few more ORBS. Head back to the middle ledge and pickup the SMALL MEDIPACK beside the pushblock east. Pull the pushblock one tile west, climb up and grab the ledge north/east. Shoot the vases and pickup the SHOTGUN AMMO. Climb the small ledge north/east, face west and shoot another ORB from a distance. Take a standing jump to the ledge west, shoot another ORB and backflip back to the ledge behind. Take a running jump over the slope south and pickup the SHOTGUN AMMO. Shoot the vases on the ledges south and pickup the SMALL MEDIPACK and SHOTGUN AMMO. Take a running jump to the octagonal ledge south, a running jump to the ledge west and shoot another ORB. Take a running jump back to the octagonal ledge east, a running jump to the ledge north, a running jump over the slope north and continue to the far ledge north. Take a running jump to the ledge west and shoot the final ORB for a cutscene showing the Dragon now docile.
Take a running jump south, climb the block and pickup the SMALL MEDIPACK. Take a running jump to the block south/east and a standing jump to the ledge east. Pull the pushblock to the middle to connect a beam of light. Take a running jump to the ledge north/east, push the pushblock once west and push once north to connect the lightbeam. Take a running jump to the ledge north/west and pull the pushblock out once, pull twice south and push once south to link the lightbeam. Take a running jump to the ledge south/west. Pull the pushblock once south and push west twice. Shoot the vases in the north ledge and pickup the SMALL MEDIPACK. Return to the ledge south, climb the pushblock and take a running jump with grab to the slope west. Pull up and backflip to the ledge behind. Head to the ledge south and take a running jump with grab across the gap. Pull the pushblock once east and push once east. Take a running jump with grab to the ledge south and pull the pushblock 3 times north. Safety drop to the ledge below, shoot the vases on the ledge south and pickup the SMALL MEDIPACK. Shoot the vases in the south/west ledge and pickup the two SHOTGUN AMMO. Return to the ledge, pull the pushblock once south and push the pushblock west. Take a running jump to the ledge east and pull the pushblock once east, twice north and push once north to connect the final lightbeam and open a door in the north/east wall.
Route to SECRET# 31: Head north/west and climb the pushblock in the north/west corner. Take a running jump with grab to the slope west. Pull up and backflip to the ledge behind. Head to the ledge east and take a running jump with grab across the gap. Shoot the vases in the north/east corner and pickup SECRET#31 BRONZE ball.
Continue around the upper perimeter ledges, shoot the vases and pickup the six SHOTGUN AMMO. Head to the east wall and use the small slope to the lower level and drop to the pushblock to the level below. Head west to the plaque and watch a cutscene and the Dragon disappear. Shoot the vases and pickup the SHOTGUN AMMO. Head through the opened door in the north/east wall and slide down the slope. Jump to grab the crevice, shimmy right around the corner, drop to the slope and jump off the 1st slope to the slope behind. Jump with grab to the ledge ahead. Shoot the vase and pickup the SHOTGUN. Head through the opening west for a cutscene of the next area.
Room 25: The Sanctuary of Water
Arm weapons and shoot the two GLADIATORS while avoiding the blasts from the SKULL. Shoot the Lion Head Gems around the perimeter walls (south, east, west, north) and 3 more in the centre (looking south, east) of the area with the shotgun. Quickly GET OUT OF THE WATER as the Skull explodes and the SHIVA shoots beams electrifying the water. Head to the south/east corner and push the floor lever. Head to the south wall and push the two pushblocks north. Head to the east wall and push the south/east pushblock 2 times west. Push the north pushblock once north. Push the next north pushblock once north and once west. Push the floor lever in the north/east corner. Head to the south wall and push the south/east pushblock 2 times west. Head to the next south/west pushblock and push 2 times west. Push the floor lever in the south/west corner. Head to the west wall and push the middle pushblock once north. Push the north/west pushblock once north and 2 times east. Push the floor lever in the north/west corner.
Head to the north wall and climb the raised block south. Take a running jump with grab to the ledge north. Push the wall switch to raise two platforms in the upper ledges south. Take a standing jump to the raised block and a running jump to the lower floor west. Shoot the vases around the perimeter and pickup two SMALL MEDIPACKS, six SHOTGUN AMMO and SECRET#32 BRONZE ball. Head to the west wall and climb the raised block to the upper ledge west. Shoot the vases on the upper ledges and pickup the two SHOTGUN AMMO. Head to the north/west corner, take a standing jump to the column north/east and a standing jump with grab to the ladder north. Climb the ladder to the top, shoot the vases and pickup the SHOTGUN AMMO. Head to the ledge west and take a running jump to the slope south. Slide then jump and grab the ledge south. Shoot the vases and pickup four SHOTGUN AMMO. Take a running jump to the raised platform south/east. Face north, arm the shotgun and shoot the Lion Head Gem in the north wall.
Drop down to the slope below and take a standing jump down to the pushblock south/east. Head to the east wall, climb the pushblock and raised block and climb up to the upper east ledge. Shoot the vases and pickup the SHOTGUN AMMO. Take a running jump to the column north and a running jump with grab to the ladder north. Shoot the vases and pickup the SHOTGUN AMMO. Climb the stairs north/east, drop south and take a running jump with grab to the crevice south. Shimmy right around the corners and drop to the ledge south. Shoot the vases and pickup the two SHOTGUN AMMO and SMALL MEDIPACK. Take a running jump to the raised platform south/west. Face north, arm the shotgun and shoot the Lion Head Gem in the north wall for a cutscene of the door opening in the south/east corner.
Head to the south/east corner, safety drop to the ledge below and head through the newly opened door. Run off the ledge south/east to the block below. Shoot the vases and pickup the SHOTGUN AMMO and SMALL MEDIPACK. Push the floor lever to open a door to a previous area at the beginning of the level. Return to the ledge north, climb the block north/east and take a running jump with grab to the ladder. Climb up, jump back to the slope behind and jump to grab the ledge. Head through the entrance south for a cutscene of the area ahead.
Room 26: The Sanctuary of Wind
Safety drop to the lower floor, shoot the vases and pickup the four SHOTGUN AMMO, two SMALL MEDIPACKS and the SHOTGUN around the perimeter. Head to the east wall, climb the block and push the wall switch to lower and raise blocks. Head west and push the pushblock once south and 2 times west. Climb the pushblock and take a standing jump with grab to the raised block north. Pull up and shoot the GLADIATOR across the gap east. Take a running jump with grab to the main platform east, head to the end of the platform and pull the chain to lower two floor trap doors below and raising two trap doors here.
Face north and take running jumps across the two wooden platforms while avoiding the rolling balls. Angle to face north/east and take a standing jump to the ramp and a running jump with grab to the ladder north. Climb and shimmy left then drop to the ledge behind. Head through the opening west, angle to face south/west and when the moving block approaches, take a running jump to the ledge then run forward to the safe tile. Face south and take a standing jump to the next safe tile beyond the moving block. Face south and take a running jump with grab to the jumpswitch on the column ahead while avoiding the moving block to stop the rolling balls below. Head north, take jumps across the ramps to the raised trap door north. Face south and push the boulder off the ramp south to watch a cutscene of the boulder hitting a switch.
Route to SECRET#33: Climb the raised block west, shoot the vase on the left, take a running jump to the ledge west and pickup the SECRET#33 BRONZE ball. Take a running jump to the ramp south/east and return to the main platform south.
Face south and take running jumps across the two wooden platforms while avoiding the rolling balls. Angle to face south/east and take a standing jump to the ramp and a running jump with grab to the ladder south. Climb and shimmy right then drop to the ledge behind. Head through the opening west, angle to face north/west and when the moving blocks approach, take a running jump to the ledge then a running jump forward to the safe tiles. Face north and when the blocks are together, take a standing jump then a running jump with grab to the jumpswitch on the column ahead to stop the rolling balls below. Head south, take jumps across the ramps to the raised trap door south. Face north and push the boulder off the ramp north to watch a cutscene of the boulder hitting a switch and opening doors below. If you’re not going for the secret, safety drop to the lower floor and drop through the trap door to the lower floor.
Route to SECRET#34: Head north, climb the ladder and shimmy to the ledge left. Take a running jump with grab to the ledge east (with the plant). Take standing jumps across the ledges south and a running jump to the Shiva platform. Push the wall switch east to open a door south/west. Safety drop to the lower platform and head across the ramps south. Climb the block west, shoot the vases and take a running jump to the ledge west. Take a running jump to the platform west and head through the newly opened door south. Take a running jump to the ledge south and a running jump to the lower platform south/east. Reverse roll and take a running jump to the ledge north/west. Safety drop to the lower ledge and take a running jump to the platform north. Shoot vases and pickup the SHOTGUN AMMO and SECRET#34 SILVER ball. Push the floor lever to open the door back to the previous room.
Head through the newly opened doors west for a cutscene of the area ahead.
Room 27: The Centre
N.B. Keep a SAVEGAME at the beginning of this room in case you experience a glitch in a pushable later on. Head up the ramp and shoot the four HARPIES. Shoot the vases around the perimeter and pickup the two SMALL MEDIPACKS, two SHOTGUN AMMO and SECRET#35 BRONZE ball. Head to the pushblock in the middle of the room and push 2 times north. Climb the pushblock and take a standing jump to the ledge. Push the pushable east then climb the block west and ledge east. Take a running jump to the next ledge east and a running jump to the platform with the flame pedestal east. Push the floor lever so the handle faces north to move two transparent platforms. Take a running jump north and pickup the SHOTGUN AMMO. Take a running jump to the transparent platform west and a running jump to the ledge west and pickup the SHOTGUN AMMO. Head to the opening south and take a running jump to the column south/east. Take a standing jump with grab to the structure east and pull up. Take two running jumps south and a running jump to the ledge south/east.
Push the floor lever so the handle faces south/east and watch a cutscene of platforms rising in the middle structure. Climb to the ledge with the portal and take a running jump to the ledge north/east. Push the floor lever so the handle faces north/east and watch a cutscene of platforms rising and a small block raising the pushable in the middle structure. Drop to the ledge with the flame pedestal south and a running jump to the middle structure west. Safety drop to the blocks below and push the pushable onto the raising block north. Climb the block west and the ledge east and running jumps to the platform with the flame pedestal east. Take a standing jump with grab to the ledge north and a running jump to the transparent platform west. Take a running jump to the ledge west, a running jump to the ledge south and a running jump to the ledge south/west. Push the floor lever so the handle faces south/west and watch a cutscene of a block raising the pushable in the middle structure below.
Drop down north/east to the pushable in the middle structure below and push onto the solid block east. Climb the block south/west and a standing jump with grab to the ledge south/west. Push the floor lever so the handle faces north/east to lower a small block in front of the pushable. Drop down north/east and pull/push the pushable 3 times north. Climb the column south/west, and a standing jump with grab to the ledge south/west. Push the floor lever so the handle faces south/west to raise the pushable. Drop down north/east back to the pushable and push the pushable north onto the transparent platform. Take a running jump to the platform with the flame pedestal east and push the floor lever so the handle faces south to move the transparent platform with the pushable on it. Take a running jump to the ledge north, head to the window west and a running jump to the ledge north/west. Pull the pushable once onto the raising block and take a standing jump to the transparent platform south/west. Head back to the middle structure south and climb the block west. Take a standing jump with grab to the ledge north/west and push the floor lever so the handle faces north/west raising the pushable. Take a running jump to the transparent platform east and a running jump to the ledge north/east. Safety drop to the ledge with the flame pedestal and push the floor lever so the handle faces north to move the transparent platform beside the pushable.
Take a standing jump with grab to the ledge north/east, a running jump to the transparent platform west and a standing jump to the ledge north. Push the pushable onto the transparent tile south and take a running jump to the ledge east. Safety drop to the platform with the flame pedestal. Push the floor lever so the handle faces south to move the pushable to the middle structure. (N.B. If the pushable goes in the opposite direction of the transparent platform, this is a TR4 glitch per the builder. Reloading a savegame at the beginning of Room 27 and replaying the room should make the pushable work properly.) Head back to the middle structure and climb the block west. Take a standing jump with grab to the middle structure ledge east. Head north and pull the pushable to the middle of the structure where the lightbeams now connect to the pushable.
Getting the Torch to the Upper Portal: Make your way back down to ground floor and pickup a TORCH from the middle of the room. Head south around the pool and drop the torch at the south wall between the two water statues where there is a raised block in the wall. Climb up the middle structure via the pushable, west block, east ledge, south column and a standing jump with grab to the south/west ledge. Push the floor lever so the handle faces north/east to lower blocks below and in front of the south wall. Drop into the pool east, pull out, head south and place the torch onto the lowered block. Climb up the middle structure via the pushable, west block, east ledge, south column and a standing jump with grab to the south/west ledge. Push the floor lever so the handle faces south/west to raise the block in front of the south wall and raise the torch along with it. Drop to the column north/east and a running jump with grab (to change trajectory) through the opening south/west. Head to the east opening and take a standing jump down to the block south/east (slight health loss). Take a running jump to the block south and pickup the torch. Take a running jump to the block north/east and drop the torch. Drop into the pool below and climb back up the middle structure via the pushable, west block, east ledge, north column and a standing jump with grab to the north/west ledge. Push the floor lever so the handle faces south/east to lower blocks below. Drop to the column south/east, take a running jump to the south/east platform and run off the south edge with grab (to change trajectory) to land on the lowered block south. Take a running jump to the block south/east and pickup the torch. Take a running jump to the block north/west and a running jump to the middle structure north/west. Take a running jump to the block west and a standing jump to the ramp south/west. Take standing jumps to the middle structure east and a running jump to the platform with the flame pedestal east. Light the torch on the flame and take a running jump to the block north/west. Take a running jump to the transparent platform north and drop the torch onto the lowered block. Return to the middle structure south and take a running jump to the column south/west. Take a standing jump with grab to the ledge north/west, push the floor lever so the handle faces north/west and take a running jump to the raised block north/east. Pickup the torch and take a running jump to the ledge south/east and a running jump to the ledge with the portal.
TIMED RUN: Head through the portal and drop the torch one tile in front of the south ledge (for easier pickup). Pull the wheel 6-8 times, backflip with twist, jump over the pushable, pickup the torch and take running jumps across the light bridges south across the cavern. At the end, jump to the right to enter the door before it closes. Drop the torch, push the floor lever to raise the pushable and link the lightbeams. Pull the wheel 6-8 times, pickup the torch and head through the door. Drop the torch, shoot the vases and pickup the three SHOTGUN AMMO and SMALL MEDIPACK.
Route to SECRET#36 (Part 1): Climb the ledge in the south/east corner and push the wall switch to activate spikes at the bottom of the Sanctuary of Fire Room floor.
Drop back down, pickup the torch and return to the light bridges north. Take running jumps across the bridges north back to the ledge with the two portals. Head through the portal west, take a running jump to the ledge, drop the torch, shoot the rolling ball base and quickly pickup the torch again to provide a light bridge for the rolling ball to raise the pushable and connect the lightbeams. N.B. If the rolling ball freezes after shooting, pickup the torch, save your game then reload and the ball should unfreeze.
Route to SECRET#37: Push the pushblock south and pull/push 2 times west. Climb the pushblock and jump to grab the monkey swing above. Swing west, SAVE (in case the game crashes) and grab the jumpswitch to raise platforms below. Jump the platforms, climb into an alcove north and pickup the SECRET#37 SILVER ball on the pedestal. Return via the platforms back to the main ledge.
TIMED RUN: Pickup the torch and head through the portal north. Drop the torch one tile from the north ledge, shoot the vases and pickup the two SHOTGUN AMMO. Pull the turnwheel 6-8 times, take a running jump over the wheel, pickup the torch and take running jumps over the light bridge to the far door before it closes. Drop the torch, push the floor lever to raise two pushables in the outer ledge. Pull the turnwheel 6-8 times, pickup the torch and head through the door before it closes. Drop the torch, shoot the vase and pickup the SHOTGUN AMMO.
Route to SECRET#38: TRICKY JUMP: Make sure Lara’s head is aligned straight to the ball then take a running jump to the dome west and pickup the SECRET#38 GOLDEN ball. (TIP: Hold and keep the ALT + UP ARROW keys pressed while doing the running jump to get an extra bit of distance). Return to the ledge east.
Pull/push each pushable to the east and west ledges to line up to the portals across the cavern and link the lightbeams. Pickup the torch and head across the light bridge to the far ledge south. Head through the portal on the left (south/east). TIMED RUN: Drop the torch in the middle of the ledge behind the wheel south, pull the turnwheel 6-8 times, reverse roll and take a standing jump to the ledge south. Pickup the torch, take a standing jump to the ledge east and a running jump to the ramp east. Jump off the ramp and run across the light bridge to the end and enter the door before it closes. Drop the torch, push the floor lever and watch a cutscene of all the lightbeams linking together. Pull the turnwheel 6-8 times, pickup the torch and exit the room. Shoot the vases and pickup the four SHOTGUN AMMO, two SMALL MEDIPACKS and a LARGE MEDIPACK. Pickup the torch and run across the light bridge back to the other side west. Take running jumps to the portal south. Walk through the portal and take a running jump to the ledge south. Arm weapons and shoot the two HARPIES. Take running jumps south to the far south ledge. Push the pushblock to the ladder north and take a running jump with grab to the ladder. Climb the ladder, pull the chain and watch a cutscene of the next area.
Room 28: The Cube
Take running jumps across ledges east to the far ledge east. Shoot the vases and pickup the two SMALL MEDIPACKS and three SHOTGUN AMMO around the perimeter. CUBE SOLUTION (EASY): Push the white and black floor levers then shuffle the cube. Push the blue, red, yellow and green floor levers and watch a cutscene of the solution. If you need to reset the puzzle, pull the chain on the opposite side of the cube cavern. CUBE SOLUTION (TRICK): There is a trick to the puzzle. As long as the black and white floor levers are pushed while the cube is SHUFFLED and the other coloured levers pushed while the cube is UNSHUFFLED, you can solve the puzzle no matter what order or how many times you shuffle or unshuffle the cube. It also works with black and white levers pushed while UNSHUFFLED and other coloured levers pushed while SHUFFLED.
Route to SECRET#39: From the main platform, head north and up the stairs to the upper platform north. Continue west up the first flight of stairs south and climb the ledge south. Pickup the SECRET#39 BRONZE ball on the right (west).
At this point, you can complete the main game by taking a running jump to the middle column and picking up the final item (point of NO RETURN) for a cutscene ending the game. N.B. DO NOT pickup the final item if you want to find the remaining secrets or play the Bonus levels.
Route to SECRET#36 (Part 2): From the upper platform north, jump back and grab the edge. Shimmy to the diagonal part of the platform and fall into the water pool at the bottom. Climb out east and head through the opening east. Head through the door south with a running jump to the ledge south and a running jump to the stairs down to the Sanctuary of Fire Room. (N.B. If the door south is closed, head up the ramp on the right and climb into the alcove south. Safety drop into the room, take a standing jump to the slope south/west and jump to the ledge south. Climb the ledge south and take a running jump to the staircase down to the bottom of the Sanctuary of Fire Room.) Head to the platform in the middle of the south wall, avoid the spikes and pickup the SECRET#36 SILVER ball. Exit avoiding the spikes. Climb the raised block north. Take running jumps across the several columns north/west with a running jump to the column west. Climb the ledge and head through the door west. Climb the stairs and take a running jump with grab to the ledge east. Take a running jump with grab to the crevice south. Shimmy left around the corners and drop to the flat ledge. Face west and backflip to the slope behind. Jump and grab the ledge above. Take a running jump with grab to the platform north. Head through the opening north and through the room to the far door north. Slide down the slope and jump to grab the crevice north. Shimmy right, drop to the slope and backflip to the slope behind. Jump off the slope and grab the ledge ahead. Head through the opening east and through the room to the far wall east and turn left (north). Climb the pushblock, climb the raised block and climb the ledge east. Head through the door south/east, angle to face south/east and run off the edge to land on the ledge below. Head through the door south and through the opening west back to the bottom of Room 27. Head west to the end of the room between the two ramps to the vertical portal room.
Route to SECRET#40: Drop through the vertical portal, push the floor lever to activate the portals. Head through the portal south. Shoot the vases and pickup the SMALL MEDIPACK. Take a running jump with grab across the gap west. Head up the corridor west and around to the circular door north. Climb the central block north and push the floor lever to re-activate the portal. Enter the portal, follow the left wall through the corridor and enter the portal on the left. Head down the corridor with the floor lever. Walk through the portal and stop so you don’t fall to the ground. Take a standing jump to the raised block north/west and safety drop to the lower floor. Head to the north platform and push the floor lever to lower a block north/east. Pickup a TORCH on the pedestal north/west, light the torch on the flame pedestal south and drop it on the lowered block north/east. Head to the north platform and push the floor lever to raise the block. Climb the ladder north/west, take a standing jump to the ledge north/east, standing jump to the raised block east and a running jump to the ledge with the portal. Take a running jump to the raised block east, pickup the torch and take a running jump back to the ledge with the portal. Head through the portal with the torch in hand, head south through the corridor and through the portal at the end. Make a hairpin turn right and head through the portal back to the upper level. Head through the circular door south and down the corridor to the cavern at the bottom east. Take a running jump to the light bridge on the left, up the slope and jump to the upper ledge. Head south and take running jumps to the light bridges west. TRICKY JUMP: From the west edge of the light bridge, hop back twice then run, toss the torch while running then jump and grab the ladder. Climb into the alcove and pickup the SECRET#40 GOLDEN ball on the pedestal. Climb down the ladder and safety drop to the floor below. Take a running jump with grab across the gap west and through the portal west back to the portal room.
Head through the portal east to access the Secret Bonus Level Area.
BONUS LEVEL 4 – Broken Memory Fragments
Shoot the vases and pickup the three SHOTGUN AMMO and two SMALL MEDIPACKS around the portal platform.
BRONZE PORTAL (needs 24 BRONZE secrets)
Enter the portal in the north/west corner and take a running jump with grab to the column north. Take a running jump east and push the floor lever so the handle faces north to raise/lower blocks on columns and platforms. Take a running jump to the column south and a running jump west back to the starting platform. Climb the raised block north and take a running jump with grab to the block behind the portal south. Take standing jumps west to the higher ledge west and push the floor lever so the handle faces north. Safety drop to the lower ledge and take a running jump to the column south and a running jump east back to the starting platform. Climb the raised block north and take a running jump with grab to the block behind the portal south. Take standing jumps east to the higher ledge east and push the floor lever so the handle faces north. Safety drop to the lower level and take standing jumps south and west back to the starting platform.
Climb the raised block north and take a running jump with grab to the block behind the portal south. Take standing jumps west to the higher ledge west, take a standing jump to the raised column east and a running jump to the raised column east. Take a running jump with grab to the dome north and a running jump to the column north. Take a standing jump to the ledge east and pull the pushable 2 times. Take a running jump to the ledge east, a running jump to the dome north and a running jump to the ledge west. Drop to the pushable north, hop back and grab the edge and shimmy to the other side of the pushable. Push the pushable to the lowered block south. Take a running jump with grab to the ledge east. Take a running jump to the ledge south/west and a running jump to the ledge south/east. Take a running jump to the ledge east and a running jump to the dome east. Push the floor lever to raise the block with the pushable and take a running jump to the ledge west. Pull the pushblock once, hop back and grab the edge of the ledge, shimmy to the other side and push the pushblock south. Safety drop to the ledge east and push the pushable 2 times west. Head down the stairs north and up the stairs west. Shoot the vases and pickup the SHOTGUN AMMO. Push the floor lever to raise the pushable and exit west.
Head down the stairs east and up the stairs south. Jump up and grab the upper ledge south. Shoot the vases (to make room) and take a standing jump to the ledge west. Drop to the lower block west and push the pushable south. Safety drop to the lower ledge west, shoot the vases and pickup the SHOTGUN AMMO. Take a running jump to the ledge north/east and head up the stairs west. Enter the room east and push the floor lever so that the handle faces south to raise the pushable. Exit west, down the stairs east and up the stairs south. Jump up and grab the upper ledge south. Take a standing jump with grab to the ledge west. Push the pushable east and then pull/push as far as possible north. Take a running jump to the ledge east and a running jump to the dome east. Take a running jump to the ledge south, drop down then safety drop to the lower ledge Take a running jump to the ledge west, shoot the vases and pickup the two SMALL MEDIPACKS and SHOTGUN AMMO on the platforms. Take a running jump with grab to the block east and climb into the dome east. Take a running jump with grab to the ledge north and a running jump to the platform north. Shoot the vases and pickup the SHOTGUN AMMO. Take a running jump to the dome west, shoot the vases and pickup the LARGE MEDIPACK on the pedestal. Take a running jump back to the platform east and push the floor lever to open the door east. Take a running jump with grab to the ledge south and head through the newly opened door east.
Take a running jump to the platform north/east, arm weapons and shoot the six HARPIES. Shoot the vases and pickup the two SMALL MEDIPACKS, three SHOTGUN AMMO and LARGE MEDIPACK on the pedestal. Head to the push block in the south/west corner and pull/push east. Push the floor lever south so the handle faces south to raise the block south. Climb the pushblock and raised block and pull/push the pushable to the extended ledge north to connect the light beams north and west. Take a standing jump back to the raised block and push the floor lever west so the handle faces west to raise the block west. Pull/push the pushblock to the west raised block, climb and pickup the LARGE MEDIPACK behind the pillar west. Head to the south/west corner and take a running jump to the door south/west. Take a running jump to the dome south and take a running jump with grab to the ladder east. Push the pushable east and north to connect the lightbeams. Drop to the lower ledge, shoot the vases and pickup the SHOTGUN AMMO. Climb back down the ladder and backflip to the dome behind. Head west, climb the block and jump to grab the small ladder south. Climb the ladder, push the pushable west and watch a cutscene of four doors opening in the north wall. Take a running jump to the dome north, a running jump to the ledge west, drop north and take a running jump with grab to the ledge north. Pickup the LARGE MEDIPACK on the pedestal.
Take a standing jump to the ledge north/west, head through the door and shoot the three HARPIES. Pickup the LARGE MEDIPACK on the pedestal and head down the stairs north/east. Take a standing jump north, shoot the vases and pickup the SHOTGUN AMMO. Take a running jump to the platform north/east, push the floor lever so the handle faces north to raise blocks and shoot the three AHMETS below. Head to the dome north, to the dome west and pickup the LARGE MEDIPACK on the pedestal west. Safety drop to the lower platform, shoot the vases and pickup three SHOTGUN AMMO and two SMALL MEDIPACKS. Push the floor lever in the north/west corner so the handle faces west. Push the floor lever in the south/west corner so the handle faces north. Head to the south/east corner, take a running jump to the ledge south, push the wall switch and watch a cutscene of a door opening south. Jump back to the platform north and take a running jump to the ledge south with the newly opened door. Enter the room and climb through the window south. Take a standing jump with grab (to change trajectory) to the small ledge south, a running jump with grab to the small ledge west, a running jump with grab to the small ledge west and a standing jump with grab (to change trajectory) to the window north. Push the floor lever and watch a cutscene of a smaller raised block outside. Climb back into the window, standing jump to the small ledge south, running jumps with grab to the small ledges east and standing jump with grab back to the small room north. Exit back to the main platform north and climb the smaller raised block. Take a running jump with grab to the larger raised block east and running jumps with grab to the three raised blocks north. Climb the stairs, arm weapons and brace for an onslaught of enemies.
Immediately head right to the closed door in the east wall for a safe spot from which to shoot the four GLADIATORS and six AHMETS. Shoot the vases and pickup the four SHOTGUN AMMO and four SMALL MEDIPACKS around the main platform. Head through the newly opened door east and pickup the SECRET# 41 BRONZE TROPHY from the pedestal. Slide down the slope and jump back to the portal platform.
SILVER PORTAL (needs 7 SILVER secrets)
Enter the middle portal north, shoot the vases and pickup the SMALL MEDIPACK. Take a running jump to the platform north, shoot the vases and pickup the SHOTGUN AMMO. Head up the slope west, jump up and grab the ledge south and take a running jump to the platform south. Pickup a torch from the pedestal and take a running jump back to the platform north. Head down the slope and take a running jump to the ledge north. Drop the torch on the lowered blocks and take a running jump back to the platform south. Head up the slope west, jump up and grab the ledge south and take a running jump to the platform south. Pickup a torch from the pedestal and take a running jump to the slope north/east. Jump to the next slope and jump to the platform east. Light the torch on the flame pedestal and take a running jump to the light bridge east. Take a running jump to the next two light bridges north. Take a running jump, toss the torch and grab the crevice. Shimmy left around the corner, let go jump with twist off the slope and grab the ledge behind. Push the floor lever so the handle faces north. Take a running jump to the platform with the flame pedestal north/west. Take a running jump with grab to the ledge west and a standing jump with grab to the upper ledge south. Shoot the vases and pickup the SHOTGUN AMMO. Head to the raised blocks south and pickup the torch. Take a standing jump to the lower ledge north and a running jump to the platform with the flame pedestal east. Light the torch on the flame pedestal revealing more light bridges.
Take standing jumps to the platforms west and a standing jump to the light bridge west. Take a running jump to the solid ledge north. Drop the torch, shoot the vases and pickup the SHOTGUN AMMO. Take the torch and a running jump to the platform north. Push the floor lever so the handle faces north to open two doors on the west ledge. Take the torch with a running jump to the west ledge and pickup the SMALL MEDIPACK on the pedestal. Take the torch through the newly opened door west and shoot the four HARPIES. Head to the floor lever west and push the floor lever to lower the raised block west. Take the torch west and light the wall torch in the alcove west to open a door between two gargoyles in an upper area. Head to the east floor lever and drop the torch onto the lowered block east. Push the floor lever east to raise the block east. Head back through the newly opened door east and take a running jump to the platform east. Take a standing jump to the platform north and a running jump to the platform north. Push the floor lever so the handle faces east and immediately side jump to the transparent platform before it rises. Take a standing jump with grab to the ledge east. Shoot the vases and pickup the four SHOTGUN AMMO and two SMALL MEDIPACKS. Head through the door between two gargoyles west and head to the right of the staircase and pickup the torch from the raised block west. Head east then climb the staircase west. Head across the light bridge west and take a running jump to the dome west.
Drop the torch, shoot the vases and pickup the SHOTGUN AMMO. Take a running jump to the platform north, shoot the vases and pickup the SHOTGUN AMMO and SMALL MEDIPACK. Take a running jump to the ledge north, push the floor lever so the handle faces north and watch a cutscene of two doors beside the Shiva statue not opened yet. Reverse roll and take a running jump back to the platform south and a running jump to the dome south. Pickup the torch, head across the light bridge east and a running jump to the platform east. Drop the torch, take a running jump to the platform north/east, shoot the vases and pickup the SMALL MEDIPACK. Take a running jump with grab to the ledge north, push the floor lever so the handle faces north and watch a cutscene of the two doors beside the Shiva statue now open. Reverse roll, take a running jump back to the platform south, a running jump to the platform south/west and head down the stairs east. Head north, climb the ledge west and take a standing jump to the transparent platform east. Safety drop to the platform below. Head through the door west and take a running jump to the newly opened door beside the Shiva statue north. Head up the stairs and watch a cutscene of the task ahead.
Pick one of the KNIGHTS and shoot it through one of the electrical beams east or west. Watch a cutscene of the explosion and the door opening north. Shoot the vases and pickup the three SHOTGUN AMMO and SMALL MEDIPACK around the perimeter. Head through the door north and pickup the SECRET#42 SILVER TROPHY on the pedestal. N.B.: If you have all 3 Golden Secrets, slide down the ramp back to the portal platform. If you do not have all 3 Golden Secrets, you can still do the Golden Portal challenge by heading back through the door (see Alternate Route below).
GOLDEN PORTAL (need 3 GOLDEN secrets)
Head through the portal north/east, shoot the vases and pickup four SMALL MEDIPACKS. Starting from the portal, take a running jump to grab the jumpswitch west where the top and bottom symbols match raising the platform underneath. Reverse and take a running jump to the jumpswitch east where the top and bottom symbols match raising the platform underneath. Reverse and take a running jump to the 2nd jumpswitch west where the top and bottom symbols match raising the platform underneath. Reverse and take a running jump to grab the 4th jumpswitch east with the platform already raised. Reverse and take a running jump to grab the 4th jumpswitch west with the platform already raised. Reverse and take a running jump to grab the 3rd jumpswitch east with the platform already raised. Reverse and take a running jump to grab the 3rd jumpswitch west with the platform already raised. Head north and climb the newly raised block. Take a running jump with grab to the ledge north.
Shoot the vases and pickup the LARGE MEDIPACK on the pedestal and four SMALL MEDIPACKS around the perimeter. Push the floor lever west so the handle faces west. Push the floor lever east so the handle faces east. Push the floor lever north so the handle faces north. Push the turnstile south/west so the wall underneath faces north/south. Push the turnstile south/east so the wall underneath faces east/west. Push the turnstile middle/east so the wall underneath faces north/south. Push the turnstile middle/west so the wall underneath faces north/south. Push the turnstile north/west so the wall underneath faces north/south. Push the turnstile north/east so the wall underneath faces north/south. Head south and take a standing jump to the raised block south. Safety drop, reverse and take a running jump into the maze north. Head west, hairpin turn east, head north half way, take a running jump with grab through the arch west, head north, take a standing jump west and a running jump across the gap north.
Head north and watch a cutscene of a DRAGON awakening. Pickup the SHOTGUN and take a running jump to the platform north.Take a running jump to the platform north/west and a running jump to the ledge north/west. Take a running jump to the platform north/east and a running jump to the blocks east. Climb the blocks to the top and head south to the end of the ledge. Shoot the vases and pickup the SMALL MEDIPACK. Take a running jump to the small platform south/west and a running jump to the platform south/west. Take a running jump with grab to the ledge east, climb the block and shoot the gem in the lion statue west to raise a block. Take a running jump to the ledge west and climb the raised block to the upper ledge. Climb the ledge east to the block with the plant, angle to face north/west and jump up and shoot the base of the 1st boulder. Angle to face north/east and jump up and shoot the base of the 2nd boulder. 3rd BOULDER EASY METHOD: Head east, climb the angled ledge east, face north and jump up and shoot the base of the 3rd boulder. 3rd BOULDER CHALLENGING METHOD: Head to the north/east corner of the platform and take a running jump over the gap to the platform north/east. Head to the slope west, backflip and jump to grab the jumpswitch. Head north to the slope west, backflip and jump to grab the jumpswitch. Climb the small raised block and take a running jump with grab to the large raised block and shoot the base of the 3rd boulder to neutralize the Dragon.
Head to the south/west corner and take a running jump across the gap to the platform south/west. Shoot the vases and pickup the two SMALL MEDIPACKS. Head to the south/west corner and safety drop through the hole in the floor and head to the ledge north/east. Take a running jump with grab to the ledge north and push the wall lever north to watch a door opening nearby. Safety drop to the ledge west and take a running jump to the platform north/west. Take a running jump to the ledge north/west and climb the blocks west to the top. Take a running jump through the newly opened door west and pickup the SECRET#43 GOLDEN TROPHY on the pedestal. Slide down the slope and jump to return to the portal platform. Head through the middle portal back to the previous level (skip down to Level 3 Tower of Astrash below).
ALTERNATE ROUTE: GOLDEN PORTAL (without 3 GOLDEN secrets)
N.B.:If you do not have all 3 Golden Secrets, you can still do the Golden Portal challenge by heading back through the door after the Silver Portal challenge. However this route misses the majority of intended gameplay. You can still do the multi-jumpswitch, maze and dragon challenges if you wish (see above).
Head back through the door and down the stairs south with a running jump back to the platform south. Head east with a running jump to the platform east and a standing jump to the two platforms north. Push the floor lever to lower the transparent platform. Push the floor lever again with a sideflip to land on the rising platform. Take a standing jump with grab to the ledge east and head up the large staircase west. Take a standing jump to the platform north/east and a running jump to the ledge south/east. Climb the block east and take a running jump to the ledge north. Head along the ledge east and take a running jump to the ledge east. Head north then north/east and take a running jump to the ledge north. Safety drop through the hole in the floor west and head to the ledge north/east. Take a running jump with grab to the ledge north and push the wall lever north to watch a door opening nearby. Safety drop to the ledge west and take a running jump to the platform north/west. Take a running jump to the ledge north/west and climb the blocks west to the top. Take a running jump through the newly opened door west and pickup the SECRET#43 GOLDEN TROPHY on the pedestal. Slide down the slope and jump to return to the portal platform. Head through the middle portal back to the previous level.
Route back to the top of Room 28: The Cube
Climb the block and jump up and grab the portal above. Exit through the opening east. Head left and climb the push block east, standing jump south, climb west, climb east, climb south, standing jump with grab south/west, running jump east, running jump east, running jump to the ledge north/east, climb the ledge and enter the portal east. Take a running jump through the next portal west to the ledge north. Take a running jump to the portal ledge north and head through the portal. Head through the next portal south. Take a running jump to the platform south and run south along the ledge. Take a running jump with curve right to the ledge south/east and a running jump to the portal ledge south/east. Head through the portal south and take a running jump with grab to the platform south. Take a running jump with grab to the ledge west and a running jump to the platform west. Climb the push block and grab the ladder north. Climb the ladder and take standing jumps to the platforms south/east, a running jump across the gap east, a standing jump north/east and a running jump north/east. Climb the stairs south to the ledge south. Take a running jump with grab to the cube column north and pickup the GREAT MECHANICAL PUZZLE OBJECT to end the game.