TR1 VALLEY 1
TRLE Level by step0to1
Walkthrough by Treeble (updated with a few notes from the level designer)
Pro-tip: save often as there are unmarked death traps along the way.
When the level begins, loop around to the right and pull up next to the wall where there's a small bump on the floor. Hop over the gaps to get flares in the end, then safety drop to the floor and go down the ramp in one of these gaps for a small medipack. Nearby you'll see a double closed gate requiring two keys, that's our current goal here.
If you look at the far wall, you'll see two doors close to the ceiling in the opposite corners of the room. There's one key behind each, and you can get them in any order you like. To open the doors, first slide down into the big greenish hole in the area and step on the face tile (many doors operate this way in this level); and, for the other door, grab the tilted corner of the ledge with the marble pedestal but don't pull up as you'll burn to a crisp. Instead, shimmy to the tile with the pedestal and carefully walk around it to a wall switch behind it. Both doors are now open.
Let's begin with the nearby passage. Backflip to the ramp and bounce off to grab the taller ledge by the open door. Go through the passage and crawl though the triangular crack in the wall ahead, then slide off into a dry cave. Head north, making a stop for flares, and inspect the deep chasm ahead, we need to find a way down safely.
If you throw a flare into the pit, you'll spot a ladder in the far NW wall: do an angled running jump to grab it and work your way down to the bottom. Just as the ladder ends, a slope leading to a deadly pit begins, so slide and grab the ledge in order to shimmy around the corner and pull up to a flat spot. Throw the wall switch in here, then go back to the ladder and climb it all the way until you breach the darkness threshold, at which point you want to backflip and immediately bounce off the slope to grab the cave floor.
Go south and face another massive chasm. To clear this one, grab the edge of the sloped rocks on the west side of the room and shimmy as far as left you can to a flat spot. Pull up and save your game. Do a standing jump due south, over the sloped rocks, to land in a lower flat spot, from which you can do a long running jump to the chasm rim on the other side. Jump past the slope (and pit) towards the south wall, and then hop into the alcove in the far right corner. You can grab a crack in the pillar there and shimmy around and into the open door high up in the wall. Crawl through the cramped spaces to find a RUSTY KEY called Load.
Safety drop and now jump over the rock barrier hiding the other corner alcove. Climb the ladder on the pillar and backflip to a ledge near the top. Hop over the dead skeleton to avoid sharing the same fate and stick to the ledge while you jump over the rocky stalagmites (mind an illegal slope in the third one). You come to a closed door, climb up to it and step on the adjacent face tile, then resume the lower path to find a pushable block. Push it all the way in to find a wall switch to operate the door you've just seen. Drop on the other side and head to the right to find yourself back in the initial area of this level.
The remaining key is a nightmare to get to.
Go to the far north wall of this room and do a series of jumps over the tricky flat spots of the pointy rocky ledges all the way up to the open door. Crawl through and lower yourself on the other side to slide down into a twice as massive flooded cavern. Always keep an eye on your oxygen meter as the rocky formations of this place are tricky to swim through and there are a lot of things to be found in several different similar passages deep in this cave. And again, save often; things need to be done in a specific order and it's easy to lose track of where you've been to.
So, let's begin. Facing the still waterfall you've just dropped down from, swim about halfway down the cave wall to find an opening in the east wall. Swim all the way to the back wall and go left, all the way going up and down the tunnels until you eventually reach a face tile in an underwater alcove high up. Make sure you swim over it, and you can take a lungful of air in a tight air pocket right next to it.
Swim back to the main cave, again fill your lungs, and now swim through an underwater passage below all the algae at the bottom of the cave. Get the large medipack in the lower cave and find an opening up in the corner. Save your game. The tiles adjacent to the water are trapped with spikes; pull through the already active spikes and quickly run through as your health meter gets drained. Pull the leftmost rock once and then push the other one into that corner to reveal the next face tile. Climb up the wall ladder to the ceiling and shift towards the water pit to avoid the other spike trap, if you don't want to sacrifice more health running through the spikes again, and swim back to the flooded cave.
Swim through the algae and go back to that hole in the east wall, but this time stick to the right hand side to find a shorter passage leading to an underwater lever. One of many. Pull it and go back to the main flooded cave area.
Swim towards the northern half of the flooded cave until you spot a couple of arches on the bottom. Surface for air and line up with the tight passage on the floor between the arches, swimming through the cramped tunnels down there to another face tile you need to swim over. Go back for air.
The next open door is actually just on the south end of these underwater arches, swim in and through the gap, and then immediately roll to find an underwater lever in that alcove. Two down, still too many to go. Back to the flooded cave and surface for air.
Facing that row of arches again, now swim through another opening on the cave floor, but this one is just after the second arch (counting away from the door you've just been to), and squeeze your way through the narrow cracks in the wall to a face tile at the bottom. Roll and return the same way to the flooded cave.
In a similar fashion, now swim into an opening below the collapsed round pillar in the far NW corner of the cave. At the very end of the series of tunnels there is another face tile; once you're sure you've swam over it, return the same way you came from and surface for air.
Now squeeze into the opening below the collapsed round pillar in the NE corner and swim through two open gates to find the third underwater lever at the end. Go back and breathe again.
Face the nearby north wall and swim to a triangular edge on the west side. Pull up and climb the ladder on the pillar. At the top, shift to the right and jump your way through the tight corridor. When you pull up to a snowy ledge, you'll realize it's another face tile and you'll hear a door opening elsewhere. To get to said door, however, you need to go back to the flooded cave (you can drop through the triangular opening to the water) and swim to the east side of the cave, where you'll find another ladder mirroring the one you've just been to.
Climb this mirror ladder to the top, but don't dare run to those flares you see in the back as the different tiles between the rock columns are concealing spike traps. Instead, disarm the boulder hanging over the other pack of flares in the NW corner and then jump to the corner rock there. From this higher point, it's safe to jump over the spike tiles towards the other side of the room. Take those flares you'd seen earlier and pull up to the south ledge. Push the block there twice so you step on another face tile. To return, you can take a long running jump over the spikes where the ledge is at its lowest (where you pulled up). Safety drop to the triangular opening over water and get back to the flooded cave again.
Swim a bit towards the south until you're roughly under the ladder on the dry east rocks. Facing east, dive to the bottom to spot another underwater passage, but don't be hasty: as soon as you swim over that opening, a boulder drops. Once the trap has been disarmed, swim to the end of the passage there for the next underwater lever. This might be hard to believe, but we're finally done with this nightmare, so it's time to go fetch that key at last (the door, high up on the north wall, should be open).
Come back to the surface and pull up on the tip of that triangular platform beneath the ladder. From the flat spot at the top of the ladder, face north and take a running jump, veering right in order to slide backwards so that you can grab the ledge. Shimmy a bit further left until you can pull up. Turn around and take a running jump to grab that overhanging rock in the middle of the room, it's a climbable surface and you can shift all the way around, at which point you can backflip with a midair roll to the opposite rocky rim. Grab the ledge in case you hit the sloped corner and shimmy left to safety.
Note from the level designer: on the opposite where the door opened, be careful with those jumps and make your way to the snowy block, jump on the triangular platform and on the one on the other side. Shimmy a bit further left until you can pull up.
Climb the nearby block and grab the monkey swing. You don't get to the door in one go, however, so when you reach the end of the first segment, face the wall and let go to drop on the sloped rocks below, grab the ledge and shimmy to the right. Pull up, and this new segment of the monkey swing takes you straight to the open door (but be careful not to drop on the sloped corner of the block).
Jump through the infernal tight places and crawl into the passage at the end to find a SILVER KEY also called Load. It might require a bit of zigzagging to get to as the place is extremely claustrophobic. With both keys in your backpack, it's time to find a way back to those doors we'd seen at the start of the level.
Upon exiting the crawlspace, head east into a dark cavern area. Watch out for illegal slopes as you move towards the water pit nearby. As soon as you drop to the water level, turn around to find two wall switches on the wall. As you wade towards the south end of the passage, about halfway through the water is slightly deeper (a harmless fish swims around), find an underwater lever on the left wall.
On the other end, pull the blocks out of your way in order to climb the ledges to the top, then safety drop to a trench and go east to find yourself back in the starting room. Carefully jump your way down through those tricky triangular ledges and go use those Loads to open the gates we'd seen much earlier on.
Outside, head to the NE corner and jump over the stalagmites all the way to the back. The face tile rests on a slope, so step on it and immediately bounce off to grab the ladder. Shift to the right and backflip to safety, then go back to the front of the temple entrance and loop around it to the NW corner. Wade down the steps and as soon as the trench gets deeper, pull the underwater lever at the bottom of the steps while another fish pretends to loom over you. The side doors are open, go back to the temple entrance.
Let's start with the leftmost door. There are two rocks you need to move to reveal the face tiles hiding beneath them, and the tile between them is protected by a boulder trap (might do well to disarm it first). Pull the rocks aside and step on both tiles to raise the gates blocking the two push blocks in the back. Pull those towards the alcoves in the back, swan dive over each in turn, and throw the two wall switches that were hiding behind them. We're done here, proceed towards the rightmost door of the temple.
Note from the level designer [after pulling the blocks towards the alcoves,]: roll over, grab the upper ledge on the right, and shimmy to the right not to burn going up.
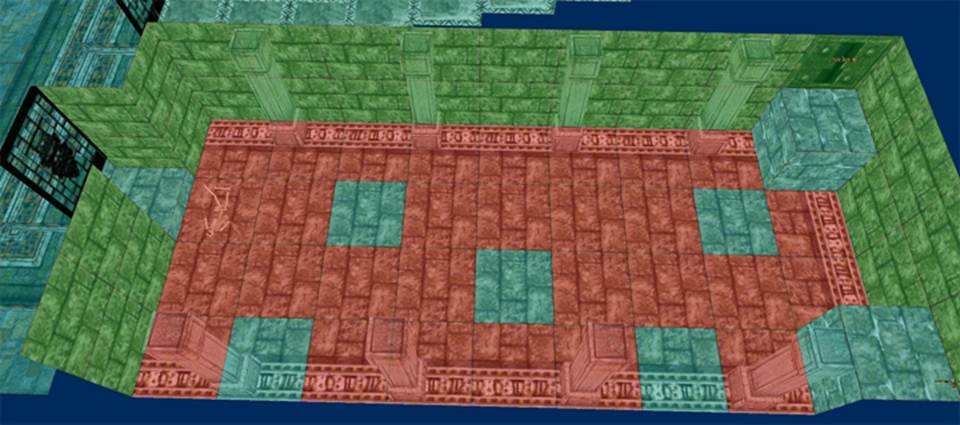
From the entrance, save your game. Only a handful of tiles inside are safe to stand on, so please refer to the screenshot below. It's a bit difficult spotting the seams and Lara creeps a little forward before every jump, so save upon each successful jump. On the other side of the room, throw both wall switches and jump your way back.
Note from the level designer [regarding the safe spots]: The sequence is on the ceiling of the hallway before, note them and push your way to activate the two levers at the end.
The central double doors are now open and you're home free.