THE WOLF WITHIN
Adventure and walkthrough by JesseG
There is no compass in TR3, so no cardinal directions will be given.
The first level is the Forest, but the next three levels are played in any order.
Puzzle solutions are at the bottom of this walkthrough.
Forest Village
Forest Valley
The character, named Luke, starts in a small forest valley. From behind, a tiger comes to attack. There are several directions to explore and gather items in, but we will go directly to progressing the game. Go to where Luke started, and look for a crevice in the flat rock wall. Jump up and grab it on the right side, then shimmy left until you reach the landing. From there, jump over the slope and find a monkeyswing just above Luke's head (you might notice another monkeyswing ahead, but we will save that for later). Swing across the monkeyswing to the next rock landing. Turn left and climb up to the top of the tree, and from there you can take a running jump and grab the branch of the next tree. Climb up the ladder, keep pushing forward and Luke will automatically enter the crawlspace. You will be prompted how to use the crawlspace roll: crawl to the other end and press the jump button to exit. You can go around either side of the mountain, but jumping over to the landing on the left will let you grab some MP5 ammo. Slide down the mountainside to reach the farmland.
The Farmland
There are two lizards here. Once those are dealt with, you will need to solve a puzzle in order to gain access to three of these buildings. The solution is in the Puzzles section of this walkthrough. The barn has flares and shotgun ammo, as well as harpoons up on the balcony. There is also a red warp crystal just outside the barn that you can use to fast travel here later. One farmhouse has the SHOTGUN on a table, a small medpack next to the bed in the back room, and shotgun ammo at the window. Another farmhouse has the crowbar next to the stove, which you will need to progress. In the back room you will find harpoons across from the bed and flares on the window sill. There is shotgun ammo in the middle of the cornfield, and harpoons in the wheat field. The last farmhouse is not part of the puzzle, instead it is a secret that we will visit later.
Getting a quadbike
Next to the farmhouse with the pumpkin field, there is a hill you can climb up to reach another area, where there is a fence and a building behind it. Go between the fence and the hill and you will find a crawlspace in the rock. Crawl through it until you can stand up. Turn around, jump up and grab the ladder and go to the top. From here you can drop down on the right and then jump to a landing with a large medpack. Return to the top of the ladder and take a running jump over the slope, holding the jump button. Luke will jump from the other side of the slope and clear the fence, landing on the other side. Across from the door in the fence there is a switch, press it to open both of the exits. Then go to the other side of the building and use the crowbar you found in the farmhouse to open the blocked door. Inside there are several quadbikes. Get on one and drive it out of the back exit toward the docks.
The docks, riding the quadbike
You can grab a yellow warp crystal to fast travel to the docks later. Drive the quadbike along the shore to the other side, then follow the sharp right turn (remember, the sprint key lets you turn more sharply if needed) and drive up the ramp to get across the gap. There is a valley to explore here but we will do it later. For now, follow the higher path to the right, then drive up the ramp to the left to cross the next gap (remember, if needed, you can stop and hold the sprint key, then hold the action key, then release the sprint key to peel out at a high speed). For a pickup, get off the quadbike here and jump to the window sill in the tree on the right to grab MP5 ammo. Return to the jeep and continue driving forward, taking the next ramp across the gap. Get off the jeep and enter the cave.
Traps in the caves and tree
There is a lizard here in the cave. Continue forward and go down the slope, you will be forced into the wolf form, which plays a little differently from the human form, as the game will teach you. From the bottom of the slope you can take a standing jump straight ahead and grab the crevice, then shimmy left all the way and drop down to the landing below. Jump ahead onto the slope, slide right and then jump onto the next slope, jump again to reach the landing. Take a running jump to the right and you will learn about the sprint jump in wolf form. Turn right again and you will find a crevice across a far gap so practice the sprint jump (hop back from the edge three times, then press and hold forward, sprint, and jump) and grab the crevice to pull into it. Crawl to the end and you will learn about the swim sprint. Exit the crawlspace and you will see a spiked wall is coming at you, so quickly swim away from it (use the sprint key to go faster) and pull the two switches under the door to open it. Swim through it and swim upward to find a tunnel with blades. Using the sprint swim at the right time, get past both sets of blades and swim upward, the current will take you through a small waterfall.
You are inside a large tree trunk, with shotgun ammo in the shallow water across from you. There are trap doors in the ceiling and four switches along the walls. The solution to this puzzle is in the puzzles section of this walkthrough. Once solved, pull the block from the wall (in wolf form, moveable blocks are easily spotted and appear completely yellow) under the trapdoors, then jump up and monkeyswing on them to the crevice in the wall. Jump up through the opening to the upper floor.
There are spikes all across the ceiling here. You will also want to note that there are three holes in the walls, including the window sill. You will see why in a second. Go to the wall on the right and push the switch for a timed event. Before the spikes lower, you have 10 seconds to quickly shoot the targets that appear in the three holes in the walls (the pistols are sufficient for this). If you shoot the targets in time, the exit opens and some trapdoors raise near the window which will block the spikes on that side of the room, so go take cover there before the spikes impale you. Exit through the newly opened door. Another door opened here to the outside but that is just as a return route, where we want to go next is up the ladder. Jump off and explore the large tree top, you will find harpoons to the left on this side and a small medpack on the opposite side from there. Go back to the ladder and shimmy right and pull up to the landing. Go around the corner and you will see some boulders at the landing across from you. Sprint jump across the gap and immediately jump to the left to avoid the boulders that start rolling at you. Then crawl under the blades to the switch. This switch is timed, pressing it will raise a trapdoor above the nearby ladder. After pressing the switch jump up and grab the monkeyswing, and swing up the roof while dodging the flame shooting out of the wall. Swing over and onto the underside of the trapdoor, face the ladder so you can drop and grab the wall. Wait for the trapdoor to drop and then you can climb up to the roof. Before doing anything else, jump to the metal platform on the right and pick up the green warp crystal so you can fast travel back here later. You will open a portal here eventually.
As the game tells you, your objective at this point is to find three tablets to unlock the sword that is trapped on the island in the middle of the lake (you may have visited it earlier). But now that we can freely transform, there are other pickups and secrets we can go after as well. The remaining areas of the level can be tackled in any order.
Ancient Tablet 1/3: Quadbike Ride in the Valley
Either go fetch the quadbike you rode to the caves, or return to the building at the docks to grab another quadbike. Either way you want to drive the quadbike down into the valley I told you to ignore earlier. It is the grassy area with trees, between the dock area and the caves.
There is a secret here, let's get that first. There is a ramp in the far corner of the valley, you can drive that to reach the square landing next to it with a tree on it. It is easy for the quadbike to overshoot the landing, but if you take the ramp at an angle you should be able to run into the wall on the left side to stop in time. Get off the quadbike and pick up the small medpack on the landing. Find the crawlspace along the leaf wall to the left, and enter to find SECRET #1: uzi ammo and a rocket. Return to the quadbike and drive off of this landing.
Locate the other ramp closer to the center of the valley. Ride up it with the quadbike to clear the jump to the next platform. You will want to use the left side of the ramp so that the quadbike catches the short wall and doesn't fall off the other side. Get off the quadbike and look past the wall, there is a ledge against the border to reach. Perform a sprint jump and grab the ledge, then pull up. The ancient tablet is to the left for you to pick up.
Ancient Tablet 2/3: The Barn
Return to the farmland area, and get the barn doors open if they are not already. Climb up to the upper balcony on the left. An extended platform near the window will allow you to get across to the other side. Sprint jump over there to grab the opposite balcony and pull up. Go to the left, either crawling behind the hay or shimmying around it, to obtain the ancient tablet before dropping back down.
Before leaving this area there is a secret to find. Remember that in wolf form you can easily see movable blocks. If you explore the area in wolf form you may notice the movable block in the farmhouse that you haven't accessed yet. Pull it out, then move it aside to gain access to SECRET #2. A large medpack is between the beds, a rocket is at the closed door and there is uzi ammo across from there.
Ancient Tablet 3/3: The Hillside Ruins
Go to the island with the sword and tablet receptacles. It is the island near the forest valley, in the middle of the lake. There is a blue warp crystal there if you haven't already picked it up. From there, face the hillside where you can see some structures on top. Make sure you are in wolf form and jump into the water, swimming in that direction. There is a tunnel here with a high current, so use the sprint key as you swim until you reach the end. Pull up into a chamber with a spike pit and some flame traps. The human form shimmies faster, so switch to it and then get ready for a timed event. Push the switch to raise a trapdoor for a short time, and then leap back and take a jump and grab toward the crevice on the left. Shimmy to the left while avoiding the flames coming out of the wall. Drop onto the trapdoor and grab the crevice on the left before the trapdoor gives way under you. Shimmy left again and avoid one last flame trap. Pull up at the end, then climb the wall to reach the outside.
Two tigers are ready to attack. There are two stone pillars you can jump to from the waterfall and pull up onto. One has shotgun ammo on top and the other has the ancient tablet.
There is also a secret in the area. If you use the wolf form you will be able to easily spot a movable block on one side of the waterfall. Pull it out and move it aside to reach SECRET #3, desert eagle ammo and grenades.
Detours for Two More Secrets
There are two more secrets not yet mentioned. For the first, to the forest valley where you started the level. Find the same crack in the rock wall and shimmy left to the landing, then jump over the slope to the next landing, with that monkeyswing you previously used on your left. Straight ahead there is another monkeyswing that is trickier to grab. Slide down the slope in front of it only for a moment, then quickly jump and grab the monkeyswing. Follow it to the end, grab and pull up onto the tree. Use the landing behind you to reach the crawlspace at the top of the tree. Exit on the other side and find flares on the branch, but we're not done here yet. Make sure you are in wolf form, then take a sprint jump across and grab the next tree branch. Pull up and go to the next branch on your left, then take a running jump to grab the branch of the next tree. The longer branch on your right has SECRET #4, MP5 ammo and shotgun ammo.
The last secret has been attainable from the start, so you may have found it already. Jump into the lake and then swim to the taller of the two large trees - that is, the tree that does not have the traps in it. Swim around to the far corner and you will find a small gap to swim through. Inside the flooded tree trunk is SECRET #5, desert eagle ammo and grenades.
By the way, there are some pickups in the large lake. There are harpoons toward the middle of the lake and uzi ammo next to the forest where you started. There are more harpoons in the lake on the right side of the tree that has the boss portal above it.
The Boss of the Forest
With all three tablets in hand, return to the island with the sword. Place the ancient tablets in their receptacles to gain access to the emerald sword. Return to the boss portal platform and insert the sword into the pedestal there. The portal raises. Jump into it to teleport to the boss battle. The boss attacks immediately, so get ready to move.
You may recognize Puna from TR3, but the arena is different: the floor is mostly fragile, so make sure as you dodge the lightning attacks that you jump to a different spot each time. The corners are always stable. The boss is vulnerable to gunfire whenever he shoots lightning. When the boss summons a lizard, the entire floor stays solid, so use the time to take a breather. When you dispatch the lizard, the floor will start collapsing again. Once the boss has taken enough damage and explodes, you can take the emerald lizard to end the level.
You will be prompted to choose which place on the globe to proceed to next - the remaining three levels may be visited in any order, and you can revisit previous levels to collect more secrets after finding upgrades (when you do this, jump through the boss portal to exit the level again). Once all four levels are complete, the Final Showdown will become available as an option.
Two secrets Upon Your Return
With the rocket shoes and grappling hook, you can reach two more secrets.
On the island where you collected the sword, go to the edge facing the large tree (with the underwater secret). Look up to find a branch, you can reach it with the rocket shoes. Do so to pull up and find the ROCKET SHOES SECRET: a rocket and grenades.
At the building where you unlocked the quadbikes, go through the entrance in the fence. There is a short tree branch above you across from the roof. Use the rocket shoes to reach the branch. Face the roof and use the grappling hook on the ladder, you will just make it past the slope and land on the roof to find the GRAPPLING HOOK SECRET: a rocket, shotgun ammo, harpoons and grenades.
Deep Sea Wreckage
Underwater caves
You start the level in a large underwater area. There are some pickups in this area to find. Swim ahead to the right, up against the tall rock tower are some harpoons. Going the other way, under the rock arch you started in on the left side are more harpoons. Swim up, above the rock arch you started in there is uzi ammo in the direction of the tall rock tower. For a new weapon turn left, and swim toward the undersurface of the island into a small cave, wherein the harpoon gun lies. Exit and swim straight down to find flares next to three hands (these are recepticles we will find orbs for in this level). There is shotgun ammo near a jellyfish and a tunnel in the floor (which we will save for later), and nearby is a small medpack resting halfway up the side of the large rock arch above the sandy part of the seafloor. Above that same arch, towards the tall rock tower is more shotgun ammo.
The Island's Rocket Shoes Secret, Creating Fish Bait
Pull up onto the island, you will see an inactive portal like you've seen at least once before. Grab the warp crystal here. First go right to get some harpoons next to one of the trees. Then go left and find flares next to the rocky hill with a large tree and canopy. Now go to the other side of that hill to find shotgun ammo sitting outside of a small rock clearing, in which a raptor is roaming. There is a pushable block here (easier to see, as usual, if you are in wolf form). Pull it back four times, then push it up against the tall rock pillar. Use the block to jump up and grab the top of the rock pillar (or you could have just used the rocket shoes, if you have those). Pull up and jump off the slope and grab the opposite ledge. Shimmy left until you can pull up onto a landing*. There are two ways to go here, we will go left first for some pickups and a possible secret.
Jump and grab the crawlspace to the left, next to the tree trunk. Pull in and crawl around the tree to the left. Pull up onto the next landing and hop the gap to the other side for some shotgun ammo and uzi ammo. If you have the rocket shoes upgrade, you can go for a secret here. Pull back the block once, then hop on it. You can use the rocket shoes as a human to grab the tree branch high above. Pull up to find ROCKET SHOES SECRET #1: MP5 Ammo and desert eagle ammo.
Drop down and return to the landing* noted above, and this time jump to the next landing on the right. Straight ahead is a far ledge, there is just enough room to perform a sprint jump here, so use the wolf form and sprint jump across to land on top of the sandy hill. Jump up and grab the climbable tree on the right, and shimmy left until you can drop down on the other side of the hill. Jump ahead to the next landing, jump up and grab the monkey bars. Swing to the other side, drop and grab the crawlspace. Crawl to the other end and exit. Facing the caves ahead, there is a raptor carcass hanging from a rope. Shoot it to make it fall, you will see it attracts the piranha in that area, making it safe to swim in.
The Security Card and Rocket Shoes Secret in the Caves
Go back to where you started underwater and look for a wide tunnel on the left side of the rock arch. Swim into it to reach the area with the piranha fish. Since they are distracted, you can safely swim across and grab the Pilot's Security Card. Leave the way you came.
For some pickups and a possible secret, look for a tight crack inside the same rock arch that is next to that wide tunnel. Swim into it and to the end where you can pull up to an area overlooking the piranha pool. Here you can find flares and a large medpack. If you have the rocket shoes you can get a secret here, by standing facing the pool you came out of and jumping up to grab the ledge above. Pull up to find ROCKET SHOES SECRET #2: grenades and a large medpack.
To the Crashed Plane for the Aqua Lung and a Gappling Hook Secret
Make sure you have plenty of air before proceeding. Underwater, from the previous rock arch swim toward the island but go down one level. Under a rock arch on the left you will find a wrecked military plane. Swim toward the closed door and use the key card on the slot to the right to open it (here the game informs you that you can use objects and pushblocks underwater).
Inside, two scuba divers ambush you. swim to the right first, there is some shotgun ammo in the small corridor on the right. Follow up the tunnel until you reach the surface of the water. Grab the warp crystal here. Not only is this a breathing hole but we can get some pickups and possibly a secret. On the left side, face away from the slope and jump backwards onto it, jumping again to grab the monkeyswing around. Turn around (push the roll or down key to do this easily) and swing to the landing on the other end, where you will find a small medpack. If you have the grappling hook you can go for a secret here. Face the ladder across the room and use the grappling hook, grabbing the ladder. Climb up and shift right above the slope as much as possible. Let go and jump at the very end, twisting midair to grab the ledge on the other side. Pull up and jump from one landing to the next to find GRAPPLING HOOK SECRET #1: harpoons and MP5 Ammo.
Go back into the plane and swim to the other end where there are two closed doors. Observe that there are boulders rested up against them. Pulling the nearby switch will open the doors, causing the boulders to roll down the floor, so quickly swim upward to dodge them. Go back and take a breath if needed. Then swim into the now open room and grab the Aqua Lung from the floor, which gives you infinite air as a human. For the rest of the level this walkthrough will assume you will use the human form as needed when exploring the depths.
Before leaving, turn to face the entrance and find a switch* near the ceiling. Pull it to see a hatch open in the shipwreck next to the island. Now let's find the way to get there.
Through the Volcano to Get Inside the Shipwreck
Swim up toward the surface, around the island on the left side, past the shipwreck. By this point there are two mutant fish swimming around this area. You will find an underwater opening to the left of the volcano, but for a detour go around to the other side of the shipwreck first and find a small medpack in the water near the island. There are harpoons in the gap between the two parts of the shipwreck, and more harpoons on top of a small hill on one side of it. Enter the volcano opening you noted earlier and turn right, follow the route until you can exit the water at the end, inside the volcano. Go to the edge and look down to find a slope, this is your way down. Slide down, jumping over the deadly gap, and reach the bottom where there is a warp crystal to grab. Straight ahead is some uzi ammo against the wall. Go to the other end, switch to wolf form and prepare to take a sprint jump to the rock with sloped sides straight ahead.
For a pickup and a possible secret, sprint jump to the right side of that sloped rock. Jump off of that slope and grab the crawlspace. Pull up and exit to the left, jumping off the next slope to grab the monkeyswing. Swing to the landing at the end, where you will find a small medpack. If you have the grappling hook, you can go for a secret here. Turn to the right and use the grappling hook to reach the climbable wall. Shimmy to the right until you reach the landing. Drop down and go forth to find GRAPPLING HOOK SECRET #2: a rocket and uzi ammo. To get back, use the sloped rocks in front - you will need to jump from one to the next, then jump onto the landing you reached earlier.
Now sprint jump to the left side and jump off the slope to the next landing. Jump to another landing on the right, then take a running jump to the monkeyswing. Follow it around the corner until you can drop and grab the crawlspace. Stand up and switch to human form if needed. Exit backwards from the other end and shimmy left. Pull into the crawlspace and exit again on the left to keep shimmying, dodging the flames. Pull up at the end and jump up to the higher landing. Jump into the water on the right where a mutant fish awaits. Swim down the tunnel, taking note of the somewhat harmful steam coming from the sides, and exit the water at the other end.
Jump onto the landing in the hill here, then turn around and jump up to grab the climbable wall. Make your way to the top where you emerge at the mouth of the volcano. For pickups, turn to the right and see a ramp. Switch to wolf form and use the ramp to sprint jump to the back part of the volcano where you will find a large medpack and desert eagle ammo. Also, there is some shotgun ammo on the side of the volcano if you slide down a bit. Return to the top of the stream of flowing lava and take a running jump to the first sloped rock, then jump at the right time to the second block on the right. Jump from this slope to grab the ladder on the back of the shipwreck.
Getting the UPV
Go to the switch above the trapdoor, switch to wolf form and push the switch. The trapdoor beneath you opens, throwing you into water. Quickly swim (use sprint if needed) to the other end where you will pull up and find a ladder on your left. Climb it to find a pushable block next to a raised trapdoor. Before time runs out, push the block forward once. Now you can stand on it to take a running jump to the other part of the shipwreck. Slide down and grab the warp crystal here. If the hatch is closed here, you can warp here later after finding the switch* noted under the above section To the Crashed Plane for the Aqua Lung. Through the open hatch there is a scuba diver guarding three UPV units. How to get it out of here? The only way is through the peculiar wall - indeed, the UPV can be used to smash through these types of walls.
Now that you have the UPV and the aqua lung, the rest of the level is open to explore in any sequence, as you search for secrets and three orbs.
An Orb 1/3 and a Secret in the Volcano
Take the UPV to the underwater tunnel you used to enter the volcano earlier. Instead of turning right, smash through the wall. A yellow submersible decides to take this moment to charge at you. Turn around as fast as you can and dodge into the side tunnel, or out in the ocean. When the danger has passed, turn back and go through the tunnel and follow it all the way to the end, smashing through another wall with the upv. There's also a mutant fish to greet you along the way. Climb out of the water.
For a secret, first turn to the right and find a landing to jump to. Look left and find a sloped ledge, you can jump onto it and grab the edge to shimmy to the right. Drop onto the sloped rock beneath you and slide just a little before jumping and grabbing the monkeyswing. Swing left to the end so that you can drop and slide down while safely avoiding the spikes. Turn around and find desert eagle ammo surrounded by lava - use the slope and monkeyswing again to return. There is a pushable block hidden along the wall near the exit - use the wolf form to see it easily. Pull it back to find SECRET #1: a rocket. Use the exit on the left to find a crawlspace you can enter on the right, and exit on the other end. Swim to the right and climb out of the water once again.
This time, look into the pit and find a landing to the right to jump down to. Jump to the slope, and then jump and grab the ledge opposing it. Shimmy to the right until you can pull up. Climb up to the higher ledge, then switch into wolf form and sprint jump across the gap to the hole in the wall. A raptor is guarding this puzzle. The game tells you to use the action button to place or remove flags until the puzzle is solved. The solution is in the puzzle section at the end of the walkthrough. Once it is solved, the trapdoor in the ground opens. Drop in to find an Ancient Orb. Return to the entrance and jump onto the slope on the right to return to the water through which you got here, and leave.
An Orb 2/3 in the Crashed Plane
Return to the plane with the UPV and take it over to the far side, where you can go down and find a wall to smash through. Do so to enter the cargo hold of the plane, where two scuba divers are waiting for you. Around the corner on the right is some uzi ammo . Go to the back where there is a narrow hallway with active pistons to dodge. After those, take a detour to the left to find a large medpack. Now enter through the open yellow door, which closes behind you as a borer descends from above. Make you way downward while dodging the circular blades, and go through the tunnel below the darts firing out of the wall. Travel up through the second tunnel with its own circular blades and get through the tunnel across the way before the second borer reaches you. For a new weapon, turn around after the danger has passed and enter the upper tunnel to find the grenade launcher. In this chamber you will find an Ancient Orb. When you pick it up, the exit opens in the ceiling. Swim through it and leave, with another scuba diver ready to intercept you.
An Orb 3/3 Deep Underwater
In the large underwater area, there is a hole in the sandy part of the sea floor. Locate the hole and swim down through it (no UPV needed, but human form is recommended), following the windy tunnel down and down until you reach a chamber with pushable blocks. The solution is noted in the puzzle section at the end of this walkthrough. Once solved, the door opens and you can grab the Ancient Orb in the chamber beyond.
UPV Secret Deep Underwater
In the large underwater area, there is a secret within the large rocky tower in the far corner. Take the UPV there and find a breakable wall close to the sea floor on one side of the tower. Break through and drive up to the water surface. Exit the UPV and pull out on the low edge. Take standing jumps until you reach the top and SECRET #2: MP5 Ammo and shotgun ammo.
UPV Secret Under the Island
From the large sand hill on the island, take the UPV underwater where the rocks meet in a corner. There is a small crack here with a breakable wall, so drive through it. Follow the tunnel all the way to the end (smashing through another wall in the process) and surface from the water. Jump up the rocks next to the volcano until you reach the top for SECRET #3: grenades and a small medpack.
To the Boss
With the three orbs in tow, swim deep down from the island (where the inactive portal lies) to the sea floor, where three hands await for their orbs. Place all three and the trapdoor opens in the middle. Swim in and grab the Citrine Sword. Swim back up to the island, to the inactive portal, which is now guarded by two raptors. Use the sword to activate it. Jump through to start the boss encounter.
You will fall into water surrounding a rock island with a T-Rex on top. The T-Rex occassionally shoots lasers out of its mouth, so you better keep moving. Pull all four underwater switches, one on each of the outer stone structures, to raise the trapdoors for a few seconds - these can be found attacked to two of the stone arches. When you get to one of them, surface and use the left-hand slope to jump onto the first trapdoor, then take a jump onto the next landing, and finally to the island so that you can gun down the boss. After some health is lost, you will be pushed back into the water. Keep using the switches and trapdoors to get back to the boss until it is defeated and drops the Citrine Element. Grab it to end the level. Desert Launchpad
To the Power Station for an Access Card
You will start in a desert area with several buildings around you. Let's head to the power station first. Head to the left. There is a small patch of land with harpoons on it. Continue left on the sand. On the way you will see a warp crystal on your left, pick it up. You'll also see a flamethrower guy patrolling here. Continue past the large building and run to the end until you find a monkeywing above you. Around the pillar on the left is some shotgun ammo. Jump up from the raised ground to grab it, and swing to the climbable wall. Release and grab the wall, and shimmy right.
For some pickups, climb to the top and continue to shimmy right until you can pull up onto the top of the hill. Make your way onto the roof to find a large medipack. Dropping down to the other side of the quicksand pit will get you some uzi ammo. With the aqua lung you can cross the quicksand to return, or run around the building the long way. If you do, you will find shotgun ammo on the ground next to the quicksand.
Return to the same climbable wall and shimmy right, underneath the crawlspace, and climb up into it. Crawl to the end and drop down into a cavern. Grab the shotgun ammo from atop the grate in the ground. In the opposite corner are some flares. Back onto the landing, turn to face another landing to jump to above some slopes. There, grab the ledge above and slide down to the next, longer landing. Switch to the wolf form and face the river, and do a sprint jump over the hill to land in the water. Immediately sprint to swim fast against the current, and keep going until you can pull out of the exit at the end. Drop down to the next level where you can find uzi ammo, before dropping down again. There is an armed man patrolling this room. Watch your feet while you deal with him - there are green tripwires here. Touching one will alert a turret in the next room. Underneath two wires is desert eagle ammo. If you do mistakingly activate the turret, once it starts firing upon you, run out of its line of sight (without touching a tripwire again) and it will turn back off. Grab the warp crystal in the middle of the floor here.
You will see a electric motor making its rounds in the pit to the right. You need to solve this puzzle to guide the motor to the fusebox tucked away in the corner. The solution is at the bottom of this guide. By the way, there are harpoons in the crawlspace next to that fusebox. Once the puzzle is done, a trapdoor opens across the hall to reveal an Access Card underneath. Also, a flamethrower enemy appears to confront you. Take the card and leave this area. If you don't have a warp crystal to use, you will need to go back the way you came: Climb up out of the side room with the tripwires, and swim down the river just enough to pull up onto a landing and backtrack through the cave and the crawlspace above it.
To the Laboratory for a Battery
Back outside, with the power station behind you go all the way across and up a sandy hill. There is a pit of quicksand here, so watch your step. There are also two armed men above, one is patrolling on the bridge and the other is at the far end of the bridge on the right. From the first landing, jump to the right to the landing. Jump from stone to stone until you reach a climbable wall. Climb it and shimmy all the way left. Then drop down onto the slope and jump back to the slope behind you. Quickly jump again to grab the monkeyswing. Turn around and swing to the end. Form this landing, turn left and jump to the next landing, where you can pull up and grab a crawlspace. Crawl to the right and jump to the next, longer landing. Our destination is the vent in the wall ahead. Shoot it out, then transform into wolf form and perform a sprint jump to make it into the vent and slide down.
You will fall into a vat of slime. It's not fatal, but it suffocates Luke quickly and slows down his movement, so you will need to react quickly in swimming to the floating crate and pulling up onto it. Face the ramp and jump over to it. If you have the aqua lung, switch to human form and you can swim throught the slime without suffocating. Grab AQUA LUNG SECRET #1: MP5 Ammo and a large medipack. Up the ramp, in the hallway you can push the switches to open gates on the minecart tracks (these will be necessary for getting secrets later). You can also find flares near one of these switches. Grab the warp crystal in the middle of the floor. Then go to the gate and use your Access Card to open it and access the laboratory.
When you enter, lab monkeys awaken to attack Luke, both in front of small medipacks. There are harpoons under the canopy in the middle. There are six switches along the back wall. These are part of a puzzle that appears on the ceiling, and the solution is at the end of this guide. Once solved, two more lab monkeys will awaken. Also, a trapdoor will open, giving you access to a Power Cell. Grab it and head back to the power station to place it in the missing slot at the left end of the hall. This powers up two things: a laser in the launchpad, and a shrinkray in the laboratory. Let's go to the launchpad first.
To the Launch Pad for Rocket Shoes and a Grappling Hook Secret
Back outside, go to the lake under the bridge. For a pickup, follow the lake along the side of the large building, and find a cavern under the hill to the right which has a small medipack Swim in the lake, and find some shotgun ammo against the wall of the laboratory underwater, and harpoons closer to the middle of the lake. Swim to the far corner with shallow land, and pull up onto the hill above. Turn left, make sure you are in wolf form and take a sprint jump from about halfway on the last tile, in order to slide forward on the other side of the gap. Immediately jump to the next slope, then jump and grab the climbable wall. Climb to the top and take the next few jumps until you reach a monkeyswing. Before grabbing it, you can jump down to the right for some shotgun ammo. Now get to that monkeyswing and swing to the end, drop and grab the edge of the roof so that you can shimmy right over the vent. Drop down and shoot the vent to gain access to the launchpad.
Inside, there are two armed men patrolling the ground floor. If you've activated the laser there will also be a flamethrower guy investigating why it turned on. Drop down and open the gate across the room for easy access. Across from the gate is some shotgun ammo in one of the blue pits in the floor. With the laser active, there is a puzzle here to solve on the bottom and top floors of this area. The solution is at the end of this guide.
To get to the top floor, climb one of the blue pillars and then grab a ledge above. There are some flares in front of the window across from the vent you entered through. Then make your way to the platform that has a pushable block on it. Push it back against the wall and into the center.
For a secret, if you have the grappling hook, you can use it from atop the pushable block to reach the ladders on either side. One has a simple crawlspace above it with harpoons. The other has a crawlspace that leads to a room below. Drop down to find GRAPPLING HOOK SECRET #1: uzi ammo and MP5 ammo. Use the ladder behind you to exit.
From the pushable block, look up to find a ladder that you can grab to reach the top level. While you're up there, grab the warp crystal from where the boss portal is, and grab uzi ammo next to the endpoint machine for the laser.
Once the puzzle is solved, a trapdoor opens on the middle level, letting you obtain the Rocket Shoes.
Now that the Rocket Shoes will let you reach higher places, the rest of the level is open to explore in any sequence, as you search for secrets and three energy orbs.
Energy Orb 1/3 and two secrets in the Laboratory
Visit the Laboratory again and go to the back room. If you haven't gotten it yet, grab the uzi ammo in the corner on the left. You can see a maze beneath your feet. Pressing the switch at the back of the room will shrink Luke and place him inside the maze. This is a puzzle to figure out how to reach the Energy Orb, and the solution is at the bottom of this guide. Also hidden in the maze is SECRET #1: a small medpack and grenades. Once you grab the Energy Orb, two lab monkeys will materialize and attack.
For a pickup and a secret, go back to the main room and use the rocket shoes to reach the top of the canopy in the middle.
Take a jump toward the roof where there is a switch against the wall. This opens a trapdoor somewhere. To reach it, jump across to the other side of the room. Face the jagged slopes and jump to the landing on the left side. Crawl inside to find the opened trapdoor. Next to the trapdoor is a large medipack. Inside is more of that slime, but in human form, if you have the aqua lung it will prevent you from drowning. Swim to the end and enter the aquarium to find AQUA LUNG SECRET #2: grenades and uzi ammo.
Energy Orb 2/3 in the Desert
Go outside, and across from the gate leading to the launch pad, to the right there is a quicksand pit surrounded by slopes. On the other side of it there are harpoons lying on the ground. Go around to the side of the slopes where there is a landing you can jump to, so you can reach the quicksand. Jump forward into the quicksand and reach the far end, where you can use the rocket shoes to pull up toward the left side. Turn around and jump up to grab the higher landing. Switch to wolf form and sprint jump across, then another running jump will get you to the next landing. Grab the monkeyswing and swing to the end, until you can drop onto the slope facing the climbable wall. You can either fall off and grab it in mid-air, or jump off the slope and slide off the opposing surface to grab the wall. Either way, climb down and to the left side, so that you can jump off backwards and land where the Energy Orb is. Picking it up will alert an armed man around the corner.
Energy Orb 3/3 using Minecarts
It's time to start putting the mine carts to use. The mine carts in this game do not travel in a loop like in TR3, instead they travel back and forth between two endpoints. To get things in place, first go to the launch pad on the middle level and enter the hallway, which leads to a small armory. You can find the Desert Eagle and some ammo for it here. Continue around the corridor, follow up the tracks and drop down to the room below. Dispatch the flamethrower enemy if you haven't already, that will be one less obstacle to deal with. Climb back up and ride the minecart here down to the other side, immediately crouching to avoid the metal beam. Now the minecart is in place for the upcoming timed run for the energy orb. While you're here at this second armory, you can grab the MP5 and a small medipack.
Now, go to the power station and use the rocket shoes to reach the upper level.
Before continuing, if you have the grappling hook you can reach a secret here. Go to the landing near the ladder in the wall, and use the grappling hook as a human to grab onto the ladder. Shimmy right and climb up into the crawlspace. Be careful of the drills here, and use the crawlspace roll (press the sprint button) to get past them. At the end, turn around and jump up. Continue and slide down, and jump over the gap to reach GRAPPLING HOOK SECRET #2: shotgun ammo and a rocket. Press the button to drop through the trapdoor and exit.
Back at the upper level of the power station, you can jump across the platforms in the other direction to grab a large medipack. From the middle platform you can use the rocket shoes to reach the highest level, where there is a mine cart. Open the door using the switch. Then, enter the minecart and swing the wrench at the lever to open a timed trapdoor. Ride the bridge into the launch pad. Run to the right where you left the next minecart, and ride it back up to the top, crouching under the metal beam again. Exit and drop down to the room below, and quickly head to the trapdoor before it closes. Pick up the last Energy Orb.
Two More Secrets Using the Minecarts
From here, or from the second level of the launch pad, make your way to the side corridor where you found the Desert Eagle. If you are a wolf, you will easily see that there is a pushable block concealed in the wall. Push it back twice, then push back the block on your right. You can climb above the next block on your left, then drop down behind it to pull it back once. Climb up again and drop down the other side to push it back against the wall. Turn around and push the initial block into the wall. Now you can pull the second block back to its starting position and reveal a route to a minecart (you should also hear a door open). Before you hop in, make sure the door across the bridge is open, if not then go to the laboratory hall to open it with a switch. Ride the minecart across the bridge to the laboratory building, hitting the lever along the way - this opens a timed trapdoor in the lab, under one of the consoles in the wall. Make your way there, drop in and crawl to the other end, where you can pull up into the empty aquarium tank for SECRET #2: MP5 ammo and a small medpack.
Now for perhaps the most elaborate secret in this adventure.
The first requirement is to find a switch near the locked secret area. Ride the minecart that has been sitting in the hall of the laboratory. It hops across a bridge over the quicksand. At the other side you can find harpoons. Drop down and press the switch against the wall to see that deadly lasers blocking a switch in the power station have been disabled.
The second requirement is now to put all four minecarts in place. Start by riding the minecart you just used, so it should be back in the laboratory. Ride the next minecart back to where the pushable blocks are in the launch pad. The next minecart is the one used for Energy Orb 3/3 above, make sure it is back at the bottom of the ramp. The final minecart is the one connecting the launchpad to the power station - it should be in the power station.
With all the minecarts in place, go to the middle level on the power station and to the switch you gained access to. Press it to start a long timed run. Ride all of the four minecarts, one after another, across the quicksand pit to the timed door. Enter to claim SECRET #3: a rocket, and desert eagle ammo.
To the Boss
With all three energy orbs, return to the desert where the receptacles surround a trapdoor. Place the orbs to open the trapdoor, revealing the Ruby Sword. Return to the top of the launch pad and use the sword to open the portal.
Enter the portal to appear inside the rocket ship. Push the switch, which launches the rocket and opens some trapdoors nearby. Jump up, grab, and slide down to meet the boss, who will start throwing fire at you. Take care to avoid the flames around him, as well as the electrified floor panels. Your best bet is to jump to the left on top of the console, to have the most footing available. Dodge his attacks while firing at him until he succumbs and drops the Ruby Stone. Grab it to end the level.
Tundra Castle
Snowy Mountain, Aqua Lung Secret
Luke starts on a landing on the side of a mountain with rough footing. Careful not to slide into the pit, it is full of deep snow (quicksand) and you will likely run out of air before you can escape (unless you have the aqua lung upgrade). Jump onto the slope just ahead of you, and immediately jump from it onto the slope going down to the left, but turn right so that you slide down backwards. Grab the ladder at the end of the slope, and use it to climb to the left until you are close to the end, then you can let go and slide down to a landing with MP5 Ammo on it. Turn left and look up to find a monkeyswing - jump forward to grab it and swing to the end, safely dropping onto the landing past the spikes. A wasp appears here. Turn left and pick up the blue warp crystal next to the pit.
If you have the aqua lung upgrade, you can go for a secret here. Make sure you are in human form, then drop into the deep snow pit and head to the left where you can see a small opening into the side of the pit. Wade through underneath it to enter a cave that winds around a corner. Follow the path to the end and climb up the ladder. In this tunnel is AQUA LUNG SECRET #1: shotgun ammo, a large medpack and a rocket. You can then turn back and use the first exit to wade back through the deep snow to the entrance to the pit, or simply use the warp crystal to return to the top of the pit.
Transform into wolf form and take a sprint jump to the small landing ahead, then another running jump to the next landing. Drop down on the left, and drop again to grab the crevice below. Shimmy left and drop onto the solid landing below where there are some flares. Pull up left and crawl through the flooded tunnel ahead. A wasp will pester you in the next area. For a pickup, wade/swim to the far left corner and get some shotgun ammo. Wade to the right end of the other side - quickly, as the hypothermia meter will appear - and pull up. Slide down the slope ahead to reach a small forest area with various buildings.
Rocket Shoes Secret, Frozen Lake, Crowbar
There is a mutant crawling around the forest. On the roof of the wooden cabin is a small medpack. There is another small medipack in the hole on the left side of the cabin.
If you have the rocket shoes upgrade, you can go for a secret here. Go to the far end of the cabin roof. Look up and find a high ledge above. Transform into human form. Stand one tile back from the edge of the roof and use the rocket shoes to grab the ledge. Pull up and slide down, and jump and grab the next ledge across the gap. Shimmy left and pull up at the end. Turn left and jump across the gap to some uzi ammo. Then turn left and jump again and grab the next landing. Climb up and pick up the desert eagle ammo. Crawl through the narrow opening on the right, drop down the other side for ROCKET SHOES SECRET #1: MP5 Ammo.
There are a few areas to explore, let’s go to the frozen lake first. To get there, head right through the forest, past the wooden cabin (note a lock on the door), down the slope. Pull up on the right to reach the lake. Transform into wolf form so that you can swim sprint through the deadly cold waters faster as needed. Grab the green warp crystal from the top of one of the icebergs. There is a crowbar under this iceberg, so swim there and grab it, and pull back onto the surface before hyperthermia takes its toll. The other snow patch on the lake has shotgun ammo sitting on it. If you are up for another dive, under the other big iceberg is a small medpack on the lake floor. That’s all we can accomplish here for now, so return to the forest area.
Through the Caves, Aqua Lung Secret
Go to the building with the blue double doors. They will slide open and shut upon approach, so time your entry to avoid damage. Inside are more obstacles: two grinders pose a threat. Dodge them and grab the ladder at the end of the path. The camera shows another ladder is behind you, so climb down close to the bottom, jump and twist to grab the opposite side. Climb down and to the left, then to the right along the lower climbable surface, then down some more once you reach the end. You will reach the surface of an underground lake.
The water is still dangerously cold here, so use the wolf form. Sprint swim through the tunnel in the water until you find the next opening in the ceiling. Pull up onto land and warm up. Then dive back in and continue sprint swimming through the tunnel. You will reach a pool area with a waterfall, swim to the right where there is land you can pull up onto. For a large medpack, take another dive and find it on the lake floor next to the sloped rock wall before pulling up onto land again. Look for the monkeyswing that is past a sloped rock, jump onto the slope and jump from it to grab the monkeyswing. Swing to the end and drop onto the rock. Go to the left side and turn right. Looking up there is a crawlspace, so jump up and pull into it. Crawl to the right until you can stand, and jump up to the next landing past the slope. Turn right to face the waterfall, then take a running jump across to land in the water at the top. The river is waist deep and hypothermia is still a threat, so quickly wade to the other side, where a mutant will come to attack you. Grab the yellow warp crystal while you're here. For some pickups, drop down into the pit below and look ahead for a snow-filled cavern. The deep snow is quicksand here. Jump in and wade to the other side for harpoons and flares.
If you have the aqua lung upgrade, you can go for a secret here. Transform into human form. Turn left and jump into the deep snow, and keep wading forward under the low ceiling until you reach the landing on the other side for AQUA LUNG SECRET #2: MP5 Ammo and a small medpack. You can use the yellow warp crystal or return the way you came on foot.
Exit the snow-filled cavern and use the rocks on the opposite wall to return to the top of the pit, or just use the yellow warp crystal. Transform into wolf form and sprint jump from the right side to grab the ledge in the opposite wall. Shimmy left and pull up, you might as well transform back to human form because more shimmying is coming up, and the human form shimmies faster. Grab the ledge and drop down to grab the next ledge below. Shimmy left until the end and let go. Slide backward and then down to the left, quickly jumping over the row of spikes, to reach a pool of water with a yellow tank in it.
Castle Basement Traps, Rocket Shoes Secret, Cabin Key
The water here is warmer and does not trigger hypothermia, so you do not have to rush as much. Swim to the right and pull up onto the slope, jump off onto the landing and pull up into the basement.
There are three valves along the far wall to the right. That is the first thing to visit, the goal is to gain access to two entryways in the wall on the right. The valves can also be used to gain access to a secret in the ceiling that requires the rocket shoes upgrade to reach. The solution is in the puzzle section at the end of the walkthrough. The hole in the ceiling leads to ROCKET SHOES SECRET #2: a large medpack and grenades. Both entryways lead to trap sequences.
The left entryway has a slope with spikes in it, jump over them and reach the bottom to find four swinging pots on fire. Notice the four white tiles on the floor, you will need to step on all four to open the exit. Once you do so, go there and press a switch. The camera shows the cell gates, this is one of the two switches to open them. Drop into the water and return to the basement, where a monster has appeared.
The right entryway has a slope that eventually has a boulder roll down it, dodge it at the bottom of the slope by running left or right, which will trigger another boulder, dodge to the center in front of the closed door. You will need to trigger the third boulder to get the exit open, so approach it and get ready to dodge to the side when you get close. Once it is activated and rolls down, the exit opens. Go there and press a switch. The camera shows the cell gates, this is one of the two switches to open them. Drop into the water and return to the basement, where a monster has appeared.
Once you have pressed both switches, the cell gates are open. Go to the middle cell first where you find the Cabin Key. Then go to the right cell and find the switch in the right wall. Pull it to open a trapdoor in the ceiling of this room. Climb up the ladder to reach the front yard of the castle. Go to the front doors to find a red warp crystal if you haven’t collected it already.
The Grappling Hook in the Cabin
Go up the hill to the forest area, and use the cabin key to open the door to the cabin. Slide down and jump onto the box with the Grappling Hook, and pick it up. The game explains that in human form, you can face a climbable surface that is far away and grab onto it by selecting the grappling hook from the inventory. This requires having some headroom above you. From the top of the crate, face left and see the ladder outside. Select the grappling hook to pull yourself toward that ladder and exit the cabin. A monster has appeared in the area. We can explore more places now, let’s start by returning to the castle.
The Castle’s Dining Room, Kitchen, Chapel
Return to the castle basement (quickest way is to warp to the front door, then drop down through the trapdoor you opened previously). Go to the left cell and step on the small mound of dirt, facing the ladder in the corner. Use the grappling hook to reach the ladder and drop into the pit to find the UZIS. Climb out and turn right into the stairwell. The stairs are broken on the left side, but there is a ladder above them. Go up the stairs on the right and face the ladder across from you. Use the grappling hook to get across, then continue up the stairs to find an open door to the ground floor.
Enter to find a dining room with six banners on the table. This is a puzzle, but we need one more item first. Continue straight ahead to the foyer, there is a Notebook on a small table across from the fireplace. Once you pick that up, you have all the information you need to solve the puzzle. The solution is at the end of this walkthrough.
Once solved, the door in the corner opens and you can enter the kitchen. There is shotgun ammo on the counter with the spices, and flares on the table. Go through to the next room to find a wall of crates. If you transform to wolf form you’ll easily see which ones you can move. Push the leftmost crate twice, you can find harpoons on the right. Then pull out the crate to the right. Circle around and push in the rightmost crate once. Jump on the crate and run around to the right to find a switch. Pull it to see doors open in the foyer.
Go back there to find that a mutant has entered through the entrance. Enter the chapel, and go to the altar in the back. Stand on it and climb up to the ledge above. Transform into wolf form and take a sprint jump to the left to land on the windowsill. Shoot the window, transform into human form and jump to the crevice in the outside wall. Shimmy left and pull up. Find a ladder in the wall on the left, next to the other window in the wall. Use the grappling hook to grab it, and shimmy left to the windowsill. Shoot the window and get inside, go across the balcony to the hallway.
The Castle’s Bedrooms, a Secret
A monster attacks from the room with the fireplace. Enter that room and get uzi ammo in the corner. Then leave and go into the bedroom on the left. There is a block that can be moved here, pull it out to reveal the ROCKET LAUNCHER. Exit and go to the farthest bedroom on the right, where there is a locked door. Use the crowbar you got from the lake to open it. There is shotgun ammo next to the window in the corner. Transform into wolf form and you’ll see a block that can be moved, along with another block that is higher up in the wall. Move the block on the ground so it sits under the higher block. With that in place, swing around to the other bedroom on the other side of the wall, there is another block here to move, so move it across the room so it is on the other side of that higher block. Now with a block on each side, you can push this block to reveal an exit leading upstairs.
Before you go upstairs there is a secret to find, it is back in the bedroom where you found the rocket launcher. Take the block on the ground beneath you and push it out of this bedroom, through the hallway into the rocket launcher bedroom. You’ll see there is a block higher up in the left corner, move your block under it. Move the block that had the rocket launcher under it and line it up so that you can pull the higher block out to reveal SECRET #1: MP5 Ammo. Return to the exit that leads upstairs.
The Castle’s Library and Roof, Using the Turret
Climb upstairs into the library. Two mutants attack from the rooms on the left. Go to the wooden desks and there is a large medpack in the corner, to the left of the window. Go to the study with the fireplace and pull the switch in the far left corner to see a trapdoor open. Go back to the bookshelves. Climbing the shelves farthest from the trapdoor will let you reach a small medpack at the top. Exit and climb the shelves closest to that trapdoor, so that you can grab the ladder and climb up to the roof. Climb up to the outside, shimmy left, and drop onto the slope. Quickly jump to land beyond the spikes. Pull into the crawlspace on the right and crawl to the exit, jump out where a wasp is flying about. Hop across the pillars until you reach the turret stationed on the castle wall. Another wasp will ambush you from behind.
Grab the turret and turn to the right and point down - there is a fragile ice wall in that corner. Fire a rocket from the turret to break it down and open a new path. Before leaving this area there are a few more pickups to get. Head along the top of the wall to the right to find desert eagle ammo. Go back to the roof and drop down on the side of the rounded part, there are harpoons in the corner on the right. Continue over the chapel roof and use the wolf form's sprint jump to reach the far wall (near the left side) where a large medpack sits. Go back to the rounded part of the roof. Against the wall is some shotgun ammo. Drop onto the balcony below to get some uzi ammo and desert eagle ammo.
Riding a Boat for Secrets and a Gem 1/3
Facing the castle entrance, turn right and head through the hole in the wall. There are harpoons against the wall on the left, in the water. Jump over the freezing water over to the snow, and hang left to find shotgun ammo in the water on this side. Jump up the slopes through the ice wall you shattered with the turret. Transform into wolf form and jump into the water, quickly doing a swim sprint for some uzi ammo on the right. Go around the corner to the left and to the end where you can pull up on an ice ledge. Below this ledge are some harpoons. Crawl through the tunnel on the right and exit outside, sliding down. Climb up onto the hill and deal with the mutant here. Go through the open door to enter the boathouse.
Use the switch on your left to open the gates. This alerts two wasps just outside. Hop in one of the boats and drive out onto the lake. Drive to the diagonal corner and dismount the boat to land on it. Transform into human form and jump into the waist-deep water. Wade around the corner to the end and use the grappling hook on the rock wall ahead. Take a running jump to the left and grab the crevice, shimmy left over the slope and drop down to safely reach the floor of the spike pit. Walk over to a crawlspace in the wall on the right, and enter it to grab an Ancient Gem. You can simply warp away at this point, but if you want to go it on foot: exit and walk to the corner behind you on the right where the floor is slightly higher. You can jump up and grab the ledge here, do so and turn around and jump into the river to wade back to the lake.
Before we leave the boats behind, there are two secrets to find. Get on a boat and go into the lake. Facing the boathouse, look for a steep slope of ice to the right. This is a bit tricky to get up with the boat, but it is possible. The trick is to drive towards it and not use the sprint key until just before you hit the slope (this way the boat is tilted higher in the front) to give you the extra speed to clear the slope. At the top is a small pool with SECRET #2 underwater: harpoons and a rocket.
For the next secret, get back into a boat and go out the back gates of the boathouse. First there is a pickup in this ice tunnel. Park the boat next to the ledge with the small medpack so that you can hop out and grab it. Then take the boat down the tunnel and drive down the snowy hill to the moat next to the castle. Drive up to the hole in the wall, where there is a diagonal ledge. Leap out of the boat onto it for SECRET #3: grenades. We are done with the boats now.
While you're in this moat area, there is shotgun ammo in the water off of the snowy land, near where you can surface from the water using a ramp.
Gem 2/3 in the Mountains
Go back to the forest with the cabin, and jump on the building with the evil sliding doors. Face the snowy hill on the left and jump over to it, and jump your way to the top. Face the climbable wall on the hill across from you and use the grappling hook to get over there. Shimmy to the right and climb up the ladder and to the right, then drop down onto the slope on the right side. Jump and twist so that you can steer left and land on the left landing where there is some uzi ammo. Transform into wolf form and sprint jump across the gap and grab the other side. Pull up and grab the Ancient Gem. We are done in this area.
Gem 3/3 in the Caves
Go back to the flooded caves (warping is probably the most convenient option). Return to the landing at the foot of the waterfall, and go to the other side where you can see a climbable wall across from you. Use the grappling hook and climb up it. At the top on the left is a small medpack. Turn around and transform into wolf form, perform a sprint jump to the small landing across the chasm. Jump onto the slope to the right and jump to the next landing where the last Ancient Gem awaits.
To the Boss
Now with all three gems in hand, it’s time to finish the level. Go to the forest and approach the blue stone structure to the right of the evil sliding doors. Place the three gems, which opens the trapdoor on top of the structure. Hop inside to grab the Sapphire Sword. Exit and go down the hill toward the castle, turn left and place this sword in the receptacle to open the boss portal. Get prepared for battle, then jump in.
You will appear on a large sloped hill that loops indefinitely. Mind the gaps with spikes in them. The boss hovers in front of you the whole time, shooting energy beams at you. Watch out for the charged shots - not only are they very damaging, but the boss is shielded from attacks while charging and firing the shot. Otherwise, keep firing away until the boss succumbs, at which point the looping stops and you will eventually slide to solid ground, where the Sapphire Teardrop sits. Grab it to end the level.
Final Showdown
If you've fought against the final boss of Tomb Raider III, this will be a familiar battle. You must shoot the crystalized spider until it collapses, then rush to one of the four serpent receptacles and place the corresponding gem in its mouth, and run back to the center. If you are caught behind one of the green lines in the ground while your foe is awake, you are at danger of being instantly killed by it, so stay in the center until you make it collapse. The desert eagle is the most effective weapon to bring it down, if you have the ammo. After placing all four crystals you will see the health bar appear - it's time to bring down the boss for good. Once you gun it down one last time it will explode and the game will move to the epilogue.
Forest Puzzle Solutions
Farmhouse switches
Two of the farmhouses, as well as the barn, have a sequence of symbols somewhere on them. You need to press the switches in the correct order to get access to each of these buildings. The farmhouse with the switches has its symbols on the left side, where the corn field is: Sun, Crow, Wheat. The farmhouse with the hay in the field has its symbols on the front, behind a tree: Wheat, Crow, Sun. The barn has its symbols up on the ceiling, above the large window: Sun, Wheat, Crow.
Tree trunk switches
Each switch toggles some of the trapdoors in the ceiling to open or close. You need to get all the trapdoors closed, except the last one above the crevice which should be open. The correct switches to push are: the one to the right of the block in the wall, and both switches on the opposite wall.
Deep Sea Puzzle Solutions
Volcano Flag Puzzle
Stand on a tile on the marble grid and press ACTION to place or remove a flag. Note the roman numerals - the goal is to place flags such that each roman numeral matches the amount of flags in the neighboring 8 spaces. Two flags are hardcoded as an example - they cannot be removed. You will need to place 9 more flags to fulfill this condition. The solution is below:
Underwater Pushable Blocks
The blocks work differently underwater - you can only push, not pull, and when pushed the block slides as far as it can before stopping. The goal is to get the three blocks on the metal tiles at the same time.
The block that starts closest to you should be pushed onto the metal tile on the left. After that, choose one of the other blocks to push against the side of that first block, then push up. Keep pushing the two blocks in a cyclical pattern and they will help each other stop closer to the upper metal tile. Once that is covered, use the remaining block to cover the lower metal tile.
Desert Puzzle Solutions
Electric Motor Puzzle
There are three switches here, each of them lowers or raises a wall for a short period of time. These will help you guide the motor to the fuse box.
First, push the middle switch as the motor approaches the middle of the area, to help it cross over to the other side.
Then, push the switch on that side as the motor approaches the far corner, to force the motor to move along the outer wall. Careful, as now the deadly motor can cross in front of the switches!
Lastly, push the remaining switch as the motor approaches the fuse box to lower the wall, so that it will turn in and reach its goal.
Laboratory Image Puzzle
Each switch causes a different shape to be drawn on the ceiling. The goal is to use the shapes to match the other image on the ceiling. The correct switches to push are (from left to right) the first, third, fourth, and fifth switches.
Laboratory Shrinkray Maze Puzzle
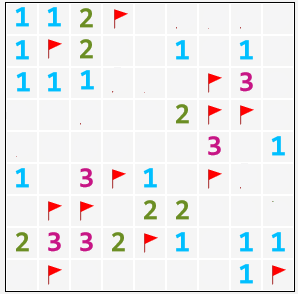
The pipes on top of the maze show which doors are opened by each switch. Enter the maze and press the switches in the correct order to access the energy orb. The below image shows the maze layout with numbered doors and their corresponding switches.
(Thanks to lizard queen for this image)
The solution is to press the switches in this order: 1+4,3+7,2+7,3+7,5+6,the other 5+6. As you leave, you will need to push that last switch again, as well as the 1+4 switch to gain access to the exit.
Launchpad Laser Puzzle
The goal is to guide the laser to the machine on the other side, using the mirrors to reflect it. Each of the four switches will rotate the mirrors closest to that side.
Facing where the laser starts, the solution is to push the switch in front, the switch to the right, and the switch in back. This activates a laser on the top floor which continues the puzzle.
On the top floor, facing the laser's starting point, push the switch in front, the switch to the left, and the switch in back. This activates the laser on the middle level which completes the puzzle.
Tundra Puzzle Solutions
Basement Valve Switches
Each switch turns on a flame under a corresponding trapdoor, and lifts the trapdoor in the air a certain amount. The trick is that turning on more flames makes each one less powerful, and the trapdoors are not lifted as much. The solution to access the two entryways in the wall is to turn on only the middle and right valves. The solution to access the hole in the ceiling with the rocket shoes is to turn on only the left valve.
Dining Room Table
The notebook gives you several rules about where the banners should appear in relation to each other at the dining room table. You can rotate a banner between different colors by repeatedly pressing the switch. The wall on one side of the room shows which banners correspond to which person in the rules. The king’s banner does not have a switch, so you know that is where the king is sitting. The solution going clockwise from the king is: Queen (purple), Princess (blue), Prince (green), Duke (red), Duchess (orange).