The Idol of Durga
Level and Walkthrough Cbl / Chris-Craig Michaels
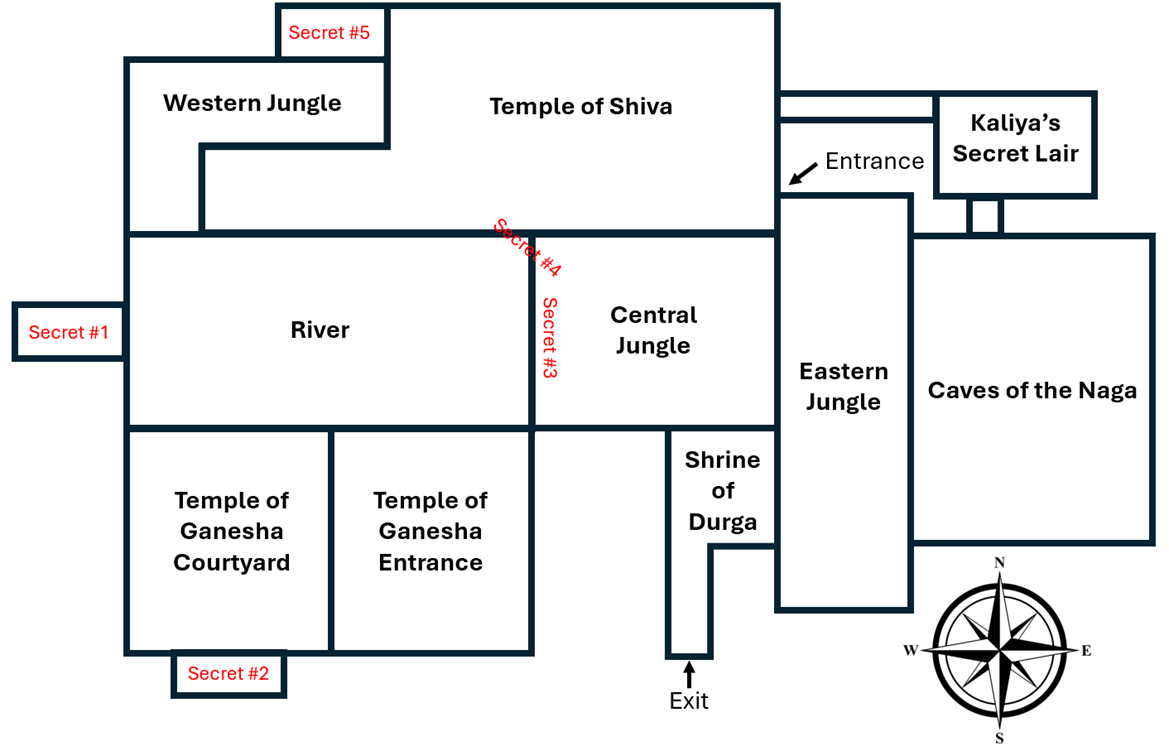
CENTRAL JUNGLE
Deep in the Western Ghats, Karnataka, India…
Lara slides down a slope in front of a statue of the goddess Durga. Lara starts facing west, possessing one small medipack, one large medipack. and three flares.
At any time, the player can press ”J” on the keyboard to open Lara’s Journal to the most recent page. The opening pages read:
“I'm returning to the temple baths under strange circumstances. The idol of Durga has once again disappeared. And no one who has entered the temples has been seen again. Where is the idol?”
Proceed west through the chamber with a pool in the center. Exit the door on the southwest corner to explore the jungle. Proceed south, noting the Shrine of Durga with a silver keyhole. You can't open this yet. There is a set of uzi clips among the trees to the west hidden behind a fern. Continuing south, you will find a set of steps with a skeleton. Here, you will pick up the BLOODY NOTE, which reads:
“Something spooky has stolen the IDOL OF DURGA. Evil spirits walk the caves and temples. The baths bubble with poison.”
This is followed by instructions:
“Find the key to Durga's shrine, shatter and gather gems: blue in the west, yellow in the east, to open the temple of Shiva and RETRIEVE THE IDOL.”
RIVER
Facing west, climb up the steps and turn north (right) by the tree. A flyby, which will start in the Temple of Shiva, is showing slots for the blue and yellow gems. The camera shows a fallen tree in front of a waterfall to the west, and the Temple of Ganesha to the south above a bridge. Below the bridge on the eastern rock wall, catch a glimpse of some blue crystals.
After the flyby, collect nearby pickup items: some uzi clips in the eastern temple wall above some moss, and shotgun shells in an alcove with a carved elephant. Take a dip in the river and swim all the way to the base of the waterfall to collect another set of uzi clips on the right.
SECRET #1
Notice the small solid rock peeking out from the base of the waterfall on the right. Swim up to the waterfall and pull up to enter a hidden cave. Diving down into the interior pool, pull a lever to trigger a descending rope. Run, jump and grab the rope to swing across to the far western side of the chamber toward the decoration of the statue of Durga. Enter the sunny chamber with the tree to hear the secret chime for SECRET #1. A camera shows the Secret Kaliya Gem up on a pillar on the south wall.
Pick up the shotgun shells and a large medipack before climbing up on the tree roots. Look up at the ceiling and you will see some branches to monkeyswing over to the pillar. Pick up the KALIYA'S SECRET GEM to trigger a journal update on the screen, press J to read. Secrets provide “Behind the Scenes” journal entries with bonus content.
Swim back to the waterfall entrance before swimming back to the southeast (right) shore of the river.
ENTERING THE TEMPLE OF GANESHA
Facing west, climb up the bank with tree roots. Here, you're faced with two options: head north (right) by crossing the log to go behind the Temple of Shiva, or head south (left) to cross the bridge in front of the Temple of Ganesha. The fastest route is across the bridge; note the blue crystals below the bridge, you will come back to them later.
From the bridge, hop right to the branch by the temple window to pick up some shotgun shells. Peering through the window, you can see the interior of the temple and courtyard, including the pedestal with the Durga Shrine Key.
Finish crossing the bridge and stand in front of the decorated pushable block to trigger a journal entry, instructing you to keep an eye out for similar pushable blocks. By pushing this block off the edge, you'll create a shortcut to the top of the wall that will allow you to backtrack later.
Stay on top of the wall and turn right (south) toward a courtyard with a tree and a blue crystal sticking out from underneath its roots. Shoot the crystal and collect the SMALL BLUE CRYSTAL SHARD from the ground below.
Climb the ruined pillar in the center of the courtyard and, facing south, run and jump to the branches and rock wall toward the temple with three small waterfalls. Use the switch on the right to open the gate. Before going in, jump to the tree branch above and opposite the switch to collect some shotgun shells.
Now it’s time to enter the Temple of Ganesha. Run down the flooded hallway and turn left to pick up shotgun shells underneath the waterfall. Ahead, a window shows you a dark room with snake decorations, this is Secret #2 which you will enter later. For now, turn west and hope onto a platform that gives you a further journal update. This update, about Ganesha, mentions to keep an eye out for Ganesha's sign.
Continuing west down the steps, the camera will pan back to show a special floor tile: a Ganesha pressure pad. Standing on this tile opens the door in front of you. Before going down through the broken floor, jump to the right side of the door to a hidden alcove with a large statue of Ganesha on the wall and pick up a small medipack. Now, hop down and proceed into the courtyard.
TEMPLE OF GANESHA COURTYARD
The camera will pan back as a tiger approaches. Once you've dealt with the tiger, avoid the depression with the skeleton for now and head into the colonnade of the temple on the left (south) side of the courtyard. Being careful to avoid the shallow spike pits, go all the way to the back to find another Ganesha pressure pad. Standing on this will trigger all the spikes at once. The center spike pit in the colonnade has a large medipack, and now you can pick up the SHOTGUN next to the skeleton in the courtyard.
Run west toward the temple with two marching elephants facing each other on either side of a broken ladder. Climb the ladder halfway up and turn south, positioning Lara to backflip and jump off a sloped ledge to grab the next stage of the ladder.
Shimmy to the right and then climb up. This will give Lara access to the roof and another Ganesha pressure pad. Standing on this, triggers a trap door in the central pool below. A running jump and swan dive (you even have time for a somersault) will send Lara down into the lower level of the pool.
Explore to find some shotgun shells. Then swim north to proceed deeper into the underwater chambers and find an underwater switch in front of a head of Ganesha. Pulling this will trigger a camera showing you a raising block upstairs in the temple. While you could swim further to another chamber, with some sunlight and a door, this will not be open yet.
Return to the surface and climb onto the raising block you've just triggered to the second floor of the Temple of Genesha. Pick up some uzi clips located in front of the windows on the northwest side of the temple and then return to the central window to pick up the SHRINE OF DURGA KEY.
Picking this up opens the underwater gate, allowing you to exit the Temple of Genesha. Before you do, there's a secret to collect.
SECRET #2
Run to the southeast corner of the temple roof to face the eastern wall of the courtyard. A crevice in the rock allows you to run, jump and grab and then shimmy around the pillar to find yourself on the upper story of the temple where you came in. Continue south over the broken pillars toward the temple above the colonnade where you triggered the spikes. Run, jump and grab to reach a larger crevice in the southern temple, where you can shimmy right and then climb up into a crawlspace.
Crawling toward the interior triggers SECRET #2. Forward crawl jump into the pool below and swim quickly across to the small platform before getting attacked by the crocodile lying in wait in the pool. Once safe, pull out your guns, dispose of the crocodile. Now it’s safe to explore the pool and pick up a set of harpoons.
Climb back out onto the ledge and do a sideways jump east, allowing you to grab a crevice and shimmy right. Pull up and head east into a dark overgrown chamber decorated with carvings of snakes around the edges of the floor. Be careful as you explore: you can pick up flares on the south side, but when you pick up a large medipack on the north side of the room, you will trigger a naga. These move like crocodiles, but they are more difficult to kill and cause Lara more damage.
Exploring deeper in the chamber triggers a second naga. In both cases, you can use the ledge at the entrance to the chamber to stand a safe distance above the naga to avoid damage. Before leaving, go all the way to the east wall of the chamber to pick up some uzi clips and a KALIYA'S SECRET GEM. Picking it up will trigger another behind-the-scenes journal entry.
Exit the secret chamber by jumping back in the pool and making your way to the ledge where you stood to kill the crocodile. This time, standing on it facing the crawl space where you entered, sideways jump to the left (west), grab the crevice, shimmy further left. You will be able to stand up, run, jump, and grab another crawl space to exit. Safety drop down.
RETURN TO THE
RIVER AND CENTRAL JUNGLE
Dive into the central courtyard pool, and this time swim north and proceed all the way, exiting the underwater area to find yourself in the pool underneath the bridge in front of the Temple of Ganesha. Climb out on the south side and shoot the shatterable blue crystals to collect the LARGE BLUE CRYSTAL SHARD. If you collected the small gem earlier, it is now possible to combine them to create the BLUE SHIVA GEM. The alcove behind the gem contains some more shotgun shells.
Climb up the northern rocks above the pool to find yourself standing above the river and the waterfall from earlier. Again, you can take multiple paths, but since you have the key to the Shrine of Durga, now is a good time to retrace your steps and return to the jungle clearing where you first entered the level. Use the key to enter the Shrine of Durga.
THE SHRINE OF
DURGA
Stepping up onto the first platform, you will trigger a journal entry about the shrine. To your left is a gate that has not yet opened. Directly in front of you is a ladder, which allows you to climb up to the second level. A chamber lit with yellow sunlight has the empty slot for the Idol, but it is missing. Instead, face north and pull the pulley, triggering a flyby that reveals a new rope available outside.
Backtrack to the steps with the skeleton where you picked up the bloody note. Climb the stone block on the southern side of the steps so you can do a running jump to enter the tree branches. This is a good spot to save if you haven't already, since you'll be doing some climbing around rooftops.
SECRET #3
Back up all the way to the edge of the branch and do a standing jump and grab to grab the edge of the roof. This is a tricky jump, but if you have trouble you can climb up further and reach this roof several ways.
Once on the roof, run north toward the leaning tree and jump toward it, using its trunk to slide down to a hidden alcove opening into high tree branches, triggering SECRET #3]. Carefully navigate the ledges and branches to pick up some shotgun shells, and then a large medipack. A vulture flies up when you approach the large medipack, so kill it quickly before it knocks Lara out of the branches. Once it’s dead, do a running jump to the final ledge where you can collect a third KALIYA'S SECRET GEM. Since you triggered the rope in the Shrine of Durga earlier, simply hop down onto one of the tree branches below and you will be close to the now-lowered rope.
ROPE SWING AND
EASTERN JUNGLE
Now that the rope has triggered, climb into the branches and face east toward the lowered rope. Run, jump and grab the rope, lowering Lara the base before swinging forward and jumping to land on the eastern tree branches. Hop off the tree branches to enter the eastern side of the jungle.
Sitar music accompanies two tigers attacking from either side. Once they are dead, explore the new area with a small waterfall and pool in the center. To the south, Lara will look up at a jump switch on the outside of a shrine, but she can’t get there yet. Inside is a small pool and an archway with a yellow shatterable crystal above it, as yet inaccessible. If you look closely, you can see the crowbar visible through a window here.
Back outside, there is a Ganesha pressure pad that will open a door back into the Shrine of Durga, allowing you to backtrack easily between the central and eastern jungle.
Explore northward to find a leafy shaded area of the ruins with a pillar decorated with a twisted snake. Climb up the pillar and roll to face an oncoming vulture. Kill it before running and jumping to a ledge with a pulley in front of an image of Ganesha. Pulling this will open a small door underneath the small waterfall. Before leaving this area, do a running jump to an alcove with an image of Shiva to pick up a small medipack. Safety dropping down, you will see another window into a chamber with water and more yellow crystals which you will need to locate later.
SECRET #4
Before going into the pool beneath the waterfall, go on a secret hunt. Return to the tree you landed on with the aid of the rope swing and, standing on its north side, face north toward the rock wall. A small crevice allows Lara to grab and shimmy left and around the corner and eventually to climb up to a ledge. Run and jump to a tree branch further north, turn west, and perform two running jumps and grabs to reach the far side. Observe the temple of Shiva to your right, with windows providing a preview of a hallway you will enter much later.
For now, hop behind the tree on the western wall of the clearing to trigger SECRET #4. Pick up uzi clips before dropping down into a small chamber, where a camera reveals a rotating Shiva statue. Pick up the large medipack and another set of uzi clips before approaching the statue.
As you get close, the statue shatters and you must fight a Shiva. These Shivas attack Lara but do not block bullets, so use your shotgun to kill it quickly. After it has died and disappeared, pick up the fourth KALIYA'S SECRET GEM, which includes a journal entry about the beta colors used on these Shivas. Return to where you entered and either backtrack through the trees or drop down and re-enter the eastern jungle.
CAVES OF THE NAGA LOWER ENTRANCE
Jump into the pool below the small waterfall in the eastern jungle. Swim east. Emerge from the water and immediately draw your guns to kill an attacking snake]. These snakes move. Explore the chamber to pick up some shotgun shells. Be sure to do this now, since later they will be blocked by a boulder. Ignore the ladder (it is blocked by a collapsible floor above) and instead, run through a lower hall with two collapsible tiles to enter a sunlit cave. There is a small medipack under the tiles, but you will backtrack through here in a moment and can return to pick it up.
For now, be careful to avoid the stalactites as you explore the cave. A second set of stalactites falls as you explore southward behind the pillar to enter a narrow corridor with branches to the right and left. Proceeding forward triggers a boulder, so get out of the way. Running further triggers a snake. While you can shoot the snake, you can also trigger a second boulder and, if the snake is in the way, dispose of it with the boulder.
Run to the top of the slope, avoiding a third set of stalactites before hopping up into a final narrow corridor blocked by a pushable block made of green stone. By pushing this out of the wall, Lara will find herself back in the eastern jungle inside the shrine with yellow crystals.
BACK IN THE
EASTERN JUNGLE
Standing on the pushable block, Lara can now climb up to the second story of the shrine to shoot the yellow crystals and pick up the SMALL YELLOW CRYSTAL SHARD. The ledge next to the short bridge will trigger a journal entry.
Cross the bridge and jump down and grab to shimmy sideways to the open window or do a running jump from the bridge to the window outside. Exiting the window, a camera will remind Lara of the jump switch that is now accessible from the roof. Before jumping down to pull it, there are some goodies in the treetops, including some uzi clips and a large medipack. Exploring the tree branches also triggers a vulture, so be careful not to fall.
Once you have collected goodies, return to the rooftop and hang from the edge, positioning yourself above the jump switch so you can drop down to pull it. This will trigger a flyby showing the empty chamber behind the waterfall has become a staircase.
Enter the waterfall chamber and proceed halfway up the steps before turning to your left, where you can climb into a small alcove to collect uzi clips. Once you have these, proceed up the steps.
BACK IN THE CAVES
OF THE NAGA
Run east across the two collapsible tiles toward a skeleton. The skeleton holds a harpoon gun, but don't pick it up yet! Standing on the same square as the skeleton will trigger a boulder. Instead, hop backwards to grab the edge of the ladder down to the lower chamber that you explored previously, now accessible because of the collapsed floor. Let the boulder go by before pulling up and collecting the HARPOON GUN.
To your right, you will see sunlight, which partially conceals some stalactites hanging from the ceiling, and beyond them a crowbar switch. You don't have the crowbar yet though, so instead explore to the right. Go all the way up the ramp where the boulder fell and, turning right, jump and grab to pull into a crawl space.
Once Lara is in the crawl space, she will trigger some rotating blade traps. The best way to get by the traps is to crawl as close to the wall opposite the blades and perform a forward somersault while the blades are retracted. Do this twice and then safety drop out of the crawl space.
Dropping down, Lara will trigger three snakes that move to attack her. Kill the snakes before picking up the CROWBAR next to the skeleton. Go to the southern wall of the chamber to trigger a journal entry explaining that the carvings of snakes on the wall relate to the demon naga Kaliya. Some breakable floor tiles will allow Lara to exit, returning to the lower levels of the cave.
Backtrack to the ladder you saw earlier, picking up the small medipack revealed by the collapsing floor tiles from before. Climbing up the ladder, you are now once again at the crossroads between the boulder trap and the crowbar switch. Run and jump and immediately continue running toward the crowbar trigger to avoid stalactites. Use the crowbar switch to open the gate and proceed north.
CAVES OF THE NAGA:
YELLOW GEM CHAMBER
Slide down into a watery chamber with sunbeams in the middle. The camera will pull back, revealing a set of pillars in the center and the last yellow gems on top of a tall pillar blocked by a gate.
Explore the chamber and pool, going to the northwest corner to pick up a large medipack and collecting some harpoons underwater near the north wall. As you swim toward the eastern wall, draw your harpoon gun and be ready to kill a crocodile that emerges from an alcove in the southeast corner. Swim into this alcove and pull the underwater lever to trigger a timed gate near the yellow crystals. An hourglass flips next to the lever, indicating this is timed.
Quickly roll in the water and swim back to the pillar closest to where you entered the cave. Climb up and do a running jump and grab to get to the top of a second pillar. Continue hopping from pillar to pillar, circling the chamber until you reach the (hopefully) open door. Quickly run through before it falls shut behind you.
Once Lara is through, draw your pistols and shatter the final yellow crystal to pick up the LARGE YELLOW CRYSTAL SHARD. As with the blue crystals, check your inventory to combine the two shards to form the YELLOW SHIVA GEM.
CAVES OF THE NAGA:
UNDERWATER CAVERN
Picking up the crystal triggers a trapdoor below. Jump down through the trap door and proceed into a watery tunnel. A camera will remind Lara that there are two sets of stalactites down here too. Avoid them while picking up some harpoons as you swim west through the tunnel.
Reaching the end of the tunnel, Lara will encounter three crocodiles. Crocodiles each take 4 harpoons to kill, which is also the reload limit between harpoon rounds, so it’s best to get four direct shots on each croc so you have time to reload before the next one attacks. If you have explored well up until this point, you should have ample harpoons, but a fresh set of harpoons can be found by exploring the underwater chamber in front of you.
Proceed west through the chamber toward the sunlight and air pocket. As you swim, be careful to avoid three other sets of stalactites ready to fall from the ceiling. On the western side of the chamber, pick up some shotgun shells and pull an underwater switch that can be found behind a rock on the chamber's floor. This opens the gate to the exit in the southwest corner of the room. Swimming out, you will find a pack of flares before emerging back in the river near the start of the level.
BACK ON THE RIVER
Now you have both crystals needed to enter the temple of Shiva. Backtrack by running south and climbing the pushable block from earlier to reach the top of the wall in front of the temple of Ganesha. This time, turn north to face the temple of Shiva, and jump onto the branches of the tree growing sideways out of the wall.
Perform a run, jump, and grab to reach the ledge of one of the windows of the temple of Shiva. Drop down and grab to shimmy right and around the corner and drop into the opening in front of one of the waterfall windows. The screen will announce that you are now entering the Temple of Shiva.
TEMPLE OF SHIVA
Drop down onto the ledge above the interior pool where you will see a set of gold gates on the western wall, flanked to the south by a blue gem slot and north by a yellow gem slot. Only the blue gem slot is accessible for now, since Lara cannot jump across to the far side. Place the gem in the slot and then jump into the interior pool.
Swim to the northern side of the pool where you can pick up some shotgun shells, and then return to the south side of the pool and swim down into the cave below. Do a little exploring in this cave and you will find a small mini pack on the eastern side and some shotgun shells on the western side. Continue further west to exit. Just before the exit, you can turn left and pick up an extra pack of flares.
WESTERN JUNGLE
Lara has emerged in the western jungle, across the fallen log in front of the large waterfall at the western side of the river. It’s possible to explore this part of the level much earlier. When you surface, Lara will wade forward to encounter a tiger. Get out of the water quickly to maneuver more nimbly and avoid taking damage.
You're now in the back of the temple of Shiva. Here you'll see another pool with some ruined pillars. Shoot the crocodile in the water before exploring the pool. On the northern side you will find some harpoons hidden in a nook with a window facing the temple interior. Explore the pool’s floor to find an underwater cave containing shotgun shells and a large medipack. Return to the surface and exit on the western side of the pool where you first entered.
A pillar on the side of the temple is short enough to climb. Standing beneath it triggers a fixed camera that previews the platforming puzzle ahead. Climb up, and turning south, do a running jump to the first slanted pillar and immediately jump again to make it to make it to the second pillar. I recommend saving here. While you can jump up and monkeyswing toward the tree stump on the eastern side of the pool, there is a secret to find.
SECRET #5
This is the trickiest secret in the game. Standing on the pillar, face north and look for the orange fruits in the trees as well as a hidden break in the foliage. Do a running jump and grab and climb through to find a slope of leaves that blocks your view of the other side. Standing on the left side of the slope, jump forward and slide down before jumping again, angling to the left to get to a safe platform and avoiding the pit which has hidden spikes at the bottom. You have now found SECRET #5!
Jump and grab the jump switch on the north wall to trigger the floor spikes. Once the spikes have sprung, you can safely go down and collect the DESERT EAGLE.
Hopping back up, explore the western side of the chamber to pick up a large medipack. When you do so, you will encounter another golden naga. After killing it, do a running jump and grab over to the eastern side to pick up the fifth KALIYA'S SECRET GEM. This will reveal a behind the scenes page about the Indus Valley civilization. Going into the hallway, you'll find a set of desert eagle clips, which will trigger another naga. The exit is a crawlspace on the south wall of this hallway. On the other side, you can do a running jump to reach the tree stump, no grab required.
BACK TO THE TEMPLE
OF SHIVA
Do another running jump from the tree stump over toward the temple where you will see a pushable block. Pushing this reveals a set of uzi clips and also gives you a shortcut if you want to come back here later.
Use the crowbar switch to open the door to the back of the temple of Shiva. Climbing in, be careful not to fall down to the interior chamber: safety drop or use the ladder. You will now be able to place the yellow Shiva gem in the gem slot, which will open the temple doors.
In the first chamber of the temple, collect some shotgun shells on the southern side of the chamber before proceeding to the north to climb up the ladder to get to the second floor. Jumping backwards off the ladder will trigger the entrance doors to close once again. You are now trapped in the temple.
FIGHTING SHIVAS
In the upper chamber, locate the southwest nook with some shotgun shells before entering the main room where you will encounter a Shiva statue. The statue turns to face you as you enter, looming over a pedestal with a key and skeleton beneath it. When you're ready, take the TEMPLE ROOF KEY from the pedestal and be ready to fight the Shiva statue, which comes to life. Killing the Shiva will trigger the exit door which will allow you to proceed into a long temple hallway with another Shiva statue at the end. There's also a journal update, which provides background about the god Shiva and points out that, since Shiva is notoriously invincible, these statues are not the god himself.
Run east, passing a chamber on the left with a colossal Shiva statue flanked by two smaller statues and containing your ultimate goal: the idol of Durga wreathed in fire in the center of the room. For now, you can ignore this and proceed forward toward the steps, which will trigger another Shiva statue to come to life. Dodge the Shiva's blades and keep shooting until the statue has been defeated, which will once again open a door in the eastern end of the hall that will allow you to proceed.
SLICING BLADES
HALLWAY
Running south, you will encounter a trap hallway with moving slicing blades. Carefully jump over or somersault under the blades as they move. You will need to throw a switch in the middle of the room, and if you are quick enough you can also pick up the small medipack in the hallway. If dodging the blades proves too difficult, you can make your way to the far side of the hall and then use the monkeyswing on the roof to navigate Lara in front of the switch before dropping down, giving her more time to avoid the blades as they move back and forth. Throwing the switch in the blade hallway opens the pool chamber.
POOL CHAMBER
The pool room contains five octagonal pools, each filled with yellow poisoned water. If you have been reading the journal entries, you might surmise the nagas have been poisoning it.
Exploring the pool room, you can pick up some flares behind the northernmost pillar. Looking into the poison pools, notice that some of them have a Ganesha pressure pad in the center. You will need to wade and swim to stand on each of the three Ganesha triggers to leave. Counter-clockwise from the entrance, only the second and last of the pools have a ledge low enough for Lara to climb out. Lara can press the pressure pads in any order. But be careful not to run out of exposure before she begins loosing health. One of the pools (fourth counter-clockwise from the entrance) has a small alcove with a large medipack hidden inside.
Once all three pads have been pressed, the doors will open and Lara can exit the pools and proceed forward.
TIMED SWITCH
PUZZLE
Exiting the pools chamber, Lara finds herself in a room with a semi-collapsed roof. There are alcoves with some uzi clips and shotgun shells hidden around the room. The western windows reveal the area where you collected secret #5.
The hallway on the southwestern corner of the room hides a tiger. Dodge and dispose of it before going down the hallway and climbing up the ladder at the end. Reaching the top of the ladder will reveal a view into the area with the lock for the Temple Roof Key, but you cannot get there yet.
Lara emerges from the hall onto a wide ledge above the floor with the collapsed roof. Push the pushable block off the platform to create an easy way to get back up to the top. Around the chamber are four switches, three of which are blocked by gratings. The western wall has one switch exposed, with an hourglass indicating that it will start a timed run. Throwing this first switch will flip the timer and start a ticking clock.
After throwing the first switch, role, run and jump to the opposite side of the room to throw the second switch. Role, run and jump again across to the first side of the room to flip the third switch and repeat to get the fourth. Repeat again and return to the western side of the room, quickly running through the last door on the northern side of the room which is also timed and closes behind you.
THE FIRST SHIVA
BRIDGE GEM
Proceed up the steps of this new hallway, turning right to pick up some uzi clips and an alcove. Turn back and slide down into a new room with flames burning on the floor and kneeling guardian statues equipped with long white swords. In front of one of these is a skeleton possessing the uzis, but you can't pick them up yet without getting burned.
Explore the room for some goodies. Two pillars stand in the middle of the room, but they are too tall to reach yet. On the western side, you will find a small medipack and an additional journal entry in front of a carving of an elephant. This carving is in higher definition than the textures around it, since it is the original photograph used for the India textures in Tomb Raider 3. There is also an alcove with two sets of uzi clips on the eastern side of the room, near a pedestal with a red SHIVA'S BRIDGE GEM.
Taking the gem will awaken the nearby guardian statue. A camera shows it stirring, as well as a raising block triggering by one of the pillars in the middle of the room. Kill the statue, being careful to avoid the flames on the floor.
Climb the newly raised block, which allows you to jump up to one of the room’s pillars. Pulling up will trigger some new rotating blade like those encountered in the Caves of the Naga earlier. Facing east, do a running jump and grab to get past the first blade.
Ignore the second blade for now and instead run, jump, and grab toward the eastern end of the chamber. Here you will find a Ganesha pressure pad. Standing on this triggers another raising block immediately below you and douses the flames by the skeleton, which will allow you to go back down and collect the UZIS.
Hop down and go to pick up the UZIS, which will trigger the second guardian statue. Once you've killed it, go back to the second raising block to avoid backtracking through the blade traps. From the second raising block, run, jump and grab and pull up onto a ledge on the southern wall to collect some shotgun shells. Use the ladder to climb up to the third floor of the chamber.
BLADE HALLWAYS
Up here you will encounter three halls of blade traps. In the first hall, carefully jump over the first rotating blade, and then time your jumps to dodge the second and third rotating blades. Pick up a small medipack under the skeleton lying on the floor before attempting to navigate the second hall.
The second hall begins with two rotating blades on top of one another, impossible to jump over. Standing on the small platform below them, wait until both blades have retracted and then perform a roll to move quickly to the opposite side of the platform.
Hop up to the central platform where you will see a slicing blade. If you look closely, you will notice the top rung of a ladder sticking up on the other side. You can crawl and duck underneath the slicing blade. Climb down the ladder and shimmy left to pick up a pair of uzi clips. Jump carefully over the last slicing blade and you are in the final of the three hallways.
The third hallway has just one slicing blade trap, moving up and down. Time your jump while the blade is down to make it to the other side. Standing on a Ganesha pressure pad will trigger a short flyby, showing you a door that you have now opened.
THE SECOND SHIVA
BRIDGE GEM
Go down to the open door, being careful not to re-enter the chamber that you just left. When you enter, a fixed camera gives you a view of the room: three rotating blades on the east, south, and west wall, with a golden mesh pushable block in the center of the room. A second Shiva's Bridge gem is embedded in the block. Two more guardian statues kneel in the corners, waiting. The blades are the key to solving this puzzle.
Pull the movable block one square south and then continue to push it further south from other side until it slides over the south wall’s rotating blade. The extended blade knocks out the gem.
Pick up the SHIVA'S BRIDGE GEM, triggering the two guardian statues. Dodge their attacks until they are killed, bearing in mind that the statues can fly, so you are not safe anywhere.
Now that the statues have been triggered, you can reposition the movable block to the square where it's supposed to be, marked by a circle in the southwest corner of the room. Pushing the box onto this square will trigger the raising block underneath it, lifting the pushable block into an attic hallway. A flyby reminds you that there is now a hole through the pushable block and pushing it all the way to the end will connect back to the central temple chamber with the colossal Shiva statue.
The exit door in the northeast corner of the room opens when the flyby completes. The rotating blade traps have ceased, allowing Lara to more easily pick up some shotgun shells near the eastern wall.
THE COLOSSAL SHIVA
STATUE
Run into a new hallway and collect a small medipack. The poison pools are visible through gratings underneath you. Stand on the collapsable floor in the chamber at the end of the hall to return to the slicing blade hallway. You can either once again dodge the blades or use the monkey swing to safely backtrack down the hall and continue back toward the central temple room with the colossal Shiva statue.
You are now ready to place the Shiva bridge gems in their slots. Placing each one will trigger a door on either side of the bridge as well as raise Shiva's swords, allowing you to proceed. Run into the small hallway on the eastern side of the main temple room and climb the ladder to the top. Before running across the now accessible bridge, explore the alcove to the right to pick up a pair of uzi clips.
Run across the bridge to a short hall where you can finally use the Temple Roof Key to open a trapdoor to the attic. Climb the ladder, and the trap door will close behind you. You are in the attic with the pushable block you raised earlier. I suggest saving your game here.
Push the block forward down the hall, until it plummets to the temple floor, putting out the fire and giving you a platform to retrieve the idol.
Before returning to the central temple chamber, explore the attic more. Some nooks contain a small medipack and more shotgun shells. The attic passage to the east will lead to a now-open trap door that allows you to safely drop down onto the Shiva bridge.
The center of the bridge is low enough that you can drop down safely to the floor, landing immediately behind the object of your quest, which you can now pick up: The Idol of Durga.
[NOTE: there is a
rare bug that results in the pushable block losing collision after it falls. If
you encounter this, load an earlier savegame and it should resolve.]
Picking up the idol triggers the last two Shivas. These statues can block Lara's bullets, so use some strategy to fight them by switching your aim between the two. The shotgun is especially effective at taking them down.
TWO PATHS
Killing both Shivas will open the door to the exit, where you can drop down into a pool of water.
Now, there are two routes to proceed. One, if you have all secrets will give you a secret boss encounter and unlock some additional diary entries. The other route allows you to complete the level now, although you can always return to collect all secrets later (they remain accessible at any time).
OPTION 1: COMPLETE
THE LEVEL
If you are ready to finish the level, then climb out onto the broken pillars in the middle of the room and navigate around them until you have reached the solid floor on the southern side. A Ganesha pressure pad will open the doors back into the first chamber of the level.
Run south toward the shrine of Durga. Enter and climb the ladder so you can place the idol of Durga in its box, revealing the much larger statue of Durga which has been missing all along. The door to the final hallway opens. If you have not defeated the secret boos, this hall will be decorated with images of nagas. A journal entry will tell you that the idol of Durga is restored, but that you have not solved the mystery of who poisoned the bands. This journal entry reminds you that secrets are accessible at any time and you can return to explore the level further without having to restart your game if you want to find all the secrets.
Proceeding forward will lead to an exit from the jungle, and the end of the game.
Thanks for playing!
OPTION 2: KALIYA’S
SECRET LAIR
If you have all five Kaliya’s secret gems and want to reveal the hidden boss fight, instead of climbing the central pillars in the last pool room, swim downward in the southeast corner of the pool. The screen will announce that you have entered the underwater cavern that is the beginning of Kaliya’s Secret Lair. Swim through quickly since the water is poisoned. And pick up the two sets of uzi clips flanking the skeleton.
Proceed through a narrow tunnel opening up into a wide cavern, where two nagas attack. Kill the nagas so you can explore the poison pools here: the first is a bit deeper and contains a small medipack and a pair of uzi clips. The second is shallow, allowing you to wade to pick up a large medipack.
Placing all five of Kaliya’s secret gems in their serpent-shaped sconces will open the door to the final chamber. Here, if you haven't already done so you can pick up a pair of UZIS, which will help in the boss fight against a powerful multi-headed naga, KALIYA.
DEFEATING KALIYA
Kaliya has three heads, each of which will shoot fireballs at Lara. This enemy is based on the Hydra enemies from Tomb Raider Chronicles. Like the Hydra enemies, its hitpoints cannot be modified with TRLE and it can be a bullet-sponge if you do not use strategy to defeat it.
The boss chamber has poison water throughout, but there are a few islands where Lara can remain safe. Side-jumping between these will allow Lara to avoid getting hit with fireballs, although if she does catch fire, then she can use the poison water to put it out, she just can’t stay in for very long.
Kaliya’s heads are only vulnerable when they have fire in their mouths. Using the Uzis or the pistols results in the greatest likelihood of successfully harming the heads; the shotgun is powerful but slow, and the Desert Eagle is more likely to miss. Tap the look button while Lara is aiming to switch between the different heads as they prepare to shoot their fireballs. They are most vulnerable a couple seconds after a fireball appears. You will know that your bullets have connected when you see a spout of blood, which will also extinguish the fireball. Switching between all three heads and timing your shots well will allow you to defeat Kaliya. As each head dies, it bursts apart and vanishes.
Once all three of Kaliya’s heads are defeated, you can safely climb the block on the right side of the chamber and use the monkeyswing to exit. Climb up the ladder on the western chamber wall, revealing one final journal entry about Kaliya. Trigger a final Ganesha pressure pad to open a hidden trapdoor back into the Caves of the Naga.
RETURN TO THE
SHRINE OF DURGA
Backtrack westward through the pool beneath the small waterfall in the eastern jungle and proceed into the Shrine of Durga, where, if you have not already, you can place the idol of Durga in its rightful place.
If you found all secrets and defeated Kaliya, the exit hallway will be lit red and decorated with various apsaras and images of Durga. The last journal tile also gives an alternate journal entry with additional information about Durga and her weapons. Run toward the brightly lit jungle at the exit to complete the level.
Thanks for playing!